
Oracle Database 12c on VMware vSAN: Day 2 Operations and Management
Executive Summary
This section covers the Business Case, Solution Overview and Key Highlights of the Oracle Database 12c on vSAN Day 2 Operation and Management document.
Business Case
Customers deploying production Oracle workloads have stringent requirements to support and maintain critical database operational tasks such as backup and recovery, cloning, data refresh for development and test environment and patching. These operational tasks are also known as Database Day 2 Management Operations.
It is a major challenge for organizations to ensure that Day 1 Operations including deployment and provisioning is implemented followed by Day 2 Operations in the background to ensure continued business without any service disruption.
With the rapid adoption of VMware vSAN™ for business-critical workloads due to highly scalable, available, reliable, and high performance HCI solution. It is essential to provide features and tools for seamless Day 1 and Day 2 Operations. vSAN offers a range of tools and features for Day 1 and Day 2 Operations. VMware vSphere® web client provides administrators with the capability to manage their infrastructure in a unified way for deploying, provisioning, health check, and performance monitoring. vSAN 6.0 and above has improved the snapshot capability, which provides users with enterprise-class snapshots and clones that can be used for Oracle database cloning use cases.
Solution Overview
The Oracle Real Application Clusters on VMware vSAN reference architecture addresses common business challenges that CIOs face today in an online transaction processing (OLTP) environment that requires availability, reliability, scalability, predictability and cost-effective storage, which helps customers design and implement optimal configurations specifically for Oracle RAC Database on vSAN.
The Oracle Database 12c on VMware vSAN 6.2 All-Flash reference architecture addresses common business challenges that CIOs face today in an OLTP and decision-support-system (DSS) environment that requires predictable performance and cost-effective storage.
Having addressed Day 1 Operations including deployment and provisioning of critical Oracle workloads on VMware vSAN, this operation guide focuses on Day 2 Operations of Oracle on vSAN including backup and recovery, database cloning, database refresh for test and development environment and database patching.
VMware vSAN snapshot and clone technologies are primarily used for providing support to Oracle Day 2 Operations. VMware vSAN snapshot and clone technologies used with inherent Oracle tools provide efficient Day 2 Operations for business-critical Oracle database.
This guide covers all of the above use cases while the focus is on vSAN, the above uses cases can also be applied to Oracle workloads on vSphere connected to traditional storage arrays.
Key Highlights
The following highlights validate Day 2 Operational capabilities provided by VMware vSAN for business-critical Oracle workloads:
- Leveraging vSAN snapshots and clones for seamless database operations:
- Backup and recovery
- Cloning
- Data refresh for development and test environment from production
- Patching
Introduction
This section provides the purpose, scope and the intended audience of this document.
Purpose
This operation guide validates the ability of vSAN to provide capability to manage Day 2 Operations for Oracle workloads on vSAN.
Scope
Provide operation procedures for below oracle database Day 2 Operations using vSAN snapshots and clones:
- Backup and recovery
- Cloning
- Data refresh for development and test environment from production
- Patching
Provide overview of the various features of vSphere, vSAN, vRealize suite and Oracle for the following database Day 2 Operations:
- Security
- Troubleshooting
- Capacity planning and reporting
- Database usage metering and reporting for chargeback purposes
Audience
This operation guide is intended for Oracle database administrators, virtualization and storage architects involved in planning, architecting, and administering a virtualized Oracle environment with vSAN. The use cases can also be handy in the following scenarios:
- Oracle development team:
- Developing new features or versions
- Oracle QA team:
- Testing existing software for bugs
- Testing new features or version
- Oracle DBA team:
- Test backup and possibly recovery scenarios
- Provisioning a copy of a database for different business unit (BU)
- Testing database patching, upgrade, and migration strategies
- Server operations team who may want to:
- Testing operating system patches
This paper includes the following terminologies
Table 1. Terminology
|
TERM
|
DEFINITION
|
|---|---|
| Oracle Single Instance | Oracle Single-Instance database consists of a set of memory structures, background processes, and physical database files, which serves the database users. |
| Oracle ASM | Oracle Automatic Storage Management (Oracle ASM) is a volume manager and a file system for Oracle database files that support Single-Instance Oracle Database and Oracle RAC configurations. |
| Oracle Clusterware | Oracle Clusterware is a portable cluster software that allows clustering of independent servers so that they cooperate as a single system. |
| Oracle Restart | A feature of Oracle Clusterware, which allows to register resources such as ASM disk groups, ASM, and RDBMS instances in a clusterware. |
| Oracle RAC | Oracle Real Application Clusters (Oracle RAC) is a clustered version of Oracle database providing a deployment of a single database across a cluster of servers. |
| Oracle Data Guard | Oracle Data Guard ensures high availability, data protection, and disaster recovery for enterprise data. Data Guard provides a comprehensive set of services that create, maintain, manage, and monitor one or more standby databases to enable production Oracle databases to survive disasters and data corruptions. |
| Physical standby database | A physical standby uses Redo Apply to maintain a block for block, replica of the primary database. Physical standby databases provide the best DR protection for Oracle Database. |
| Oracle RMAN | Oracle Recovery Manager (Oracle RMAN) is a backup and recovery manager for Oracle Database. |
| Oracle ACFS | Oracle Automatic Storage Management Cluster File System (Oracle ACFS) is a multi-platform, scalable file system, and storage management technology that extends Oracle ASM functionality to support customer files maintained outside of Oracle Database. |
Technology Overview
This section provides an overview of the technologies used in this solution.
Overview
This section provides an overview of the technologies used in this solution:
- VMware vSAN 6.6
- VMware PowerCLI™
- VMware vmkfstools
- Virtual machine snapshots
- Virtual machine clones
- Virtual machine disk mode
- Multi-writer attribute for shared vmdks
- Oracle Automatic Storage Management
- Oracle backup and recovery
- Oracle Database cloning
- Oracle Database refresh for development and test from production
- Oracle database patching
VMware vSAN 6.6
vSAN 6.6, the sixth generation of vSAN, is designed to help customers modernize their infrastructure by addressing three key IT needs: higher security, lower costs, and faster performance.
The industry’s first native HCI encryption solution and a highly available control plane is delivered in vSAN 6.6 to help customers evolve without risk and without sacrificing flash storage efficiencies. Operational costs are reduced with 1-click firmware and driver updates. vSAN has been enhanced with up to 50 percent greater flash performance enabling customers to scale to tomorrow’s IT demands. See VMware vSAN 6.6 Technical Overview for details.
VMware PowerCLI
VMware PowerCLI provides a Windows PowerShell interface to VMware vSphere, VMware vCloud, vRealize Operations Manager™, and VMware Horizon® APIs. VMware PowerCLI includes numerous cmdlets, sample scripts, and a function library. VMware PowerCLI provides more than 500 cmdlets for managing and automating vSphere, vCloud, vRealize Operations Manager, and VMware Horizon environments. See VMware PowerCLI Documentation for more information.
VMware vmkfstools
Vmkfstools is one of the VMware ESXi™ Shell commands for managing VMFS volumes, storage devices, and virtual disks. You can perform many storage operations using the vmkfstools command. For example, you can create and manage VMFS datastores on a physical partition, or manipulate virtual disk files, stored on datastores. See the “Using vmkfstools” topic on VMware vSphere 6.5 Documentation Center for detailed information
Virtual Machine Snapshots
Snapshots are basically the state of any system at a particular point-in-time when the snapshot is taken.
Broadly, snapshots for Oracle databases on VMware vSphere can be performed on three different levels:
- Database level for example using Oracle ACFS snapshots, which is an online, read-only or read-write, point-in-time copy of an Oracle ACFS file system. See About Oracle ACFS Snapshots for detailed information.
- vSphere level using VMware Snapshots.
- Storage level using LUN-based Snapshots available in traditional storage array.
VMware vSphere, using VM snapshots, provides the ability to capture a point-in-time state and data of a virtual machine. This includes the virtual machines’ storage, memory, and other devices such as virtual NICs.
Snapshots are useful for creating a point-in-time state and data of a VM for backup or archival purposes and for creating test and rollback environments for applications.
Snapshots can capture virtual machines that are powered-on, powered-off, or even suspended. When the virtual machine is powered on, there is an option to capture the virtual machine’s memory state, and allow the virtual machine to be reverted to a powered-on point in time.
For further information about how to use virtual machine snapshots in vSphere environments, see Using Snapshots To Manage Virtual Machines.
vSAN 6.0 introduced a new on-disk format including VirstoFS technology. This always-sparse filesystem (512-byte block size instead of 1MB block size on VMFS-L), called vsanSparse, provides the basis for a new snapshot format, and is available since vSAN 6.0. Using the underlying sparseness of the filesystem and a new, in-memory metadata cache for lookups, vsanSparse offers greatly improved performance compared to previous virtual machine snapshot implementations.
When a virtual machine snapshot is created on vSAN 5.5, a vmfsSparse/redo log object is created. Starting in vSAN 6.0, when a virtual machine snapshot is created, vsanSparse “delta” objects get created. The vsanSparse snapshot format provides vSAN administrators with enterprise-class snapshots and clones. The goal is to improve snapshot performance by continuing to use the existing redo logs mechanism but now utilizing an “in-memory” metadata cache and a more efficient sparse filesystem layout.
See Tech Note for vSAN 6.0 Snapshots for best practices and improvements in vSAN 6.0 Snapshots.
Things to keep in mind while using snapshots:
- Typically, snapshots are used temporarily for point-in-time copy of a virtual disk to provide a quick roll back during change window. Snapshots are also used by backup tools to allow point time backups without interrupting the normal operation of the VM.
- Snapshots will never grow larger than the size of the original base disk. However, the size of the delta will be dependent on the number of changes made since the snapshot was previously taken.
- Proactively monitor the vSAN datastore capacity and read cache consumption on a regular basis when using snapshots intensively on vSAN.
- VMware supports the full maximum chain length of 32 snapshots when vsanSparse snapshots are used.
- Even with the improved snapshot capabilities with vSAN, the recommendation is to have a few snapshots for a short term.
See Performance of vSAN Snapshots in vSphere 6.0 for more details on vSAN snapshot performance.
A virtual machine snapshot can be taken through:
- Web Client GUI: see Taking a Snapshot for detailed information.
- PowerCLI commands: see PowerCLI Reference: New Snapshot for detailed information.
Virtual Machine Clones
Clones are an exact replica or a duplicate of a system, which functions exactly like the parent system. Broad clones for Oracle databases on VMware vSphere can be performed on three different levels:
- Database cloning for example using Oracle Enterprise Manager Cloud Control or classic cloning using RMAN backups. See Cloning Oracle Databases and Pluggable Databases for more information.
- vSphere level using VMware cloning technology.
- Storage level using traditional storage-array-based cloning.
vSphere through the use of VM clones provides the ability to create a virtual machine that is a copy of the original. The new virtual machine is configured with the same virtual hardware, installed software and other properties that were configured for the original virtual machine.
There are three types of clones:
- Full clone—A full clone is an independent copy of a virtual machine that shares nothing with the parent virtual machine after the cloning operation. Ongoing operation of a full clone is entirely separate from the parent virtual machine.
- Linked clone—A linked clone is a copy of a virtual machine that shares virtual disks with the parent virtual machine in an ongoing manner. This conserves disk space, and allows multiple virtual machines to use the same software installation.
- Instant clone—Like a linked clone, an instant clone shares virtual disks with the replica VM after the linked clone is created. The process of creating instant clones differs from that used for linked clones in the following way. The cloning process creates a running parent VM from the replica VM. At the creation time, the instant clone shares the memory of the running parent VM from which it is created. A typical use case of linked clone and instant clone is for Virtual Desktop Infrastructure (VDI) deployment.
In this operation guide, the full clone functionality is used. For further details on clone, see Clone a Virtual Machine.
There are two types of cloning operations performed in the operation guide:
- Cloning of an entire virtual machine that contains all vmdks including the operating system, Oracle binaries, and Oracle data vmdks
- Cloning the database vmdks of a virtual machine alone
A virtual machine full clone operation can be triggered through:
-
Web Client GUI: see Clone a Virtual Machine for more information.
The GUI only allows cloning of an entire virtual machine, cloning of individual vmdks of a VM is not allowed.Cloning a running virtual machine:
- Trigger a temporary snapshot of the virtual machine first.
- A clone is made from the snapshot of that virtual machine.
- After the clone is created, the snapshot is then deleted.
In case the VM is powered off, the clone is made directly from the VM.
This method also provides options to specify a target datastore and VM storage policy for the cloned VM.
vSAN is using Storage Policy Based Management (SPBM) framework that provides storage policy based management at virtual machine object level. This can be leveraged to turn on or turn off specific features like erasure coding for the cloned VM. For example, the production VM can be configured RAID 1 for performance reasons but the clone VM for test and development can be RAID 5 for space efficiency.
- PowerCLI and vSphere API
For cloning an entire virtual machine online, vSphere API contains a clone VM task, which includes the ability to clone a VM. It also allows us to clone a VM from a snapshot using Data Object VirtualMachineCloneSpec. Further Data Object VirtualMachineRelocateSpec provides option to provide the target datastore and VM Storage policy for the Cloned VM.
PowerCLI also has an option to clone individual vmdks of a virtual machine, using Copy-Hardisk command with the following restrictions:
- Works only when the VM is powered off.
- Cloned vmdk will inherit the default vSAN policy. We cannot specify a vSAN SPBM policy for cloned vmdk.
As this method of cloning individual vmdks results in a downtime for the database, PowerCLI option using vSphere API is deployed only to clone an entire VM.
-
vmkfstools:
The vmkfstools command can be used to clone individual vmdks only but not the entire virtual machine.
Since virtual machine disk files are locked while in-use by a powered-on virtual machine, follow one of the methods to use the vmkfstools command to clone individual disks:
- VM should be powered off and then clone vmdks.
- A snapshot of the VM is taken, so a child delta disk is created and the lock and updates are moved to child delta disk.
- The parent base disk is considered as a point-in-time copy. This disk is used as a source for cloning using vmkfstools.
A caveat, only the default vSAN storage policy is applied to clone vmdks using this method. However, the vSAN storage policy for vmdk can be subsequently changed and verified for policy compliance.
See Cloning individual virtual machine disks via the ESX/ESXi host terminal (1027876) for more information.
Virtual Machine Disk Mode
Table 2 shows the various disk modes, namely dependent, independent-persistent, and independent-non-persistent.
Table 2. Virtual Machine Disk Mode
| OPTION | DESCRIPTION |
|---|---|
| Dependent | Dependent disks are included in snapshots. |
| Independent- persistent | Disks in persistent mode behave like conventional disks on your physical computer. All data written to a disk in persistent mode is written permanently to the disk. |
| Independent– non-persistent | Changes to disks in non-persistent mode are discarded when you turn off or reset the virtual machine. With non-persistent mode, you can restart the virtual machine with a virtual disk in the same state every time. Changes to the disk are written to and read from a redo log file that is deleted when you turn off or reset the virtual machine. |
Independent disks, persistent or non-persistent, are omitted from snapshots. Hence any VM disks that need to be included in the snapshot must be dependent. See Change the Virtual Disk Configuration for detailed information.
Multi-Writer Attribute for Shared VMDKs
VMFS is a clustered file system that disables (by default) multiple virtual machines from opening and writing to the same virtual disk. To run clustered applications such as Oracle RAC, the shared vmdks would need to use the multi-writer option that allows VMFS-backed disks to be shared by multiple virtual machines.
With the VMFS clustered file system, VMware vSAN also supports the multi-writer option to enable in-guest systems that leverage cluster-aware filesystems that have distributed write capability.
See reference articles for more information:
- Enabling or disabling simultaneous write protection provided by VMFS using the multi-writer flag (1034165)
- Using Oracle RAC on a vSphere 6.x vSAN Datastore (2121181)
Figure 1 shows supported and unsupported actions or features with multi-writer flag.
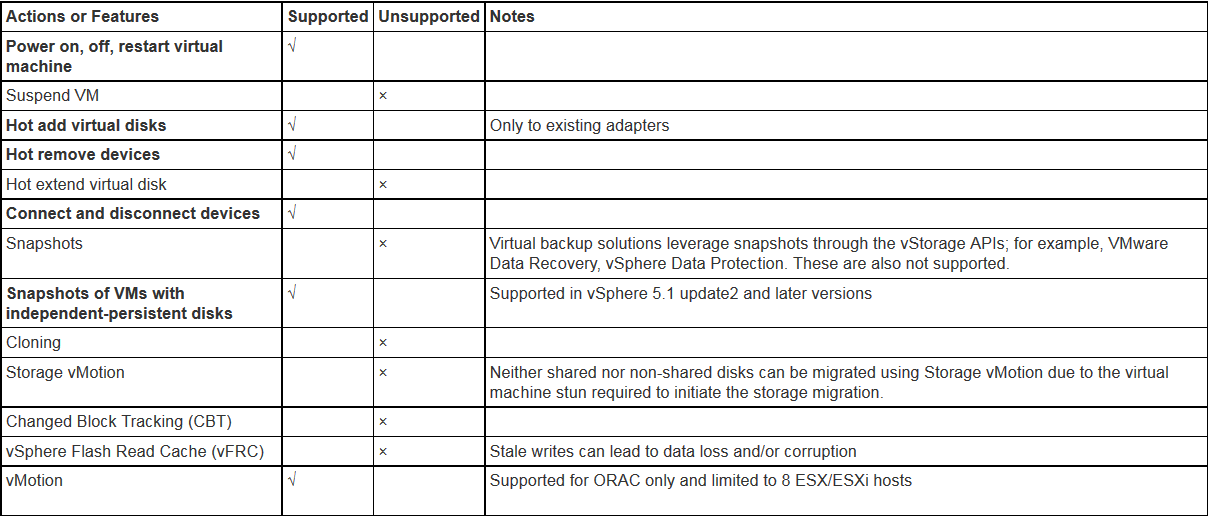
Figure 1. Supported and Unsupported Actions or Features with Multi-Writer Flag
Figure 2 shows an example of how the multi-writer flag for a shared vmdk can be set using the vSphere web client.

Figure 2. Set Multi-Writer Flag for a Shared VMDK
Oracle RAC and VMware Snapshots
Restrictions when using shared disks with the multi-writer attribute as per KB 2121181:
- Shared vmdks must be set to eager zeroed thick. They cannot be thick lazy zeroed or thin provisioned.
- Snapshots are disallowed for shared vmdks that are set to default dependent disk mode.
Note: Shared vmdks need not to be set to independent persistent for the multi-writer attribute.
Starting from vSAN 6.7 Patch 01 EZT requirement is removed and shared disks can be provisioned as thin by default to maximize space efficiency. More information on that can be found at the following blog articles.
- EZT requirement for Multi-Writer Disks is now removed for vSAN Datastore
- Oracle RAC on vSAN 6.7 P01 – No more Eager Zero Thick requirement for shared vmdk’s
- Oracle RAC storage migration from non-vSAN to vSAN 6.7 P01 – Through Thick to Thin
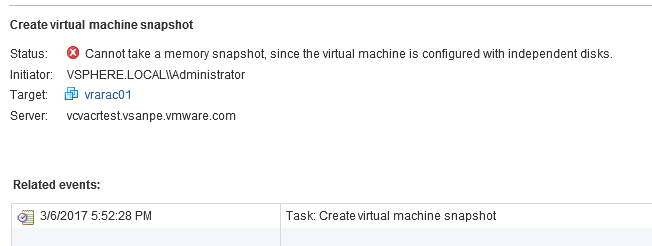
For example, in the case of a RAC VM as shown in Table 6, if the shared vmdks are set to default dependent disk mode and a VM Snapshot is taken, the operation fails as shown in the following screenshot.

However, the workaround of taking snapshots of RAC VM is to set the shared disks to independent persistent with the multi-writer attribute, which ensures that the snapshot operation ignores the shared disks (see Figure 1) but will successfully take snapshots for non-shared vmdks (operating system and Oracle binaries vmdk in this case).
- The snapshot is successful if it is not a memory snapshot.

- The snapshot fails if it is a memory snapshot (error message below).'
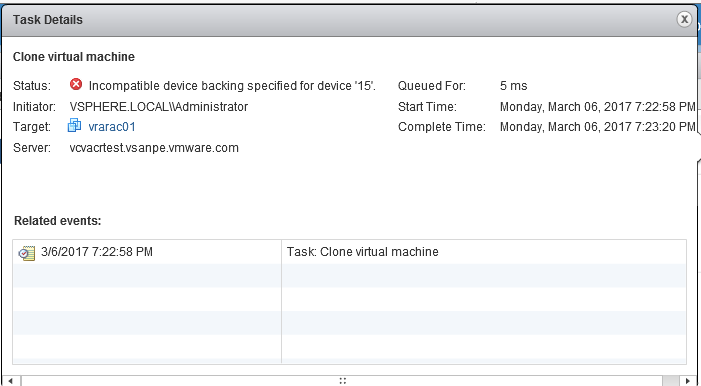
Oracle RAC and VMware Clones
The following error message shows the failure of cloning an Oracle RAC VM when it is powered on from the web client.

The following error message shows the failure of cloning an Oracle RAC VM when it is powered off from the web client.
In summary:
- A snapshot operation against any of the RAC VMs, powered on or powered off, is successful as long as:
- The shared disks are set to multi-writer mode.
- The shared disks are set to independent persistent mode.
- This snapshot operation will only take snapshots of the dependent vmdks only and cannot be memory’s snapshot.
- A clone operation against any of the RAC VMs, powered on or powered off, is unsuccessful as shown above.
- The RAC cluster can be:
- Online and any snapshot operations against dependent disks followed by cloning operation of dependent disks using vmkfstools produce clones of dependent disks only.
- Offline and vmkfstools can be used to produce clones of all dependent and independent disks.
Oracle Automatic Storage Management
Oracle ASM is a volume manager and a file system for Oracle Database files that supports Single-Instance Oracle Database and Oracle RAC configurations.
Oracle ASM is Oracle's recommended storage management solution that provides an alternative to conventional volume managers, file systems, and raw devices.
Oracle ASM uses disk groups to store data files. An Oracle ASM disk group is a collection of disks that Oracle ASM manages as a unit. You can add or remove disks from a disk group while a database continues to access files from the disk group. See Overview of Oracle Automatic Storage Management for more information.
Oracle Backup and Recovery
The purpose of backup and recovery is to protect the database against data loss and reconstruct the database after data loss. Oracle provides different options for database backup and recovery.
The most popular is Oracle RMAN, which is the preferred backup solution for Oracle database.
See “Introduction to Backup and Recovery” for more information.
The popular Oracle backup and recovery options are:
- User managed database backup (hot and cold backup)
- Crash consistent backup
- Oracle Recovery Manager
- Data Pump
See “Oracle Backup and Recovery Solutions” for more information.
User Managed Database Backup (Hot and Cold Backup)
The user managed backup and recovery mechanism includes performing backup and recovery with a mixture of host operating system commands and SQL*Plus recovery commands. This strategy does not depend on using the Oracle Recovery Manager.
With a cold backup, we can make a consistent whole database backup of all files in a database after the database is shut down with the NORMAL, IMMEDIATE, or TRANSACTIONAL options. See “Making User-Managed Backups of the Whole Database” for more information.
With a hot backup, this would require:
- Putting the Tablespace/Entire Database (depending on whether it is a tablespace level or database level backup) in a BEGIN backup mode by the ‘ALTER TABLESPACE/DATABASE BEGIN BACKUP’ command.
- Taking an operating-system-level backup of the Tablespace/Database data files.
- Taking the Tablespace/entire Database out of the backup mode by the ‘ALTER TABLESPACE/ DATABASE END BACKUP’ command.
The overhead of transitioning a database in and out of backup mode is:
- Additional redo data is logged
- Complete database checkpoint is required
- More operational steps and complexity during the backup operation
Crash Consistent Backup
A crash consistent backup is the backup of a point-in-time image of an Oracle database that is equivalent to a database crash induced by a power outage, other failures or a shutdown.
When the database is started up, the instance recovery, which is the process of applying records in the online redo log to data files to reconstruct changes, is performed automatically to bring the database to a consistent state.
This is one of the most common backup method used for storage-based backups and is fully supported by Oracle as long as the following conditions are met.
From ‘Supported Backup, Restore and Recovery Operations using Third Party Snapshot Technologies’ (Oracle Doc ID 604683.1), the third-party vendor needs to guarantee that their snapshots conform to all the following requirements:
- Integrated with Oracle’s recommended restore and recovery operations above
- Database crash consistent at the point of the snapshot
- Write ordering is preserved for each file within a snapshot
Oracle Recovery Manager (RMAN)
Oracle Recovery Manager provides a comprehensive foundation for efficiently backing up and recovering Oracle databases. A complete High Availability (HA) and Disaster Recovery (DR) strategy requires dependable data backup, restore, and recovery procedures.
RMAN is designed to work intimately with the server, providing block-level corruption detection during database backup and recovery. RMAN optimizes performance and space consumption during backup with file multiplexing and backup set compression, and integrates with third-party media management products for tape backup. See “Database Backup and Recovery User’s Guide” for more information.
Data Pump
Oracle Data Pump is another utility to export logical data to binary files, which you can later import into the database. The Data Pump command-line clients expdp and impdp use the DBMS_DATAPUMP and DBMS_METADATA PL/SQL packages. See “Database Utilities” for more information.
Database Cloning
Cloning of an Oracle database is the process of making an exact copy of another database for various reasons. The cloned database is both fully functional and separate in its own right.
Some of the use cases for cloning would be making copies of the production database for purposes of using it as:
- Development database for developing new applications or adding new features to existing applications
- QA database for testing existing software for bugs, testing new software features or version
- Test database backup and recovery scenarios
- Provision a copy of a database for different BUs
- Test database patching, upgrade and migration strategies
- Benchmarking purpose for performance evaluation
Optionally after cloning, the DBA may choose to mask sensitive data in the cloned database before releasing it for general consumption.
For example, a production database for a credit card company will have real customer data that cannot be revealed for security purposes, so Oracle data masking is used to masking real customer names, social security number.
Some examples of Database cloning include using Oracle Enterprise Manager Cloud Control or classic cloning using RMAN backups. See “Cloning Oracle Databases and Pluggable Databases” for more information.
Sometimes the database cloning process may also include making copies of the Oracle database home directories along with a copy of the Oracle database for cases when we need to test database patching, upgrade, and migration strategies.
Database Refresh for Development and Test from production
Database refresh is typically the process of refreshing the contents of a development or testing database from a copy of the production database so that they have the latest data to develop or test against.
Some of the use cases of database refresh are:
- Development and test environments may not have the latest data to test the current application against
- A production bug needs to be investigated in the test environment but the data is not the latest
Oracle provides tools for database refresh including:
- Oracle RMAN
- Data Pump
Oracle Database Patching
One of the tedious and time-consuming tasks that an Oracle DBA would have to perform as part of his or her responsibilities is patching databases to apply system patches, Patch Set Update (PSU), Security Patch Update (SPU) or Critical Patch Update (CPU) patches.
Patches need to be applied in a very safe manner and there are many factors that need to be taken into consideration when applying database patches namely liaising with business unit application owners for outage window, a good backup and restore mechanism in place in case it needed to roll back from a failed patching exercise. Otherwise, you might require a full system restore which results in a long drawn outage with potential revenue loss.
Starting with Oracle Database 11g Release 2 (11.2), Oracle ASM is installed as part of an Oracle Grid Infrastructure installation.
Patching Single-Instance databases using Grid Infrastructure requires patching the Grid Infrastructure binaries, or the RDBMS binaries, or both depending on the patch type. See “Introduction to OPatch and Patching” for more information.
In case of patching an Oracle Real Application Cluster (RAC), Oracle provides the flexibility of doing a Rolling Patch upgrade where RAC nodes are patched one by one, thereby avoiding taking down the entire cluster for the patching process ensuring that SLAs are met and uptime is guaranteed. See “Database Upgrade” for more information.
See My Oracle Support document for more information on “Rolling Patch—OPatch Support for RAC (Doc ID 244241.1)”.
Solution Configuration
This section introduces the resources and configurations for the solution including architecture diagram, hardware & software resources and other relevant VM and storage configurations.
Architecture Diagram
This section introduces the resources and configurations for the solution including:
- Architecture diagram
- Hardware resources
- Software resources
- Network configuration
- Single-Instance Database VM and Database Storage Configuration
- RAC Database VM and database storage configuration
- Recovery Database VM and database storage configuration
Note: This solution configuration was done using Oracle 12.1.0.2 and VMware vSAN 6.6. The process of Cloning, Snapshots and Backup is not specific to any particular version of Oracle and VMware vSAN.
Architecture Diagram
As shown in Figure 3, the key designs for the vSAN Cluster solution for Oracle database were:
- A 4-node vSAN Cluster with two vSAN disk groups on each ESXi host.
- Each disk group was created from 1 x 800GB SSD (cache) and 3 x 800GB SSDs (capacity).
- Default vSAN policies used:
- Fault Tolerance Method = Performance (RAID 1)
- Failure to tolerate (FTT) =1
- Checksum enabled
- Stripe width of 1
- Object space reservation (OSR) set to 0 percent
- OSR will be set to 100 percent for the shared disks used by Oracle RAC because they use multi-writer and it requires eager-zeroed thick mode.
- Note - Starting from vSAN 6.7 Patch 01 EZT requirement is removed and shared disks can be provisioned as thin by default to maximize space efficiency. More information on that can be found at the following blog articles.
- vSAN deduplication and compression enabled
- A VM—24 vCPU and 256GB memory with Oracle SGA set to 192GB and PGA set to 16GB.
- Oracle Linux 7.3 operating system was used for database VMs.
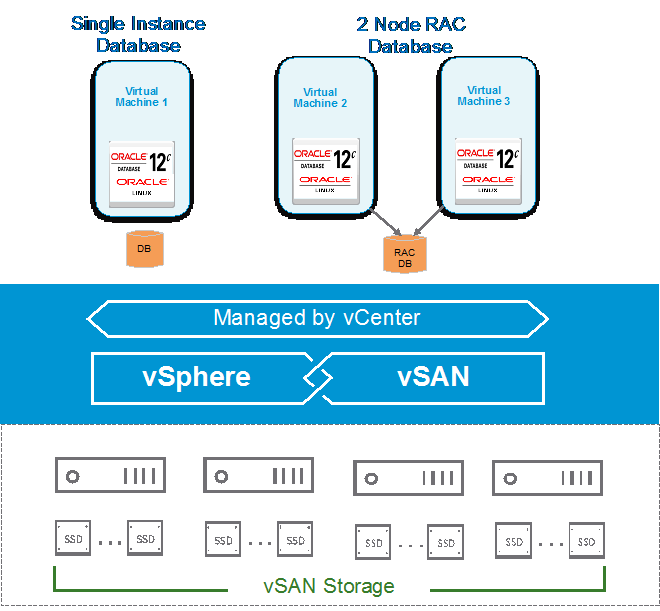
Figure 3. vSAN Cluster for Oracle Database Solution
Hardware Resources
Table 3 shows the hardware resources used in this solution.
Table 3. Hardware Resources
| DESCRIPTION | SPECIFICATION |
|---|---|
| Server | 4 x ESXi Server |
| Server Model | Cisco UCS-C240-M4S |
| CPU | 2 sockets with 16 cores, each of Intel CPU E5-2698 v3 2.30GHz with hyper-threading enabled |
| RAM | 384GB DDR4 RDIMM |
| Storage controller | 1 x 12G SAS Modular RAID Controller |
| Disks | 8 x 800GB SAS SSD, 6GBps |
| Network | 2 x 10Gb port |
The storage controller used in the operation guide supports the pass-through mode. The pass-through mode is the preferred mode for vSAN and it gives vSAN a complete control of the local SSDs attached to the storage controller.
Software Resources
Table 4 shows the software resources used in this solution.
Table 4. Software Resources
| SOFTWARE | VERSION | PURPOSE |
|---|---|---|
| VMware vCenter Server® and ESXi | 6.5.0d | ESXi cluster to host virtual machines and provide vSAN Cluster. VMware vCenter Server provides a centralized platform for managing VMware vSphere environments |
| VMware vSAN | 6.6 | Software-defined storage solution for hyperconverged infrastructure |
| Oracle Linux | 7.3 | Oracle database server nodes |
| Oracle Database 12c | 12.1.0.2.0 | Oracle database |
| Oracle Workload Generator for OLTP | SLOB 2.3 | To generate OLTP workload |
Network Configuration
A VMware vSphere Distributed Switch™ (VDS) acts as a single virtual switch across all associated hosts in the data cluster. This setup allows virtual machines to maintain a consistent network configuration as they migrate across multiple hosts. The vSphere Distributed Switch uses two 10GbE adapters per host as shown in Figure 4.

Figure 4. vSphere Distributed Switch Port Group Configuration in All-Flash vSAN
A port group defines properties regarding security, traffic shaping, and NIC teaming. Jumbo frames (MTU=9000 bytes) was enabled on the vSAN and vSphere vMotion interface and the default port group setting was used. Figure 4 shows the distributed switch port groups created for different functions and the respective active and standby uplinks to balance traffic across the available uplinks. Three port groups were created:
- VM Management port group for VMs
- vSAN port group for kernel port used by vSAN traffic
- vSphere vMotion port group for kernel port used by vSphere vMotion traffic
For vSAN network design best practices, see VMware vSAN Network Design.
Single-Instance Database VM and Database Storage Configuration
A VM named ‘ORA12C-OL73’ was created with Oracle Linux 7.3 operating system installed and was configured with 24 vCPU and 256GB memory.
Oracle 12.1.0.2 Grid Infrastructure and RDBMS binaries were installed and a Single-Instance Database was created.
Oracle ASM data disk group with external redundancy was configured with allocation unit size of 1M. Data redo and FRA ASM disk groups were presented on different PVSCSI controllers.
All VM vmdks are set to default dependent mode so that VMware snapshot technology can be made use of.
All best practices of Oracle on VMware were followed as per Oracle Databases on VMware Best Practices Guide.
Table 5 provides Oracle VM disk layout and ASM disk group configuration.
Table 5. Oracle Database VM ‘ORA12C-OL73’ Disk Layout
| NAME | SCSI TYPE | SCSI ID (CONTROLLER, LUN) | SIZE (GB) |
ASM DISK GROUP |
|---|---|---|---|---|
| Operating System (OS) / | Paravirtual | SCSI (0:0) | 60 | Not Applicable |
| Oracle binary disk /u01 | Paravirtual | SCSI (0:1) | 60 | Not Applicable |
| Online redo disk 1 | Paravirtual | SCSI (1:0) | 100 | REDO |
| Database data disk 1 | Paravirtual | SCSI (2:0) | 250 | DATA |
| Database data disk 2 | Paravirtual | SCSI (2:1) | 250 | DATA |
| Database data disk 3 | Paravirtual | SCSI (2:2) | 250 | DATA |
| Database data disk 4 | Paravirtual | SCSI (2:3) | 250 | DATA |
| Database data disk 1 | Paravirtual | SCSI (2:4) | 250 | DATA |
| Database data disk 2 | Paravirtual | SCSI (2:5) | 250 | DATA |
| Database data disk 3 | Paravirtual | SCSI (2:6) | 250 | DATA |
| Database data disk 4 | Paravirtual | SCSI (2:8) | 250 | DATA |
| Archive Log disk 1 | Paravirtual | SCSI (3:0) | 250 | FRA |
| Archive Log disk 2 | Paravirtual | SCSI (3:1) | 250 | FRA |
RAC Database VM and Database Storage Configuration
A RAC cluster with two nodes, vrarac01 and vrarac02, was created with Oracle Linux 7.3 operating system installed and was configured with 24 vCPU and 256GB memory. Oracle 12.1.0.2 Grid Infrastructure and RDBMS binaries were installed and a RAC database was created.
Oracle ASM data disk group with external redundancy was configured with allocation unit size of 1M. Data redo and FRA ASM disk groups were presented on different PVSCSI controllers.
Each RAC VM has the setting of VMDKs as follows:
- OS and Oracle binaries’ vmdks are set to default dependent disk mode
- Cluster shared vmdks are set to independent persistent with the multi-writer attribute enabled including:
- Database
- Cluster registry (OCR) and VOTE
- Fast Recovery Area (FRA)
- Redo Log
All best practices of Oracle on VMware were followed as per Oracle Databases on VMware Best Practices Guide.
Table 6 provides Oracle RAC VM’s disk layout and ASM disk group configuration.
Table 6. Oracle RAC VM ‘vrarac01’ and ‘vrarac02’ Disk Layout
| NAME | SCSI TYPE | SCSI ID (CONTROLLER, LUN) | SIZE(GB) |
ASM DISK GROUP | DISK MODE |
|---|---|---|---|---|---|
| Operating System (OS) / | Paravirtual | SCSI (0:0) | 60 | Not Applicable | Default(Dependent) |
| Oracle binary disk /u01 | Paravirtual | SCSI (0:1) | 60 | Not Applicable | Default(Dependent) |
| Cluster Vote Disk 01 | Paravirtual | SCSI (1:0) | 5 | VOTE and CRS | Independent-Persistent /multi-writer |
| Cluster Vote Disk 02 | Paravirtual | SCSI (1:1) | 5 | VOTE and CRS | Independent-Persistent /multi-writer |
| Cluster Vote Disk 03 | Paravirtual | SCSI (1:2) | 5 | VOTE and CRS | Independent-Persistent /multi-writer |
| Cluster Vote Disk 04 | Paravirtual | SCSI (1:3) | 5 | VOTE and CRS | Independent-Persistent /multi-writer |
| Cluster Vote Disk 05 | Paravirtual | SCSI (1:4) | 5 | VOTE and CRS | Independent-Persistent /multi-writer |
| Database Data disk 01 | Paravirtual | SCSI (2:0) | 60 | DATA | Independent-Persistent /multi-writer |
| Database FRA disk 01 | Paravirtual | SCSI (3:0) | 60 | FRA | Independent-Persistent /multi-writer |
| Database Redo disk 01 | Paravirtual | SCSI (1:5) | 30 | REDO | Independent-Persistent /multi-writer |
Recovery Database VM and Database Storage Configuration
Another VM was created for recovery purposes “ORA12C-OL73-Test” with Oracle Linux 7.3 operating system installed and was configured with 24 vCPU and 256GB memory. Oracle 12.1.0.2 Grid Infrastructure and RDBMS binaries were installed and configured.
The VM has the ASM instance running to speed up the DB recovery process. No database is running on this VM.
All best practices of Oracle on VMware were followed as per Oracle Databases on VMware Best Practices Guide.
Table 7. Oracle Database VM ‘ORA12C-OL73-Test’ Disk Layout
| NAME | SCSI TYPE | SCSI ID (CONTROLLER, LUN) | SIZE (GB) |
ASM DISK GROUP |
|---|---|---|---|---|
| Operating System (OS) / | Paravirtual | SCSI (0:0) | 60 | Not Applicable |
| Oracle binary disk /u01 | Paravirtual | SCSI (0:1) | 60 | Not Applicable |
All VMs have the same version of OS and Oracle binaries.
Solution Validation
In this section, we present the test methodologies and processes used in this operation guide.
The proposed solution is designed and deployed using an Oracle Single-Instance Database on a vSAN Cluster and focuses on below Day 2 Operations:
- Database backup and recovery
- Database cloning
- Database refresh for development and test from production
- Database patching
In this section, we present the test methodologies and processes used in this operation guide.
Solution Overview
This solution primarily uses vSAN snapshot and clone feature to showcase the above Day 2 Operations.
A large Oracle database was created in a virtual machine against which SLOB tool was deployed to load database schemas. Subsequently, SLOB OLTP workload was generated on the database. Refer to Appendix C SLOB and Database Configuration for details.
During this workload generation, vSAN snapshot and clone were used to validate the four database use cases discussed above.
Solution Validation - Backup and Recovery
This section validates backup and recovery procedure for Oracle database on a vSAN Cluster.
Backup and Recovery
Having discussed the various technology and features available in VMware and Oracle for backup use cases. In this use case, we look at different scenarios where we use a combination of the following technologies to backup and recover a Single-Instance Oracle database on a vSAN Cluster:
- vSAN snapshot and clone
- Oracle backup and recovery
- Oracle archive log backup
The Oracle database backup can be done using one of the two Oracle methods:
- Hot backup
- Crash consistent
The VM cloning process can either be:
- At virtual machine level, which includes all the VM vmdks:
- Operating system disk
- Oracle mount point disk
- Oracle database disks
- At the Oracle database disks level, which includes only the database vmdks
The four scenarios covered as part of the use cases including:
- VM-level snapshots and clone using Oracle hot backup
- VM-level snapshots and clone using Oracle crash consistent backup
- VMDK-level backup using Oracle hot backup
- VMDK-level backup using Oracle crash consistent backup
In conjunction with the above use cases, database archive log backups can be performed using Oracle RMAN to recover a database to a System Change Number (SCN) or Time.
VM-level Snapshot and Clone using Oracle Hot Backup
Test Overview
VM ‘ORA12C-OL73’ has a Single-Instance production database running on a vSAN Cluster, which needs to be backed up and restored in case of any data loss.
The high-level steps of this use case are:
Clone the database VM
- Run SLOB, an Oracle workload against the Single-Instance Oracle database in VM ‘ORA12c-OL73’.
- While the workload is running, take a backup of the Oracle database by:
- Placing the database in a hot backup mode using the ‘ALTER DATABASE BEGIN BACKUP’ mode.
- Taking a virtual-machine-level backup using VMware snapshot called ‘ORA12c-OL73_HotBackup_Snap ‘using web client or through PowerCLI.
- Issuing an ‘ALTER DATABASE END BACKUP’ command to end the Oracle database backup.
- A clone of the virtual machine called ‘ORA12C-OL73-Clone’ is then made from the snapshot using PowerCLI commands.
- Delete the snapshot after the cloning operation is completed.
Power on cloned VM and recover database
- After powering on the cloned virtual machine ‘ORA12C-OL73-Clone’, the cloned database is started and recovered using the Oracle media recovery mechanism.
- A copy of the production database at a point in time is now available for any data recovery scenario.
Figure 5 illustrates this process.
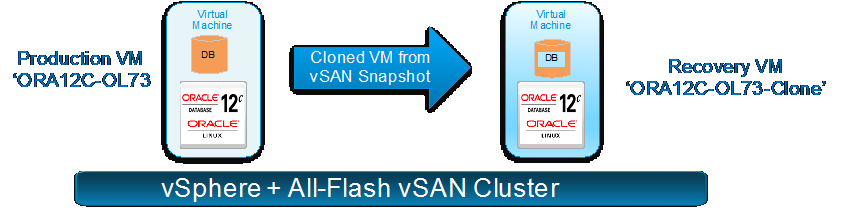
Figure 5. VM-level Snapshot and Clone Process
Test Procedures
Clone the database VM
- Run SLOB against the Oracle database VM to simulate a production OLTP workload for one hour:
oracle@ora12c-ol73:ora12c:/home/oracle/SLOB> sh ./runit.sh 24
2. While the workload is running, place the database in hot backup mode. Hot backups are created while the Oracle database is online and running in archived log mode:
oracle@ora12c-ol73:ora12c:/home/oracle> sqlplus /nolog
SQL*Plus: Release 12.1.0.2.0 Production on Tue Jan 31 11:23:13 2017
Copyright (c) 1982, 2014, Oracle.  All rights reserved.

SQL> conn / as sysdba
Connected.

SQL> alter database begin backup;
Database altered.
Snippet of the Oracle Alert log file after the ‘BEGIN BACKUP’ command is executed to show no errors:
oracle@ora12c-ol73:ora12c:/u01/admin/ora12c/diag/rdbms/ora12c/ora12c/trace> tail -f alert_ora12c.log
Tue Jan 31 12:26:52 2017
Archived Log entry 114 added for thread 1 sequence 133 ID 0x12983539 dest 1:
Tue Jan 31 12:28:11 2017
alter database begin backup
Tue Jan 31 12:28:28 2017
Thread 1 advanced to log sequence 135 (LGWR switch)
Current log# 7 seq# 135 mem# 0: +DATA_DG/group07_redo01.log
Current log# 7 seq# 135 mem# 1: +DATA_DG/group07_redo02.log
3. After placing the database is in hot backup mode, create a snapshot of the database VM ORA12C-OL73 using the web client as shown in Figure 6. The name of the snapshot is ‘ORA12c-OL73_HotBackup_Snap’.
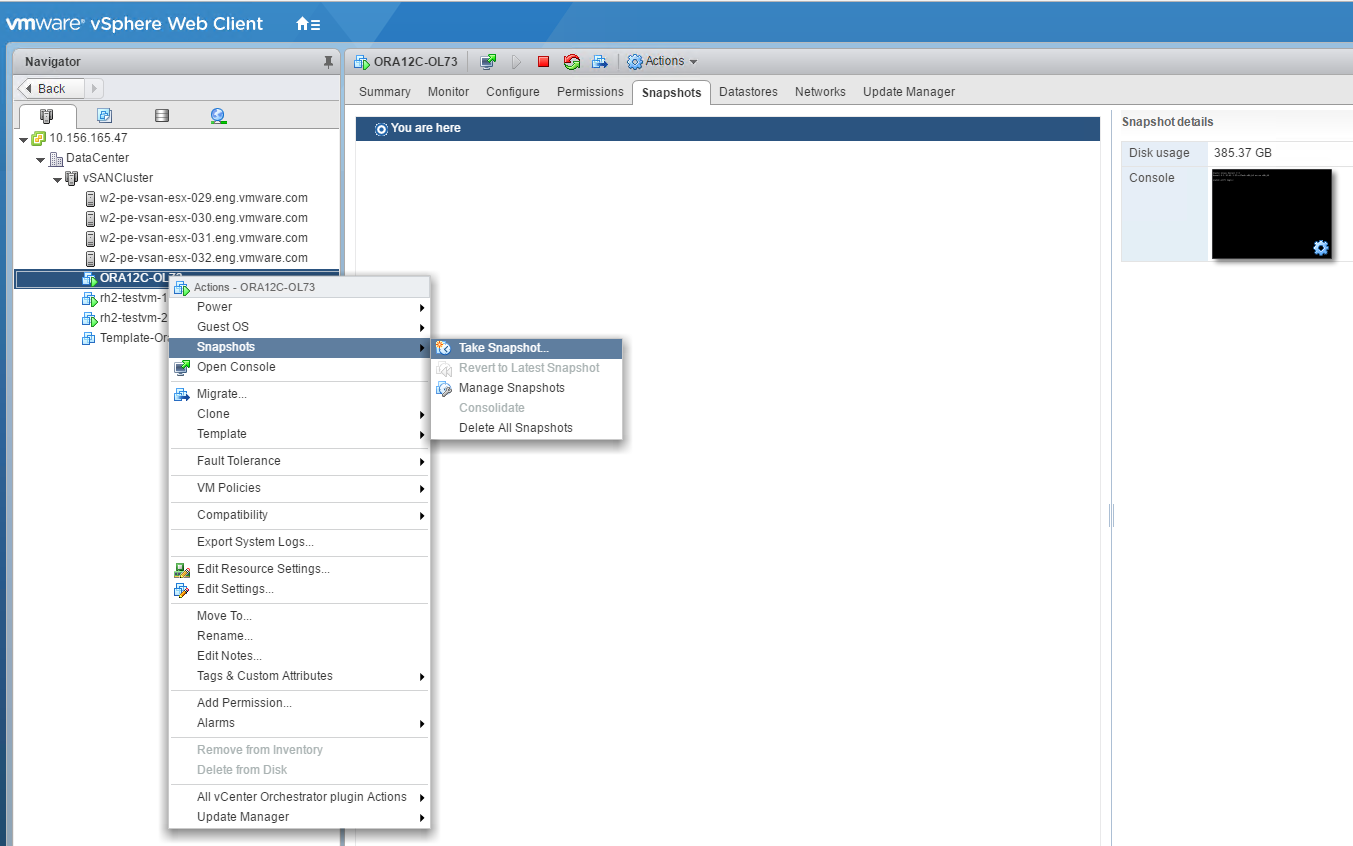
Figure 6. Snapshot of VM from Web Client
During this snapshot process, the “Quiesce” option was not used and the snapshot memory was not required.
The snapshot can also be taken using the PowerCLI command.
New-Snapshot -VM ORA12c-OL73 -Name ‘ORA12c-OL73_HotBackup_Snap’ -Memory $false -description HotBackup_Snap
When a vsanSparse snapshot is taken, child delta disks are created for every parent base disks. The parent base disk is now considered a point in time.
4. The following output listing all the files of the virtual machine shows the base disk and child delta disks that are created after snapshot. Observe that the disks ending with -000001.vmdk are the child disks.
[root@w2-pe-vsan-esx-029:/vmfs/volumes/vsan:52803547e520f694-1f6104395ada7b7c/4eb27e58-dcb1-d3bf-6117-0025b501004e] ls -l
-rw-------    1 root     root           340 Jan 31 20:33 ORA12C-OL73-000001.vmdk
-rw-r--r--    1 root     root            53 Jan 23 20:17 ORA12C-OL73-0215ec4e.hlog
-rw-------    1 root     root         22778 Jan 31 20:33 ORA12C-OL73-Snapshot4.vmsn
-rw-------    1 root     root           258 Jan 25 04:22 ORA12C-OL73-cb2bee34.vswp
-rw-------    1 root     root             0 Jan 25 04:22 ORA12C-OL73-cb2bee34.vswp.lck
-rw-------    1 root     root          8684 Jan 31 20:33 ORA12C-OL73.nvram
-rw-------    1 root     root           599 Jan 31 20:11 ORA12C-OL73.vmdk
-rw-r--r--    1 root     root          1378 Jan 31 20:33 ORA12C-OL73.vmsd
-rwxr-xr-x    1 root     root          5840 Jan 31 20:33 ORA12C-OL73.vmx
-rw-------    1 root     root             0 Jan 25 04:22 ORA12C-OL73.vmx.lck
-rwxr-xr-x    1 root     root          5749 Jan 31 20:33 ORA12C-OL73.vmx~
-rw-------    1 root     root           342 Jan 31 20:33 ORA12C-OL73_1-000001.vmdk
-rw-------    1 root     root           545 Jan 31 20:11 ORA12C-OL73_1.vmdk
-rw-------    1 root     root           343 Jan 31 20:33 ORA12C-OL73_10-000001.vmdk
-rw-------    1 root     root           546 Jan 31 20:15 ORA12C-OL73_10.vmdk
-rw-------    1 root     root           343 Jan 31 20:33 ORA12C-OL73_11-000001.vmdk
-rw-------    1 root     root           546 Jan 31 20:12 ORA12C-OL73_11.vmdk
-rw-------    1 root     root           343 Jan 31 20:33 ORA12C-OL73_12-000001.vmdk
-rw-------    1 root     root           546 Jan 31 20:16 ORA12C-OL73_12.vmdk
-rw-------    1 root     root           342 Jan 31 20:33 ORA12C-OL73_2-000001.vmdk
-rw-------    1 root     root           546 Jan 31 20:11 ORA12C-OL73_2.vmdk
-rw-------    1 root     root           342 Jan 31 20:33 ORA12C-OL73_3-000001.vmdk
-rw-------    1 root     root           546 Jan 31 20:11 ORA12C-OL73_3.vmdk
-rw-------    1 root     root           342 Jan 31 20:33 ORA12C-OL73_4-000001.vmdk
-rw-------    1 root     root           546 Jan 31 20:11 ORA12C-OL73_4.vmdk
-rw-------    1 root     root           342 Jan 31 20:33 ORA12C-OL73_5-000001.vmdk
-rw-------    1 root     root           546 Jan 31 20:11 ORA12C-OL73_5.vmdk
-rw-------    1 root     root           342 Jan 31 20:33 ORA12C-OL73_6-000001.vmdk
-rw-------    1 root     root           546 Jan 31 20:12 ORA12C-OL73_6.vmdk
-rw-------    1 root     root           342 Jan 31 20:33 ORA12C-OL73_7-000001.vmdk
-rw-------    1 root     root           546 Jan 31 20:12 ORA12C-OL73_7.vmdk
-rw-------    1 root     root           342 Jan 31 20:33 ORA12C-OL73_8-000001.vmdk
-rw-------    1 root     root           546 Jan 31 20:12 ORA12C-OL73_8.vmdk
-rw-------    1 root     root           342 Jan 31 20:33 ORA12C-OL73_9-000001.vmdk
-rw-------    1 root     root           546 Jan 31 20:13 ORA12C-OL73_9.vmdk
-rw-r--r--    1 root     root        318613 Jan 18 00:52 vmware-1.log
-rw-r--r--    1 root     root        503538 Jan 23 00:35 vmware-2.log
-rw-r--r--    1 root     root        276336 Jan 23 00:47 vmware-3.log
-rw-r--r--    1 root     root        296265 Jan 23 20:17 vmware-4.log
-rw-r--r--    1 root     root        309408 Jan 25 04:20 vmware-5.log
-rw-r--r--    1 root     root       1270017 Jan 31 20:33 vmware.log
-rw-------    1 root     root     115343360 Jan 25 04:22 vmx-ORA12C-OL73-3408653876-1.vswp
5. Remove the database from hot backup mode after the snapshot is taken.
SQL> alter database end backup;
Database altered.
Snippet of the Oracle alert log file after the ‘END BACKUP’ command is executed to show no errors:
Tue Jan 31 12:34:18 2017
Thread 1 advanced to log sequence 150 (LGWR switch)
  Current log# 6 seq# 150 mem# 0: +DATA_DG/group06_redo01.log
  Current log# 6 seq# 150 mem# 1: +DATA_DG/group06_redo02.log
alter database end backup
Completed: alter database end backup
Tue Jan 31 12:34:25 2017
6. Create a clone of the virtual machine called ‘ORA12C-OL73-Clone ‘using PowerCLI. The cloned VM is placed on the same vSAN datastore in this case.
- The PowerCLI script uses vSphere API that contains Clone_VM task and includes the ability to specify a snapshot to clone from using the VirtualMachineCloneSpec:
- A sample PowerCLI script for cloning.
$SourceVM = "ORA12C-OL73"
$Cluster = "vSANCluster"
$Datastore = "vsanDatastore"

$Snapshot_view = Get-View ( Get-Snapshot $SourceVM )
$Default_ClusterResourcePool_view = Get-View ( Get-Cluster $Cluster | Get-ResourcePool "Resources" )
$Target_Datastore_view = Get-View (Get-Datastore -Name $Datastore)
$SourceVM_view = Get-View ( Get-VM -name $SourceVM )
$CloneName = $SourceVM_view.name+"-Clone"
$CloneFolder = $SourceVM_view.parent

$CloneSpec = New-Object Vmware.Vim.VirtualMachineCloneSpec
$CloneSpec.Snapshot = $Snapshot_view.MoRef
$CloneSpec.Location = New-Object Vmware.Vim.VirtualMachineRelocateSpec
$CloneSpec.Location.Pool = $Default_ClusterResourcePool_view.MoRef
$CloneSpec.Location.Datastore = $Target_Datastore_view.MoRef
$CloneSpec.Location.DiskMoveType = [Vmware.Vim.VirtualMachineRelocateDiskMoveOptions]::moveAllDiskBackingsAndDisallowSharing

$SourceVM_view.CloneVM_Task($CloneFolder, $CloneName, $CloneSpec)
7. Wait for the cloning task to complete.
For fault isolation and data availability, placing the cloned VM in an alternate independent datastore is recommended. We can also clone the virtual machine to an NFS datastore or traditional VMFS datastore. Further, the cloned virtual machine can be sent to backup media using third-party-backup software for onsite protection or to remote site for offsite protection.
8. Delete the snapshot after the cloning operation is completed.
Power on cloned VM and recover database
- In case of any data loss in the production database, restore the cloned VM ‘ORA12C-OL73-Clone’ from a backup.
- Add the restored VM ‘ORA12C-OL73-Clone‘ to inventory.
- Start VM ‘ORA12C-OL73-Clone’.
- Open VM ‘ORA12C-OL73-Clone’ console and assign an IP address.
- The hostname for ‘ORA12C-OL73-Clone’ was kept the same as the production VM ‘ORA12C-OL73’ because changing the hostname would require reconfiguration of the Grid infrastructure, which would increase the recovery time.
- After the cloned VM ‘ORA12C-OL73-Clone’’ is powered on, the cloned database can automatically start up if Oracle Restart is configured to bring up the database or it needs to be brought up manually by performing a media recovery:
oracle@ora12c-ol73:ora12c:/u01/app/oracle/product/12.1.0/dbhome_1/dbs> sqlplus /nolog
SQL*Plus: Release 12.1.0.2.0 Production on Tue Jan 31 19:42:48 2017
Copyright (c) 1982, 2014, Oracle.  All rights reserved.

SQL> conn / as sysdba
Connected to an idle instance.

SQL> startup mount pfile=initora12c.ora
ORACLE instance started.
Total System Global Area 2.0616E+11 bytes
Fixed Size                  6870952 bytes
Variable Size            2.6844E+10 bytes
Database Buffers         1.7878E+11 bytes
Redo Buffers              529997824 bytes
Database mounted.

SQL> recover database;
Media recovery complete.
SQL>

SQL> alter database open;
Database altered.
7. Validate the Oracle recovery process from the alert log:
oracle@ora12c-ol73:ora12c:/u01/admin/ora12c/diag/rdbms/ora12c/ora12c/trace> tail -f alert_ora12c.log
…

Tue Jan 31 20:43:09 2017
ALTER DATABASE RECOVER database
Tue Jan 31 20:43:09 2017
Media Recovery Start
 Started logmerger process
Tue Jan 31 20:43:09 2017
Parallel Media Recovery started with 24 slaves
Tue Jan 31 20:43:10 2017
Recovery of Online Redo Log: Thread 1 Group 3 Seq 147 Reading mem 0
  Mem# 0: +DATA_DG/group03_redo01.log
  Mem# 1: +DATA_DG/group03_redo02.log
Tue Jan 31 20:43:19 2017
Media Recovery Complete (ora12c)
Completed: ALTER DATABASE RECOVER database
alter database open
Tue Jan 31 20:43:26 2017
Ping without log force is disabled
.
Tue Jan 31 20:43:26 2017
Beginning crash recovery of 1 threads
 parallel recovery started with 23 processes
Tue Jan 31 20:43:26 2017
Started redo scan
Tue Jan 31 20:44:18 2017
Completed redo scan
 read 6110585 KB redo, 0 data blocks need recovery
Tue Jan 31 20:44:18 2017
Started redo application at
 Thread 1: logseq 140, block 1311994
Tue Jan 31 20:44:18 2017
Recovery of Online Redo Log: Thread 1 Group 4 Seq 140 Reading mem 0
  Mem# 0: +DATA_DG/group04_redo01.log
  Mem# 1: +DATA_DG/group04_redo02.log
Tue Jan 31 20:44:20 2017
Recovery of Online Redo Log: Thread 1 Group 5 Seq 141 Reading mem 0
  Mem# 0: +DATA_DG/group05_redo01.log
  Mem# 1: +DATA_DG/group05_redo02.log
Tue Jan 31 20:44:28 2017
Recovery of Online Redo Log: Thread 1 Group 6 Seq 142 Reading mem 0
  Mem# 0: +DATA_DG/group06_redo01.log
  Mem# 1: +DATA_DG/group06_redo02.log
Tue Jan 31 20:44:35 2017
Recovery of Online Redo Log: Thread 1 Group 7 Seq 143 Reading mem 0
  Mem# 0: +DATA_DG/group07_redo01.log
  Mem# 1: +DATA_DG/group07_redo02.log
Tue Jan 31 20:44:43 2017
Recovery of Online Redo Log: Thread 1 Group 8 Seq 144 Reading mem 0
  Mem# 0: +DATA_DG/group08_redo01.log
  Mem# 1: +DATA_DG/group08_redo02.log
Tue Jan 31 20:44:50 2017
Recovery of Online Redo Log: Thread 1 Group 1 Seq 145 Reading mem 0
  Mem# 0: +DATA_DG/group01_redo01.log
  Mem# 1: +DATA_DG/group01_redo02.log
Tue Jan 31 20:44:56 2017
Recovery of Online Redo Log: Thread 1 Group 2 Seq 146 Reading mem 0
  Mem# 0: +DATA_DG/group02_redo01.log
  Mem# 1: +DATA_DG/group02_redo02.log
Tue Jan 31 20:45:04 2017
Recovery of Online Redo Log: Thread 1 Group 3 Seq 147 Reading mem 0
  Mem# 0: +DATA_DG/group03_redo01.log
  Mem# 1: +DATA_DG/group03_redo02.log
Tue Jan 31 20:45:08 2017
Completed redo application of 0.00MB
Tue Jan 31 20:45:08 2017
Completed crash recovery at
 Thread 1: logseq 147, block 852326, scn 1986762
 0 data blocks read, 0 data blocks written, 6110585 redo k-bytes read
Tue Jan 31 20:45:08 2017
8. A copy of the production database at a point in time is now available for any data recovery scenario.
Test Results
A point-in-time copy of the Single-Instance production database was made available using snapshot and clone with Oracle hot backup and recovery technologies.
VM-level Snapshot and Clone using Oracle Crash Consistent Backup
Test Overview
VM ‘ORA12C-OL73’ has a Single-Instance production database running on a vSAN Cluster, which needs to be backed up and restored in case of any data loss.
The steps for crash consistent backup and recovery is very similar to the above 6.2 VM-level Snapshot and Clone using Oracle Hot Backup section.
The high-level steps for the use case are:
Clone the database VM
- Run SLOB, an Oracle workload against the Single-Instance Oracle database in VM ‘ORA12c-OL73’.
- While the workload is running, take a crash consistent backup of the Oracle database by creating a VMware snapshot called ‘ORA12c-OL73_CrashConsistent_Snap ‘using web client or through PowerCLI.
- A clone of the virtual machine called ‘ORA12C-OL73-Clone’ is then made from the snapshot using the PowerCLI command:
- Web client can also be used to create the clone of the virtual machine, which takes a temporary snapshot used for cloning and deletes the snapshot after the cloning operation is completed.
- Delete the snapshot after the cloning operation is completed (if not using web client).
Power on the cloned VM and recover the database
- After powering on the cloned virtual machine ‘ORA12C-OL73-Clone’, the cloned database is started and recovered using the Oracle Instance recovery mechanism.
- A copy of the production database at a point in time is now available for any data recovery scenarios.
Figure 7 illustrates this process.

Figure 7. VM-level Snapshot and Clone Process
Test Procedures
Clone the database VM
Follow all steps till the part where the snapshot is deleted after the cloning operation completes from 6.2 VM-level Snapshot and Clone using Oracle Hot Backup.
The only difference here is database is not put in a hot backup mode but a crash consistent backup is taken.
Power on Cloned VM and Recover database
- In case of any data loss in the production database, restore the cloned VM ‘ORA12C-OL73-Clone’ from a backup.
- Add the restored VM ‘ORA12C-OL73-Clone’ to inventory.
- Start VM ‘ORA12C-OL73-Clone’.
- Open VM ‘ORA12C-OL73-Clone’ console and assign an IP.
- The hostname for ‘ORA12C-OL73-Clone’ was kept the same as the production VM ‘ORA12C-OL73’ because changing the hostname would require reconfiguration of the Grid infrastructure, which would increase the recovery time.
- After the cloned VM ‘ORA12C-OL73-Clone’’ is powered on, the cloned database can automatically start up if Oracle Restart is configured to bring up the database or it needs to be brought up manually for an instance/crash recovery:
oracle@ora12c-ol73:ora12c:/u01/app/oracle/product/12.1.0/dbhome_1/dbs> sqlplus /nolog
SQL*Plus: Release 12.1.0.2.0 Production on Thu Feb 2 14:20:22 2017
Copyright (c) 1982, 2014, Oracle.  All rights reserved.

SQL> conn / as sysdba
Connected to an idle instance.

SQL> startup pfile=initora12c.ora
ORACLE instance started.
Total System Global Area 2.0616E+11 bytes
Fixed Size                  6870952 bytes
Variable Size            2.6844E+10 bytes
Database Buffers         1.7878E+11 bytes
Redo Buffers              529997824 bytes
Database mounted.
Database opened.
SQL>
7. Validate the Oracle recovery process from the alert log:
oracle@ora12c-ol73:ora12c:/u01/admin/ora12c/diag/rdbms/ora12c/ora12c/trace> tail -f alert_ora12c.log
…..
Thu Feb 02 14:20:59 2017
ALTER DATABASE OPEN
.
Thu Feb 02 14:20:59 2017
Beginning crash recovery of 1 threads
 parallel recovery started with 23 processes
Thu Feb 02 14:20:59 2017
Started redo scan
Thu Feb 02 14:21:50 2017
Completed redo scan
 read 5707919 KB redo, 5024822 data blocks need recovery
Thu Feb 02 14:23:07 2017
Started redo application at
 Thread 1: logseq 183, block 81246
Thu Feb 02 14:23:07 2017
Recovery of Online Redo Log: Thread 1 Group 7 Seq 183 Reading mem 0
  Mem# 0: +DATA_DG/group07_redo01.log
  Mem# 1: +DATA_DG/group07_redo02.log
Thu Feb 02 14:23:11 2017
Recovery of Online Redo Log: Thread 1 Group 8 Seq 184 Reading mem 0
  Mem# 0: +DATA_DG/group08_redo01.log
  Mem# 1: +DATA_DG/group08_redo02.log
Thu Feb 02 14:23:20 2017
Recovery of Online Redo Log: Thread 1 Group 1 Seq 185 Reading mem 0
  Mem# 0: +DATA_DG/group01_redo01.log
  Mem# 1: +DATA_DG/group01_redo02.log
Thu Feb 02 14:23:30 2017
Recovery of Online Redo Log: Thread 1 Group 2 Seq 186 Reading mem 0
  Mem# 0: +DATA_DG/group02_redo01.log
  Mem# 1: +DATA_DG/group02_redo02.log
Thu Feb 02 14:23:37 2017
Recovery of Online Redo Log: Thread 1 Group 3 Seq 187 Reading mem 0
  Mem# 0: +DATA_DG/group03_redo01.log
  Mem# 1: +DATA_DG/group03_redo02.log
Thu Feb 02 14:23:41 2017
Recovery of Online Redo Log: Thread 1 Group 4 Seq 188 Reading mem 0
  Mem# 0: +DATA_DG/group04_redo01.log
  Mem# 1: +DATA_DG/group04_redo02.log
Thu Feb 02 14:23:49 2017
Recovery of Online Redo Log: Thread 1 Group 5 Seq 189 Reading mem 0
  Mem# 0: +DATA_DG/group05_redo01.log
  Mem# 1: +DATA_DG/group05_redo02.log
Thu Feb 02 14:23:55 2017
Completed redo application of 3603.96MB
Thu Feb 02 14:28:52 2017
Completed crash recovery at
 Thread 1: logseq 189, block 1238626, scn 2813297
 5024822 data blocks read, 5024695 data blocks written, 5707919 redo k-bytes read
…….
8. A copy of the production database at a point in time is available for any data recovery scenario.
Test Results
A point-in-time copy of the Single-Instance production database was made available using snapshot and clone with Oracle crash consistent mechanism for data recovery purposes.
VMDK-level Backup using Oracle Hot Backup
There may be cases when the user wants to back up just the Oracle database disks and not the entire virtual machine.
The user might want to back up one or more databases running in a VM rather than the entire VM itself.
For example, a VM might have:
- Three production databases, ‘PROD1, ‘PROD2’, and ‘PROD3’
- With requirement to recover ‘PROD1’ database only
The three production databases can either be:
- Residing with each on their dedicated set of ASM disks per database: no sharing of ASM disk groups between databases.
- Residing with all databases sharing the ASM disk groups.
Figure 8 shows the use case for VMDK-level backup.

Figure 8. Use case for VMDK-level Backup
The best practice by Oracle is to have every Oracle database on its own set of dedicated ASM disks in separate disk groups to avoid the ‘noisy neighbor’ effect.
This use case is based on the following assumptions:
- Both production VM ‘ORA12c-OL73’ and recovery VM “ORA12C-OL73-Test" have the same version of OS and Oracle binaries.
- All three production databases are on their own set of dedicated ASM disks.
- Oracle hot backup mechanism used for backup and recovery.
The difference between the above two VM-level cloning use cases and the current method is in the cloning process where:
- The vmkfstools command is used to clone database VMDK only in this use case.
- The cloned VMDKs are attached to a VM for the purpose of recovery, this VM does not have any database instance running.
- Bring up the cloned database on this new VM.
Test Overview
The ‘ORA12C-OL73’ VM has a running Single-Instance production database on a vSAN Cluster that needs to be backed up and restored in case of any data loss using the VMDK-level backup.
The high-level steps for this use case are:
Clone the database disks (vmdk)
- Run SLOB, an Oracle workload against the Single-Instance Oracle database in VM ‘ORA12c-OL73’
- While the workload is running, take a backup of the database:
- By placing the database in a hot backup mode using the ‘ALTER DATABASE BEGIN BACKUP’ command
- Take virtual-machine-level backup using VMware snapshot called ‘ORA12c-OL73_HotBackup_Snap ‘using web client or through PowerCLI
- Issue an ‘ALTER DATABASE END BACKUP’ command to end the Oracle database backup
- Alternatively, to take a crash consistent backup of the database: take a virtual machine snapshot ‘ORA12c-OL73_CrashConsistent_Snap‘ using web client or through PowerCLI without putting the database in a hot backup mode
- Clone the virtual machine database disks only using the vmkfstools commands and place the cloned vmdks into a new folder called ‘current-clone’.
- Delete the snapshot after the cloning operation is completed.
Attach Cloned disks (vmdks) to Recovery VM and Recover Database
- Attach the cloned database VMDK to the recovery VM “ORA12C-OL73-Test” that pre-exists with Grid Infrastructure and RDBMS binaries installed and configured.
- The recovery VM has the ASM instance already running to speed up the DB recovery process.
- Scan the operating system to see new Oracle ASM disks.
- Mount the new ASM disk groups.
- Create required directories for Oracle and Grid user.
- Create the database initialization parameter file pfile from the spfile
- Start Oracle DB and perform recovery.
- A copy of the production database at a point in time is now available for any data recovery scenario.
Test Procedures
Clone the database disks (vmdk)
- The initial steps are the same as in the 6.2 VM-level Snapshot and Clone using Oracle Hot Backup section where the database is placed in hot backup mode and a snapshot is taken.
- The following output shows all the files of the virtual machine along with the base disk and the child delta disks that are created after the snapshot. Observe that the disks ending with -000001.vmdk are the child disks.
[root@w2-pe-vsan-esx-029:/vmfs/volumes/vsan:52803547e520f694-1f6104395ada7b7c/4eb27e58-dcb1-d3bf-6117-0025b501004e] ls –l /vmfs/volumes/vsanDatastore/ORA12C-OL73
-rw-------    1 root     root           340 Feb  2 22:54 ORA12C-OL73-000001.vmdk
-rw-r--r--    1 root     root            53 Jan 23 20:17 ORA12C-OL73-0215ec4e.hlog
-rw-------    1 root     root         22778 Feb  2 22:54 ORA12C-OL73-Snapshot5.vmsn
-rw-------    1 root     root           258 Feb  2 19:05 ORA12C-OL73-cb2bee34.vswp
-rw-------    1 root     root             0 Feb  2 19:05 ORA12C-OL73-cb2bee34.vswp.lck
-rw-------    1 root     root          8684 Feb  2 22:58 ORA12C-OL73.nvram
-rw-------    1 root     root           599 Feb  2 19:05 ORA12C-OL73.vmdk
-rw-r--r--    1 root     root          1377 Feb  2 22:54 ORA12C-OL73.vmsd
-rwxr-xr-x    1 root     root          5840 Feb  2 22:54 ORA12C-OL73.vmx
-rw-------    1 root     root             0 Feb  2 19:05 ORA12C-OL73.vmx.lck
-rwxr-xr-x    1 root     root          5749 Feb  2 22:54 ORA12C-OL73.vmx~
-rw-------    1 root     root           342 Feb  2 22:54 ORA12C-OL73_1-000001.vmdk
-rw-------    1 root     root           545 Feb  2 19:05 ORA12C-OL73_1.vmdk
-rw-------    1 root     root           343 Feb  2 22:54 ORA12C-OL73_10-000001.vmdk
-rw-------    1 root     root           546 Feb  2 22:08 ORA12C-OL73_10.vmdk
-rw-------    1 root     root           343 Feb  2 22:54 ORA12C-OL73_11-000001.vmdk
-rw-------    1 root     root           546 Feb  2 22:08 ORA12C-OL73_11.vmdk
-rw-------    1 root     root           343 Feb  2 22:54 ORA12C-OL73_12-000001.vmdk
-rw-------    1 root     root           546 Feb  2 22:08 ORA12C-OL73_12.vmdk
-rw-------    1 root     root           342 Feb  2 22:54 ORA12C-OL73_2-000001.vmdk
-rw-------    1 root     root           546 Feb  2 22:08 ORA12C-OL73_2.vmdk
-rw-------    1 root     root           342 Feb  2 22:54 ORA12C-OL73_3-000001.vmdk
-rw-------    1 root     root           546 Feb  2 22:08 ORA12C-OL73_3.vmdk
-rw-------    1 root     root           342 Feb  2 22:54 ORA12C-OL73_4-000001.vmdk
-rw-------    1 root     root           546 Feb  2 22:08 ORA12C-OL73_4.vmdk
-rw-------    1 root     root           342 Feb  2 22:54 ORA12C-OL73_5-000001.vmdk
-rw-------    1 root     root           546 Feb  2 22:08 ORA12C-OL73_5.vmdk
-rw-------    1 root     root           342 Feb  2 22:54 ORA12C-OL73_6-000001.vmdk
-rw-------    1 root     root           546 Feb  2 22:08 ORA12C-OL73_6.vmdk
-rw-------    1 root     root           342 Feb  2 22:54 ORA12C-OL73_7-000001.vmdk
-rw-------    1 root     root           546 Feb  2 22:08 ORA12C-OL73_7.vmdk
-rw-------    1 root     root           342 Feb  2 22:54 ORA12C-OL73_8-000001.vmdk
-rw-------    1 root     root           546 Feb  2 22:08 ORA12C-OL73_8.vmdk
-rw-------    1 root     root           342 Feb  2 22:54 ORA12C-OL73_9-000001.vmdk
-rw-------    1 root     root           546 Feb  2 22:08 ORA12C-OL73_9.vmdk
-rw-r--r--    1 root     root        318613 Jan 18 00:52 vmware-1.log
-rw-r--r--    1 root     root        503538 Jan 23 00:35 vmware-2.log
-rw-r--r--    1 root     root        276336 Jan 23 00:47 vmware-3.log
-rw-r--r--    1 root     root        296265 Jan 23 20:17 vmware-4.log
-rw-r--r--    1 root     root        309408 Jan 25 04:20 vmware-5.log
-rw-r--r--    1 root     root       1309416 Feb  1 16:07 vmware-6.log
-rw-r--r--    1 root     root        381329 Feb  2 22:54 vmware.log
-rw-------    1 root     root     115343360 Feb  2 19:05 vmx-ORA12C-OL73-3408653876-1.vswp
Note: ORA12C-OL73.vmdk is the operating system vmdk and ORA12C-OL73_1.vmdk is the vmdk with the Oracle mount point (/u01).
3. Clone all database vmdks only from the snapshot of VM1 data vmdk into a new folder ‘current-clone’ on the vSAN datastore using vmkfstools. The base disk is a point-in-time copy of the database hence it is used as the cloning source.
-rw-------    1 root     root           599 Feb  2 19:05 ORA12C-OL73.vmdk
-rw-------    1 root     root           545 Feb  2 19:05 ORA12C-OL73_1.vmdk
-rw-------    1 root     root           546 Feb  2 22:08 ORA12C-OL73_10.vmdk
-rw-------    1 root     root           546 Feb  2 22:08 ORA12C-OL73_11.vmdk
-rw-------    1 root     root           546 Feb  2 22:08 ORA12C-OL73_12.vmdk
-rw-------    1 root     root           546 Feb  2 22:08 ORA12C-OL73_2.vmdk
-rw-------    1 root     root           546 Feb  2 22:08 ORA12C-OL73_3.vmdk
-rw-------    1 root     root           546 Feb  2 22:08 ORA12C-OL73_4.vmdk
-rw-------    1 root     root           546 Feb  2 22:08 ORA12C-OL73_5.vmdk
-rw-------    1 root     root           546 Feb  2 22:08 ORA12C-OL73_6.vmdk
-rw-------    1 root     root           546 Feb  2 22:08 ORA12C-OL73_7.vmdk
-rw-------    1 root     root           546 Feb  2 22:08 ORA12C-OL73_8.vmdk
-rw-------    1 root     root           546 Feb  2 22:08 ORA12C-OL73_9.vmdk
4. Only the database vmdks (11 disks) are cloned from ORA12C-OL73_2.vmdk to ORA12C-OL73_12.vmdk. For brevity, the cloning process for one of the vmdks is shown below.
vmkfstools -i "/vmfs/volumes/vsanDatastore/ORA12C-OL73/ORA12C-OL73_2.vmdk"
"/vmfs/volumes/vsanDatastore/current-clone/ORA12C-OL73_2.vmdk" -d thin &
5. Delete the snapshot after the cloning operation is completed. We can also clone the vmdk to an NFS datastore or traditional VMFS datastore and back up the cloned virtual machine to backup media for onsite protection or to a remote site for offsite protection.
6. Validate the cloned vmdks in the “current-clone” folder.
[root@w2-pe-vsan-esx-029:/vmfs/volumes/vsan:52803547e520f694-1f6104395ada7b7c/ab4b8a58-aa57-e7c1-a6ee-0025b501005e] ls –l /vmfs/volumes/vsanDatastore/current-clone
-rw------- 1 root root 546 Feb 3 01:40 ORA12C-OL73_10.vmdk
-rw------- 1 root root 546 Feb 3 01:45 ORA12C-OL73_11.vmdk
-rw------- 1 root root 546 Feb 3 00:26 ORA12C-OL73_12.vmdk
-rw------- 1 root root 546 Feb 2 23:43 ORA12C-OL73_2.vmdk
-rw------- 1 root root 546 Feb 3 01:16 ORA12C-OL73_3.vmdk
-rw------- 1 root root 546 Feb 2 23:55 ORA12C-OL73_4.vmdk
-rw------- 1 root root 546 Feb 3 00:51 ORA12C-OL73_5.vmdk
-rw------- 1 root root 546 Feb 3 01:45 ORA12C-OL73_6.vmdk
-rw------- 1 root root 546 Feb 3 01:13 ORA12C-OL73_7.vmdk
-rw------- 1 root root 546 Feb 3 00:51 ORA12C-OL73_8.vmdk
-rw------- 1 root root 546 Feb 3 01:43 ORA12C-OL73_9.vmdk
Attach Cloned Disks (vmdk) to Recovery VM and Recover Database
1. In case of any data loss in the production database, restore the cloned vmdks from a backup media.
2. The recovery VM “ORA12C-OL73-Test” pre-exists with GI and RDBMS binaries. To speed up the database recovery process, the VM has the ASM instance running. The recovery VM has two vmdks:
- ORA12C-OL73-Test.vmdk that houses the root file system
- ORA12C-OL73-Test_1.vmdk that houses the Oracle mount point
3. Attach the restored cloned database vmdks to the recovery VM “ORA12C-OL73-Test” using the PowerCLI command:
PowerCLI C:\> New-HardDisk -DiskPath "[vsanDatastore] current-clone/ORA12C-OL73_10.vmdk" ORA12C-OL73-Test
By default, it attaches the VMDK to the VM at the next available SCSI address, which in this case was SCSI 0:2.
As recovery VM “ORA12C-OL73-Test” is for recovery purpose only and will be short lived, the focus is not placing disks in the same SCSI order as the production VM.
In case the use case is to placing disks in the same SCSI order as the production VM, GUI can be used to do that or PowerCLI scripting needs to be used.
4. Attach the remaining database VMDK to the recovery VM “ORA12C-OL73-Test”:
New-HardDisk -DiskPath "[vsanDatastore] current-clone/ORA12C-OL73_11.vmdk” ORA12C-OL73-Test
New-HardDisk -DiskPath "[vsanDatastore] current-clone/ORA12C-OL73_12.vmdk” ORA12C-OL73-Test
New-HardDisk -DiskPath "[vsanDatastore] current-clone/ORA12C-OL73_2.vmdk” ORA12C-OL73-Test
New-HardDisk -DiskPath "[vsanDatastore] current-clone/ORA12C-OL73_3.vmdk” ORA12C-OL73-Test
New-HardDisk -DiskPath "[vsanDatastore] current-clone/ORA12C-OL73_4.vmdk” ORA12C-OL73-Test
New-HardDisk -DiskPath "[vsanDatastore] current-clone/ORA12C-OL73_5.vmdk” ORA12C-OL73-Test
New-HardDisk -DiskPath "[vsanDatastore] current-clone/ORA12C-OL73_6.vmdk” ORA12C-OL73-Test
New-HardDisk -DiskPath "[vsanDatastore] current-clone/ORA12C-OL73_7.vmdk” ORA12C-OL73-Test
New-HardDisk -DiskPath "[vsanDatastore] current-clone/ORA12C-OL73_8.vmdk” ORA12C-OL73-Test
New-HardDisk -DiskPath "[vsanDatastore] current-clone/ORA12C-OL73_9.vmdk” ORA12C-OL73-Test
A total of 11 vmdks are attached to recovery VM including eight data disks, one redo disk, and two FRA disks.
5. After database vmdks are attached, validate the attached database disk using the fdisk command. If new disks are not visible, scan the SCSI bus. The code snippet below scans the SCSI bus:
for i in `ls -1 /sys/class/scsi_host`; do
echo "- - -" > /sys/class/scsi_host/${i}/scan
done
root@ora12c-ol73-test ~]# fdisk -lu
….. Disk /dev/sdc: 268.4 GB, 268435456000 bytes, 524288000 sectors Units = sectors of 1 * 512 = 512 bytes Sector size (logical/physical): 512 bytes / 512 bytes I/O size (minimum/optimal): 512 bytes / 512 bytes Disk label type: dos Disk identifier: 0x9b5079f0 Device Boot Start End Blocks Id System /dev/sdc1 2048 524287999 262142976 83 Linux Disk /dev/sdd: 268.4 GB, 268435456000 bytes, 524288000 sectors Units = sectors of 1 * 512 = 512 bytes Sector size (logical/physical): 512 bytes / 512 bytes I/O size (minimum/optimal): 512 bytes / 512 bytes Disk label type: dos Disk identifier: 0x533b374a Device Boot Start End Blocks Id System /dev/sdd1 2048 524287999 262142976 83 Linux ….
The above output is truncated for brevity.
6. Use the “oracleasm scandisks” command to scan the attached disks for Oracle ASM disks. Disks tagged for ASMLib will be added to the ASMLib kernel driver.
[root@ora12c-ol73-test ~]# oracleasm listdisks

[root@ora12c-ol73-test ~]# oracleasm scandisks
Reloading disk partitions: done
Cleaning any stale ASM disks...
Scanning system for ASM disks...
Instantiating disk "DATA_DISK07"
Instantiating disk "DATA_DISK08"
Instantiating disk "FRA_DISK02"
Instantiating disk "REDO_DISK01"
Instantiating disk "DATA_DISK01"
Instantiating disk "FRA_DISK01"
Instantiating disk "DATA_DISK02"
Instantiating disk "DATA_DISK03"
Instantiating disk "DATA_DISK04"
Instantiating disk "DATA_DISK05"
Instantiating disk "DATA_DISK06"
[root@ora12c-ol73-test ~]#

[root@ora12c-ol73-test ~]# oracleasm listdisks
DATA_DISK01
DATA_DISK02
DATA_DISK03
DATA_DISK04
DATA_DISK05
DATA_DISK06
DATA_DISK07
DATA_DISK08
FRA_DISK01
FRA_DISK02
REDO_DISK01
7. Mount the three ASM disk groups DATA_DG, REDO_DG, FRA_DG using the asmcmd command:
grid@ora12c-ol73-test:+ASM:/home/grid> asmcmd
ASMCMD> mount DATA_DG
ASMCMD> mount REDO_DG
ASMCMD> mount FRA_DG

ASMCMD> lsdg
State    Type    Rebal  Sector  Block       AU  Total_MB  Free_MB  Req_mir_free_MB  Usable_file_MB  Offline_disks  Voting_files  Name
MOUNTED  EXTERN  N         512   4096  1048576   2047992   741692                0          741692              0             N  DATA_DG/
MOUNTED  EXTERN  N         512   4096  1048576    511998   410077                0          410077              0             N  FRA_DG/
MOUNTED  EXTERN  N         512   4096  1048576    102399   102346                0          102346              0             N  REDO_DG/
ASMCMD>
8. Create the required directories for Oracle user to bring the database up if this is the first database on this VM. Create the diagnostic destination for the Oracle user.
mkdir –p /u01/admin/ora12c
mkdir /u01/admin/ora12c adump
The default value of the DIAGNOSTIC_DEST path would be derived from the value of ORACLE_BASE environment variable which is /u01/app/oracle in this case. We choose not to use the default setting but to create the DIAGNOSTIC_DEST under /u01/admin/ora12c folder.
9. On the Oracle production VM, create a pfile from the production database spfile if we want to make any custom changes. For example, SGA and PGA settings for the cloned database.
Copy the pfile and Oracle password file from Production VM to the Recovery VM under the $ORACLE_HOME/dbs directory
scp $ORACLE_HOME/dbs/initora12c.ora ora12c-ol73-test:/u01/app/oracle/product/12.1.0/dbhome_1/dbs
scp $ORACLE_HOME/dbs/orapwora12c ora12c-ol73-test:/u01/app/oracle/product/12.1.0/dbhome_1/dbs
10. Start Oracle DB and perform database recovery. If crash consistent method was used for backup, see 6.3 VM-level Snapshot and Clone using Oracle Crash Consistent Backup for recovery steps.
oracle@ora12c-ol73:ora12c:/u01/app/oracle/product/12.1.0/dbhome_1/dbs> sqlplus /nolog
SQL*Plus: Release 12.1.0.2.0 Production on Tue Jan 31 19:42:48 2017
Copyright (c) 1982, 2014, Oracle.  All rights reserved.

SQL> conn / as sysdba
Connected to an idle instance.

SQL> startup mount pfile=initora12c.ora
ORACLE instance started.
Total System Global Area 2.0616E+11 bytes
Fixed Size                  6870952 bytes
Variable Size            2.6844E+10 bytes
Database Buffers         1.7878E+11 bytes
Redo Buffers              529997824 bytes
Database mounted.

SQL> recover database;
Media recovery complete.
SQL>

SQL> alter database open;
Database altered.
SQL>
11. Validate the Oracle recovery process from the alert log.
oracle@ora12c-ol73:ora12c:/u01/admin/ora12c/diag/rdbms/ora12c/ora12c/trace> tail -f alert_ora12c.log
…

Fri Feb 03 13:05:17 2017
ALTER DATABASE RECOVER database
Fri Feb 03 13:05:25 2017
Media Recovery Start
 Started logmerger process
Fri Feb 03 13:05:25 2017
Parallel Media Recovery started with 24 slaves
Fri Feb 03 13:05:26 2017
Recovery of Online Redo Log: Thread 1 Group 3 Seq 219 Reading mem 0
  Mem# 0: +DATA_DG/group03_redo01.log
  Mem# 1: +DATA_DG/group03_redo02.log
Fri Feb 03 13:05:45 2017
Recovery of Online Redo Log: Thread 1 Group 4 Seq 220 Reading mem 0
  Mem# 0: +DATA_DG/group04_redo01.log
  Mem# 1: +DATA_DG/group04_redo02.log
Fri Feb 03 13:06:05 2017
…..
Fri Feb 03 13:07:27 2017
Media Recovery Complete (ora12c)
Completed: ALTER DATABASE RECOVER  database
alter database open
Fri Feb 03 13:07:46 2017
Ping without log force is disabled
.
Fri Feb 03 13:07:46 2017
Beginning crash recovery of 1 threads
 parallel recovery started with 23 processes
Fri Feb 03 13:07:46 2017
Started redo scan
Fri Feb 03 13:08:57 2017
Completed redo scan
 read 6101007 KB redo, 0 data blocks need recovery
Fri Feb 03 13:08:57 2017
Started redo application at
 Thread 1: logseq 218, block 1115110
Fri Feb 03 13:08:57 2017
Recovery of Online Redo Log: Thread 1 Group 2 Seq 218 Reading mem 0
  Mem# 0: +DATA_DG/group02_redo01.log
  Mem# 1: +DATA_DG/group02_redo02.log
……
Fri Feb 03 13:10:05 2017
Completed redo application of 0.00MB
Fri Feb 03 13:10:05 2017
Completed crash recovery at
 Thread 1: logseq 224, block 1577473, scn 3144748
 0 data blocks read, 0 data blocks written, 6101007 redo k-bytes read
12. A copy of the production database at a point in time is now available for any data recovery scenario.
The steps for “vmdk-level backup using Oracle crash consistent backup” is the same as this except Oracle crash consistent backup is used instead of hot backup mechanism.
Test Results
A point-in-time copy of the Single-Instance production database was made available using VMware Snapshot with cloning only, the database vmdks with Oracle hot backup mechanism for data recovery purposes.
Production databases sharing ASM disk groups in a VM
In case all the three production databases shown in Figure 8 were sharing the ASM disks:
- All steps are the same as detailed above in the 6.4 VMDK-level Backup using Oracle Hot Backup section.
- Only caveat is the cloned ASM disks attached to the recovery VM contain data for ‘PROD2’ and ‘PROD3’ as well:
- This would not be an issue as we are not starting up ‘PROD2’ and ‘PROD3’ databases to perform recovery.
- If needed for cleanup purposes, ‘PROD2’ and ‘PROD3’ databases on the recovery VM can be dropped.
Oracle RAC Backup and Recovery
In case of an Oracle RAC Cluster, as VMware snapshots are disallowed for shared vmdks for multi-writer related reasons, the RAC cluster can be:
- Online and any snapshot operations against dependent disks followed by cloning operation of dependent disks using vmkfstools produce clones of dependent disks only.
- Offline and vmkfstools can be used to produce clones of all dependent and independent disks.
These are the high-level components of an Oracle RAC cluster and the components need to be part of any regular backup process:
- Operating system binaries
- Oracle binaries
- Oracle Cluster Registry (voting disks are backed up as part of OCR backup). See Backing Up Oracle Cluster Registry for more information.
- Oracle database data:
- Data files
- Control files
- Server parameter files (SPFILEs)
- Archived redo log files. See ‘Overview of Configuring RMAN for Oracle RAC’ for more information.
To take an online backup of an Oracle RAC Cluster on a vSAN Cluster
- Back up the operating system and Oracle binaries using Operating system tools such as tar and cpio to create an operating system tarball of the OS and Oracle binaries.
- Back up Oracle Cluster Registry. This backup can be run from any RAC node (voting disks are backed up as part of OCR backup). See “Managing Oracle Cluster Registry and Voting Files” for more information.
- Back up the Oracle database using Oracle RMAN. This backup can be run from any RAC node. See “Overview of Configuring RMAN for Oracle RAC” for more information.
To restore the online backup of the Oracle RAC database to a new Single-Instance database on a vSAN Cluster
- Ensure that target VM ‘ORA12C-OL73-Test’ has new ASM disk groups (DATA, FRA, and REDO) created in the same way as they exist in production RAC database.
- Restore and Recover the RAC database backup using the Oracle RMAN utility.
- The target VM has a new database that contains a copy of the RAC database from which the data can be restored into production.
To restore the online backup of the Oracle RAC database to a new Oracle RAC Cluster on a vSAN Cluster
- The new target cluster has to be a fully functional Oracle RAC Cluster without the database created (outside the scope of this operation guide).
- The new target cluster needs to have the same ASM disk groups (DATA, FRA, REDO) as it exists in production RAC database (outside the scope of this operation guide).
- Restore and recover the RAC database backup using Oracle RMAN on any node of the cluster.See RMAN Restore Scenarios for Oracle RAC for more information.
To take an offline backup of an Oracle RAC Cluster on a vSAN Cluster
Follow the steps detailed in the ‘To clone an entire Oracle RAC Cluster Offline’ subsection in the 7.2 Oracle RAC Cloning section.
To restore the offline backup of the Oracle RAC database to a new Single-Instance database on a vSAN Cluster
Follow the steps detailed in the ‘To refresh a target Single-Instance database from offline RAC database’ subsection in the 8.2 Database Refresh from Production RAC section.
To restore the offline backup of the Oracle RAC cluster to a new Oracle RAC Cluster on a vSAN Cluster
Follow the steps detailed in the ‘To clone an entire Oracle RAC Cluster Offline’ subsection in the 7.2 Oracle RAC Cloning section.
Solution Validation – Database Cloning
This section validates database Cloning procedure for Oracle database on a vSAN Cluster.
Database Cloning
Database cloning use case can leverage any of the four methods covered in the 6.1 Backup and Recovery section to clone a database.
This use case uses the VM-level cloning method for a Single-Instance database. VM ‘ORA12C-OL73’ runs on a vSAN Cluster.
Figure 9 illustrates this use case to clone a database VM.
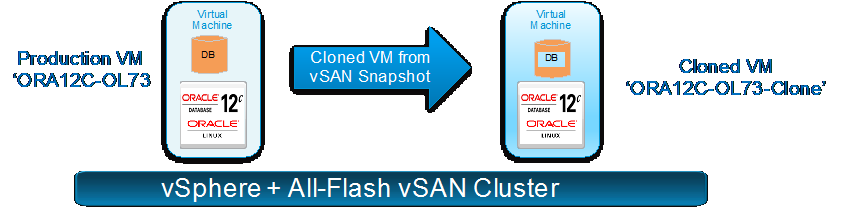
Figure 9. Clone a Database VM
Test Overview
We chose to implement Single-Instance database cloning using the 6.2 VM-level Snapshot and Clone using Oracle Hot Backup scenario.
The high-level steps for this use case are:
Clone the database VM
- Take a backup of the Oracle database:
- While the workload is running by placing the database in a hot backup mode, use the ‘ALTER DATABASE BEGIN BACKUP’ mode.
- Take a virtual-machine-level backup using VMware snapshot called ‘ORA12c-OL73_HotBackup_Snap’ using web client or through the PowerCLI command.
- Issue an ‘ALTER DATABASE END BACKUP’ command to end the Oracle database backup.
- A clone of the virtual machine called ‘ORA12C-OL73-Clone’ is then made from the snapshot using the PowerCLI command or the vmkfstools command.
- Delete the snapshot after the cloning operation is completed.
Power on the cloned database VM and recover the database
After powering on the cloned virtual machine ‘ORA12C-OL73-Clone’, the cloned database is recovered using the Oracle recovery mechanism.
Test Procedures
The steps are exactly the same as those of the 6.2 VM-level Snapshot and Clone using Oracle Hot Backup section.
The operating system host name of the cloned VM will be the same as the production VM. The steps to change the host name of the cloned VM can be found in the My Oracle Support document ‘How to Reconfigure Oracle Restart [ID 986740.1]’.
After the cloned VM is up and the database is recovered, the cloned database SID is the same as that of the production database and so an Oracle utility called ‘nid’ can be used to change the DBID of the new cloned database. Optionally, we can also change the cloned database name to a new name using the same utility. See Changing the DBID and Database Name for more information.
Optionally, data masking packages can be deployed to mask any sensitive data using the Oracle Data Masking packages before releasing the database to users.
Oracle has introduced their Data Masking Pack as a new feature in Oracle Database 11g that provides a permanent, one-way mask of sensitive data. The Data Masking Pack is a separately licensed Oracle Enterprise Manager pack that has been included with both Database Control and Grid Control in Oracle Database. See Oracle Data Masking and Subsetting for more information.
Test Results
A point-in-time copy of the Single-Instance production database was cloned using VMware Snapshot and cloning using Oracle hot backup mechanism for database.
Clone a specific database from a VM
There might be cases when a VM has multiple Oracle databases running and the user wants to clone just one database and not the entire virtual machine. Figure 10 illustrates this use case to clone specific database from a production VM.
An example use case might be a VM:
- Has three production databases, ‘PROD1, ‘PROD2’, and ‘PROD3’.
- The requirement is to clone ‘PROD1’ database only.
- Production VM ‘ORA12c-OL73’ and target VM have the same version of OS and Oracle binaries.
- Target VM can pre-exist to which the cloned vmdks can be attached.
- Target VM can be created with same version of OS and Oracle binaries and then cloned vmdks can be attached to it.
In that case, ‘VMDK-level backup using Oracle Hot Backup’ method can be used to clone ‘PROD1’ database to the target VM.

Figure 10. Clone Specific Database from a Production VM
Oracle RAC Cloning
As pointed out in the 3.10 Oracle Backup and Recovery section, we have the Oracle Clusterware components and the database components that make up an Oracle RAC cluster.
In case of an Oracle RAC Cluster, as VMware snapshots are not allowed for shared vmdks for multi-writer related reasons, the RAC cluster can be:
- Online and any snapshot operations against dependent disks followed by cloning operation of dependent disks using vmkfstools produce clones of dependent disks only.
- Offline and vmkfstools can be used to produce clones of all dependent and independent disks.
To clone an Oracle RAC Clusterware online on a vSAN Cluster
- Back up the Grid Infrastructure binaries using one of the two methods:
- Operating system tools such as tar and cpio to create a tarball of the Grid Infrastructure binaries from either RAC node (vrarac01 or vrarac02).
- Use VMware snapshot and clones:
- A snapshot operation against either RAC node (vrarac01 or vrarac02) has a backup for the operating system and Oracle binaries vmdks.
- Use PowerCLI commands or vmkfstools to create clones of the Oracle binaries’ vmdks from the snapshot.
- Delete the snapshot after the cloning operation completes.
2. Restore a copy of the above backup:
- If operating system tools are used, restore tarball of the Grid Infrastructure binaries to the recovery VM “ORA12C-OL73-Test”.
- If VMware snapshot and clone are used, attach cloned vmdks of source Oracle vmdks to the recovery VM “ORA12C-OL73-Test” that has the same OS and Oracle version as that of the RAC.
3. The cloned/restored Oracle Grid Infrastructure home on recovery VM “ORA12C-OL73-Test” contains files that are relevant only to the source RAC VM and so we need to delete unnecessary files from the Grid Infrastructure home on recovery VM “ORA12C-OL73-Test”. See Creating a Cluster by Cloning Oracle Clusterware for more information.
4. After the cleanup, recovery VM “ORA12C-OL73-Test” has the Grid Infrastructure binaries cleaned up and ready to be cloned to a new cluster.
5. Clone two new VMs from recovery VM “ORA12C-OL73-Test”, which would be the new RAC nodes of the cluster and follow the rest of the steps as detailed in Step 1: Prepare the New Cluster Nodes.
To clone an Oracle RAC database home online on a vSAN Cluster
See Cloning Oracle RAC to Nodes in a New Cluster for more information.
To clone an Oracle RAC database online on a vSAN Cluster
See Duplicating a Database for more information.
To clone an entire Oracle RAC Cluster offline on a vSAN Cluster
- Shut down both RAC nodes vrarac01 and vrarac02. See Table 6 for RAC layout.
- Create two new folders ‘vrarac01_clone’ and ‘vrarac02_clone’ in the vSAN datastore using the vSphere web client.
- Use vmkfstools to clone all vmdks attached to vrarac01: this backup would include OS vmdk, Oracle vmdk, and all shared cluster vmdks.
vrarac01 OS disk
vmkfstools -i "/vmfs/volumes/vsanDatastore/vrarac01_1/vrarac01.vmdk" "/vmfs/volumes/vsanDatastore/vrarac01_clone/vrarac01.vmdk" -d thin &
vrarac01 Oracle binary disk
vmkfstools -i "/vmfs/volumes/vsanDatastore/vrarac01_1/vrarac01_1.vmdk" "/vmfs/volumes/vsanDatastore/vrarac01_clone/vrarac01_1.vmdk"  -d thin &
Database shared disks
There are eight shared disks, just one vmdk cloning operation is shown here for brevity. The shared disks need to be cloned using “eagerzeroedthick” disk format to support multi-writer.
vmkfstools -i "/vmfs/volumes/vsanDatastore/vrarac01_1/vrarac01_2.vmdk" "/vmfs/volumes/vsanDatastore/vrarac01_clone/vrarac01_10.vmdk" -d eagerzeroedthick &
4. Use vmkfstools to clone only OS vmdk and Oracle vmdk of vrarac02.
vrarac01 OS disk
vmkfstools -i "/vmfs/volumes/vsanDatastore/vrarac02/vrarac02.vmdk"  "/vmfs/volumes/vsanDatastore/vrarac02_clone/vrarac02.vmdk" -d thin &
vrarac02 Oracle binary disk
vmkfstools -i "/vmfs/volumes/vsanDatastore/vrarac02/vrarac02_1.vmdk"  "/vmfs/volumes/vsanDatastore/vrarac02_clone/vrarac02_1.vmdk" -d thin &
5. At this point we have a clone of all RAC VM vmdks.
6. Bring up the source RAC cluster.
7. Create two new VMs, ‘vrarac01_clone’ and ‘vrarac02_clone’ and assign two Ethernet adapters for public and private network. Assign all necessary resources to the two VMs without adding any hard disks to either of the VMs.
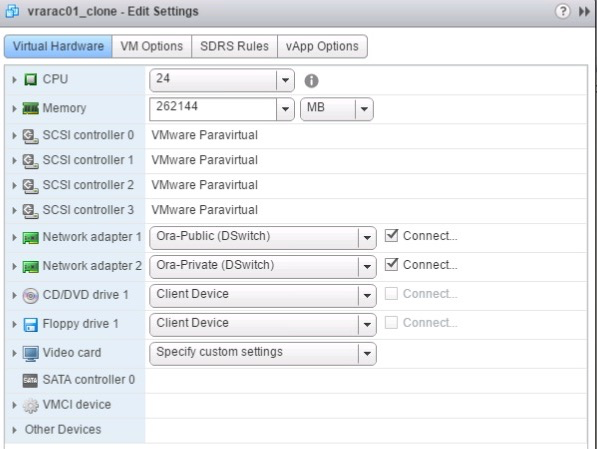
8. All vmdks (OS, Oracle, and shared vmdks) cloned from ‘vrarac01’ VM can be attached to the first node ‘‘vrarac01_clone’ of the new cluster in the same SCSI bus and slot location as ‘vrarac01’. Make sure that all shared disks are added with the multi-writer attribute.

9. Both the OS and Oracle vmdks cloned from ‘vrarac02’ VM can be attached to the second node ‘vrarac02_clone’ of the cluster in the same SCSI bus and slot location as ‘vrarac02’.
10. Add the shared cluster vmdks on ‘vrarac01_clone’ to ‘vrarac02_clone’ as shared with the multi-writer option in the same SCSI bus and slot location as vrarac01_clone.

11. Start ‘vrarac01_clone’ and ‘vrarac02_clone’ VMs with new IP addresses assigned to public and private Ethernet adapter. Make necessary changes to the /etc/hosts file on all RAC nodes.
12. The hostnames of both cloned RAC VMs are going to be the same as the source RAC VMs. New VIP and SCAN IP addresses have to be assigned to the cloned RAC VMs for the cluster to start.
13. Public, private, VIP and SCAN IPs can be changed for the new cloned cluster (scope beyond this operation guide). See the following Metalink documents for reference:
- How to Modify Public Network Information including VIP in Oracle Clusterware (Doc ID 276434.1)
- How to Modify Private Network Information in Oracle Clusterware (Doc ID 283684.1)
- How to Modify SCAN Setting or SCAN Listener Port after Installation (Doc ID 972500.1)
Solution Validation – Database Refresh from Production
This section validates database refresh procedure for Oracle database on a vSAN Cluster.
Database Refresh from Production
Database refresh use case can leverage any of the four methods covered in the 6.1 Backup and Recovery section to refresh a database.
Test Overview
We chose to implement a Single-Instance database refresh using 6.4 VMDK-level Backup using Oracle Hot Backup.
- A simple use case is to refresh a test database running in a VM from a production database, assuming that that VM has only one database, using VM-level Snapshot and Clone using Oracle Hot Backup.
- Another use case is to refresh test and development databases running in a VM from a production database.
The steps involved in the second use case are:
In this use case, the target VM:
- Has three test databases, ‘QA1’, ‘QA2’, and ‘QA3’
- Requirement is to refresh ‘QA1’ database only
The three QA databases can either be:
- Residing with each on their dedicated set of ASM disks per database: no sharing of ASM disk groups between databases.
- Residing with all databases sharing the ASM disk groups.
The best practice by Oracle is to have every Oracle database on its own set of dedicated ASM disks in separate disk groups to avoid the ‘noisy neighbor’ effect.
As shown in Figure 11, this use case is based on the following assumptions:
- Both production VM ‘ORA12c-OL73’ and target VM have the same version of OS and Oracle binaries
- All three QA databases are on their own set of dedicated ASM disks
- Oracle hot backup mechanism for backup and recovery

Figure 11. Data Refresh Use Case
The high-level steps for this use case are:
Cloning operation
Take a backup of the production database PROD1 on a vSAN Cluster from which data needs to be refreshed to QA1 database:
- Place the database in a hot backup mode using the ‘ALTER DATABASE BEGIN BACKUP’ command.
- Take virtual-machine-level backup using VMware snapshot called ‘ORA12c-OL73_HotBackup_Snap ‘using web client or through PowerCLI.
- Issue an ‘ALTER DATABASE END BACKUP’ command to end the Oracle database backup.
- To take a crash consistent backup of the database.
- Take a virtual machine snapshot ‘ORA12c-OL73_CrashConsistent_Snap’ using web client or through PowerCLI without putting the database in a hot backup mode.
- Clone the virtual machine database disks only using vmkfstools commands and place the cloned vmdks into a new folder called ‘current-clone’.
- Delete the snapshot after the cloning operation is completed.
In case the QA databases had dedicated ASM disk groups
- Shut down the ‘QA1’ database on the target VM.
- Manually drop the QA1 database using the DROP DATABASE command.
- Drop the ‘QA1’ ASM groups using the ‘DROP DISKGROUP INCLUDING CONTENTS’ command for cleanup purposes.
In case the QA databases were sharing common ASM disk groups
- Shut down the ‘QA1’ database on target VM.
- ASM disks cannot be dropped as they house ‘QA2’ and ‘QA3’ along with the ‘QA1’ database.
- Manually drop the QA1 database using the DROP DATABASE command. The old ASM disks are retained in this case.
Attach Cloned vmdk to target VM
- Attach the cloned database VMDK to the target VM that has Grid Infrastructure and RDBMS binaries installed and configured.
- The target VM has the ASM instance running to speed up the DB recovery process.
- Scan the operating system to see new Oracle ASM disks.
- Mount the new ASM disk groups dedicated for the QA1 database.
The rest of the steps are the same as in the 6.4 VMDK-level Backup using Oracle Hot Backup use case:
- Create required directories for Oracle and Grid users if needed.
- Create the database initialization parameter file pfile from the spfile.
Startup and recover the data
- Start Oracle DB and perform the recovery operations.
Additional steps are included in the test procedures below.
Test Procedures
The steps are exactly the same as in the 6.4 VMDK-level Backup using Oracle Hot Backup section with the additional steps to:
- Change the cloned database SID to be different than the production database, the steps are shown in “To restore the offline backup of the Oracle RAC cluster to a new Oracle RAC Cluster” in the 6. Oracle RAC Cloning section.
- Database cloning
Follow the steps detailed in the “To clone an entire Oracle RAC Cluster offline” subsection in the 7.2 Oracle RAC Cloning section.
- Optionally deploy data masking packages to mask any sensitive data using the Oracle Data Masking packages before releasing the database to be used. The steps are shown in the “To restore the offline backup of the Oracle RAC cluster to a new Oracle RAC Cluster” in the 7.2 Oracle RAC Cloning section.
- Follow the steps detailed in the “To clone an entire Oracle RAC Cluster offline” subsection in the 7.2 Oracle RAC Cloning section.
Test Results
A point-in-time copy of the Single-Instance production database was made available using VMware Snapshot with cloning deployed with Oracle hot backup mechanism for database refresh purposes.
Database Refresh from Production RAC
The database refresh process can:
- Refresh a target Single-Instance database from Oracle RAC database
- Refresh a target Oracle RAC database from source Oracle RAC database
In case of an Oracle RAC Cluster, as VMware snapshots are disallowed for shared vmdks for multi-writer related reasons, the RAC cluster can be:
- Online and any snapshot operations against dependent disks followed by the cloning operation of dependent disks using vmkfstools produce clones of dependent disks only.
- Offline and vmkfstools can be used to produce clones of all dependent and independent disks.
This use case is based on the assumption that both production RAC Cluster and target VM have the same version of OS and Oracle binaries.
To refresh a target Single-Instance database from online RAC database on a vSAN Cluster
Follow the steps from online 6.5 Oracle RAC Backup and Recovery section using the 'To restore the online backup of the Oracle RAC database to a new Single-Instance database' steps.
To refresh a target RAC database from online RAC database on a vSAN Cluster
Follow the steps from online 6.5 Oracle RAC Backup and Recovery section using the ‘To restore the online backup of the Oracle RAC database to a new Oracle RAC Cluster‘ steps.
To refresh a target Single-Instance database from offline RAC database on a vSAN Cluster:
- After shutting down RAC cluster, use vmkfstools to clone only database specific VMDKs (DATA, FRA, and REDO), not cluster vmdks (CRS or VOTE).
- After the cloning operation completes, add the new cloned VMDKs to the target VM that houses the Single-Instance database. Add the cloned vmdk to the same bus and SCSI slot for best practices.
- Follow the rest of the steps after attaching the vmdks from the 8.1 Database Refresh from Production section.
To refresh a target RAC database from offline RAC database on a vSAN Cluster
- The new target cluster has to be a fully functional Oracle RAC Cluster without the database created (outside the scope of this operation guide).
- After shutting down the source RAC cluster, use vmkfstools to clone only database-specific vmdks (DATA, FRA, REDO), not cluster vmdks (CRS or VOTE).
- After the cloning operation completes, add cloned shared VMDKs to the first RAC node of the target RAC cluster using the multi-writer flag attribute.
- Add the same cloned shared VMDKs to the remaining RAC nodes in the target RAC cluster in the same SCSI bus and slot location as is in the first RAC VM.
- Follow the rest of the steps after attaching the vmdks from the 8.1 Database Refresh from Production section.
Solution Validation – Database Patching
This section validates Oracle database patching by leveraging the vSAN snapshot capability on a vSAN Cluster.
Database Patching
Database patching leverages the snapshot capability to take a snapshot of the Oracle VM before the patching process in event of a patching or database upgrade failure, which has the capability to revert back to the state before the patching.
For Single-Instance databases, that would mean patching the Grid Infrastructure binaries, the RDBMS binaries or updating the database dictionary or all of the components.
In case of patching an Oracle RAC, Oracle provides the flexibility of doing a rolling patch upgrade where RAC nodes are patched one by one, thereby avoiding to take down the entire cluster for the patching process ensuring that SLAs are met and uptime is guaranteed.
Test Overview
This test covers the steps for recovering a Single-Instance database on a vSAN Cluster if needed to roll back from a failed patching operation.
Oracle recommends you shut down all database services using the Oracle Home directory before taking a backup of the system including the database before the patching exercise to recover from any failures. This means cleanly shutting down the database and backing it up.
The steps for recovering a Single-Instance database (to roll back from a failed patching operation if needed) are as follows. The database disks are set to the default dependent mode per table 6.
- Back up the database
- If the downtime is available, shut down all Oracle services including the database to take a cold backup for extra precaution and restart the database.
- If the downtime is not available, take an online backup using RMAN for extra precaution.
2. Take virtual machine snapshot called ‘ORA12c-OL73_Before_Patching’ using vSphere web client or through PowerCLI. Take an OS backup of the Grid Infrastructure and Oracle binaries for extra precaution.
3. Start the database patching exercise.
4. If the database patching exercise is successful, delete the VMware snapshot afterwards.
5. If the database patching exercise is unsuccessful, revert back to the VMware snapshot ‘ORA12c-OL73_Before_Patching’.
- After the database is reverted to the point before the patching is started, delete the snapshot ‘ORA12c-OL73_Before_Patching’.
This test describes the steps taken to recover from a failed patching operation.
Test Procedures
The steps are exactly the same as those outlined in the section above.
Test Results
A point-in-time copy of the production database was made available using VMware Snapshot that included a snapshot of the Oracle binaries and the Oracle database was available if needed to roll back from a failed patching operation.
Oracle RAC Patching and VMware Snapshots
In case of an Oracle RAC Cluster, as VMware snapshots are not allowed for shared vmdks for multi-writer related reasons, the RAC cluster can be:
- Online and any snapshot operations against dependent disks followed by the cloning operation of dependent disks using vmkfstools produce clones of dependent disks only.
- Offline and vmkfstools can be used to produce clones of all dependent and independent disks.
Oracle OPatch supports three different patch methods on a RAC environment:
- Patching RAC as a single instance (All-Node Patch)
- Patching RAC using a minimum down-time strategy (Min. Downtime Patch)
- Patching RAC using a rolling strategy—no down time (Rolling Patch)
With the rolling patch method, there is no downtime. Each node would be patched and brought up while all the other nodes are up and running, resulting in no disruption of the system.
The details can be found in My Oracle Support document ‘Rolling Patch—OPatch Support for RAC (Doc ID 244241.1)’.
The steps for recovering from a RAC database patching exercise online on a vSAN Cluster are:
- Take virtual-machine-level backup of all RAC nodes using VMware snapshot technology using web client or through PowerCLI. In this step, a snapshot is made of the operating system and Oracle mount point disks of all RAC nodes. Optionally, take an OS backup of the Grid Infrastructure and Oracle binaries for extra precaution.
- Create a guaranteed restore point using Oracle database flashback technology, which can be done online without any downtime since the version of 11gR2. Optionally, take an online backup of the database by using Oracle RMAN for extra precaution.
See Using Oracle Flashback Technology for more information.
3. Start the database patching exercise.
4. If the database patching exercise is successful:
- Delete the VMware snapshot afterwards.
- Remove the database restore point.
5. If the database patching exercise is unsuccessful:
- Flash back the RAC database using the flashback commands to the restore point created.
- Revert all RAC VMs back to the VMware snapshot taken before the patching operation.
- After the database is reverted to the point before the patching is started, delete the RAC VM’s snapshot.
Third-Party Backup Solutions using VADP and “VMware Ready for vSAN”
This section provides an overview of VMware vSphere Storage API’s for data protection (VADP) on vSphere environments, including VMware vSAN.
VMware vSphere Storage APIs - Data Protection (VADP) provides API based integration on vSphere environments including VMware vSAN. There are backup vendors who provide Oracle application-level integration along with VADP API integration, which can help in ease of backup, greater levels of manageability and control.
VADP features include Changed Block Tracking (CBT) that can speed incremental backups and recovery operations. With CBT enabled, the backup software identifies and protects changed virtual machine data and only backs up the changed blocks, thus reducing backup time and storage requirements.
Further, the VMware Ready for vSAN program that offers partners a set of tools, resources, and processes needed to certify File Services and Data Protection products with VMware vSAN. The program enables partner solutions to be listed on the VMware Compatibility Guide (VCG) with the compatible VMware vSAN product.
This VMware ready for vSAN program will provide confidence with the partner solutions deployed in VMware vSAN environments for seamless operation. These partner data protection solutions can be used for Oracle database backup and recovery as well.
Conclusion
This section provides a summary of this operation guide and validates vSAN to be an HCI platform that is capable of delivering efficient Oracle Database Day 2 Operations.
vSAN is a cost-effective and high-performance HCI platform that is rapidly deployed, easy to manage, and fully integrated into the industry-leading VMware vSphere platform. vSAN has built-in space efficiency features including deduplication, compression and erasure coding. vSAN 6.0 and above has improved the snapshot capability, which provides users with enterprise-class snapshots and clones.
vSAN, as part of vSphere, offers a range of tools to vSphere administrators with the capability to manage their infrastructure in a unified way. vSAN specific tasks for configuration, health checks, performance monitoring and capacity reports are all performed centrally from the vSphere web client. This not only helps in ease of Day 0,1 Operations but also on Day 2 Operations and thereby increasing the productivity of HCI administrator.
Using these capabilities of vSAN, we showcased Day 2 Operations for Oracle on vSAN including backup and recovery, database cloning, database refresh for test and development environment, and database patching.
In summary, this operation guide validates vSAN to be an HCI platform that is capable of delivering efficient Oracle Database Day 2 Operations. In addition, vSAN provides improved data protection, cloning, and day-to-day management and troubleshooting functions by integrating with Oracle database technologies.
Appendix A Additional Day 2 Operations Technology
This section provides an overview of additional Day 2 operations technology.
Database Security
Database security provides controls to protect databases (potentially including the data, the database applications or stored functions, the database systems, the database servers and the associated network links) against compromises of their confidentiality, integrity, and availability.
Oracle products like Oracle Key Vault, Oracle Audit Vault, Advanced Security (transparent data encryption and Oracle data redaction), Label Security and Database Firewall help provide unprecedented defense-in-depth capabilities to help organizations address existing and emerging security and compliance requirements. See “Database Security” for more information.
Some of the key factors of database encryption include:
- Encryption is on a database level
- Database data travels encrypted
- There is no deduplication after data is encrypted, if compression and data deduplication is needed, it has to be done before encryption
VMware provides two encryption solutions for security: VMware vSphere virtual machine encryption (VM Encryption) and vSAN encryption.
VM encryption: It is a feature introduced in vSphere 6.5 to enable the encryption of virtual machines. VM encryption uses the VMware vSphere APIs for I/O Filtering (VAIO) to provide encryption mechanisms for virtual machines. Encryption happens at the hypervisor level and not in the VM, hence the Guest OS and datastore type are not a factor.
Some of the key factors of VM encryption include:
- Policy based (enabled at VM level)
- Data travels encrypted
- No or near Zero deduplication savings.
vSAN encryption: vSAN 6.6 introduced Data-at-rest encryption at vSAN datastore level to further improve security and provide compliance with increasingly stringent regulatory requirements. vSAN encryption eliminates the extra cost, limitations, and complexity associated with purchasing and maintaining self-encrypting drives.
Some of the key factors of vSAN encryption:
- Enabled at Cluster level, data-at-rest encryption for all objects on vSAN Datastore
- Data travels unencrypted but it is written encrypted to the vSAN cache tier
- Full compatibility with vSAN data services, including deduplication and compression providing space efficiency along with encryption
Database Troubleshooting
Troubleshooting is one of the key Day 2 Operation tasks to find potential causes of problem in the database environment. The infrastructure hosting the application should have tools required to identify the problem quickly so downtime can be avoided or reduced and corrective actions are taken timely.
To have an effective troubleshooting mechanism in place, a combination of tools from all layers of the stack need to be deployed including:
-
Database tools
- Access to v$ tables that are basically a set of virtual tables that record current database activity. These views are called dynamic performance views because they are continuously updated while a database is open and in use. See “Wait Events Statistics” for more information.
- Active Session History (ASH) that is part of the Diagnostics and Tuning Pack. It samples information from the [G]V$ views allowing you to see current and historical information about active sessions on the database. See “Top SQL” for more information.
- Oracle AWR reports with Automatic Database Diagnostic Monitor (ADDM)
AWR collects, processes, and maintains performance statistics for problem detection and self-tuning purposes. This gathered data is stored both in memory and in the database, and is displayed in both reports and views. See “Automatic Workload Repository” for more information.
Automatic Database Diagnostic Monitor (ADDM):
- Analyzes AWR data on a regular basis
- Diagnoses the root causes of performance problem
- Provides recommendations for correcting any problems
See “ADDM Analysis” for more information.
- Oracle Enterprise Manager 12c provides a complete Application Performance Management solution for custom applications and Oracle applications, which is designed for both cloud and enterprise data center deployments and is supported on Oracle and non-Oracle platforms. See “Application Performance Management” for more information.
-
vSphere Tools
VMware provides several tools to help you monitor your virtual environment and to locate the source of potential issues and current problems.
Many of these are available from the popular vSphere web client and ESXTOP utility (a command-line utility that provides a detailed view on the ESXi resource usage. See KB 1008205):
- Performance charts: Allows you to see performance data on a variety of system resources including CPU, Memory, Storage, and so on.
- Performance monitoring: Command-line utilities that allow you to access detailed information on system performance through the command line.
- Host health: Allows you to quickly identify which hosts are healthy and which are experiencing problems.
- Events, alerts, and alarms: Allow you to configure alerts and alarms and to specify the actions the system should take when triggered.
- System log: Files System logs contain additional information about activities in your vSphere environment.
See “vSphere Monitoring and Performance” for more information.
-
vSAN tools
- vSAN Performance Service
vSAN performance service is used to monitor the performance of your vSAN environment, using the web client. The performance service collects and analyzes performance statistics and displays the data in a graphical format. You can use the performance charts to manage your workload and determine the root cause of problems.
- vSAN Space Reporting Features
vSAN space reporting is enabled by default in vSAN 6.2 and later releases. Using the vSAN space, you can view the following information:
- General vSAN space usage.
- Detailed space usage breakdown that indicates the total amount of used and free space that is available.
The purpose of the space being used and any capacity overhead due to enabled features.
- vSAN Health Check
vSAN health check delivers a simplified troubleshooting and monitoring experience of all things related to vSAN. Through the web client, it offers multiple health checks specifically for vSAN including cluster, hardware compatibility, data, limits, physical disks. See “vSAN Health Check Information” for more information.
- vSAN Performance Service
-
VMware vRealize Operations Manager
It combines multiple VMware components to deliver integrated performance, capacity, and configuration management capabilities for VMware vSphere, physical and hybrid cloud environments. There are management packs that can help in end-to-end monitoring solutions.
For example vRealize Operations Management Pack for vSAN extends the powerful abilities of VMware vRealize® Operations Manager™ by providing key metrics related to performance and health of vSAN. See a demo on how to use vROps Management Pack for vSAN to analyze vSAN Cluster Performance.
Further, by taking advantage of other management packs such as the Blue Medora Management Pack for Oracle database, we can do end-to-end centralized monitoring.
See Oracle Database 12c on VMware vSAN 6.2 All-Flash where we used vRealize Operations Manager for centralized management and to monitor vSAN Cluster and an Oracle database VM. vRealize Operations Management Pack for Storage Devices and Blue Medora Management Pack for Oracle Database were installed to provide insights into vSAN and Oracle database respectively.
In the “Oracle Database 12c on VMware vSAN 6.2 All-Flash” reference architecture, we have correlated IO metrics from VM level and database level:
- vRealize Operations Manager with vSAN Management Pack for Storage Devices provides IO metrics at the VM level and at the VMDK (virtual disk) level.
- The Blue Medora Management Pack for Oracle Database provides workload statistics from the database level, which can be read through the AWR reports by DBAs.
Database Capacity Planning
Capacity planning is the process of taking into account increased data growth, future system utilization and user base growth and forecasts how much resource must be added to the database system to ensure that the user experience continues uninterrupted.
Typically, the resources that would be added are CPU, memory, storage, or network capacity, or more likely a combination of these, depending on how demands are predicted to grow.
To have an effective capacity planning methodology in place, a combination of tools from all layers of the stack need to be deployed.
The above tools mentioned in the Database troubleshooting section like Oracle AWR, vSphere tools, vSAN features and vRealize operations manager can be used for capacity Planning and forecasting.
Database Usage Metering and Reporting for Chargeback Purposes
Enterprise-class IT organizations are challenged to continually manage the transformation from physical provisioned hardware to a virtualized model and to a cloud model. The ability to measure and charge for specific services consumed by a line of business is the key element in this era of cloud.
This capability is very important to understand:
- The costs associated for a service
- Establish a price for a service
- Provide the consumption report to business for chargeback purpose
With the rise of subscription-based cloud computing services, chargeback mechanism is increasingly adopted and acceptable. Service provider and even organizations who support internal customers or business unit deploy the above model.
There are two broad policies used to allocate and bill the costs associated with each organization’s usage:
- Charge back: Allocates the cost associated with services to business line or internal customers improving the accountability in the system.
- Show back: Provides IT management, business line, and corporate management with an analysis of the IT costs due to each department, without actually cross-charging those costs.
VMware provides this functionality using VMware vRealize Suite to make the automation, operations and business management components work together to deliver superior costing, metering, and chargeback capabilities.
Specifically, VMware vRealize® Business™ for Cloud delivers the insight IT infrastructure and operations teams need to most efficiently deploy and manage cloud environments. The cost, consumption, comparison, and planning capabilities in vRealize Business for Cloud provide an easy on-ramp for organizations just getting started with cloud computing. Essential for effectively managing hybrid-cloud environments, the business management features in vRealize Business for Cloud accelerate time to value.
vRealize Business for Cloud provides the following benefits:
- Understand efficiency: cloud costing from a single dashboard
- Assess usage and value: cloud consumption and role-based show back
- Optimize resources: cloud planning and reclamation
- Evaluate options: cloud comparison
Appendix B Storage Array-Based Snapshots and Clones
This section provides an overview of the storage array-based snapshots and clones.
In case of a vSphere Cluster connected to a traditional storage array, in addition to the database-level backup and virtual-machine-level backup, storage-level LUN based backup using snapshots can also be leveraged. This works in conjunction with Oracle backup and recovery technologies.
In case of single-instance database backup and recovery scenario, point-in-time backup can be taken using storage-LUN level snapshot of the datastore that houses the database. The database can be put in a hot backup mode, or a crash-consistent backup can be taken. To restore the snapshot backup to the original LUN, all VMs using that datastore have to be powered off and the datastore has to be unmounted from all ESXi hosts. After unmounting the datastore, storage-based restore operation is performed. After the restore is completed, mount the datastore on all ESXi hosts in the vSphere cluster and start the virtual machine(s).
In case of a RAC database backup and recovery scenario, the steps for a storage-level snapshot is the same as in the above case. Before starting the restore process, all RAC VMs have to be powered off.
In case of a single-instance database or RAC database patching scenario, the above storage snapshot-based backup and recovery methodology can be used to have a point-in-time copy.
In case of single instance database cloning or refresh, after performing a storage level snapshot, the snapshot LUN would have to be resignatured before mapping it to the vSphere cluster as a new datastore. The new datastore needs to have the same VMs as the original datastore has, so the names of VMs need to be changed in addition to changing the database name in the cloned VMs.
For an Oracle RAC database cloning using storage-level snapshots, follow the steps for a single instance database cloning or refresh as shown above. Additional steps might be required to reconfigure the Oracle Clusterware after storage cloning.
For details about how snapshot LUN detection is handled in ESXi, see VMware KB1011387.
Appendix C SLOB and Database Configuration
This section provides an overview of the SLOB and database configuration.
SLOB Oracle Workload
SLOB is an Oracle workload generator designed to stress test storage I/O capability, specifically for Oracle database using OLTP workload. SLOB is not a traditional transactional benchmark tool. It is used to validate performance of the storage subsystem without application contention.
SLOB and Database Configuration
- Database VM (24 vCPU and 256GB memory).
- Database VM with a 1,000GB SLOB schema.
- Number of users set to 24 with zero think time to hit each database with maximum requests concurrently to generate extremely intensive OLTP workload.
- Workload is a mix of 75 percent reads and 25 percent writes to mimic a transactional database workload.
- We used the following SLOB configuration file in our testing
SLOB Configuration file:
UPDATE_PCT=25
RUN_TIME=3600
WORK_LOOP=0
SCALE=42G
WORK_UNIT=64
REDO_STRESS=LITE
LOAD_PARALLEL_DEGREE=4

THREADS_PER_SCHEMA=1

# Settings for SQL*Net connectivity:
#ADMIN_SQLNET_SERVICE=slob
#SQLNET_SERVICE_BASE=slob
#SQLNET_SERVICE_MAX=2
#SYSDBA_PASSWD=change_on_install

#########################
#### Advanced settings:
#
# The following are Hot Spot related parameters.
# By default Hot Spot functionality is deactivated(DO_HOTSPOT=FALSE).
#
DO_HOTSPOT=FALSE
HOTSPOT_MB=8
HOTSPOT_OFFSET_MB=16
HOTSPOT_FREQUENCY=3

#
# The following controls operations on Hot Schema
# Default Value: 0. Default setting deactivates Hot Schema
#
HOT_SCHEMA_FREQUENCY=0

# The following parameters control think time between SLOB
# operations (SQL Executions).
# Setting the frequency to 0 deactivates think time.
#
THINK_TM_FREQUENCY=0
THINK_TM_MIN=.1
THINK_TM_MAX=.5
#########################

export UPDATE_PCT RUN_TIME WORK_LOOP SCALE WORK_UNIT LOAD_PARALLEL_DEGREE REDO_STRESS
export DO_HOTSPOT HOTSPOT_MB HOTSPOT_OFFSET_MB HOTSPOT_FREQUENCY HOT_SCHEMA_FREQUENCY THINK_TM_FREQUENCY THINK_TM_MIN THINK_TM_MAX
We used the following command to start the SLOB workload with 24 users:
‘‘/home/oracle/SLOB/runit.sh 24’’
Reference
This section lists the relevant references used for this operation guide.
White Paper
For additional information, see the following white papers:
- Tech Note for vSAN 6.0 Snapshots
- Performance of vSAN Snapshots in vSphere 6.0
- Oracle Real Application Clusters on VMware vSAN
- Oracle Database 12c on VMware vSAN 6.2 All-Flash
- Oracle Databases on VMware Best Practices Guide
Product Documentation
For additional information, see the following product documentation:
Other Documentation
For additional information, see the following document:
About the Author and Contributor
This section provides a brief background on the author and contributors of this operation guide.
Palanivenkatesan Murugan, Senior Solution Engineer in the Product Enablement team of the Storage and Availability Business Unit. Palani specializes in solution design and implementation for business-critical applications on VMware vSAN. He has more than 12 years of experience in enterprise-storage solution design and implementation for mission-critical workloads. Palani has worked with large system and storage product organizations. Palani delivered Storage Availability and Performance Assessments, Complex Data Migrations across storage platforms, Proof of Concept, and Performance Benchmarking.
Sudhir Balasubramanian, Staff Solution Architect, works in the Global Field and Partner Readiness team. Sudhir specializes in the virtualization of Oracle business-critical applications. Sudhir has more than 20 years’ experience in IT infrastructure and database, working as the Principal Oracle DBA and Architect for large enterprises focusing on Oracle, EMC storage, and Unix/Linux technologies. Sudhir holds a Master Degree in Computer Science from San Diego State University. Sudhir is one of the authors of the “Virtualize Oracle Business Critical Databases” book, which is a comprehensive authority for Oracle DBAs on the subject of Oracle and Linux on vSphere. Sudhir is a VMware vExpert and Member of the CTO Ambassador Program.
Catherine Xu, Senior Technical Writer in the Product Enablement team of the Storage and Availability Business Unit, edited this paper to ensure that the contents conform to the VMware writing style.