
Demystifying SSL Certificates

TLS/SSL certificates are very widely used throughout the suite of VMware products, and for good reason. Certificates serve two primary functions:
- They are used to encrypt traffic so sensitive data is not vulnerable to being stolen in-flight
- They are used to prove identity between two entities, such as a client/server, or two servers
Though the purpose of server certificates is straight forward, understanding and decoding them can be challenging. If you find yourself confused by them, I hope that by the end of this blog, you will have a greater understanding of working with certificates.
Self-Signed Certificates – what is the big deal?
Plenty of organizations, internet browsers, and app clients will throw red flags when visiting a webpage or making a connection to a server that contains a self-signed certificate. I am sure you have seen the red, broken padlock icon on various browsers, including a warning that the website is not to be trusted. So, what’s the deal?

Often the problem is not that the certificate is self-signed, but that the certificate issuer is not a publicly accepted certificate authority, nor one trusted by your organization. (Though both can be true at the same time.)
Let us think about server SSL certificates like driver’s licenses and passports. If you ever need to prove your identity, you use your driver's license/passport to do so. This works because the one asking for proof of identification trusts the government authority that issued the form of identification. Much like when a client makes a secure connection to a remote server, it checks the identity of the server using the SSL certificate presented by the server. If the client trusts the certificate authority that issued the certificate to the server, it can be confident that the server is who it claims to be.
Compare this to a self-signed certificate, which is most likely to be an untrusted certificate authority. We can think of a self-signed certificate like a hand-made driver’s license/passport, where the person who created the license signed it as being authentic (self-signed). Generally speaking, anyone looking for proof of identity is not going to accept that as a valid ID.
Now, think about the cards in your wallet that show your membership to fitness clubs, member-only retail stores, and more. In this case, the issuing authority would be said business or club where you received the membership card from. While this form of ID is trusted by said entity, and will allow you access into their business, the same ID card is not valid to any other organization.
In the context of VMware vCenter, the internal VMCA is a self-signed root certificate authority that has issued the vCenter Machine SSL certificate, as well as the ESXi host certificates. We can choose to trust the VMCA so we no longer get warnings when trying to connect to vCenter or our hosts. For more information on how to obtain the VMCA root CA certificate and to trust it, see this knowledge-base article.
Understanding & Quickly Determining the SSL Certificate Signing Chain
When installing custom SSL certificates, VMware products often need to know the full signing chain to make sure all certificate authorities in the chain are trusted. And, if you have the leaf certificate you wish to install, getting this information is easier than you think. In this example, I am showing how Microsoft Windows displays certificates, and how we can export the signing chain certificates using just the leaf certificate. If you are using a different operating system such as Mac or Linux, obtaining the signing chain certificate may require different steps.
For example, I want to see the full signing chain of the certificate presented at vmware.com.
Using the default Windows app to view certificates, Crypto Shell Extensions, first I open the certificate file presented at vmware.com, and click on the “Certification Path” tab. I can see the full signing chain because Windows recognizes the certificate authority that signed the certificate, DigiCert. DigiCert is among some of the default certificate authorities present in the Microsoft Windows Trusted Root Authorities. When you open a custom certificate signed by your domain’s internal certificate authority, Windows will display its full chain too, provided Windows has been told to trust the certificate authority.
There are a total of three certificates in this chain: the root, the intermediate, and the leaf certificate, also known as an end-entity. The certificate presented to my browser, and what I see when visiting vmware.com is the “leaf” certificate. Much like the leaves on a tree are the furthest point, and are supported by the branches and its roots, the leaf certificate is the last certificate in the chain.
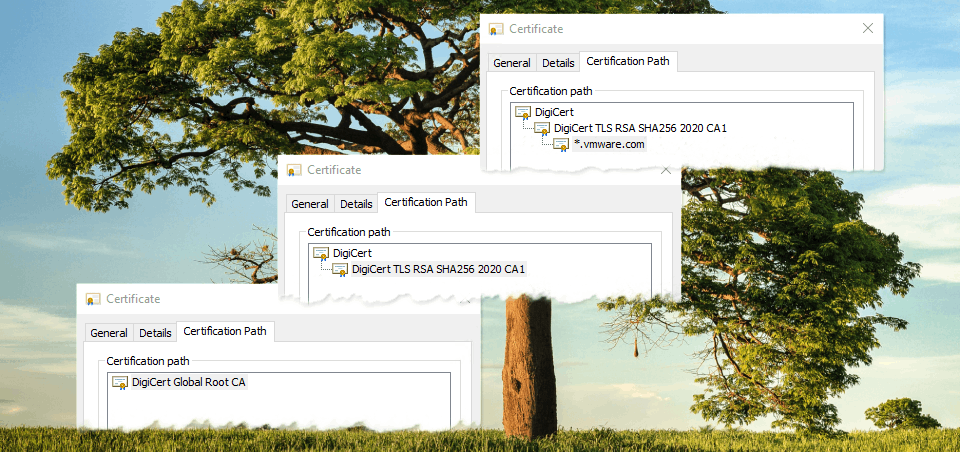
One of the requirements for trusting the leaf certificate is to make sure the rest of the certificates in the chain are also trusted. In this case, we have a single intermediate certificate authority which signed the leaf certificate. Our single intermediate certificate authority was signed by the root certificate. The root certificate is always going to be self-signed, as it is the very first certificate in the chain. Note - depending on the public key infrastructure (PKI), there may be no intermediate certificate authorities, one, or multiple intermediates CAs.
To obtain the full signing chain, we will need to start with downloading a copy of the intermediate certificate.
- Certification Path tab
- Select the intermediate certificate
- View Certificate
A new window opens, we are now looking at the intermediate certificate authority’s certificate. - Select the Details tab
- Copy to File...

Follow the wizard, which will allow us to export this certificate in Base-64 encoded X.509 format.
Once completed, close this window, returning to the Certification Path. Select the root certificate and repeat the process so that we also have the root certificate exported into its own Base-64 encoded file.
After exporting the intermediate and the root certificate, open these files with a text editor to view the Base-64 encoded certificates that we need to complete our certificate management work.
How to determine if a certificate (public key) and private key match
When it comes time to renew & replace SSL certificates, it can be easy to lose track of which certificates, private keys, and signing requests go together, especially if you are working with multiple certificates at once. And if you have ever tried to install a certificate and private key that do not match, you are not going to get very far. Thankfully, there are some simple openssl commands to help us make sure our certificate files correspond to one another.
The below commands will return the sha256 hash from the certificate files we are interested in.
The certificate signing request (CSR):
openssl req -noout -modulus -in CERTIFICATE-REQUEST | openssl sha256
The private key, which is what we want kept secret:
openssl rsa -noout -modulus -in PRIVATE-KEY | openssl sha256
The certificate, also known as the public key:
openssl x509 -noout -modulus -in CERTIFICATE | openssl sha256
For example, in my lab I used the certificate-manager CLI to generate a new CSR and private key, then got the CSR signed by my internal certificate authority which produced the certificate, certnew.crt. Before I install this certificate, I can use the above openssl commands to ensure all three files have identical sha256 hashes:
# openssl x509 -noout -modulus -in certnew.crt | openssl sha256
(stdin)= 1ce68c4ee6fc66ab31612010007d99290537f43e8e393558331289a1aa2074ea

# openssl rsa -noout -modulus -in vmca_issued_key.key | openssl sha256
(stdin)= 1ce68c4ee6fc66ab31612010007d99290537f43e8e393558331289a1aa2074ea

# openssl req -noout -modulus -in vmca_issued_csr.csr | openssl sha256
(stdin)= 1ce68c4ee6fc66ab31612010007d99290537f43e8e393558331289a1aa2074ea
As all three files have the same sha256 hash, we know that the private key was generated while the certificate signing request was, and that said private key and public key (certificate) match each other, like a lock and key.
Summary
While I only scratched the surface on TLS/SSL certificates, I hope you learned something new about why certificates exist and some tricks to help manage them. For more information about SSL certificates, check out the following blogs:
- Managing vSphere Certificates with PowerCLI
- vSphere 7 - Certificate Management
- 10 Things to Know About vSphere Certificate Management
And for even more content, be sure to check out core.vmware.com.