
Auto Deploy
Enabling the GUI for Image Builder
Because the Image Builder and Auto Deploy features are tightly coupled, the UI is only visible when both of these services are running. To enable the GUI, navigate to Administration > System Configuration > Services in the vSphere Web Client. Start both services, and set them to start automatically, if desired. Then log out and back in to the Web Client to verify the Auto Deploy object is available.
Alternatively, these services can be enabled via command line. Simply SSH into the VCSA and run the following commands:
/usr/lib/vmware-vmon/vmon-cli --update imagebuilder --starttype AUTOMATIC
/usr/lib/vmware-vmon/vmon-cli --update rbd --starttype AUTOMATIC
/usr/lib/vmware-vmon/vmon-cli --start rbd
/usr/lib/vmware-vmon/vmon-cli --start imagebuilder
Regardless of whether Auto Deploy is in use in an environment or not, the Image Builder GUI is a convenient alternative to the PowerCLI cmdlets previously required for creating custom VMware ESXi images. Administrators can upload zip depots of images and drivers, as well as create online depots that connect to VMware or OEM partner image repositories.
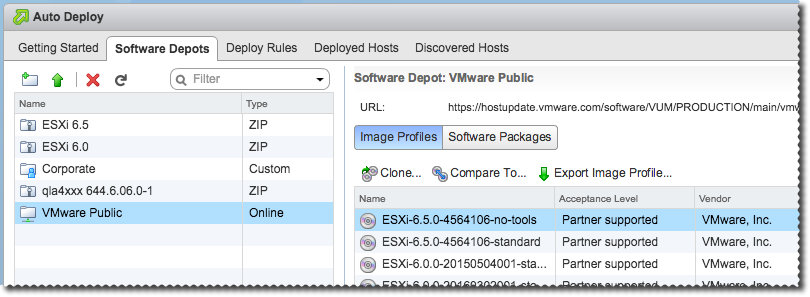
The full URL of the VMware public depot is: https://hostupdate.vmware.com/software/VUM/PRODUCTION/main/vmw-depot-index.xml
In addition to being available to Auto Deploy for deploy rule creation, the UI also allows administrators to customize, compare, or export images to ISO or zip format for a variety of uses. The vSphere 6.5 product documentation describes the functionality in more detail.
Even though the PowerCLI Image Builder is still available, this new Image Builder GUI helps those customers that prefer a more guided approach for these tasks.
Using the GUI for Auto Deploy
Auto Deploy GUI – Software Depots and Deploy Rules Walkthrough
New Discovered Hosts Workflow
Auto Deploy GUI – Discovered Hosts Walkthrough
VMware vSphere 6.5 Auto Deploy Discovered Hosts Workflow Demo
Adding Reverse Proxy Caching
The latest release of VMware vSphere contains improvements to Auto Deploy, including a new graphical user interface, a new deployment workflow, and various manageability and operational enhancements. One such enhancement is a dramatically-simplified caching capability.
There are several reasons why you might consider adding reverse proxy caching to your Auto Deploy infrastructure. First, this design will reduce the load on the vCenter Server Appliance and Auto Deploy service, freeing up resources for other processes. Second, the boot time of individual stateless VMware ESXi hosts is modestly improved – saving about 30 seconds in a typical setup, possibly more in a heavily-loaded environment. Finally, you can potentially boot far more stateless hosts concurrently without overwhelming the VCSA.
Resiliency is a natural priority when changing critical infrastructure components. I’m glad to report that the new reverse proxy design does not create a single point of failure, since you can deploy multiple proxy servers that are tried in a round-robin sequence with no load balancers. Furthermore, if all proxies happen to become unavailable, the stateless clients fail gracefully back to the default behavior of directly accessing the Auto Deploy server. This is a welcome improvement over previous releases. Just keep in mind that the caches are only for performance optimization, and not for redundancy of the overall stateless infrastructure – the Auto Deploy server is still in charge and must be online for successful host boot operations.
Instant Reverse Proxy Container
If you like the sound of these benefits, then it’s easy enough to test this design by quickly deploying a Docker container configured for the task. Create one or two Linux VMs running Docker (I’m using PhotonOS in my lab) and fire up the Nginx container that I published on Hub:
docker run --restart=always -p 5100:80 -d -e AUTO_DEPLOY=10.197.34.22:6501 egray/auto_deploy_nginx
In the above example, the proxy will listen on port 5100 and fetch any requested ESXi image files from your existing Auto Deploy server located at 10.197.34.22. Run this container on each VM that will act as a proxy, and make note of their IP addresses for the next part.
Connectivity Test
Before you configure Auto Deploy to use these new caches, it’s a good idea to verify connectivity. One way to do this is to watch the Nginx log file while manually requesting a file from the cache.
To watch the Nginx log, get the id of the container and use the docker logs –f command:
root@photon-a9f9d2d38769 [ ~ ]# docker ps
CONTAINER ID IMAGE COMMAND CREATED STATUS PORTS NAMES
c73960b6cd13 egray/auto_deploy_nginx "/bin/sh -c 'envsubst" 5 seconds ago Up 4 seconds 443/tcp, 0.0.0.0:5100->80/tcp determined_booth
root@photon-a9f9d2d38769 [ ~ ]# docker logs -f c739
Then, request the Auto Deploy tramp file from another system, like so:
$ curl http://10.197.34.172:5100/vmw/rbd/tramp
!gpxe
set max-retries 6
set retry-delay 20
post /vmw/rbd/host-register?bootmac=${mac}
Confirm that the proxy responds immediately with the above output. If it does not, go back and double-check addresses, ports, and other potential connectivity problems. Also, observe the log file that is being tailed for a corresponding hit.
Activate the Proxies
Now that you have one or more reverse proxies up and running, it’s time to configure Auto Deploy to start using them. This is done by using PowerCLI, through a new cmdlet introduced in the 6.5 release. Run the following command for each proxy you need to register, adjusting the address accordingly:
Add-ProxyServer -Address http://10.197.34.171:5100
Add-ProxyServer -Address http://10.197.34.172:5100
Check the configuration by running Get-ProxyServer, and if necessary, remove a proxy from rotation with the Remove-ProxyServer cmdlet.At this point, any stateless hosts that boot will use the cache. You can verify the configuration by accessing the Auto Deploy diagnostics web interface:
https://vcsa:6501/vmw/rbd/host/
Click on any listed host, then on the diagnostics page that will appear, click Get iPXE Configuration. Check the resulting configuration for the multiple-urs directive and lines beginning with uris -a that point to your proxy caches, like so:
set watchdog-expiration 600
set multiple-uris 1
uris -a http://10.197.34.171:5100
uris -a http://10.197.34.172:5100
kernel -n colonel.c32 /vmw/cache/fe/be5d851efb91bf4c5484d99498a04c/mboot.c32.c0a4d96685fec0cd2eba007e904ff115
imgargs colonel.c32 -c /vmw/rbd/host/0c111f2628259084380c3bc56f091df6/boot.cfg -e
boot colonel.c32
Action!
Boot or reboot stateless hosts, and they will access the proxy caches. You can monitor requests coming to the Auto Deploy server and to the caches to verify the changes have taken effect. Note that the first time a host boots, the proxy will need to fetch all the files from Auto Deploy to cache them. After that, everything but a small set of non-cacheable files will be served from the caches.
The caches are easy to monitor through the docker logs command, as described above. It’s also pretty simple to watch key activity on the Auto Deploy (VCSA) system. Try the following command with and without the caches enabled if you want to get a feel for the boot time reduction in your environment:
root@vcsa [ ~ ]# tail -f /var/log/vmware/rbd/ssl_request_log | egrep 'tramp|waiter|boot.cfg|/up'
From Concept to Production
The example above is a proof of concept, intended to help you understand how to configure and monitor the effects of reverse proxies. For most production datacenters, it would be wise to create a proxy server that is equipped with SSL certificates so that the traffic between hosts and the proxies can be encrypted. The Nginx SSL configuration is straightforward, but beyond the scope of this article. You can also read how I created the container if you want to use that as a reference.
Summary
The new reverse proxy cache feature in Auto Deploy 6.5 is very easy to set up, and will boost performance without introducing additional failure points to your vSphere infrastructure. Docker containers running Nginx offer a simple way to demonstrate the concept in your environment.