
Technical Preview of Cloud Consumption Interface (CCI) OnPrem
Introduction
The Cloud Consumption Interface (CCI) Initial Availability has been announced at VMware Explore 2022. It represents a pivotal step forward in providing a seamless and user-friendly experience for both consumers and providers of virtual machines, disks, Kubernetes clusters, and more within the vSphere-based cloud ecosystem. In this blog, we will delve into the installation instructions for the technical preview of CCI OnPrem designed to cater to cloud-disconnected environments.
What is Cloud Consumption Interface (CCI)?
Before we dive into the installation process, let's briefly revisit what CCI is all about. CCI serves as a cloud experience layer for Supervisor IaaS services. To end-users, it presents itself as a graphical web console, a common IaaS API endpoint, and a command-line interface (CLI) for self-service access to vSphere-based cloud resources. Simultaneously, it empowers infrastructure service providers to define regions, resource envelopes, and resources accessible through self-service by consumers. CCI seamlessly integrates into the vSphere+ platform, supercharged by the capabilities of Aria Automation.
If you're eager to delve deeper into CCI, there are numerous publicly available resources at your disposal. Two examples are provided below:
Introducing Technical Preview of CCI OnPrem
As of today, the CCI Initial Availability (IA) exists solely as a cloud service, and it has garnered enthusiastic feedback. Simultaneously, it has generated demand for an OnPrem version catering to cloud-disconnected environments. In response to this growing need, VMware is thrilled to introduce a technical preview of CCI powered by the Aria Automation on-prem appliance. This preview release is intended to offer insights into the technology's capabilities and to collect invaluable feedback from users, which will be used to to help shape CCI and broader VMware roadmap.
However, it's important to note activating CCI on the Aria Automation on-prem appliance is a Technical preview intended for gathering customer feedback and influencing VMware's product roadmap. As such, it should only be installed on a fresh Aria Automation instance that is not used for any production workloads. This technical preview feature is not part of any shipping product capability today, and it does not fall under regular support service level agreements (SLAs). VMware retains the right to discontinue development of this capability for the on-prem appliance at any time and may request users to stop using it. Additionally, any feedback provided by users may be used by VMware for various purposes.
Prerequisites
Enable vSphere with Tanzu
Before installation, ensure that you have vSphere with Tanzu enabled in your environment. If you don't have it enabled yet, you can follow the documentation provided here to enable at least one supervisor. Although the minimum supported version for CCI is vSphere 7 U3i, it's recommended to use the latest version to take advantage of the latest features and for the best user experience.
Download and Install Aria Automation 8.13 or Later
To install CCI, you need to start with a fresh Aria Automation appliance. If you have a license, you can download the latest version of Aria Automation from Customer Connect. Alternatively, if you wish to use an evaluation license for CCI testing, you can request a trial license for 60 days and download Aria Automation from the Eval Center.
Please follow the Aria Automation product documentation to install a single node deployment using the Aria Suite Easy Installer. As the technical preview is for testing purpose only, we do recommend fresh single node install of Aria Automation 8.13 or later.
The following system resources are required to install VMware Aria Automation and supporting components using Easy Installer:
- VMware Aria Automation
- VMware Aria Suite Lifecycle
- VMware Identity Manager
| Requirements | VMware Aria Suite Lifecycle | VMware Identity Manager | VMware Aria Automation |
|---|---|---|---|
| Medium Profile | |||
| Total Disk Size | 78 GB | 100 GB | 246 GB |
| Virtual CPU | 2 | 8 | 12 |
| Memory/RAM Size | 6 GB | 16 GB | 48 GB |
Note: For the purposes of these instructions we have used VMware Aria Automation 8.13 and vSphere 8.0 U1.
With these prerequisites in place, you'll be well-prepared to install and configure CCI OnPrem technical preview in your environment.
Using VMware Aria Suite Easy Installer
You can find the official VMware Aria Suite Easy Installer documentation here. Following video illustrates how we've set up this testing environment.
Note: This video resolution can be scaled up to 4K via Settings
Installation Steps
Now that we've set the stage, let's walk through the high-level steps to install the technical preview of CCI OnPrem.
Add a vCenter Cloud Account for CCI OnPrem
To enable Cloud Consumption Interface (CCI) OnPrem capabilities, follow these steps to create a vCenter cloud account associated with a vCenter where at least one supervisor is enabled. If a Cloud Account already exists, you can update it by adding the capability tag as indicated below.
Navigate to Aria Automation Assembler -> Infrastructure -> Connections -> Cloud Accounts and click on Add Cloud Account.
Select vCenter and enter a Name. Please ensure that the cloud account adheres to specific naming conventions: Use only lowercase letters, Use only hyphens ("-") for special characters, avoid using any uppercase letters.
Validate Credentials and accept the Certificate.
Under Configuration, select Datacenters and also check the option to Create a cloud zone for the selected datacenters. This step is crucial to ensure that CCI OnPrem can access and manage resources within the specified datacenters.
To enable CCI OnPrem capabilities, add the cci_onprem Capability tag to the cloud account. This Capability tag is required by the installation script.

Click Add to finish the configuration.
Download and run the CCI OnPrem Install script
You can find the installation bundle in the https://github.com/vsphere-tmm/cci-onprem GitHub repository. To obtain the most up-to-date installation scripts, select the latest available branch for download and select the .zip bundle. You can transfer this bundle onto your Aria Automation Appliance using tools such as WinSCP, or download it directly onto the appliance.

To install the technical preview of CCI OnPrem, ssh as root into the Aria Automation Appliance you have deployed earlier.
Run the following commands to download the installation bundle to a tmp directory:
- cd /tmp
- wget https://github.com/vsphere-tmm/cci-onprem/raw/latest_branch/cci_aria_automation_deployment.zip
- unzip cci_aria_automation_deployment.zip
Note: Due to the size of the .zip file it is required to install git-lfs first if you wish to clone the repository using git

Run the installation script from the cci_aria_auto_deployment directory to deploy the CCI Helm charts and Kubernetes pods:
- cd cci_aria_auto_deployment
- ./deploy_cci_on_aria_auto_appliance.sh
- type yes to accept the terms


Wait for the script to finish. This operation may take several minutes.
Obtain Org ID from Cloud Services
To proceed to the next step, you'll need your Organization ID. To obtain it, login to Cloud Services Console, click on the User in the top right corner. Under the Organization name, you'll find your Organization ID. You can conveniently copy it to your clipboard directly from this location.

Alternatively, you can click on View Organization to access all Organization details and easily copy the ID from there.
Generate Sample data using a script
The Cloud Consumption Interface (CCI) streamlines the management of cloud resources by enhancing the supervisor concept through the use of Aria Automation projects and the introduction of the following k8s objects and names :
- project: supervisor
- projectrolebinding
- region: onprem
- regionbinding : onprem
- regionbindingconfig : onprem
- supervisornamespaceclass : basic
- supervisornamespaceclassconfig : basic
- supervisornamespaceclassbinding : basic
To harness the full potential of CCI, it's imperative to initiate a fundamental configuration process.
There are no supervisor namespace classes, regions, or projects created yet to be able to create a Supervisor Namespace yet. Run the populate sample data script to create the necessary Kubernetes objects:
- ./populate_sample_data --user username --org-id longorg_id --storage-class storage-policy-name


Wait for the script to finish. This operation may take several minutes.
CCI OnPrem is now ready to use!
(Optional) Next Steps: CCI Usage Examples
Following examples may help you get started using your newly deployed CCI OnPrem.
Create a Supervisor Namespace with CCI UI
To create a new Supervisor Namespace, login to Aria Automation Service Broker, and navigate to Consume -> Supervisor Namespaces.

Click on New Supervisor Namespace, select a Namespace Class, enter a Name, and click on Create.

Wait for the Status to change to Active.

Your Supervisor Namespace is now ready to use.
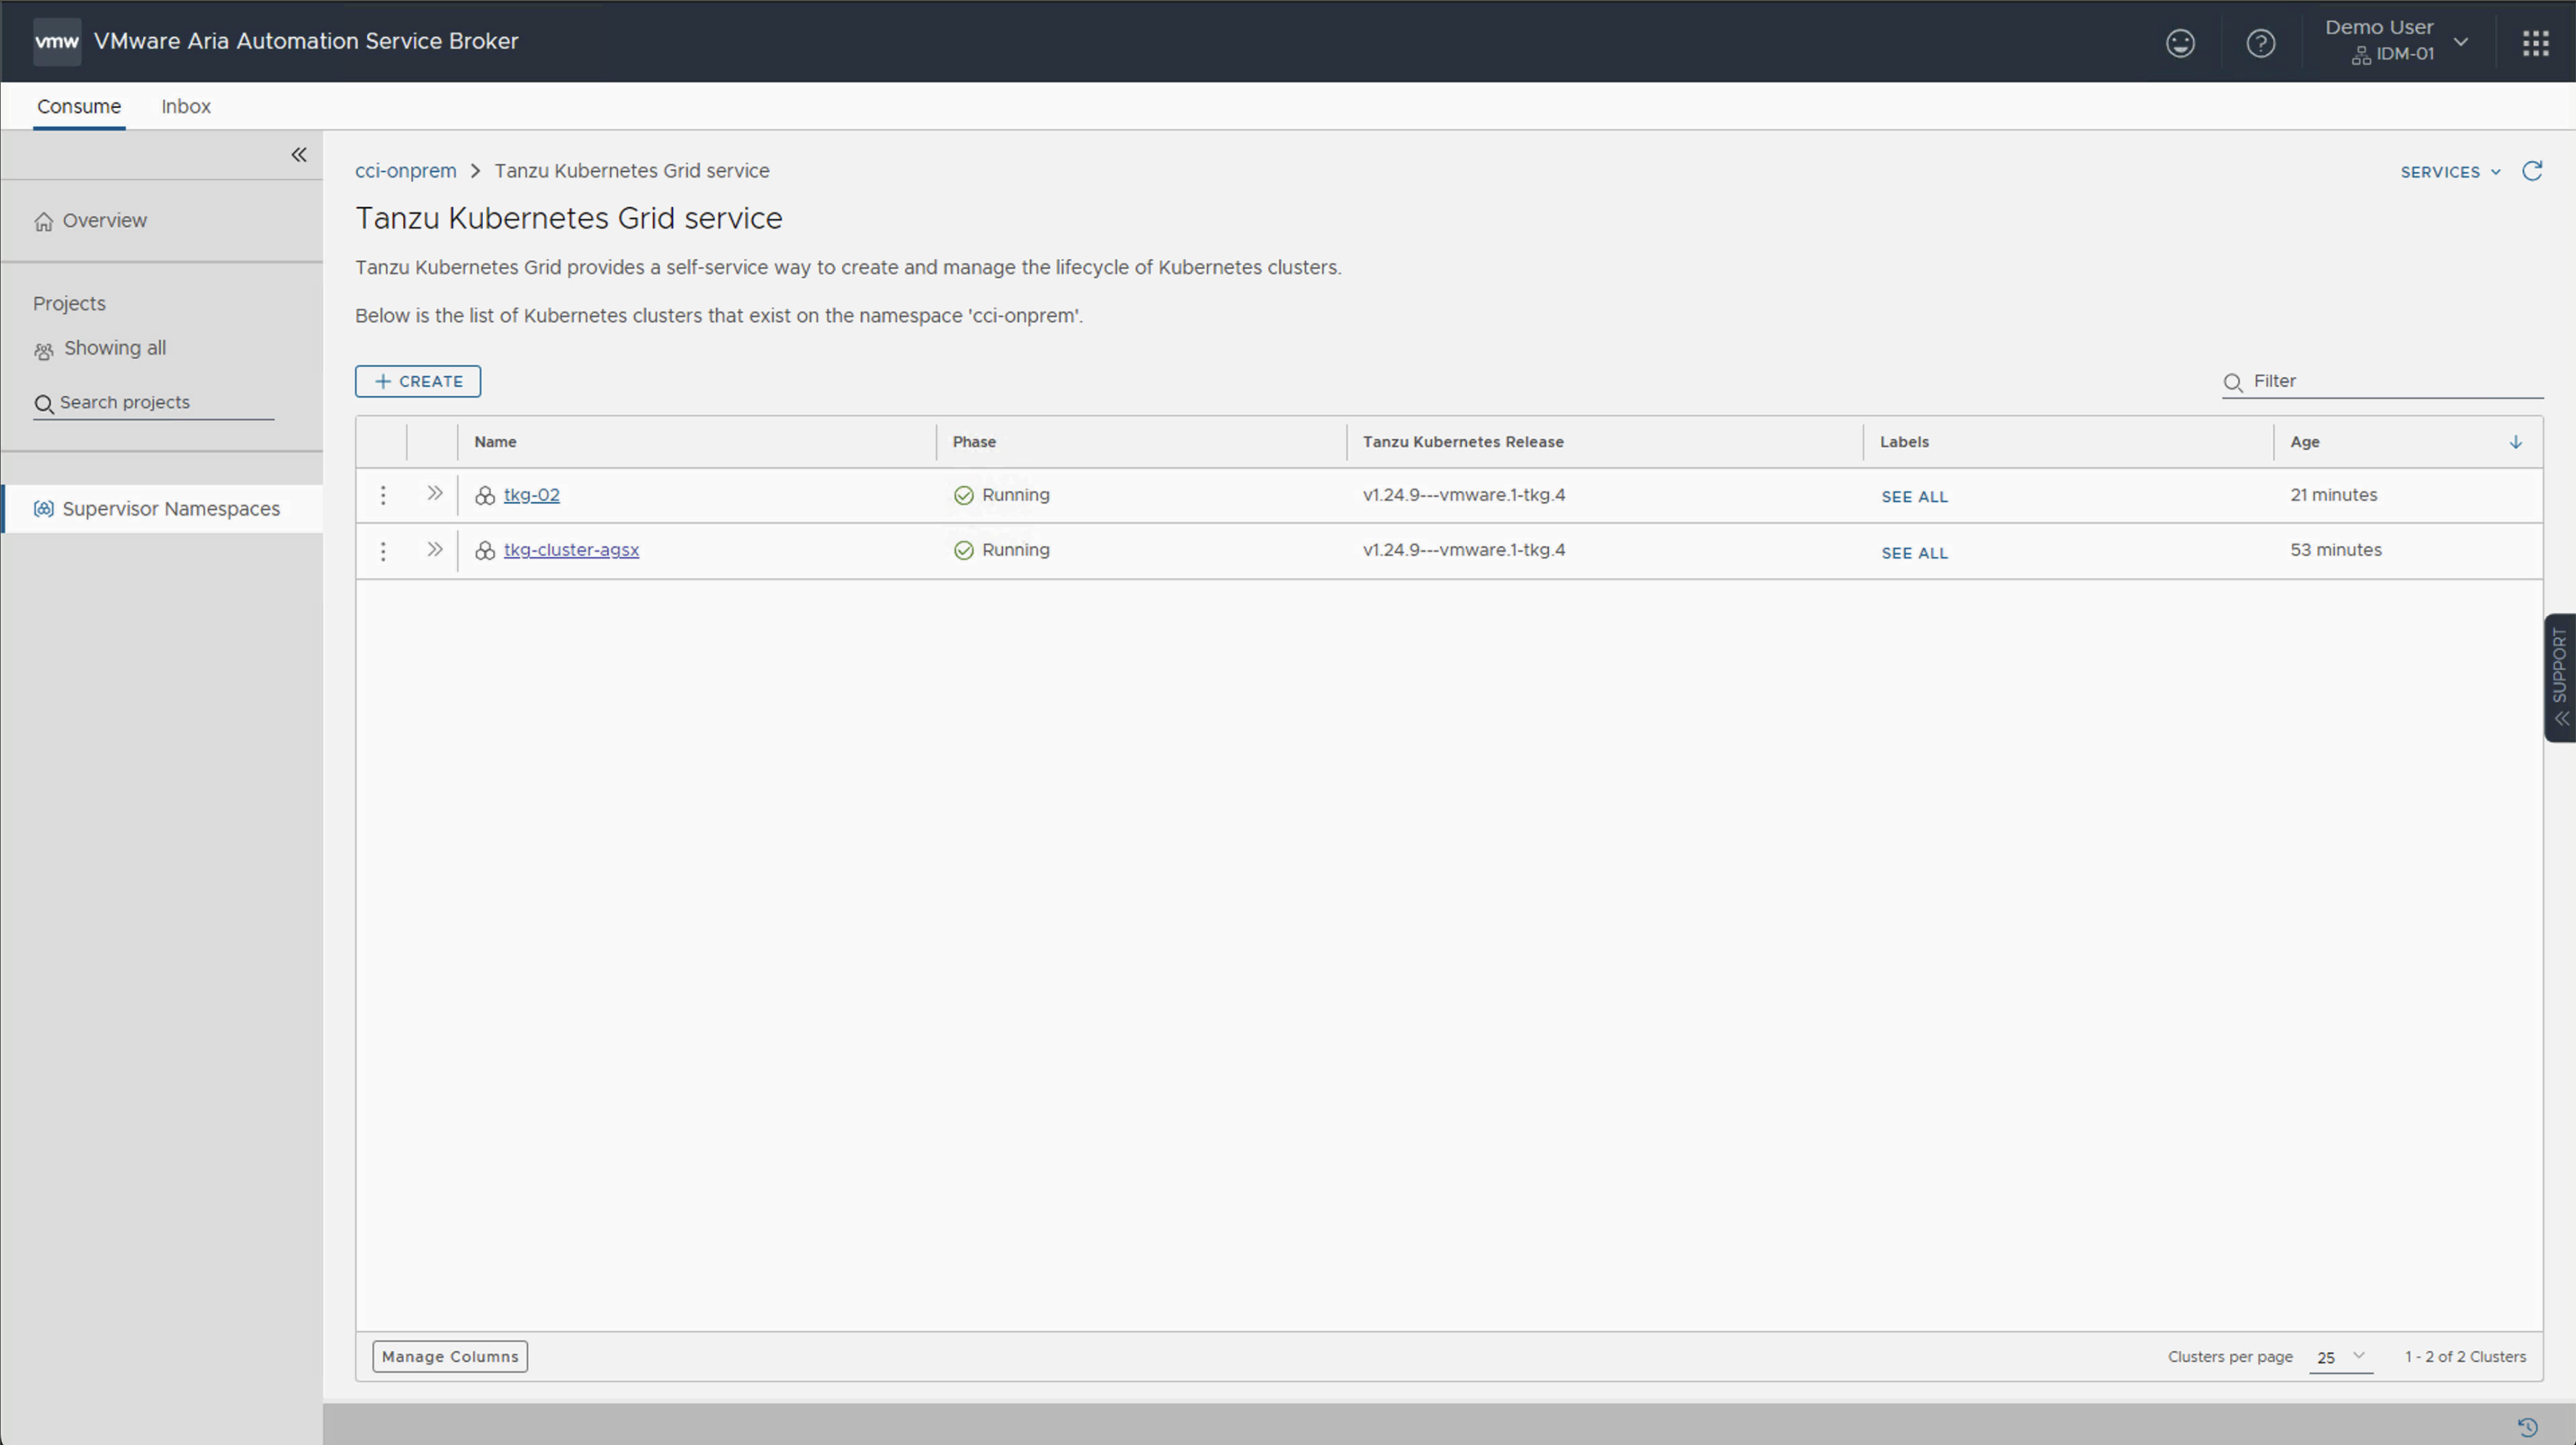
Deploying a TKG cluster with CCI UI
To deploy a basic TKG cluster, click into the Supervisor Namespace and open Tanzu Kubernetes Grid service.

Click on Create, select Configuration Type and click Next.
Please note the 'Cluster Class' feature was introduced with TKG 2.0 on vSphere 8. If you are utilising vSphere 7, kindly be aware that this option will not be accessible.

Review the configuration and click Finish.
Tip: You can also download the automatically generated YAML manifest if you'd like to reuse it later.

Wait for the cluster to enter Running phase.

Configuring Identity Source
To be able to allow users from your domain to interact with CCI OnPrem it is required to configure an Identity Source.
Login to VMware Aria Suite Lifecycle that you have deployed as part of Aria Automation installation with the admin account you have configured during initial deployment and click on Identity and Tenant Management.

Select Directories, Add Directory, and select the appropriate type, in this example we will add Active Directory over LDAP.

Enter your configuration details, Bind User details, Test the connection, and click on Create and Next.

Follow the configuration to select your domain, and groups and users you want to sync.
Wait for the directory to sync.

Configuring User Access in Cloud Services Console
To grant access to CCI OnPrem to additional users, login to Cloud Services Console as the administrator and select Identity & Access Management from the left menu. Click on Active Users, select a User, and click on Edit Roles.

Following roles provide minimum required access to CCI:
- Organization Role:
- Organization Member
- Service Roles:
- Assembler - Assembler User
- Service Broker - Service Broker User

Adding a User to a Project
To add a user to a Project, login to Aria Automation Assembler as an administrator.
Navigate to Infrastructure -> Administration -> Projects.
Open the Supervisor Project which has been generated by the script we ran to generate the sample data.
Note: Please do not delete or tamper with "vmware-system-cci" project, as this is where the property group data is stored as JSON for the newly created CCI objects.

Click on Users, and Add User.
Search for the User and add an appropriate Role.

Click Save to finish the configuration.

Installing the kubectl cci plugin
Login to a machine which you want to use to execute kubectl cci commands. In our example we are using an Ubuntu 22.04 virtual machine.
Note: The kubectl binary is currently unavailable for download from the automation appliance in this beta release. Please note that this limitation is temporary, in the meantime, you can download it from the web using the provided links below:
- Linux: https://www.mgmt.cloud.vmware.com/ccs-ui/cci-k8s-plugin/linux/kubectl-cci.zip
- Windows: https://www.mgmt.cloud.vmware.com/ccs-ui/cci-k8s-plugin/windows/kubectl-cci.zip
- ARM Mac: https://www.mgmt.cloud.vmware.com/ccs-ui/cci-k8s-plugin/darwin-arm64/kubectl-cci.zip
- AMD64 Mac: https://www.mgmt.cloud.vmware.com/ccs-ui/cci-k8s-plugin/darwin-amd64/kubectl-cci.zip
Execute following commands to install the plugin:
- curl -ks https://www.mgmt.cloud.vmware.com/ccs-ui/cci-k8s-plugin/linux/kubectl-cci.zip -o /tmp/kubectl-cci.zip
- unzip -qn /tmp/kubectl-cci.zip -d /tmp
- sudo install /tmp/kubectl-cci /usr/local/bin

Obtaining Access Token and logging into CCI CLI
You will need to obtain an Access Token to login to CCI using the kubectl cci plugin.
Login to a CLI machine and execute the following command:
curl --insecure --location --request POST 'https://yourapplianceurl/csp/gateway/am/api/login?access_token' \
--header 'Content-Type: application/json' \
--data-raw '{
"username": "username",
"password": "password",
"domain": "domain"
}'

The token will be returned on the next line.

Login to CCI with following command:
-
kubectl cci login --server yourapplicanceurl --token youraccesstoken
Note: The plugin supports the use of
--insecure-skip-tls-verifyflag when using self-signed certificates, however for security reasons this is not recommended. -
kubectl config use-context yournamespace


Deploying a TKG cluster with CCI CLI
Login to a machine with kubectl cci plugin installed. You will need to provide a YAML manifest to deploy a TKG cluster using the CLI.
Tip: An easy way of obtaining a complete YAML manifest is to navigate to Tanzu Kubernetes Grid Service and run through the creation process to have the YAML automatically generated for you. Here you can download the bundle. Once you have downloaded the bundle you may discard the configuration.

Save the downloaded YAML manifest as tkg-02.yaml and deploy it using the following command:
- kubectl apply -f tkg-02.yaml

Verify the cluster has been created:
- kubectl get cluster

You can also see the cluster creation in the UI.
Share Your Thoughts
In closing, the technical preview of CCI powered by the Aria Automation on-prem appliance marks an exciting milestone in the evolution of cloud consumption within the vSphere with Tanzu ecosystem. This offering has the potential to revolutionize how businesses interact with and harness cloud resources, offering a more seamless and user-centric experience.
We value your input and insights as we continue to refine and expand the capabilities of CCI. If you have any questions or would like to share your feedback, please don't hesitate to reach out to us at cci@vmware.com. Your feedback is instrumental in shaping the future of CCI, ensuring that it meets the evolving needs of cloud consumers and providers alike.
To gain a deeper understanding of what CCI can accomplish, we invite you to watch our demos: "Deploying a 3 Tier Demo App using CCI" and “Deploy Open Cart using CCI”. It's an excellent opportunity to see firsthand how CCI can simplify and enhance your cloud experience.
Thank you for being part of this exciting journey with us. Together, we are redefining cloud consumption and paving the way for a more efficient and user-friendly future.