
Cloud Foundation Holodeck - Core Automation
Overview
This session provides an understanding of the core Software Defined Data Center automation delivered by SDDC Manager in VMWare Cloud Foundation. The modules in this lab focus on the simplicity of managing Hyper Converged Infrastructure at scale with VCF.
What will you learn in this session? Module breakdown:
- Module 1 – Introducing SDDC Manager Dashboard and Inventory
- Module 2 – Certificate Management
- Module 3 – Password Management
- Module 4 – Workload Domain Creation
- Module 5 – Workload Domain Expansion
- Module 6 – Workload Domain Contraction
Prerequisites
This lab guide requires a total of 7 additional nested ESXi hosts for expansion. It is recommended to perform the following using VCF Lab Constructor prior to beginning this lab
- Holo-Console ISO image used to deploy console to provide Active Directory and Certificate Authority functions
- VLC-Holo-Site-1 deployed with VLC
- Four Host standard Management Cluster
- Use the “Add 3 additional hosts” capability during VLC Deployment with add_3_hosts.json, and action set to “none”. This will commission hosts esxi-10, esxi-11 and esxi-12 into the free pool during VLC deployment for use in the Workload Domain Creation module
- Use VLC Expansion pack option with add_hosts5-8.json config file to deploy 4 additional hosts (esxi-5, esxi-6, esxi-7, esxi-8) for use in the Workload Domain Expansion module
Module 1: Introducing SDDC Manager Dashboard and Inventory
This module is designed to familiarize the user with the overall SDDC Manager User Interface
[Step 1] Logging in to the environment
- Open a new tab in the Chrome browser
- Click the Managed bookmarks folder in the bookmark bar then select SDDC Manager
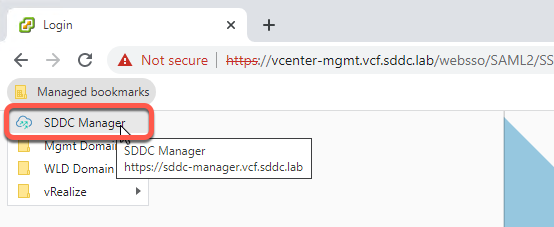
- Click advanced / proceed to sddc-manager.vcf.sddc.lab, if required to accept the certificate
- Log into SDDC Manager as user: administrator@vsphere.local with the password: VMware123! (Note: Initial login to SDDC Manager connects you to the management domain vCenter for authentication to SSO)
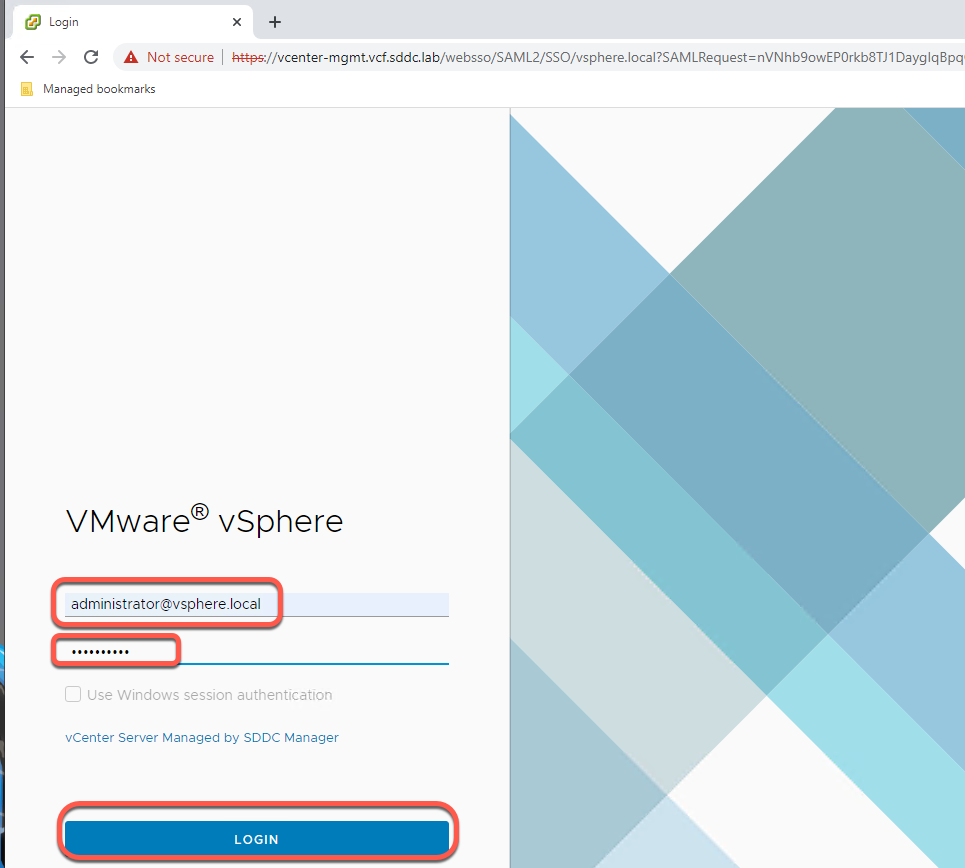
- Click Login
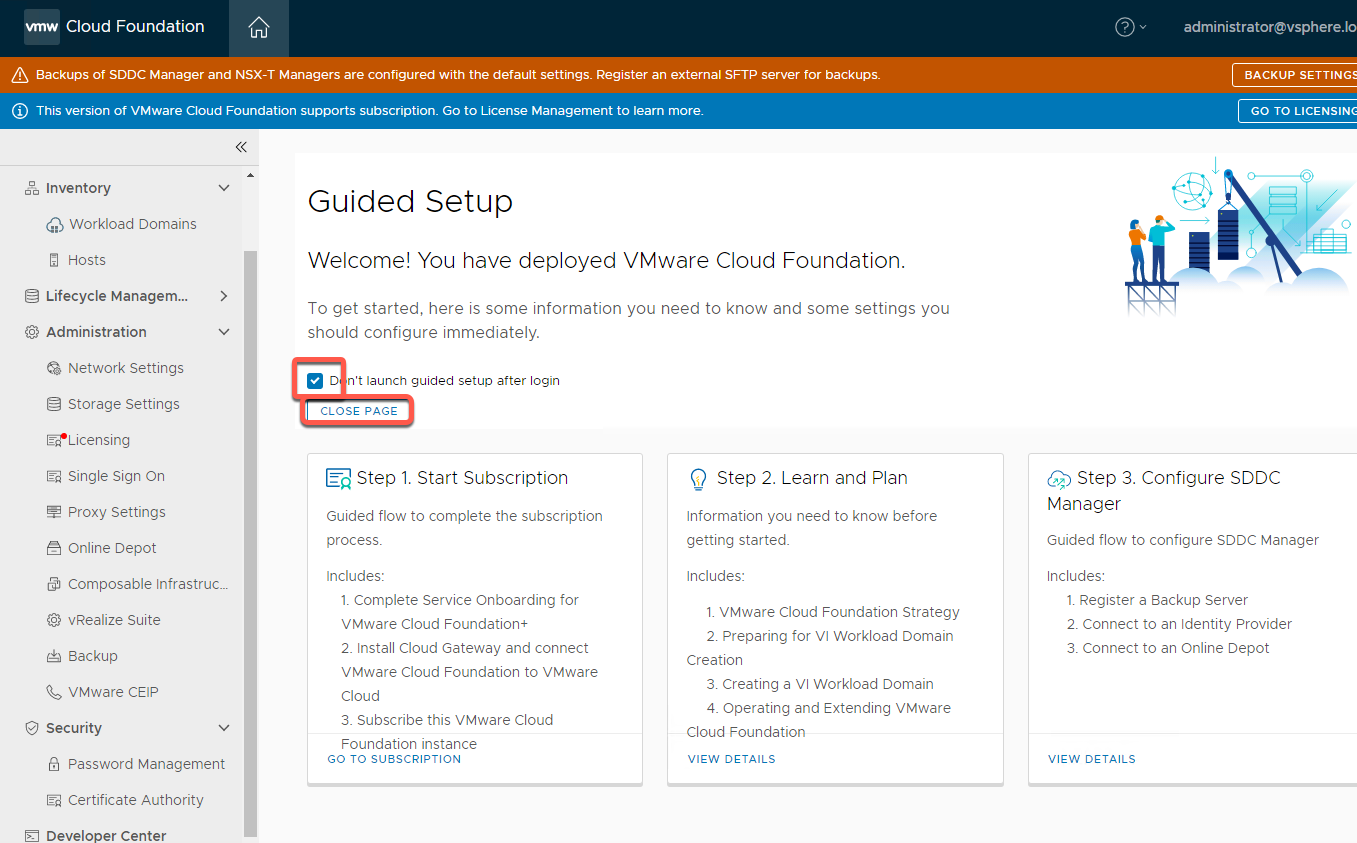
- If this is the first time logging in you will land on a Guided Setup screen. Select Don’t launch guides setup after login and Close Page.
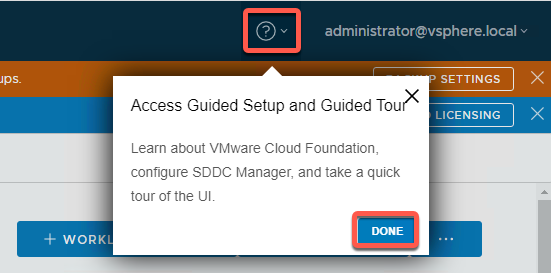
- Guided setup is available any time later by clicking the Circle question mark next to the username. Click done to clear
[Step 2] Guided Tour
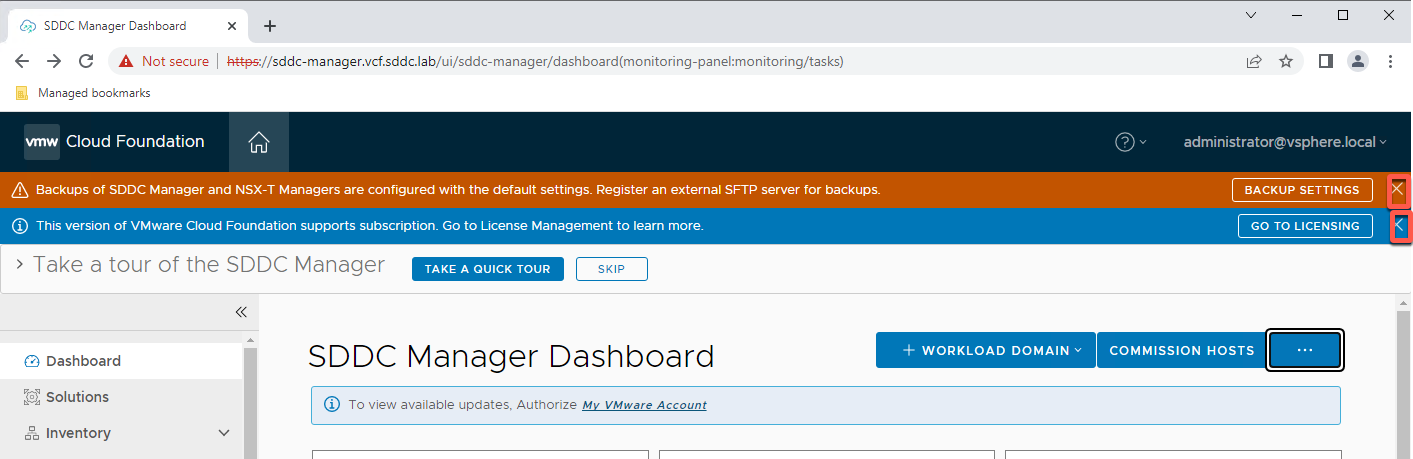
If this is the first time accessing the dashboard you can clear the Backup and Subscription banners. By taking a guided tour you will be able to identify where to go to access important sections of VCF for configuration and troubleshooting
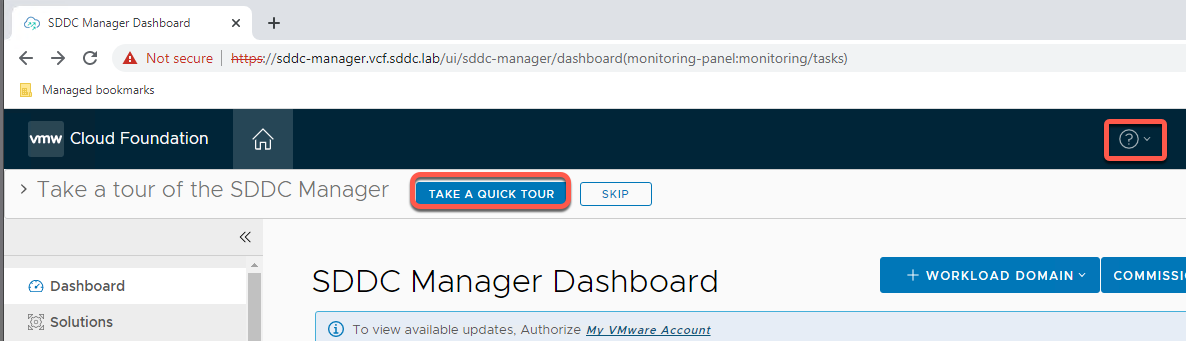
- Click Take a Quick Tour (If this banner is not available click the circle-question mark and select Guided Tour)
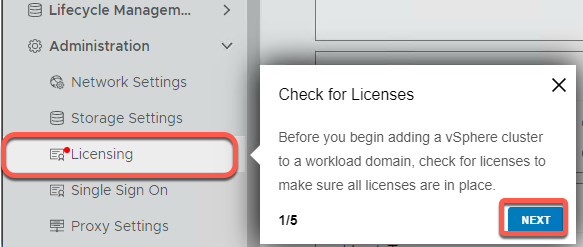
- The first stop shows where to manage License inventory
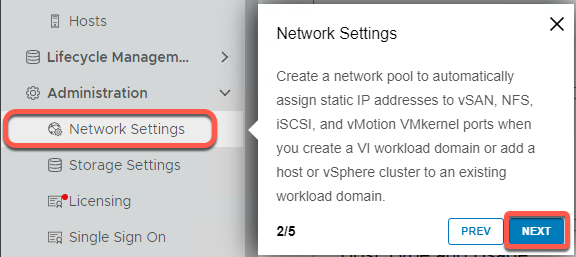
- Stop two shows where to find VCF specific Network Settings
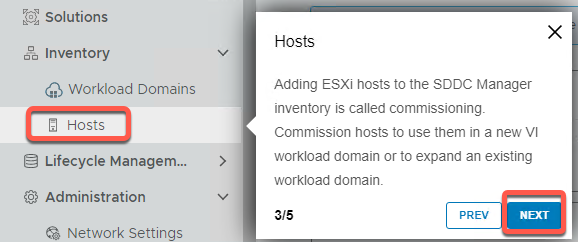
- Stop three shows VCF Host Management. This will be visited later in the lab.
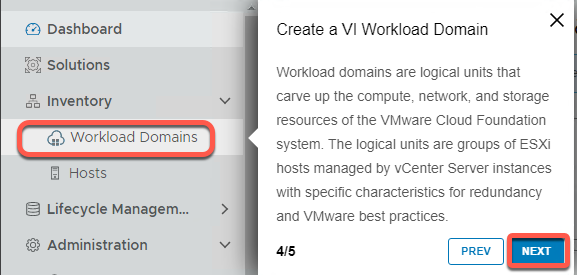
- The fourth stop shows VCF Workload Domain management, including where to Create a Virtual Infrastructure Workload Domain
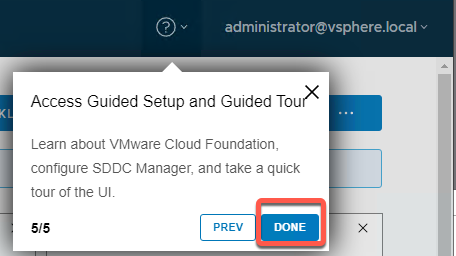
- The last stop shows how to relaunch the tour
[Step 3] View the SDDC Manager Dashboard
- Click on the Dashboard link on the left navigation
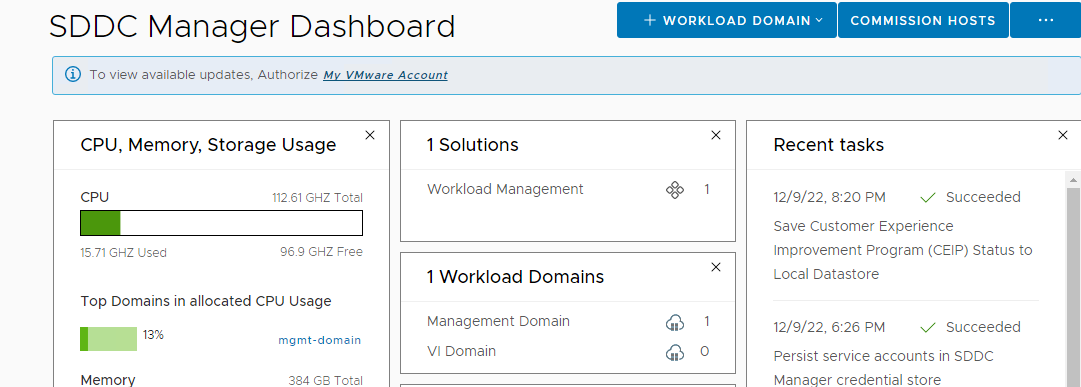
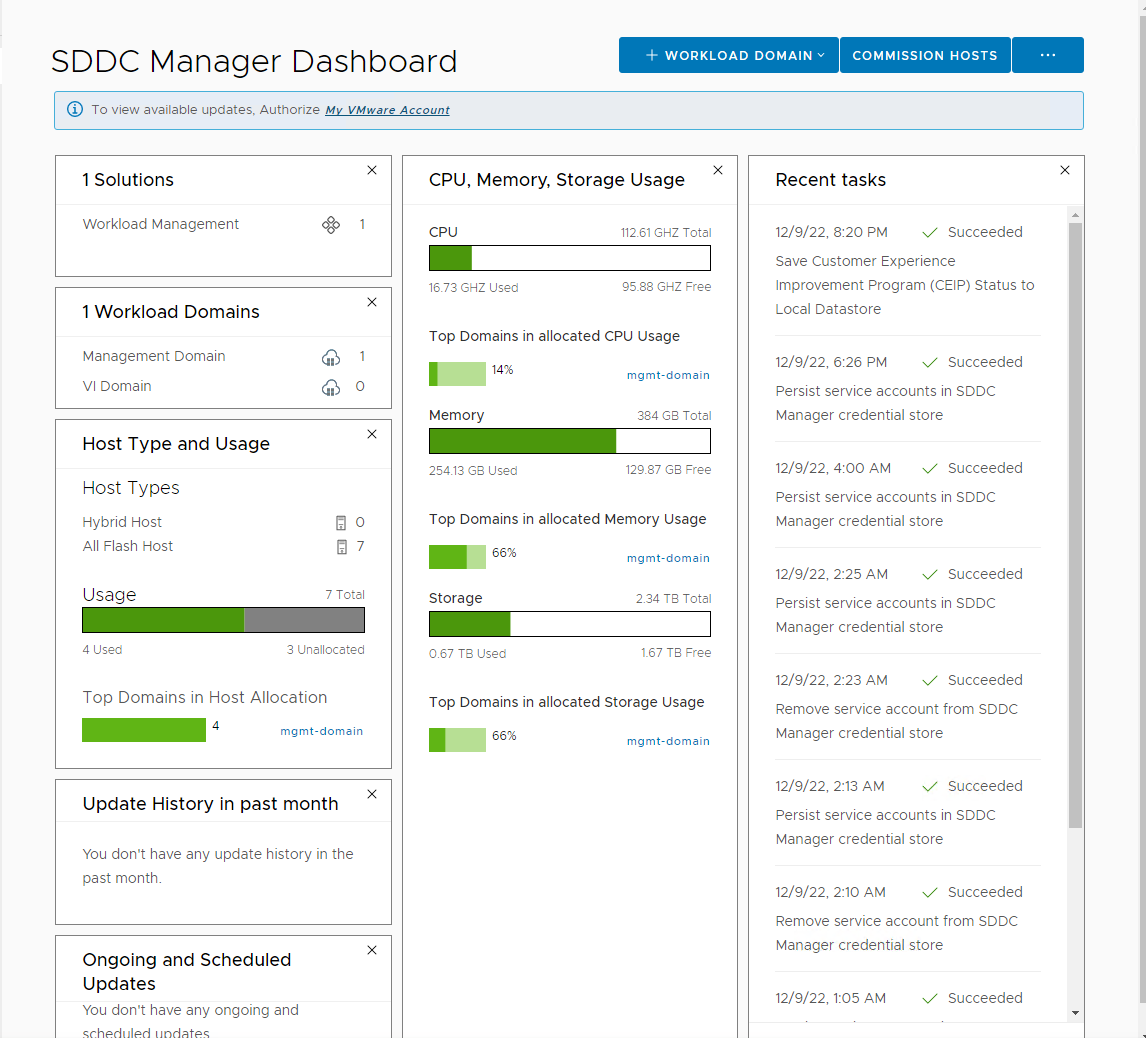
The Dashboard page is the home page that provides the overall administrative view of your system. The Dashboard page provides a top-level view of the Cloud Foundation environment. The dashboard includes:
- VMware solutions enabled. Workload Management shows this is a VMware Cloud Foundation with Tanzu enabled instance. VCF with Tanzu functionality is explored in another volume in the VCF Labs series.
- Workload Domains shows a snapshot of configured domains including Management and any Virtual Infrastructure workload domains. This lab starts with a Management Domain only and will add addition resources later.
- Host types and usage shows the total inventory of Hybrid (Flash plus spinning media) and All Flash hosts. VCF does not allow mixing the two types of hosts within a workload domain.
- Available CPU, memory, and storage capacity is shown for the VCF instance as well as percentages for the largest domain consuming resources. Since this lab is configured with the management domain only, it is the only domain shown.
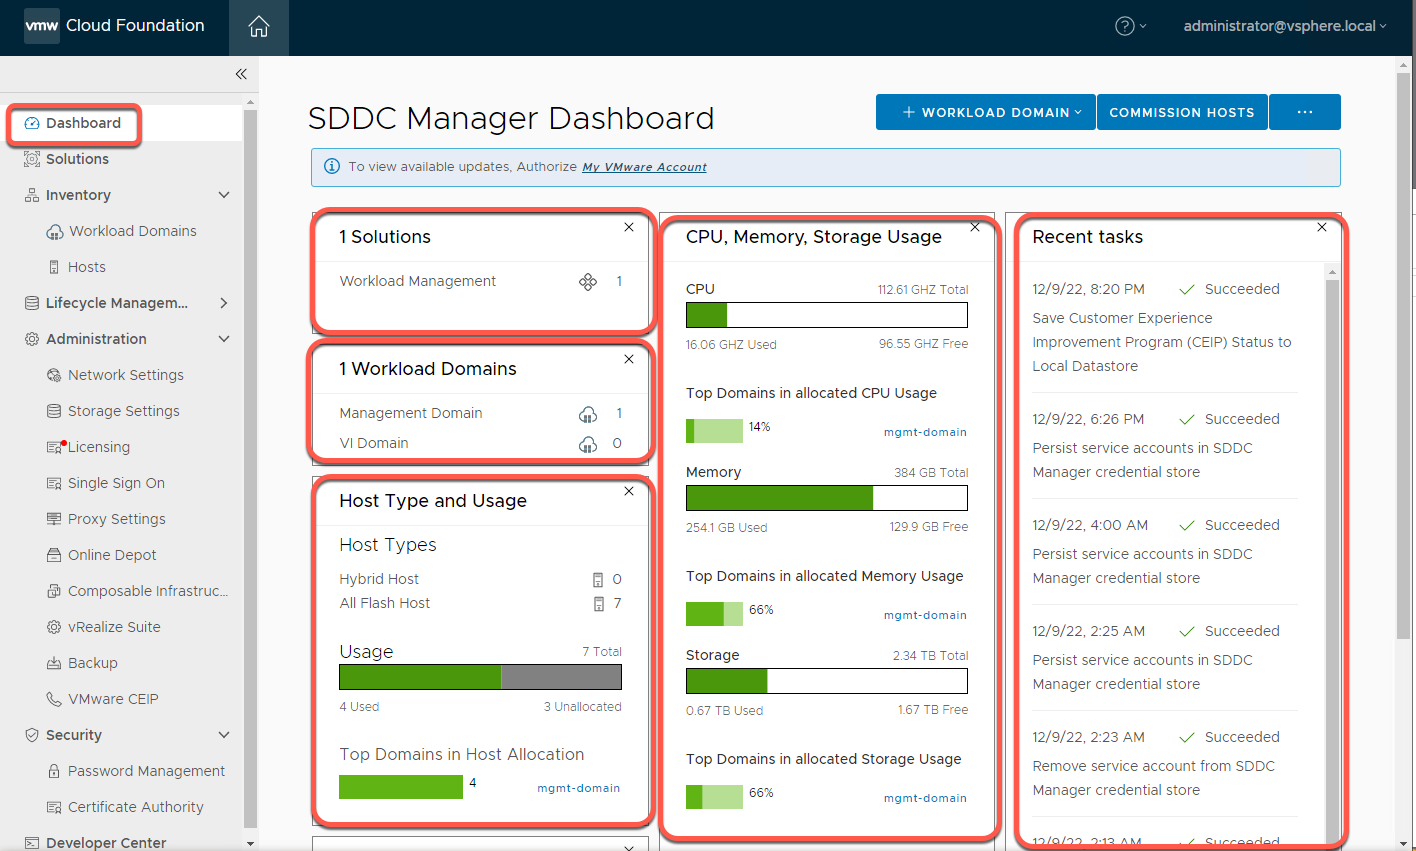
- Click the X to close tasks pane at the bottom of the page to view the remainder of the dashboard.

- The lower section of the dashboard shows Updates and Update history

[Step 4] Customizing the Dashboard
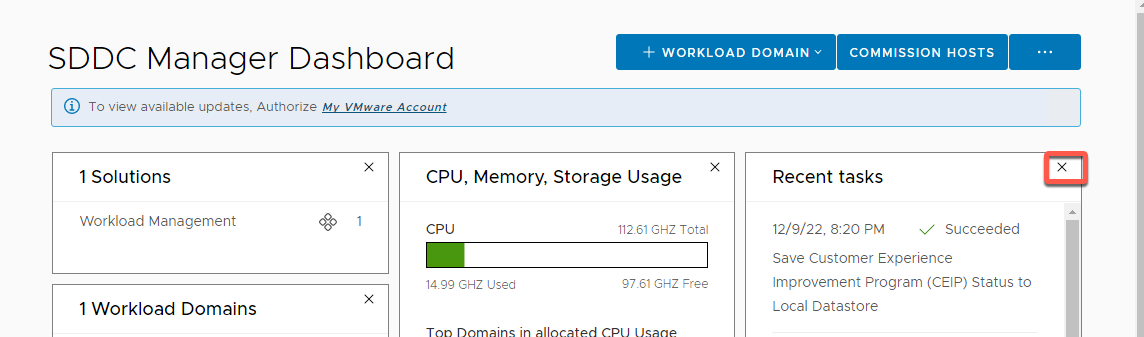
- Widgets can be moved around by clicking in the title bar and dragging. Try dragging CPU, Memory and Storage usage left

- Your result should look like this:
- Drag CPU, Memory, Storage back to the middle column
- It also possible to remove widgets you do not need. Try closing Recent tasks
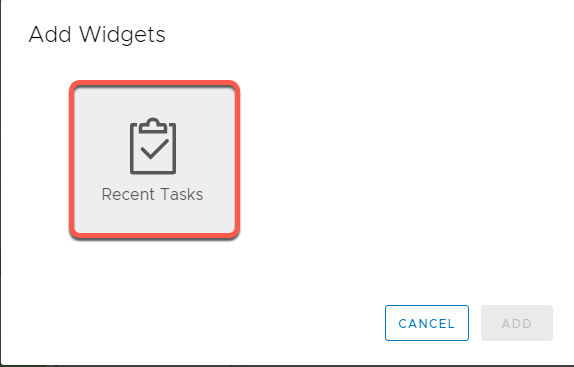
- Click the three dots on upper right of the dashboard then Add New Widgets to restore
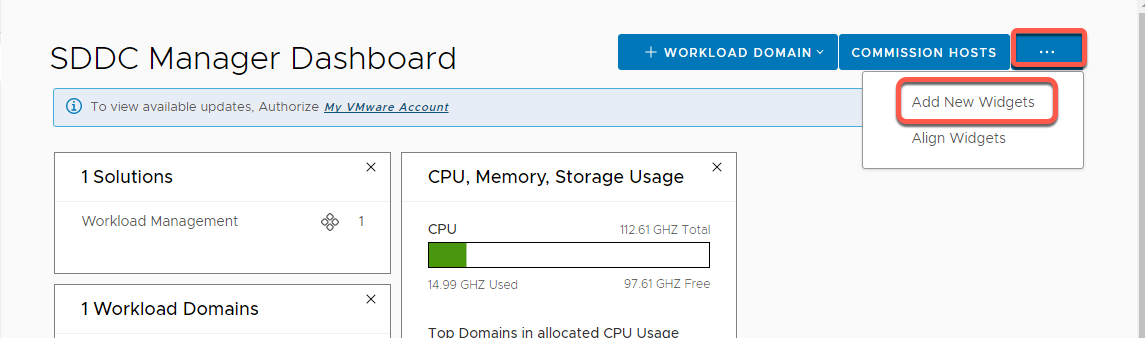
- Select Recent tasks to add that widget back in the dashboard
- You are free to customize the dashboard to your liking. The lab guide shows the default layout for consistency
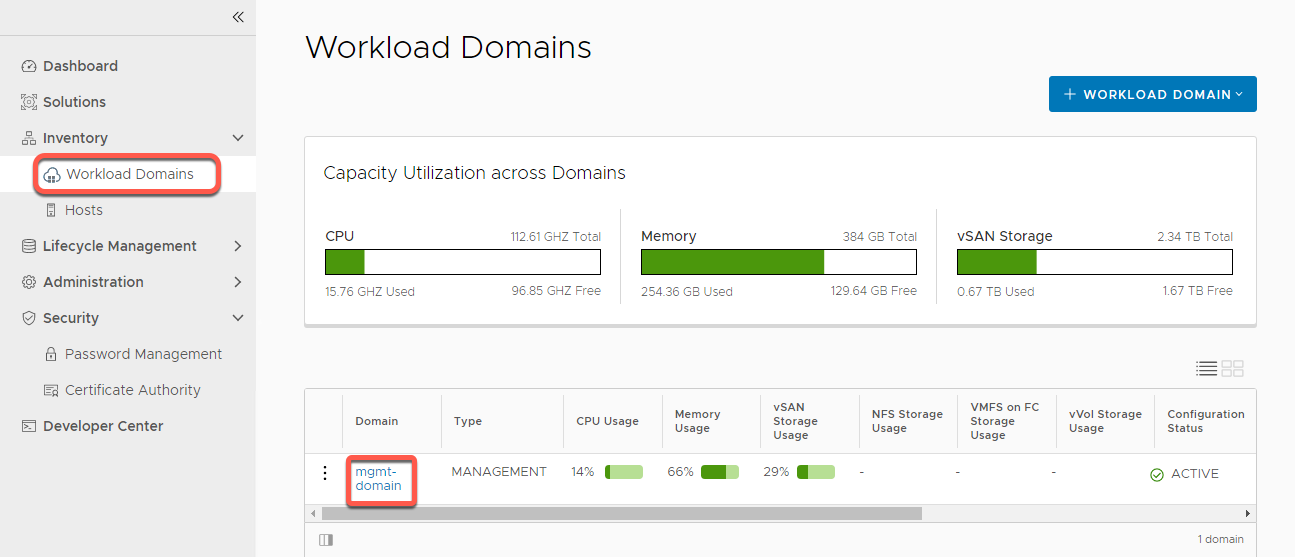
[Step 5] Exploring the Management Domain
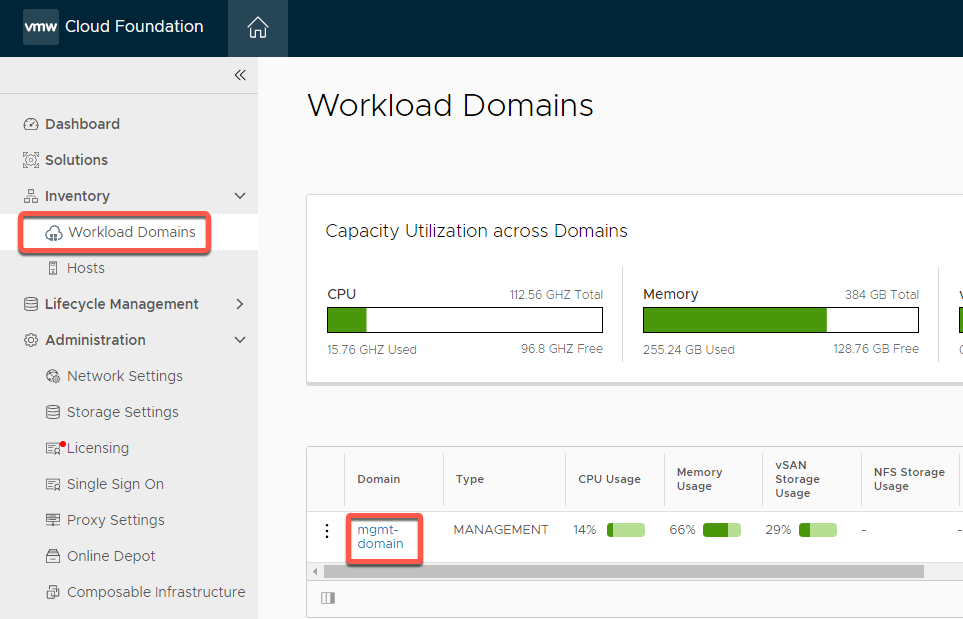
- From the left navigation panel select Inventory -> Workload Domains
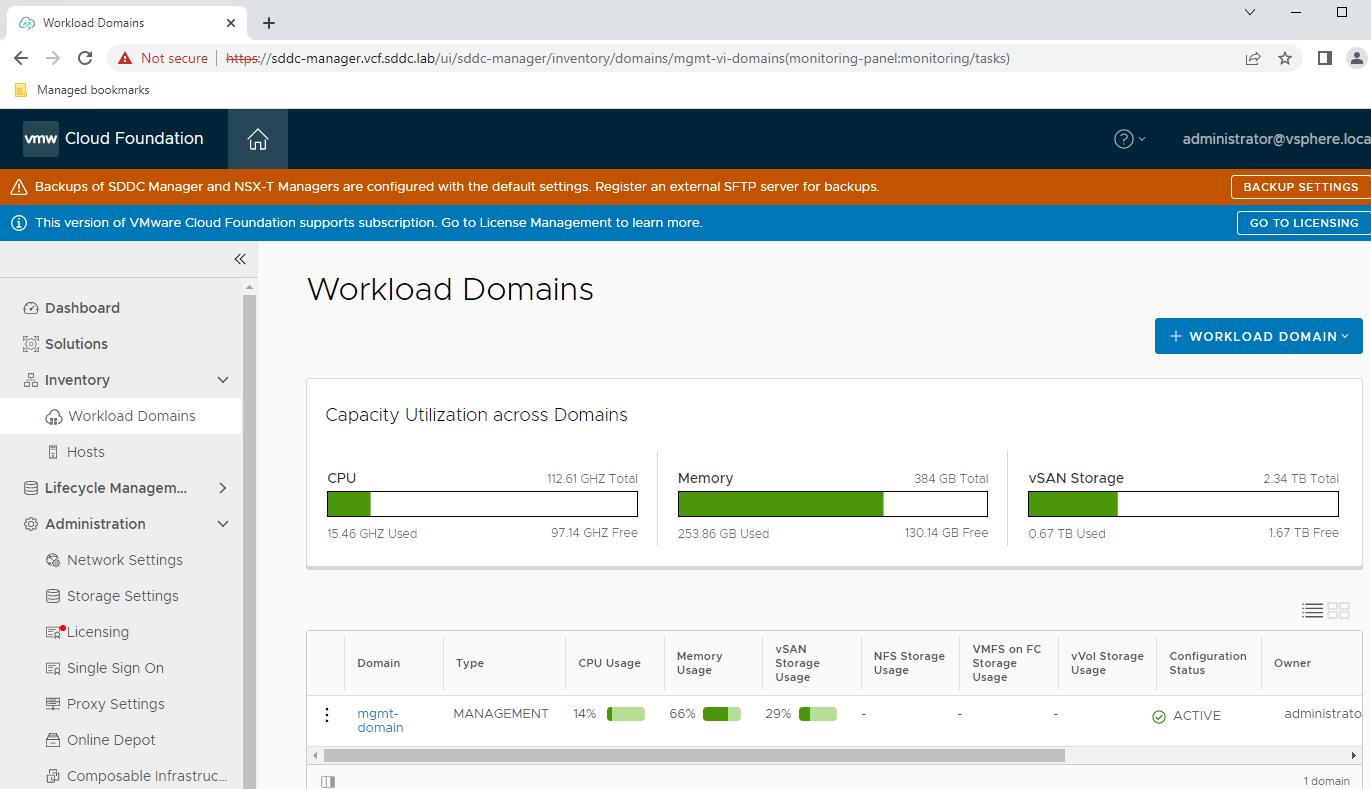
From the Workload Domains view we can see the available CPU, Memory, and Storage capacity. We are also able to see the Workload Domain(s) and the type of workload domains that have been created within the environment. This environment has the management workload domain only. The Management Domain is responsible for the overall VMware Cloud Foundation environment.
We will provision a Virtual Infrastructure (VI) workload domain later in this lab. VI Workload domains are used to provide resources for virtual server workloads and applications. VMware best practices recommend that management servers be physically separated from user workloads.
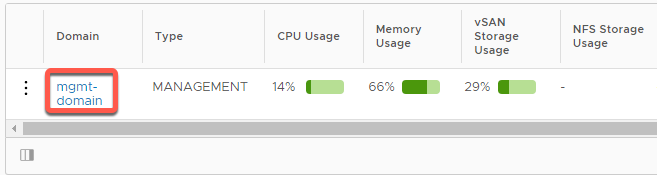
- Click on the mgmt-domain link
If this is your first time accessing this page, you can clear the information notices on changes to SSH policy in VCF and NSX-T upgrade guidance.
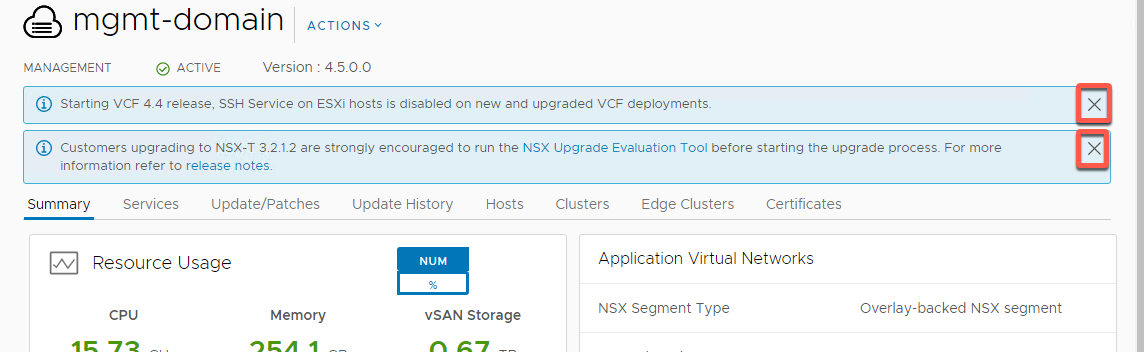
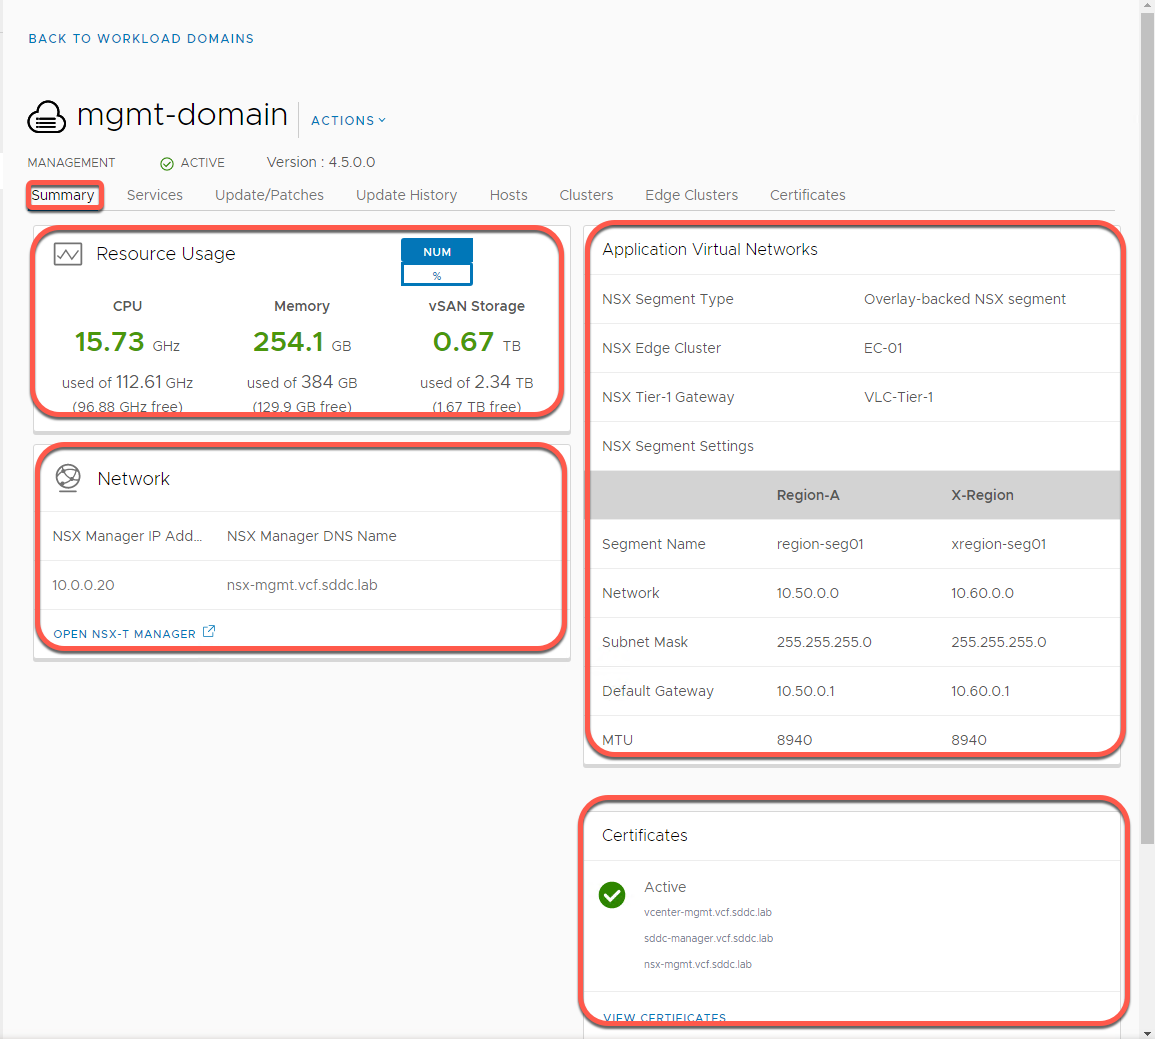
- From the Summary Tab on the landing page of the mgmt-domain you can see the following
- Resource consumption by this workload domain. Details include capacity allocated, capacity used and Capacity free
- Network Information specific to the domain
- Configuration of Application Virtual Networks (AVN). AVN is a specific configuration of VMware NSX in the management domain to support VMware vRealize products
- Certificates status
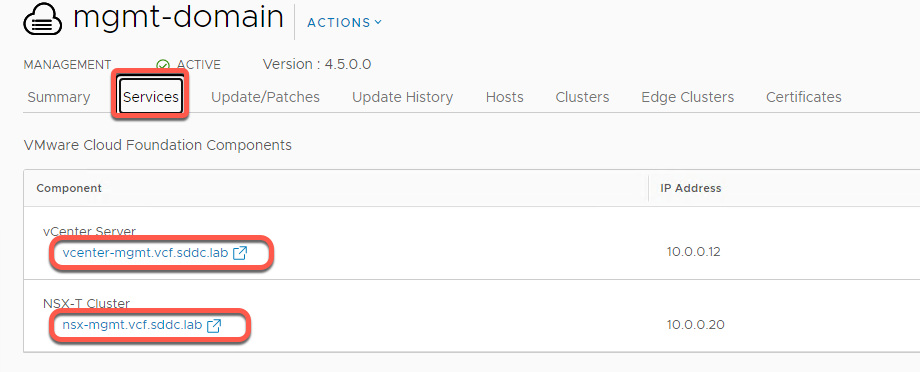
- Click on the Services tab
- Displays the FQDN and IP address of all associated components that have been deployed to support the specific Workload Domain. This includes vCenter Server and NSX Manager.
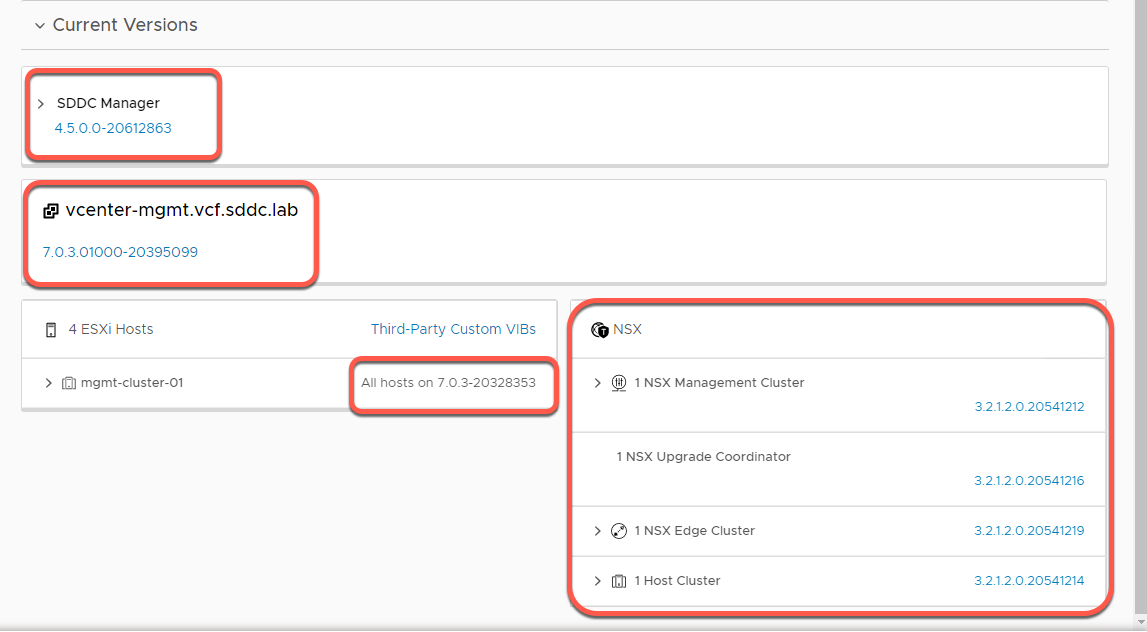
- Click on the Update/Patches tab:
- Shows the pre-check workflow, as well as any updates that have been made available that apply to this specific Workload Domain. Also listed are the specific versions of software for the deployed components within the Workload Domain. Selecting a version number will take you to the Update history for that component. (Scroll down for all)
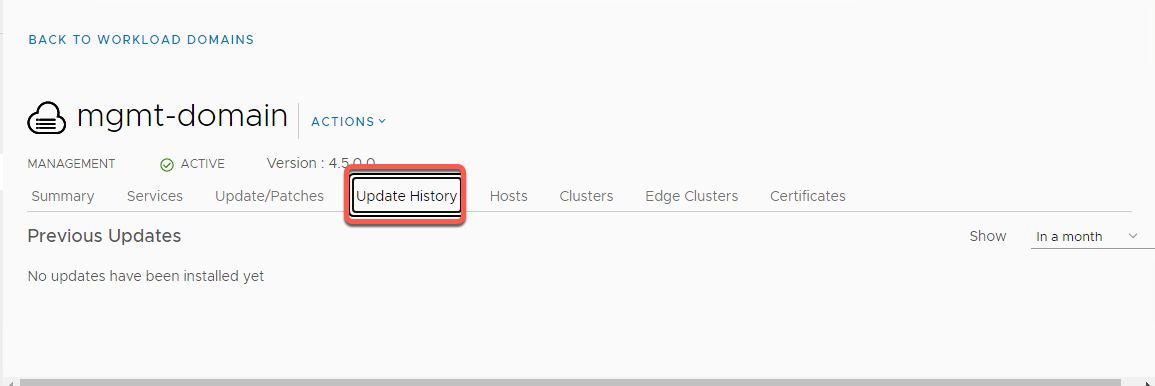
- Click the Update History tab:
- Shows all updates that have already been applied to the system. You have the option to filter the time period over which you'd like results displayed.
- Since this is a fresh lab, Previous Updates will be blank
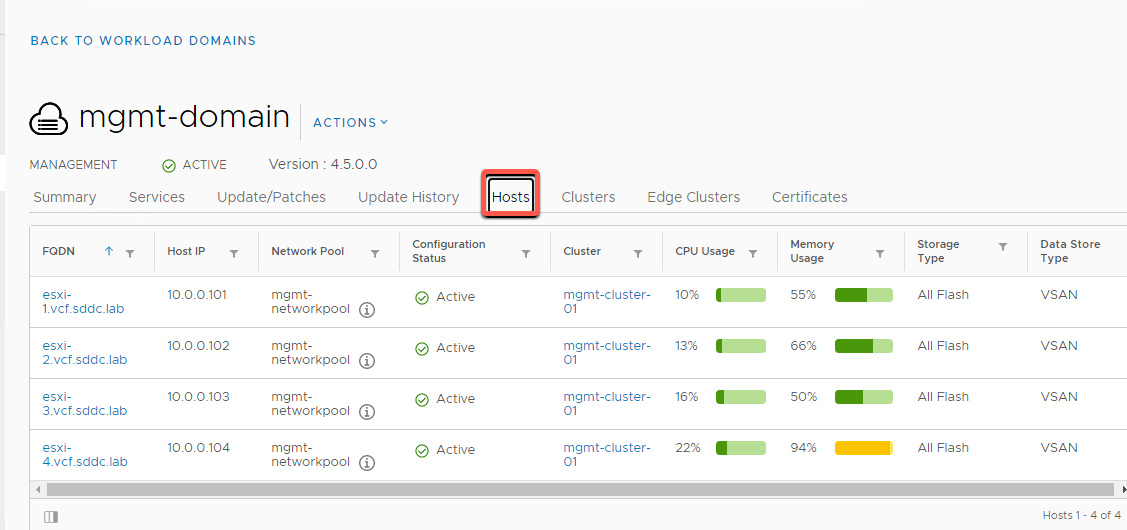
- Click on the Hosts tab:
- Displays all the hosts that are part of this specific Workload Domain including the Cluster that the host belongs to, the FQDN of the host, the Management IP address, Network Pool, Host Status, Resource Usage, and Storage Type (Hybrid or All Flash)
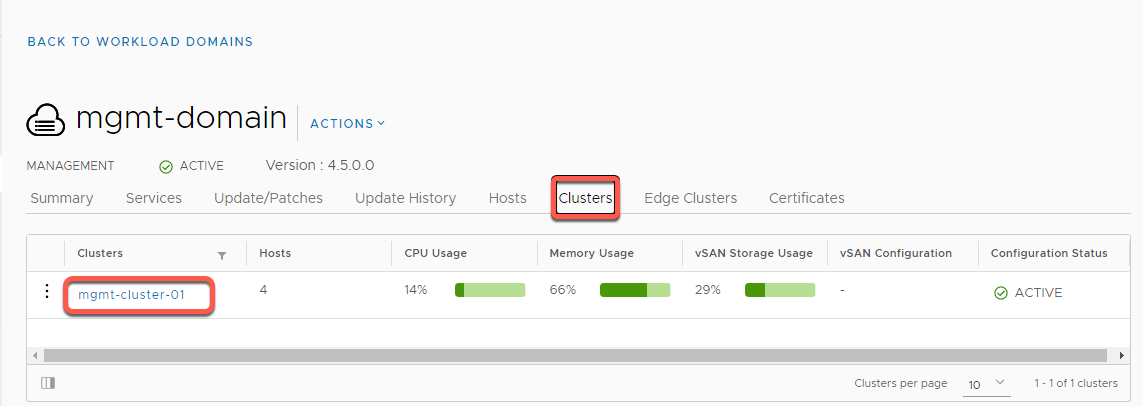
- Click on the Clusters tab:
- Lists out all available clusters under a given Workload Domain
- Cuirrently there is only one cluster in the Mangement domain. Another cluster will be added later in this guide
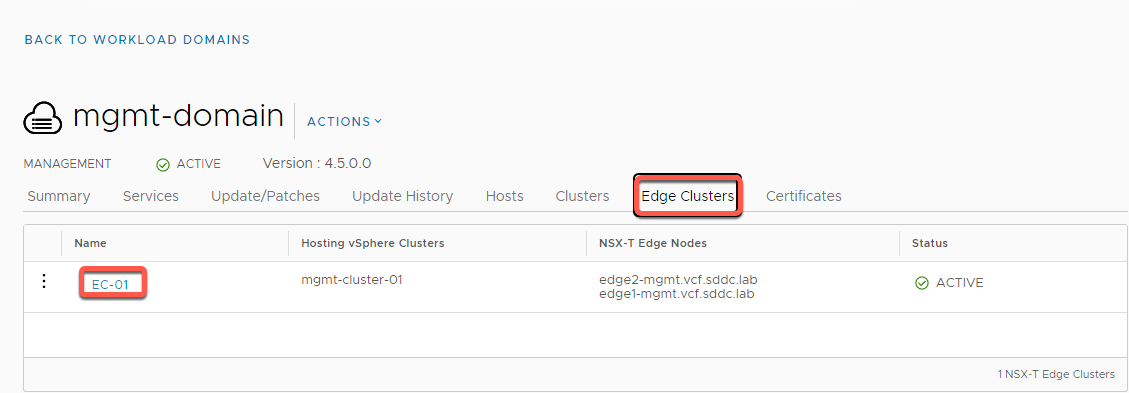
- Click on the Edge Clusters tab:
- Shows available NSX Edge Cluster(s) for this domain
- The default VLC Holodeck configuration deploys edge cluster EC-01 in the management domain
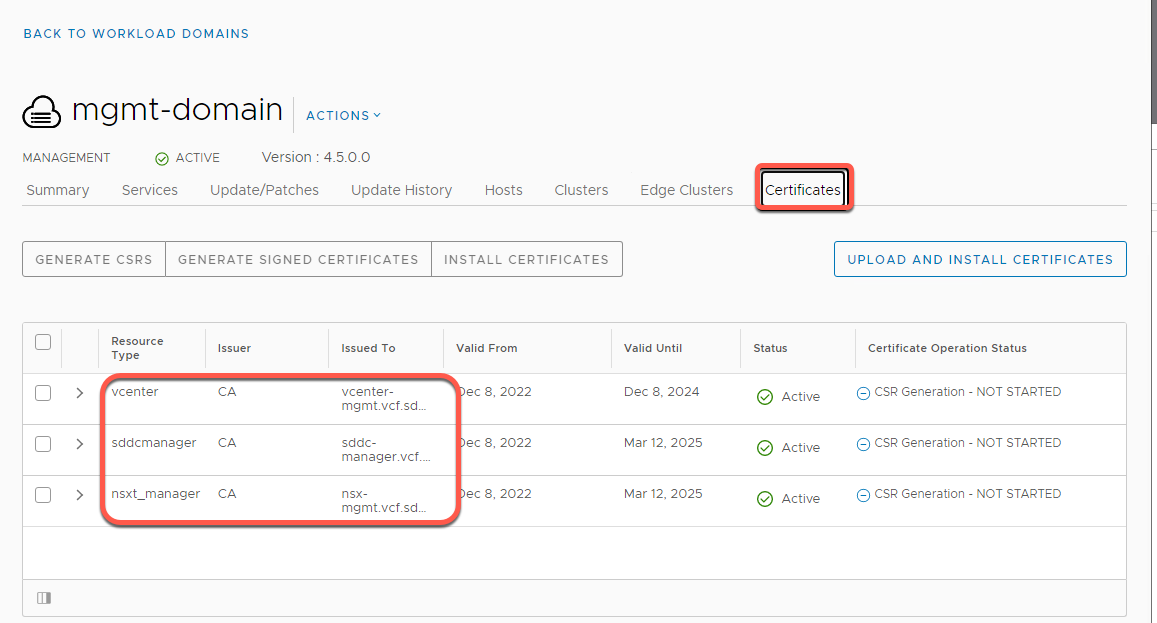
- Click on the Certificates tab:
- Displays the certificate information for all components of the VMware Cloud Foundation environment. This interface can also automate the replacement of a certificate for all component inside of VMware Cloud Foundation. We will explore certificate management in a later Exercise.
[Step 6] Explore Hosts Inventory
- From the left navigation panel select Inventory -> Hosts
- From the hosts page we get an immediate picture of the status of CPU, Memory and Storage consumption across all hosts in this VCF instance
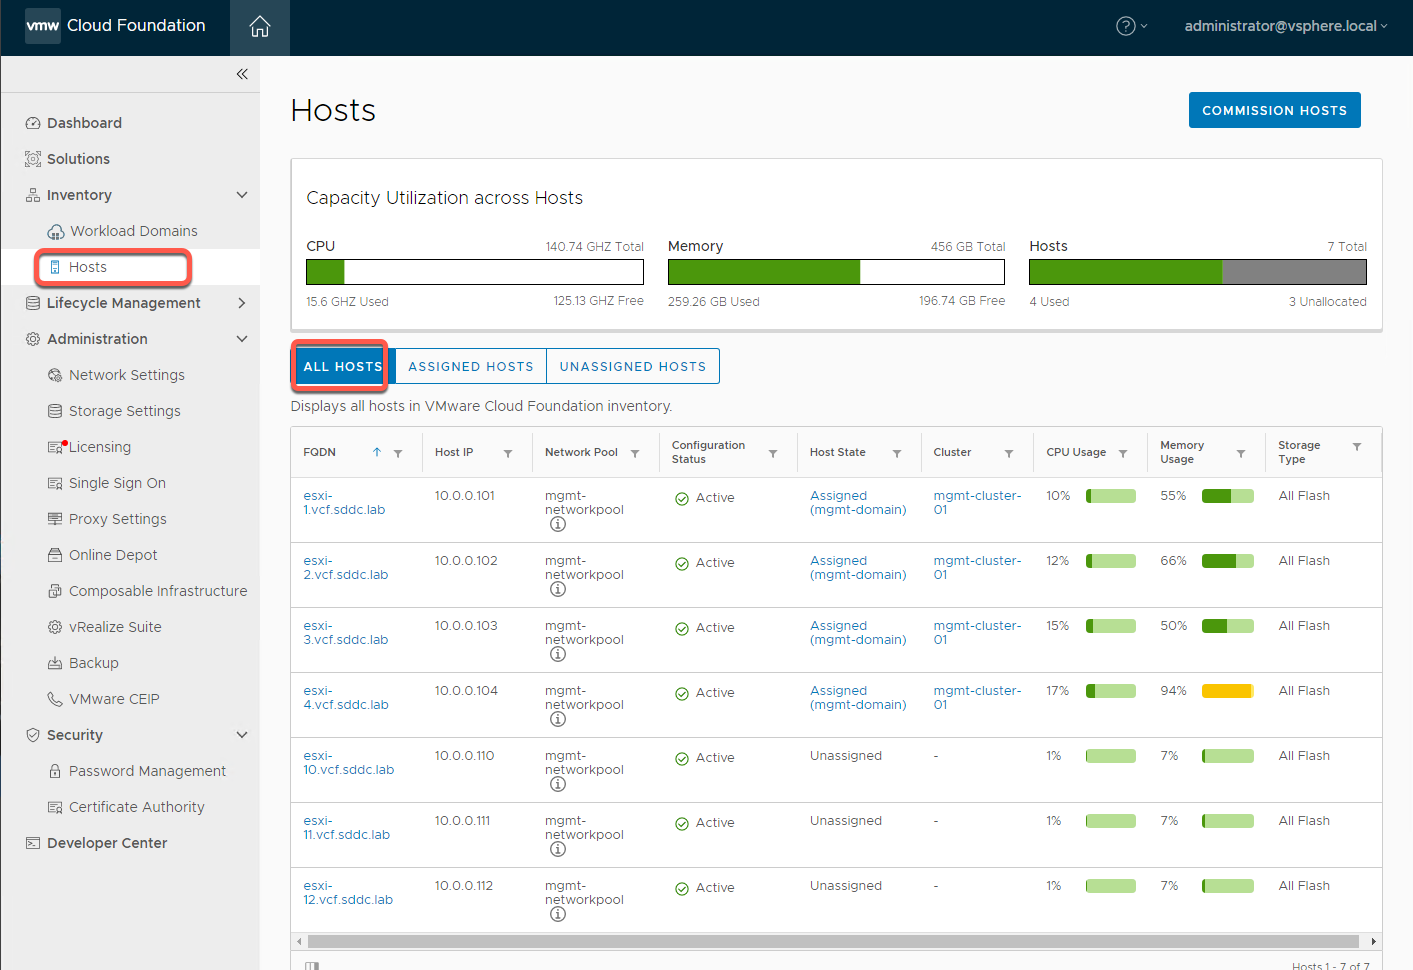
- Notice you can also break out the view by All hosts, as well as Assigned Hosts and Unassigned Hosts
- This screen is also where you add additional hosts to the environment via the Commission Hosts button. This will be explored in a later module
Module 2: Certificate Management
An easy way to increase the security of an environment, and a common practice for most IT organizations, is to replace the self-signed certificates that are generated during installation with a certificate signed by the organizations Certificate Authority (CA). VMware Cloud Foundation simplifies this process allowing customers to easily update and manage these certificates.
You can manage certificates for all external-facing Cloud Foundation component resources, including configuring a certificate authority, generating and downloading CSRs, and installing them. This section provides instructions for using Microsoft certificate authority, however Cloud Foundation also supports the use of 3rd party certificate authorities.
You can manage the certificates for the following components.
- vCenter Server
- NSX Manager
- SDDC Manager
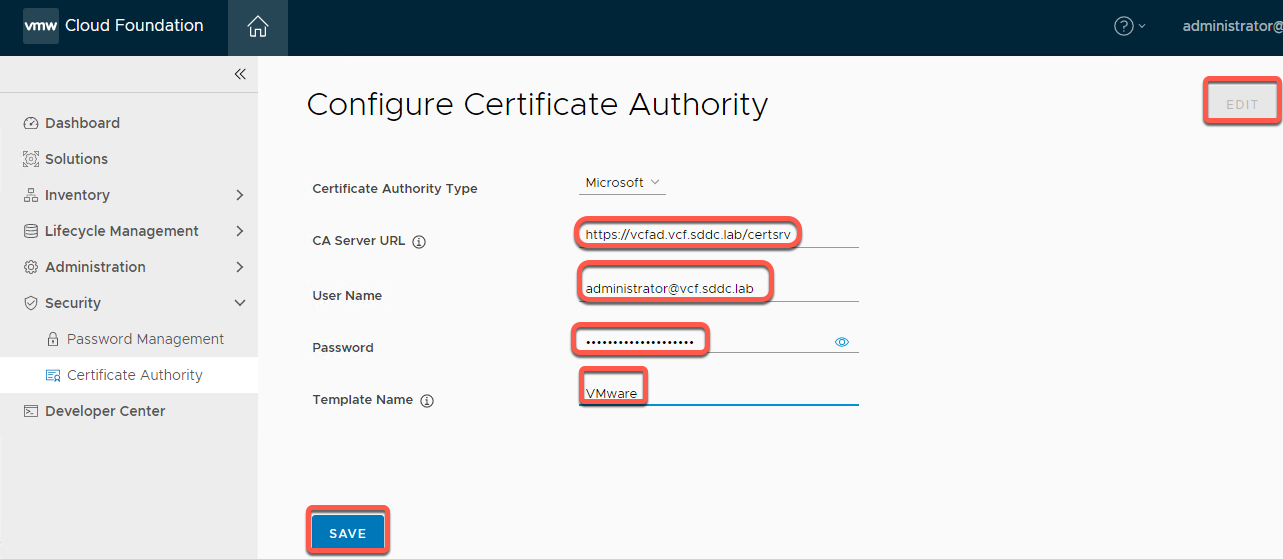
[Step 1] Configure Certificate Authority if needed
- From the left navigation panel click Security -> Certificate Authority
- Click Edit
- Enter the following data (requires Holo-Console preconfigured as certificate server which should have been completed during initial install)
Certificate Authority Type: Microsoft
CA Server URL: https://vcfad.vcf.holo.lab/certsrv
Username: administrator@vcf.holo.lab
Password: VMware123!
Template: VMware
- Click Save and Accept the certificate
[Step 2] Generate CSR
- From the left navigation panel click Inventory -> Workload Domains
- Click on mgmt-domain
- Click the Certificates tab on menu bar
- Select the checkbox next to the vCenter resource
For the purposes of this lab, we will only do certificates for vCenter Server, but SDDC Manager can be done. The NSX Manager in this lab is running in single server mode versus a 3-node cluster and will error attempting to replace certificates
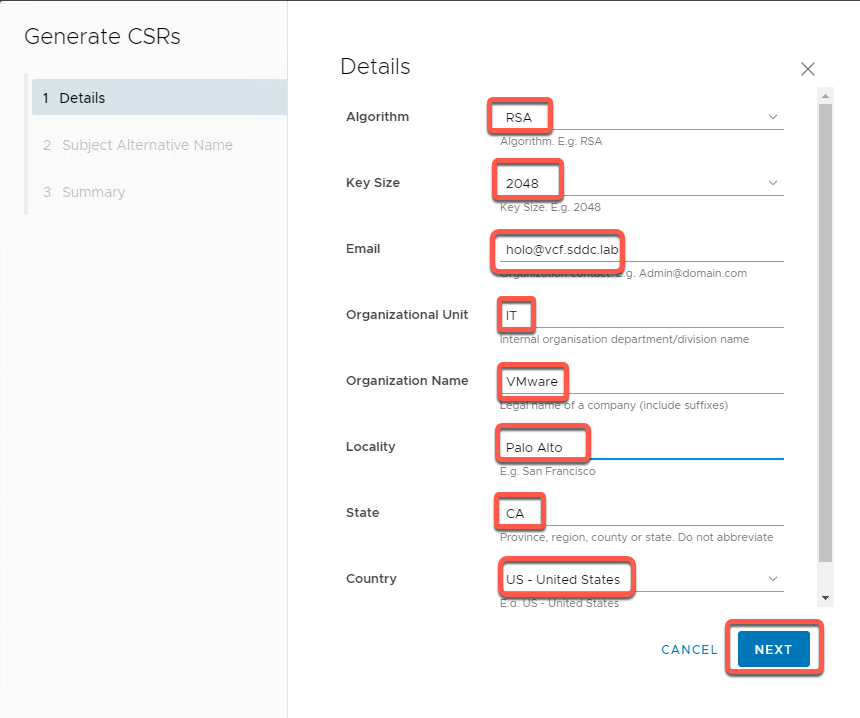
- Click Generate CSRS

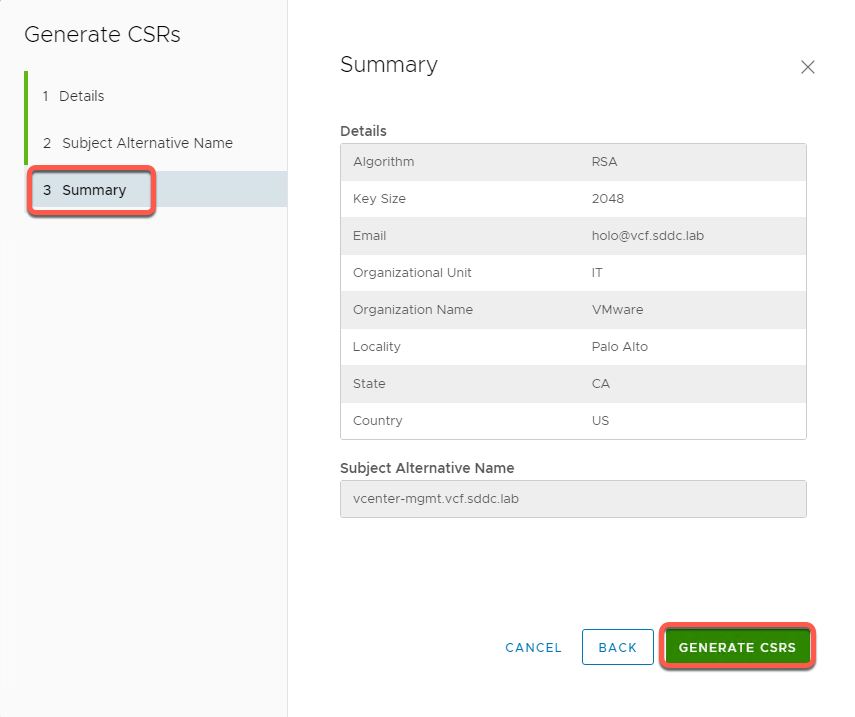
- Populate the Fields in the CSR wizard with the following information:
Algorithm: RSA
Key Size: 2048
Email: holo@vcf.sddc.lab
Organizational Unit: IT
Organization: VMware
Locality: Palo Alto
State: CA
Country: US
- Click Next
- Leave Subject Alternative Name (SAN) at default and click Next
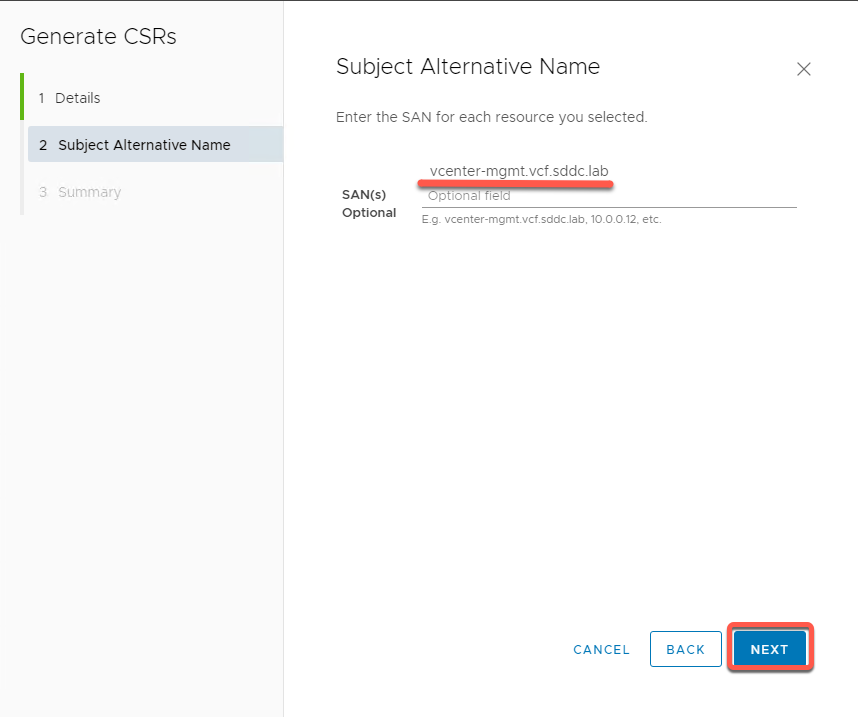
- Review Summary and click Generate CSRS
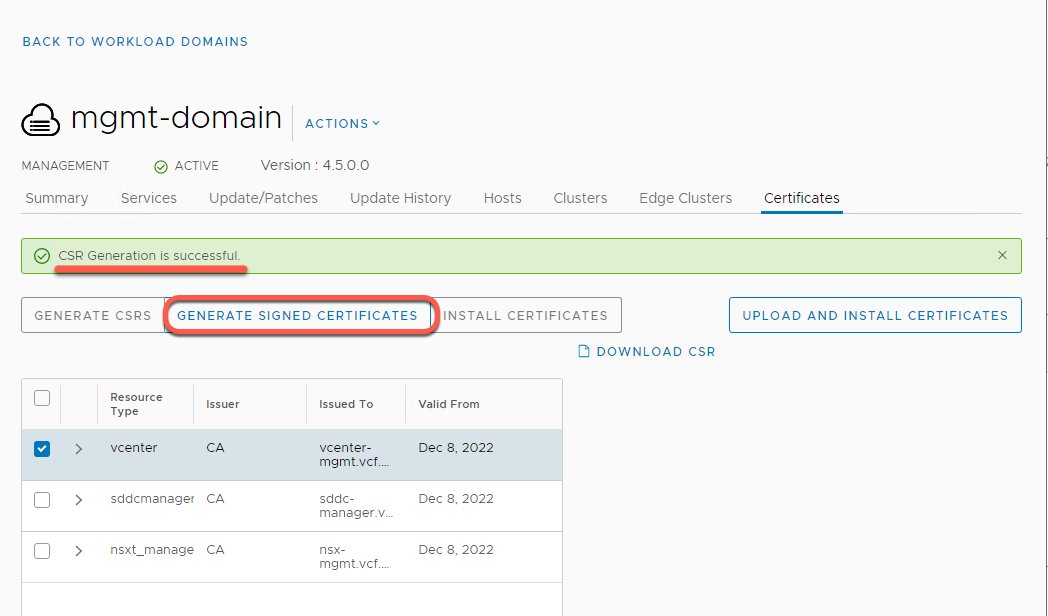
[Step 3] Generate Signed Certificates
- After receiving CSR Generation Successful banner, click Generate Signed Certificates
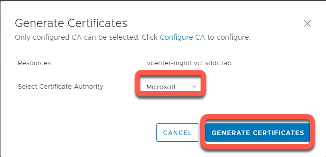
- Select Certificate Authority Microsoft
Click Generate Certificates
[Step 4] Install Certificates
- After receiving Certificate Generation is Successful banner, click Install Certificates
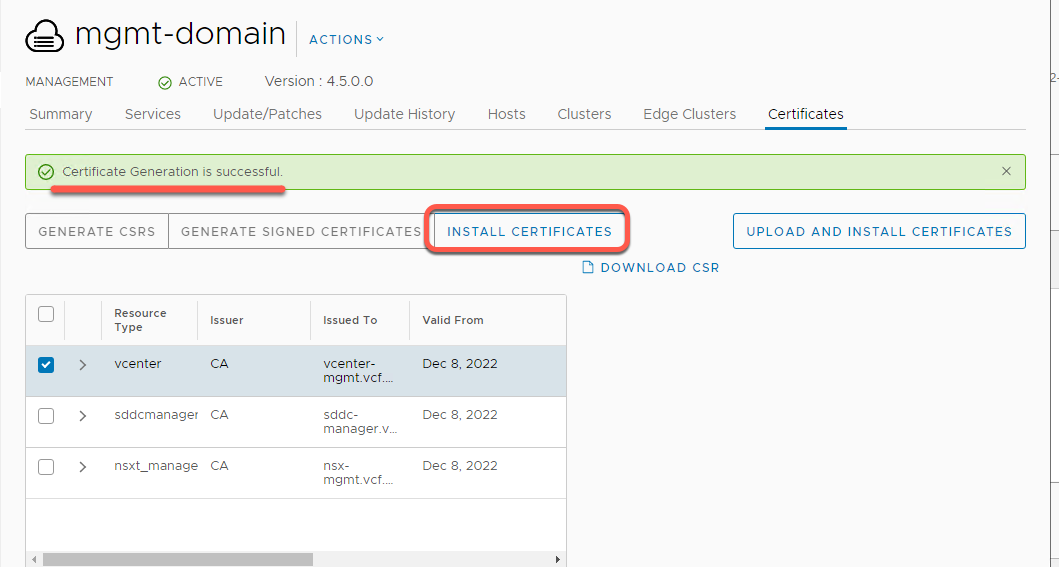
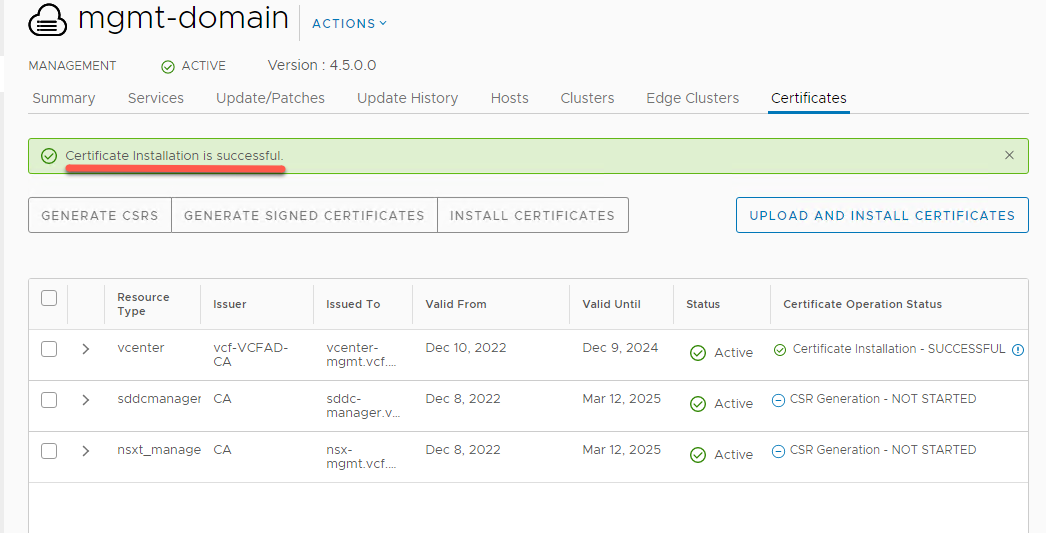
- This process can take up to 20 minutes When complete you should see a “Certificate Installation is Successful” banner and same status for vCenter
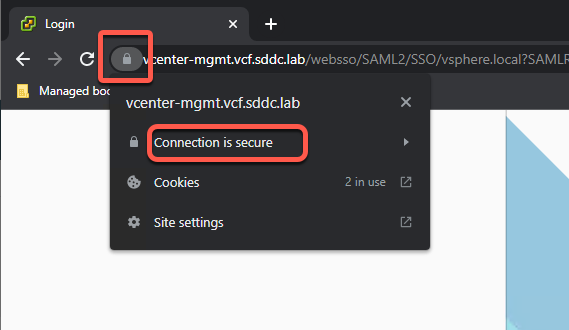
- Open a new incognito window in Chrome
- Click the Managed Bookmarks and navigate to Mgmt Domain -> Mgmt vCenter
- Click the lock Icon on the URL, followed by clicking on Connection is Secure
- Click on Certificate is valid
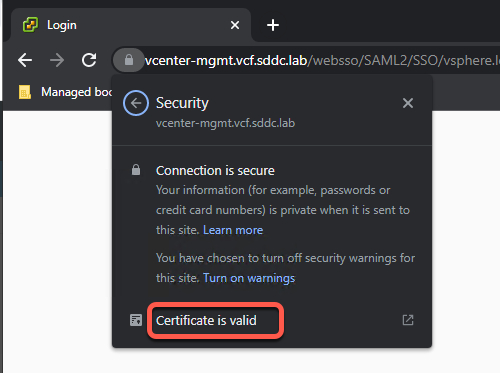
- The certificate viewer will open with the certificate for the server. Note the information that was entered during the CSR process
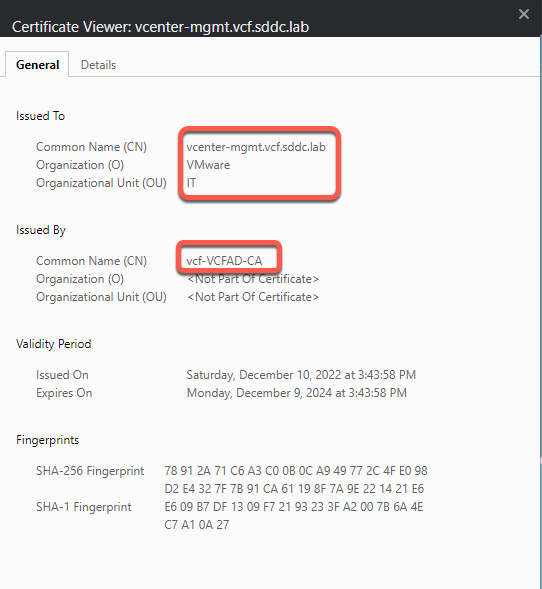
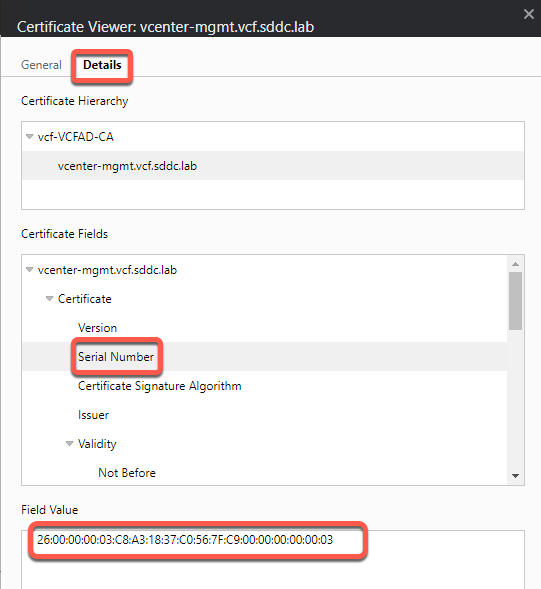
- Click Details tab then Serial Number. Keep this window open in this tab
- Open a new tab in Chrome and browse to SDDC Manager if necessary
- Click on Inventory -> Workload domains -> mgmt-domain
- Click on the Certificates tab and expand vCenter.
- Note the serial number matches the serial number in the details tab of the certificate viewer as well as the other information you entered in the CSR.

Module Summary
SDDC Manager simplifies and automates management of SSL Certificates across SDDC components.
Module 3: Password Management
Overview
Passwords are initially set in a Cloud Foundation system as part of the bring-up procedure. Following bring up, admin staff will typically update these passwords using the password management functionality in VCF. Passwords are also typically updated periodically or when certain events occur, such as when an administrator leaves your organization, reducing the likelihood of security vulnerabilities.
You can change or rotate passwords for the software components deployed by VMware Cloud Foundation. The process of password rotation generates randomized passwords for the selected accounts. You can change passwords for the following entities:
- ESXi
- vCenter Server
- NSX Manager
- NSX Edges
- vRealize Suite
This module will consist of the following exercises
- Using Password Update
- Using Password Rotate
- Using the Password API
Exercise 1: Using Password Update
Password Update is used to set specific user defined passwords on accounts accessed directly by users.
[Step 1] Enable SSH on host esxi-1
- Open a new tab in the Chrome browser (if necessary)
- Click the Managed bookmarks folder in the bookmark bar then select Mgmt Domain – Mgmt vCenter
- Click Launch vSphere Client if necessary
- Login as user: administrator@vsphere.local with the password: VMware123!
- Click Login
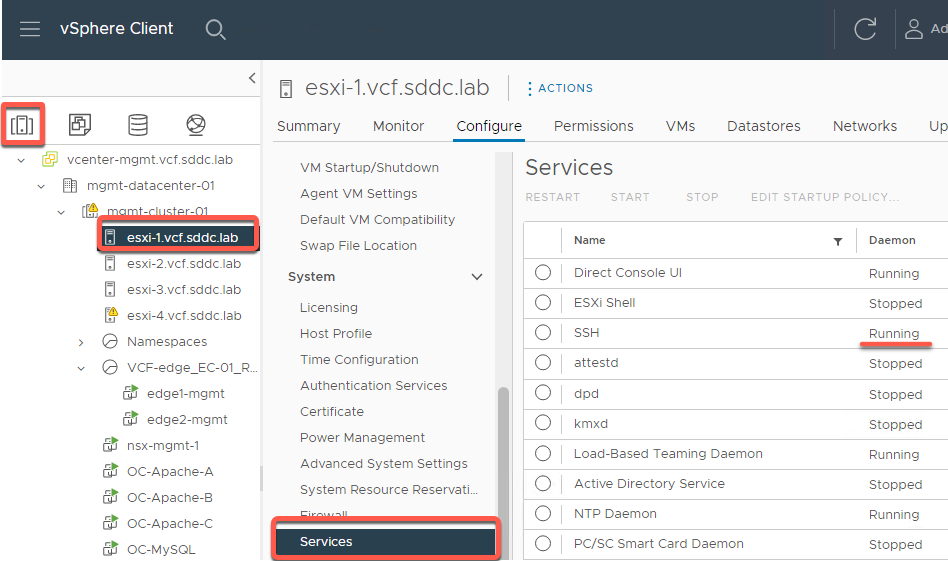
- On the Hosts and Clusters icon, select mgmt-datacenter01 -> mgmt-cluster-01-> esxi-1
- Select Configure -> Services
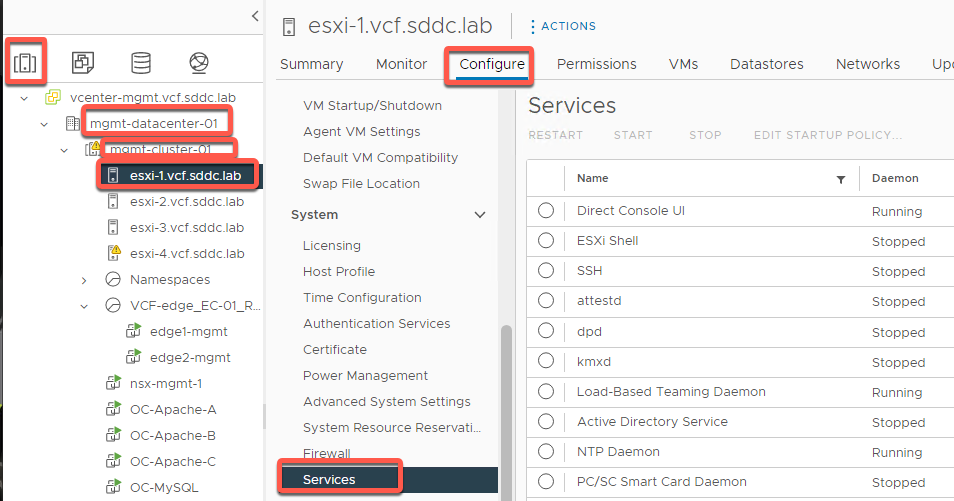
- Click the SSH radio button then START
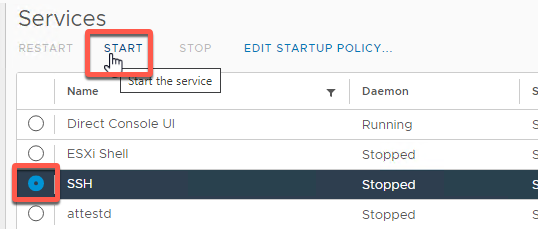
- Monitor progress in the task pane

[Step 2] Change password on host esxi-1
- Click the SDDC Manager tab on the browser, or open a new tab
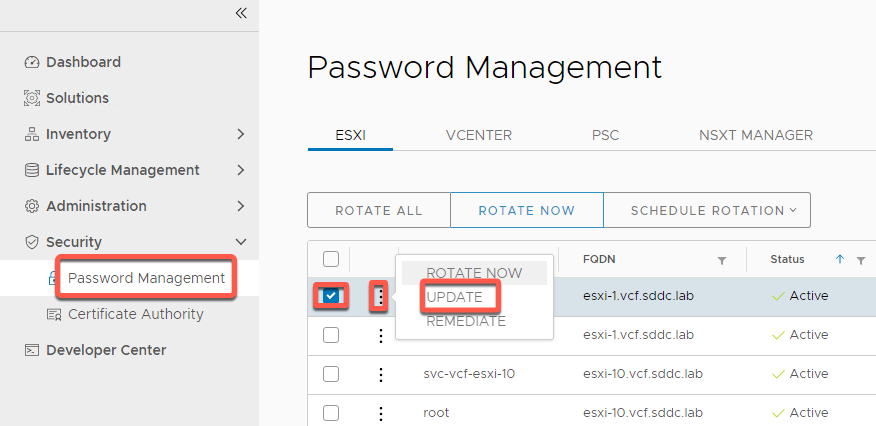
- Click Security
- Click Password Management
- Select the check box next to root user for esxi-01
- Click the three dots next to root, then choose UPDATE
- Change the password to Cloud4321! Then click UPDATE
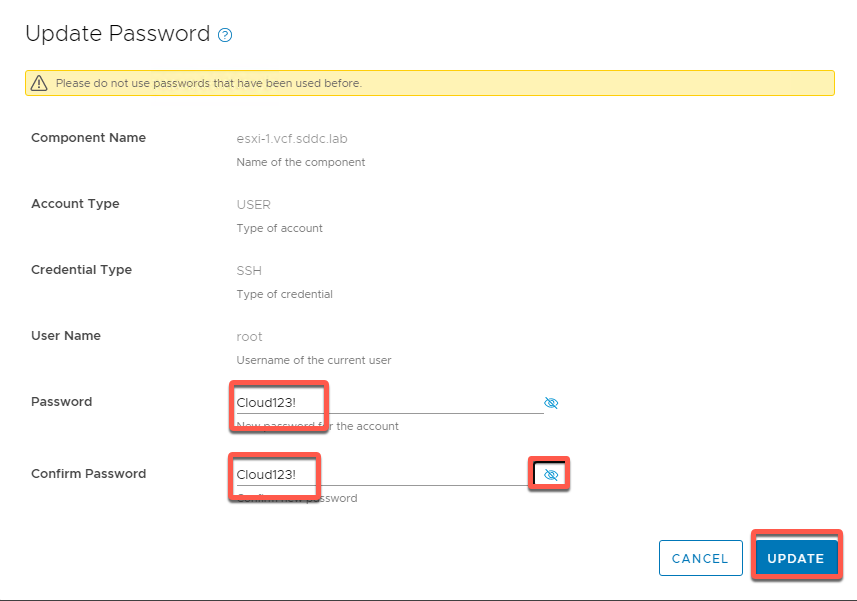
- Monitor for completion in the task pane

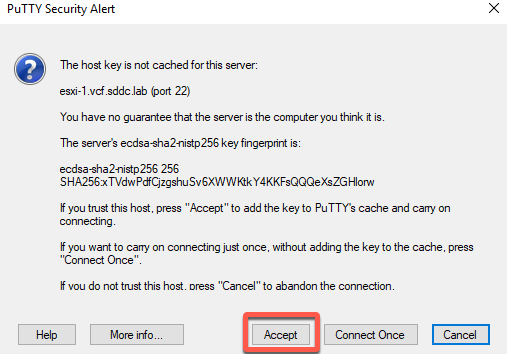
- Open a Putty window and ssh to esxi-1.vcf.sddc.lab
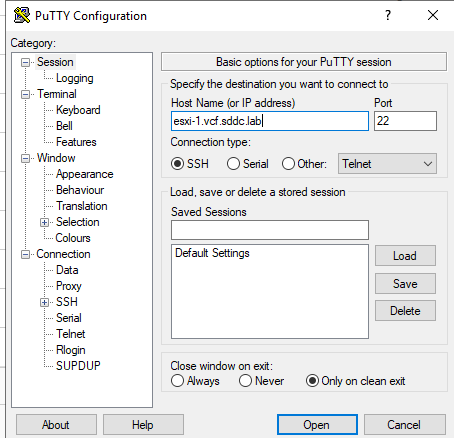
- Click the Accept button to add the certificate to the cahe
- Login as user root and password Cloud4321!
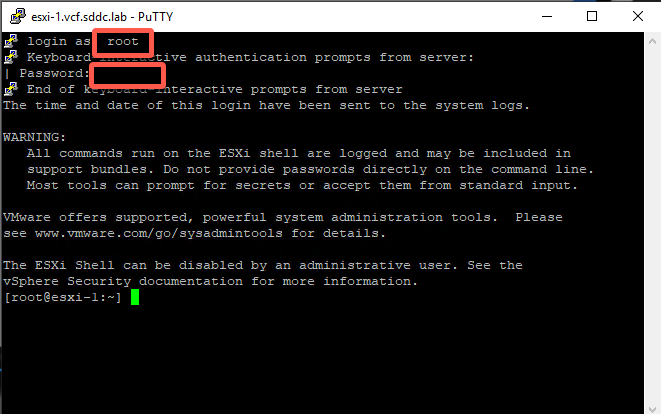
- Successfully logging in validates the password change
Exercise 2: Using Password Rotate
Password rotation is typically used to update accounts used by SDDC Manager for automation operations. These are typically “service” type users
[Step 1] Login to SDDC Manager
- Open a new tab in the Chrome browser (if necessary)
- Click the Managed bookmarks folder in the bookmark bar then select SDDC Manager
- Login as user: administrator@vsphere.local with the password: VMware123!
- Click Login
[Step 2] Rotate password
- Select Security -> Passwords
- Select svc-vcf-esxi-1
- Click Rotate Now
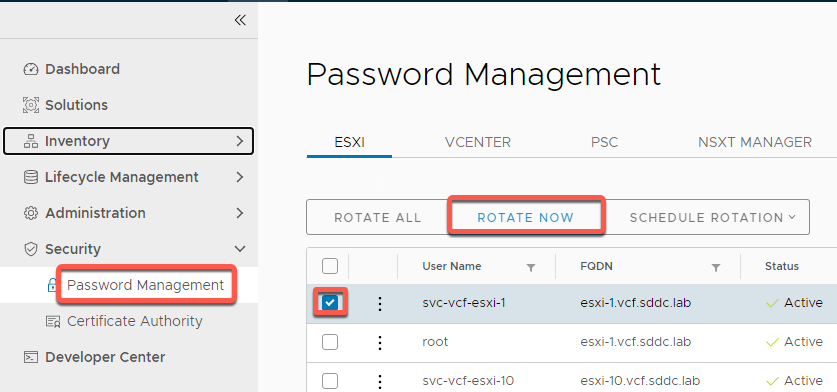
- Confirm by clicking Rotate. This will rotate the password to a randomly generated password that will be stored in the SDDC Manager database.

- Monitor task in progress

Exercise 3: Password Lookup with SSH
[Step 1] Enable/Verify SSH on host esxi-1 (if necessary)
- Open a new tab in the Chrome browser (if necessary)
- Click the Managed bookmarks folder in the bookmark bar then select Mgmt Domain – Mgmt vCenter
- Login as user: administrator@vsphere.local with the password: VMware123!
- Click Login
- On the Hosts and Clusters view, select mgmt-datacenter01 -> mgmt-cluster-01-> esxi-1
- Select Configure
- Select System>Services
- Verify SSH is running. If not, click the radio button for SSH and then Start
[Step 2] Lookup password for esxi-1
- Open a PuTTY window
- Connect to sddc-manager.vcf.sddc.lab (or 10.0.0.4)
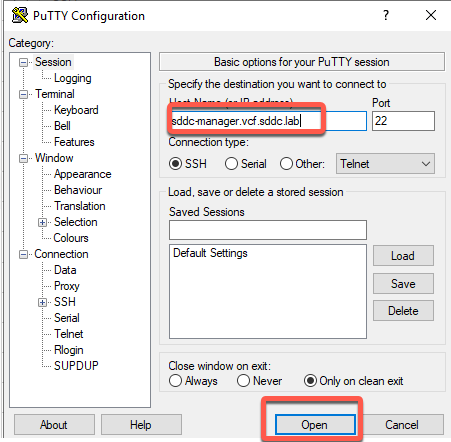
- Accept the Putty security warning
- Login as user vcf password VMware123!
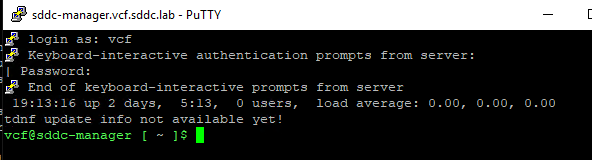
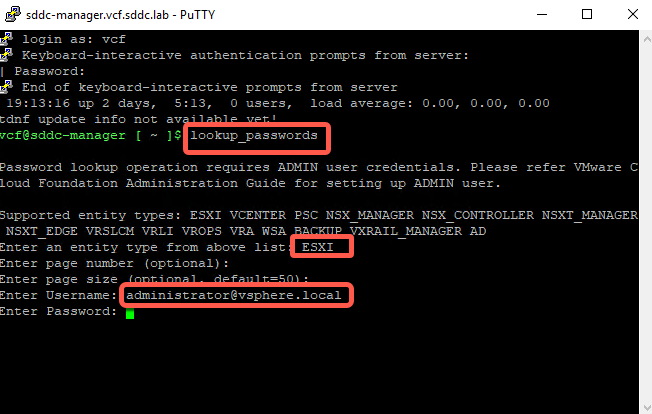
- Enter the command lookup_passwords
- Enter ESXi
- Press Enter for page number to bypass
- Press Enter for page size to accept default
- Enter user name administrator@vsphere.local password VMware123!
- Results (scroll back up)
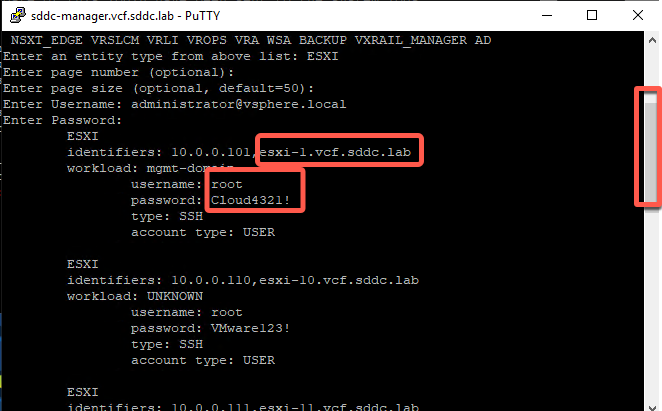
- Notice the password you set earlier
Exercise 4: Password lookup using API
[Step 1] Login to SDDC Manager
- Open a new tab in the Chrome browser (if necessary)
- Click the Managed bookmarks folder in the bookmark bar then select SDDC Manager
- Login as user: administrator@vsphere.local with the password: VMware123!
- Click Login
[Step 2] Lookup password
- On the left navigation click Developer Center
- Click API Explorer
- Expand APIs for managing Credentials
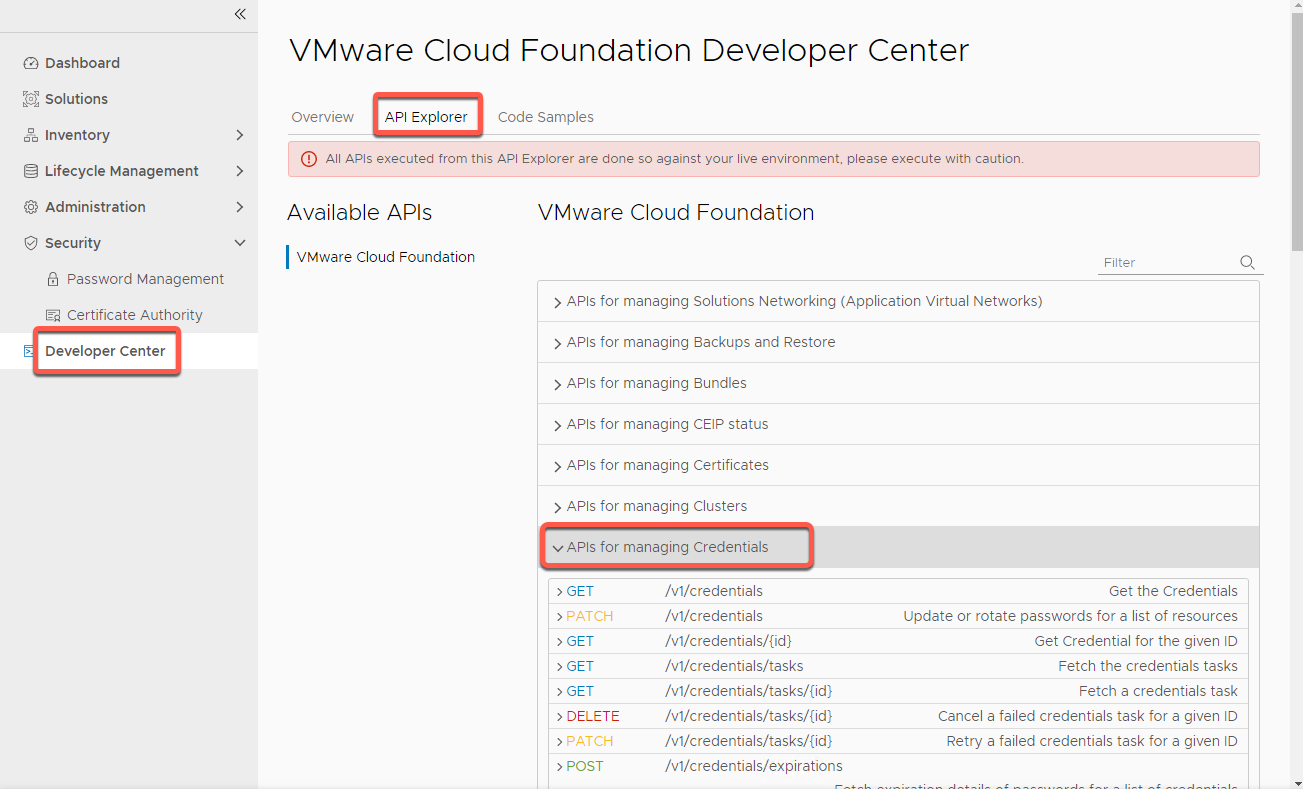
- Expand GET /v1/credentials
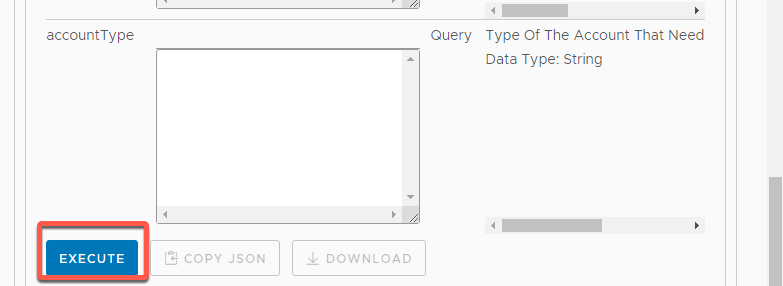
- Type esxi-1.vcf.sddc.lab in the resourceName field
- Scroll to bottom and hit EXECUTE
- Click on PageOfCredentials
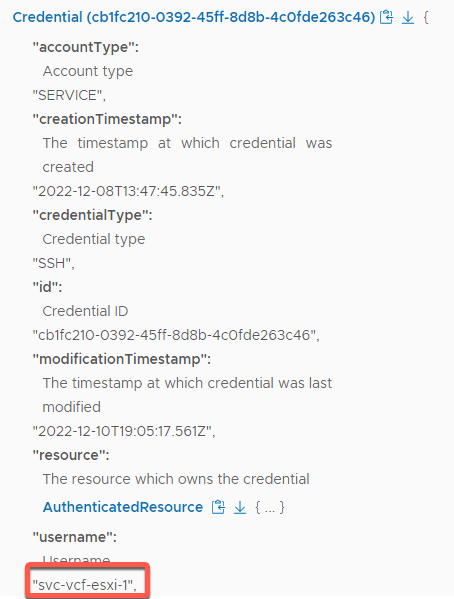
- Click on the Credential (GUID) lines to expand the User and Service account information (The order of user and service credentials may vary, so open both)
- User account example
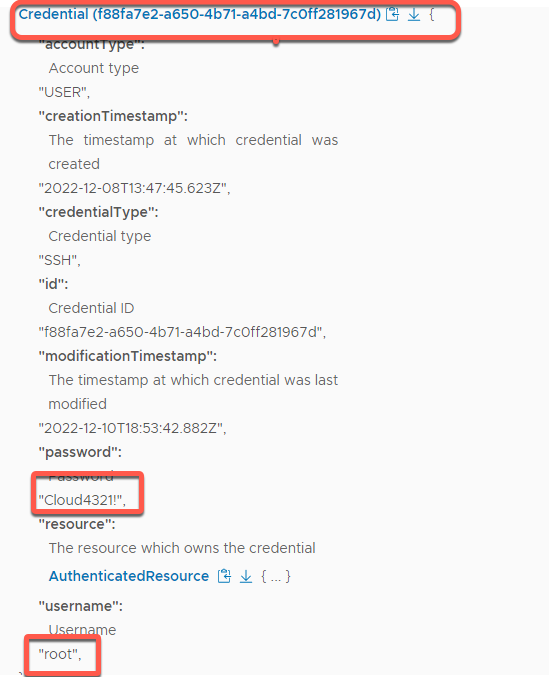
- Service account example
Module 4: Workload Domain Creation
This module will show the process of adding a workload domain to an environment.
**Note** This module requires the VLC-Holo-Site-1 configuration with hosts ESXi-10 through ESXi-12 commissioned and unassigned.
[Step 1] Log in to the environment
- Open a new tab in the Chrome browser (if necessary)
- Click the Managed Bookmarks folder in the bookmark bar then select SDDC Manager
- Log into SDDC Manager as user: administrator@vsphere.local with the password: VMware123!
- Click Login
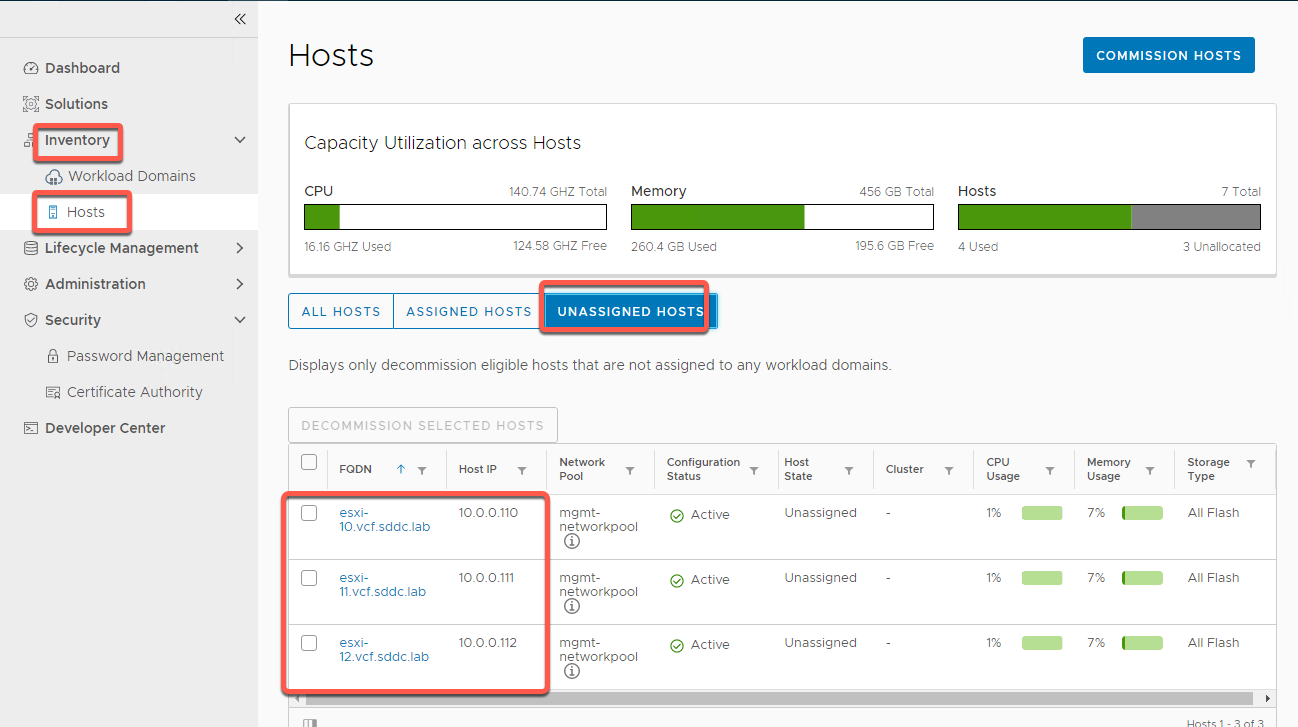
[Step 2] Validate unassigned hosts are available
- On the left navigation panel select Inventory -> Hosts
- Select Unassigned Hosts
- Verify ESXi-10, ESXi-11 and ESXi-12 are available in the inventory
[Step 3] Create Workload Domain
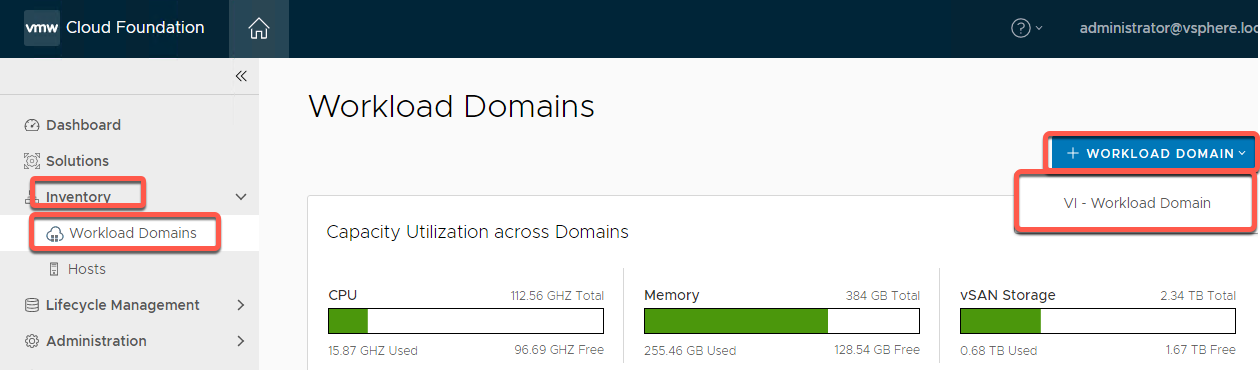
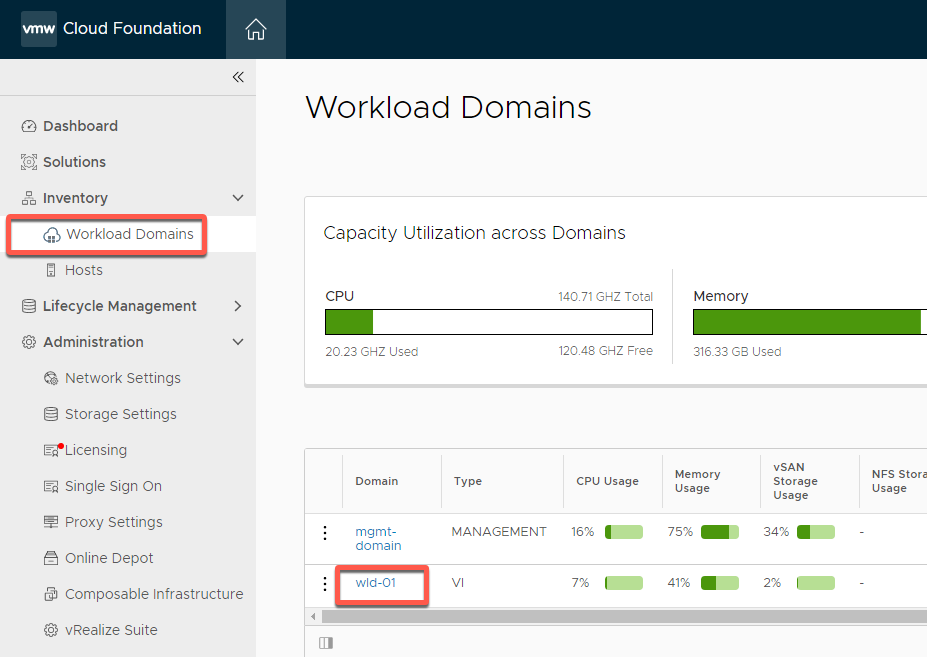
- On the left navigation panel select Inventory -> Workload Domains
- Select +Workload Domains
- Select VI – Workload Domain
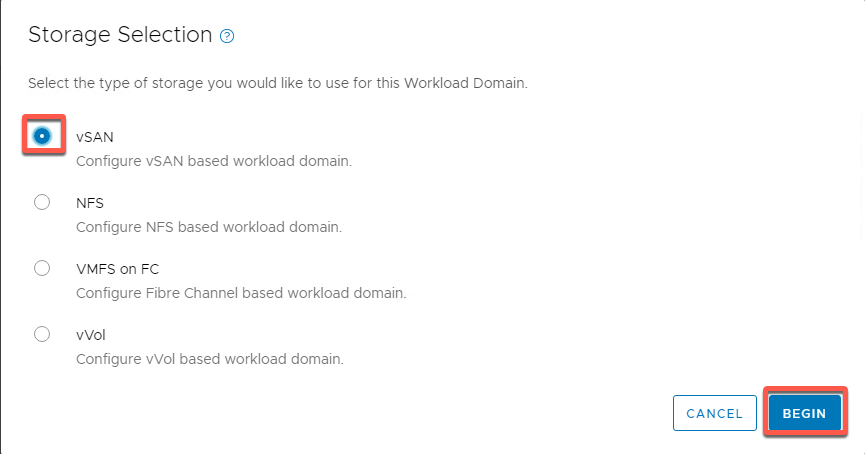
- Select vSAN and Begin
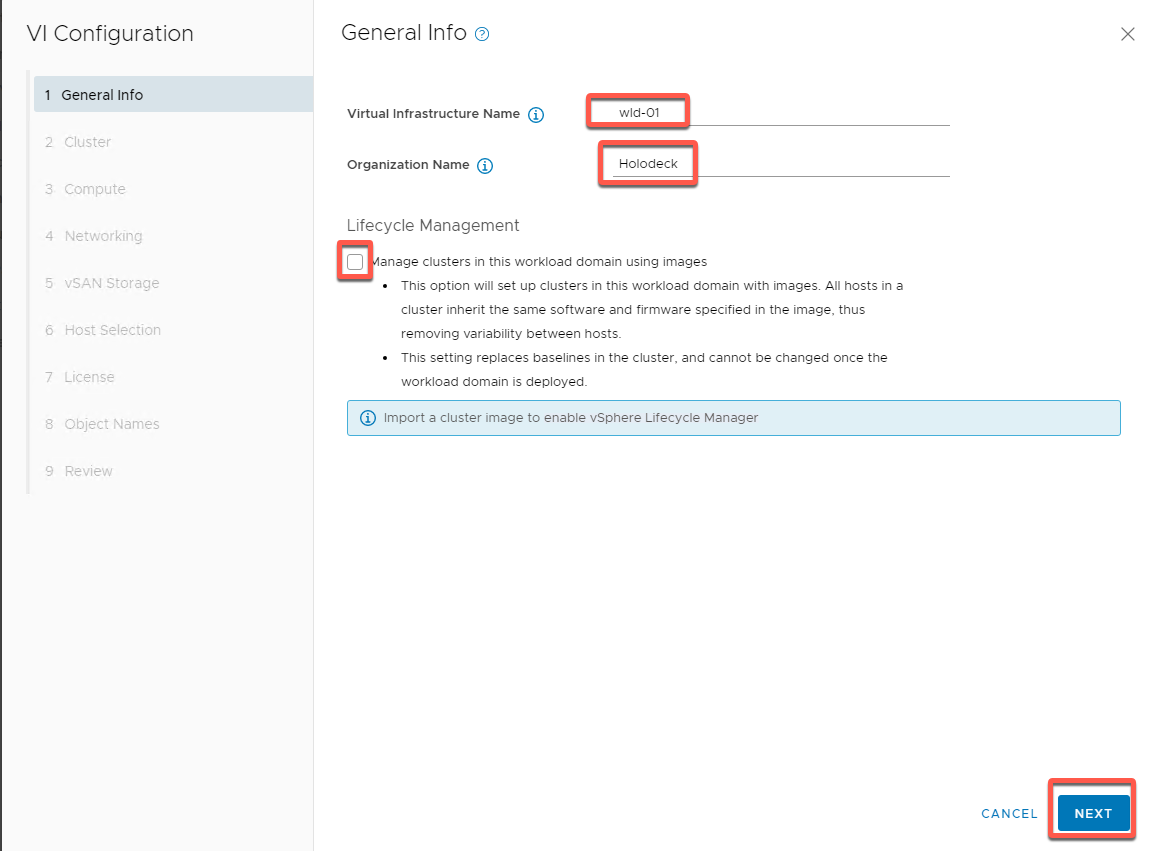
- Name the domain WLD-01
- Name the organization Holodeck
- Do not select Manage clusters in this workload domain using images (the nested lab config does not support image based VLCM)
- Click NEXT
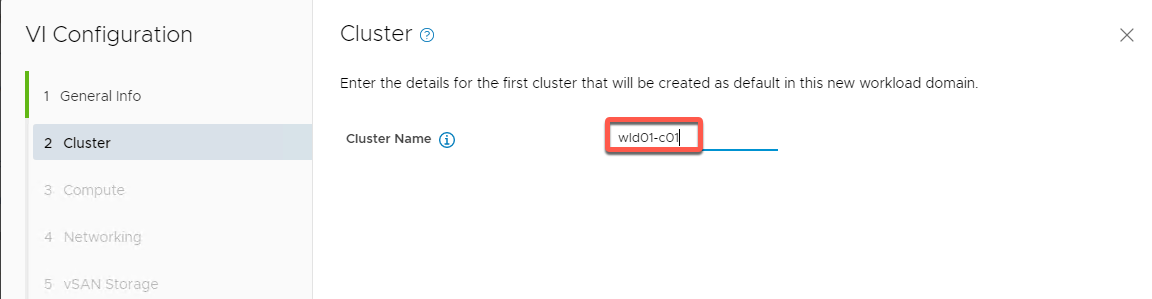
- Name the cluster wld01-c01 then click NEXT
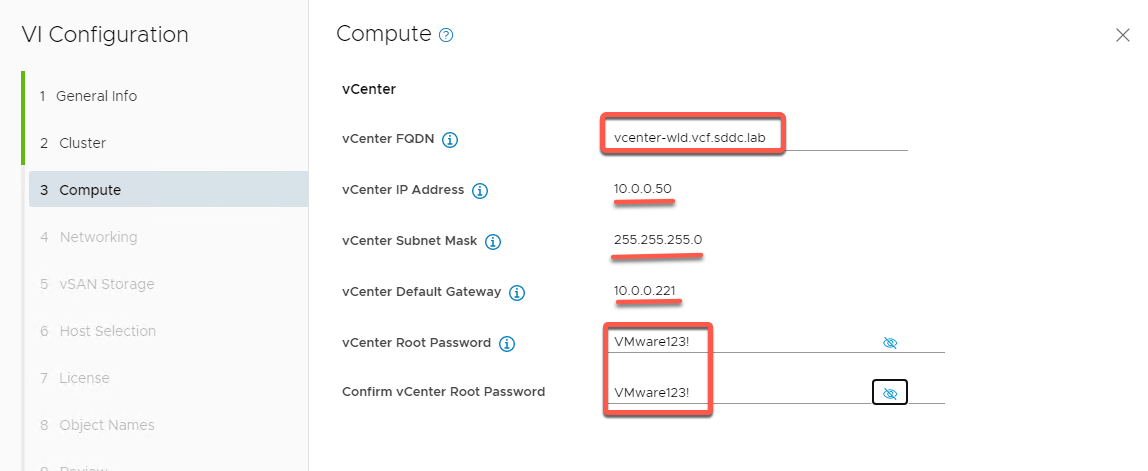
- Add compute info
- vCenter FQDN: vcenter-wld.vcf.sddc.lab
- vCenter IP (should auto populate to 10.0.0.50)
- vCenter Subnet (should auto populate to 255.255.255.0)
- vCenter Default gateway (should auto populate to 10.0.0.221)
- vCenter root password VMware123!
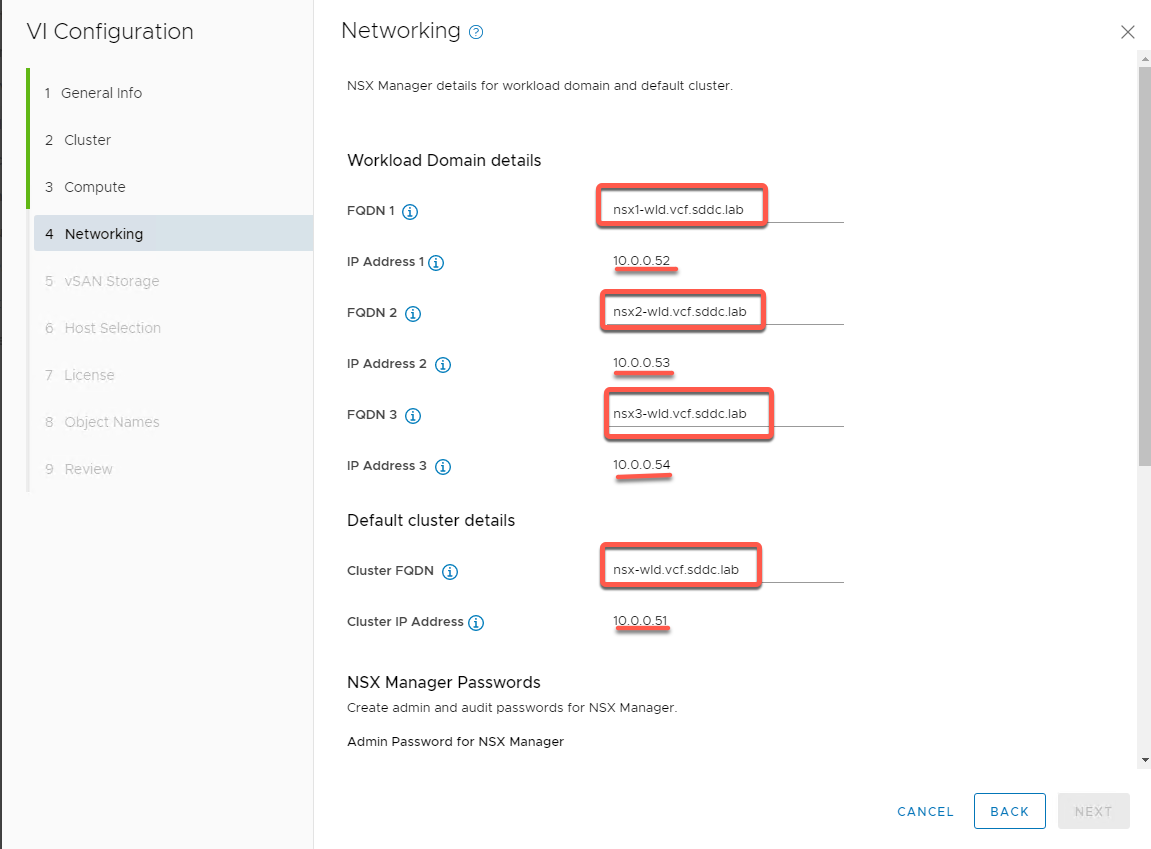
- Enter NSX info as follows: (Tip: You can cut and paste FQDN info from C:\VLC\VLC-Holo-Site-1\conf\additional_DNS_Entries.txt)
- FQDN 1: nsx1-wld.vcf.sddc.lab
- IP 1 (Should auto populate to 10.0.0.52)
- FQDN 2: nsx2-wld.vcf.sddc.lab
- IP 1 (Should auto populate to 10.0.0.53)
- FQDN 1: nsx3-wld.vcf.sddc.lab
- IP 1 (Should auto populate to 10.0.0.54)
- Cluster FQDN: nsx-wld.vcf.sddc.lab
- Cluster IP (Should auto populate to 10.0.0.51)
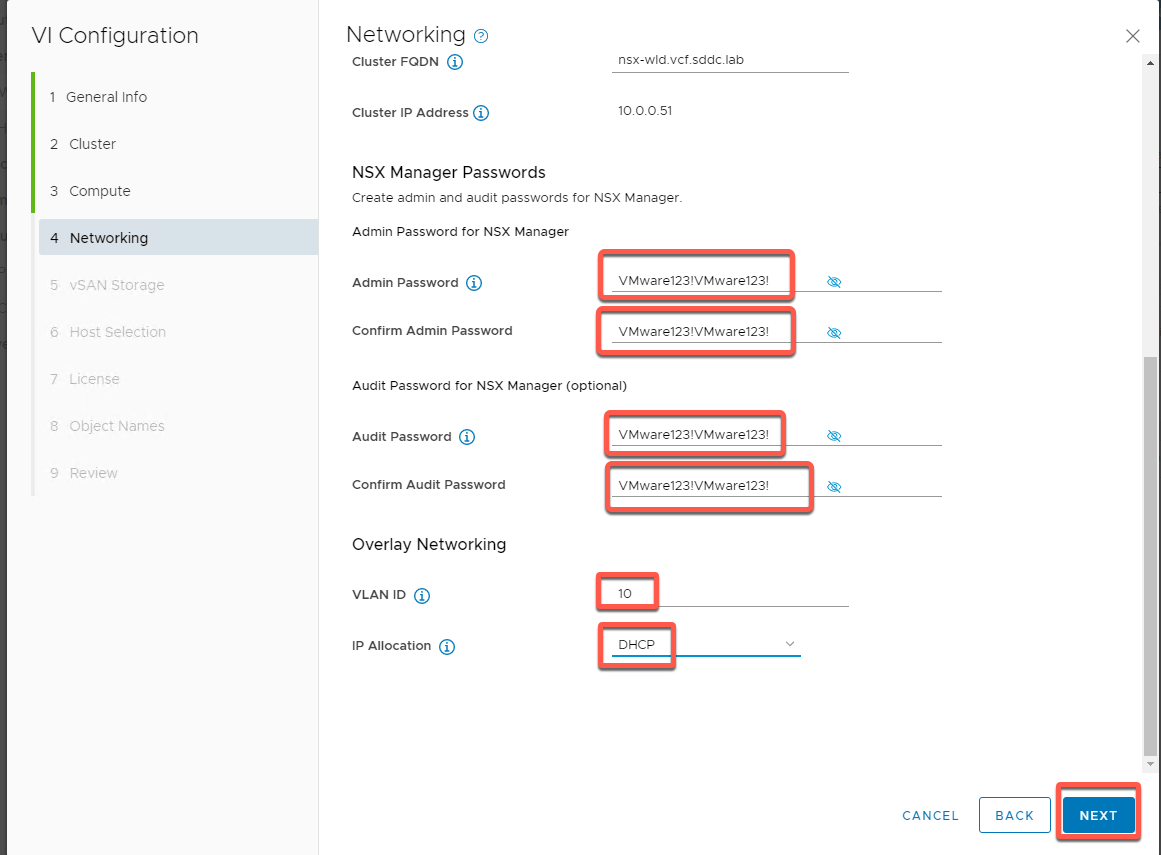
- Scroll down and enter passwords for Admin and Audit. Both should be set to VMware123!VMware123!
- Set VLAN ID to 10
- Set IP Allocation to DHCP
- Click NEXT
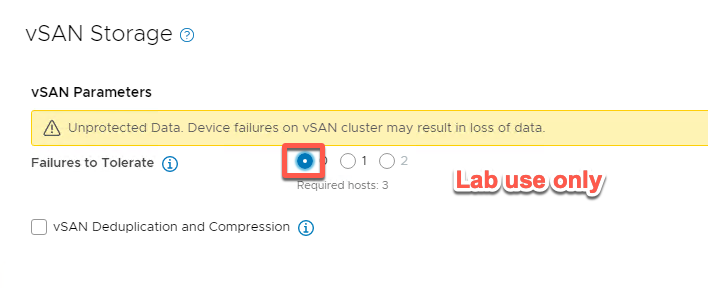
- Set Failures to Tolerate to 0, as this is a lab environment. (In live environments this must always be set to 1 or 2).
- Click NEXT
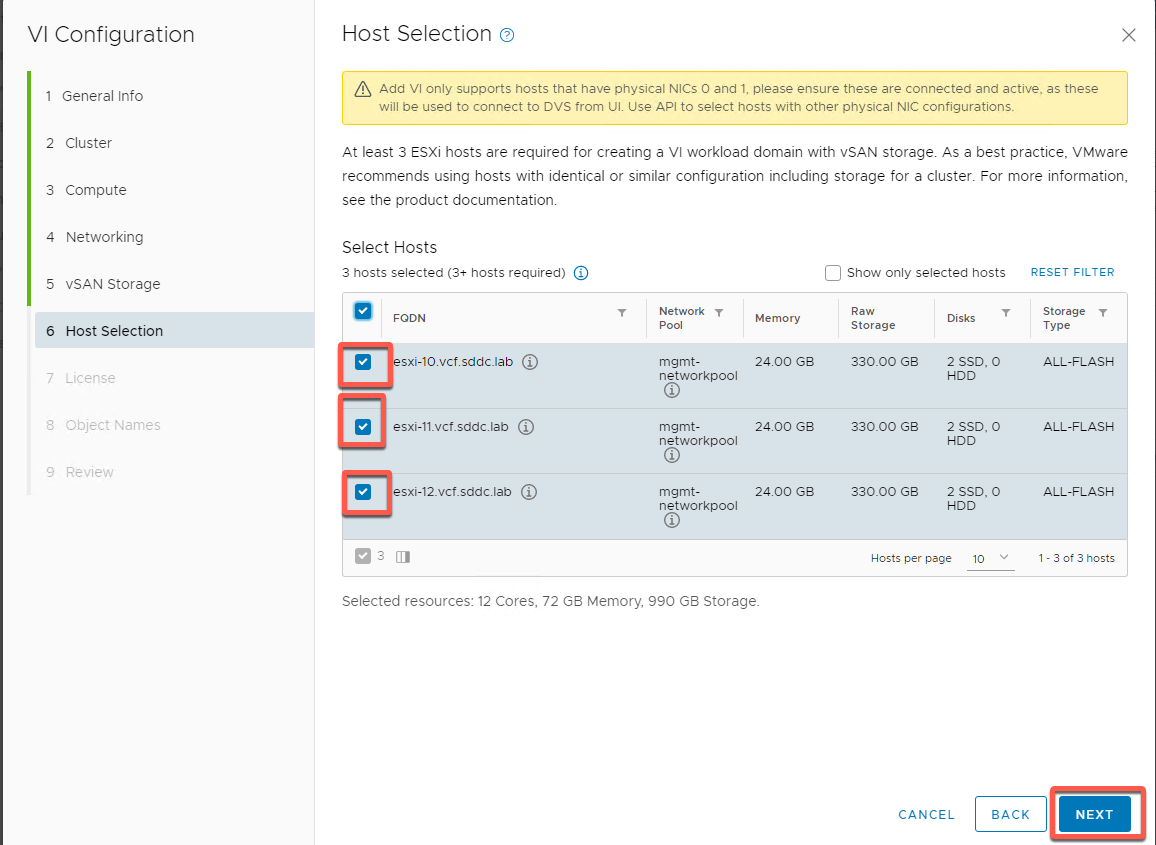
- Select hosts esxi-10, esxi-11 and esxi-12 then click NEXT
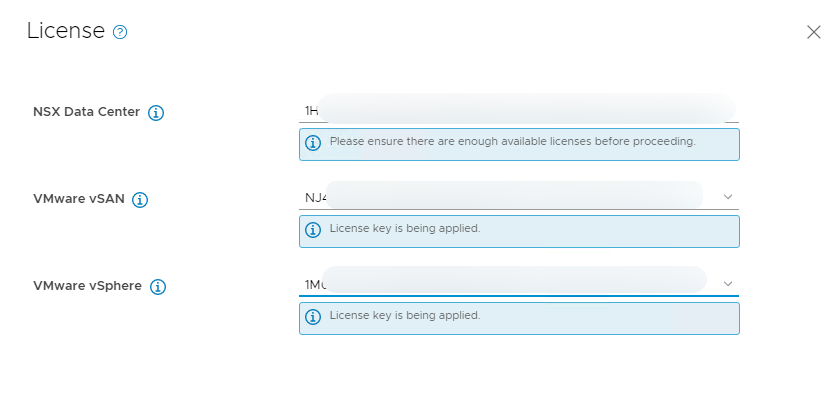
- Select your licenses from the drop down list
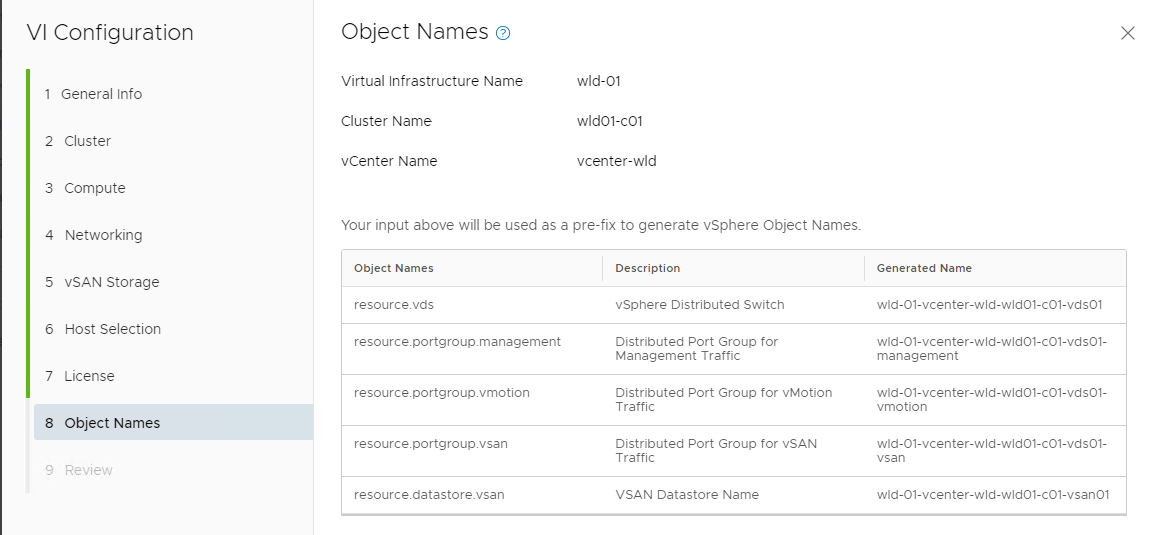
- Verify your object names then click NEXT
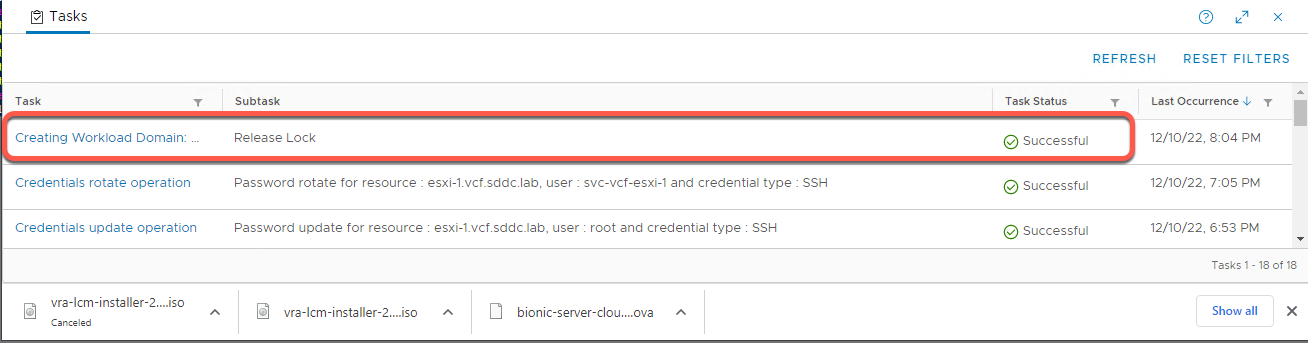
- Click Finish (NOTE: there is a known issue with VCF 4.5 that may show a black screen on the last Review )
- Monitor progress in the task pane
[Step 4] Explore Workload Domain Components
- Open a new tab in the Chrome browser (if necessary)
- Click the Managed Bookmarks folder in the bookmark bar then Mgmt Domain -> Mgmt vCenter
- Log into vCenter Server as user: administrator@vsphere.local with the password: VMware123!
- Click Login
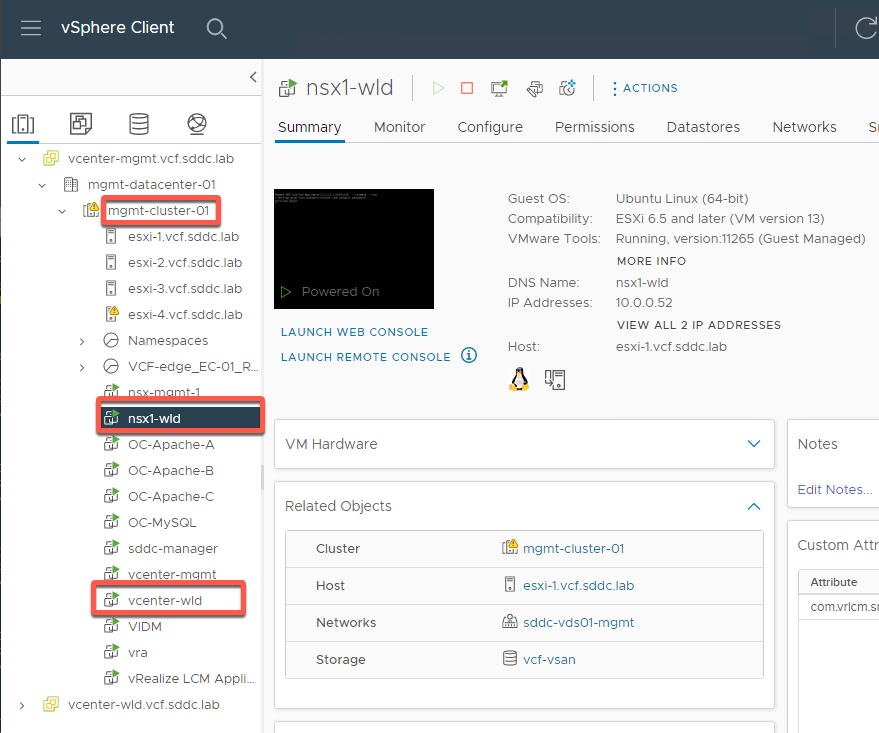
- Click Hosts and Clusters view, and expand mgmt-datacenter-01 -> mgmt-cluster-01
- Notice nsx1-wld and vcenter-wld virtual machines running in the management domain.
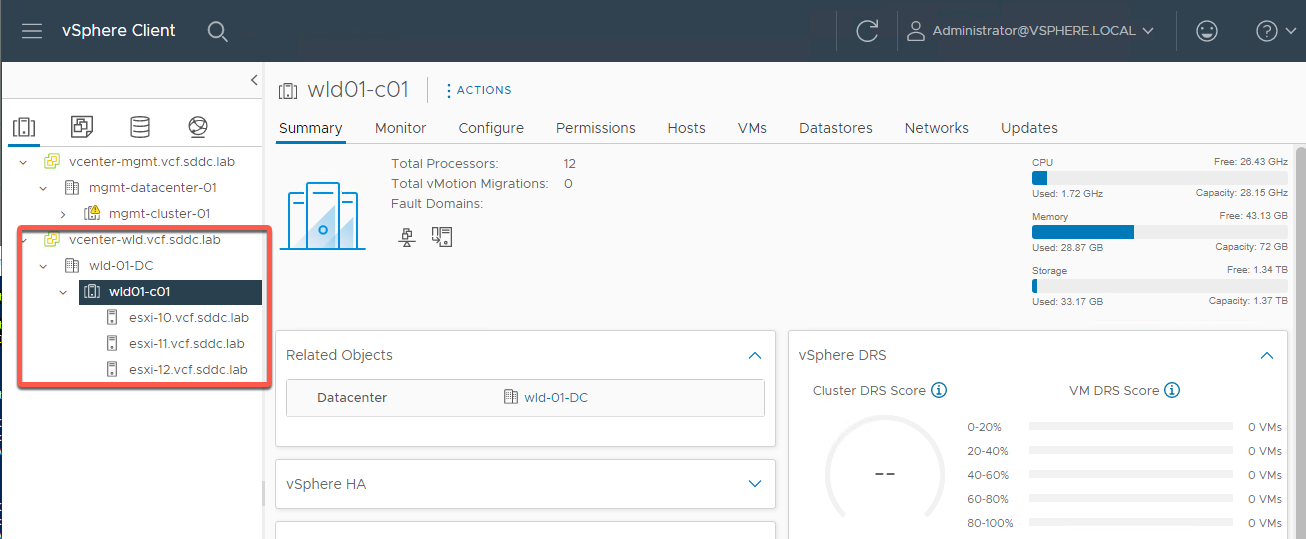
- Expand vcenter-wld.vcf.sdc.lab -> wld-01-DC -> wld01-c01
- Notice wld01-C01 with esxi-10, esxi-11 and esxi-12 as was built earlier
Module Summary
SDDC Manager significantly simplifies and automates deployment of additional capacity in a workload domain. This includes deploying NSX Manager, vCenter Server, and configuring a vSAN cluster.
Module 5: Workload Domain Expansion
This module will show the process of adding a node to an existing cluster in a workload domain, as well as adding a cluster to an existing workload domain.
Prerequsites:
- Holodeck pod with hosts ESXi-5 through ESXi-8 initialized in the nested environment commissioned.
- Expects C:\VLC\VLC-Holo-Site-1\add_hosts5-8_bulk_commission_VSAN.json configuration used in commissioning
[Step 1] Log in to the environment
- Open a new tab in the Chrome browser (if necessary)
- Click the Managed Bookmarks folder in the bookmark bar then select SDDC Manager
- Log into SDDC Manager as user: administrator@vsphere.local with the password: VMware123!
- Click Login
[Step 2] Add host to cluster
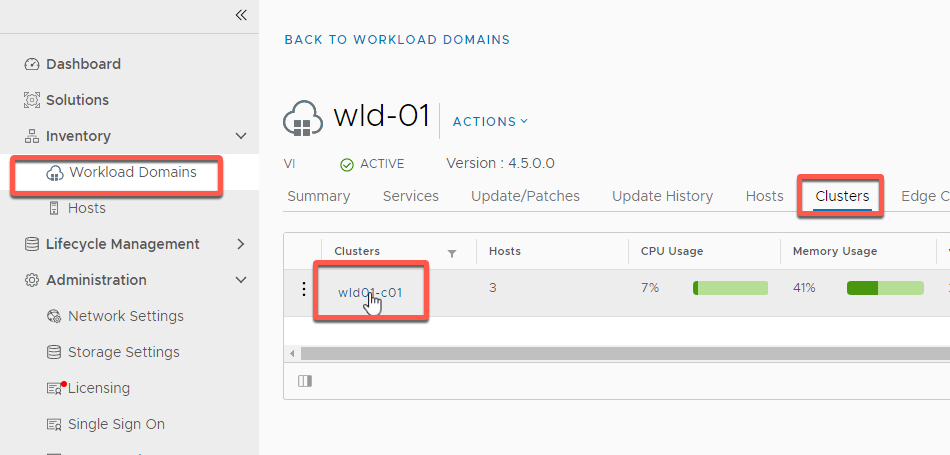
- Select Inventory -> Workload Domains-> wld-01
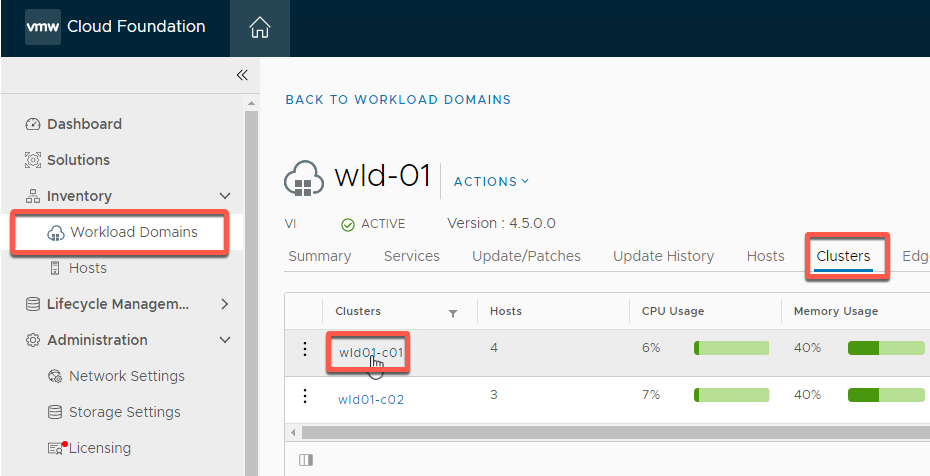
- Select Clusters -> wld01-c01
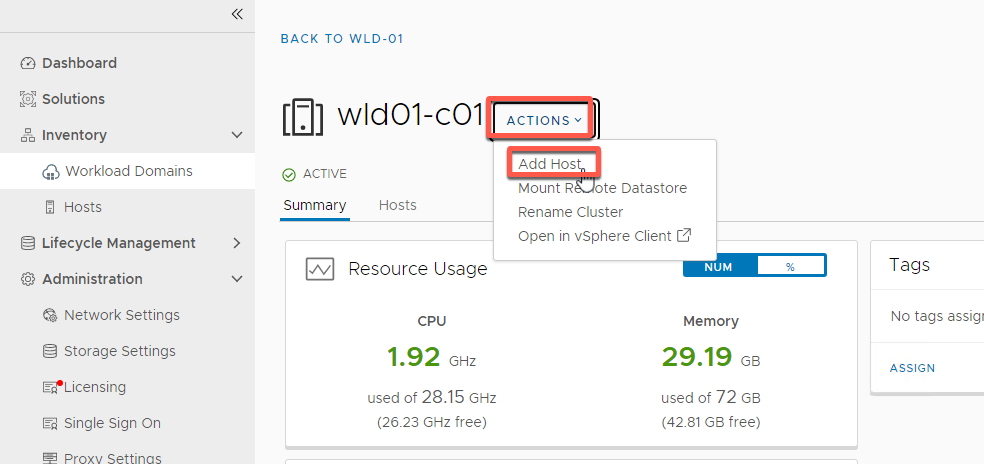
- Select Actions -> Add Host
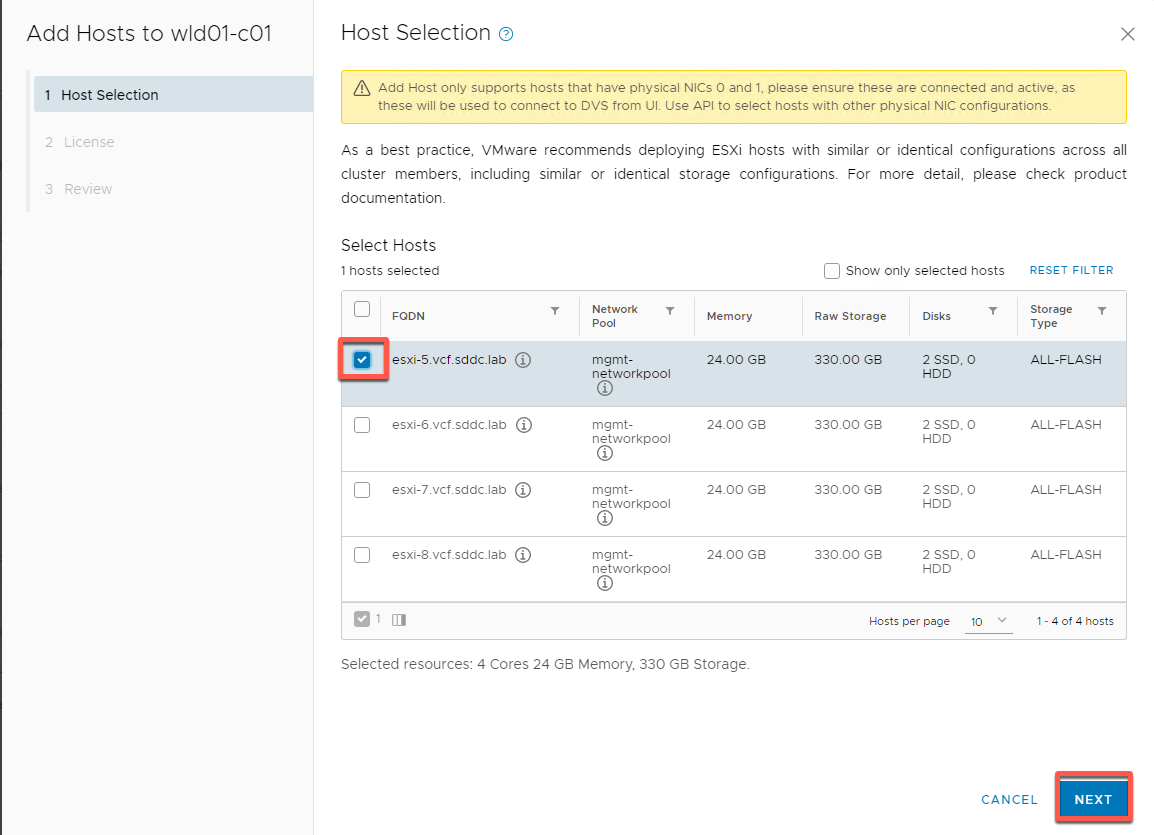
- Select esxi-5 then Next
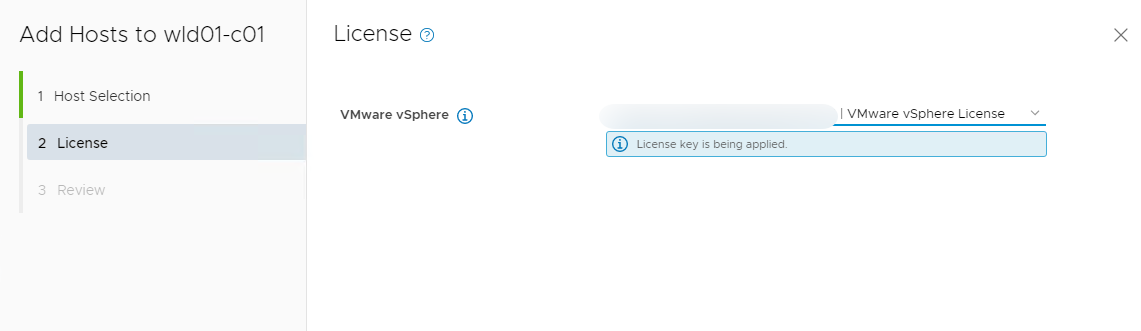
- Select your vSphere license then Next
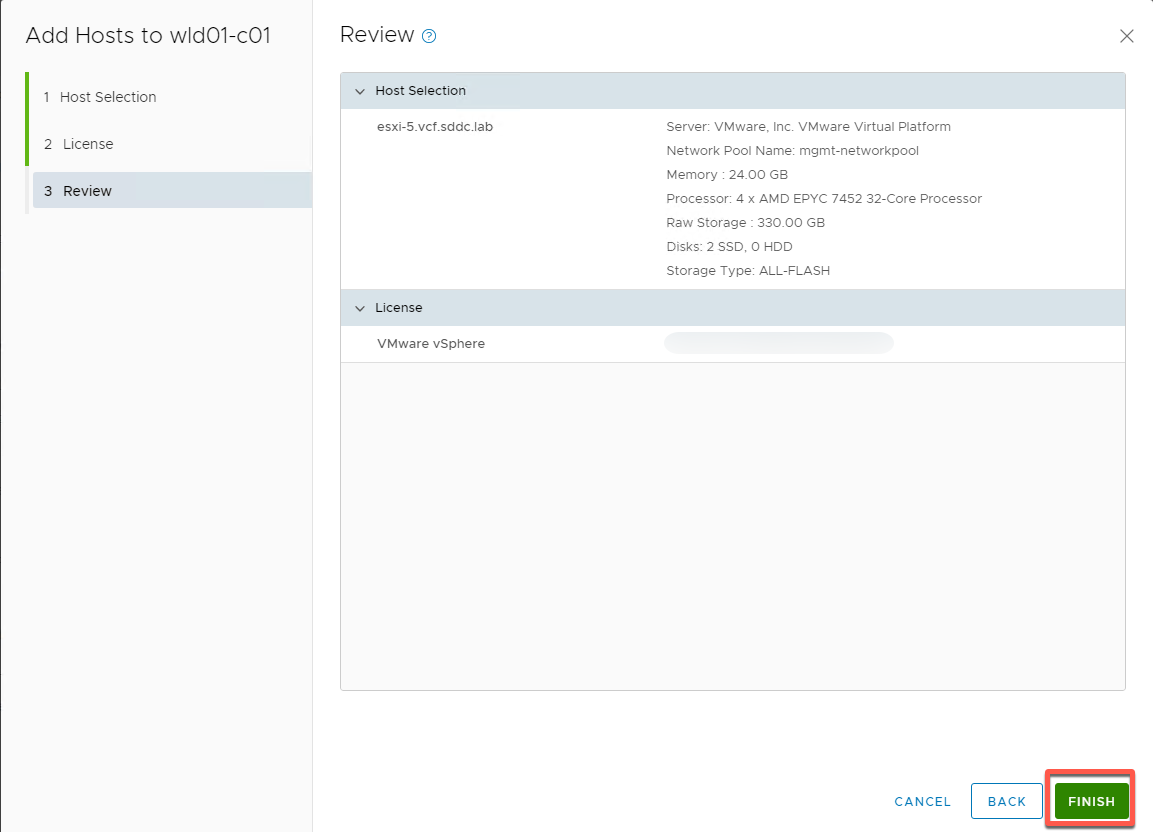
- Review details, then click Finish
- Monitor progress in the task panel
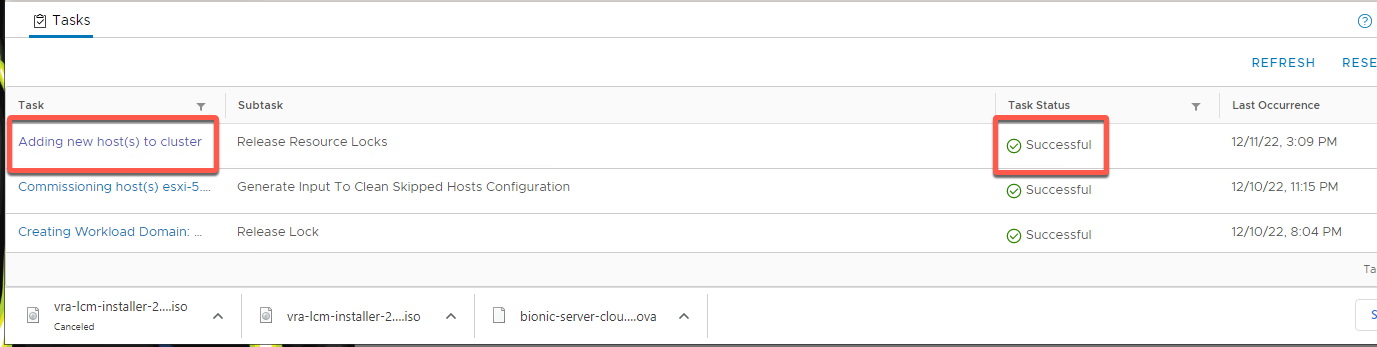
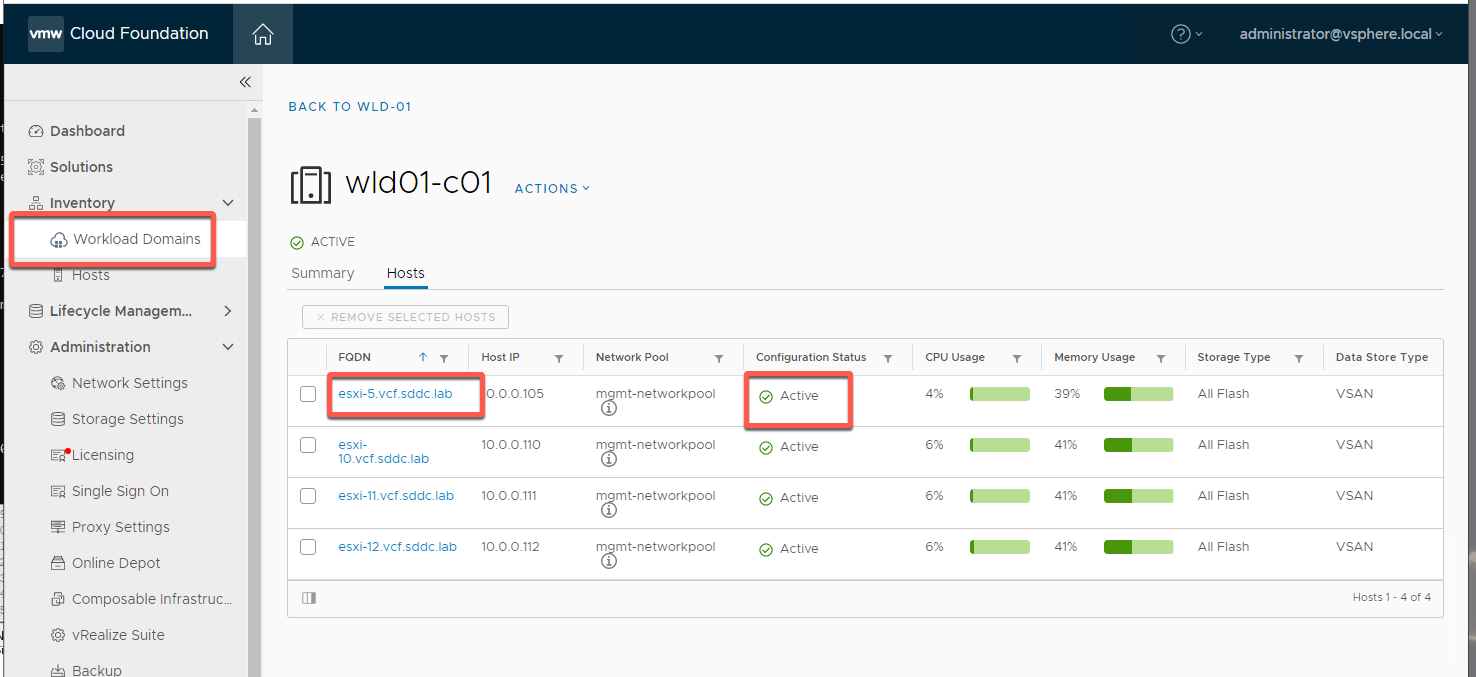
- Your result should be
[Step 3] Add cluster to Workload Domain
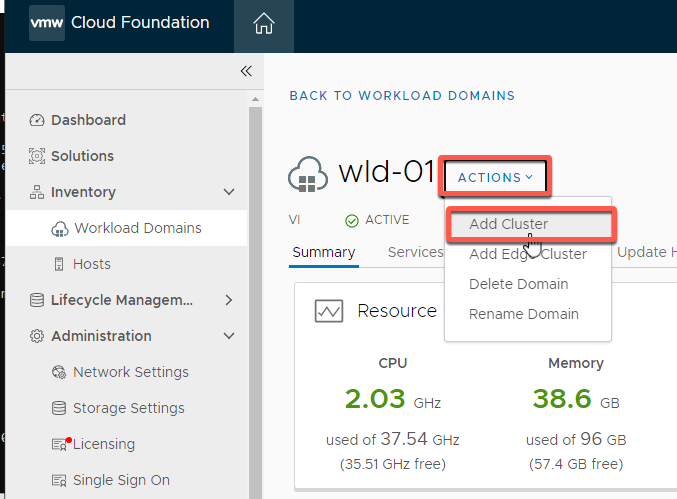
- Select Inventory -> Workload Domains-> WLD-01
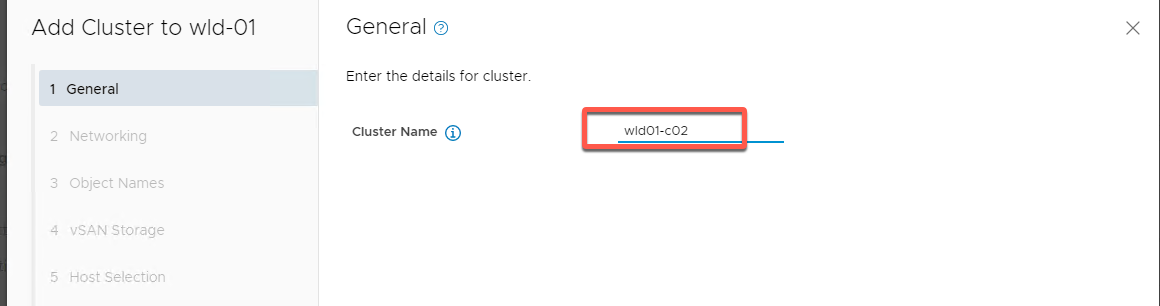
- Select Actions -> Add Cluster
- Select VSAN for Storage and click Begin
- Name the cluster wld01-c02 and click Next
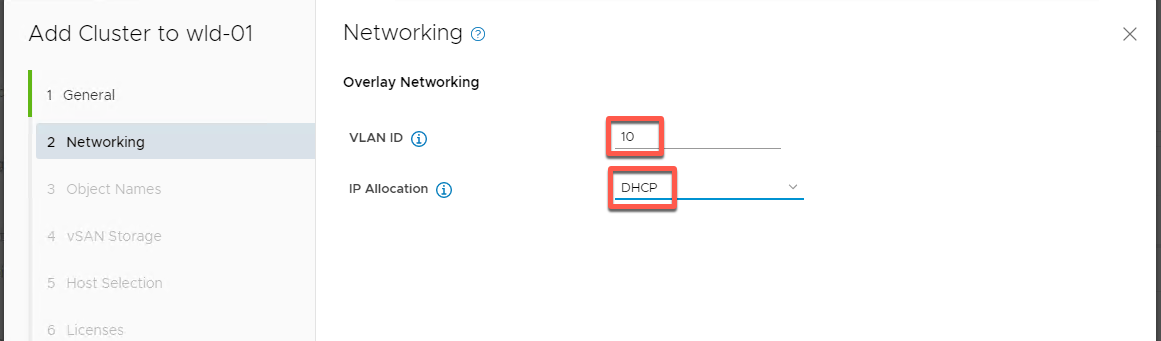
- Set VLAN to 10 and DHCP addressing for IP Allocation then Next
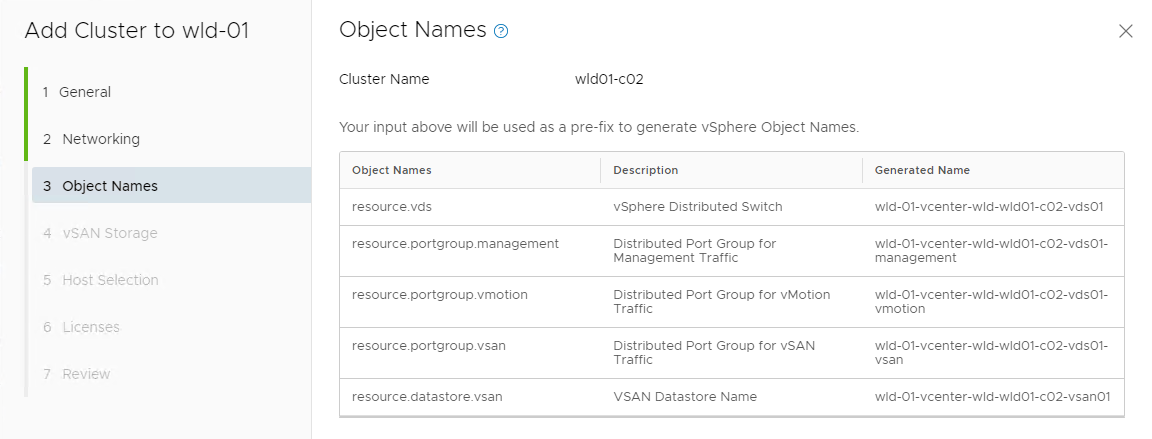
- Accept Object naming and click NEXT
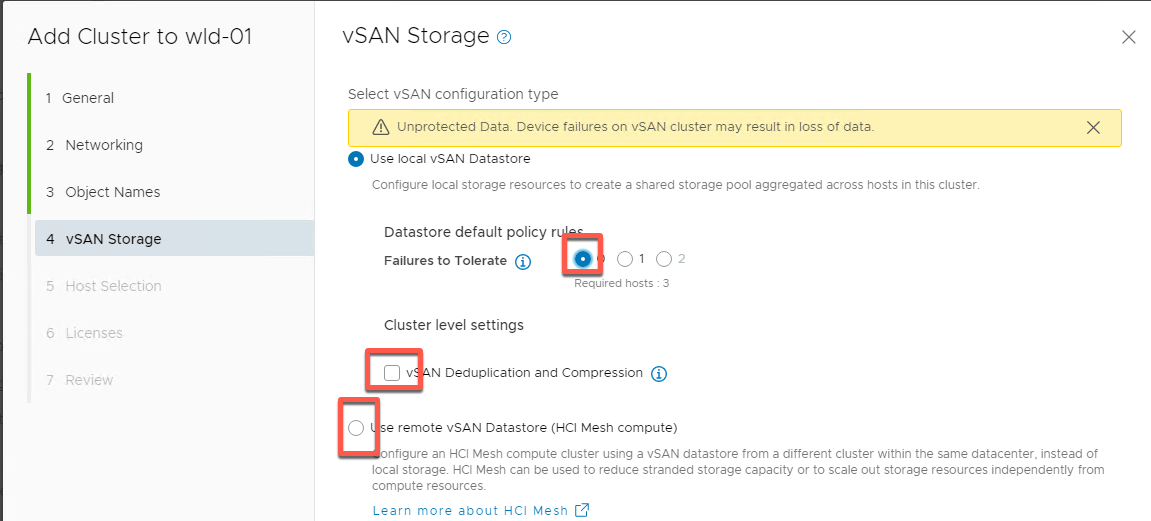
- Select 0 for Failures to Tolerate. Do not check Deduplication and Compression as this is a nested lab. The lab is also not configured for HCI Mesh
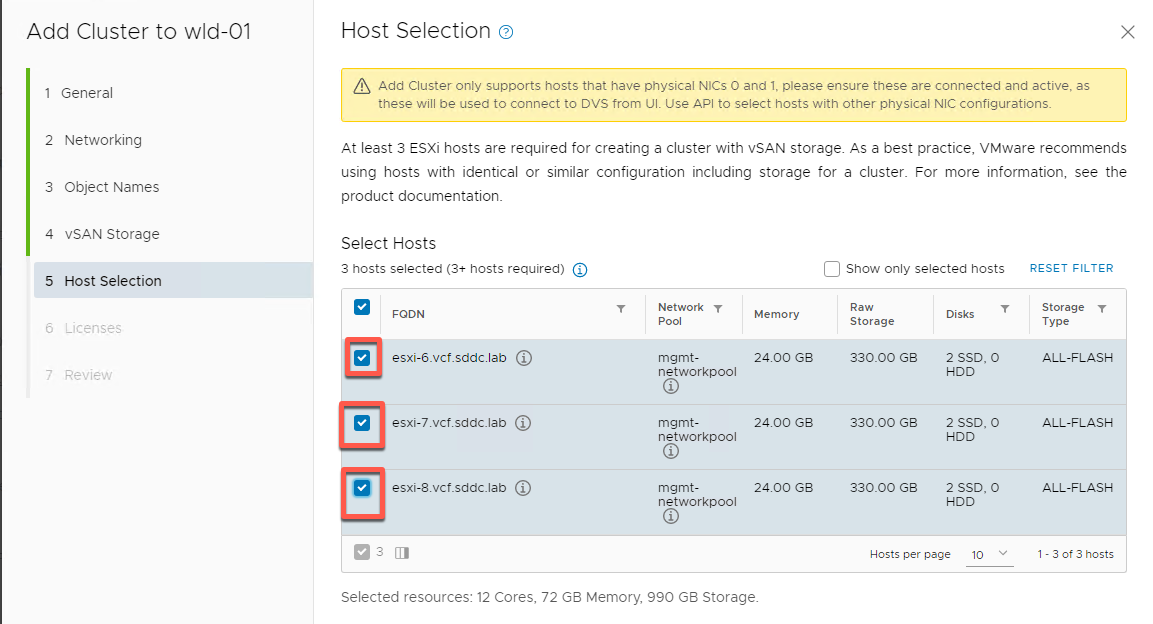
- Select hosts esxi-6, esxi-7 and esxi-8 then click Next
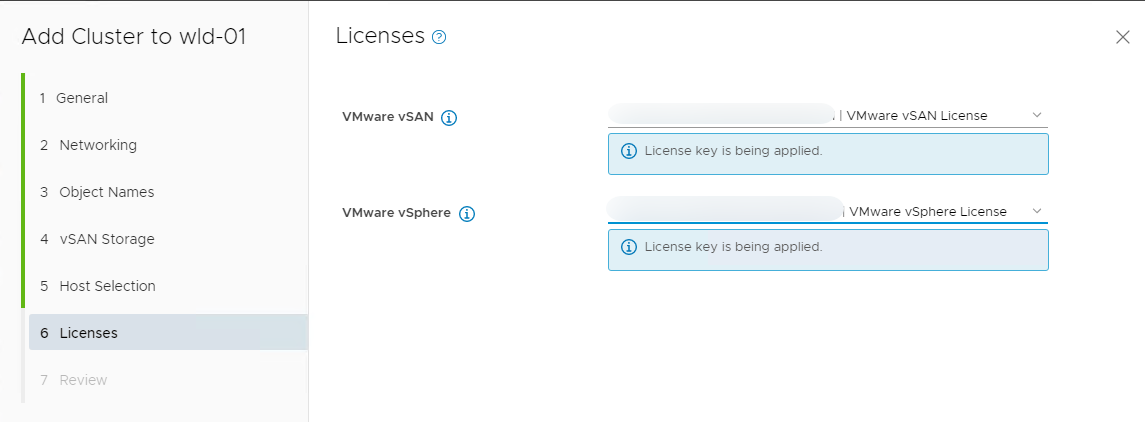
- Apply your licenses then click Next
- Review details and click Finish (NOTE: There is a known issue with Chrome browser and several summary screens. If the Review screen is black, simply click finish to move forward)
- Monitor in task pane
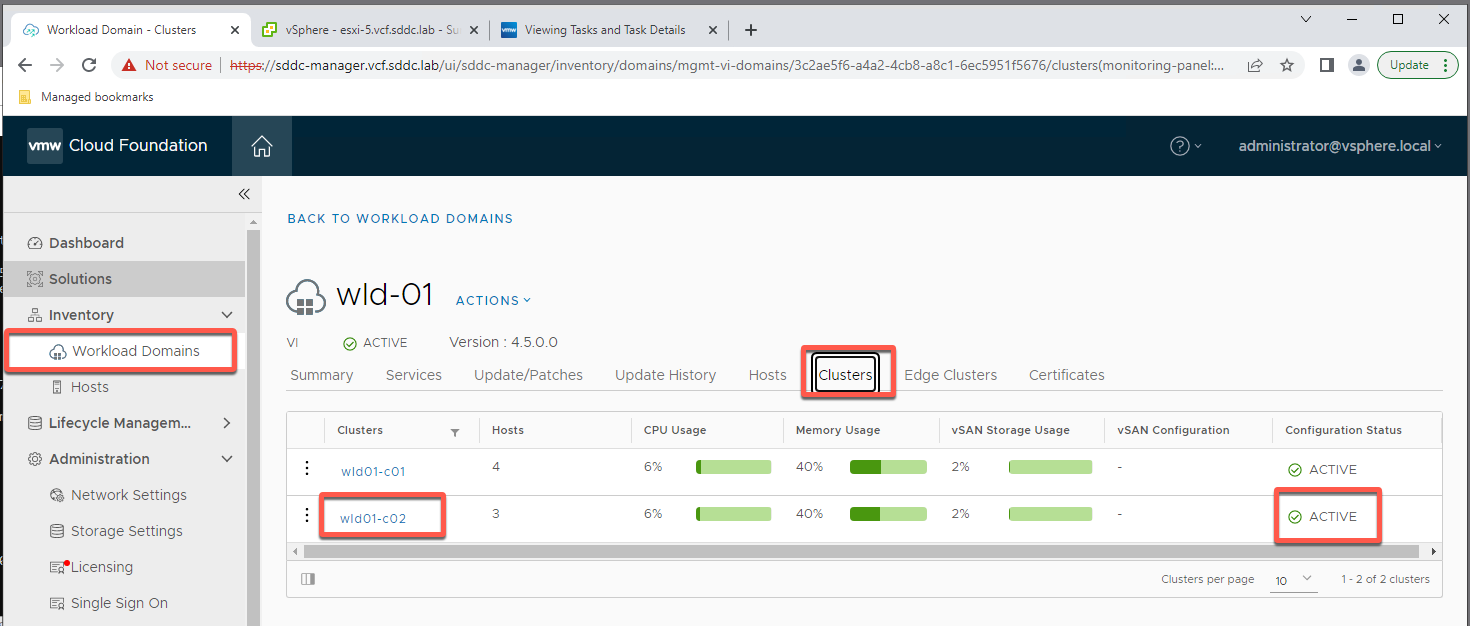
- Your results should look like this
Module 6: Workload Domain Contraction
This module will show the process of reducing capacity in a workload domain by removing a node from a cluster and removing a cluster. The module concludes with decommissioning hosts from the SDDC Manager Inventory.
Prerequisites:
Complete Module 5 Workload Domain Expansion
[Exercise 1] Log in to the environment
- Open a new tab in the Chrome browser (if necessary)
- Click the Managed bookmarks folder in the bookmark bar then select SDDC Manager
- Log into SDDC Manager as user: administrator@vsphere.local with the password: VMware123!
- Click Login
[Exercise 2] Remove node from cluster
- Select Inventory -> Workload Domain -> WLD-01 -> Clusters -> wld01-c01
- Select Hosts, then select esxi-5
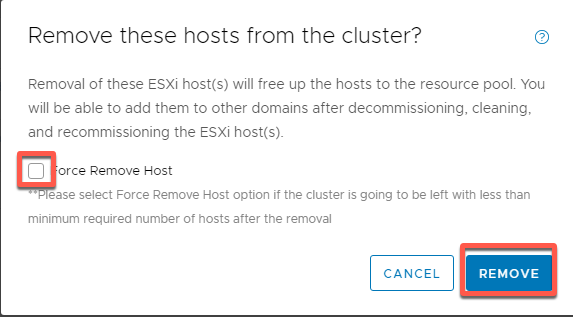
- Click Remove Selected Hosts
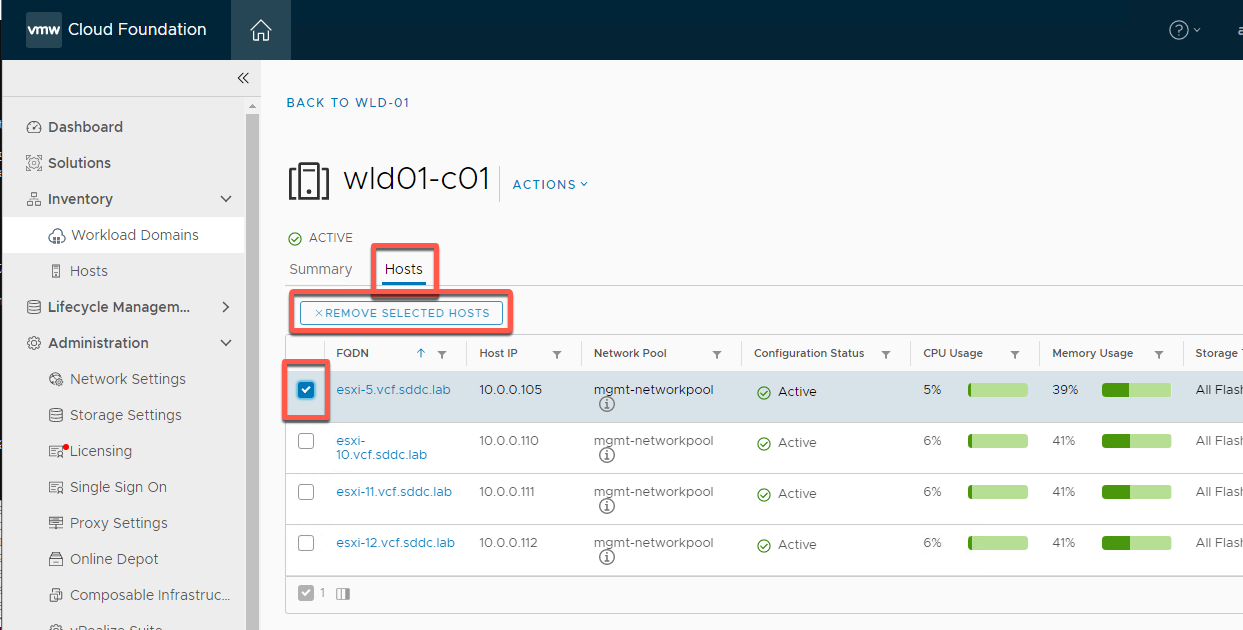
- Click Remove (as we have 3 hosts remaining we do not need Force)
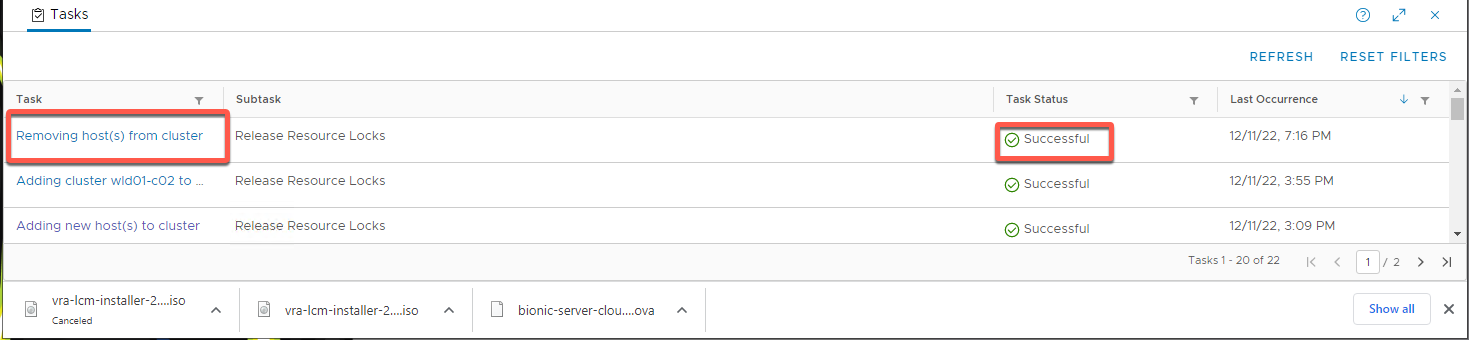
- Expected result
[Exercise 3] Remove cluster
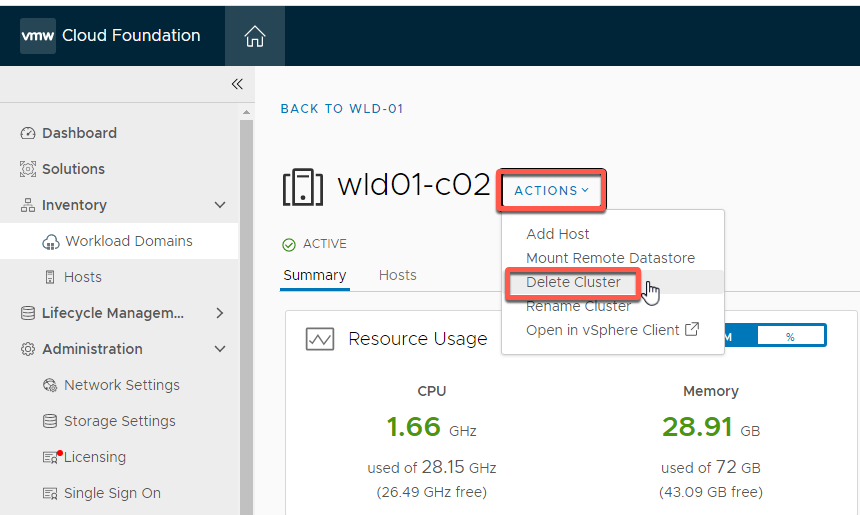
- Select Inventory -> Workload Domain -> WLD-01 -> Clusters -> wld01-c02
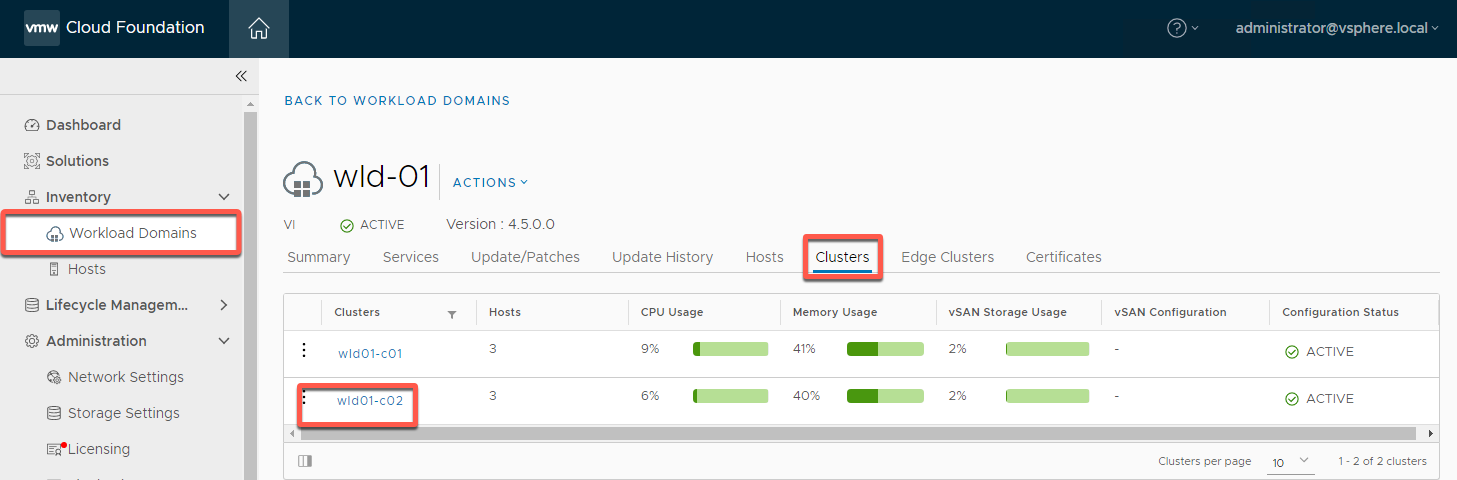
- Select Actions -> Delete Cluster
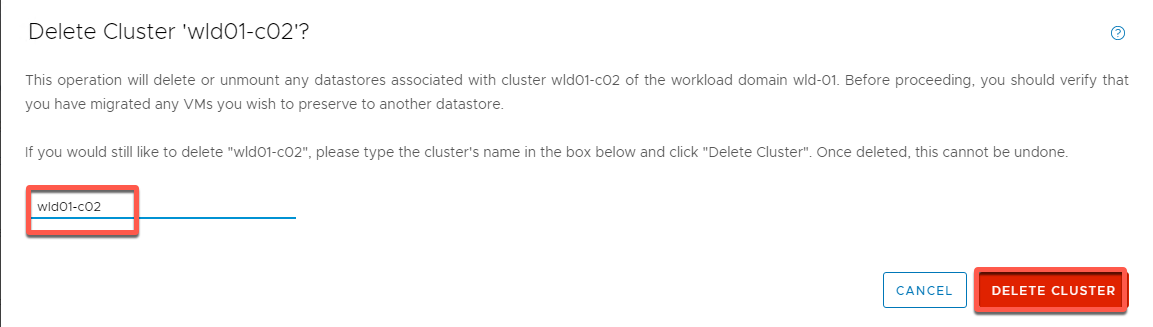
- Enter the cluster name (wld01-c02) to confirm then click Delete Cluster
- Monitor progress in the task pane
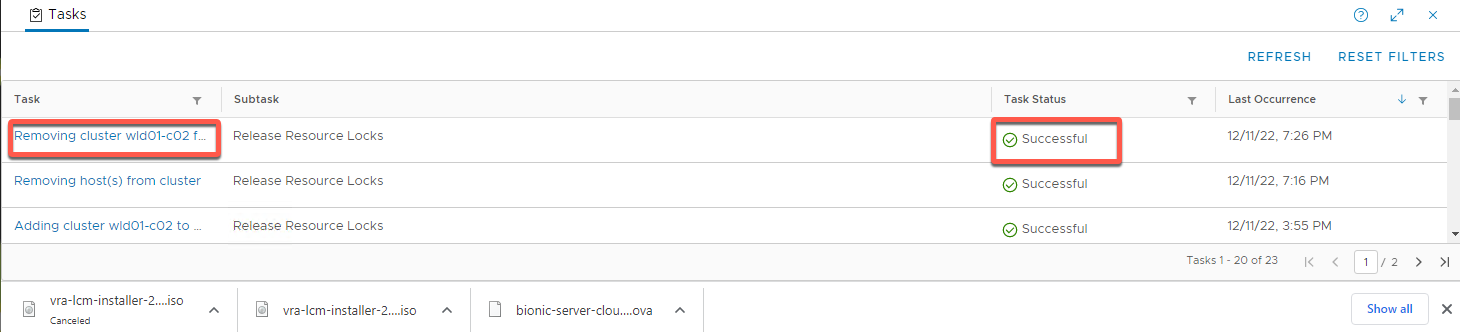
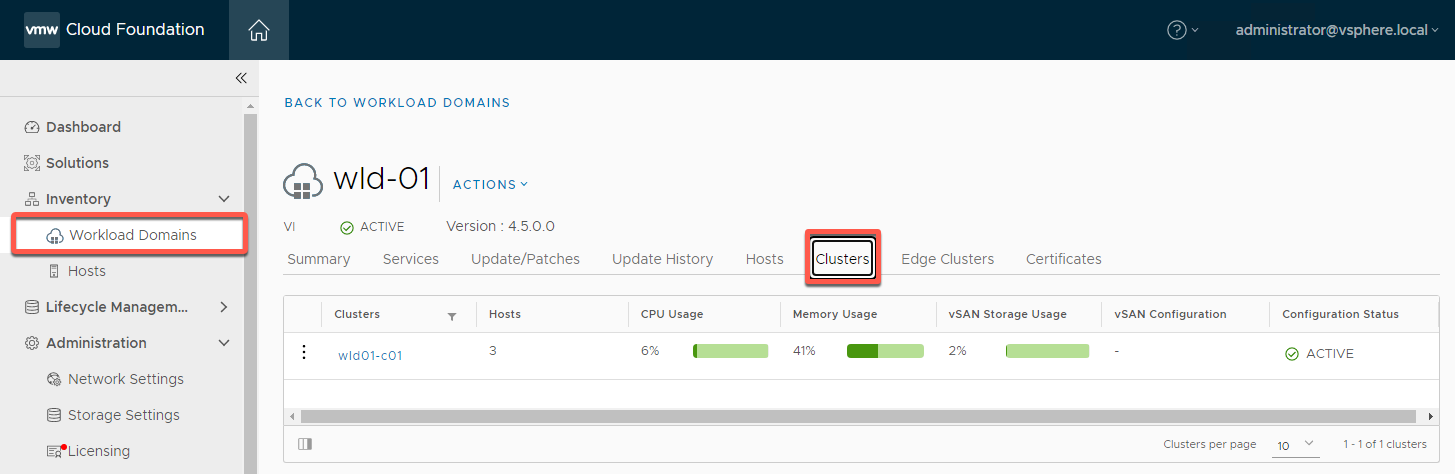
- End result
[Exercise 4] Decommission Hosts
This exercise should be completed each time either a host or a workload domain has been deleted from the SDDC environment.
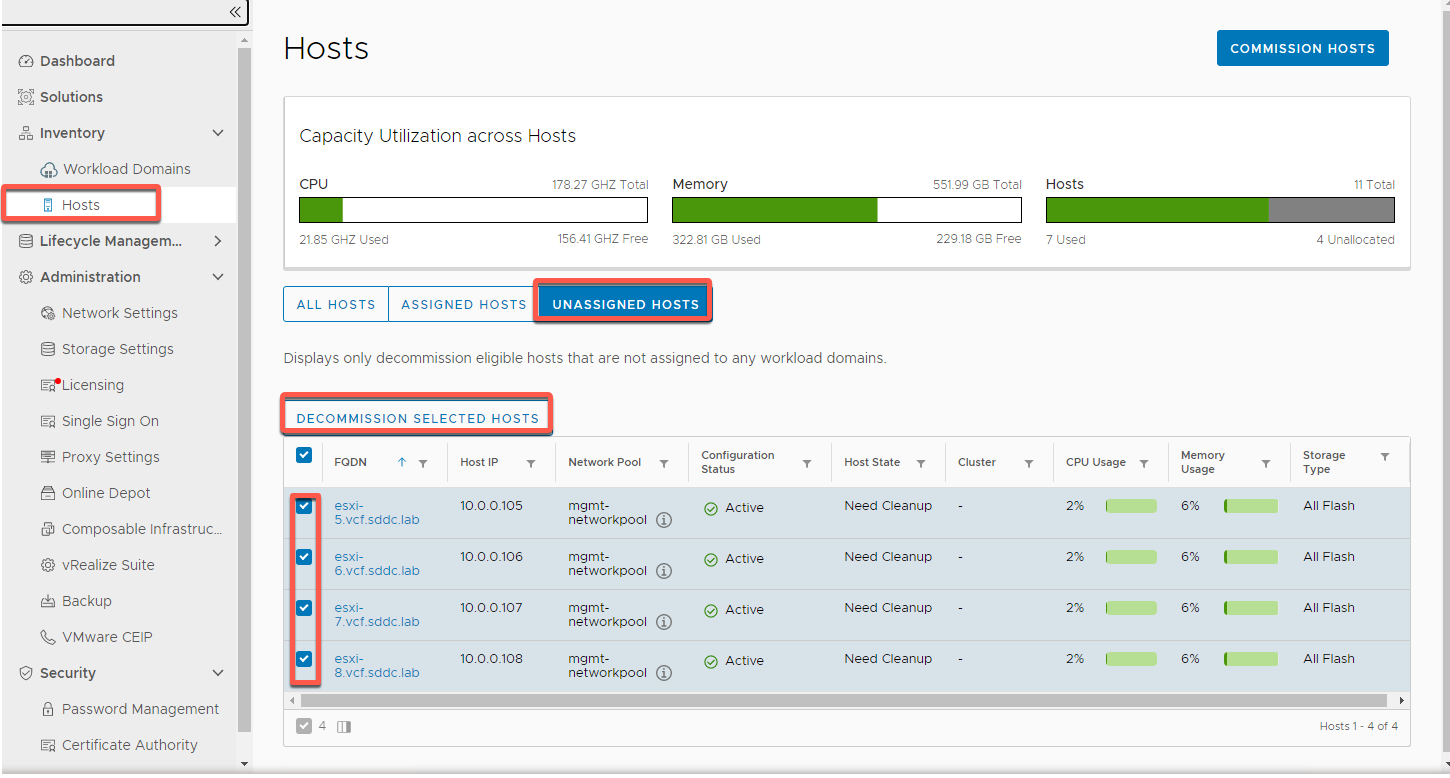
- Select Inventory -> Hosts -> Unassigned Hosts
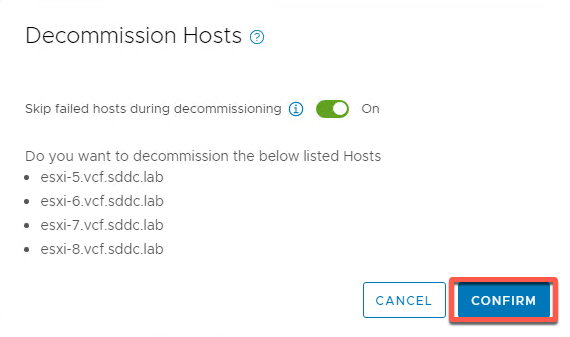
- Select hosts esxi-5 through esxi-8, then click Decommission Selected Hosts
- Click Confirm
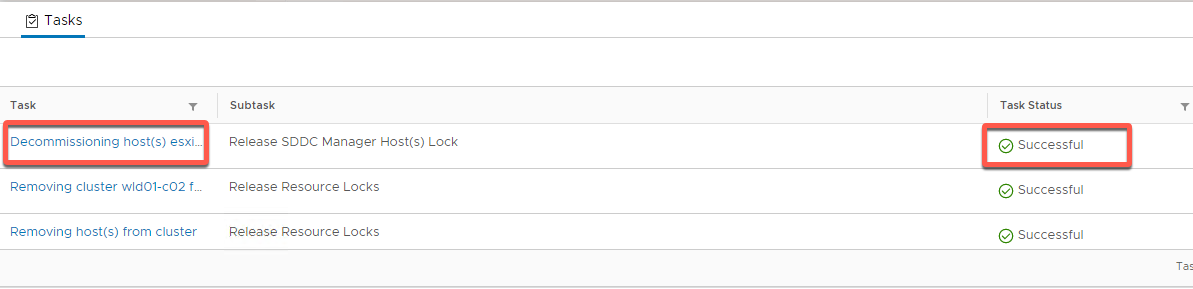
- End result should be
At this point in a physical environment the vSphere administrator would wipe the hosts and redeploy vSphere. In the VLC Holodeck environment this is as simple as powering off and deleting the nested ESXi hosts and regenerating with “expansion pack” functionality.