
Cloud Foundation Holodeck: vRealize Automation - Fixed Networks
Overview
This module introduces consumption of a VCF based VMware Cloud using vRealize Cloud Assembly. Participants will gain experience with using vRealize Automation Cloud Assembly to deploy application workloads onto preconfigured NSX Segments and firewall policies.
It is anticipated that this module will take 60-90 minutes to complete.
This module consists of the following exercises
- Create NSX Segments with DHCP services, and connect to OC-T1 Tier-1 router
- Create Cloud Assembly Network Profile for OC-DB-Auto-Seg
- Create Cloud Assembly Network Profile for OC-Web-Auto-Seg
- Review vRealize Cloud Template
- Deploy OpenCart from Cloud Template
- Review Provisioning Diagram
- Review Deployed Application
- Delete Deployed Application
This module relies on:
- Holodeck OpenCart SDN lab completed (This lab consumes The T1 Router, Tagging and Distributed Firewall rules from the SDN lab)
- Holodeck VRA initial setup complete including Quick Start
Deploying OpenCart to pre-existing NSX Segments – Holodeck Config
Exercise 1: Create NSX Segments with DHCP Server
In this exercise we will create two new NSX segments to host OpenCart web and database servers. Each segment will use a /24 subnet and reserve a part of the address space for VRA deployed services like load balancers and the remainder for DHCP boot of hosts. Note that this step requires admin level privileges to NSX and in a live datacenter environment this might be carried out by the network team or a consolidated operations team.
[Step 1] Logging in to the environment
- Open a new tab in the Chrome browser
- Click the Management NSX-T shortcut in the bookmark bar (click advanced / proceed to nsx-mgmt.vcf.sddc.lab, if required to accept the certificate)
- Log into NSX Manager as user: admin with the password: VMware123!VMware123!
- From the NSX-T Manager interface click the Networking tab
- Select Network Topology
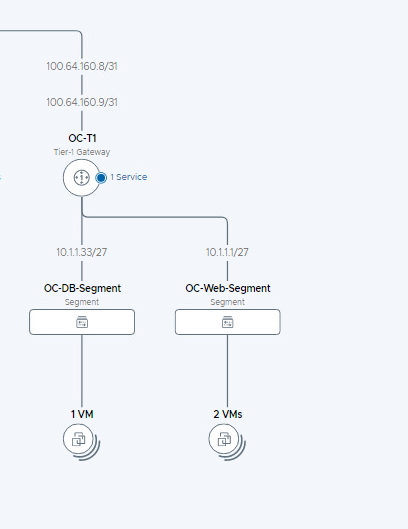
In the topology view you should see the OC-T1 router and OC-DB-Segment and OC-Web-Segment from the previous module. We are going to add additional segments to this Tier-1 router for use by vRealize Cloud Assembly. The next steps will create the following networks
- OC-DB-Auto-Seg
- 10.1.3.0/24
- Gateway 10.1.3.1/24
- DHCP Server 10.1.3.254/24
- DHCP Range 10.1.3.100-10.1.3.253
- OC-Web-Auto-Seg
- 10.1.4.0/24
- Gateway 10.1.4.1/24
- DHCP Server 10.1.4.254/24
- DHCP Range 10.1.4.100-10.1.4.253
[Step 2] Create OC-Holodeck DHCP Profile
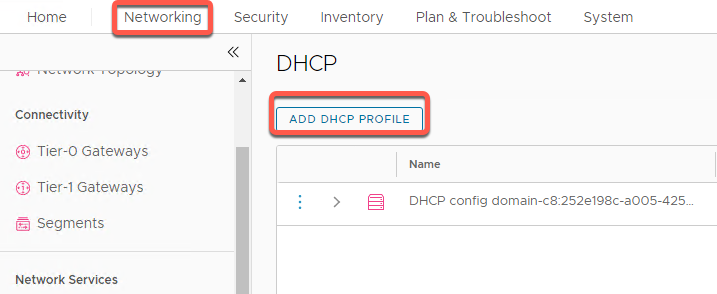
- From the NSX-T Manager interface click the Networking tab at the top of the screen
- Click DHCP in the left pane.
- Click Add DHCP Profile
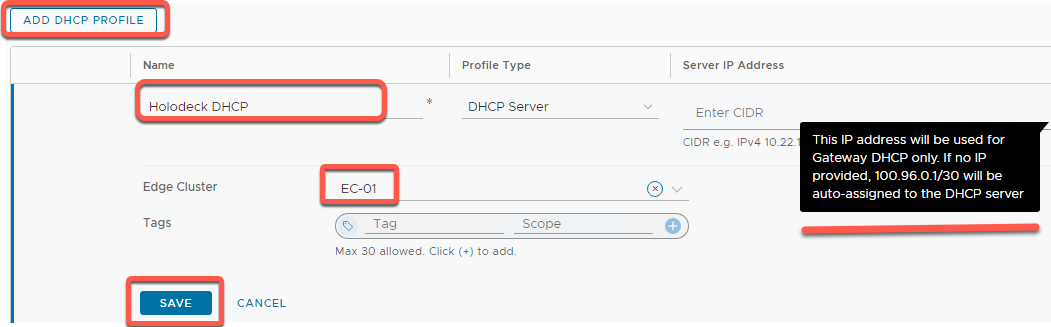
- Name the profile Holodeck-DHCP
- Leave the Server IP Address blank as we will assign segment specific DHCP addressing later
- Click Edge Cluster and select EC-01
- Click Save
[Step 3a] Create the OC-DB-Auto-Seg
- From the NSX-T Manager interface click the Networking tab at the top of the screen
- Click Segments in the left pane.
-
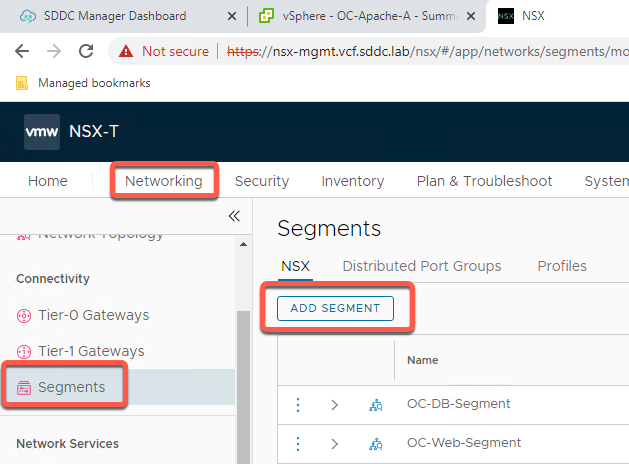 Click ADD SEGMENT button
- In the Segment Name field, enter OC-DB-Auto-Seg
- Set Connected Gateway to OC-T1
- In the Transport Zone dropdown, select mgmt-domain-tz-overlay01
- Add IPv4 gateway 10.1.3.1/24

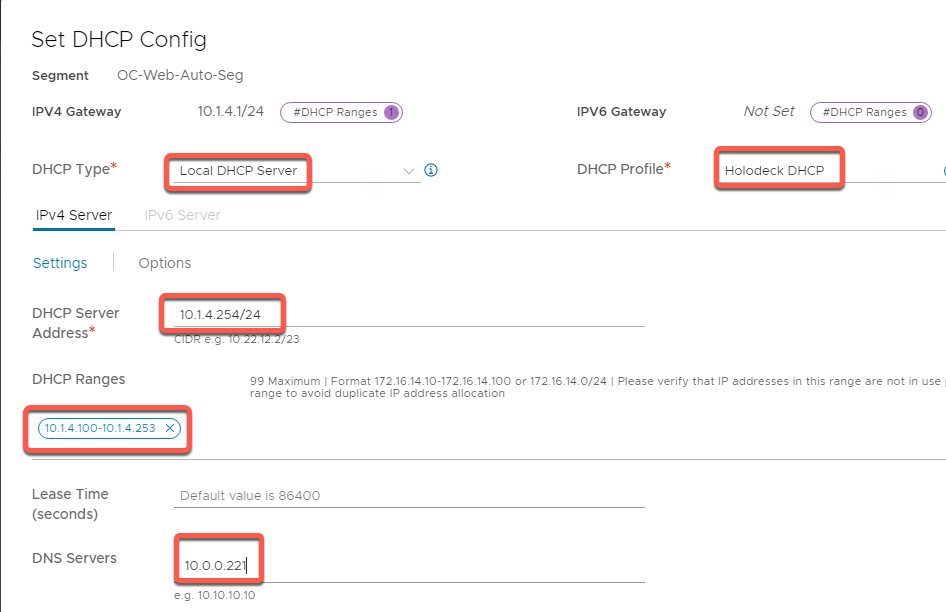
- Click SET DHCP CONFIG
- Set DHCP Type to Local DHCP Server
- Select Holodeck DHCP profile
- Set DHCP Server Address 10.1.3.254/24
- Set DHCP Ranges 10.1.3.100-10.1.3.253
- Set DNS to 10.0.0.221
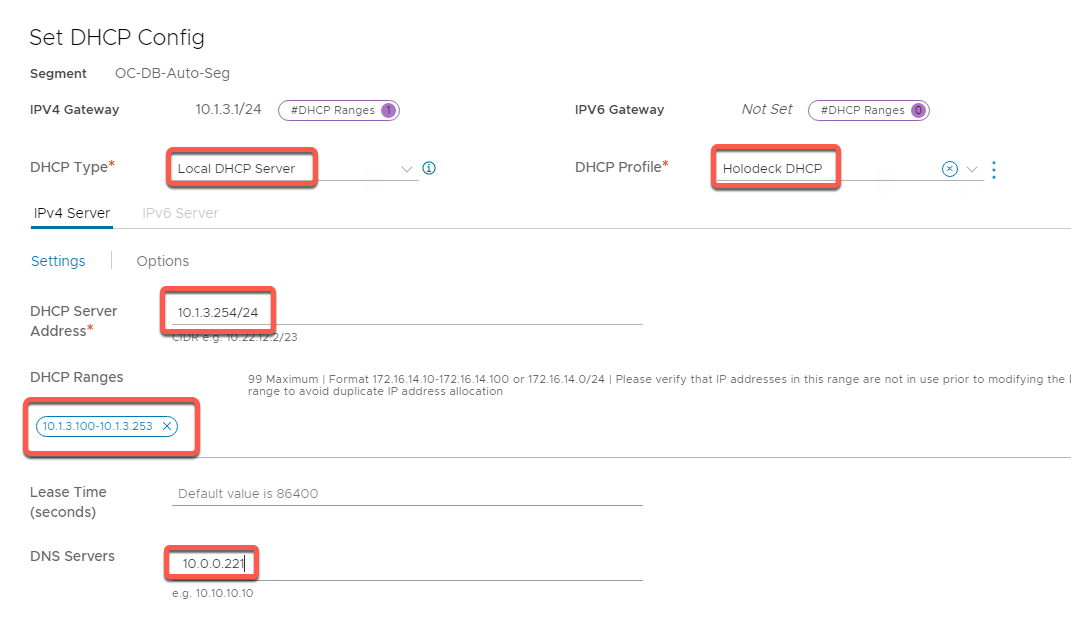
- Leave all IPv6 settings Not Set
- Click Apply
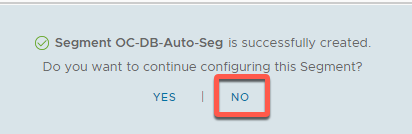
- At bottom of the Segments screen, click Save
- You will see your segment has been successfully created. Click NO on the Want to continue configuring this segment?
[Step 3B] Create the OC-Web-Auto-Seg
- From the NSX-T Manager interface click the Networking tab at the top of the screen
- Click Segments in the left pane.
- Click ADD SEGMENT button
- In the Segment Name field, enter OC-Web-Auto-Seg
- Set Connected Gateway to OC-T1
- In the Transport Zone dropdown, select mgmt-domain-tz-overlay01
- Add IPv4 gateway 10.1.4.1/24
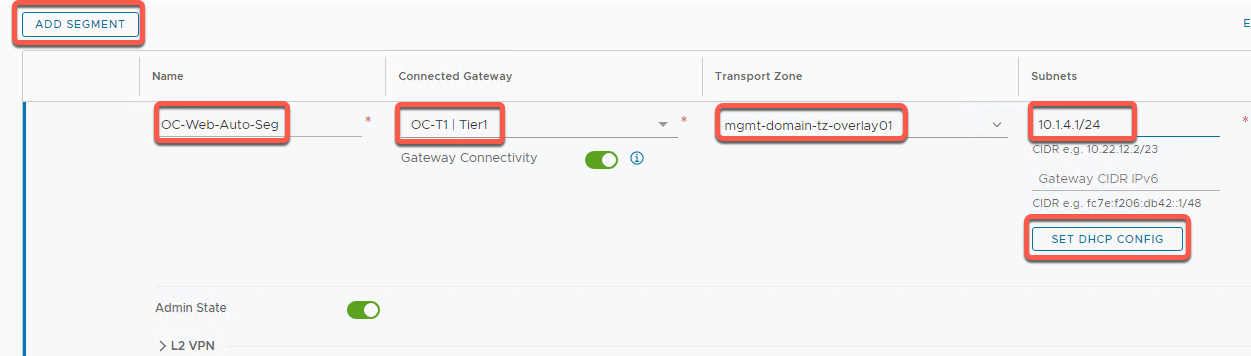
- Click SET DHCP CONFIG
- Set DHCP Type to Local DHCP Server
- Select Holodeck DHCP profile
- Set DHCP Server Address 10.1.4.254/24
- Set DHCP Ranges 10.1.4.100-10.1.4.253
- Set DNS to 10.0.0.221
- Leave all IPv6 settings Not Set
- Click Apply
- At bottom of the Segments screen, click Save
- You will see your segment has been successfully created. Click NO on the Want to continue configuring this segment?
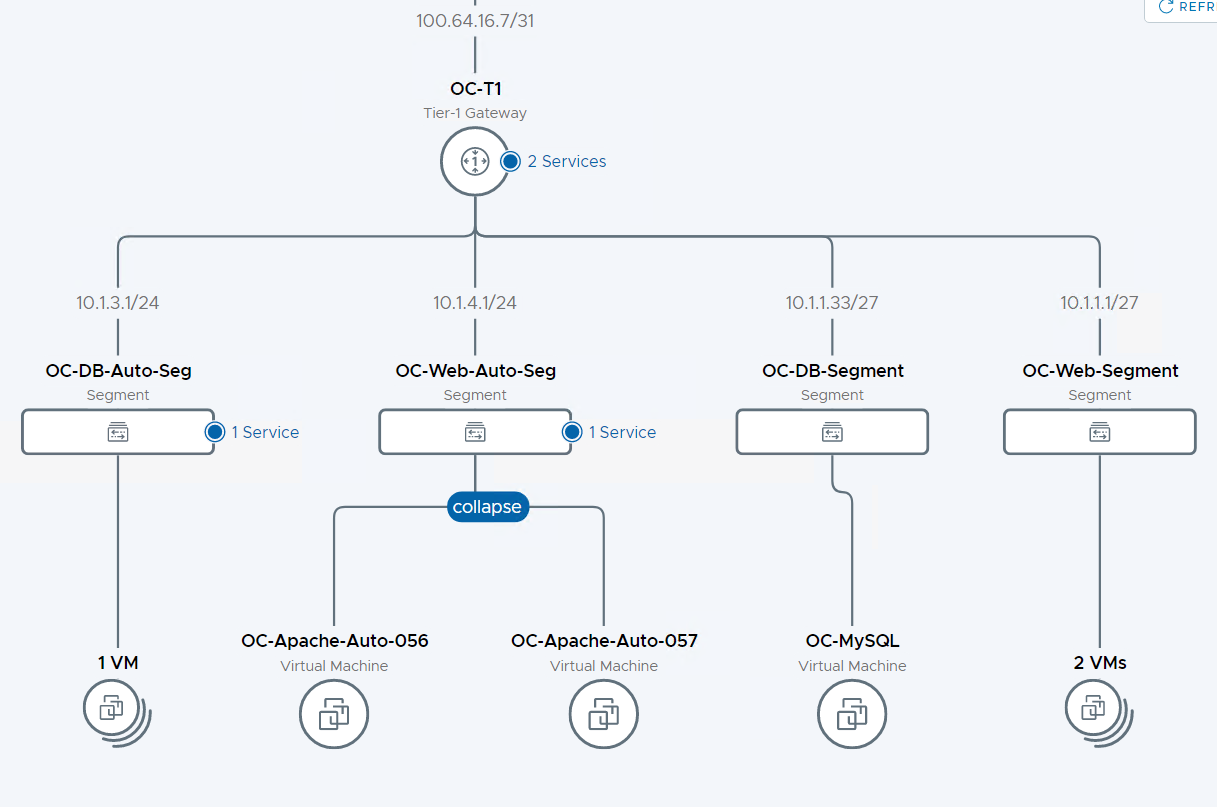
[Step 3c] Review the network topology
- From the NSX-T Manager interface click the Networking tab at the top of the screen
- Click Network Topology in the left pane.
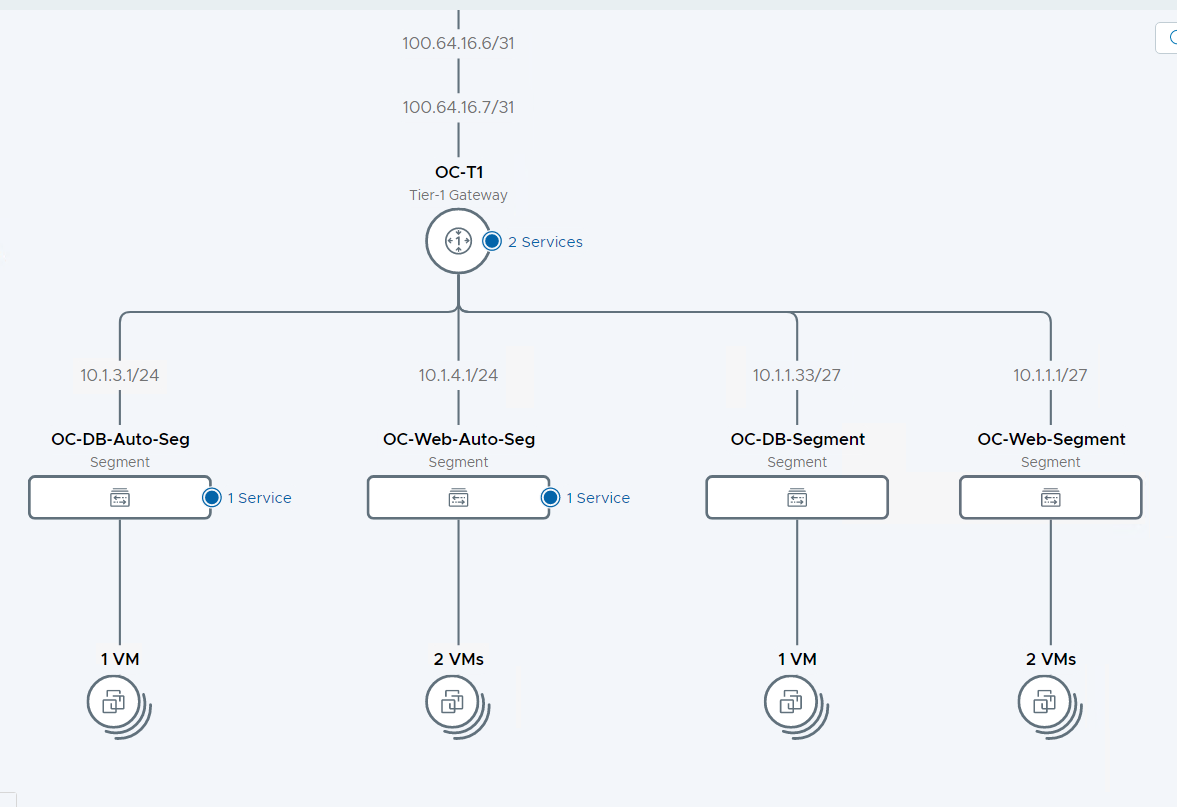
- Locate the OC-T1 Tier-1 Gateway on the topology
- Your topology should look like the following
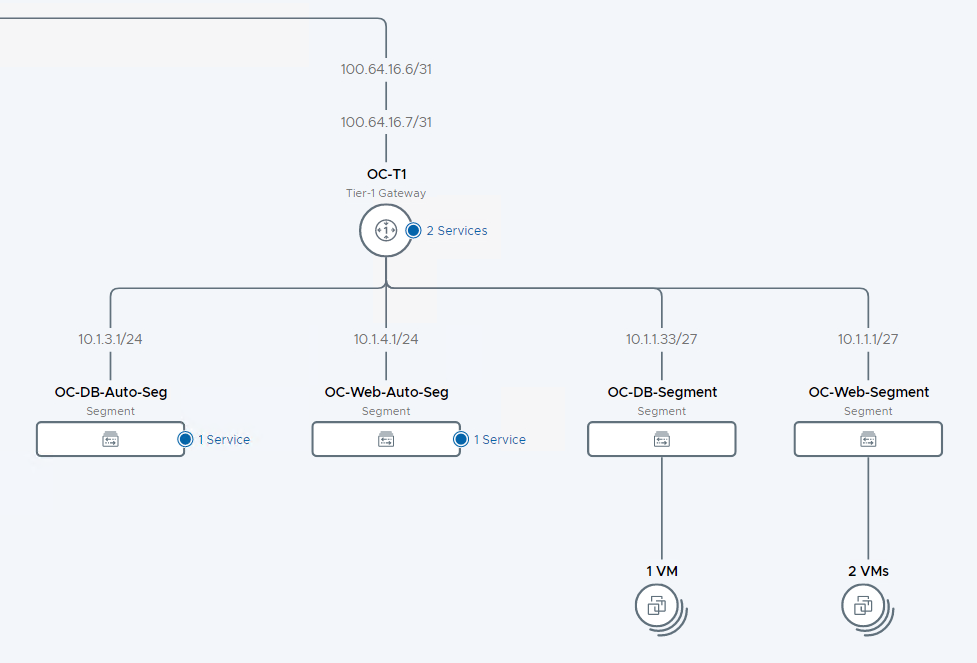
- Click on 1 Service on OC-DB-Auto-Seg. Notice the DHCP service

- Note the time taken to complete this exercise. In 10-15 minutes, you created 2 new networks, with router connectivity. How long would this take in your current environment?
Exercise 2: Create OC-DB-Auto-Seg Cloud Assembly Network Profile
In this exercise we will configure a new Network Profile in Cloud Assembly for the OC-DB-Auto-Seg segment that was created earlier. Cloud Assembly Network Profiles configure how VRA consumes or creates NSX networks. In this example we are configuring VRA to consume an existing NSX segment, along with existing security policies
[Step 1] Connect to vRealize Cloud Assembly (if necessary)
- Click + in the Chrome browser to open a new window
- Click the vRealize bookmark folder and select vra.vcf.sddc.lab
- Click GO TO LOGIN PAGE
- Login: Username: configadmin Password: VMware123!
- Click Cloud Assembly
[Step 2] Create OC-DB-Auto-Seg Network Profile
- Click Infrastructure -> Network Profiles
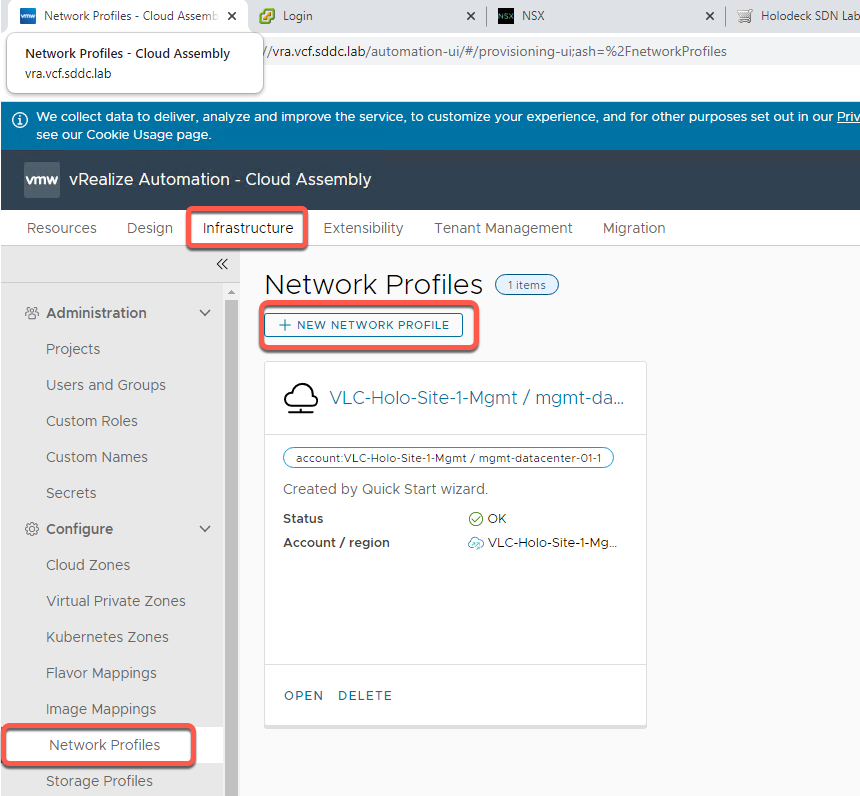
- Click New Network Profile
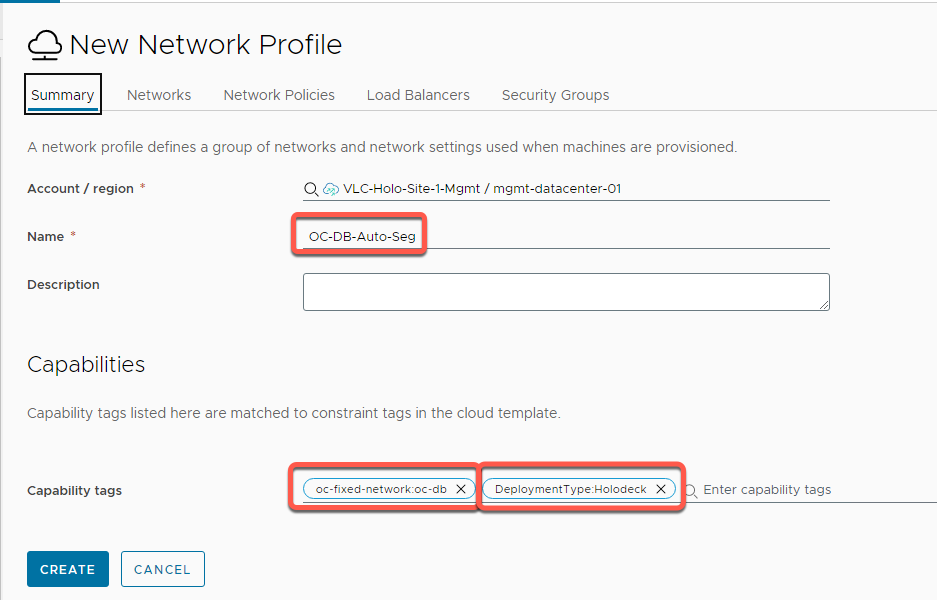
- On the Summary tab, Click on Account/Region and enter VLC.
- Select VLC-Holodeck-Mgmt / mgmt-datacenter-01
- Set the name to OC-DB-Auto-Seg
- Add the tag oc-fixed-network:oc-db by entering it into the Capability Tags field and pressing enter
- Add the tag DeploymentType:Holodeck by entering it into the Capability Tags field and pressing enter
[Step 2.1] Add Networks on Networks Tab
- Click on Networks tab, then Add Network
- Click in the filter area and type OC-
- Select the OC-DB-Auto-Seg
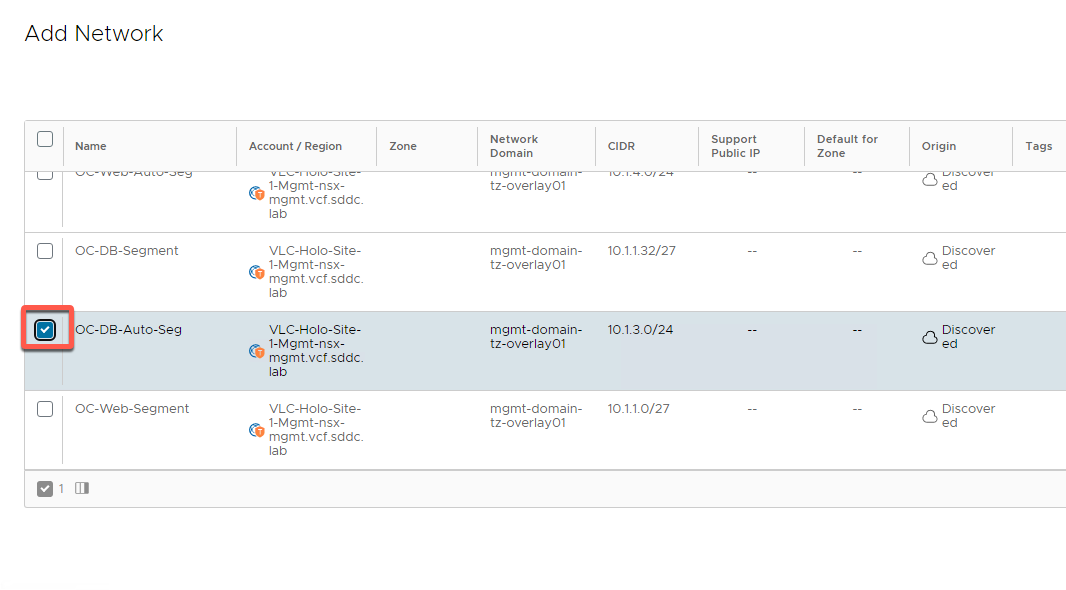
- Click Add. Your output should look like this

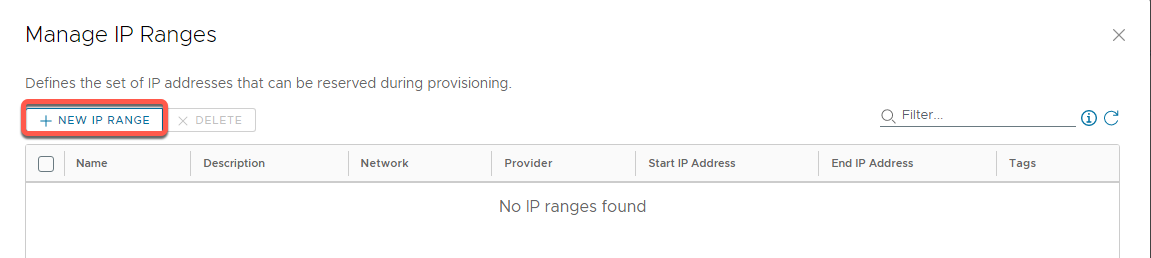
- Click Manage IP Ranges -> New IP Range
- Set Source Internal
- Name OC-DB-Auto-IP
- Network OC-DB-Auto-Seg should already be selected
- Start address 10.1.3.2
- End IP address 10.1.3.99
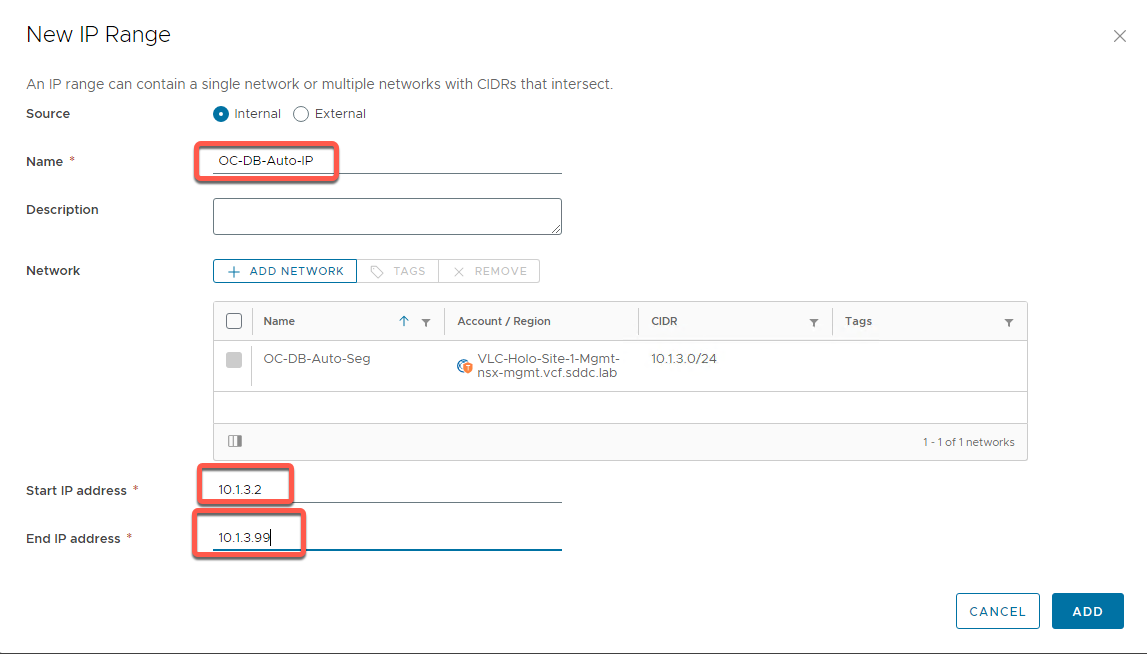
- Click Add.
- Your output should look like this
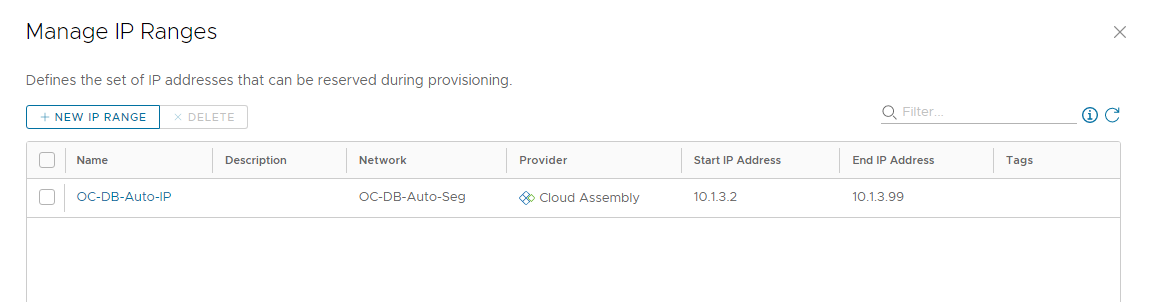
- Click Close
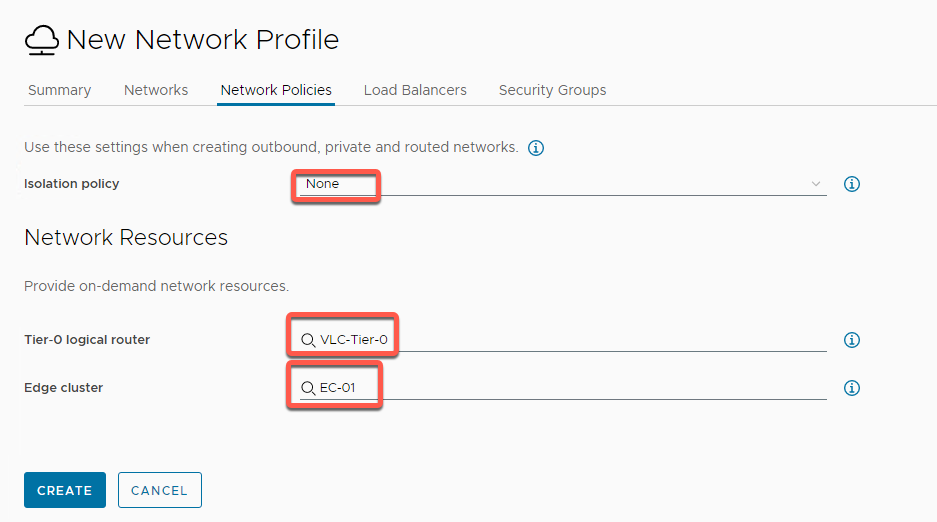
[Step 2.2] Add Network Policy on Network Policies Tab
- Click Network Policies
- Leave Isolation Policy setting default as ‘None’.
- Set Tier-0 to VLC-Tier-0 and Edge Cluster to EC-01
[Step 2.3] Load Balancers Tab
- Leave Load Balancers tab empty
[Step 2.4] Security Groups Tab
- Click on Security Groups tab, then Add Security Group
- Click on Filter, properties Any and type OC-DB
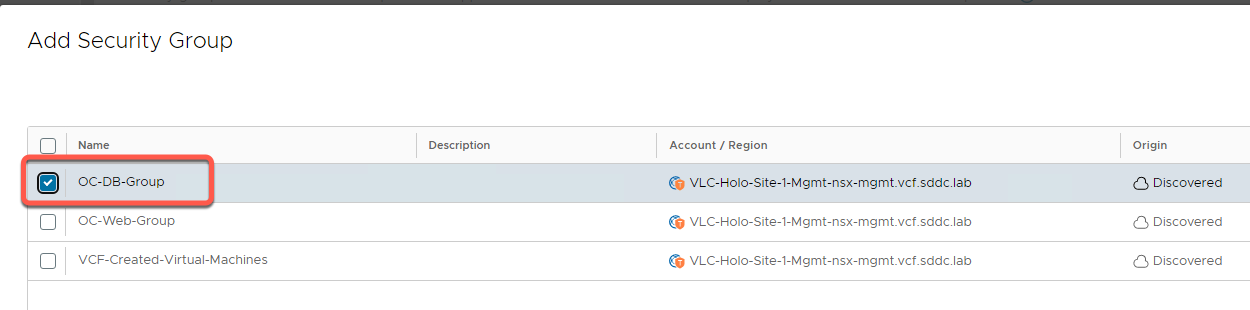
- Select OC-DB-Group and then click Add
Note: This will add anything deployed on this network to the OC-DB-Group NSX security group, which will make VM’s deployed subject to NSX security rules set for that group
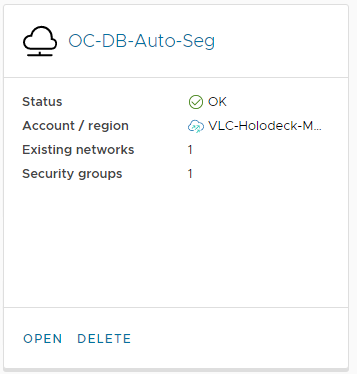
- Click Create
- Your result should look like
Exercise 3: Create OC-Web-Auto-Seg Cloud Assembly Network Profile
In this exercise we will configure a new Network Profile in Cloud Assembly for the OC-Web-Auto-Seg segment, load balancer and associated DHCP Server that was created earlier
[Step 1] Connect to vRealize Cloud Assembly (if necessary)
- Click + in the Chrome browser to open a new window
- Click the vRealize bookmark folder and select vra.vcf.sddc.lab
- Click GO TO LOGIN PAGE
- Login: Username: configadmin Password: VMware123!
- Click Cloud Assembly
[Step 2] Create OC-Web-Auto-Seg Network Profile
- Click Infrastructure -> Network Profiles
- Click New Network Profile
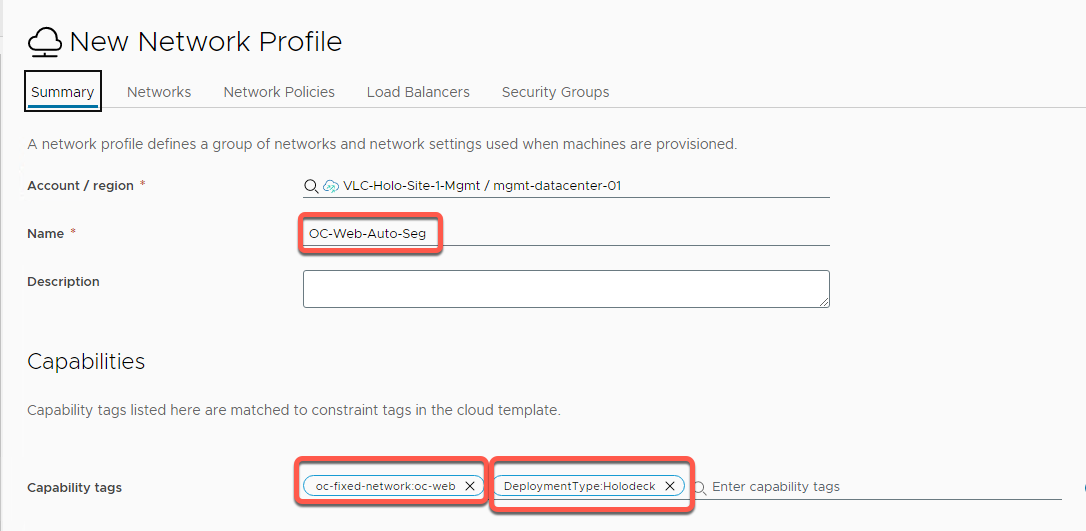
- On the Summary tab, Click on Account/Region and select VLC-Holodeck-Mgmt / mgmt-datacenter-01
- Set the name to OC-Web-Auto-Seg
- Add the tag oc-fixed-network:oc-web
- Add the tag DeploymentType:Holodeck
[Step 2.1] Add Networks on Networks Tab
- Click on Networks tab, then Add Network
- Filter for OC-
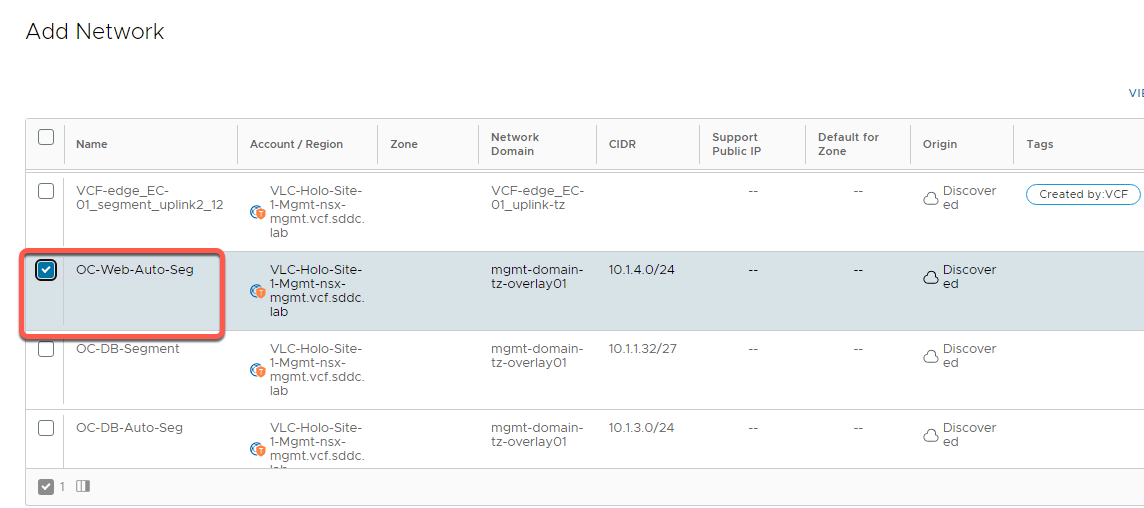
- Click Add. Your output should look like this
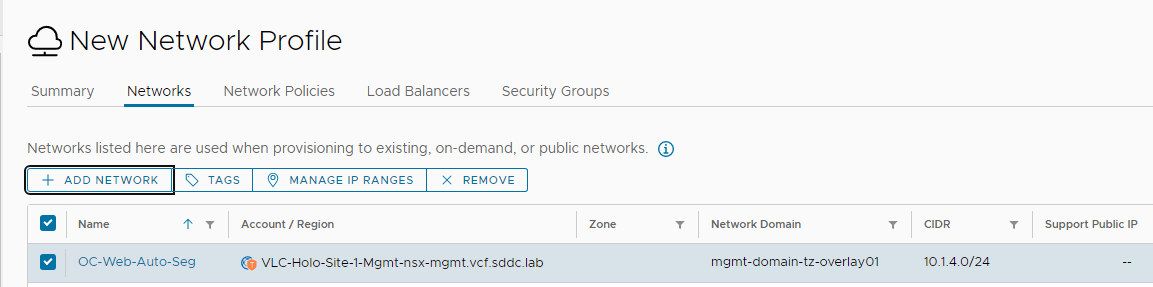
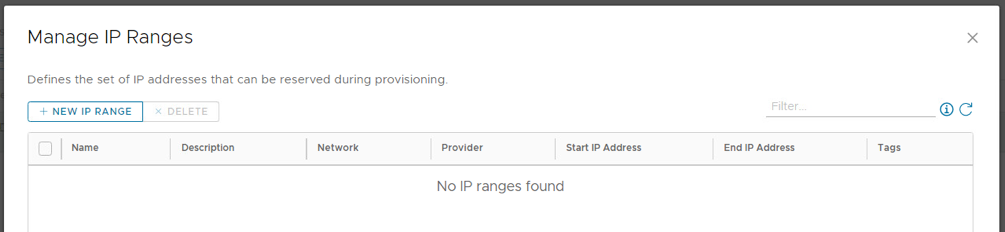
- Click Manage IP Ranges -> New IP Range
- Set Source Internal
- Name OC-Web-Auto-IP
- Network OC-Web-Auto-Seg should already be selected
- Start address 10.1.4.2
- End IP address 10.1.4.99
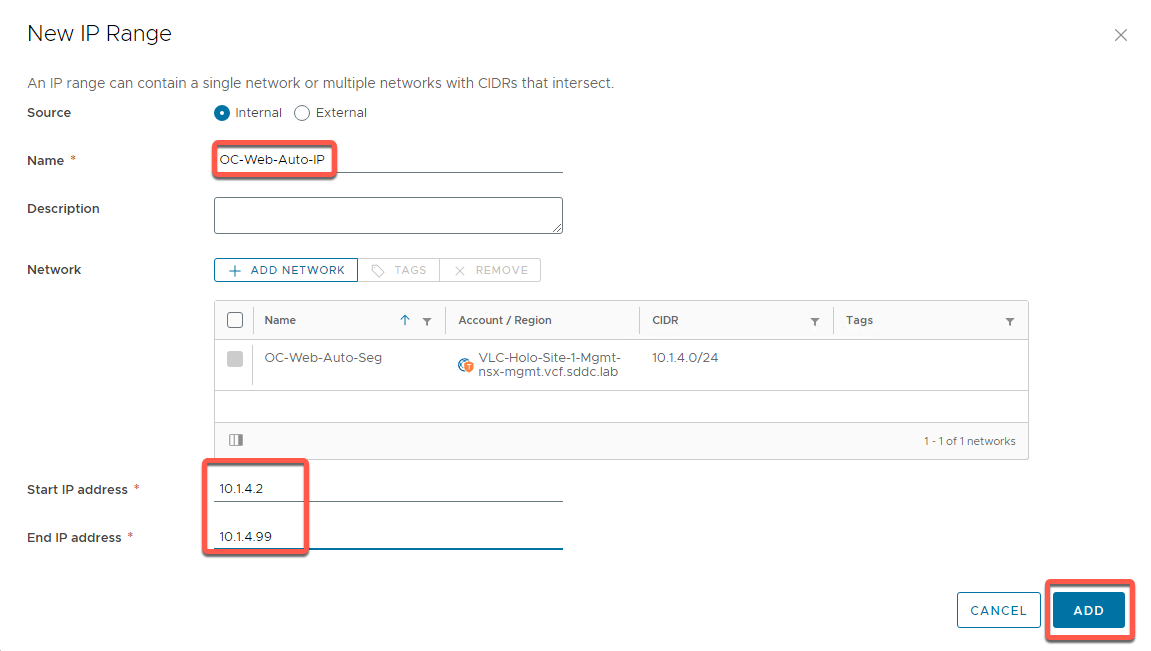
- Click Add.
- Your output should look like this
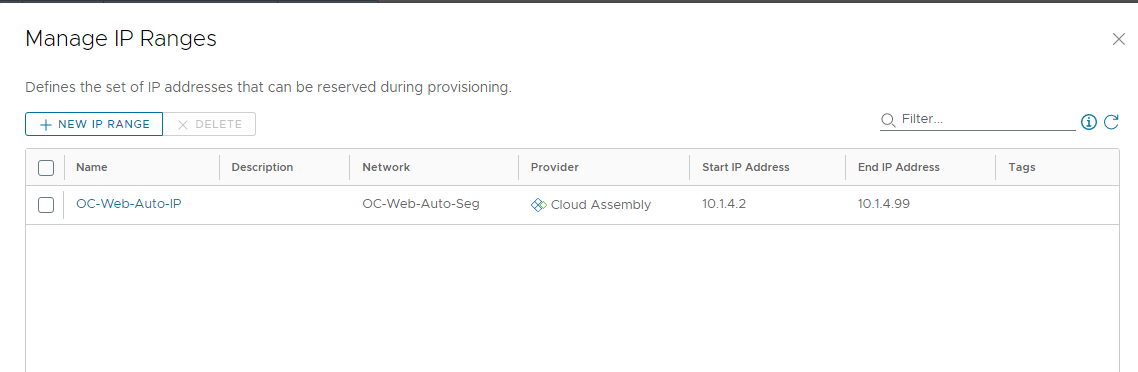
- Click Close
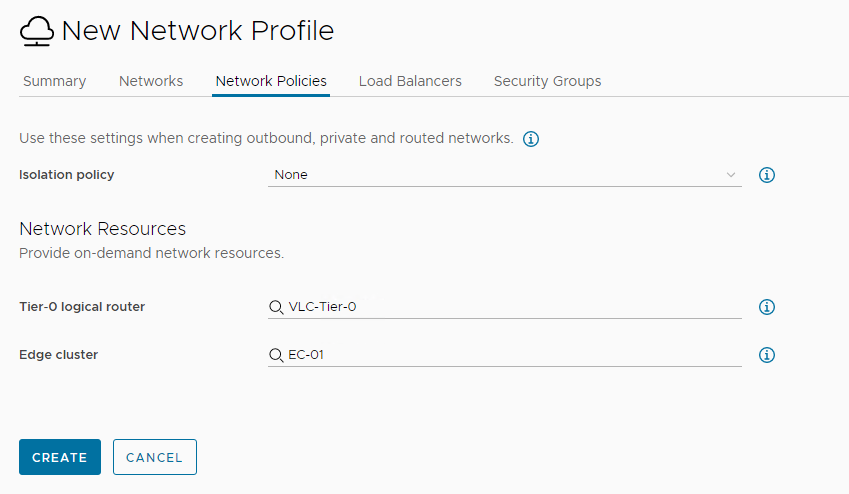
[Step 2.2] Add Network Policy on Network Policies Tab
- Click Network Policies
- Set Tier-0 to VLC-Tier-0 and Edge Cluster to EC-01
[Step 2.3] Add Load Balancer on Load Balancers Tab
- Click Load Balancers
- Click Add Load Balancer
- Scroll down and select OC-LB
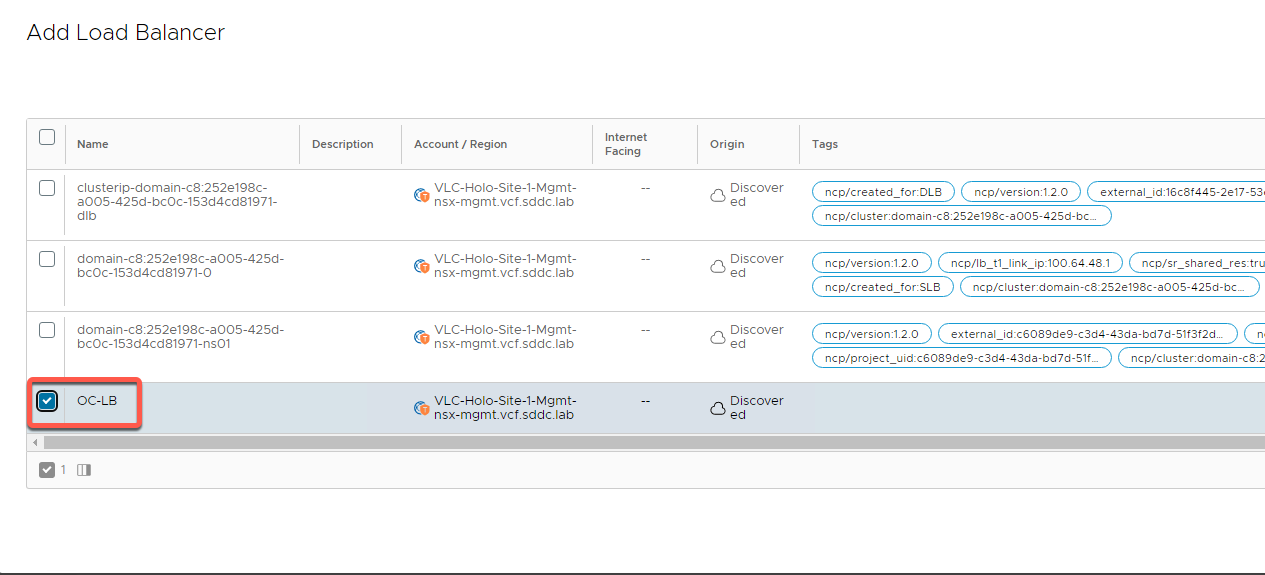
- Click Add
[Step 2.4] Add Security Group on Security Groups Tab
- Click on Security Groups tab, then Add Security Group
- Click on Filter, properties Any and type OC-

- Select OC-Web-Group and then click Add
Note: This will add anything deployed on this network to the OC-Web-Group NSX security group, which will make VM’s deployed subject to NSX security rules set for that group
- Click Create

Exercise 5: Upload and Review “Holodeck-OC-Fixed Network” Cloud Template
This exercise will upload the cloud template that will deploy an instance of the OpenCart demo application to the networks you created in the previous exercises.
[Step 1] Connect to vRealize Cloud Assembly (if necessary)
- Click + in the Chrome browser to open a new window
- Click the vRealize bookmark folder and select vra.vcf.sddc.lab
- Click GO TO LOGIN PAGE
- Login: Username: configadmin Password: VMware123!
- Click Cloud Assembly
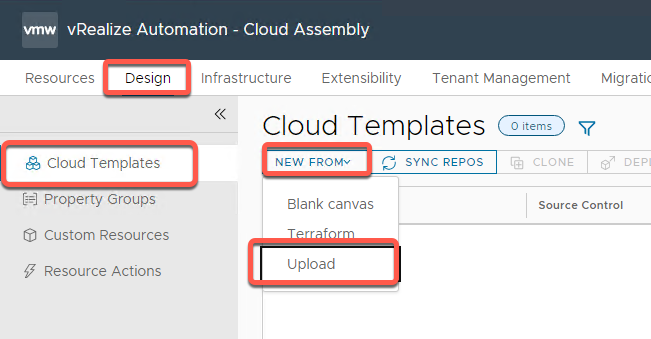
[Step 2] Upload Cloud Template
- Click Design
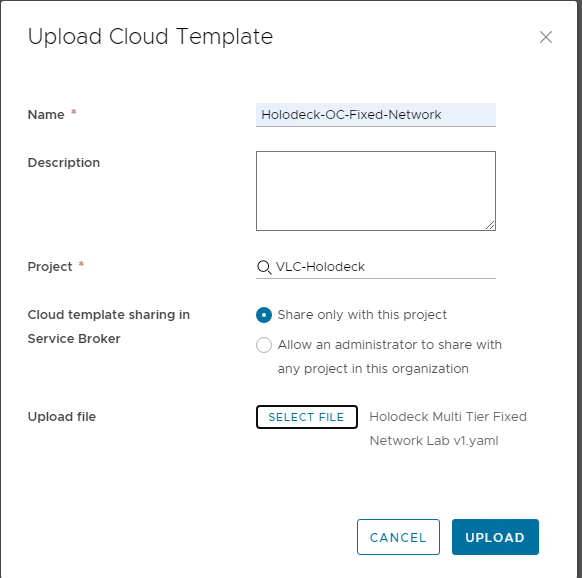
- Click New From -> Upload
- Name the template Holodeck-OC-Fixed-Network
- Select VLC-Holodeck for project
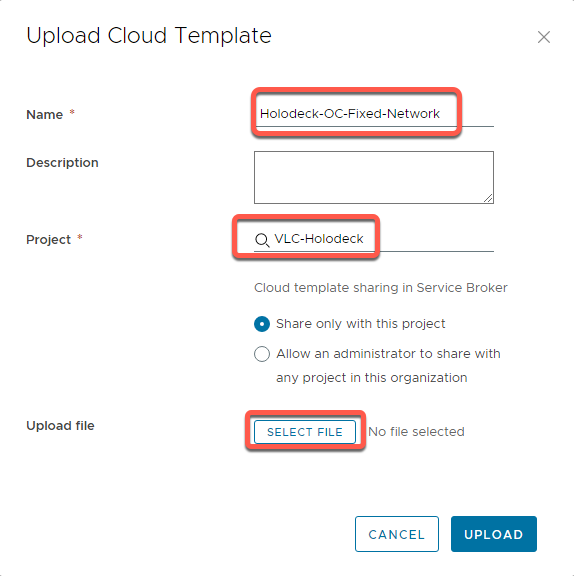
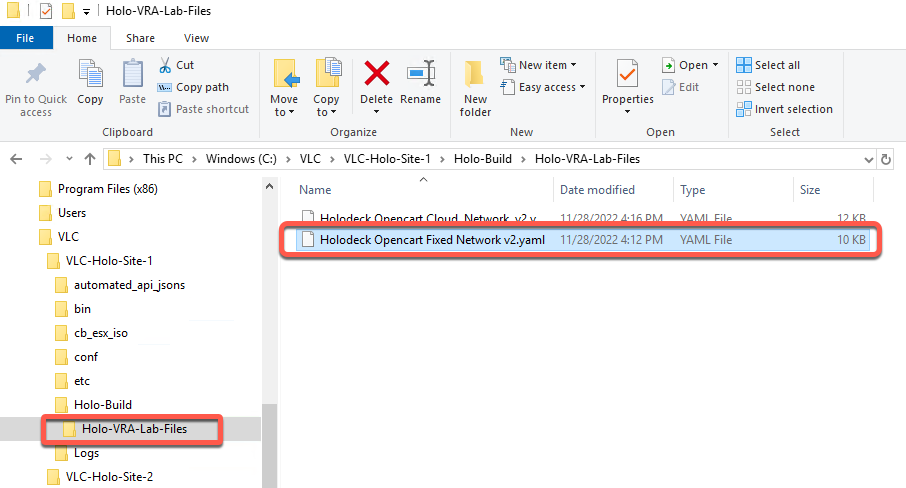
- Click Select File
- Select C:\VLC\VLC-Holo-Site-1\Holo-Build\Holo-VRA-Lab-File directory
- Select Holodeck Opencart Fixed Network Lab v2.yaml file then click Open
- Click upload
[Step 3] Review Cloud Template
Prior to deployment, we will take a quick look at what the template will deploy. As this is now an active template, please be careful to not make any changes.
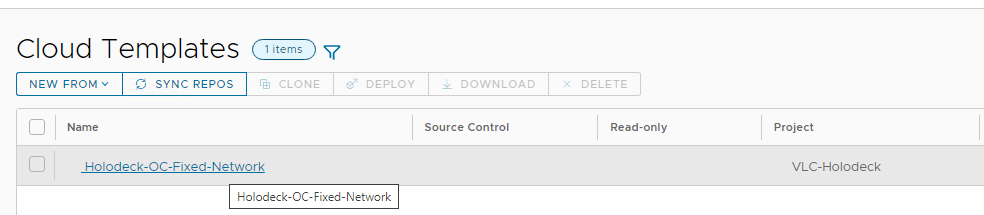
- Click on the link for the Holodeck-OC-Fixed-Network template uploaded in the previous step

- Note we have five resources.
- 2 Network resources which connect deployed virtual machines to the correct networks
- A Cloud NSX Load Balancer which configures the virtual server for this instance of OpenCart on the existing OC-LB load balancer specified as part of the
- 1 or more Apache web servers (number of servers set when the user deploys the template)
- An instance of MySQL for this OpenCart application
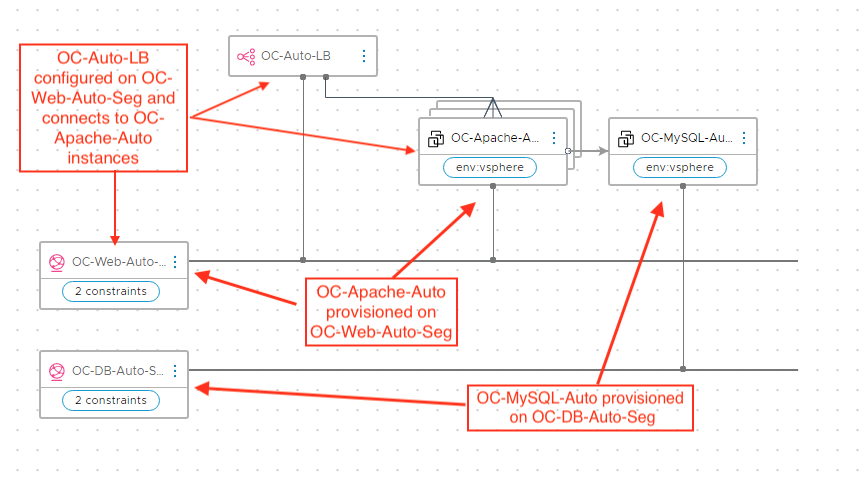
- Click on the OC-Web-Auto-Seg resource on the canvas
This highlights the relevant part of the yaml file for this cloud template
Note the OC-Web-Auto-Seg resource is looking for an existing network with a capability tags of oc-fixed-network:oc-web and DeploymentType:Holodeck. These are known as “constraints”. Cloud Assembly needs to find a Network Profile with Capabilities that meet these Constraints when deploying this template

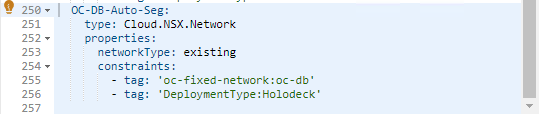
- Click on the OC-DB-Auto-Seg resource
The DB_NSX-Network has constraints of oc-fixed-network:oc-db and DeploymentType:Holodeck.
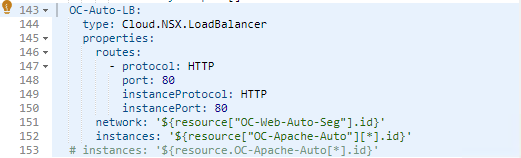
- Click on the OC-Auto-LB load balancer resource.
The Load balancer resource will create virtual server resources on the OC-Web-Auto-Seg segment, with members of the server pool (instances) based on the number of OC-Apache-Auto web servers this template deploys. The load balancer is configured to listen on Port 80 Protocol and Port), and talk to the backend Apache server on Port 80 (InstanceProtocol and InstancePort)
- Click on the OC-Apache-Auto resource
This resource creates an Apache server from a basic Ubuntu template using extensive “Cloud Init” functionality built into Cloud Assembly. Notice this resource uses both Flavor and Image mapping.
The remainder of the Apache resource definition will add needed Linux packages, configure users, and then configure the Apache Webserver for our OpenCart application
Feel free to review the entire OC-Apache-Auto Cloud.Machine resource definition.

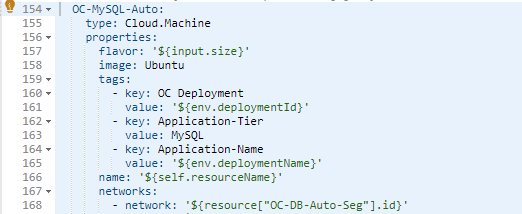
- Click on the OC-MySQL-Auto resource
This resource creates the MySQL database server from a basic Ubuntu template
- For additional info on Cloud Init see https://cloudinit.readthedocs.io/en/latest/
- For more information on vRealize Cloud Assembly see https://docs.vmware.com/en/vRealize-Automation/index.html
Exercise 6: Deploy Holodeck-OC-Fixed-Network Cloud Template
This exercise will deploy an instance of the OpenCart demo application to the networks you created in the previous exercises.
[Step 1] Connect to vRealize Cloud Assembly (if necessary)
- Click + in the Chrome browser to open a new window
- Click the vRealize Suite bookmark folder and select VMware Cloud Services
- Click GO TO LOGIN PAGE
- Login: Username: configadmin Password: VMware123!
- Click Cloud Assembly
[Step 2] Test Cloud Template
- If necessary, click Design
- Click on the Holodeck-OC-Fixed-Network link
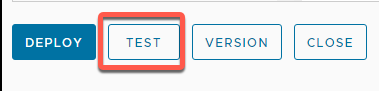
- Click Test
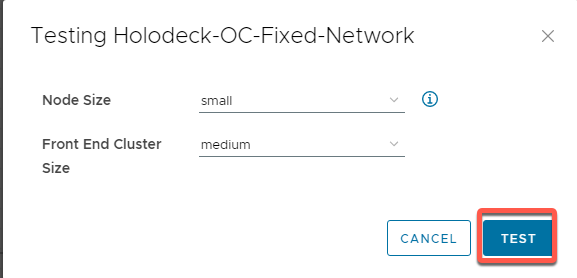
- Leave node size and front end cluster size at default
- Click Test.
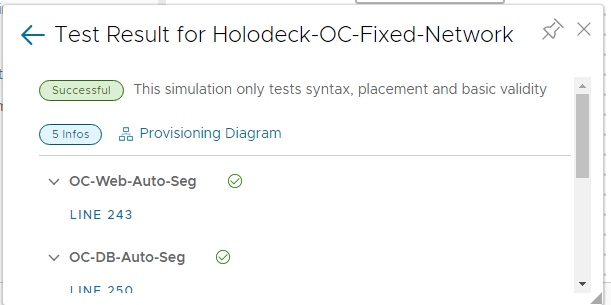
- Your result should be
- Click the X to close the test window
[Step 3] Deploy Cloud Template
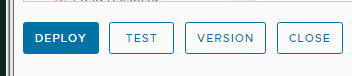
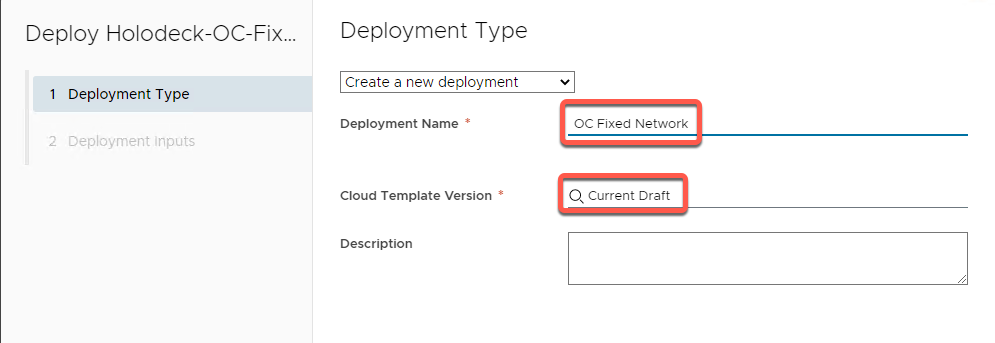
- Click Deploy
- Leave as Create a new deployment
- Name the deployment OC Fixed Network
- Leave Cloud Template Version as Current Draft
- Click Next
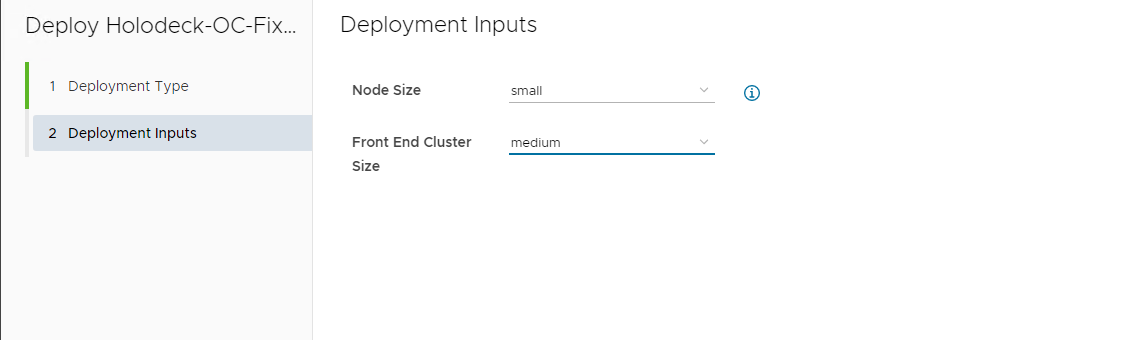
- Leave Node Size and Front End Cluster Size at default
- Click Deploy
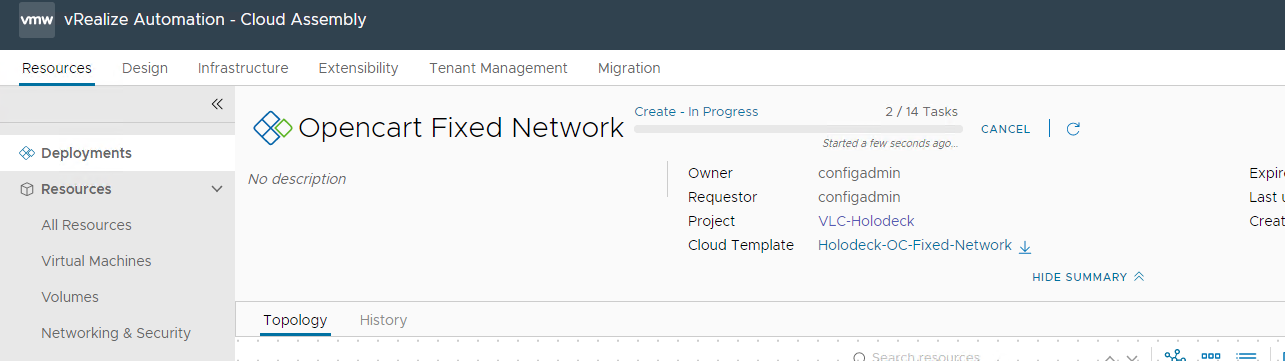
- Observe the deployment process beginning. In about 10-15 minutes you should see a Create Successful status
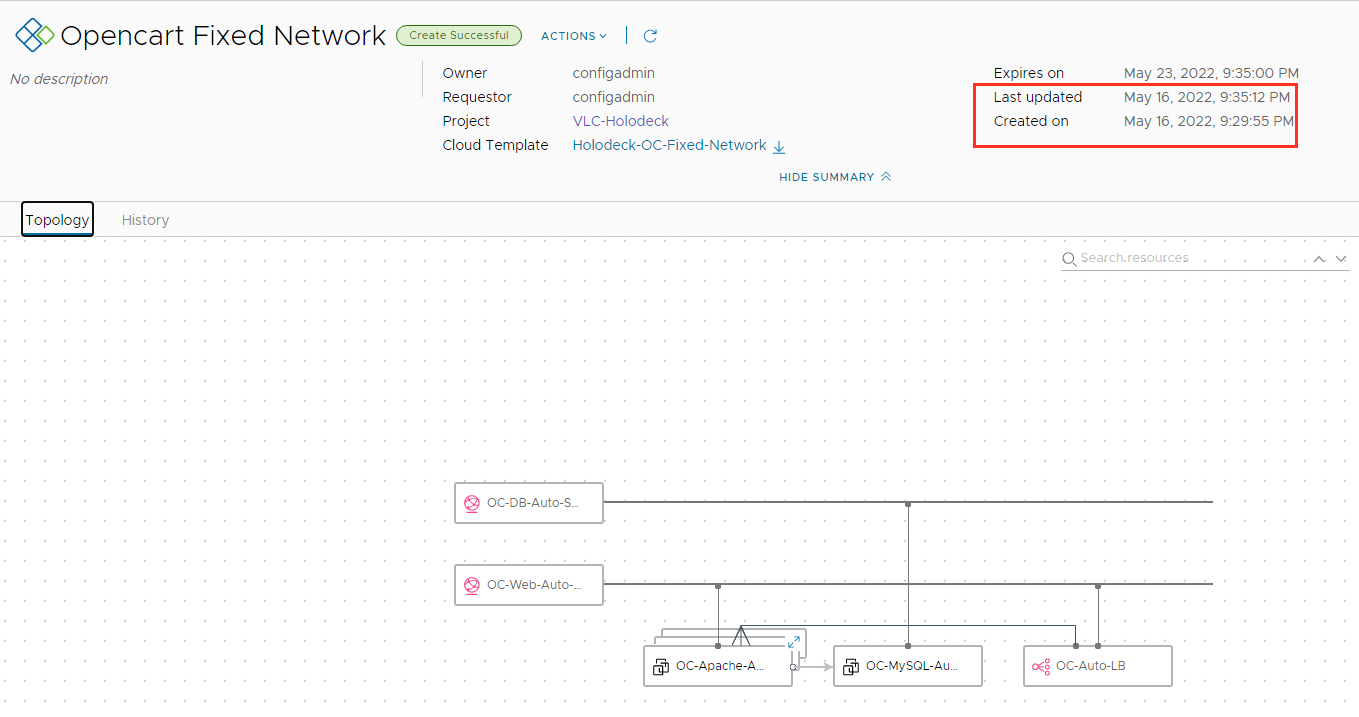
- Notice that this deployment took approximately 7 minutes
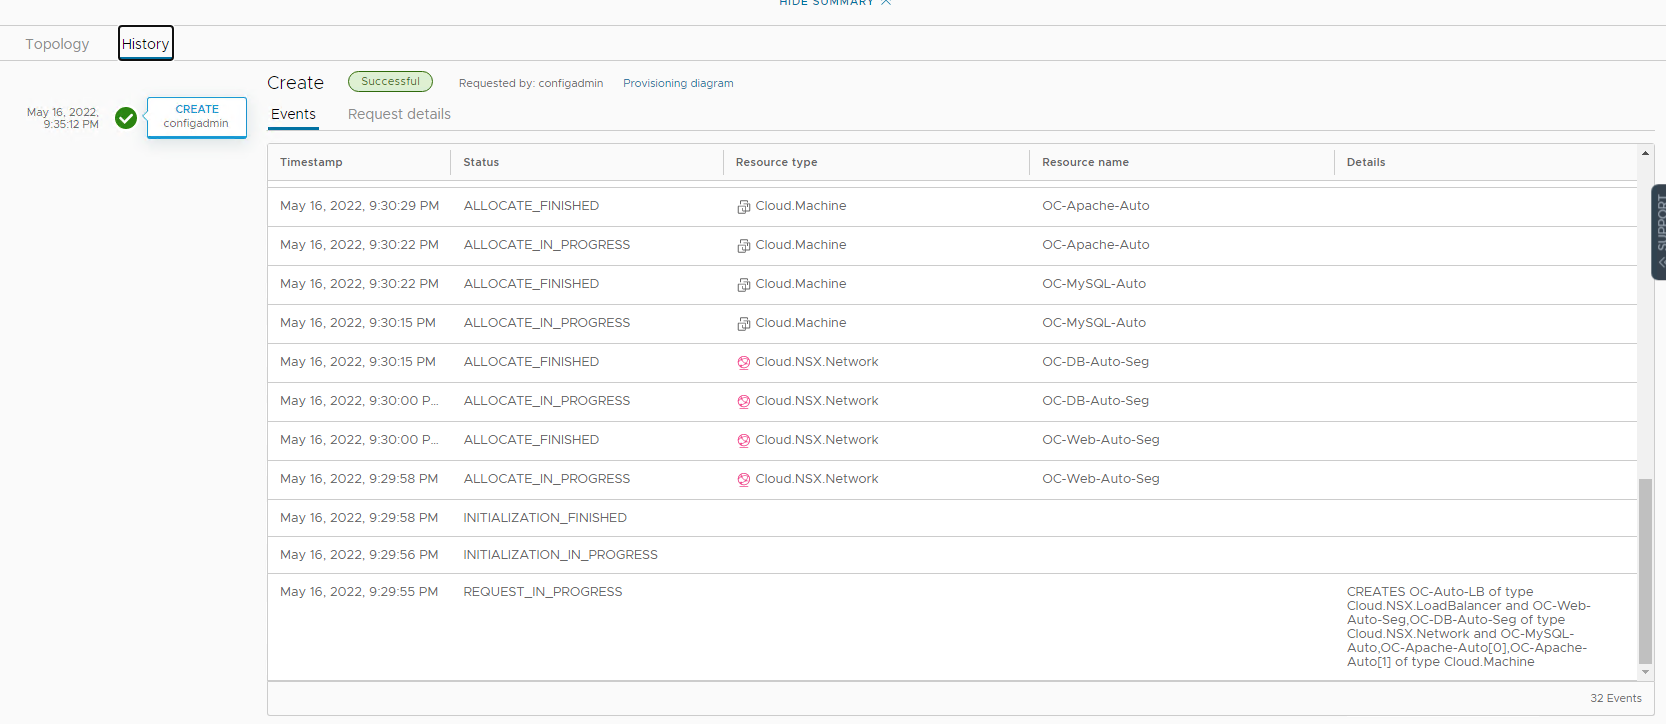
- Click History
- Scroll back and review the sequence of resource creation
Exercise 7: Review Provisioning Diagram
This exercise will review the Cloud Assembly Provisioning Diagram following a deployment. This is one of the best troubleshooting tools available for diagnosing failing deployments. This exercise will only show the initial network allocation to familiarize you with navigating the provisioning diagram
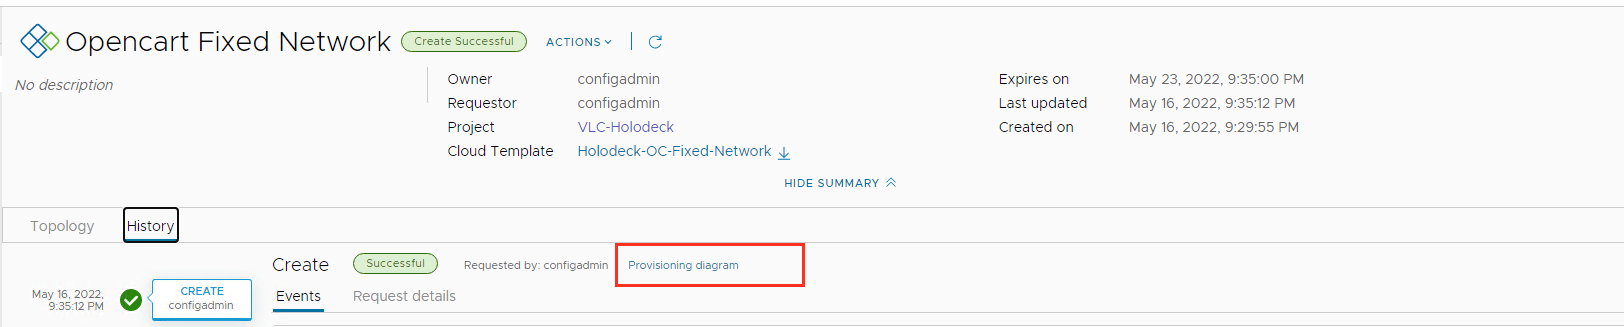
[Step 1] Access Provisioning diagram
- If your deployment history is still on screen, simply click on the Provisioning diagram link
- Alternately access the diagram from Resources->Deployments, and selecting your deployment
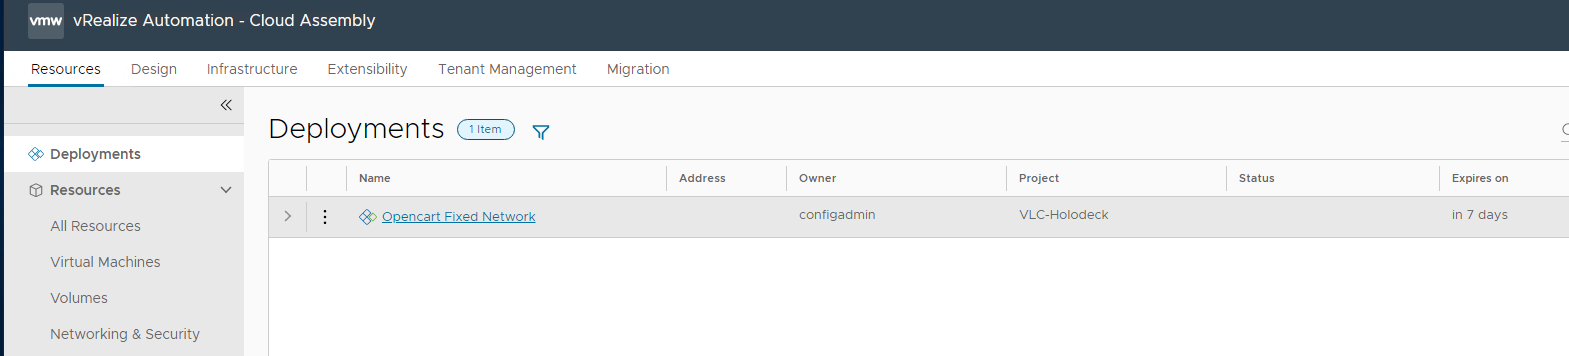
- Then click History and Provisioning Diagram
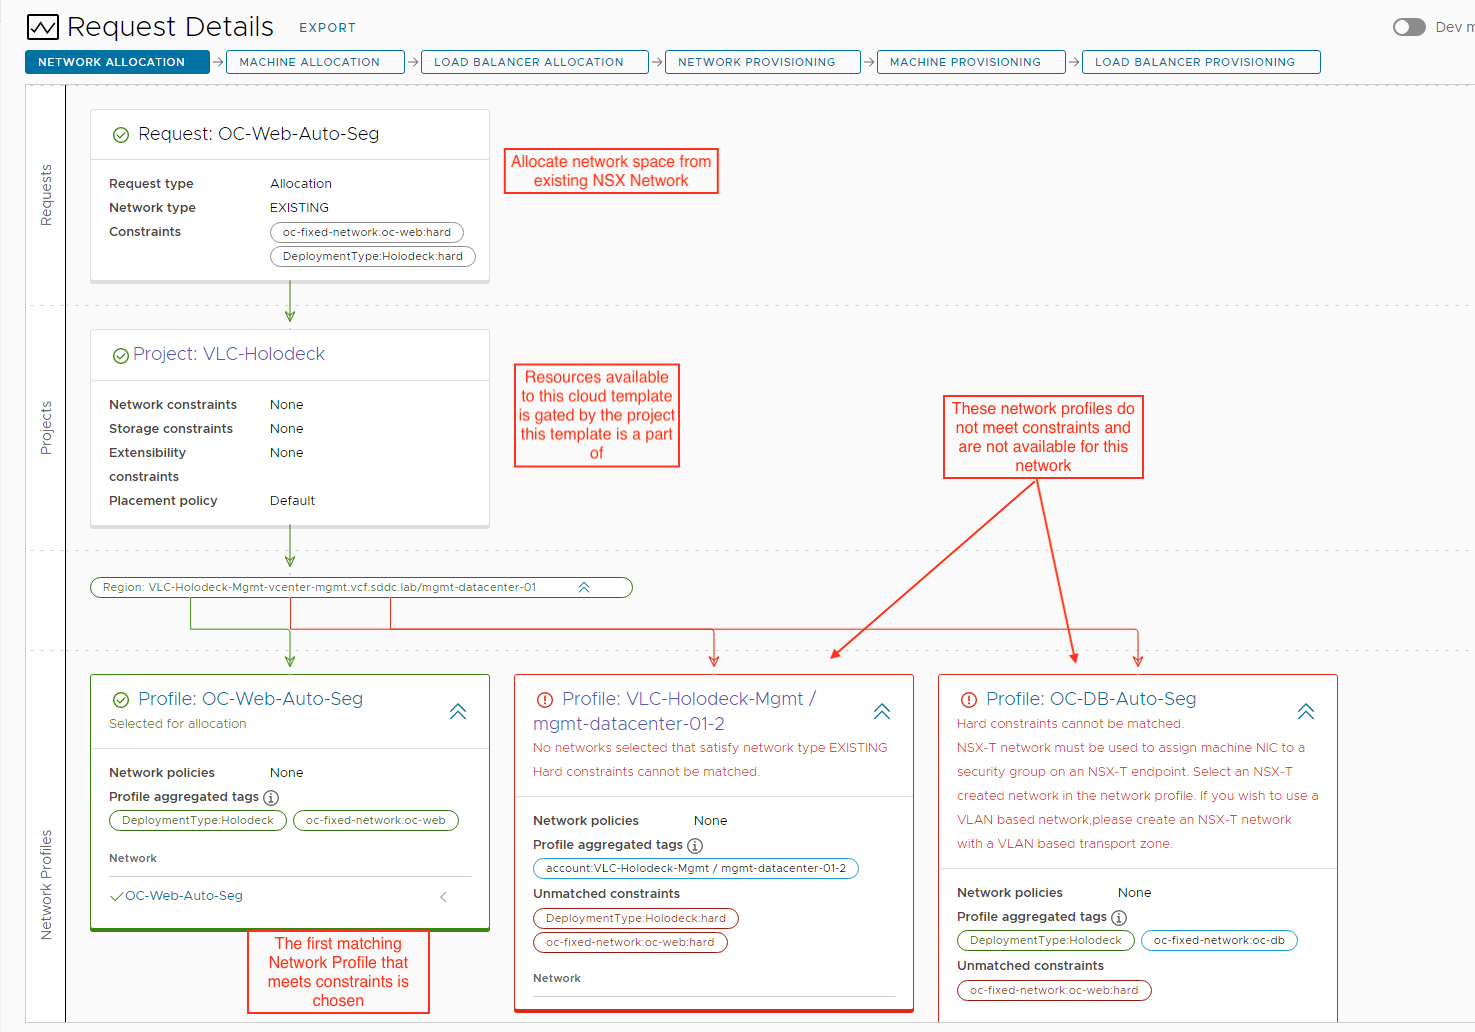
[Step 2] Review Network Allocation for OC-Web-Auto-Seg
- The initial screen presented will default to the first network provisioned, which in this lab is OC-Web-Auto-Seg
- The top most box describes the item to be created. In this case we are allocating network space from an existing segment
- The second box shows the project that this template is a part of. Access to resources can be controlled with projects
- The bottom row shows the process Cloud Assembly walks through to choose where to allocate this network. In effect, Cloud Assembly chooses the first Network Profile it finds that meets the constraints of the object being provisioned.
- Network Profile OC-Web-Auto-Seg meets the constraints of this resource
- The remaining two Network Profiles do not meet the constraints and are ineligible
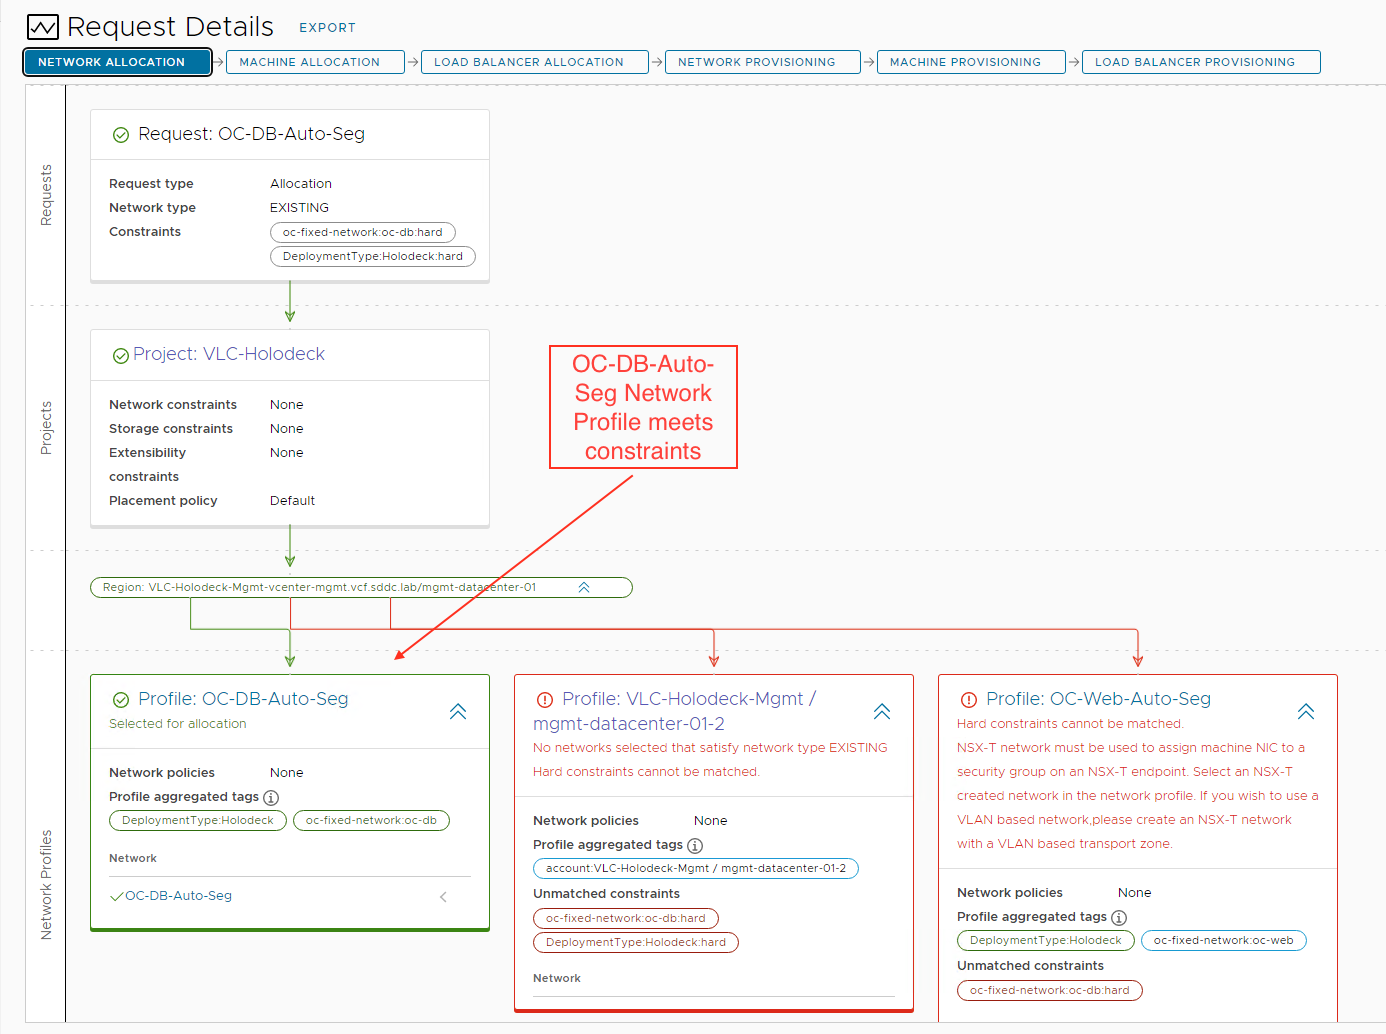
[Step 3] Review Network Allocation for OC-DB-Auto-Seg
- Click on the blue Network Allocation box and select the OC-DB-Auto-Seg
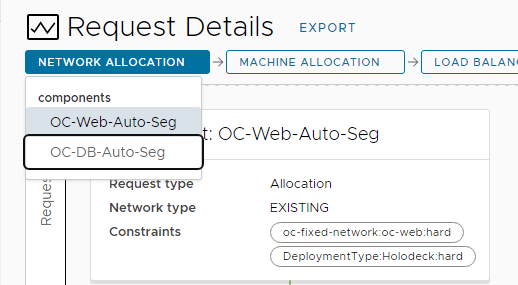
- Notice how the Network Profile that meets the constraints for OC-DB-Auto-Seg changes
Exercise 8: Review deployed Opencart application
This exercise will review the components deployed by the Cloud Template.
[Step 1] Test web servers
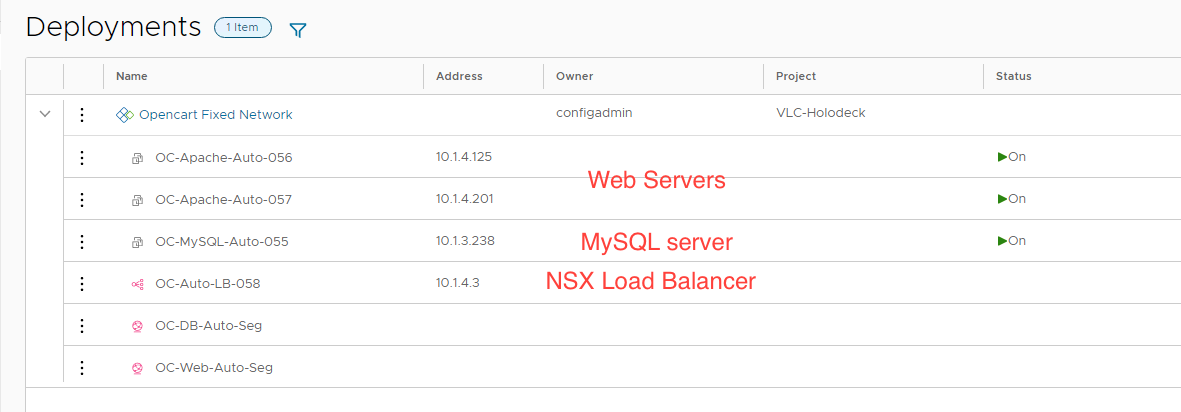
- Select Resources-> Deployments
- Click the > next to Opencart Fixed Network
- Note the following
- Two deployed OC-Apache-Auto-XXX web servers on the 10.1.4.x network, with IP addresses in the range controlled by NSX for DHCP on the OC-Web-Auto-Seg. (Note: The numeric suffix after the resources name is set by Cloud Assembly to keep resource names unique. This naming mechanism was chosen during initial Cloud Assembly setup in this environment).
- An OC-MySQL-Auto-XXX resource in the 10.1.3.x network
- An NSX Load Balancer on the 10.1.4.x network, with IP address in the range controlled by Cloud Assembly on the OC-Web-Auto-Seg
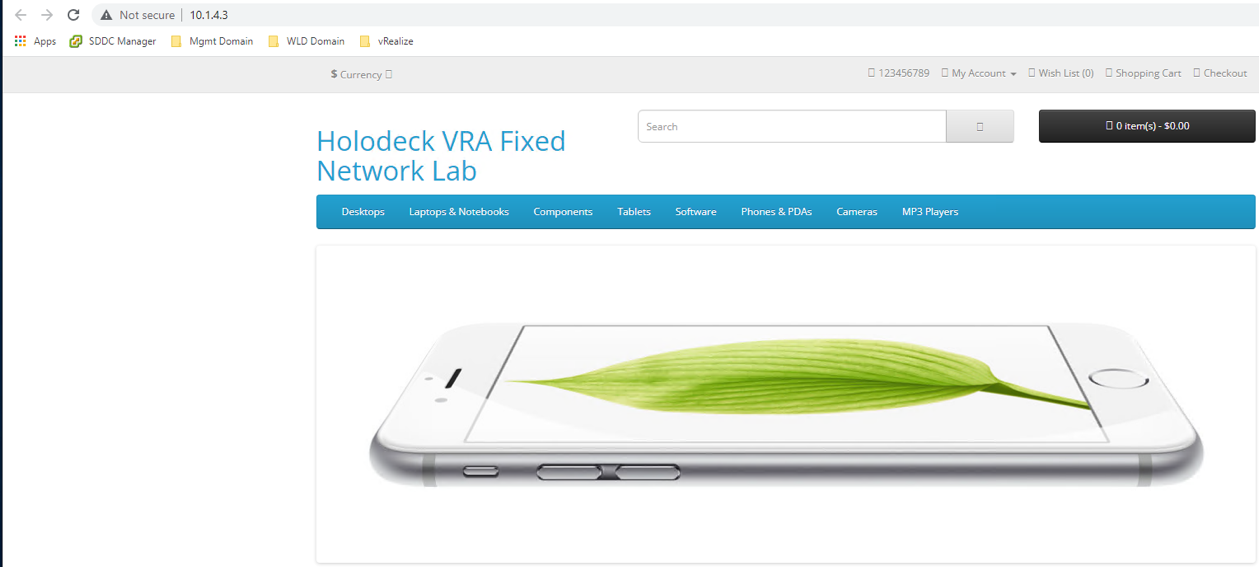
- Double click on the OC-Auto-LB-XXX IP and go to that IP address (or open a new browser window to that IP address
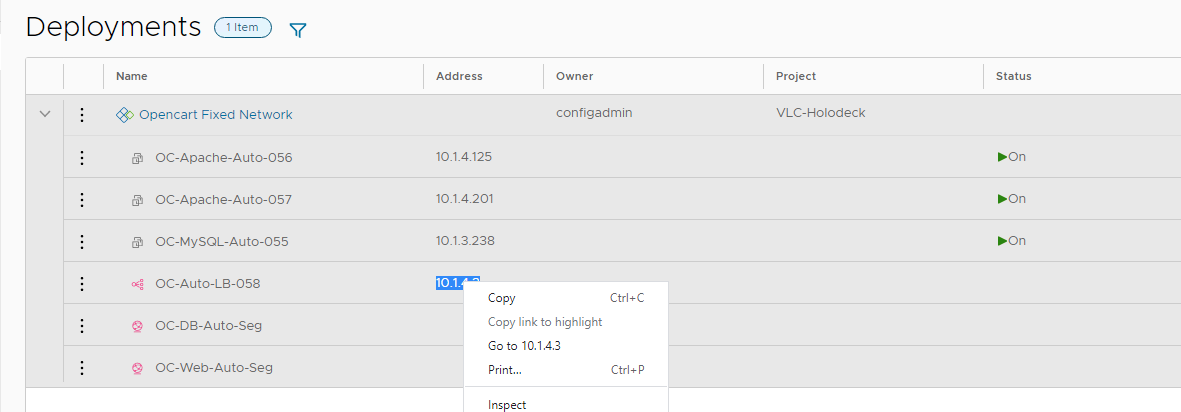
- You should open a page that looks like this
[Step 2] Review in vCenter Server
- Click + in the Chrome browser to open a new window if necessary
- Click the Mgmt Domain Folder then vCenter bookmark in the bookmark bar
- Login: Username: administrator@vsphere.local Password: VMware123!
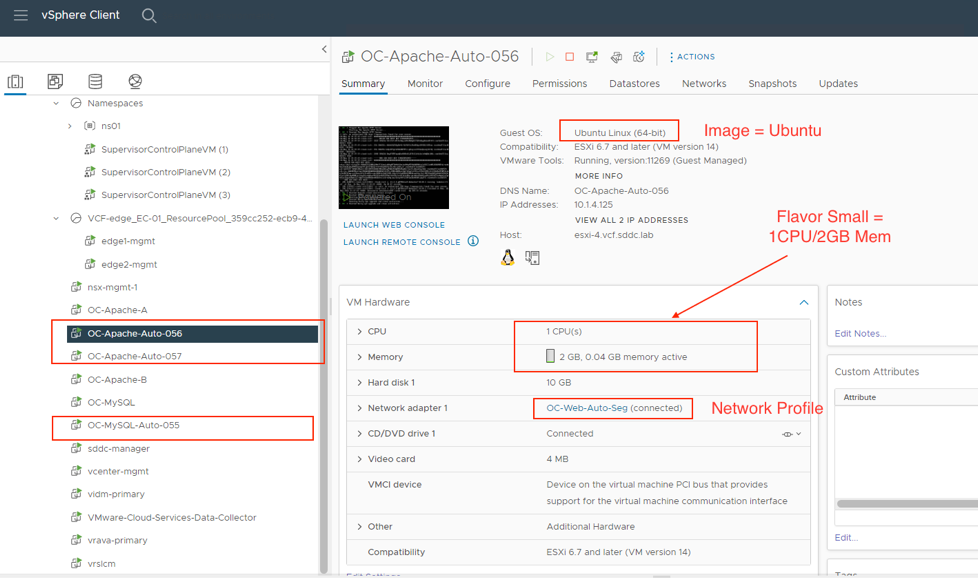
- From Hosts and Clusters view, Select one of the OC-Apache-Auto webservers identified in the Cloud Assembly Deployment Summary. In this example the machines are OC-Apache-Auto-056 and OC-Apache-Auto-057
- Note the following:
- CPU and Memory sizes match “Flavor = Small” from Cloud Assembly Flavor Mapping
- The VM is connected to OC-Web-Auto-Seg based on the OC-Web-Auto-Seg Network Profile selected for this VM. This was selected by the constraint oc-fixed-network:oc-web being matched in the network profile
[Step 3] Review in NSX Manager
- Open a new tab in the Chrome browser (If needed)
- Click the Mgmt Domain folder and Mgmt NSX shortcut in the bookmark bar (click advanced / proceed to nsx-mgmt.vcf.sddc.lab, if required to accept the certificate)
- Log into NSX Manager as user: admin with the password: VMware123!VMware123!
- From the NSX-T Manager interface click the Networking tab
- Select Load Balancing
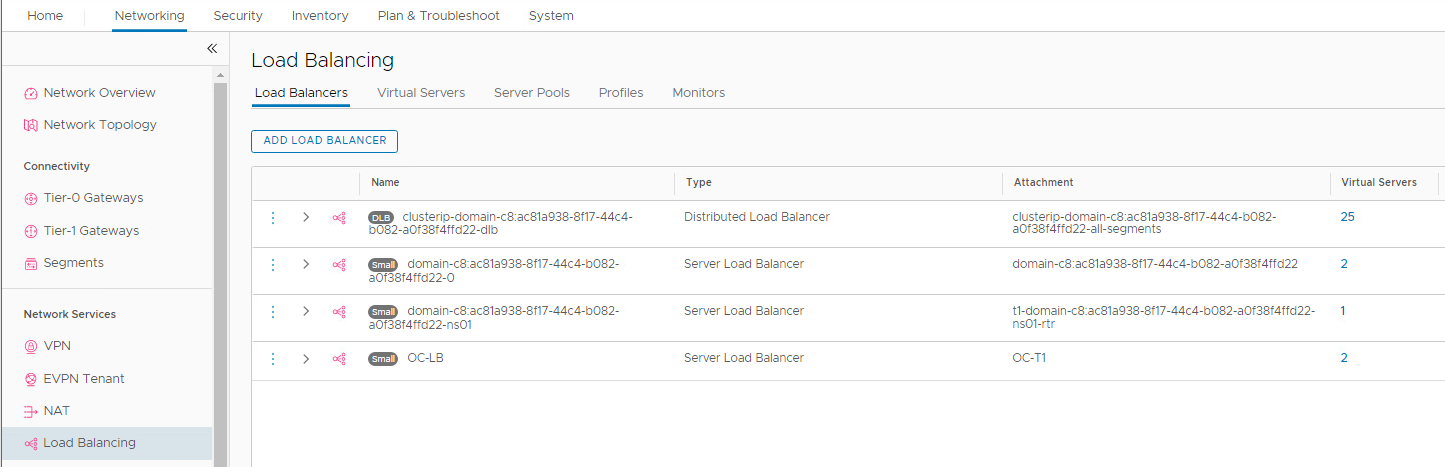
- Click on the Virtual Servers link for OC-LB. Notice where Cloud Assembly has created a second Virtual Server for this instance of OpenCart

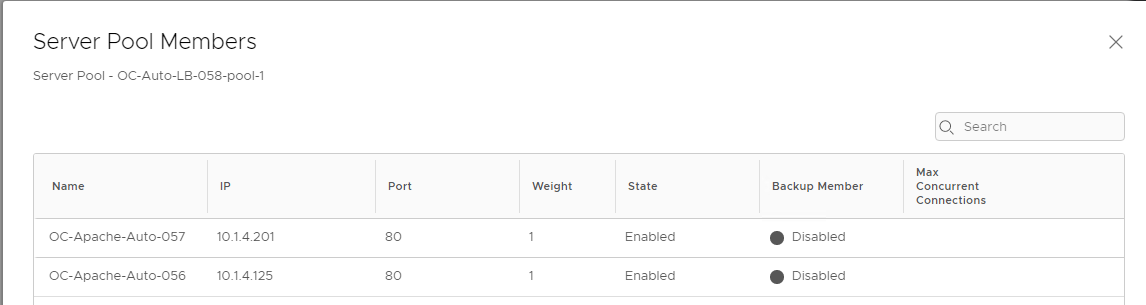
- Click on the Server Pool link for this Virtual Server. Notice the two Apache servers deployed by Cloud Assembly
- Click Close -> Close
- Click Networking -> Network Topology
- Scroll the view to the right to expand OC-T1
- Expand virtual machines under the OC-DB-Auto-Seg and OC-Web-Auto-Seg. Notice the Virtual Machines placed on these segments by Cloud Assembly
Exercise 8: Delete deployed Opencart application
This exercise will delete the components deployed by Cloud Assembly.
[Step 1] Connect to vRealize Cloud Assembly (if necessary)
- Click + in the Chrome browser to open a new window
- Click the vRealize bookmark folder and select vra.vcf.sddc.lab
- Click GO TO LOGIN PAGE
- Login: Username: configadmin Password: VMware123!
- Click Cloud Assembly
Module summary
In the previous Software Defined Networking module we introduced the capabilities of Overlay Networking and Distributed Firewall, while still operating everything manually. In this module, we have moved to automated deployment of applications from a template that consume existing NSX network and security assets. In this configuration, then networking and security team retain full control of the infrastructure, and the application team can automatically consume those resources. In the next module we will explore dynamically configuring networking and security as a part of the application deployment.