
Configuring vSphere Intermediate/Subordinate CA Mode
Introduction
With certificate lifetimes currently at 397 days, the replacement of SSL/TLS certificates on infrastructure components now requires significantly more staff time than before. To alleviate this burden on administrators, VMware vSphere includes a built-in feature known as the "VMware Certificate Authority." This feature, integrated into vCenter Server, issues certificates within a vSphere cluster. By default, this Certificate Authority (CA) uses a self-signed CA root created during the initial vCenter Server installation. However, this CA root can be replaced with an intermediate CA certificate, signed by a trusted CA, in a method VMware designates as "Intermediate CA" mode.
Intermediate CA mode, also referred to as Subordinate CA mode, offers the advantage of automating the deployment of trusted certificates to vSphere infrastructure components. Nonetheless, some organizations express concerns about issuing signing certificates in this manner, primarily due to potential impersonation of the organization and the possible lifespan of CA certificates. Mitigation strategies include the use of intermediate CA roots, certificate revocation lists, and even the creation of separate CA roots which are not generally trusted by organizational systems. However, these mitigations are beyond the scope of this document.
This document is not a substitute for the product documentation. Instead, it aims to provide consolidated guidance for organizations seeking to implement this change, while also offering useful tips and tricks for success. Please note that our test environments may not mirror your production environments, so we strongly recommend testing this change in your own non-production environment. This approach will allow you to familiarize yourself with the process and ensure the validity of the key and certificate materials. Nested vSphere environments are excellent for this purpose, and they can be easily restored using snapshots. VMware Hands-On Labs might also be suitable for this type of exercise. There's no rule saying you must adhere strictly to the lab script!
Support
VMware Global Support Services assists with certificate replacement in a break/fix capacity (contact them for issues). For proactive support, consult your Technical Account Manager or account team. While we welcome feedback on this document (use the icon above), the authors cannot provide direct support for these operations.
Disclaimer
This document is intended to provide general guidance for organizations that are considering VMware solutions. The information contained in this document is for educational and informational purposes only. This document is not intended to provide advice and is provided “AS IS.” VMware makes no claims, promises, or guarantees about the accuracy, completeness, or adequacy of the information contained herein. Organizations should engage appropriate legal, business, technical, and audit expertise within their specific organization for review of requirements and effectiveness of implementations.
Environment Preparation
This process was tested with both VMware vSphere 7 Update 3m and VMware vSphere 8 Update 1, using two vCenter Servers in Enhanced Linked Mode, each with three hosts configured for DRS, vSphere HA, vSAN, and distributed virtual switches. The following should be confirmed in your own environment prior to starting work:
- All vSphere components have time synchronization configured and operational.
- All components have valid DNS entries, both “forward” (A records) and “reverse” (PTR records).
- No hosts are in maintenance mode.
- All existing certificates are issued correctly and not expired.
- Components do not have alarms or other warnings.
- SSH access to vCenter Server has been enabled for this work and you have access to the root login or equivalent.
- You have access to the administrator@vsphere.local login for the duration of this work.
- You have a recent backup of vCenter Server.
As always, applying the latest updates for your supported major version of vSphere is recommended.
DRS and HA
While this process is tested and works smoothly on clusters with DRS, HA, and vSAN enabled, planning for the possibility of something going awry means a faster recovery if it happens. In that light, it may be desirable to consider temporarily placing DRS in “partially automated” mode, as well as deactivating vSphere HA to help eliminate complications and delays waiting for cluster elections (especially in larger clusters). Do not deactivate DRS completely as it will remove all defined resource pools.
External Systems
Other components which connect to vSphere may need to have their connections reestablished after the certificates are replaced. It may be helpful to temporarily block or remove access for service accounts for external tools and systems, to prevent disruptions to those systems as the cluster is updated, and to help confirm the reconnections afterwards.
Administrative Workstation
It is helpful if the workstation you plan to use has two web browsers installed, to help determine where a trust issue might lie. It is likely that this work will confuse the HSTS protections of browsers and require “forgetting” the web site. The methods for this vary. For example, Mozilla Firefox allows you to forget a site with Ctrl-Shift-H (view History), then right-clicking on the site and choosing “Forget About This Site.” Google Chrome also has the “thisisunsafe” workaround, if needed.
The workstation you use should have the trusted root CA certificates installed. It should also be able to access vCenter Server and host management interfaces via HTTPS and SSH, if necessary. It is also helpful if OpenSSL is installed on the workstation, for troubleshooting and certificate & key manipulation.
PowerCLI examples are given here and recommended for automation. Ensure that your workstation has PowerCLI installed and configured. This document assumes some familiarity with PowerCLI, but if you’re new to it you probably want to “Connect-viserver -server vcenter-1.7.fcotr.org” (using whatever your vCenter Server FQDN is) before you try anything.
Some workstation EDR software and/or corporate browser configurations may impose additional browser certificate security checks. Your proactive testing of this process is likely to reveal these issues before they cause trouble.
Certificate Authority Preparation
In our example here we opted to use a separate copy of OpenSSL to generate both the CA key and certificate. We did this primarily because we wanted 4096-bit keys, versus the defaults of 2048 in vSphere 7 and 3072 in vSphere 8. We also wanted to be able to use the same CA key and certificate on multiple vCenter Servers, so that trust issues are minimized. When vCenter Server generates a key it is not easily exportable. More information is available about generating these keys in the vSphere documentation, under “Certificate Requirements for Different Solution Paths.” However, you have the option to have Certificate Manager generate a Certificate Signing Request for the VMCA if you desire. See step 7 under “Running Certificate Manager” below.
You will want to refer to your own PKI tools’ documentation for the process of creating and signing the intermediate CA certificate & key pair. For this testing we used root and intermediate CA material generated by OpenSSL with the process documented at https://jamielinux.com/docs/openssl-certificate-authority/ (a big thank you to Jamie Nguyen). In this case we used the intermediate pair as the input to the VMCA Subordinate CA process. Two changes were necessary:
- We created a text file consisting of all the relevant CA certificates, chained together. We called this “chain.pem” and will refer to it that way in this document. As per the vSphere documentation, the certificates in that file should be ordered with the VMCA subordinate certificate first, then any intermediate certificates, then the root CA certificate last.
- To prevent dependency issues with vSphere startup the intermediate CA key should not be protected with a password for the import operation. You can use a command like “openssl rsa -in vsphere-key.pem -out vsphere-key-nopw.pem” to write a copy of the key file without the password. You may encounter FIPS errors with OpenSSL on the vCenter Server Appliance if you try this there, hence the recommendation to have a copy of OpenSSL elsewhere. You will want to delete the unprotected key file at the end of this process.
However you arrive at them, you will need a file with the certificate chain in it, and the key. Copy the chain.pem and vsphere-key-nopw.pem files to your vCenter Server Appliance(s). For the purposes of this document we will refer to them as /root/chain.pem and /root/vsphere-key-nopw.pem.
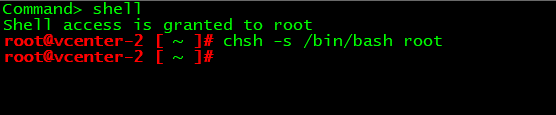
It is sometimes easier to SSH to the vCenter Server Appliance, enter the shell, then initiate the scp outbound using the vCenter Server shell itself. Otherwise for incoming scp you will need to change the root shell on the VCSA using the “chsh -s /bin/bash root” command from the shell itself:
vCenter Server Preparation
vCenter Server has advanced parameters that set the issued certificate CN data:
- vpxd.certmgmt.certs.cn.country
- vpxd.certmgmt.certs.cn.email
- vpxd.certmgmt.certs.cn.localityName
- vpxd.certmgmt.certs.cn.organizationalUnitName
- vpxd.certmgmt.certs.cn.organizationName
- vpxd.certmgmt.certs.cn.state
- vpxd.certmgmt.certs.daysValid
- vpxd.certmgmt.certs.minutesBefore
We recommend setting vpxd.certmgmt.certs.minutesBefore to 5 to prevent time synchronization issues documented in KB 2123386 (we encountered this issue in testing when updating the ESXi hosts, and while the workaround is to wait until the 24 hour timeout elapses it’s better to avoid the problem in the first place).
Set these in advance, using PowerCLI or through the vSphere Client. Sample commands are below, configured for our fictitious “Fibre Channel over Token Ring Alliance” organization. We have left our sample data here for illustration, but you’ll want to use valid information for your own organization, of course.
Repeat these steps for all vCenter Servers you are working on:
Get-AdvancedSetting -Entity vcenter-1.7.fcotr.org -Name vpxd.certmgmt.certs.cn.country | Set-AdvancedSetting -Value 'US' -Confirm:$false
Get-AdvancedSetting -Entity vcenter-1.7.fcotr.org -Name vpxd.certmgmt.certs.cn.email | Set-AdvancedSetting -Value 'ca-admin@fcotr.org' -Confirm:$false
Get-AdvancedSetting -Entity vcenter-1.7.fcotr.org -Name vpxd.certmgmt.certs.cn.localityName | Set-AdvancedSetting -Value 'Durant' -Confirm:$false
Get-AdvancedSetting -Entity vcenter-1.7.fcotr.org -Name vpxd.certmgmt.certs.cn.organizationalUnitName | Set-AdvancedSetting -Value 'IT Infrastructure Engineering' -Confirm:$false
Get-AdvancedSetting -Entity vcenter-1.7.fcotr.org -Name vpxd.certmgmt.certs.cn.organizationName | Set-AdvancedSetting -Value 'Fibre Channel over Token Ring Alliance' -Confirm:$false
Get-AdvancedSetting -Entity vcenter-1.7.fcotr.org -Name vpxd.certmgmt.certs.cn.state | Set-AdvancedSetting -Value 'Wyoming' -Confirm:$false
Get-AdvancedSetting -Entity vcenter-1.7.fcotr.org -Name vpxd.certmgmt.certs.daysValid | Set-AdvancedSetting -Value '397' -Confirm:$false
Get-AdvancedSetting -Entity vcenter-1.7.fcotr.org -Name vpxd.certmgmt.certs.minutesBefore | Set-AdvancedSetting -Value '5' -Confirm:$false
Running Certificate Manager
From here you will execute /usr/lib/vmware-vmca/bin/certificate-manager on one vCenter Server at a time. If something goes wrong you can use Certificate Manager option 8 to restore your original certificate configurations and start again.
- /usr/lib/vmware-vmca/bin/certificate-manager
- Choose option 2: “Replace VMCA Root certificate with Custom Signing Certificate and replace all Certificates”
- When asked “Do you wish to generate all certificates using configuration file : Option[Y/N] ?” answer Y
- Enter a vSphere SSO administrator username (the default of administrator@vsphere.local works, just press enter if you plan to use that)
- Enter the password for the account you specified.
- You will be prompted for all the same information as what you set above, for vCenter Server. Set it the same way. Hint: you may discover that the shell does not like backspace when entering data (you get ^H). Try Ctrl-Backspace instead, or if you’re really stuck use Ctrl-C and start again.
- Enter proper value for 'Country' [Default value : US] – (Enter your country's two letter code. We entered “US”)
- Enter proper value for 'Name' [Default value : CA] – (Give the CA a name. We entered “FCoTR vSphere CA”)
- Enter proper value for 'Organization' [Default value : VMware] – (Your company name. We entered “Fibre Channel over Token Ring Alliance”)
- Enter proper value for 'OrgUnit' [optional] – (Your department's name. We entered “IT Infrastructure Engineering”)
- Enter proper value for 'State' [Default value : California] – (This the whole name of your state or province. We entered “Wyoming”)
- Enter proper value for 'Locality' [Default value : Palo Alto] – (This is the city name. We entered “Durant”)
- Enter proper value for 'IPAddress' (Provide comma separated values for multiple IP addresses) [optional] – (We just hit enter here to leave it blank)
- Enter proper value for 'Email' [Default value : email@acme.com] – (Email address for someone responsible for the certificate. We entered “ca-admin@fcotr.org”)
- Enter proper value for 'Hostname' (Provide comma separated values for multiple Hostname entries) [Enter valid Fully Qualified Domain Name(FQDN), For Example : example.domain.com] – (We entered the FQDN of the vCenter Server, so for this example we used “vcenter-1.7.fcotr.org”)
- Enter proper value for VMCA 'Name' – (We entered “FCoTR vSphere CA”)
- You will be given two choices. This is the point at which, if you want the VMCA to generate a certificate signing request (CSR), it can do it by choosing option 1, and specifying where you would like it to write the CSR and key (/root is a good option). If you choose this route you will need to exit, copy the CSR off the VMCA, have the CSR signed, build a certificate chain file, and then use that chain and the key as input to this process. Otherwise, if you have a key and certificate chain file already you want option 2, “Import custom certificate(s) and key(s) to replace existing VMCA Root Signing certificate”
- “Please provide valid custom certificate for Root.” – (Specify the certificate chain you created, /root/chain.pem)
- “Please provide valid custom key for Root.” – (Specify the key file, /root/vsphere-key-nopw.pem)
- You will be asked “You are going to replace Root Certificate with custom certificate and regenerate all other certificates” – (If you feel comfortable with your answers enter “Y”)
- Certificate Manager will now replace all the certificates for vCenter Server services. Wait patiently until it is done. This may take some time as it will restart all vCenter Server services (same as if you’d rebooted the VCSA). An example of what it looks like while it works is:

- If there are errors it will revert the certificates to the original, self-signed ones. You can look in /var/log/vmware/vmcad for the relevant log files (use the UNIX command “less” to view a file, like “less /var/log/vmware/vmcad/certificate-manager.log”).
- When it completes you will be logged out of the web-based vSphere Client. Log back in and verify that the certificate is what you expect and no new alarms are present. If you did not disable vSphere HA you may want to wait for cluster elections to finish before proceeding with ESXi certificate replacements.
- As previously mentioned, you may encounter HSTS or caching issues with your browser, or issues with the trusted CA root if it wasn’t properly installed. Try restarting your browser, using a different one, and/or “forgetting” the site.
- You can test the certificates directly with “openssl s_client -connect vcenter-1.7.fcotr.org:443 -showcerts” (hint: use Ctrl-C to end the session).
- Worst case: you can use Certificate Manager’s option 8 to restore your original certificate information, if needed.
- Repeat this process as needed or desired for other linked vCenter Servers.
ESXi Certificates
Once the VMCA is operational and the vSphere Client is showing you the correct certificates we can move on to update the ESXi host certificates.
- In the vSphere Client you can select a host, then visit Configure->Certificate to see the current certificate on the host. You'll notice that it is issued by the old VMCA root.
- Click the “Refresh CA Certificates” button for that host. Did it work? Look at the Recent Tasks and see if it completed (you may need to refresh the client if you don’t see it). If it did not succeed then troubleshoot the error.
- Now click the “Renew” button. You will be prompted to confirm the renewal. Look at the Recent Tasks to see it complete. You may need to refresh the vSphere Client to see the new certificate data, which should reflect the information in the vCenter Server advanced parameters.
- Visit that host (for example, in our case it is https://esx-1.7.fcotr.org) to verify that the host client is displaying the new trusted CA certificate.
You can continue updating hosts manually, or use a bit of PowerCLI to automate it (thank you to Luc Dekens for the example):
$si = Get-View ServiceInstance
$certMgr = Get-View -Id $si.Content.CertificateManager
Get-VMHost | ForEach-Object -Process {
 $certMgr.CertMgrRefreshCACertificatesAndCRLs($_.Id)
}
Get-VMHost | ForEach-Object -Process {
 $certMgr.CertMgrRefreshCertificates($_.Id)
}
If you are connected to multiple vCenter Servers the Get-VMHost cmdlet will return all relevant hosts. Hosts may temporarily show as “Not Responding” in the vSphere Client while this process is happening. If a host remains in the “Not Responding” state, directly verify that the host client is responding, then try reconnecting it (Connection->Connect).
Cleanup
At this point you should have everything replaced and can begin verifying other systems’ connectivity to vSphere. Don't forget to:
- Re-enable vSphere HA
- Place DRS back into “fully automated” mode.
- Ensure you have a secure copy of the CA files, then clean up files left on the VCSA.
- Deactivate SSH on the VCSA. You can always enable it again if you need it.
Additional Resources
Please visit the vSphere security resources at https://core.vmware.com/security.