
Deploy an AI-Ready Enterprise Platform on vSphere 7 Update 2
VMware AI/MLIntroduction
Overview
This deployment guide illustrates the prerequisites and processes of setting up the newly introduced AI-Ready Enterprise Platform from NVIDIA and VMware. It includes NVIDIA Enterprise AI Suite, VMware vSphere® 7 update 2, NVIDIA A100 GPU-based servers, VM configurations and settings.
This document describes two deployment scenarios:
- Single node learning by deploying single or multiple VMs on a single VMware ESXi™ server with GPU(s) installed. This is a basic scenario for users to start with to run the AI workloads with minimum configurations on vSphere with NVIDIA GPU(s).
- Multi-node learning by deploying multiple VMs on multiple interconnected ESXi servers with GPU(s) and Mellanox Network Interface Card installed. This scenario is optional and requires additional hardware and configuration steps, to scale out the compute resources on multiple GPUs of multiple ESXi hosts to increase the performance of AI workloads.
AI-Ready Platform from NVIDIA and VMware
VMware and NVIDIA have partnered together to unlock the power of AI for every business, by delivering an end-to-end enterprise platform optimized for AI workloads. This integrated platform delivers best-in-class AI software, the NVIDIA Enterprise AI suite, optimized and exclusively certified to run on the industry’s leading virtualization platform, VMware vSphere, with industry-leading accelerated servers that have been NVIDIA-Certified. This platform accelerates the speed at which developers can build AI and high-performance data analytics for their business, enables organizations to scale modern workloads on the same VMware vSphere infrastructure they’ve already invested in, and delivers enterprise-class manageability, security, and availability.
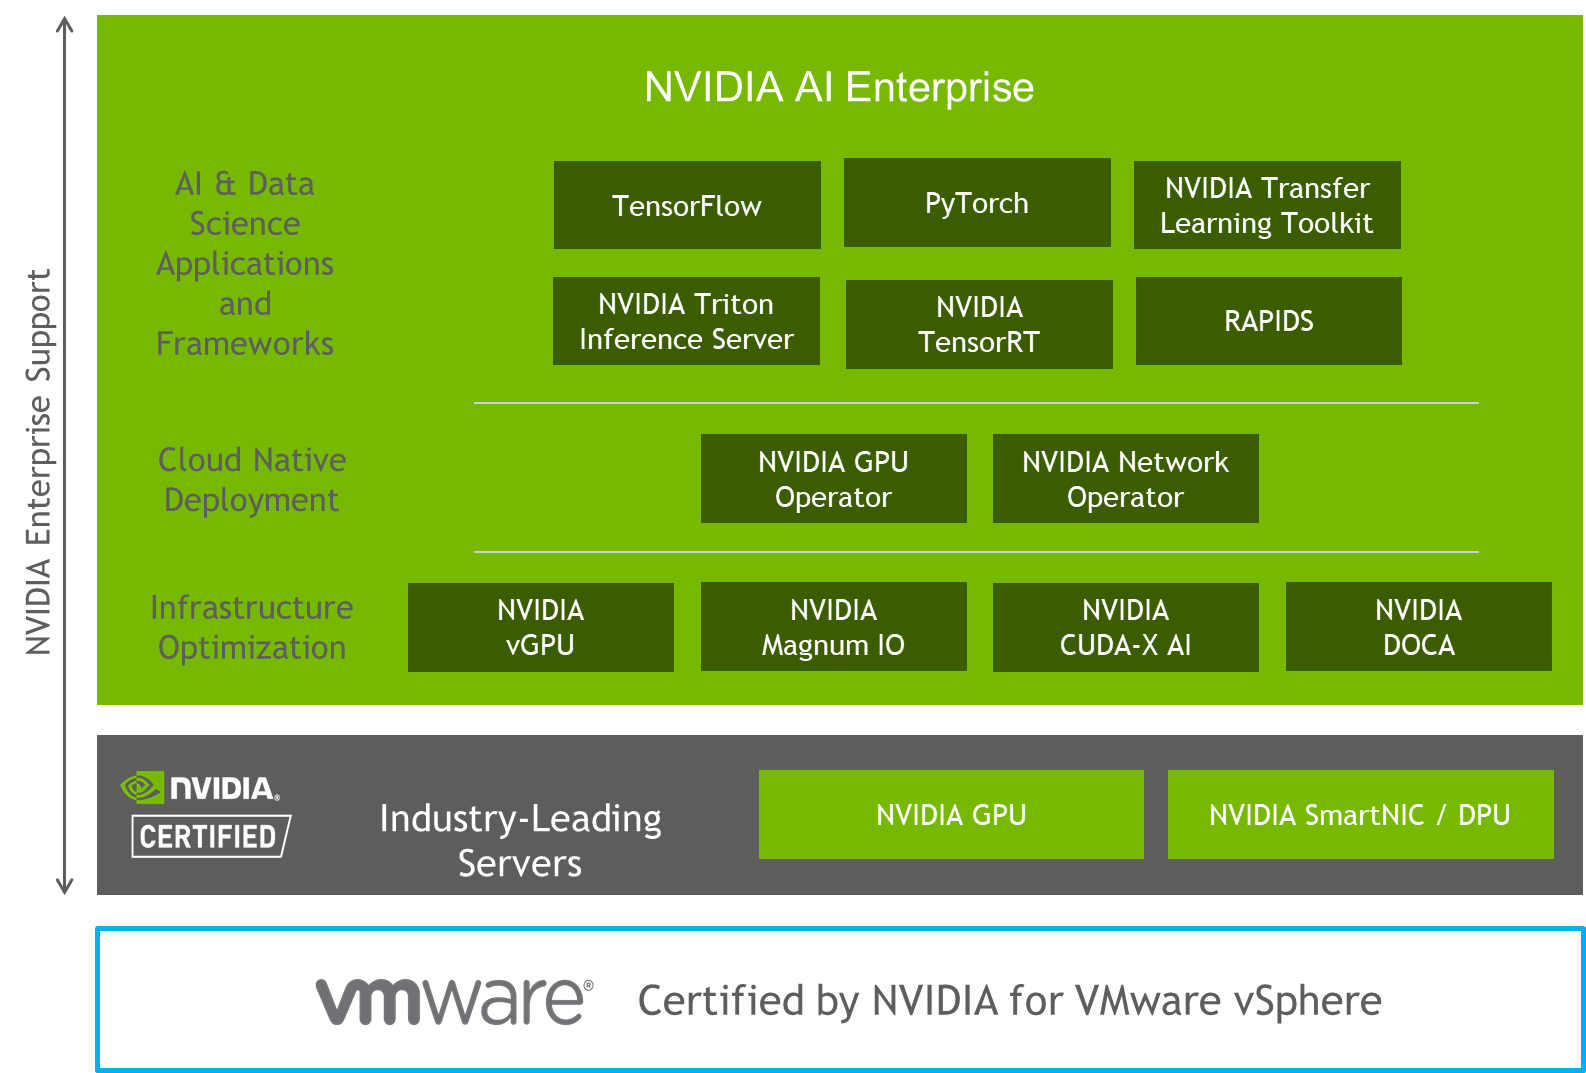
Figure 1. AI-Ready Enterprise Platform
Intended Audience
The primary audience for this document is the VMware administrators who are tasked with setting up a GPU-based VMware vSphere system or system clusters for the machine learning practitioner, the data scientists, or application architects. The document is also targeted at the IT Manager in charge of such a data center as well as the application architects who need to understand the infrastructure to support a working and virtualized machine learning application.
End-User Goals
The goals of a data center project team that would use this document can be broken down into four main areas:
- To set up an artificial intelligence or machine learning (AI/ML) infrastructure on vSphere with virtual GPUs associated with one or more VMs on a single host server and demonstrate the sharing of a physical GPU across more than one VM. This demonstrates the capability for multiple users and applications to use the same physical GPU from different VMs and optimize the consumption of that resource.
- To create a suitable platform for a separately described deployment of the NVIDIA Artificial Intelligence (AI) Enterprise Suite of software.
- To enable VMware vSphere vMotion® of a vGPU-enabled VM, while running a Machine Learning (ML) workload from one GPU-capable host to another, given the capacity at the hardware level to do so (two or more GPU-equipped host servers, networked together properly)
- In a more advanced use case, to create a cluster of two or more networked host servers and VMs that each has a GPU/NVIDIA virtual GPU (vGPU) associated with them and that are running a distributed training workload across the cluster. To show multi-node(distributed) learning via RoCE functionality in this use case.
VMware vSphere 7 Update 2
The vSphere 7 Update 2 release was made generally available in March 2021. This release adds support for the most modern GPUs, and multi-instance GPUs, a better method of sharing that AI/ML infrastructure across data scientists or GPU users.
VMware vSphere 7 Update 2 delivers:
- Support for the latest generation of GPUs from NVIDIA, based on the NVIDIA Ampere architecture, including the NVIDIA A100 Tensor Core GPU delivering, in some cases, up to 20X better performance from the previous generation.
- Support for Address Translation Services (ATS), for enhanced peer-to-peer performance between NVIDIA NICs/GPUs.
- Support for the latest spatial partitioning-based NVIDIA Multi-Instance GPUs (MIGs):
- vSphere is the ONLY virtualization platform that enables live migration (using vMotion) for NVIDIA MIG vGPU powered VMs, simplifying infrastructure maintenance such as consolidation, expansion, or upgrades, and enabling non-disruptive operations.
- With the VMware vSphere Distributed Resource Scheduler™ (DRS), vSphere provides automatic initial workload placement for AI infrastructure at scale for optimal resource consumption and avoiding performance bottlenecks.
NVIDIA Enterprise AI Suite
An end-to-end, cloud-native, suite of AI and data science applications and frameworks, optimized and exclusively certified by NVIDIA to run on VMware vSphere with NVIDIA-Certified Systems. It includes key enabling technologies and software from NVIDIA for rapid deployment, management, and scaling of AI workloads in the modern hybrid cloud. NVIDIA Enterprise AI is licensed and supported by NVIDIA.
NVIDIA vGPU
NVIDIA vGPU enables multiple Virtual Machines (VMs) to have simultaneous, direct access to a single physical GPU, or GPUs can be aggregated within a single VM. By doing so, NVIDIA vGPU provides VMs with high-performance compute, application compatibility, cost-effectiveness, scalability since multiple VMs can be customized to specific tasks that may demand more or less GPU compute or memory. For more information, see the NVIDIA vGPU webpage.
NVIDIA Multi-Instance GPU (MIG)
The new NVIDIA Multi-Instance GPU (MIG) feature allows the NVIDIA A100 GPUs, based on the NVIDIA Ampere architecture, to be securely partitioned into up to seven separate GPU compute slices for Compute Unified Device Architecture (CUDA) applications, providing multiple users with separate GPU resources for optimal GPU utilization. This feature is particularly beneficial for workloads that do not fully saturate the GPU’s compute capacity and therefore users may want to run different workloads in parallel to maximize utilization.
MIG allows multiple vGPUs (and thereby VMs) to run in parallel on a single A100, while preserving the isolation guarantees that vGPU provides. For more information on GPU partitioning using vGPU and MIG, refer to the technical brief.
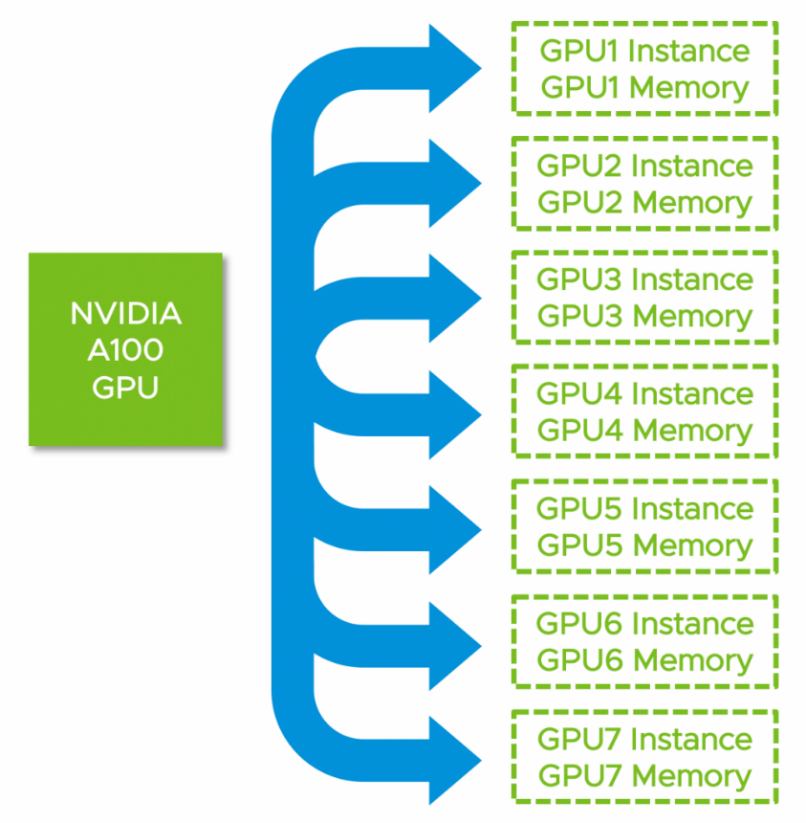
Figure 2. NVIDIA A100 Multi-Instance GPU
For more information, see Multi-Instance GPU.
Multi-Node (Distributed) Learning
Many data scientists are looking to scale compute resources to reduce the time it takes to complete the training of a neural network and produce results in real-time. Taking a Multi-GPU approach brings scientists closer to achieving a breakthrough as they can more rapidly experiment with different neural networks and algorithms. To maximize the throughput, multi-node learning takes the approach by using two or more VMs on different VMware ESXi hosts with GPU installed, with each VM assigned a full GPU. These VMs can transfer data across a network with TCP or Remote Direct Memory Access (RDMA) protocol.
Paravirtual RDMA (PVRDMA)
RDMA between VMs is known as Paravirtual RDMA. Introduced from vSphere 6.5, VMs with a PCIe virtual NIC that supports standard RDMA API can leverage the PVRDMA technology. VMs must be connected to the same distributed virtual switch to leverage Paravirtual RDMA. The method of communication between Paravirtual RDMA capable VMs is selected automatically based on the following scenarios:
- VMs running on the same ESXi server use memory copy for PVRDMA. This mode does not require ESXi servers to have an HCA (Host Channel Adapter or NIC) card connected.
- VMs present on different ESXi servers with HCA cards achieve PVRDMA communication through the HCA card. For this to happen, the HCA card must be configured as an uplink in the distributed virtual switch.
- VMs present on different ESXi servers when at least one of the ESXi servers does not have an HCA card connected, the communication happens over a TCP-based channel, and the performance is compromised.

Figure 3. Paravirtual RDMA Architecture
Single Node Learning
Deployment Prerequisites
Hardware
Server
Minimum one server that is approved on both the VMware Hardware Compatibility List and the NVIDIA Virtual GPU Certified Servers List is needed.
If vSAN is used, a minimum of three servers is required.
GPU
Minimum one NVIDIA GPU installed in one of the servers:
- Ampere class GPU (A100, A40, or A10) (A100 is MIG capable, recommended)
- Turing class GPU (T4)
- More supported GPUs can be found here
NVLink (OPTIONAL)
NVLink is a high-bandwidth hardware interconnector that enables fast communication between two physical GPUs on the same server. If multiple GPUs within the same server are aggregately used in one VM, NVLink is recommended for Peer-to-Peer CUDA transfers for better performance, see Virtual GPU Software Documentation for vGPUs supported and other limitations.

Figure 4. GPUs Interconnected by NVLink
Software
Download the Software
- VMware vSphere Hypervisor (ESXi) 7.0 Update 2
- VMware vCenter Server 7.0 Update 2
- NVIDIA vGPU software 12.2 for VMware vSphere 7.0 and NVIDIA vGPU software license server
Obtain the Licenses
Obtain vGPU Licenses
To download NVIDIA vGPU software licenses, at least one license server should be created on the NVIDIA Licensing Portal in the NVIDIA Application Hub. Creating a license server on the NVIDIA Licensing Portal registers the license server host with the NVIDIA Licensing Portal through the MAC address of the host. A separate license server VM is required that is reachable by all vGPU-enabled VMs and is loaded with the correct NVIDIA virtual GPU (vGPU) license, all vGPU VMs will contact that license server to become licensed vGPU consumers. That vGPU license is obtained from the NVIDIA Licensing Portal with the appropriate credentials. This process for setting up a License Server is fully described here.
Obtain vSphere Licenses
Connect with your NVIDIA/VMware Account Manager or go here to obtain the VMware vSphere licenses.
Environment Preparation
IP Addresses Preparation
Table 1. IP Addresses
|
Purpose |
Number of IP Addresses to Prepare |
|
vCenter |
1 |
|
vSphere Hypervisor Management |
1 per Server |
|
vSphere Hypervisor vMotion |
1 per Server |
|
NVIDIA License Server |
1 |
|
vSphere vSAN (OPTIONAL) |
1 per Server |
vSphere Environment Preparation
- VMware vCenter Server 7.0 Update 2 or later is configured to manage the ESXi servers. We recommend running it as a VM on a separate host to the above host. For the vCenter Server installation procedures and details, see About vCenter Server Installation and Setup.
- VMware vSphere Hypervisor 7.0 Update 2 installed on each of the servers. For the Hypervisor installation procedures and details, see About VMware ESXi Installation and Setup.
- Furthermore, About VMware vCenter Server and Host Management provides information about vCenter and ESXi server management and configuration.
- Also, we recommend using VMware vSAN as the first tier storage for VM placement, for more information, see About vSAN Planning and Deployment.
NTP Server
An NTP Server should be used to synchronize the time for vCenter, Hypervisor Server(s) as well as NVIDIA License Server. For details of configuring NTP Server on vCenter and Hypervisor Server, see Configure the System Time Zone and Time Synchronization Settings and Editing the Time Configuration Settings of a Host.
If there is no NTP Server available, those links above also have the information about configuring time and time zone manually.
NVIDIA License Server
The NVIDIA License Server could be installed on the servers above as a VM or could be configured on a separate physical host. Follow the instruction here to set up the NVIDIA License Server.
Hardware Settings
Enable vGPU Based on Ampere Architecture GPU
To use vGPU based on Ampere architecture GPU, VT-D/IOMMU and Global SR-IOV are required, VT-D/IOMMU as known as Virtualization Technology when applied to processor settings in server BIOS, is also a prerequisite to run 64-bit VM on vSphere.
A GPU Instance is associated with an SR-IOV Virtual Function at vGPU boot-up time.
Global SR-IOV
To enable the “Global SR-IOV” feature at the vSphere host BIOS level through the server management console, or iDRAC, below is an image of how this is done in the case of a Dell R740xd server, using the iDRAC interface. This may be different on your host servers, depending on your vendor.

Figure 5. Enable Global SR-IOV in IDRAC
vSphere Settings
Enable vGPU
Configure DRS Automation Level
If VMware ESXi cluster is used to manage the ESXi servers and DRS is enabled, configure it with Manual or Partially Automated mode. To do so:
- Log in vCenter using the vSphere Client as an administrator user.
- Click Hosts and Clusters.
- Find the cluster that manages the ESXi hosts.
- Navigate to Configure -> Services -> vSphere DRS and click EDIT.
- Select Manual or Partially Automated, then click OK.

Figure 6. Configure DRS Automation Level to Manual or Partially Automated
Set the GPU Device to vGPU Mode Using the vSphere Host Graphics Setting
A GPU card can be configured in one of two modes: vSGA (shared virtual graphics) and vGPU. The NVIDIA card should be configured with vGPU mode. This is specifically for use of the GPU in compute workloads, such as in machine learning or high-performance computing applications.
- Log in vCenter using the vSphere Client as an administrator user.
- Click Hosts and Clusters.
- Find the hosts with GPU installed, for each of the hosts.
- Navigate to Configure -> Hardware -> Graphics
- Under the HOST GRAPHICS tab, set
- Default graphics type to Shared Direct
- Shared passthrough GPU assignment policy to Spread VMs across GPUs (best performance)

Figure 7. Edit Host Graphics Setting
The following steps might be needed if there are more than one physical GPUs on the host
- Under the GRAPHICS DEVICES tab, edit each GPU settings as follows and click OK:
- Shared Direct is selected.
- Restart X Org server is checked.

Figure 8. Edit Graphic Device Setting
Install the NVIDIA Virtual GPU Manager
Before VMs enabled for NVIDIA vGPU can be configured, the NVIDIA Virtual GPU Manager (sometimes called the “vGPU Host Driver”) must be installed into the ESXi hypervisor. The process for installing the NVIDIA Virtual GPU Manager is described below.
For each ESXi server with a GPU installed:
- Enter maintenance mode.
- Install the NVIDIA Virtual GPU Manager vSphere Installation Bundle (VIB):
- SSH into ESXi server with the administrator privilege
- Remove any older version of NVIDIA Virtual GPU Manager vSphere Installation Bundle if installed:
$ esxcli software vib remove -n NVIDIA-VMware_ESXi_7.0_Host_Driver - Install the NVIDIA Virtual GPU Manager, run the following commands:
$ esxcli software vib install –v Absolute_Path_of_Directory_of_the_VIB_File/NVIDIA**.vib
- Reboot the ESXi server.
- Exit maintenance mode.
- Verify that the NVIDIA kernel driver can successfully communicate with the physical GPUs in the system by running the nvidia-smi command without any options.
$ nvidia-smi
If successful, the above command lists all the GPUs in the system.

Figure 9. nvidia-smi Output
If not, refer to the Virtual GPU Software User Guide for troubleshooting.
Verify and Enable ECC Memory
Most recent generation NVIDIA GPUs (Pascal architecture and later generations) that support NVIDIA vGPU software also support error-correcting code (ECC) memory. ECC memory improves data integrity by detecting and handling double-bit errors.
To verify whether ECC memory is enabled from the ESXi server which has GPU(s) installed.
- SSH into ESXi server with administrator privilege and find the GPU ID. If there are multiple GPUs in the host, find the GPU ID of the one to be checked by running
$ nvidia-smi, and the number highlighted is the GPU ID; if there is only one GPU in the host, the GPU ID is 0.

Figure 10. Find GPU ID
- Run the following command to check whether ECC memory is already activated on that GPU
$ nvidia-smi -i [GPU-ID] -q | grep -i -A 2 "ECC mode"
Figure 11. ECC Memory is Enabled
The figure above shows the ECC memory is enabled. If both Current and Pending are Disabled, the following steps demonstrate how to enable it by specifying a specific GPU ID. To enable ECC memory on all GPUs in the server:
- Enter maintenance mode.
- Run
$ nvidia-smi -i [GPU-ID] -e 1
- Reboot the ESXi server.
- Exit maintenance mode.
NOTE: If no GPU ID is specified, ECC memory setting is applied to all the GPUs on the system.
If the generation of GPU installed is earlier than the Pascal architecture, ensure to deactivate ECC memory in the ESXi, simply change the parameter “-e 1” to “-e 0” and reboot the ESXi server.
Verify the GPU Topology with NVLink (OPTIONAL)
For the ESXi server that has NVLink installed, to verify the topology of GPUs that interconnected by NVLinks and get the GPUs BUS ID as a differentiator for VM to set later, follow the steps below:
- SSH into ESXi server with administrator privilege.
- Run
$ nvidia-smito get GPUs’ ID and their BUS ID, as the illustration below, the GPUs’ ID and their BUS ID are highlighted:
- GPU0 has BUS ID 00000000:89:00.0
- GPU1 has BUS ID 00000000:b2:00.0
- GPU2 has BUS ID 00000000:B3:00.0

Figure 12. Find GPUs ID and BUS ID
- Run the following command to get the topology that shows how the GPUs are interconnected by NVLinks.
$ nvidia-smi topo -m
The output below illustrates:
- GPU0 and GPU1 are interconnected by NVLink-1
- GPU0 and GPU2 are interconnected by NVLink-2
- GPU1 and GPU2 are interconnected by NVLink-2

Figure 13. GPUs Topology
NOTE: If the GPU is in SR-IOV mode (for example NVIDIA A100), meaning there will be many Device Virtual Functions in addition to the physical GPU, the first Virtual Function (VF) BUS ID should be used instead of the physical GPU BUS ID. To do so, use the physical GPU BUS ID without the following Device and Function ID to search; for example, the physical GPU BUS ID found using $ nvidia-smi is 00000000:3B:00.0, this BUS ID will be used to find its first VF’s BUS ID by running $ lspci | grep -i 0000:3B, the figure below illustrates the BUS ID of the first VF(VF_0) is 0000:3b:00.4

Figure 14. Find the First VF BUS ID
Change vGPU Scheduling (OPTIONAL)
If the generation of GPU(s) installed is after the Maxwell architecture, and MIG is not configured, we recommend changing the vGPU scheduling policy from Best effort scheduling(Default) to Fixed share scheduling or Equal share scheduling for optimal performance since AI workloads are typically long-running operations.
For detailed procedures of changing the vGPU scheduling policy, see here.
Enable Multi-Instance GPU or MIG (OPTIONAL)
Prerequisites:
- NVIDIA A100 GPU is installed
- Global SR-IOV is enabled
- NVIDIA Virtual GPU Manager version R460.xx or later is installed
By default, MIG is deactivated at the host server level. We may enable MIG on a per-GPU basis. The following steps describe how to check or change the MIG setting on the ESXi server with NVIDIA A100 GPU installed:
- Enter maintenance mode.
- SSH into ESXi server with administrator privilege and find the GPU ID. If there are multiple GPUs in the host, find the GPU ID of the one to be checked by running
$ nvidia-smi, and the number highlighted is the GPU ID; if there is only one GPU in the host, the GPU ID is 0.
Figure 15. Find GPU ID
- MIG setting can be found by running:
$ nvidia-smi -i [GPU-ID] -q | grep -A 2 “MIG Mode”

Figure 16. MIG Mode is Deactivated
Current: Disabled means MIG is deactivated.
Pending: Disabled means there is no change to enable MIG to be made yet.
- To enable MIG, run
$ nvidia-smi -i [GPU-ID] -mig 1
NOTE: If no GPU ID is specified, MIG mode is applied to all the GPUs on the system.
- Recheck the MIG setting:
$ nvidia-smi -i [GPU-ID] -q | grep -A 2 “MIG Mode”
Figure 17. MIG Mode Set to Enabled, Pending Reboot
Showing MIG setting is pending changed and will be applied after rebooting the host.
- Reboot the host. This is done to perform a GPU reset. Certain processes may be active on the GPU causing the reset to be delayed, so a reboot is a safe option to take here.
- Recheck the MIG setting is enabled.

Figure 18. MIG Mode is Enabled after Rebooting
VM Settings
VM Configuration Prerequisites
- Upgrade VM Hardware Version to 19
- Supported 64-bits Operating System
- The minimum size of Virtual Hard Disk should be 500GB
In the vSphere Client, create or choose the existing VM on the ESXi server with GPU to assign vGPU, when the VM is powered off, right-click on the VM, and choose Edit Settings from the menu.
- Reserve all guest memory
Ensure to reserve all the guest memory by expanding Memory and check Reserve all guest memory (All locked).

Figure 19. Reserve All the Guest Memory
- EFI-bootable
Click on the VM Options tab, expand Boot Options, change the Firmware from BIOS to EFI.

Figure 20. Set Boot Option to EFI
NOTE: This EFI setting should be applied before the guest operating system is installed into the VM. It causes an operating system file to be created named /boot/efi.
- Advanced parameter setting
Click on VM Options tab, expand Advanced, click EDIT CONFIGURATION, then click ADD CONFIGURATION PARAMS in the popped up twice to add the following parameters and values, then click OK:
- pciPassthru.use64bitMMIO = true
- pciPassthru.64bitMMIOSizeGB = 128 (or multiple of the GPU memory size)

Figure 21. Set Advanced Parameters for vGPU
Assign vGPU
To assign vGPU profiles, there are four types of configurations described below.
Single VM with Single vGPU
Clicking Edit Settings on the VM:
- Choose PCI Device in Other Devices section in the ADD NEW DEVICE drop-down list.
- Choose NVIDIA vGPU for the New PCI device.
- Select one vGPU profile from the NVIDIA GRID vGPU Profile drop-down list.
If MIG is deactivated on the GPU selected, the vGPU profile name convention is
grid_[GPU-MODEL]-[vGPU-MEMORY]c
If MIG is enabled on the GPU selected, the vGPU profile name convention is
grid_[GPU-MODEL]-[NUM-OF-GPU-INSTANCE]-[vGPU-MEMORY]c
- Click OK.
NOTE: There are four types of series of vGPU profiles: Q, C, B, and A. For compute-intensive server workloads, such as AI, deep learning, or high-performance computing (HPC), a C-series profile should be used, thus only the vGPU profiles that have c at the end of their names should be focused.

Figure 22. Select vGPU Profile
Single VM with Multiple vGPUs with MIG Disabled
If the ESXi server that the VM is on has multiple physical GPU installed, the VM can be configured with the same number (up to four) of vGPU, to do so, repeat the steps above to assign more vGPU profiles from different physical GPUs to the same VM. This configuration must meet the following conditions:
- The supported vGPUs are list here.
- Allocate multiple physical GPUs to one VM and thus to one job. This involves setting multiple vGPU profiles for one VM. Those profiles must fully occupy their GPU memory. In this case, grid_a100-40c in the figure above must be used as the vGPU profile.
- Up to four full physical GPUs can be allocated to a VM through individual vGPU profiles.
- Only time-sliced vGPU profiles can be assigned to the VM, a GPU that has MIG enabled is not supported.
Assign vGPUs Interconnected with NVLink
If the VM needs to configure with fewer vGPU profiles than the number of GPUs installed in the server (for example 3 GPUs installed in the server, but only 2 vGPU profiles need to be configured in the VM), and a certain subset of the GPUs need to be specified(for example, 2 GPUs that interconnected by NVLink), additional advanced parameters are required:
- Find the GPUs that interconnected by NVLink and their BUS ID, since GPU0 (BUS ID: 00000000:89:00.0) and GPU1 (BUS ID: 00000000:b2:00.0) are interconnected by NVLink1, we pick those two GPUs for the VM as an example.
- Find the PCI device sequence numbers of the vGPU instances, after clicking the Edit Settings on the VM, find the PCI device sequence numbers of vGPUs, the PCI device sequence numbers 0 and 2 are highlighted in the figure below.

Figure 23. Find PCI Device Sequence Number
- Click on the VM Options tab, expand Advanced, click EDIT CONFIGURATION, click ADD CONFIGURATION PARAMS in the popped up twice to add the following parameters and values, and then click OK.
- pciPassthru[PCI-SEQUENCE-NUM].cfg.gpu-pci-id = "ssss:bb:dd.f"
In our case, those 2 entries should be:
- pciPassthru0.cfg.gpu-pci-id = "0000:89:00.0"
- pciPassthru2.cfg.gpu-pci-id = "0000:b2:00.0"

Figure 24. Specify GPUs for vGPUs
Multiple VMs Share the Same Physical GPU with MIG Disabled
Multiple VMs on the same ESXi server can share the same physical GPU. For each VMs, go through the steps of Single VM with Single vGPU. This configuration must meet the following conditions:
- The total vGPU memory allocation of all the VMs must be equal to or less than the physical GPU memory size.
- The vGPU profiles in those VMs must be identical. This restriction applies to time-sliced vGPU profiles only.
Multiple VMs Share the Same Physical GPU with MIG Enabled
Multiple VMs on the same ESXi server can share the same physical GPU. For each VMs, go through the steps of Single VM with Single vGPU. This configuration must meet the following condition:
- The total MIG compute slices (a set of SMs) for all the VMs on a server must be equal to or less than 7. The number of compute slices is shown in the middle of a100 and memory size; for example, the profile highlighted in the figure below has 4 compute slices, thus another VM on this host can choose grid_a100-[1,2,3]-20c as vGPU profile if allocating from the same physical GPU.

Figure 25. Select MIG vGPU Profile
Multi-Node Learning
NOTE: This is an optional section for those that want to deploy multi-node Machine Learning.
Customers whose Machine Learning models do not fit into one GPU’s framebuffer memory will choose to use two or more GPUs for their job. They can do this in two different ways.
- They can use two or more GPUs installed in one ESXi host (as seen earlier in the single node learning section)
- They can use GPUs on different ESXi hosts to work together on their single training job.
The second method spreads the training load across multiple servers, as you add servers to it. It is ONLY needed when a user chooses to use two or more GPUs that are installed in different servers for one model training job that this multi-node learning section applies to their situation.
Multi-node learning runs AI workload concurrently on multiple VMs on different ESXi hosts and each of these VMs could be configured with traditional VMXNet3 type of virtual NIC to use TCP as the end-to-end protocol for VM-to-VM traffic.
If RDMA over Converged Ethernet (RoCE) is properly configured on the physical NICs and network switch, we recommend the following approaches for VM-to-VM traffic to leverage the efficiency and high performance of RoCE protocol:
- Multi-node learning with RoCE: this configuration requires VMs to be configured with passthrough physical NIC and will deliver the best performance, but it would trade off some features such as vMotion.
- Multi-node learning with PVRDMA: this configuration requires additional steps to configure and VMs are configured with Paravirtual RDMA type of Virtual NIC, this approach delivers good performance, while it keeps the vSphere features like vMotion for the VMs.
Deployment Prerequisites
In addition to the deployment prerequisites of single node learning, the following prerequisites should also be met for multi-node learning.
Hardware
Server
If multi-node distributed learning is used, a minimum of two servers is needed.
Mellanox Network Interface Card
If multi-node distributed training is used, we recommend installing one Mellanox ConnectX-5, ConnectX-6, or Bluefield-2 network card in each of the GPU servers. These Mellanox network adapters are RDMA and Address Translation Services (ATS) capable, which can enable RoCE or PVRDMA to potentially maximize the performance of multi-node distributed training across multiple VMs on different ESXi servers.
Hardware Settings
In addition to the hardware settings of single node learning, the following hardware settings are recommended for multi-node learning.
Enable Multi-Node Learning with RoCE
Remote Direct Memory Access (RDMA) enables the movement of data between servers with little CPU involvement.
RDMA over Converged Ethernet (ToCE) provides an efficient, low latency, light-weight transport and enables faster application completion, better server utilization, and higher scalability, which is highly recommended for multi-node (distributed) learning.
All the ESXi servers with GPU and Mellanox NIC installed need to meet the following prerequisites and configurations.
Configure Mellanox Network Interface Card and Switch for RoCE
Ensure the recommended Mellanox Network Interface Card or other RoCE capable Network Adapter Installed and the firmware of the network interface card is up-to-date, and follow the procedures here to configure Lossless RoCE for Mellanox Onyx Switches, if the intermediate network switch is from other vendors, see the user manual.
PCIe Root Complex Placement (Recommended)
To achieve the best performance for multi-node learning, it is recommended that both the network adapter and the GPU be physically located on the same PCIe IO root complex.
Enable Multi-Node Learning with PVRDMA
All the ESXi servers with GPU and RDMA capable NIC installed need to meet the following prerequisites and configurations.
Prerequisite:
- Recommended Mellanox Network Interface Card or other RDMA capable Network Adapter Installed
- Configure Mellanox or other NIC and Switch for RoCE
Follow the Network Requirements for RDMA over Converged Ethernet guide for more requirements to enable PVRDMA.
vSphere Settings
In addition to the vSphere settings of single node learning, the following vSphere settings are also recommended for multi-node learning.
Enable Multi-Node Learning with RoCE
Multi-node learning with RoCE involves two or more VMs running on different ESXi hosts with GPU and Mellanox NIC installed, the requirements and settings below should be done on each single ESXi host involved.
Enable ATS (Address Translation Service)
VMware vSphere 7 Update 2 enhances PCIe device-to-device communication through a PCIe mechanism named Address Translation Service (ATS). ATS allows local caching of each PCIe device’s virtual-to-physical address mapping. This speeds up the local peer-to-peer device communication within a host. It therefore enhances the rate at which data travels from the GPU to the network card locally (bypassing the CPU and main memory). That network traffic then goes on to another GPU on another host, with the same ATS speed-up on the remote side.
1. Enter maintenance mode.
2. SSH into ESXi server with the administrator privilege.
After you SSH into the ESXi server, run the following command to enable ATS:
$ esxcli system settings kernel set -s atsSupport -v TRUE
3. Reboot the ESXi server and verify the ATS setting after rebooting the host:
$ esxcli system settings kernel list -o atsSupport
The following figure illustrates the ATS is successfully enabled.

Figure 26. ATS is Enabled
4. Exit maintenance mode.
Find out the NUMA Node the GPU and Network Adapter Attached to
To achieve better performance for multi-node learning, the VM mounted with vGPU and pass-through network adapter should be pinned to the NUMA node where the GPU and network adapter are attached to. To find out which NUMA node the GPU and network adapter are attached to, SSH into ESXi server with administrator privilege and run the following commands.
Get the NUMA node of GPU:
$ esxcli hardware pci list | grep -I -A 30 -B 10 NVIDIA
The highlighted area shows the GPU belongs to NUMA node 0.
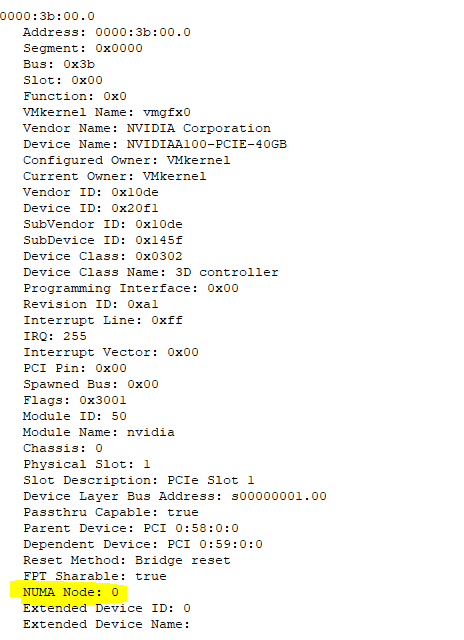
Figure 27. Find NUMA Node of GPU
Get the NUMA node of Mellanox network adapter:
$ esxcli hardware pci list | grep -I -A 30 -B 10 Mellanox
The highlighted area shows the network adapter belongs to NUMA node 0 too.

Figure 28. Find NUMA Node of Mellanox Network Adapter
Verify the GPU and Network Adapter (or HCA: Host Channel Adapter) Placement
To verify whether the GPU and Network Adapter is connected to the same PCIe Root Complex, SSH into ESXi server with administrator privilege and run the following command to get the PCI information and redirect it to a file,
$ lspci -e > lspci.out
Since ESXi doesn’t support “lspci -t”, the output file needs to be placed into another Linux server and then run
$ lspci -tvv -F lspci.out > lspciTree.out
Then run the following command to find out the root complex placement
$ grep -e "Mellanox\|NVIDIA" lspciTree.out
The output below is an example showing that both GPU and the HCA are connected to the same root complex(00.0) which is highlighted, and we can find out the network adapter and GPU’s PCI Bus ID(5e and 3b).
![]()
Figure 29. Find Root Complex Placement
Configure Network Adapter to Passthrough
- Log in vCenter using the vSphere Client as an administrator user.
- Click Hosts and Clusters.
- Find the hosts with GPU and RoCE enabled, for each of the hosts.
- Navigate to Configure -> Hardware -> PCI Devices.

Figure 30. Configure Passthrough for PCI Devices
- Click CONFIGURE PASSTHROUGH.
- Find the network adapter by the PCI Bus ID found above (5e), make sure it is not being used by any ESX/ESXi Device, check the box, and click OK.
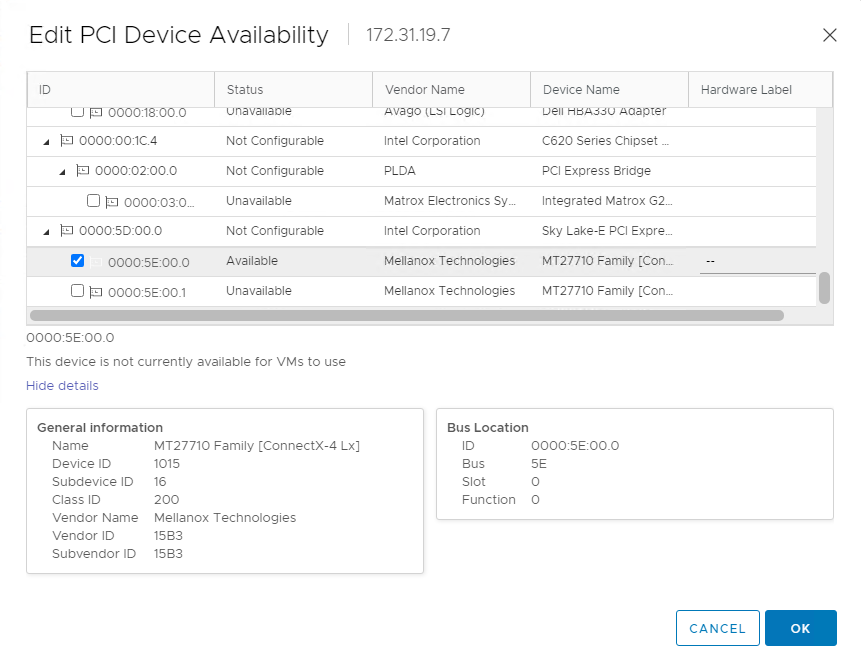
Figure 31. Select Mellanox Network Adapter to Passthrough
- To verify the network adapter has passthrough configured, you can see the adapter can be found in the Passthrough-enabled devices list.

Figure 32. Mellanox Network Adapter is Configured to Passthrough
Enable Multi-Node Learning with PVRDMA
Multi-node learning with PVRDMA involves two or more VMs running on different ESXi hosts with GPU and RDMA capable NIC installed, the prerequisites and settings below should be done on every single ESXi host involved.
Prerequisites:
- Hardware configuration meets the requirement of enabling RoCE.
- See PVRDMA Support for the pre-requisite of vSphere setting to enable PVRDMA.
Follow Configure an ESXi server for PVRDMA to configure PVRDMA in vSphere.
VM Settings
In addition to the VM settings of single node learning, the following VM settings should also be configured for multi-node learning.
Enable Multi-Node Learning with RoCE
The prerequisites and configurations below need to be met and set on all the VMs that are part of the distributed learning with RoCE on different ESXi hosts.
Prerequisites:
- Network adapter configured as passthrough
- NUMA node associated with GPU and network adapter found
- GPU and network adapter placement verified
- ATS is enabled
- Only 64bits Linux supported
To adopt the RoCE configuration on the VM, the passthrough network adapter needs to be mounted to it and there are additional advanced parameters needed to enable ACS and NUMA affinity.
Add Passthrough Network Adapter
After clicking Edit Settings of the VM:
- Choose PCI Device in the Other Devices section in the ADD NEW DEVICE drop-down list.
- Choose DirectPath IO and select the network adapter configured to passthrough.
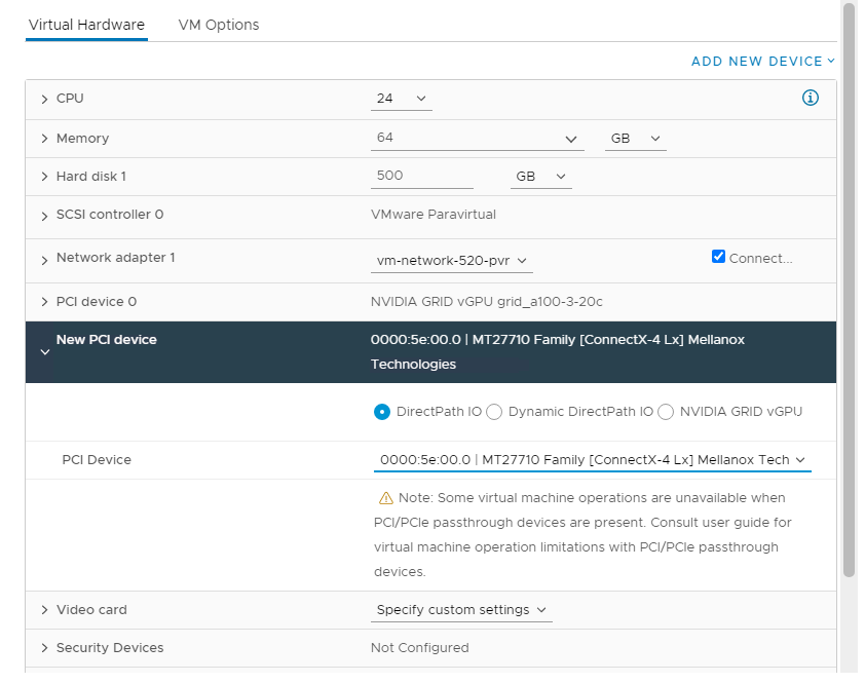
Figure 33. Configure VM with Passthrough NIC
Enable ACS and NUMA Affinity by Setting Advanced Parameters
Click on the VM Options tab, expand Advanced, click EDIT CONFIGURATION, then click ADD CONFIGURATION PARAMS in the popped up for three times to add the following parameters and values, and then click OK.
- pciPassthru.allowP2P = true (enable P2P)
- pciPassthru.RelaxACSforP2P = true (update ACS capabilities)
- numa.nodeAffinity = 0 (NUMA node associated with GPU and network adapter)

Figure 34. Configure Advanced Parameters for ACS and NUMA Affinity
Additionally, if there are multiple GPUs in the ESXi server, follow the steps here to find out the PCI device sequence ID and the BUS ID of physical GPU, which needs to be allocated.
Then set the following parameter:
pciPassthru[PCI-SEQUENCE-NUM].cfg.gpu-pci-id = "ssss:bb:dd.f" (GPU BUS ID)
Enable Multi-Node Learning with PVRDMA
The prerequisites and configurations below need to be met and set on all the VMs that are part of the distributed learning with PVRDMA on different ESXi hosts.
Prerequisites:
- The ESXi server on which the VM is running is configured for RDMA.
- VM uses virtual hardware version 13 or later.
- VM guest operating system is Linux 64-bit distribution.
Follow the procedures in Assign a PVRDMA Adapter to a VM to enable PVRDMA for the VM.
Next Steps
After the vSphere environment and VMs being properly configured with vGPU, you can power on the VMs and install the operating system with all the needed packages, NVIDIA vGPU driver and containers by following the AI Enterprise Suite guidance to start your AI journey.
Reference
About the Authors
Chen Wei, Staff Solutions Architect in the VMware Cloud Platform Business Unit, wrote this document with contributions from the following members:
- Emily Apsey, Senior Technical Marketing Engineer, NVIDIA
- Vinay Bagade, Performance Engineer, NVIDIA
- Charlie Huang, Senior Product Marketing Manager, NVIDIA
- Justin Murray, Staff Technical Marketing Architect, VMware
- Rajiv Thakkar, Product Line Marketing Manager, VMware