
Holo-2.0-HCX-Setup-LabGuide
Overview
The Holodeck HCX Lab is comprised of two parts.
- HCX Multi-Site Setup Guide
Shows how to deploy a multi-region instance of VCF using the Holodeck Toolkit, and to configure VMware HCX with a sample OpenCart application.
- HCX Migration Guide
Shows how to use VMware HCX to extend networks and migrate workloads between VCF instances deployed across regions.
This guide is the HCX Multi-Site Setup Guide. You must complete the steps in this guide before completing the lab exercises in the HCX Migration Guide.
Lab guides are available on the VCF TechZone at https://core.vmware.com/introducing-holodeck-toolkit.
Prerequisites
Prior to completing this guide verify the following:
- You are using Holodeck version 2.0 (or higher).
- You have an ESXi host with sufficient capacity to host a multi-region instance of VCF using the Holodeck Toolkit (see note 1).
- You have license keys for running Cloud Foundation 5.0 (see note 2).
- The lab environment has internet access (required for HCX License Activation and appliance configuration).
Note 1: ESXi host sizing recommendations are available on the Cloud Foundation TechZone site at https://core.vmware.com/cloud-foundation-holodeck-20-setup.
Note2: In the Holodeck HCX lab we use an NSX Enterprise license key to enable HCX. Do not use an HCX Enterprise key as it will not work in the lab.
Deploying a Dual-Region Holodeck Instance
To complete the VMware HCX lab, you first need to deploy a dual-region implementation of VCF using the Holodeck Toolkit. This section provides an overview of the six steps needed to deploy the lab environment. Follow the hyperlinks for detailed instructions on how to complete each step.

STEP 1: Configure Virtual Standard Switches on your ESXi host.
Configuring three Virtual Standard Switches (VSS) on your physical ESXi host.
- The first VSS is the default “vSwitch0” that is created during the ESXi software installation. This VSS will have a default port group named ‘VM Network’. This vSwitch is used for external network connectivity.
- Create a second VSS named “VLC-A” with a port group named “VLC-A-PG” for the first VCF instance.
- Create a third VSS named “VLC-A2” with the port group named “VLC-A2-PG” for the second VCF instance.
STEP 2: Create a Windows 2019 custom ISO.
Ensure you use Holodeck version 2.0 (or higher). Note that if you already have a Holodeck 2.0 custom ISO, you can use that.
STEP 3: Deploy the Holodeck Console.
Using the custom ISO created in step 2, deploy an instance of the “holo console”. Attach the holo console to the VLC-A-PG port group. The holo console will be automatically be assigned the IP address 10.0.0.201 on the 10.0.0.0/24 CIDR.
STEP 4: Deploy the Holodeck Router.
Deploy an instance of the holo router. The holo router has three networks that need to be configured.
- Attach the first network to the “VM Network” port group on the default VSS named vswitch0. Assign a routable IP address on your local network.
- Attach the second network to the “VLC-A-PG” on the VLC-A VSS. Configured with VLAN 10 using the CIDR 10.0.0.0/24.
- Attach the third network to the “VLC-A2-PG” port group on the VLC-A2 VSS. Configure it for VLAN 20 using the CIDR 10.0.20.0/24.
Note that in the lab, the holodeck router is configured to forward RDP connections to the holo console running on 10.0.0.201.
STEP 5: Deploy the first VCF instance (Site-A).
Use the VLC Command Line Interface (CLI) to deploy the “Site-A” VCF instance.
The first VCF instance represents Site-A. Deploy this instance to the “VLC-A-PG” port group. Note that this first VCF instance is deployed on VLAN 10 with the CIDR 10.0.0.0/24 and gateway IP 10.0.0.1.
IMPORTANT: you must use VLC CLI to deploy the Site-A VCF instance. Dual-region deployments require additional DNS configuration that is only available when deploying from the CLI.
STEP 6: Deploy the second VCF instance (Site-B).
Use the VLC Command Line Interface (CLI) to deploy the “Site-B” VCF instance.
The second VCF instance represents Site-B. Deploy this instance to the “VLC-A2-PG” port group. The second VCF instance is deployed on VLAN 20 with the CIDR 10.0.20.0/24 and gateway IP 10.0.20.1.
IMPORTANT: you must use VLC CLI to deploy the Site-B VCF instance. Dual-region deployments require additional DNS configuration that is only available when deploying from the CLI.
The diagram below depicts the holodeck configuration used for the HCX lab.

HCX Lab Setup
In this section of the lab, we configure VMware HCX along with a sample e-commerce application (OpenCart) comprised of six virtual machines.
Complete these four steps on the on the holo console.
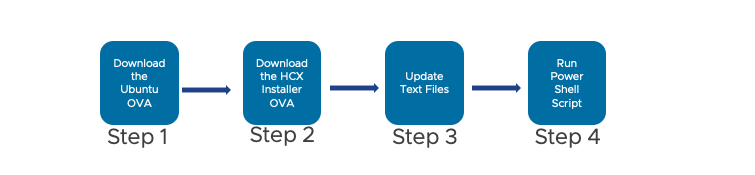
- Download the Ubuntu OVA template,
- Download the HCX Installer OVA.
- Update the initialization (.ini) file and PowerShell scripts
- Execute a series of PowerShell scripts to automate the deployment and configuration of HCX and deploy the OpenCart virtual machines.
Step 1: Stage Ubuntu OVA
Download the Ubuntu v 18.04 TLS OVA template to the C:\VLC\VLC-Holo-Site-1\Holo-Build directory on the holodeck console.
The HCX lab uses a sample workload based on the open source OpenCart application. OpenCart is a multi-tier application comprised of a MySQL database backend and multiple Apache frontend web servers. We use a PowerShell script to deploy the OpenCart application. This script uses the Ubuntu OVA template saved to the Holo Build directory to create the VMs.
- Use RDP to connect to the holo console
- Login as “Administrator” with the password “VMware123!”
- Use Chrome and download the Ubuntu 18.04 LTS Daily Build
- Copy the downloaded template to “
C:\VLC\VLC-Holo-Site-1\Holo-Build\” - Rename the file to “
bionic.ova”

Step 2: Stage HCX Installer OVA
Download the HCX Installer from VMware Customer Connect and save it in the Downloads folder on the holo console.
The HCX Installer deploys a minimal version of the HCX appliance. When a license key is added, the appliance activates, at which time it will “phone home” to download additional software components. As such, internet access for the lab is required.
Note: the lab was created using HCX version 4.7.0. Newer HCX versions will likely work, but they have not been formally tested.
- Use Chrome to connect to VMware Customer Connect and download the HCX 4.7.0 Installer
- Save the file to the
C:\Users\Administrator\Downloads\VMware-HCX-Installer-4.7.0.0-22085068.ova

Step 3: Add HCX License Information
Edit the Open ‘HCX-Multi-Site-Inputs.ini’ file and add your NSX Enterprise license key.
The deployment of HCX and OpenCart is done using PowerShell scripts. Prior to running the scripts, update the “ActivationKey” in the HCX-Multi-Site-Inputs.ini’ file with a valid NSX Enterprise license key.
Important, in the lab we use an NSX Enterprise license key. This key will enable HCX Advanced do not use an HCX Enterprise key in the lab as it will not work.
- On the holo console, open the Windows File Manager and navigate to the
C:\VLC\VLC-Holo-Site-1\Holo-Build\HCX-configdirectory. - Open ‘
HCX-Multi-Site-Inputs.ini’ in Notepad++. - Add your NSX Enterprise license as the
ActivationKey. - Save and close the file.

Step 4: Update PowerShell Scripts
Update the 01-HCX-createVLAN.ps1 and 07-HCX-switchRoute.ps1 PowerShell scripts with details for your environment.
Note that the ESXi server account to use depends on your configuration:
- (most common) If you are using a standalone ESXi host that is not managed by a vCenter Server, use the ESXi server
rootuser account. - (less common) If you are using an ESXi host that is configured as single-node clusters behind a vCenter Server instance, use the SSO
administrator@vsphere.localuser account.
Update 01-HCX-createVLAN.ps1
- On the holo console, open the Windows File Manager and navigate to the
C:\VLC\VLC-Holo-Site-1\Holo-Build\HCX-configdirectory. - Open
01-HCX-createVLAN.ps1in Notepad++. - Update the
$esxiServer,$esxiUser,$esxiPassfields with correct values for your lab. - Update the
$site1cbVMName,$holoRouterName, and$holoRouterPasswith values for your lab - Save and close the file.

Update 07-HCX-switchRoute.ps1
- On the holo console, open the Windows File Manager and navigate to the
C:\VLC\VLC-Holo-Site-1\Holo-Build\HCX-configdirectory. - Open
07-HCX-switchRoute.ps1in Notepad++ - Update the
$esxiServer,$esxiUser,$esxiPassfields with the correct values for your lab. - Update the
$site1cbVMName,$site2cbVMName,$holoRouterName, and$holoRouterPasswith values for your lab. - Save and close the file.

Step 5: Run PowerShell Scripts
Run the PowerShell scripts. There are six separate scripts that you need to run to setup the environment, deploy HCX, and deploy OpenCart.

The hcxLab.ps1 PowerShell script provides a menu to guide you through the steps to execute the scripts in order.
- On the holo console, open the Windows File Manager and navigate to the
C:\VLC\VLC-Holo-Site-1\Holo-Build\HCX-configdirectory. - Right click on
hcxLab.ps1and select run with PowerShell.

The hcxLab.ps1 script brings up a menu. Scripts 1-6 are used to deploy HCX. The 7th script, which we will not run in this part of the lab setup, is used as part of the HCX Multi-Site Workload Mobility lab to reconfigure the Holodeck environment and swing the environment gateway (Holo-Router) to the secondary site.
Verify that successful execution of each script before moving to the next step.
Run Script 1: 01-HCX-createVLAN.ps1
The first script creates two VLAN’s on Site-1’s Cloud Builder. These VLANs are used for the OpenCart DB and Web virtual machines and will be extended to the second region.
- VLAN 17 with the subnet 10.2.1.1/24 will be configured on eth0:17.
- VLAN 18 with the subnet 10.2.2.1/24 will be configured on eth0:18.
- Select option “1” to run the
01-HCX-createVLAN.ps1script.

Verify the script runs successfully and when prompted, press enter to return to the script menu.
Run Script 2: 02-HCX-createPG.ps1
The second script creates two Port Groups on the Site-A distributed switch. The first port group is named HCX-OC-DB-NET and assigned to VLAN 17. The second port group is named HCX-OC-WEB-NET and assigned to VLAN 18.
- Select option “2” to run the
01-HCX-createPG.ps1script.

Verify the script runs successfully and when prompted, press enter to return to the script menu.
Run Script 3: 03-HCX-deployHCX.ps1
The third script deploys and configures HCX. An instance of the HCX Manager appliance is deployed and configured in both Site-A and Site B. Note that internet access is required to allow for the license activation and for the required software packages to be downloaded and installed.
IMPORTANT: it will take approximately 2 hours for the 03-HCX-deployHCX.ps1 script to complete.
The script performs the following steps:
- Deploys an instance of the HCX Manager at Site 1 and Site 2.
- Applies the NSX Enterprise License
- Waits for HCX appliance activation and to apply software updates (internet access required)
- Creates the HCX Management, vMotion, and Compute profiles.
- Pairs Site A with Site B
- Instantiates the HCX Service Mesh
As part of the HCX deployment, the HCX plugin will be enabled on each vCenter. In addition, when the HCX service mesh is created you will see three additional appliances deployed at each site. After the script completes, feel free to use the vSphere client to connect to the HCX plugin and review the configuration.
- Select option “3” to run the
03-HCX-deployHCX.ps1script.

Verify the script runs successfully and when prompted, press enter to return to the script menu.
Run Script 4: 04-HCX-OC-prep.ps1
With HCX configured, we are ready to deploy the OpenCart application. Script 4 connects to the vCenter Server instance at Site-A and creates a credential store in preparation for deploying the OpenCart virtual machines.
- Select option “4” to run the
04-HCX-OC-prep.ps1script.

Verify the script runs successfully and when prompted, press enter to return to the script menu.
Run Script 5: 05-HCX-OC-Create.ps1
Script 5 uses the bionic.ova Ubuntu template saved in the C:\VLC\VLC-Holo-Site-1\Holo-Build directory to deploy and configure the virtual machines that make up the OpenCart application. The script will deploy one instance of the MySQL virtual machine and five instances of the Apache virtual machine. Note that cloud-init is used to configure the virtual machines on first boot and that internet access is required to download and install the required packages.
- Select option “5” to run the
05-HCX-OC-Create.ps1script.

Verify the script runs successfully and when prompted, press enter to return to the script menu.
Confirm the OpenCart application is running by connecting to one of the frontend web servers to confirm access to the shopping cart.
- From the holo console, open Chrome and connect to http://10.0.0.71.

Run Script 6: 06-HCX-OC-Finalize.ps1
The OpenCart virtual machines are initially deployed on the management network. Script 6 reconfigures them for use with HCX by moving the virtual machines to the HCX-OC-DB-NET and OC-HCX-OC-WEB-NET port groups and reassigning new IP addresses.
- Select option “6” to run the
06-HCX-OC-Finalize.ps1script.

Verify the script runs successfully and when prompted, press enter to return to the script menu.
This completes the setup. Note that the 7th script is not executed at this stage in the lab and will be used later.
- Select Option 0 to exit the script menu.
Step 6: Verify Final State
As a final step, validate the environment in preparation for completing the HCX lab.
Begin by verifying the database and web servers are running on the correct Port Groups.
- From the holo console, open Chrome and connect to the Management vCenter Server instance for Site A.
- From the inventory view, click the
HCX-OC-Apache-A - Verify the VM is connected to the
HCX-OC-WEB-NET - Verify the IP address is
10.2.1.2

- Click to select the VM
HCX-OC-MySQL - Verify the VM is connected to the
HCX-OC-DB-NETport group - Verify the IP address is
10.2.2.2

- Confirm the OpenCart application is working by using Chrome to connect to the URL http://10.2.1.2

This concludes the HCX multi-site setup. You are now ready to complete the HCX migration lab.