
Holo-Setup-Custom-ISO
Software Staging to Holo-Build Host
Overview
This section details downloading and staging software components on the Holo-Build host used bootstrap the Holodeck deployment.
Prerequisites
To complete this section, you will need the following:
- A Microsoft Windows Server 2019-based system with
- Internet access
- Local access to Holodeck ESXi hosts
- Minimum of 200 GB of free space available
Download the Required Software
Upon completion of this task, all the required software will be downloaded in preparation for the creation of the Holo-Console ISO image
Access the Holodeck Toolkit Intake Form
- Navigate to https://via.vmw.com/Get-Holo-Toolkit
- Complete the intake form
- Follow the link in the intake form to download the Holodeck-Standard-Main1.3.zip file to C:\Users\Administrator\Downloads
Download remaining software to the Holo-Build host
- Download the following packages to C:\Users\Administrator\Downloads
- Microsoft Server 2019 Desktop Experience (Eval copy with 6 month expiration)
- Latest VMware VMTools package
- Google Chrome Standalone
- Ensure standalone EXE package
- Latest VMware PowerCLI zip file
- Latest VMware PowerVCF zip file
- Latest VMware Power Validated Solutions Module zip file
- Latest PuTTY SSH Client MSI
- VMware OVFtool 4.5
- Requires VMware CustomerConnect login
- Download 64 Bit Windows Installer
- VMware Cloud Foundation 4.5 Cloud Builder OVA
- Requires VMware CustomerConnect login
- Notepad ++ 8.4.7
- VMware vRealize Automation 8.11.2 Easy Installer
- Requires VMware CustomerConnect login
- Download version 8.11.2 (Other versions have not been tested to work with the VLC Holodeck package)
- This package is also available via VMUG Advantage vRealize Suite 2019 download
Automated Holo-Console ISO Creation
Overview
Interaction with the VLC Holodeck Standard configuration is done through a virtual machine referred to as the Holo-Console. This VM is a specifically configured Microsoft Windows Server 2019 based VM deployed inside the Holodeck Pod. Each Holodeck Pod deployed must contain one Holo-Console. This step uses PowerShell Automation to create a custom ISO that will provide complete hands-off deployment of Holo-Console
Unzip VCF Lab Constructor
- Unzip holodeck-standard-main1.3.zip in the downloads directory
Edit the Configuration Files
Various configuration files are required to be edited to match the specific environment.

Configure createISO.ps1
- Navigate to C:\Users\Administrator\Downloads\holodeck-standard-main1.3\holodeck-standard-main\Holo-Console
- Open createISO.ps1 with notepad ++

- Validate the filenames in the default createISO.ps1 match what you have downloaded. In cases where newer versions of files are downloaded, update filenames in createISO.ps1. This example is highlighting the vRealize Automation Easy Installer which was recently updated to version 8.11.2

- Add License Keys between the quotations at the bottom of createISO.ps1 for the following products.
- esxLicense (vSphere)
- nsxLicense (NSX)
- vcLicense (vCenter Server)
- vsanLicense (vSAN)

- Save createISO.ps1
Validate createISO.ps1 customization files
- Notepad++ is copied into the ISO using the additionalfiles.txt customization file. If you are using a version of Notepad++ other than 8.4.7 it will need to be updated here. This customization file also copies the SDDC Commander custom wallpaper and PowerShell script to do the customization into the console. This is a very handy feature if you need to make files available in each deployed console.

- Notepad++ is deployed in the Holo-Console using the additionalcommands.bat customization file. Commands placed here are run at the very last step of automated Holo-Console deploy. If you are using a version of Notepad++ other than 8.4.7 update the installer filename here. Also note that files placed in the ISO are accessible at %WINDIR%\Setup\Scripts\ when this script is run. This is also a very handy feature for customizing your Holo-Console deployment

Create ISO
The following steps are performed create the Holo-Console ISO
Holo-Console ISO Creation
- Open a PowerShell window NOTE: Ensure you open a 64 bit PowerShell session versus an X86 session.
- Change directories to C:\Users\Administrator\Downloads\holodeck-standard-main1.3\holodeck-standard-main\Holo-Console
- Run .\createISO.ps1

- The process takes approximately 7 minutes
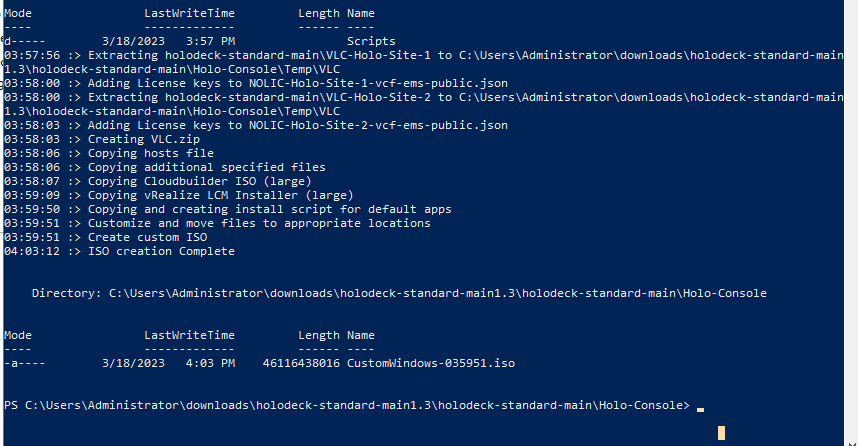
- The final file size with Cloud Builder and VRA Easy Installer in the ISO is approximately 46GB
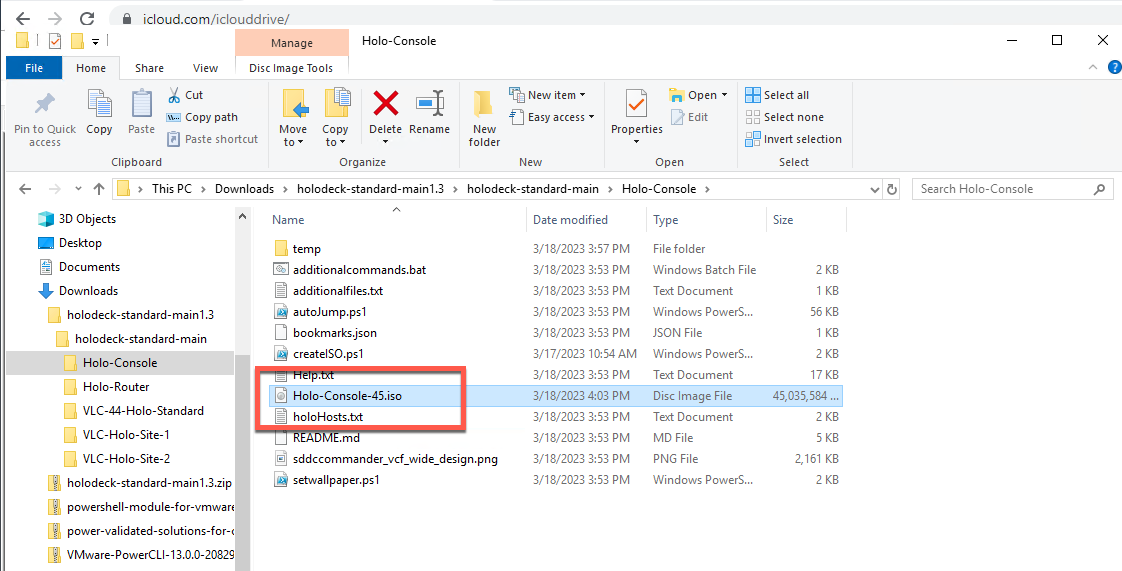
- The ISO file generated is located under C:\Users\Administrator\Downloads\holodeck-standard-main1.3\holodeck-standard-main\Holo-Console with a filename similar to “CustomWindows-XXXXXX.iso

- Rename the ISO to Holo-Console-45.iso
Staging of Holo-Console ISO to ESXi Host
Overview
After the Holo-Console customer ISO image has been created, it needs to be moved to a datastore accessible by the ESXi host in order to create a Holo-Console VM.
Upload Holo-Console ISO
The following steps are performed move the ISO to ESXi local storage.
Upload the Holo-Console ISO File
- Using the vSphere Web UI, connect to the ESXi server
- Select an appropriate datastore with enough spare capacity to host the Holo-Console custom ISO image
- Open the Datastore Browser for the selected datastore
- Select Upload
- Select the Holo-Console-45.iso file under C:\Users\Administrator\Downloads\holodeck-standard-main1.3\holodeck-standard-main\Holo-Console
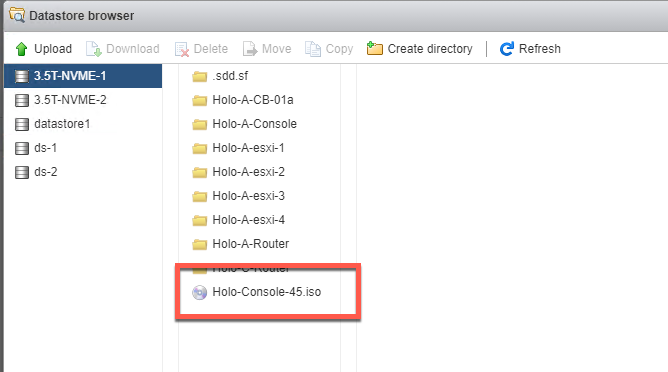
- Due to file size, this can take 10 minutes or more
- Wait for the upload to complete successfully
- Close the Datastore Browser