
Holo-Tanzu-Create-TKC
Module 4 - Deploy Tanzu Kubernetes Cluster
This module shows how to deploy a Tanzu Kubernetes Cluster (TKC) inside a vSphere Namespace.
The vSphere supervisor cluster provides a management layer from which TKCs are built. You can provision multiple TKCs within a single supervisor cluster. The workload management functionality provided by the supervisor cluster gives you control over the cluster configuration and lifecycle, while allowing you to maintain concurrency with upstream Kubernetes.
Resource quotas and storage policy applied to a vSphere Namespace are inherited by the TKCs deployed there.
When you provision a TKC, a resource pool and VM folder are created in the vSphere Namespace. The VMs for the TKC control plane and worker nodes are placed within this resource pool and VM folder.
Step 1: Deploy Tanzu Kubernetes Cluster
In this exercise, we deploy a TKC named "tkc01" in the "ns01" vSphere namespace. The TKC will be deployed with one control plane and two worker nodes.
Note, this configuration is intentionally small to facilitate the lab. Production-grade TKC deployments should always have three control plane nodes with multiple worker nodes.
From the vSphere client expand the vSphere inventory tree:
- Navigate to Menu -> Inventory
- Expand vcenter-mgmt.vcf.sddc.lab
- Expand mgmt-datacenter-01
- Expand mgmt-cluster-01
- Expand Namespaces

TKC clusters are deployed inside vSphere namespaces.
To create a TKC, connect to the developer workstation:
- Click the PuTTY icon on the Windows taskbar
- Click Tanzu WS
- Click Load
- Click Open
- Login: root
- Password: VMware123!

Create a YAML manifest for the TKC. In the lab, a sample YAML manifest is provided in the /home/sam/demo directory. To view this manifest, run the following commands:
# cd /home/sam/demo
# cat tkc-demo.yaml

Take a few minutes to familiarize yourself with the contents of the YAML file. Note the following:
- The manifest specifies the name of the TKC (tkc01) along with the name of the vSphere namespace where it will be deployed (ns01).
- The manifest specifies the version of Kubernetes to be deployed (1.22.9+vmware.1-tkg.1.cc71bc8). Note that the version must map to an available OVA image in the vSphere Content Library.
- The manifest specifies the number of control plane and worker nodes to deploy, along with the size (i.e., VM class) of the VMs. Note that the VM class must be enabled for the vSphere namespace.
- The manifest indicates the storage class to be used when deploying the VMs for the TKC. Note that the storage class must be enabled for the vSphere namespace.
- The manifest indicates the internal network settings for the TKC. In this example, the Container Network Interface (CNI) is specified as “antrea” with the corresponding service and pod CIDR blocks (default settings).
With the YAML manifest, you are ready to connect to the Kubernetes control plane, set the context to the vSphere namespace "ns01", and deploy the TKC.
Run the following commands to authenticate to the Kubernetes control plane and set the context to the “ns01” vSphere namespace.
# kubectl vsphere login --vsphere-username sam@vsphere.local --server 10.80.0.2

# kubectl config use-context ns01

Before creating the TKC, first confirm that the Kubernetes version and VM Class specified in the YAML manifest are available in the “ns01” vSphere namespace.
To query for the available Kubernetes versions, run the ‘kubectl get tkr’ command. Pipe the output through ‘grep’ to filter for Kubernetes versions 1.2x and above. Note that the version specified in the YAML manifest (1.22.9+vmware.1-tkg.1.cc71bc8) is listed as an available version.
# kubectl get tkr | grep v1.2

To query the available VM Classes run the ‘kubectl get virtualmachineclasses’ command. Note that the VM class “best-effort-small” class match the settings in the deploy TKC YAML manifest.

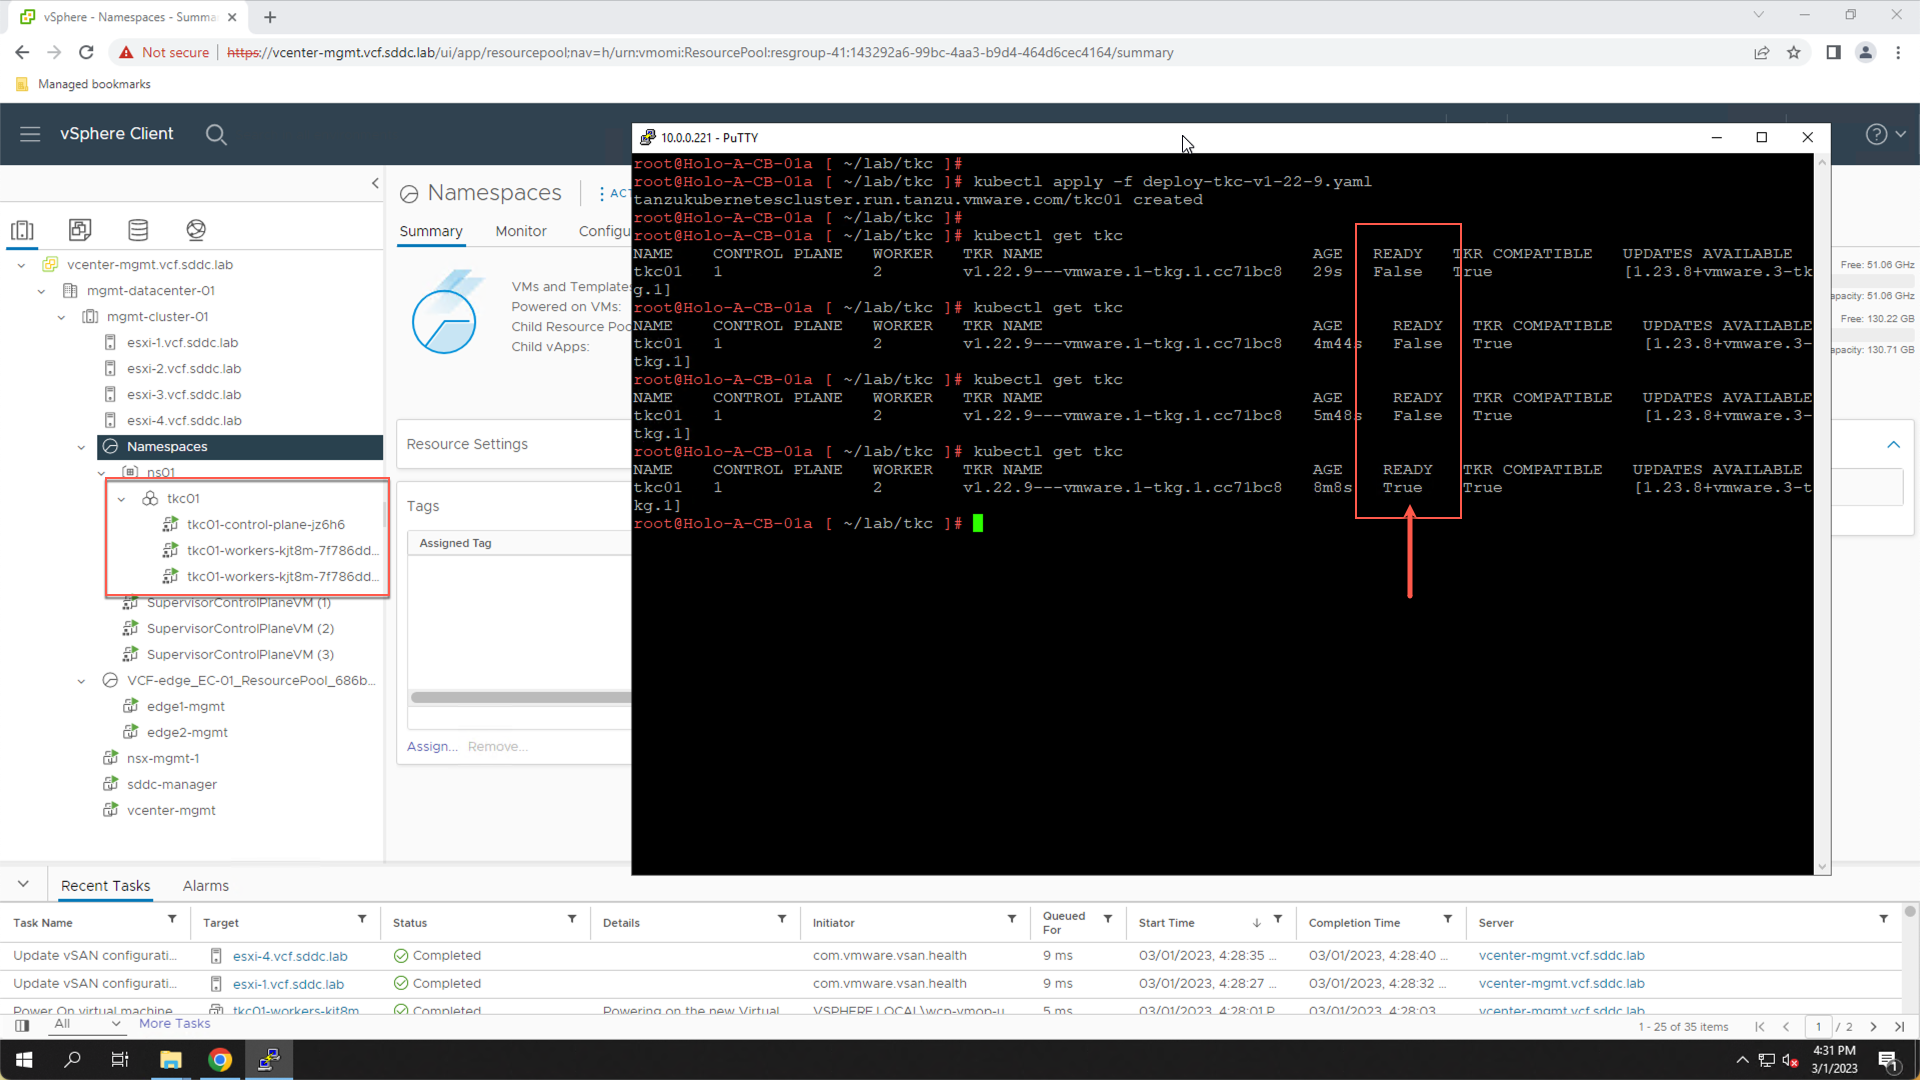
Next, apply the YAML manifest to create the TKC named "tkc01".
# kubectl apply -f tkc-demo.yaml
You are notified that the ‘tkc01’ cluster has been created. Monitor the progress of the TKC deployment using the ‘kubectl get tkc’ command. You can also monitor the TKC creation from the vSphere client where you will see the VMs that comprise the TKC being deployed.
# kubectl get tkc

Wait for the TKC to deploy. This typically takes three to five minutes. Monitor the progress by re-running the ‘kubectl get tkc’ command. The deployment is complete when the TKC READY status is set to “true”.
Step 1 Summary
In Step 1 we deployed a TKC named ‘tkc01’ in the ‘ns01’ vSphere namespace. We showed a sample YAML manifest and how to use the ‘kubectl apply’ command to apply the manifest. We also saw how to verify the required OVA image was available in the vSphere Content Library and the correct VM Class was enabled on the vSphere Namespace.
Step 2: View Details of a Tanzu Kubernetes Cluster
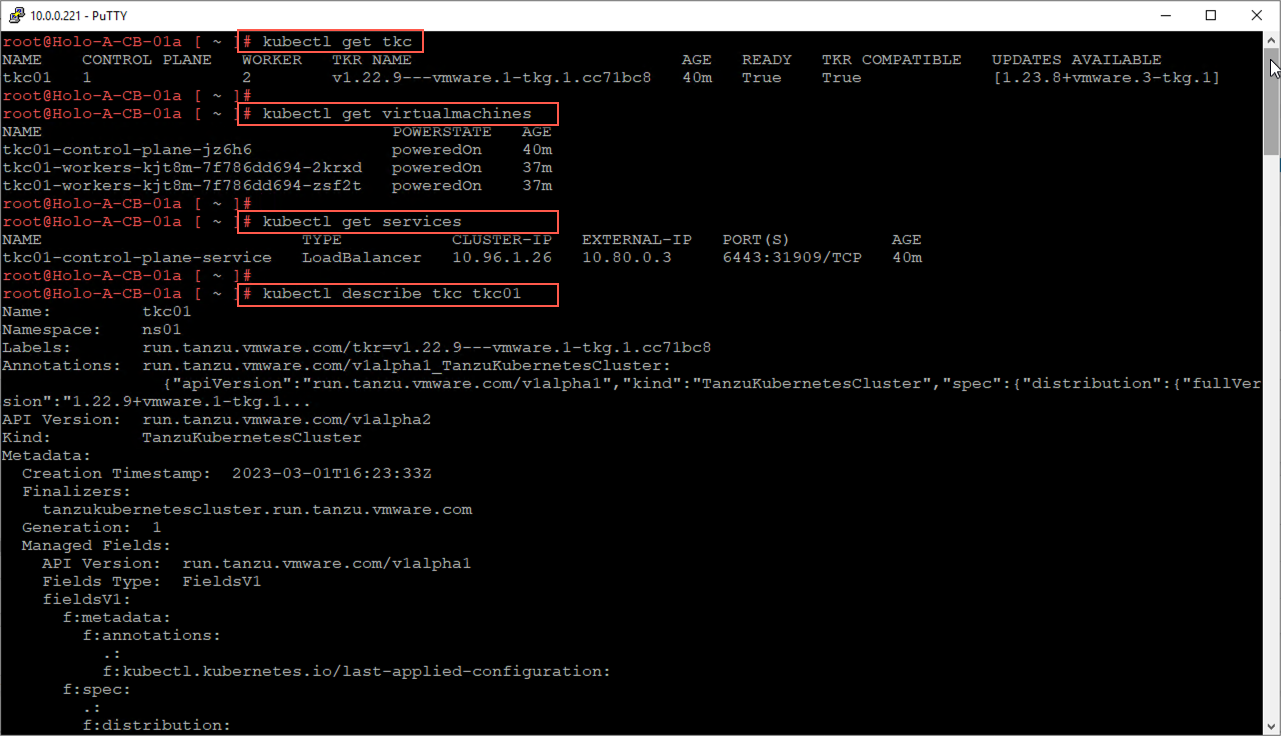
After the TKC has been deployed, run the following kubectl commands to view details about the TKC.
# kubectl get tkc
# kubectl get virtualmachines
# kubectl get services
# kubectl describe tkc tkc01
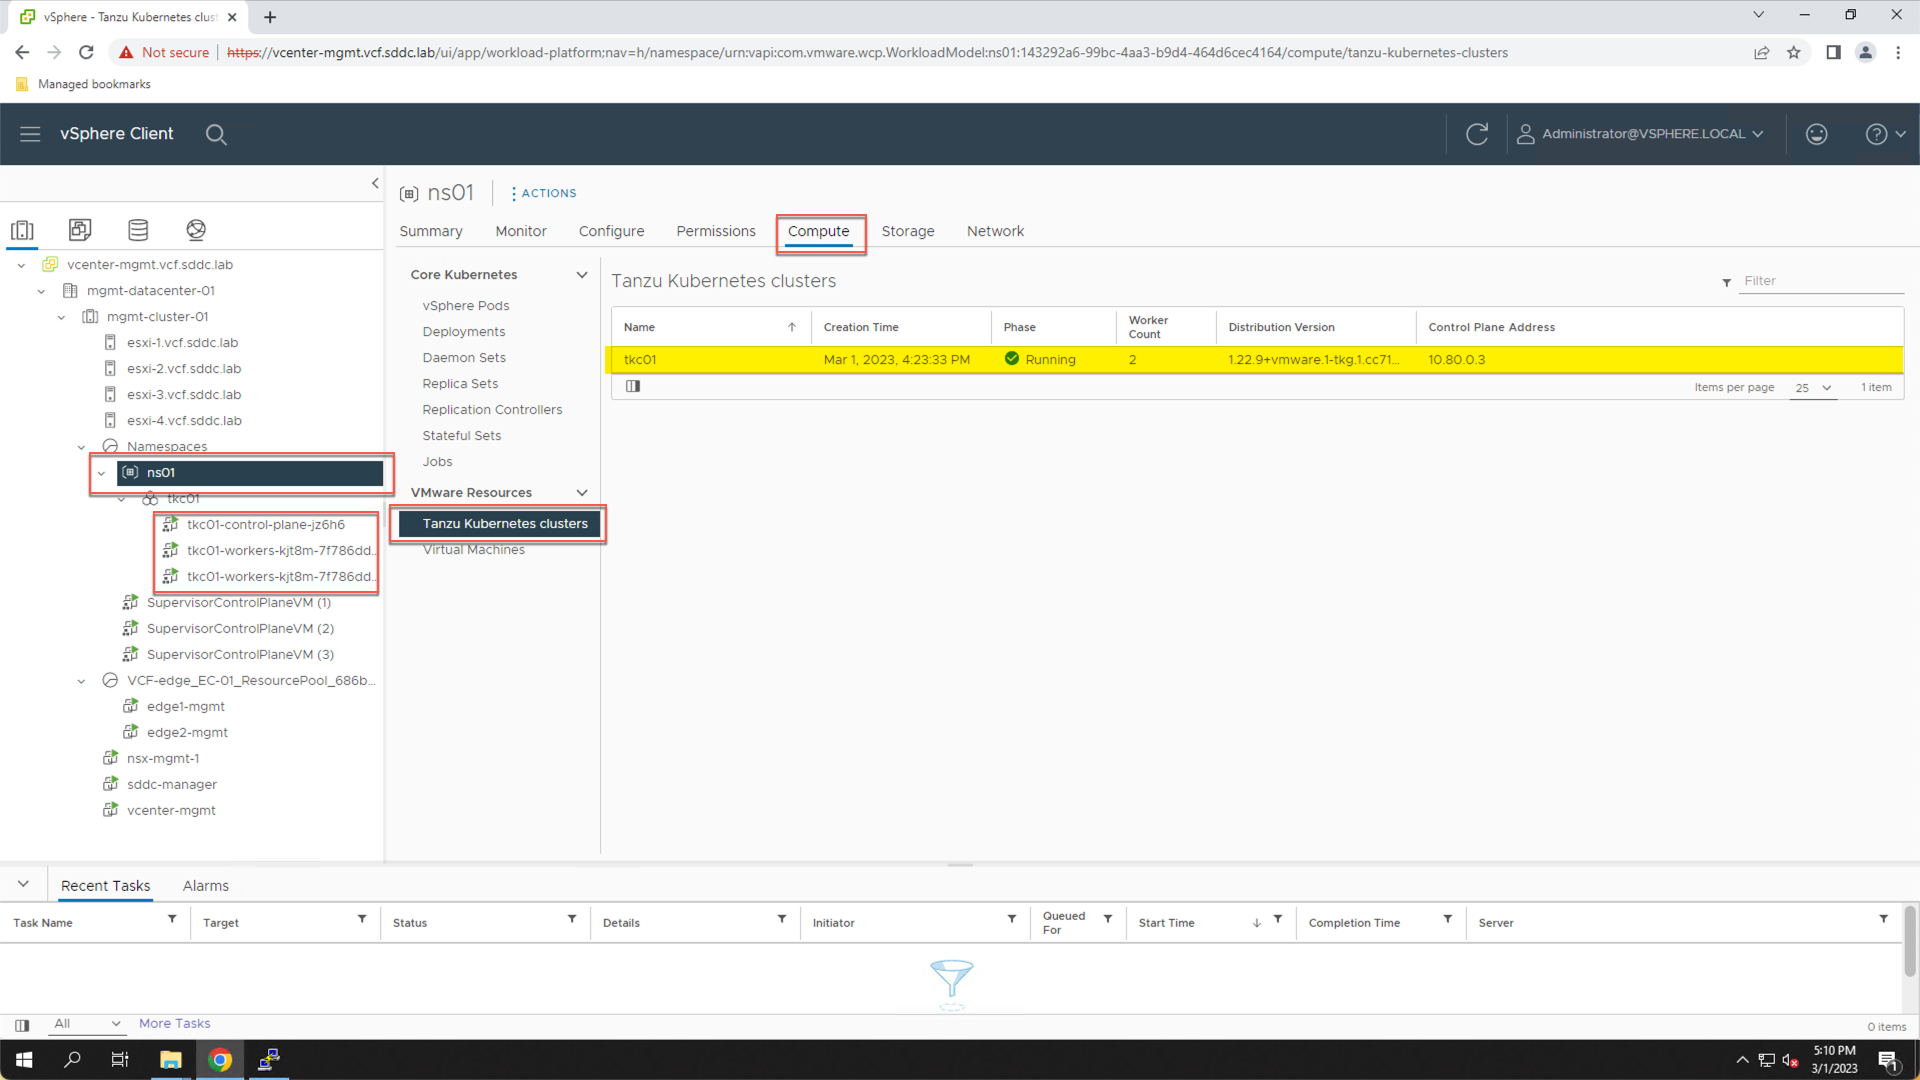
We can also view details about the TKC from the vSphere client.
- Click the “vSphere” browser tab to return to the vSphere Client.
Note in the inventory, under the "ns01" vSphere namespace, there is now a TKC object named "tkc01".
- Click to expand "tkc01"
We see the control plane and two worker nodes that were deployed for the TKC.
- Click “ns01”
- Click the “Compute” tab
- Click “Tanzu Kubernetes Clusters”
We see additional details about the TKC to include the status and Kubernetes version.
Step 2 Summary
In step 2 we showed how to view details of a deployed TKC from the command line using the ‘kubectl’ command and from Inventory view in the vSphere client.
Step 3: View NSX Configuration for a Tanzu Kubernetes Cluster
Along with the virtual machines that get deployed as part of a TKC, a new DVPortGroup is also created on the virtual distributed switch.
- Click the Network icon
- Expand the VDS inventory
Note the new DVPortGroups that was created for the TKC. Both the control plane and work nodes are connected to this DVPortGroup.

There are also several objects created inside NSX. To view these objects, connect to the NSX Manager UI:
- Click “+” to open a new browser tab
- Click Managed Bookmarks
- Click Mgmt Domain
- Click Mgmt NSX
- Login:
- User: admin
- Password: VMware123!VMware123!
From the NSX Manager UI:
- Click Networking
- Click Segments
- Expand the segment that’s name starts with “vnet-domain-c8:<id>”
This NSX segment represents the isolated L2 network that was created for ‘tkc01’. Note that the subnet is connected to a Tier 1 gateway and has been assigned the subnet 10.244.0.33/28 (note, the IP subnet may be different in your lab).
- Click the “View Topology” icon preceding the segment name

The topology diagram depicts the network path for the TKC. Note that the three VMs are attached to the NSX Segment, which is attached to the Tier-1 gateway, which is connected to the Tier-0 gateway.
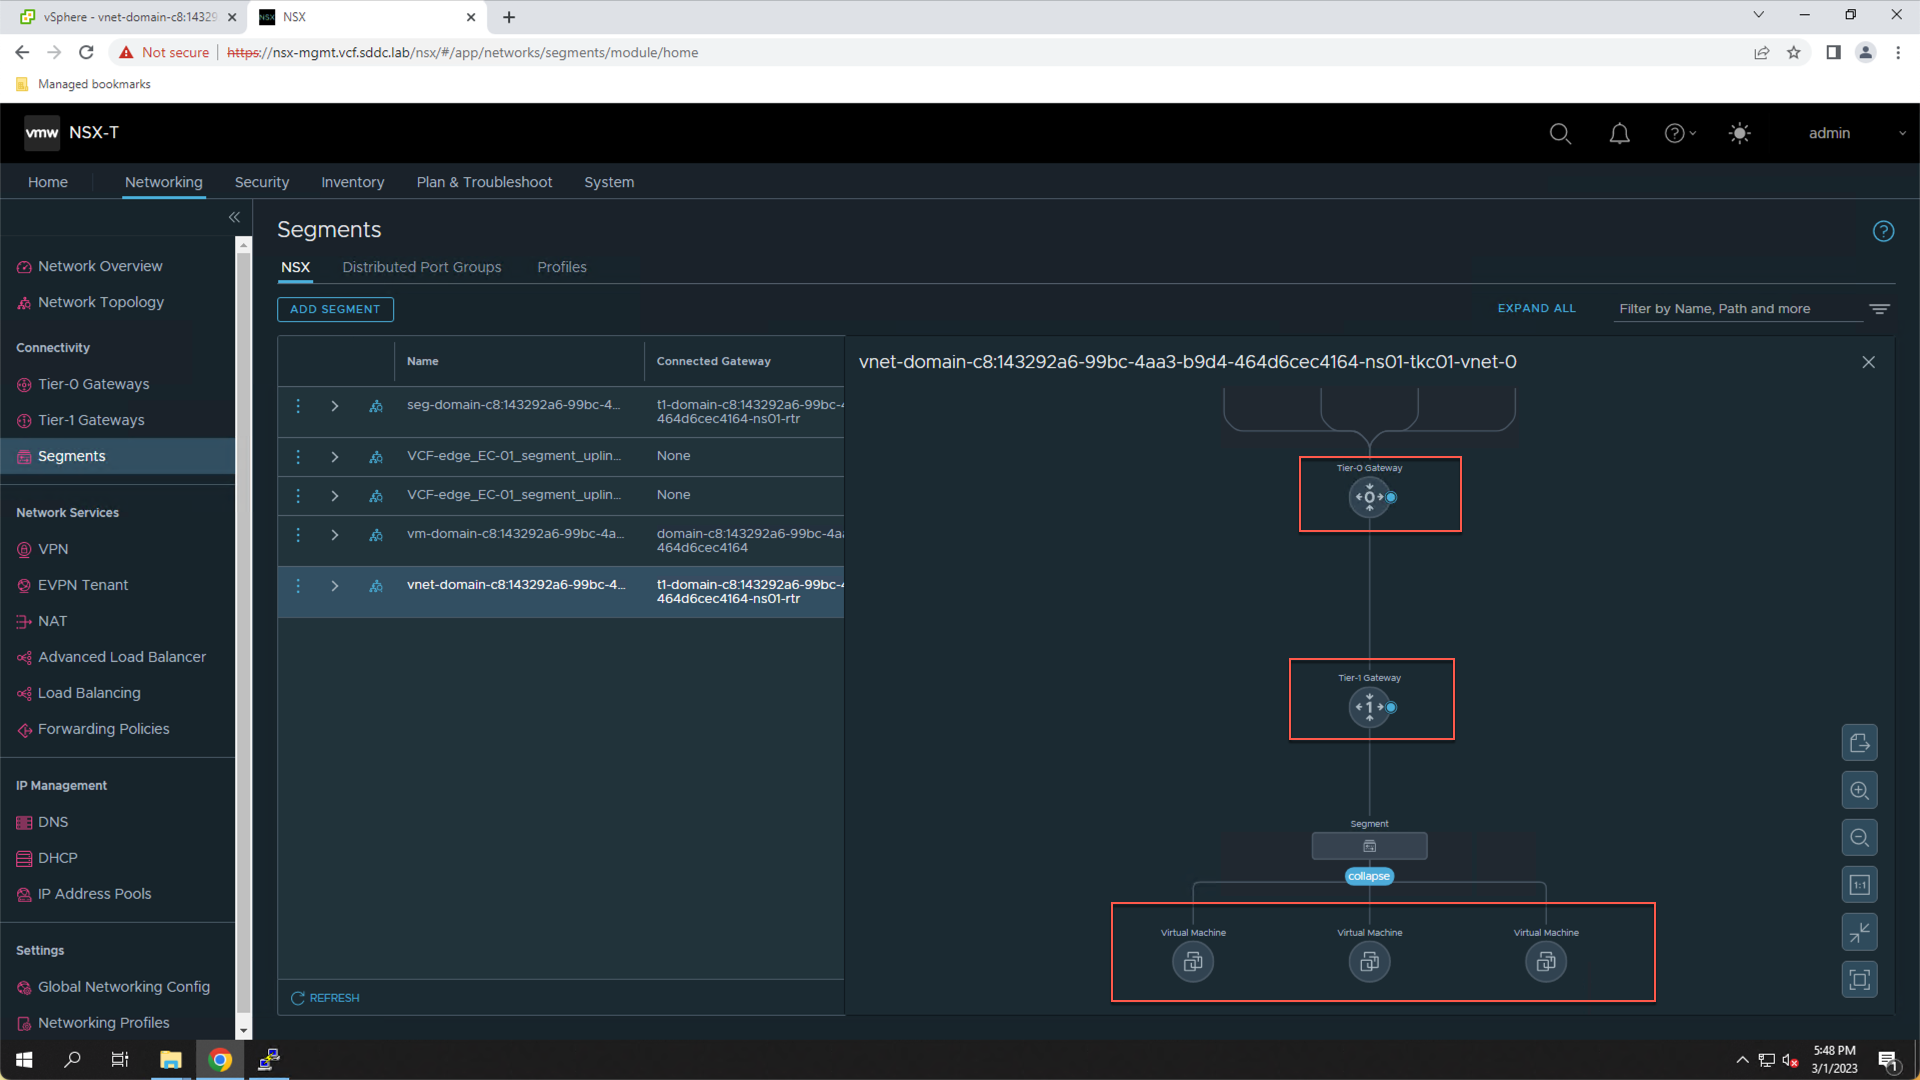
The NSX topology diagram depicts the routing path for both the control plane and worker nodes. This is also the network path that will be used by the container-based applications running in the TKC. Note that NSX was dynamically configured as part of the TKC deployment. This is achieved by the NSX Container Plugin (NCP) running on the supervisor cluster.
Each TKC that is deployed on the Supervisor Cluster will get their own isolated L2 network (NSX segment) and will have a similar path for routing through the NSX Tier-0 router configured on the NSX Edge cluster.
Step 3 Summary
In step 3 we showed the NSX objects that were created for the TKC. We showed how each TKC gets a dedicated L2 network that is attached to a Tier-1 router and configured to route through the Tier-0 router on the NSX Edge Cluster.
Module Summary
This module showed how to deploy a Tanzu Kubernetes Cluster (TKC) inside a vSphere Namespace.
VCF with Tanzu enables developers to deploy one or more Tanzu Kubernetes clusters to a vSphere Namespace. Resource quotas and storage policies applied to the vSphere Namespace are inherited by the Tanzu Kubernetes clusters.
When you provision a Tanzu Kubernetes cluster, a resource pool and VM folder are created in the vSphere Namespace. In addition, a dedicated L2 network (i.e., NSX segment) is created inside NSX and attached to a Tier-1 router.
Once deployed, TKCs can be expanded by adding additional worker nodes, resized by increasing the CPU and memory assigned to each node, upgraded, and deleted. These functions are explored in the next sections of this lab.
Module Key Takeaways
- There is a one-to-many relationship between the supervisor cluster and Tanzu Kubernetes clusters. You can provision multiple Tanzu Kubernetes clusters within a single supervisor cluster.
- The workload management functionality provided by the supervisor cluster gives developers control over the cluster configuration and lifecycle, while allowing you to maintain concurrency with upstream Kubernetes.
- You deploy one or more Tanzu Kubernetes clusters to a vSphere namespace. Resource quotas and storage policy are applied to a vSphere Namespace and inherited by the Tanzu Kubernetes clusters deployed there.