
Holo-Tanzu-Lab-Setup
Module 1 – Deploy Linux VM & Create SSO User
This module deploys a Linux Virtual Machine (VM) to the ‘mgmt-cluster-01’ cluster in preparation for completing the Holodeck Tanzu labs. In addition to deploying the Linux VM, this module also configures PuTTY access to the VM from the Holo Console.
Step 1: Confirm Workload Management Has Been Enabled
Prior to completing this module an NSX Edge Cluster must be deployed, and Workload Management enabled on the ‘mgmt-cluster-01’ cluster in the Management Domain.
- When using the Holodeck Toolkit UI, this is done by selecting the ‘Deploy NSX Edge Cluster’ and ‘Deploy Workload Mgmt’ checkboxes during deployment.
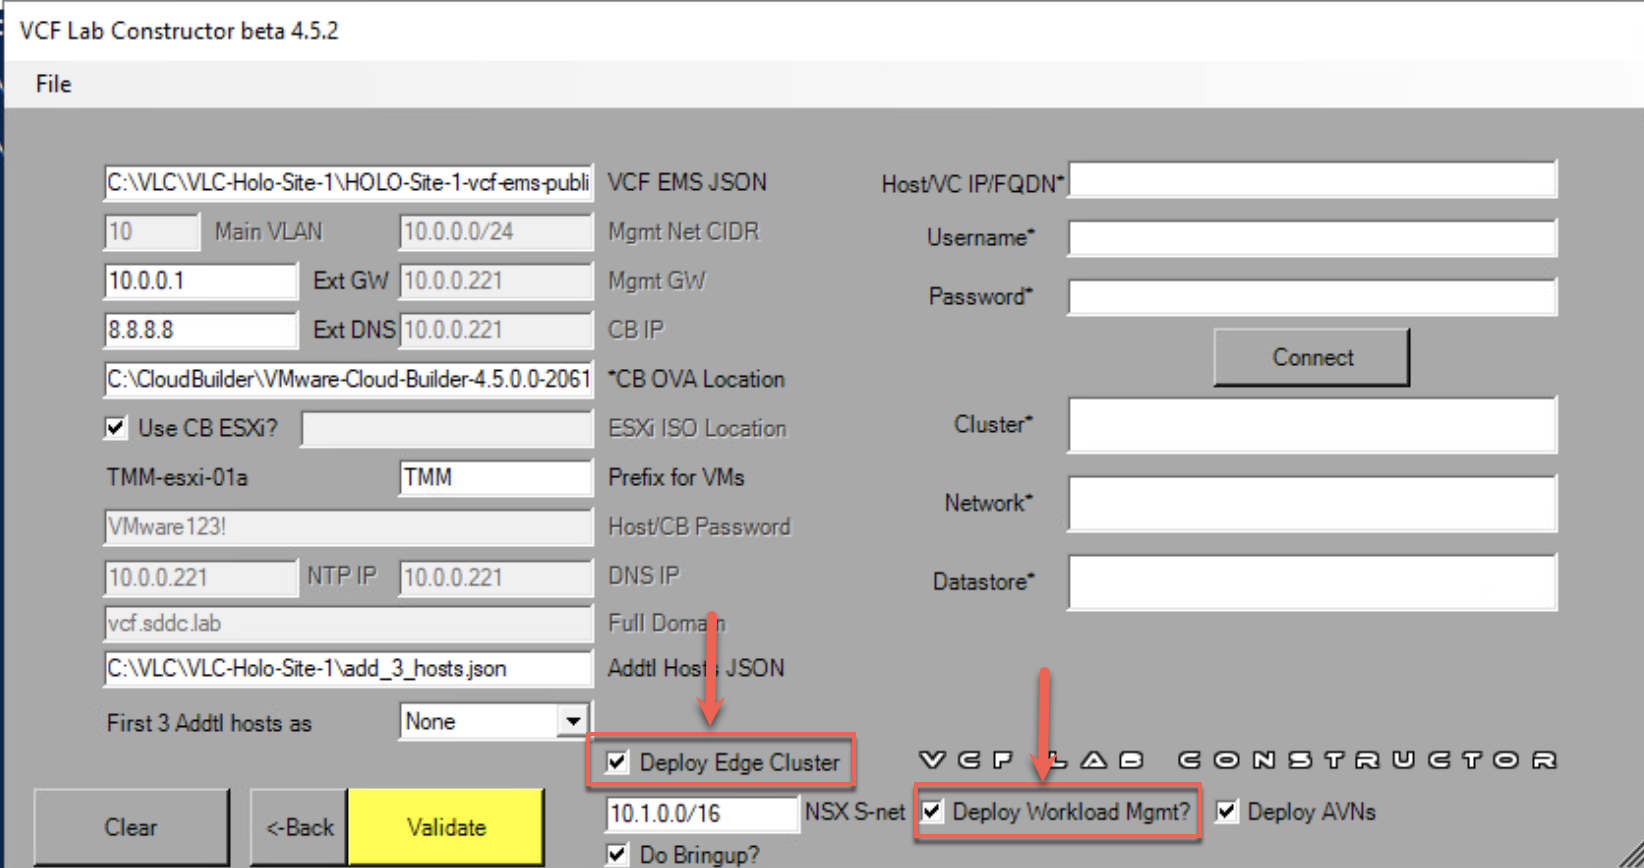
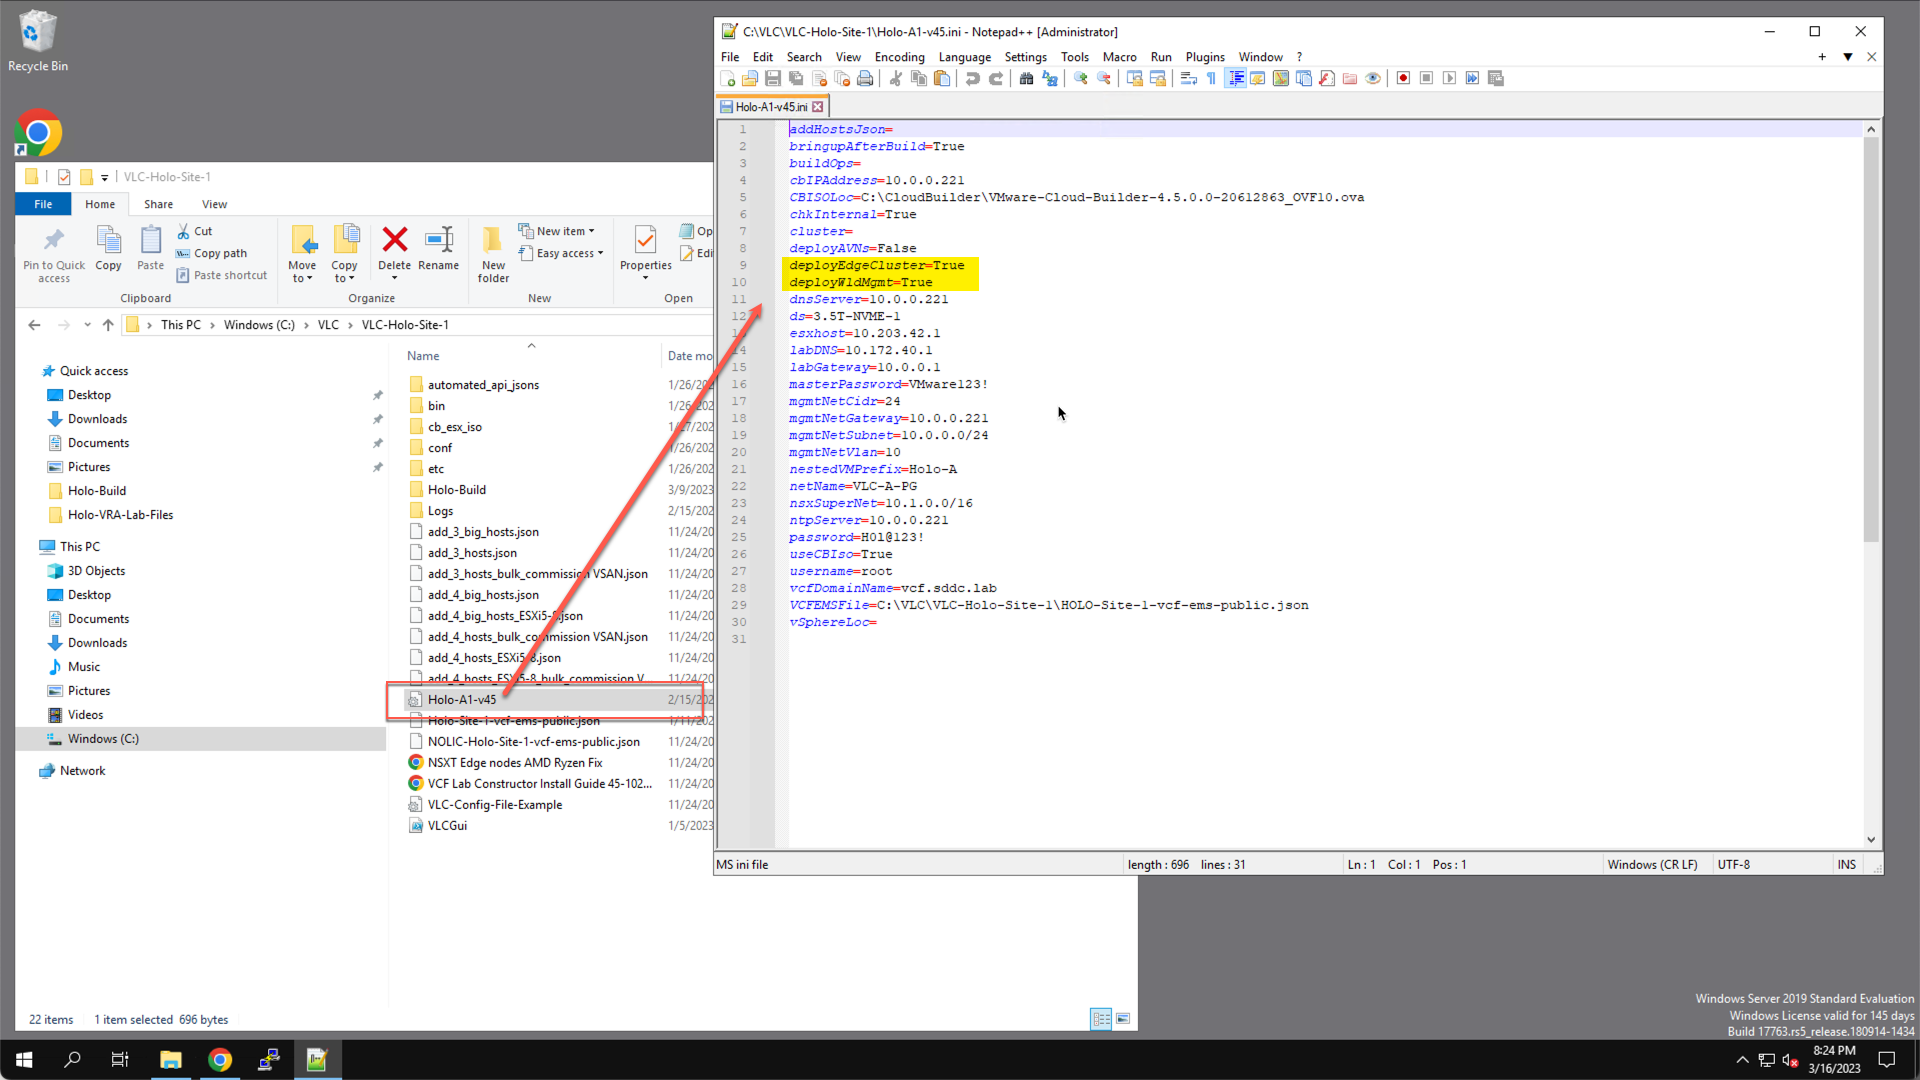
- When using the Holodeck Toolkit CLI, this is done by setting ‘deployEdgeCluster=True’ and ‘DeployWldMgmt=True’ in the
C:/VLC/VLC-Holo-SITE-1/Holo-A1-v45.ini
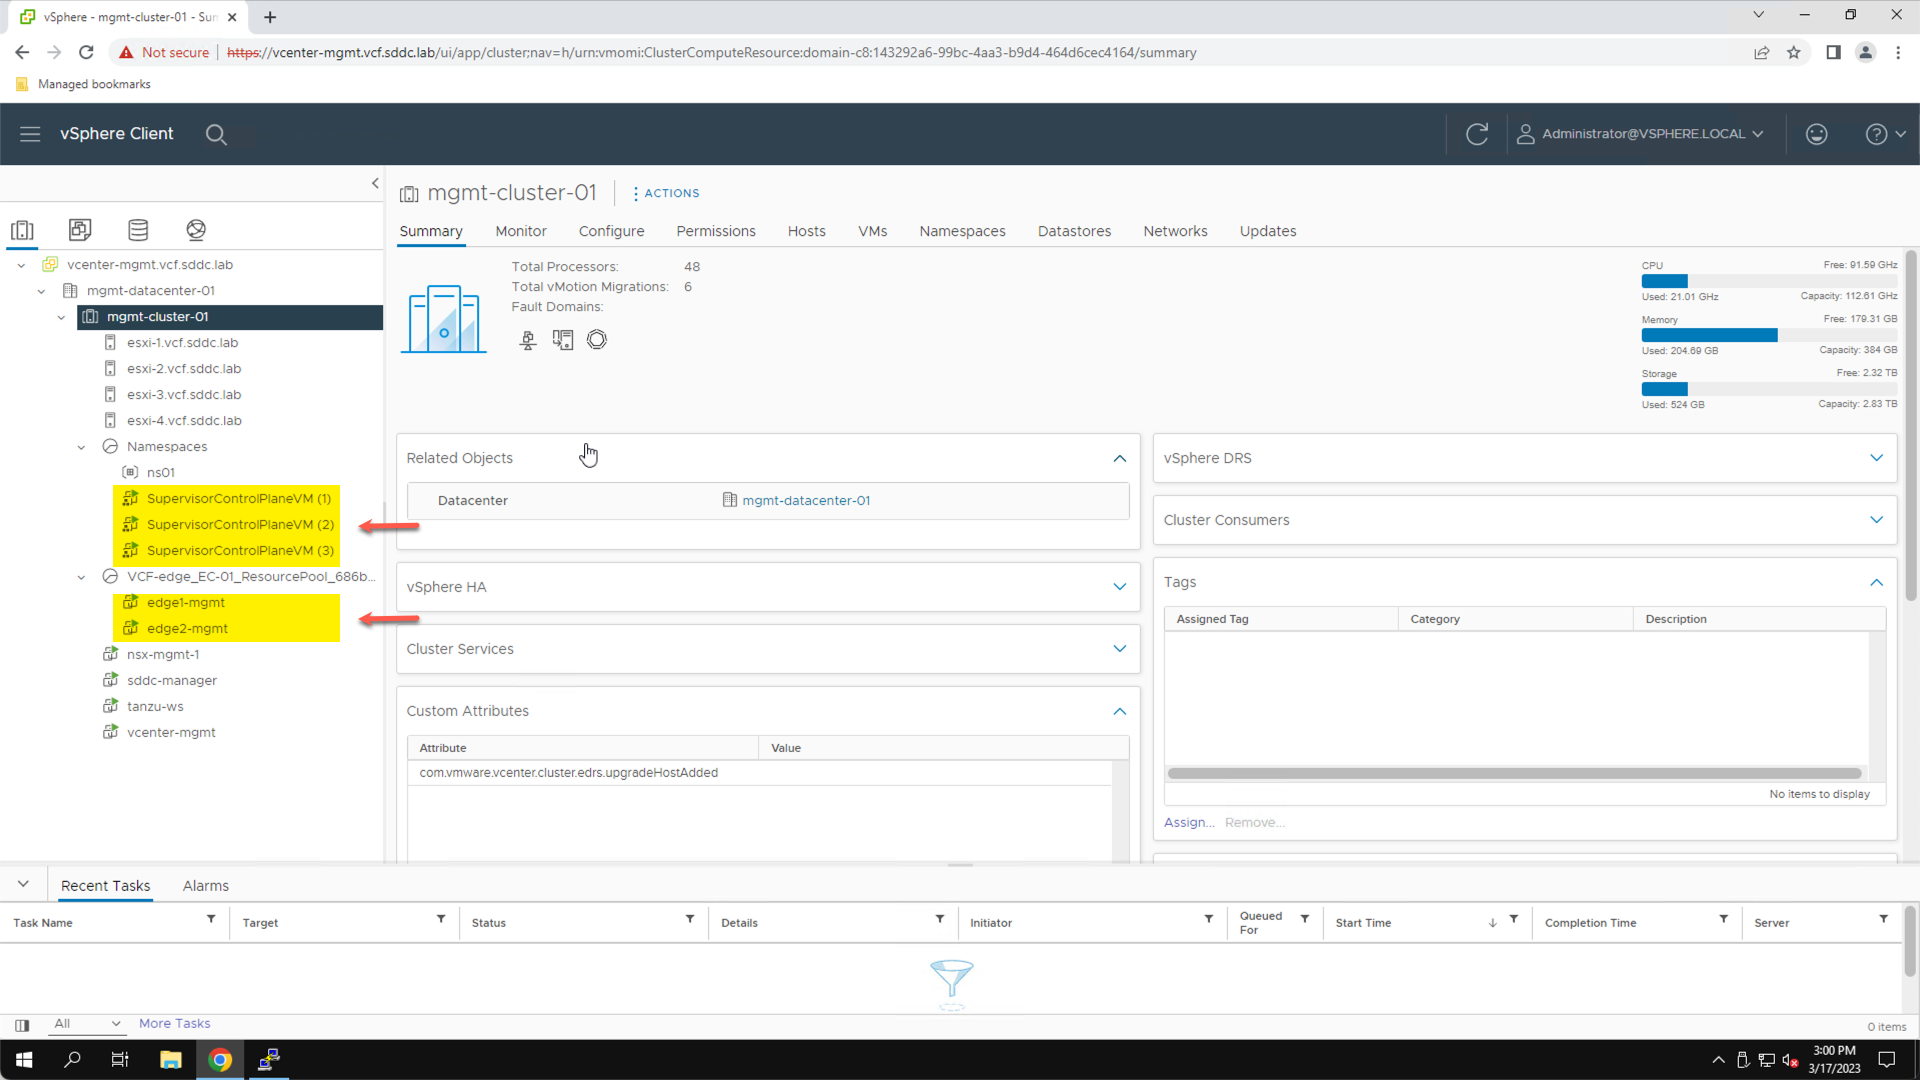
To confirm that these steps have been completed in an existing lab, connect to the vSphere Client and from the Inventory View, confirm the presence of two edge transport node VMs and the three supervisor control plane VMs.
From the Holo Console, launch the vSphere client:
- Click the Home Icon
- Click Inventory
To confirm that the Kubernetes control plane is in a healthy state, view the Supervisor Cluster status under Workload Management:
- Click the Home Icon
- Click Workload Management
- Click Supervisor Clusters
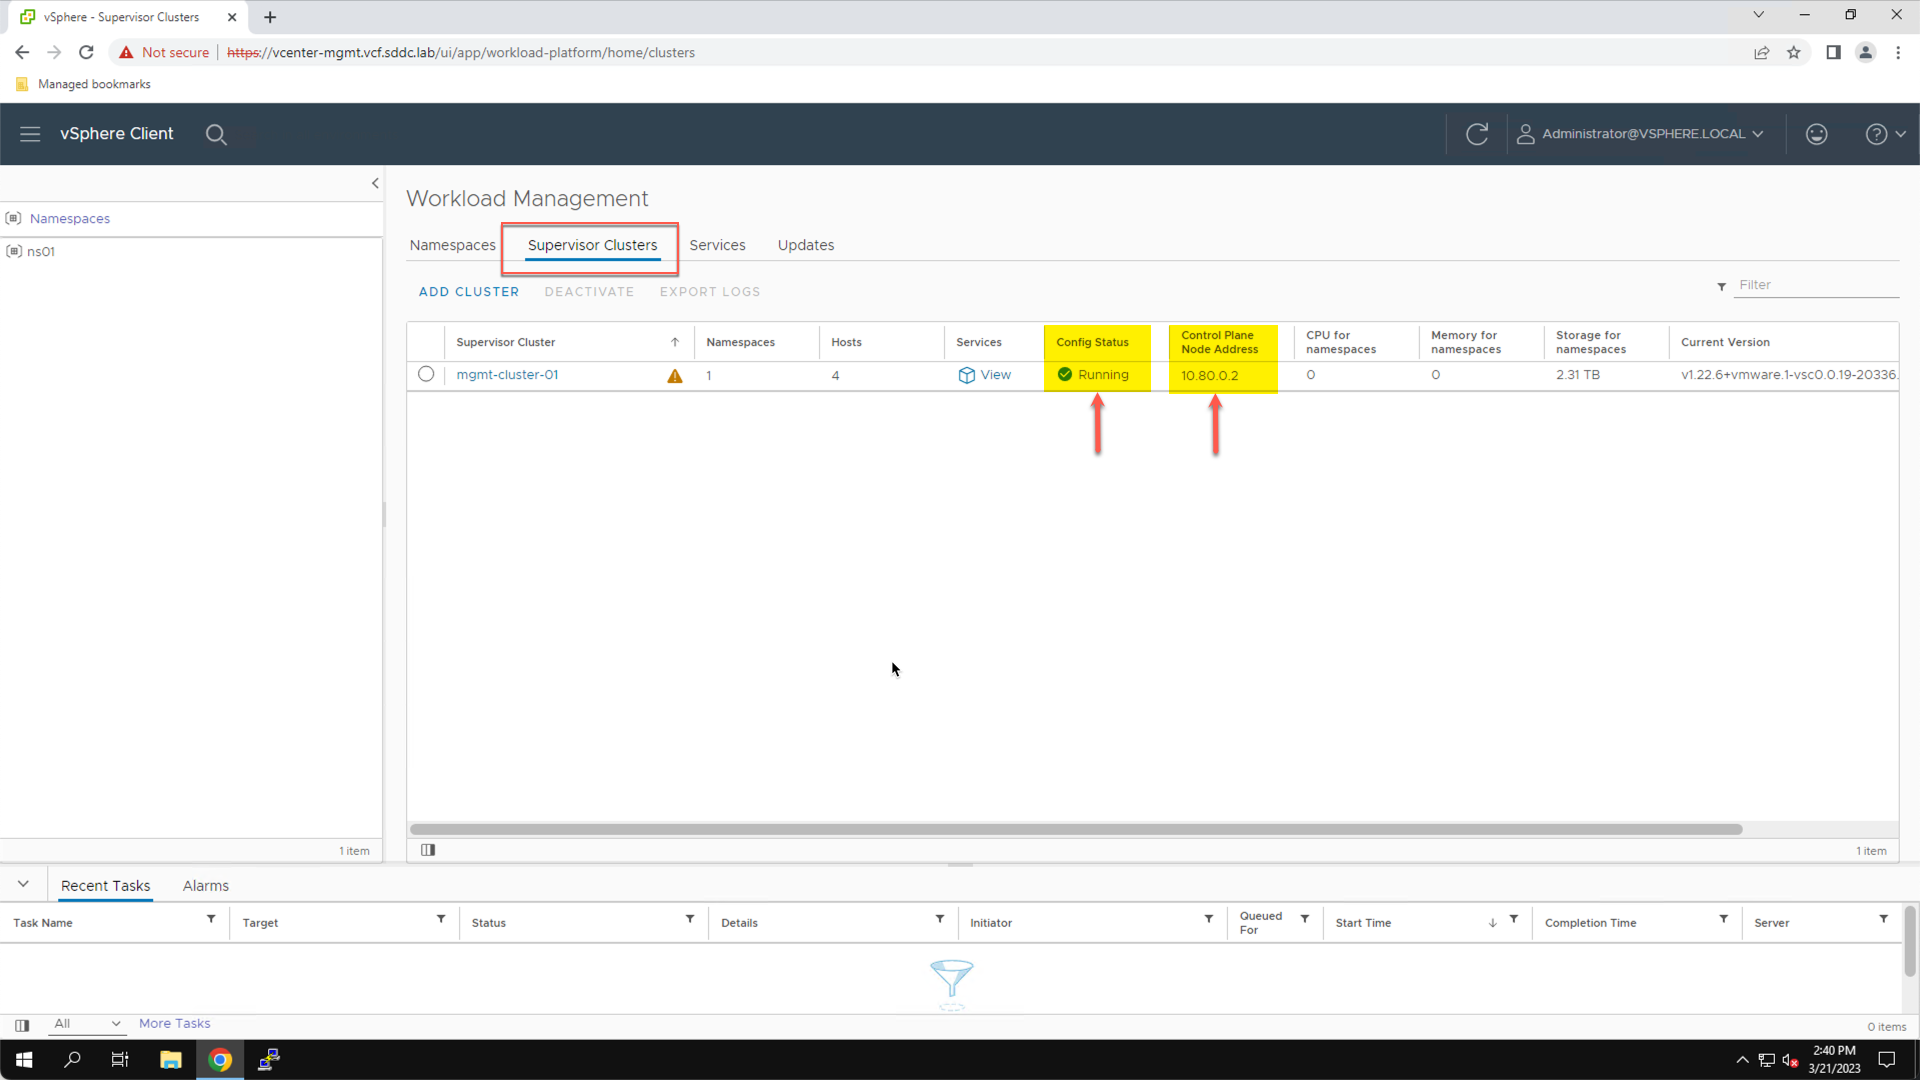
A Config Status of ‘Running’ confirms that the Supervisor Cluster is running and in a healthy state. The control plane IP address shows the IP address used to connect to the Kubernetes control plane (10.80.0.2 in this example).
Step 2: Access the Holo-Build Directory and Stage the Ubuntu OVA
Use PowerShell to deploy an Ubuntu 18.04 Virtual Machine (VM). This VM is used in the lab to interact with the Kubernetes Control Plane.
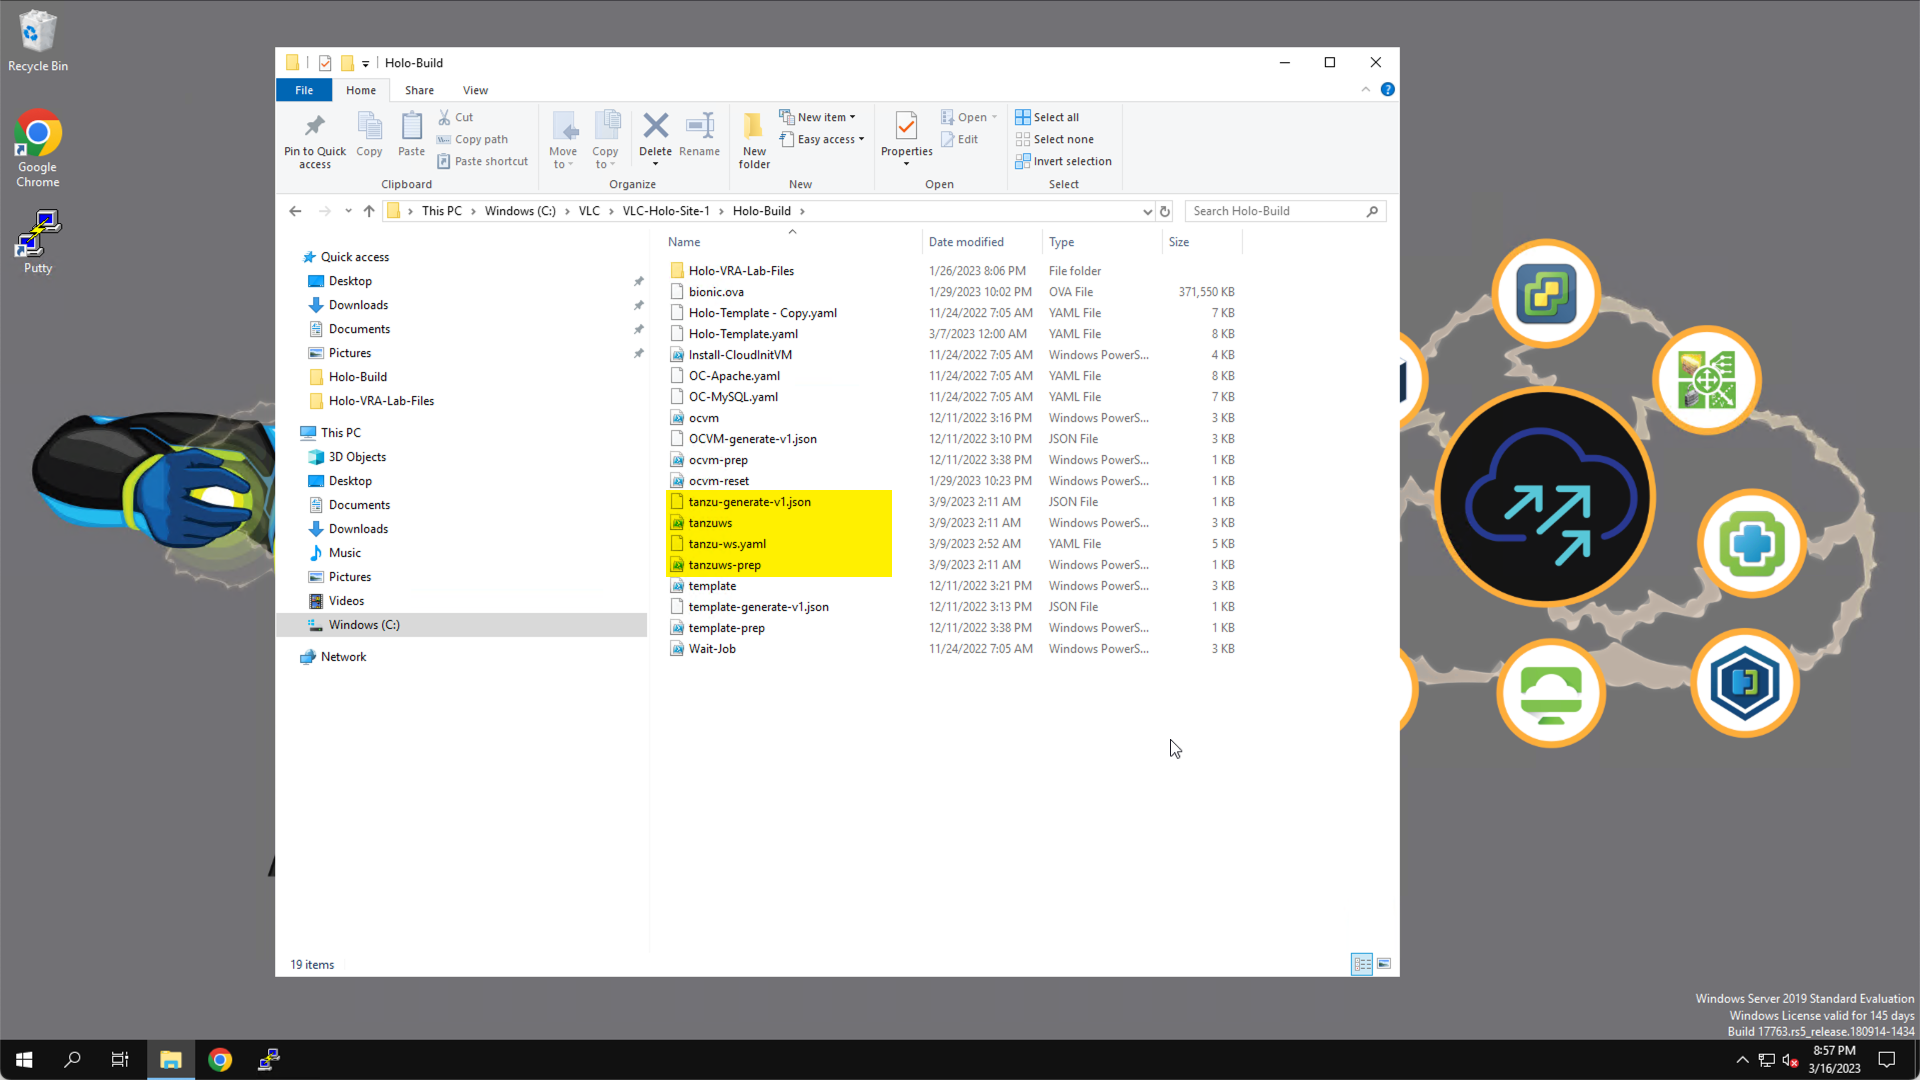
The files used to deploy the VM are available in the C:\VLC\VLC-Holo-Site-1\Holo-Build directory on the Holo Console.
From the Holo Console.
- Open File Explorer
- Navigate to
C:\VLC\VLC-Holo-Site-1\Holo-Build
There are four files. These files are preconfigured for use with the Holodeck Toolkit.
-
tanzuws-prep.ps1– establishes a connection to the vCenter server and create a credential store. -
tanzu-ws.yaml– contains the ‘cloud-init’ configuration that will be applied to the VM. -
tanzu-generate-v1.json– contains environment information needed for the VM deployment. -
tanzuws.ps1– PowerShell script used to deploy and configure the VM.
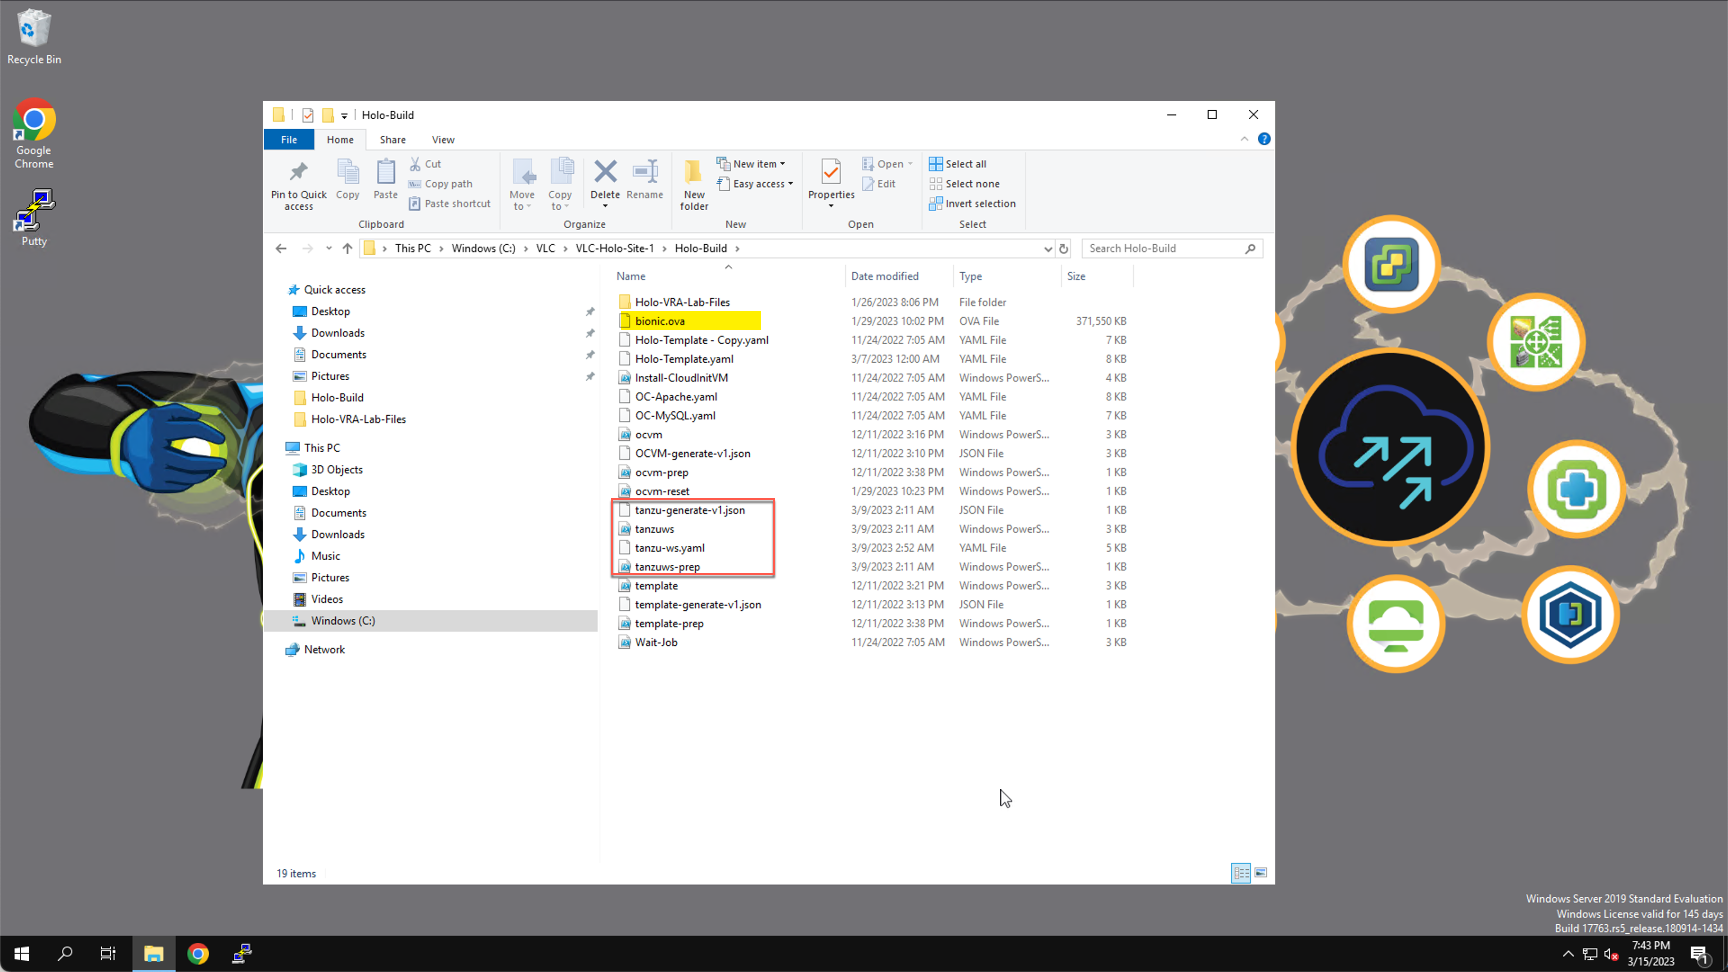
To deploy the VM, you need to download an Ubuntu 18.0.4 OVA and save it to the C:\VLC\VLC-Holo-Site-1\Holo-Build directory with the name ‘bionic.ova’:
- Use the link to download the Ubuntu 18.04 OVA
- Copy the downloaded file to
C:\VLC\VLC-Holo-Site-1\Holo-Build\ - Rename the file to: bionic.ova
Step 3: Use PowerShell to Deploy a Linux VM from the Ubuntu OVA
With the Ubuntu OVA downloaded; you are ready to run the PowerShell script and deploy a new VM.
From the Holo-Console:
- Open PowerShell
Windows Start Menu -> Windows PowerShell
- In the PowerShell window, change directory to
C:\VLC\VLC-Holo-Site-1\Holo-Build
cd C:\VLC\VLC-Holo-Site-1\Holo-Build
- Connect to the vCenter Server and create a credential store
.\tanzuws-prep.ps1
- Run the PowerShell script to create deploy the Ubuntu VM
.\tanzuws.ps1
A new virtual machine is deployed to the ‘mgmt-cluster-01’ cluster with the name ‘tanzu-ws’.
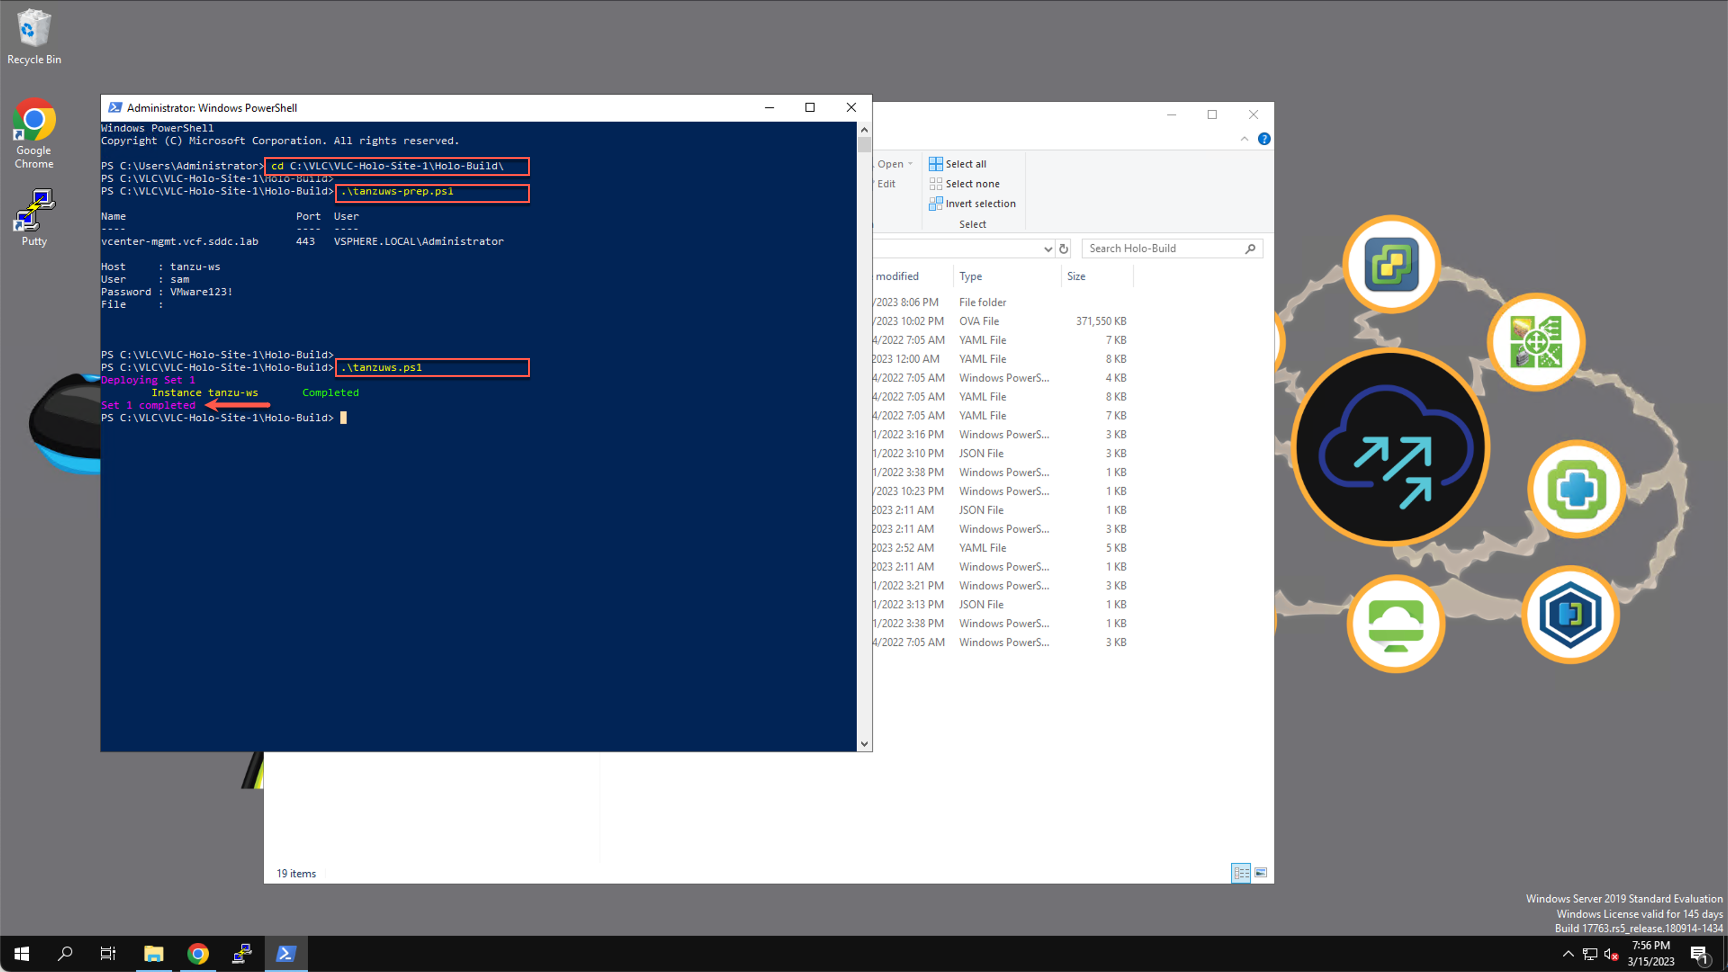
Wait for the PowerShell script to complete before continuing.
Note: following the VM deployment ‘cloud-init’ is used to configure the VM, after which it is rebooted. Wait for the reboot to complete before continuing. It will take approximately three minutes to deploy and configure the VM.
Step 4: Configure PuTTY Access to the VM From the Holo Console
To facilitate SSH access to the tanzu-ws VM, pin PuTTY to the Windows Taskbar and add a saved session for the VM.
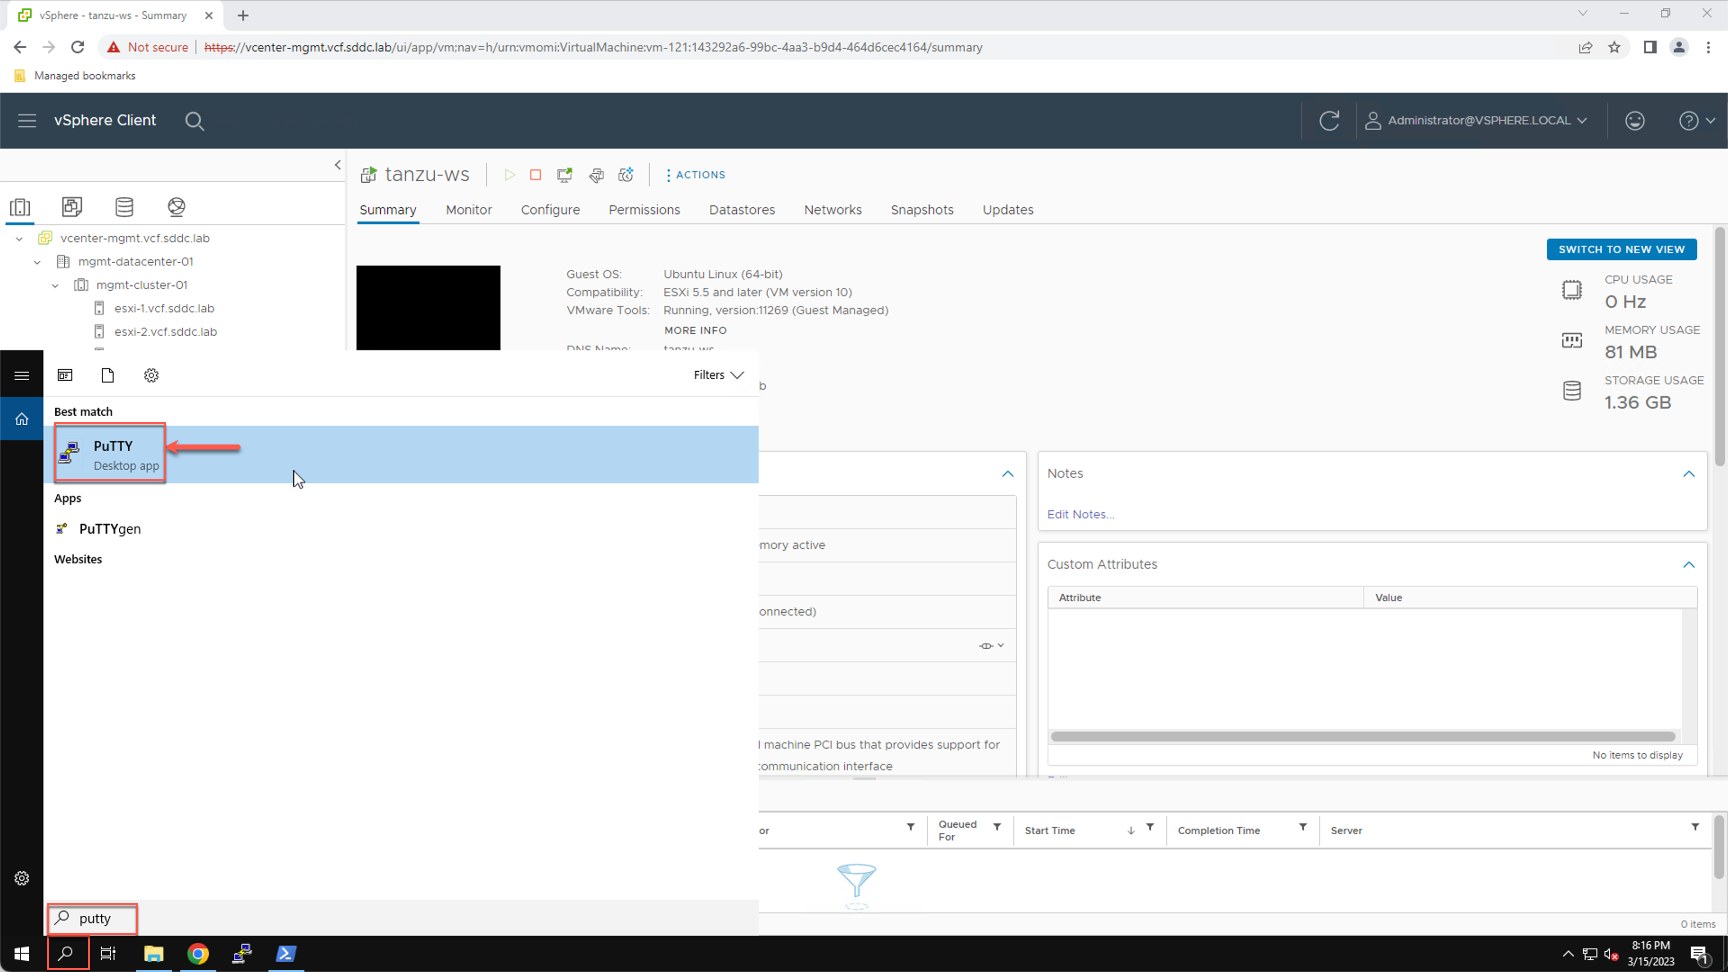
From the Holo-Console:
- Click the Magnifying Glass on the Windows Taskbar
- Type ‘putty’ in the search field
- Right click on the ‘PuTTY Desktop app’ icon
- Select ‘Pin to taskbar’
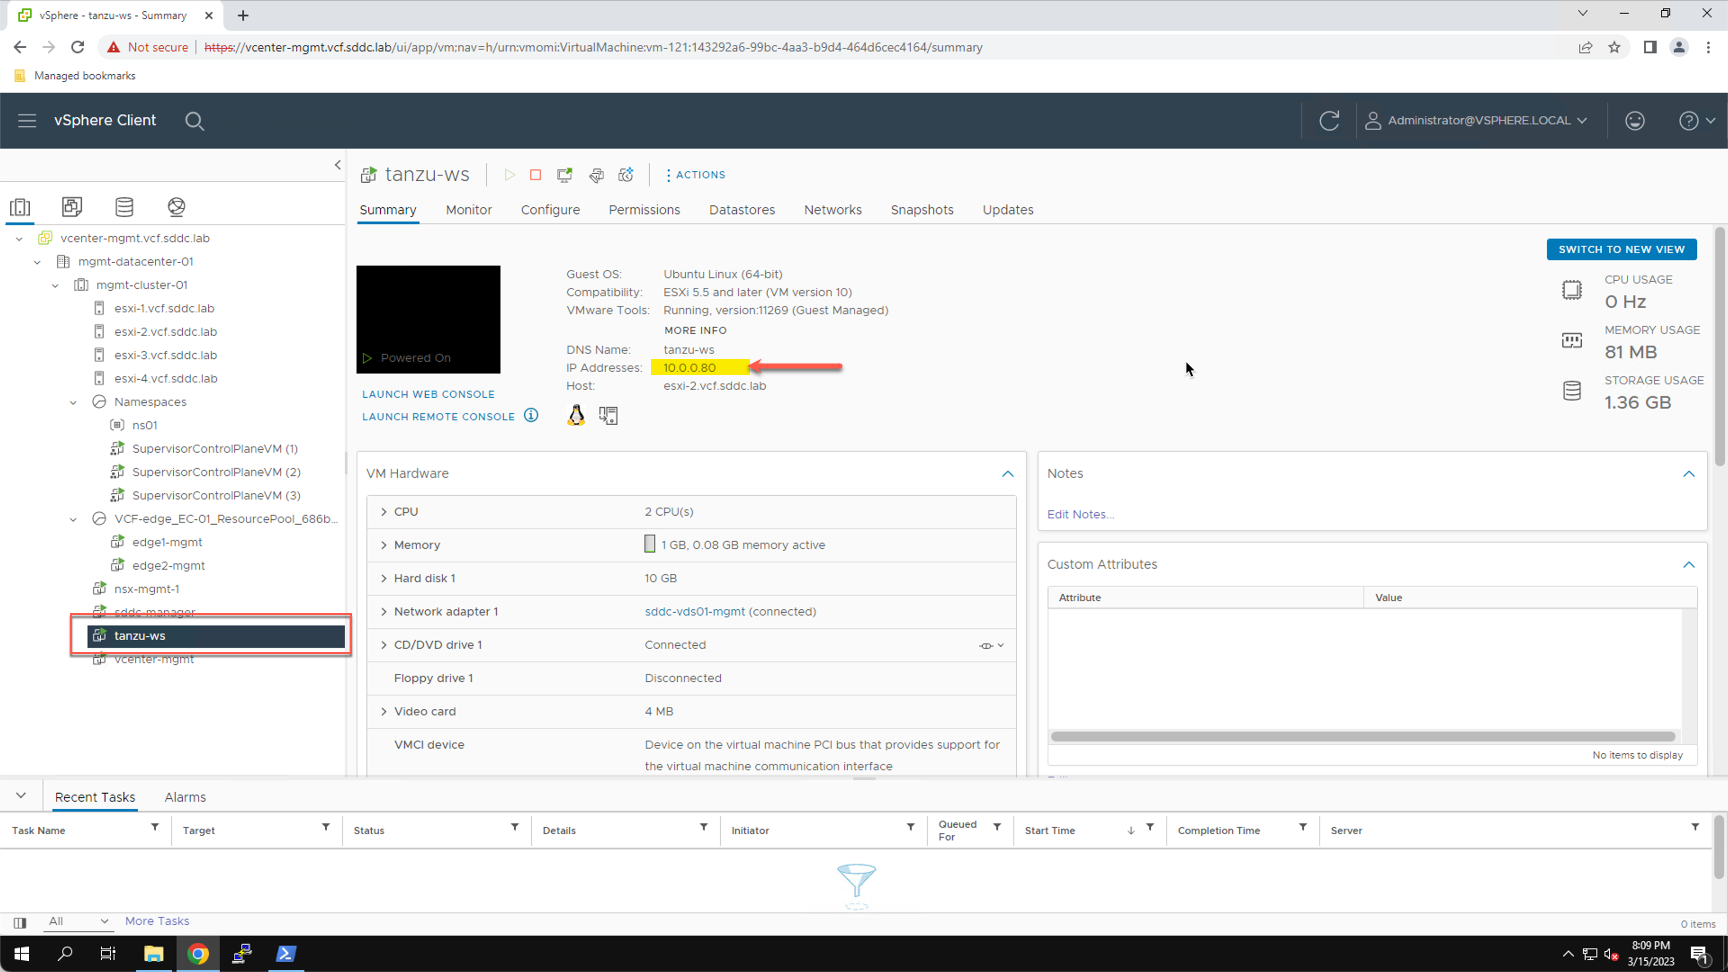
Before we add a saved session in PuTTY, we first verify the IP address assigned to the VM.
Connect to the vSphere client:
- Navigate to the Inventory View
- Select the tanzu-ws
- Note the IP address assigned (e.g. 10.0.0.80)
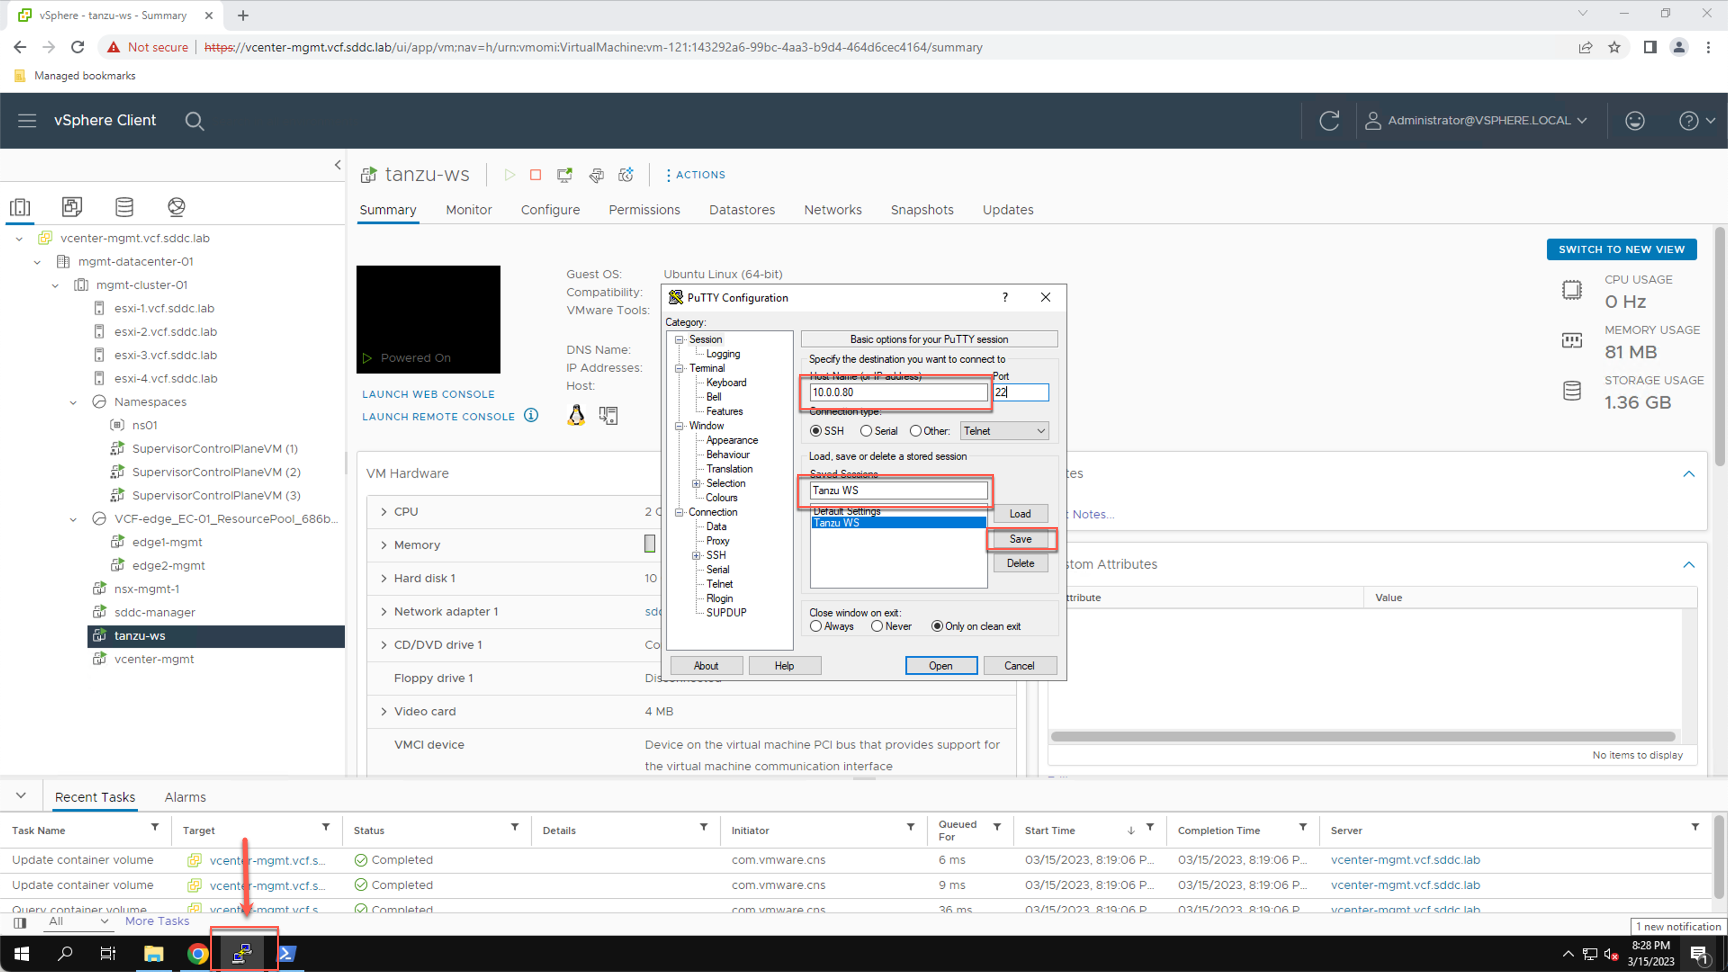
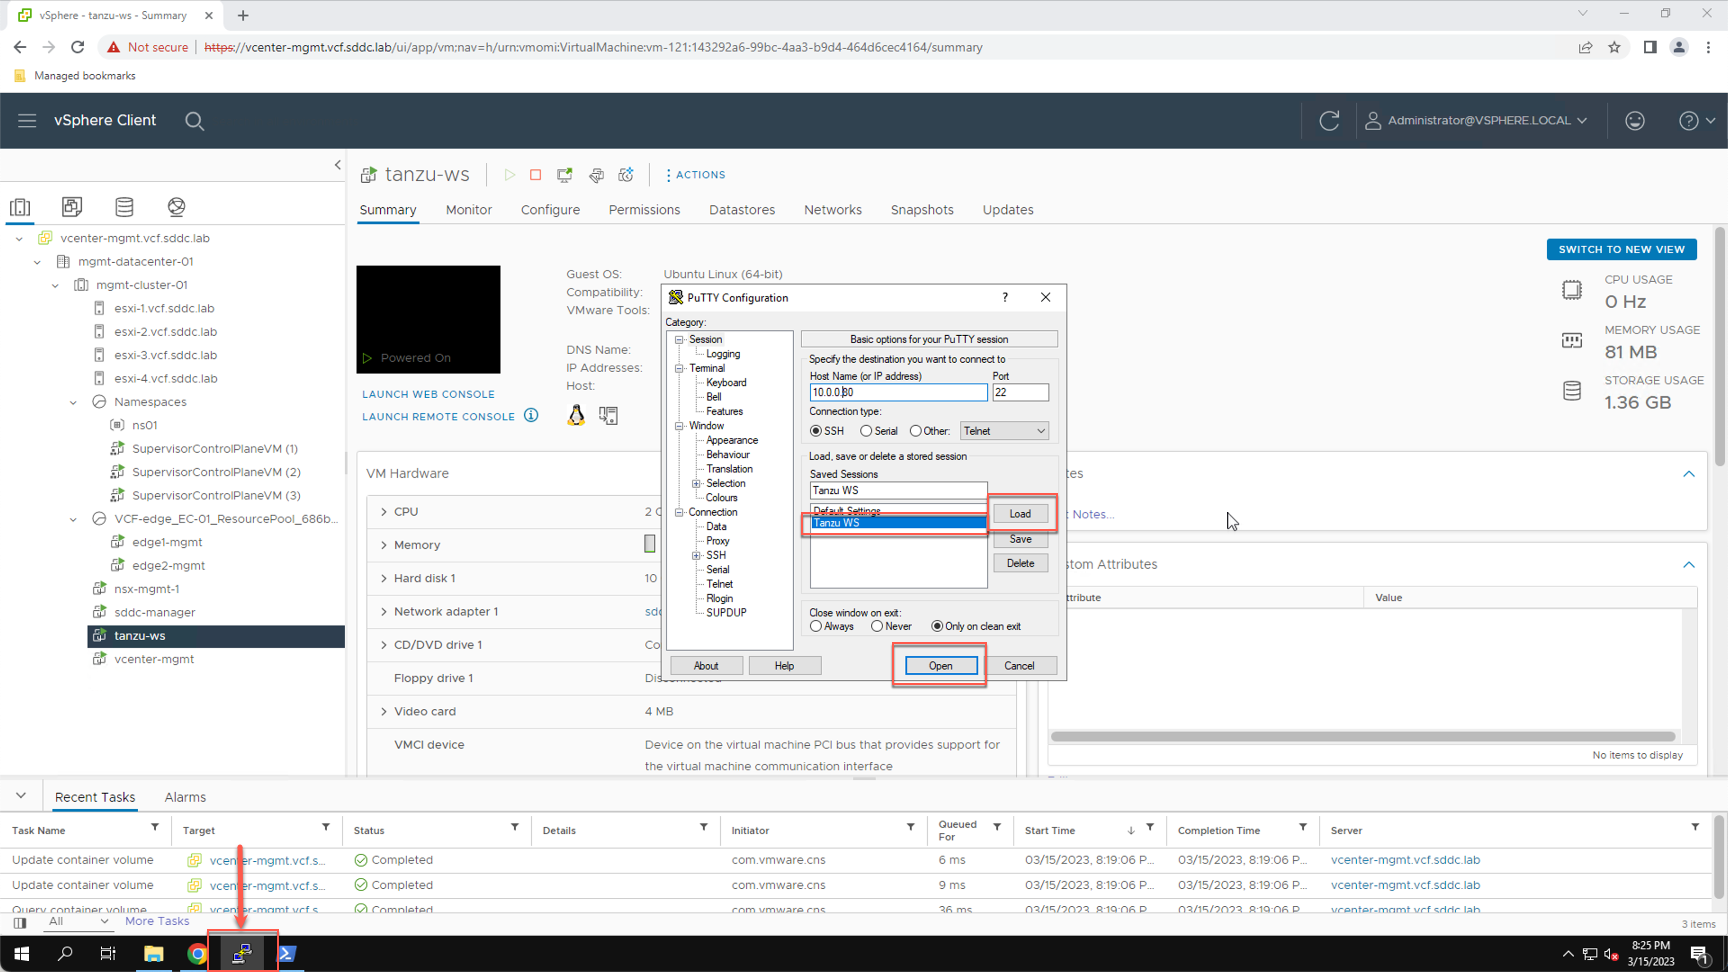
Using the IP address assigned to the VM, add a saved session named ‘tanzu-ws’ in PuTTY.
- Click the PuTTY Icon on the Windows Taskbar
- In the ‘Host Name (or IP address)’ field enter the tanzu-ws IP (e.g. 10.0.0.80)
- In the ‘Saved Sessions’ field enter: Tanzu WS
- Click ‘Save’
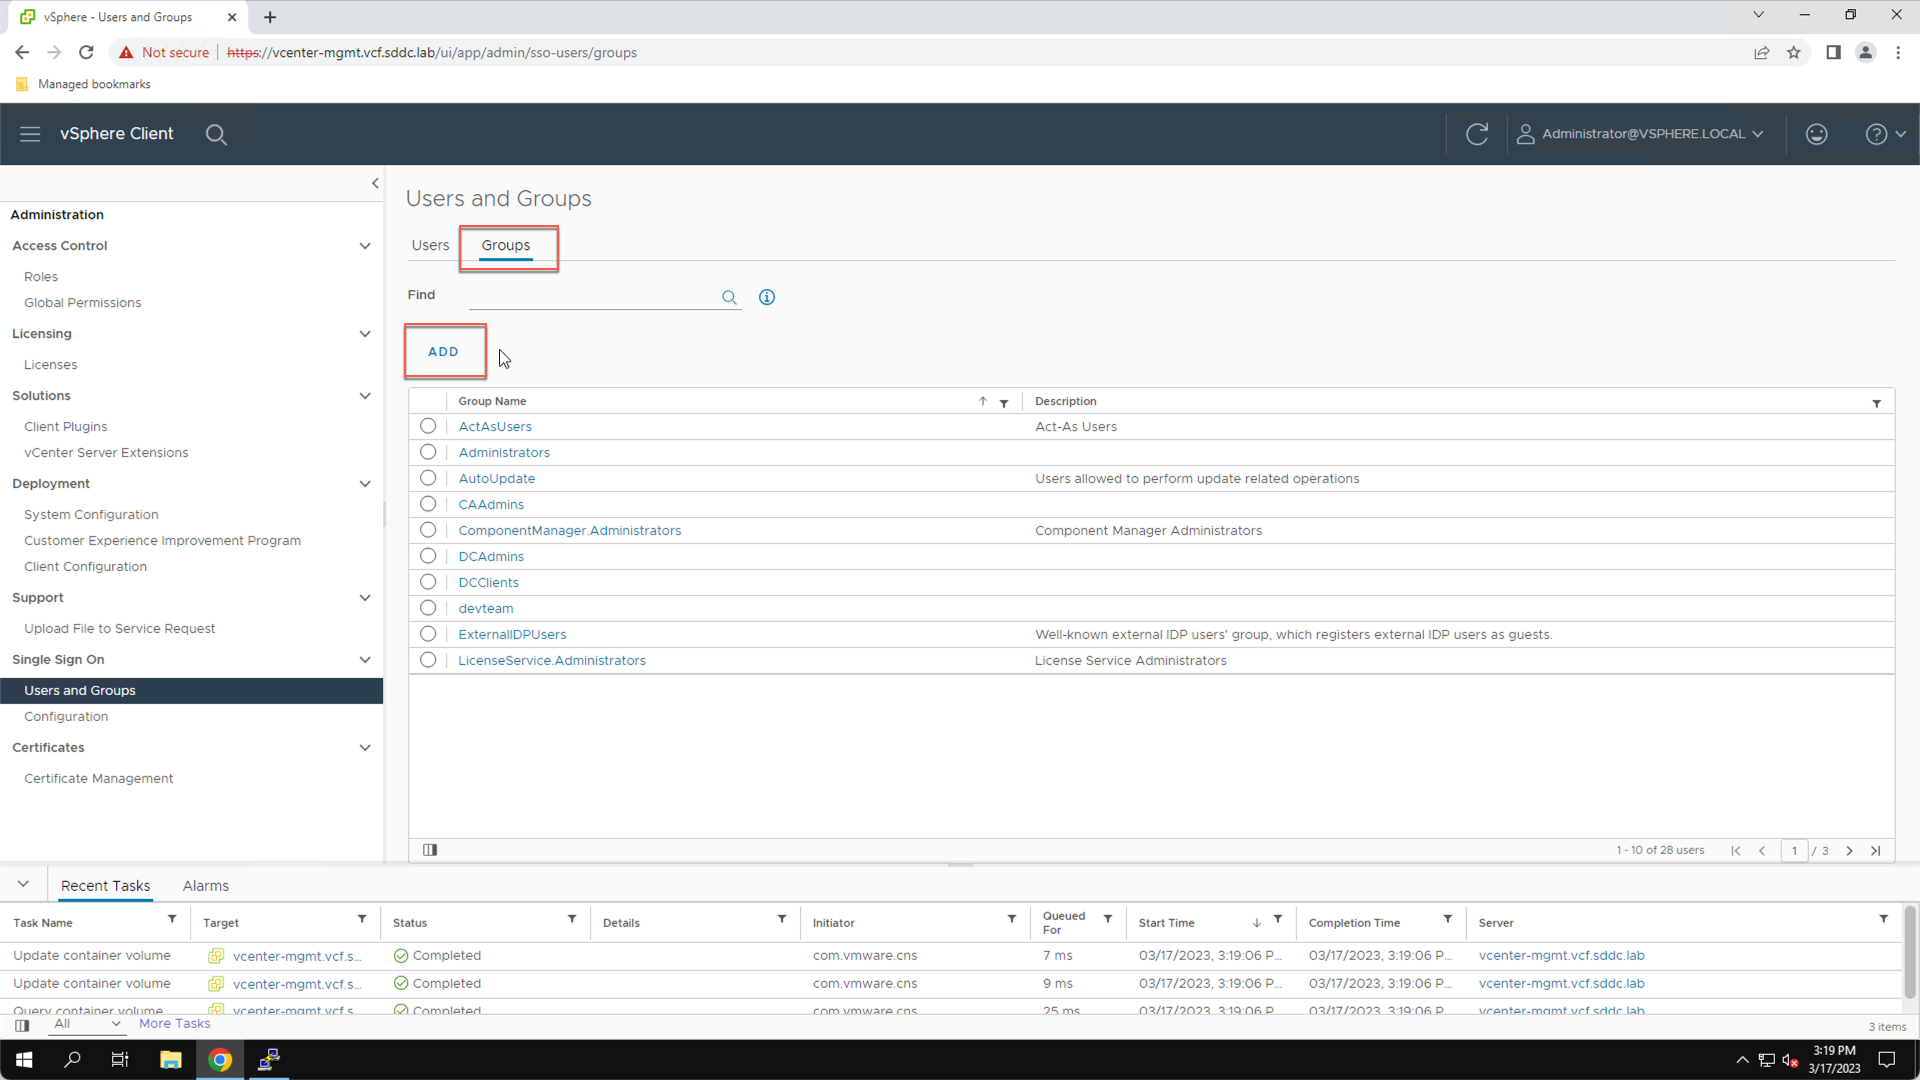
Step 5: Add a Local User and Group to the vCenter SSO Domain
vCenter SSO is used to authenticate users who log on to the Kubernetes Control Plane. In a production environment, vSphere administrators typically add their Microsoft Active Directory or corporate LDAP service as an identity source in vCenter SSO, allowing users to login using their corporate credentials. However, in the lab we will instead use a user and group configured in the default SSO domain (vsphere.local).
Use the vSphere Client to create a local user named ‘sam’ along with a local group named ‘devteam’ in the vCenter SSO domain ‘vsphere.local’. Add the user ‘sam’ as a member of the ‘devteam’ group.
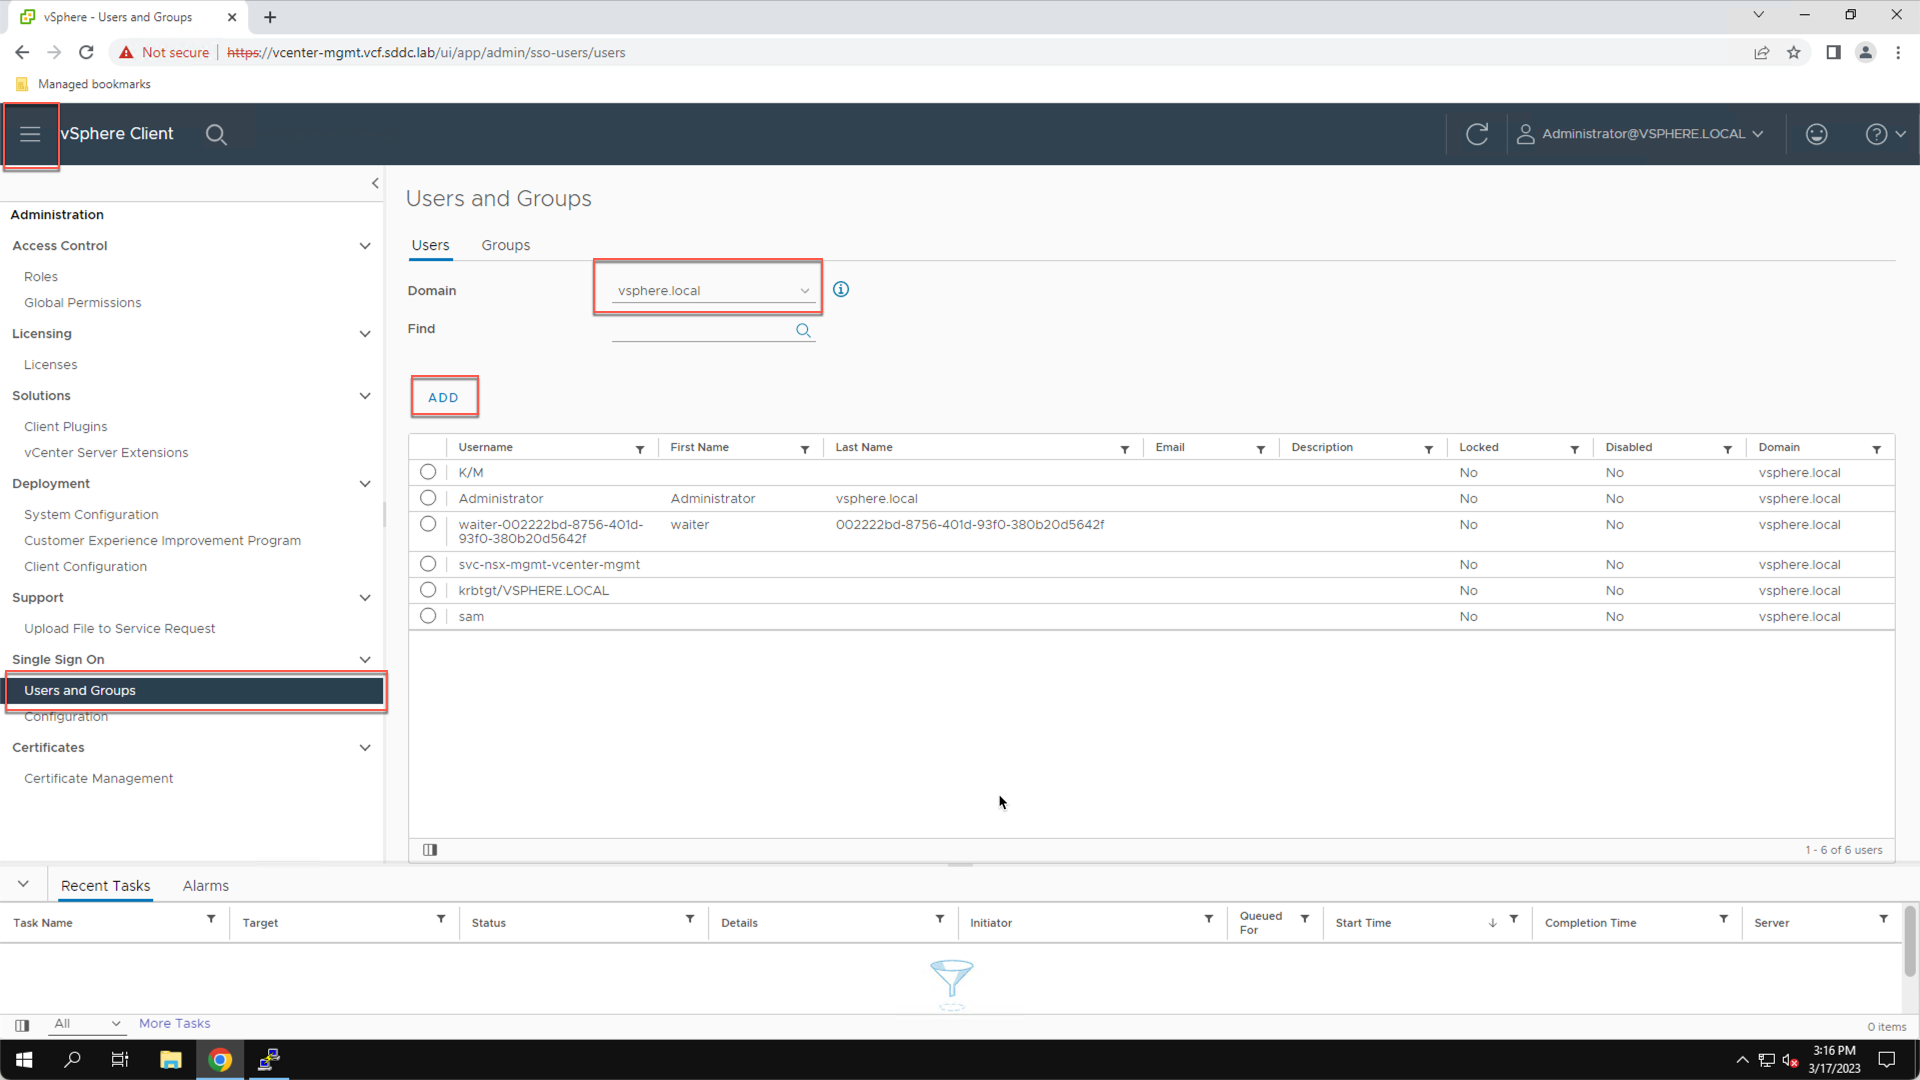
From the vSphere client:
- Click the Home Icon
- Click Administration
- Click Users and Groups
- Click the Domain dropdown
- Click vsphere.local
- Click Add
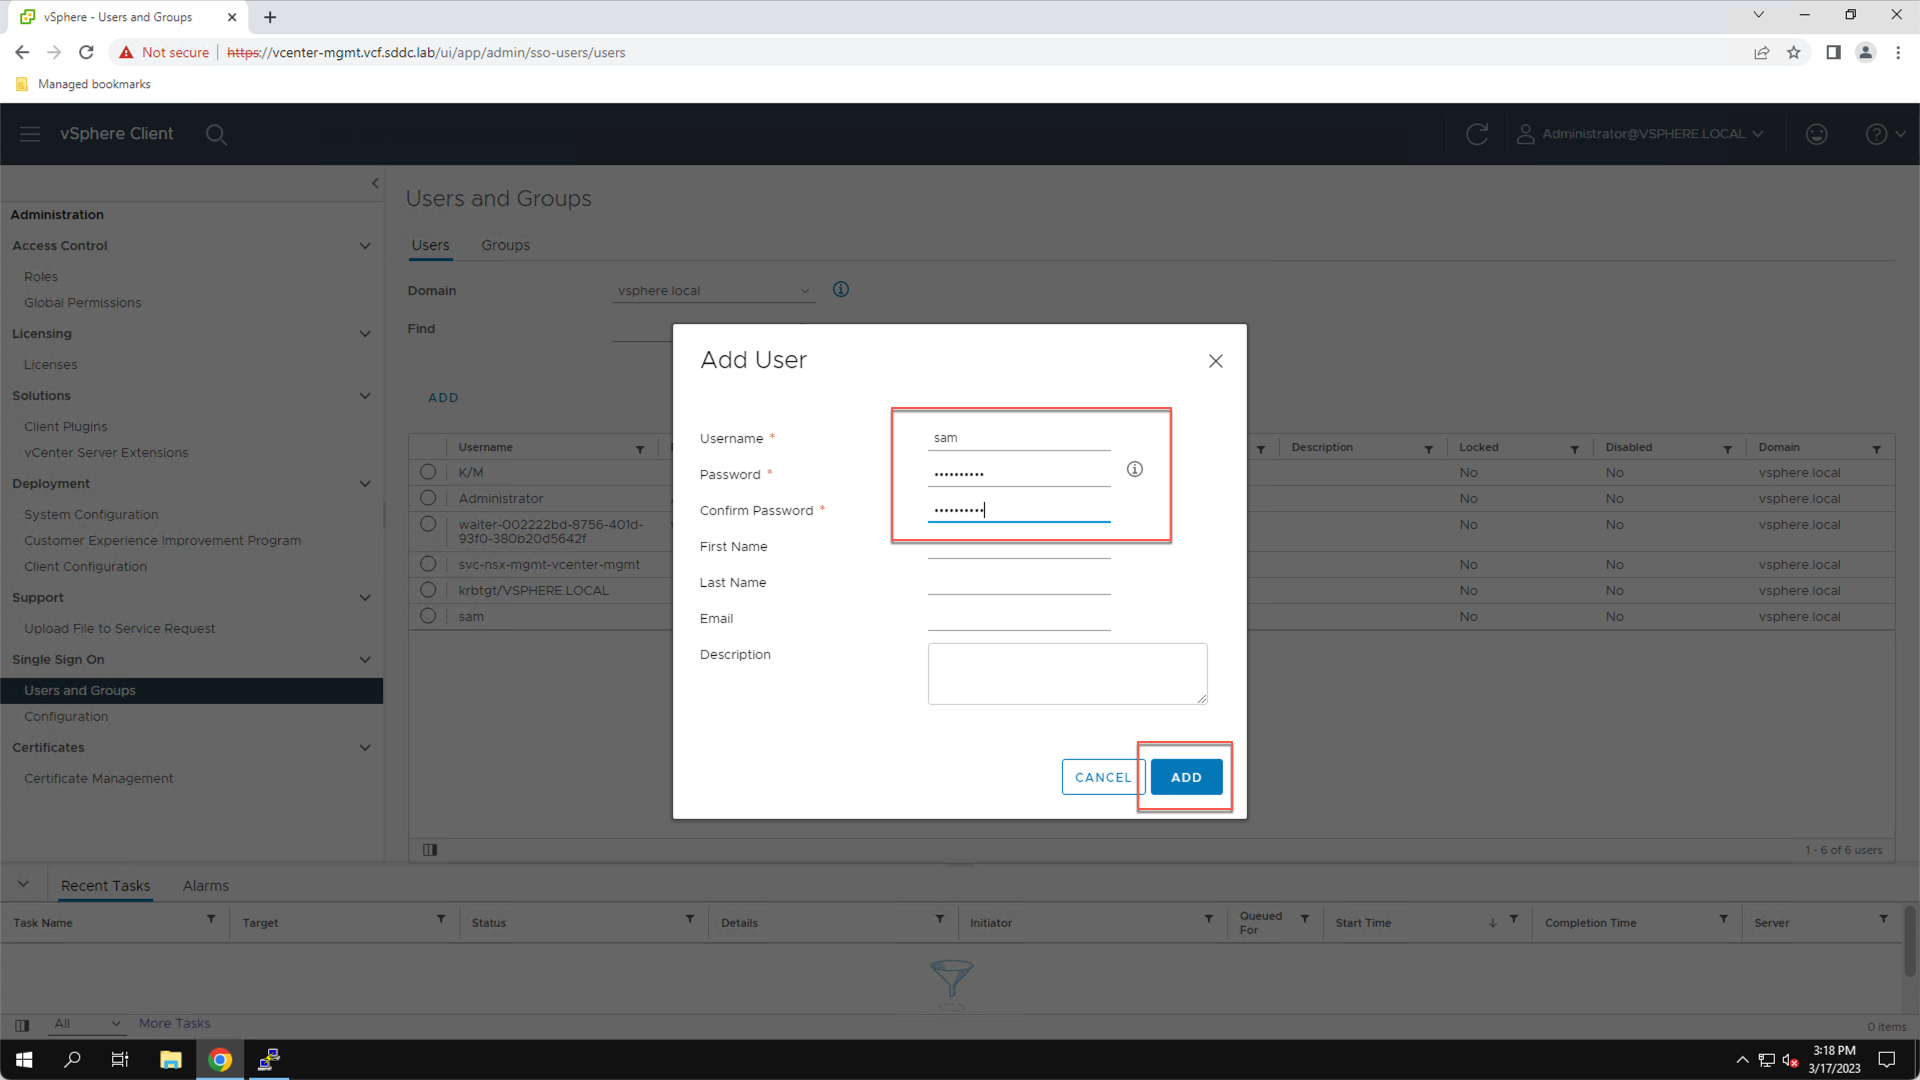
Add the user “sam” with the password “VMware123!”:
- Enter Username: sam
- Enter Password: VMware123!
- Enter Confirm Password: VMware123!
- Click ADD
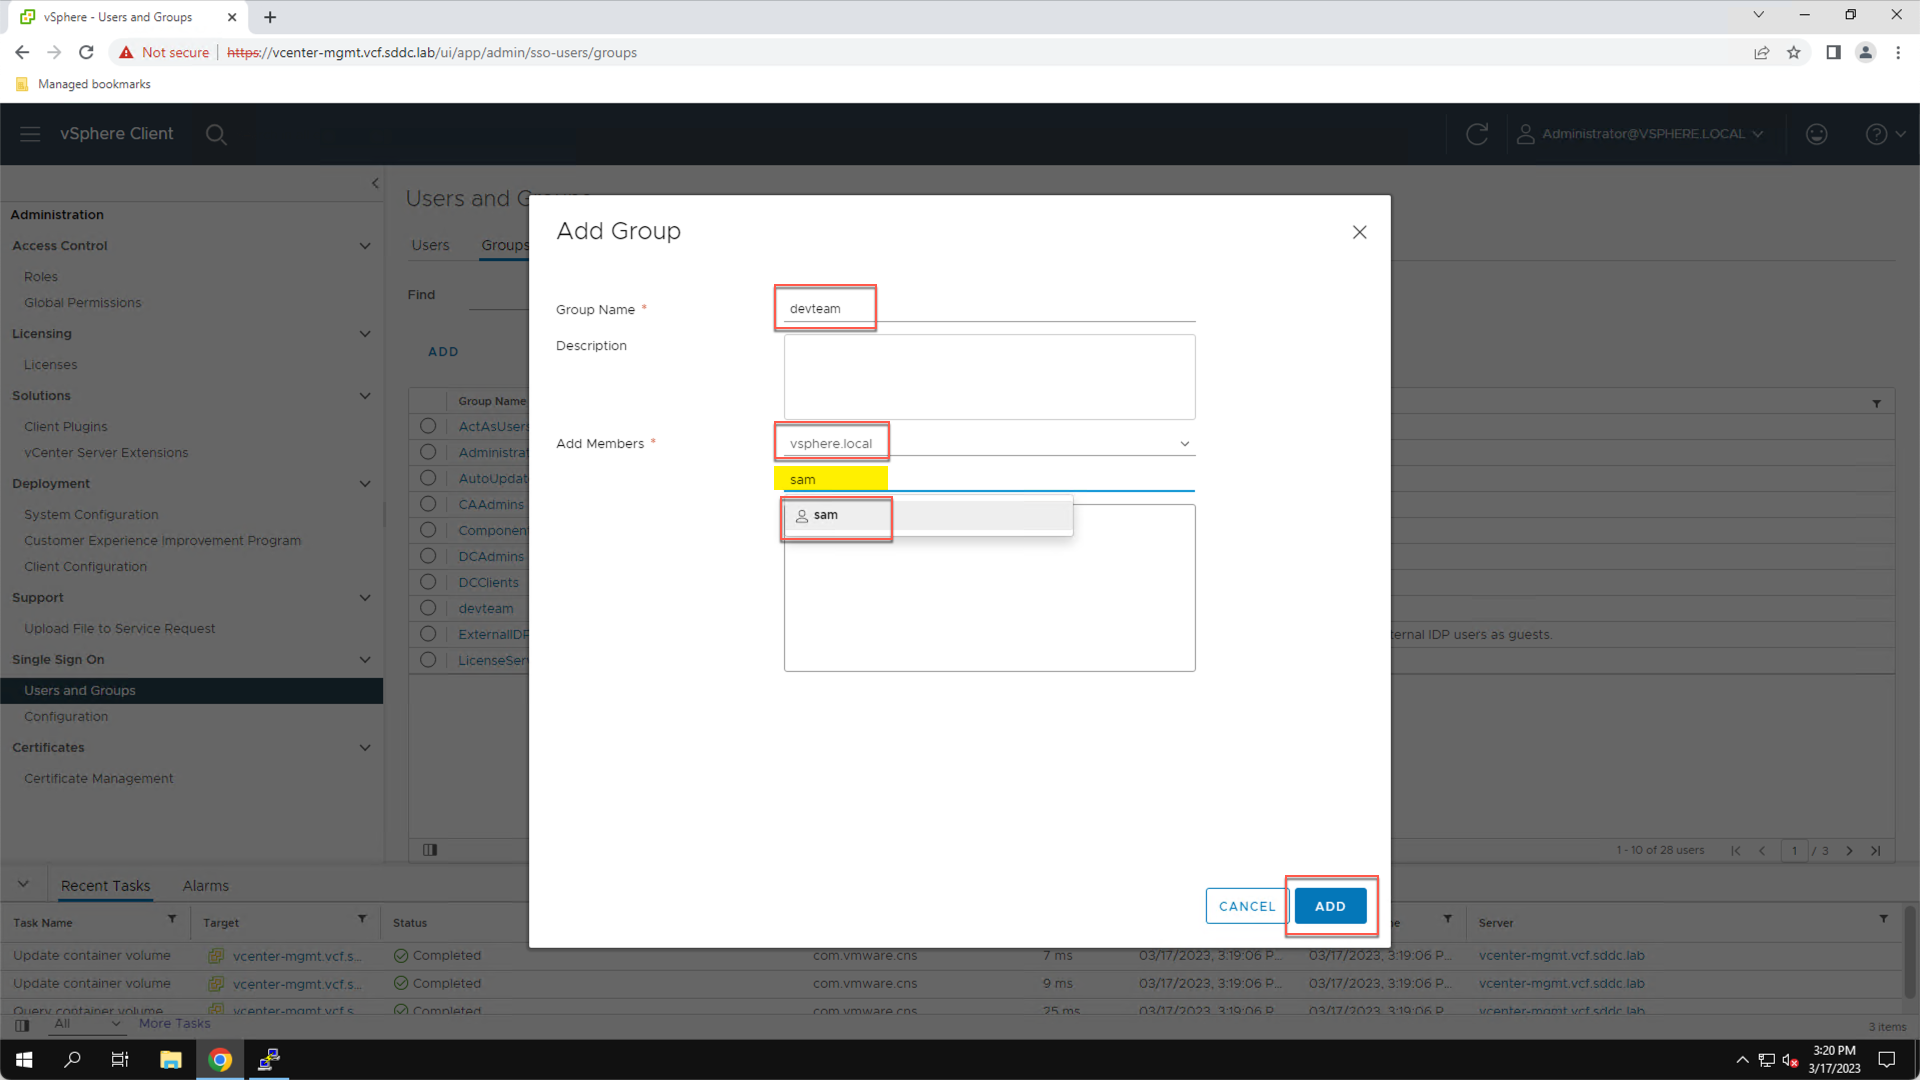
Create the group ‘devteam’ and add the user ‘sam’ as a member:
- Click the Groups Tab
- Click ADD
In the Add Group pop-up:
- Enter Group: devteam
- Verify Domain is set to: vsphere.local
- In the Search field type: sam
- Click ‘sam’ to add user as a member of the ‘devteam’ group
- Click ADD
Note, do not confuse the local Linux user account named ‘sam’ that is used to logon to the Ubuntu 18.04 VM with the vCenter SSO user account also named ‘sam’ that is used to authenticate to the Kubernetes control plane. In the lab these are two separate accounts with the same name.
Step 6: Verify Successful VM Deployment
With the Kubernetes Control Plane is running, the Ubuntu VM deployed, PuTTY access to the VM configured, and the local SSO user and group created in vCenter SSO, you are ready to complete the Holodeck Tanzu labs. As a final check, use PuTTY to connect to the Ubuntu VM and verify that you can authenticate to the Kubernetes Control Plane as the local SSO user ‘sam’.
From the Holo Console:
- Click the PuTTY Icon on the Windows Taskbar
- Under Saved Sessions click ‘Tanzu WS’
- Click ‘Load’
- Click ‘Open’
- If prompted, click “Accept” to confirm the SSH fingerprint
Login as the local Ubuntu user named ‘sam’ with the password ‘VMware123!’.
Once authenticated to the Ubuntu VM, run the ‘kubectl vsphere login …’ command to connect to the Kubernetes control plane and authenticate as the local SSO user named ‘sam@vsphere.local’:
- Authenticate to the Kubernetes control plane:
kubectl vsphere login --vsphere-username sam@vsphere.local –server 10.80.0.2

A successful connection to the Kubernetes control plane confirms that you have completed the prerequisites and are ready to complete the Holodeck Tanzu lab exercises.
Module 1 Summary
In this module we confirmed that the Kubernetes Control Plane has been enabled on the management cluster. We downloaded an Ubuntu OVA template and used PowerShell to deploy a VM from this template. We then added a local user and group to the vCenter SSO domain. Finally, we used PuTTY to SSH to the VM and verify the configuration is ready for use with vSphere with Tanzu.
Module 1 Key Takeaways:
- Before completing the VCF with Tanzu labs, an NSX Edge cluster must be configured, and Workload Management enabled on the management domain.
- A PowerShell script is provided with the Holodeck Toolkit to facilitate deploying an Ubuntu VM. In the Tanzu labs, this VM represents the developer workstation and is used to interact with the Kubernetes control plane running on the Supervisor Cluster.
- In the absence of an external identity source, a local user and group must be created in the vsphere.local SSO domain. The lab exercises are executed in the context of this user and group.