
Holo-Tanzu-Upgrade-TKC
Module 5 - Upgrade Tanzu Kubernetes Cluster
This module shows how to upgrade a Tanzu Kubernetes Cluster (TKC) running on a vSphere Namespace.
When you upgrade a Tanzu Kubernetes cluster, new control plane and worker nodes are deployed (using the newer Kubernetes version) and swapped out with the existing nodes. After the swap the old nodes are removed. The nodes are updated sequentially following a rolling upgrade approach.
Prior to completing this module, you will need to have completed Module 4 – Create a Tanzu Kubernetes Cluster (TKC).
Step 1: Prepare TKC Upgrade
We start with a deployed TKC named ‘tkc01’ that is running Kubernetes version v1.22.9. We will upgrade the TKC to Kubernetes version v1.23.9.
From the vSphere client, expand the vSphere inventory tree:
- Navigate to Menu -> Inventory
- Expand vcenter-mgmt.vcf.sddc.lab
- Expand mgmt-datacenter-01
- Expand mgmt-cluster-01
- Expand Namespaces
- Expand tkc01
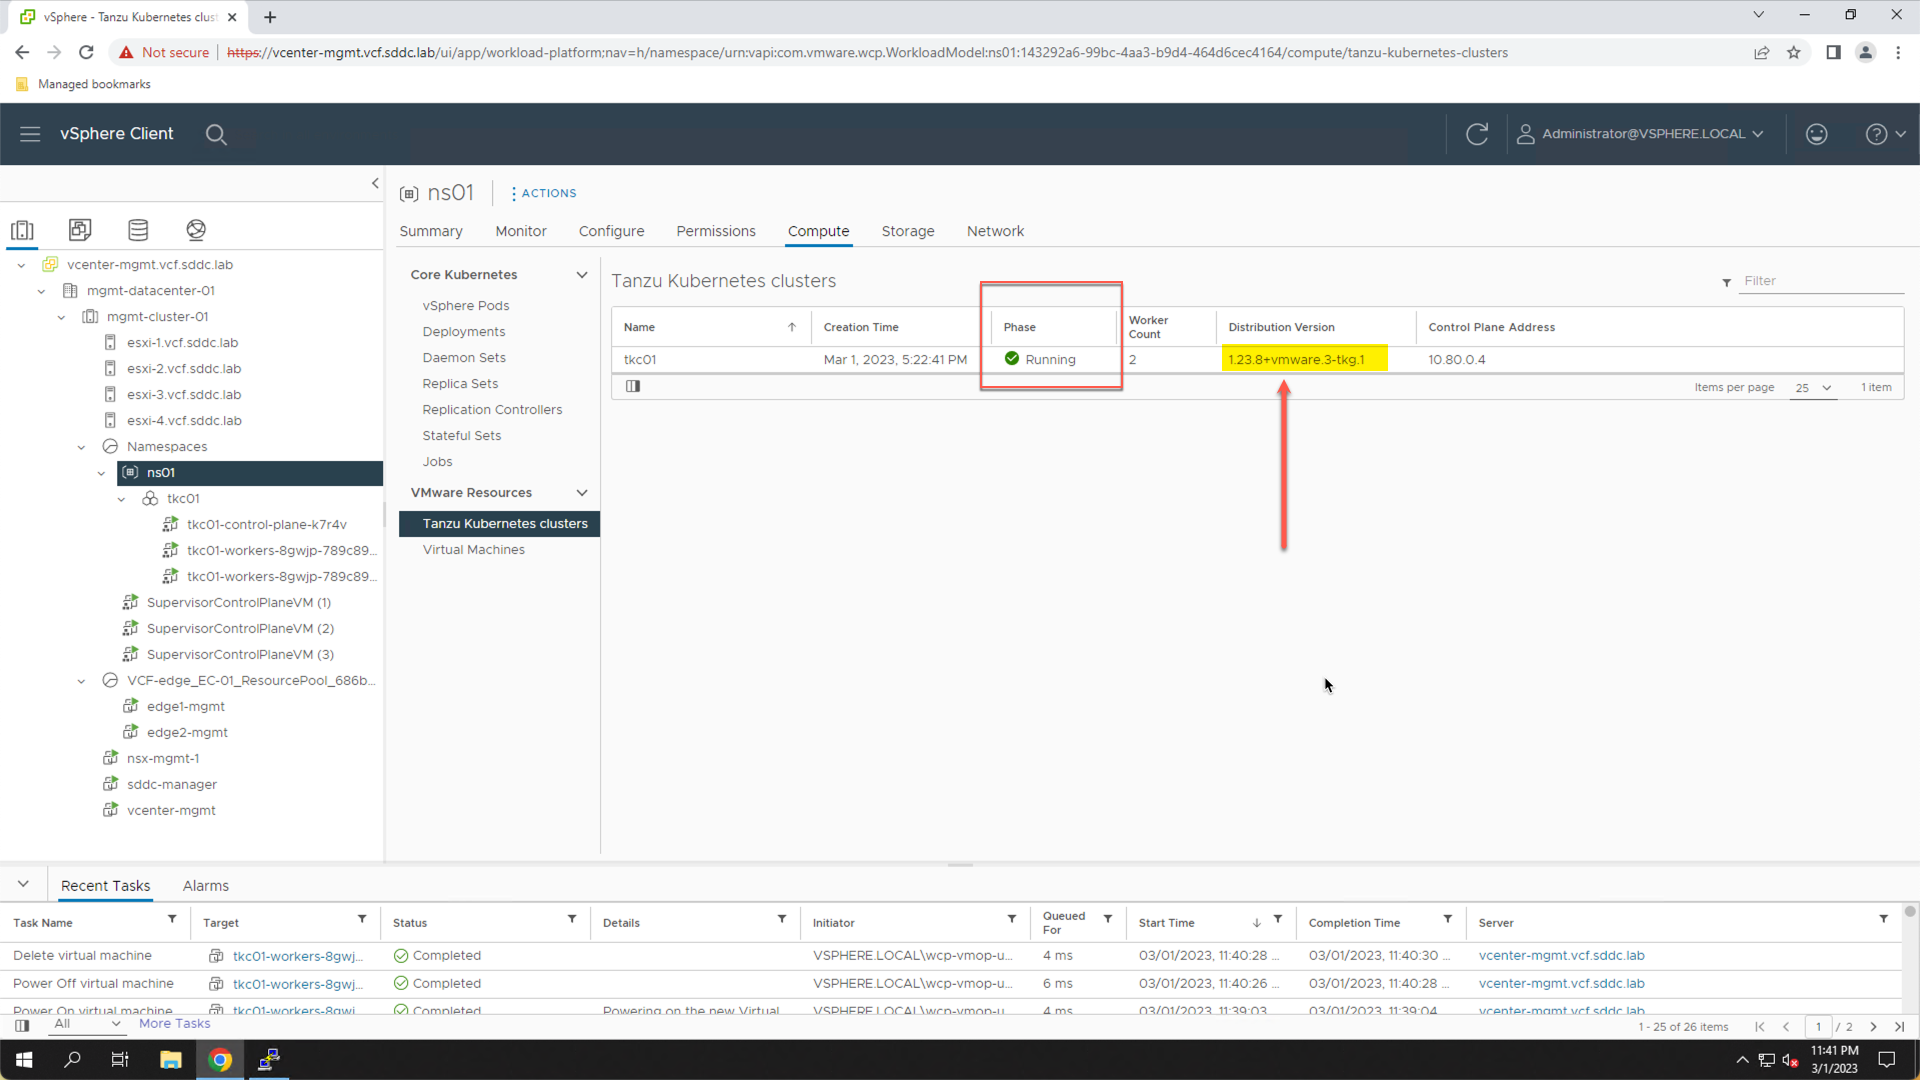
Navigate to the vSphere namespace compute tab:
- Click ns01
- Click the Compute tab
- Click Tanzu Kubernetes Clusters

The TKC ‘tkc01’ is comprised of one control plane node and two worker nodes. It is currently running Kubernetes version 1.22.9.
To perform the upgrade, we connect to the developer workstation.
- Click the PuTTY icon on the Windows taskbar
- Click Tanzu WS
- Click Load
- Click Open
- Login: sam
- Password: VMware123!

From the PuTTY terminal, connect to the Kubernetes control plane running on the supervisor cluster and set the context to the vSphere namespace ‘ns01’.
# kubectl vsphere login --vsphere-username sam@vsphere.local --server 10.80.0.2

# kubectl config use-context ns01

Run the ‘kubectl get tkc’ command to query the status of ‘tkc01’.
# kubectl get tkc

The output of the ‘kubectl get tkc’ command shows that ‘tkc01’ is currently running Kubernetes version 1.22.9. It also shows that a Kubernetes update is available, which would upgrade the cluster to Kubernetes version 1.23.8.
To perform the upgrade, we first need to confirm that the required OVA images are available in the vSphere Content Library. To do this we run the ‘kubectl get tkr’ command. To limit the output, we use ‘grep’ to filter the output to just show the available images for Kubernetes version 1.23.8
Note, in the ‘kubectl get tkr’ command ‘tkr’ is an alias for ‘tanzukubernetesreleases’.
# kubectl get tkr | grep 1.23.8

If you don't see the version you expect, check the Content Library settings to ensure the necessary OVF image is present, and a local copy has been downloaded to the vCenter server.
The command output shows that there are two available images for Kubernetes version v1.23.8. However, only one has been downloaded to the vSphere Content Library, as indicated by the ‘Ready’ status being set to ‘true’.
Note the ‘TKR version’ name associated with the available image. In this example it is ‘v1.23.8--vmware.3-tkg.1’. We will use this TKR version number to perform the upgrade (note that the version may be different in your lab).
Step 1 Summary
In Step 1 we looked at the Kubernetes version of ‘tkc01’ (v1.22.9) and identified that there is an update available (v1.23.8). We then queried the available Tanzu Kubernetes Release (TKR) images in the vSphere content library and confirmed the OVA template for the newer Kubernetes version is available.
Step 2: Upgrade TKC Cluster
To upgrade the TKC, we use the ‘kubectl edit tkc …’ command to edit the running configuration. Specifically, we update the TKR reference name for the control plane and worker nodes to the TKR version of the new Kubernetes release.
Note, there are multiple ways to upgrade a TKC. In this exercise we use the ‘kubectl edit …’ command. Refer to the documentation for alternative upgrade methods.
In the PuTTY terminal type the command ‘kubectl edit tkc/tkc01’.
# kubectl edit tkc/tkc01

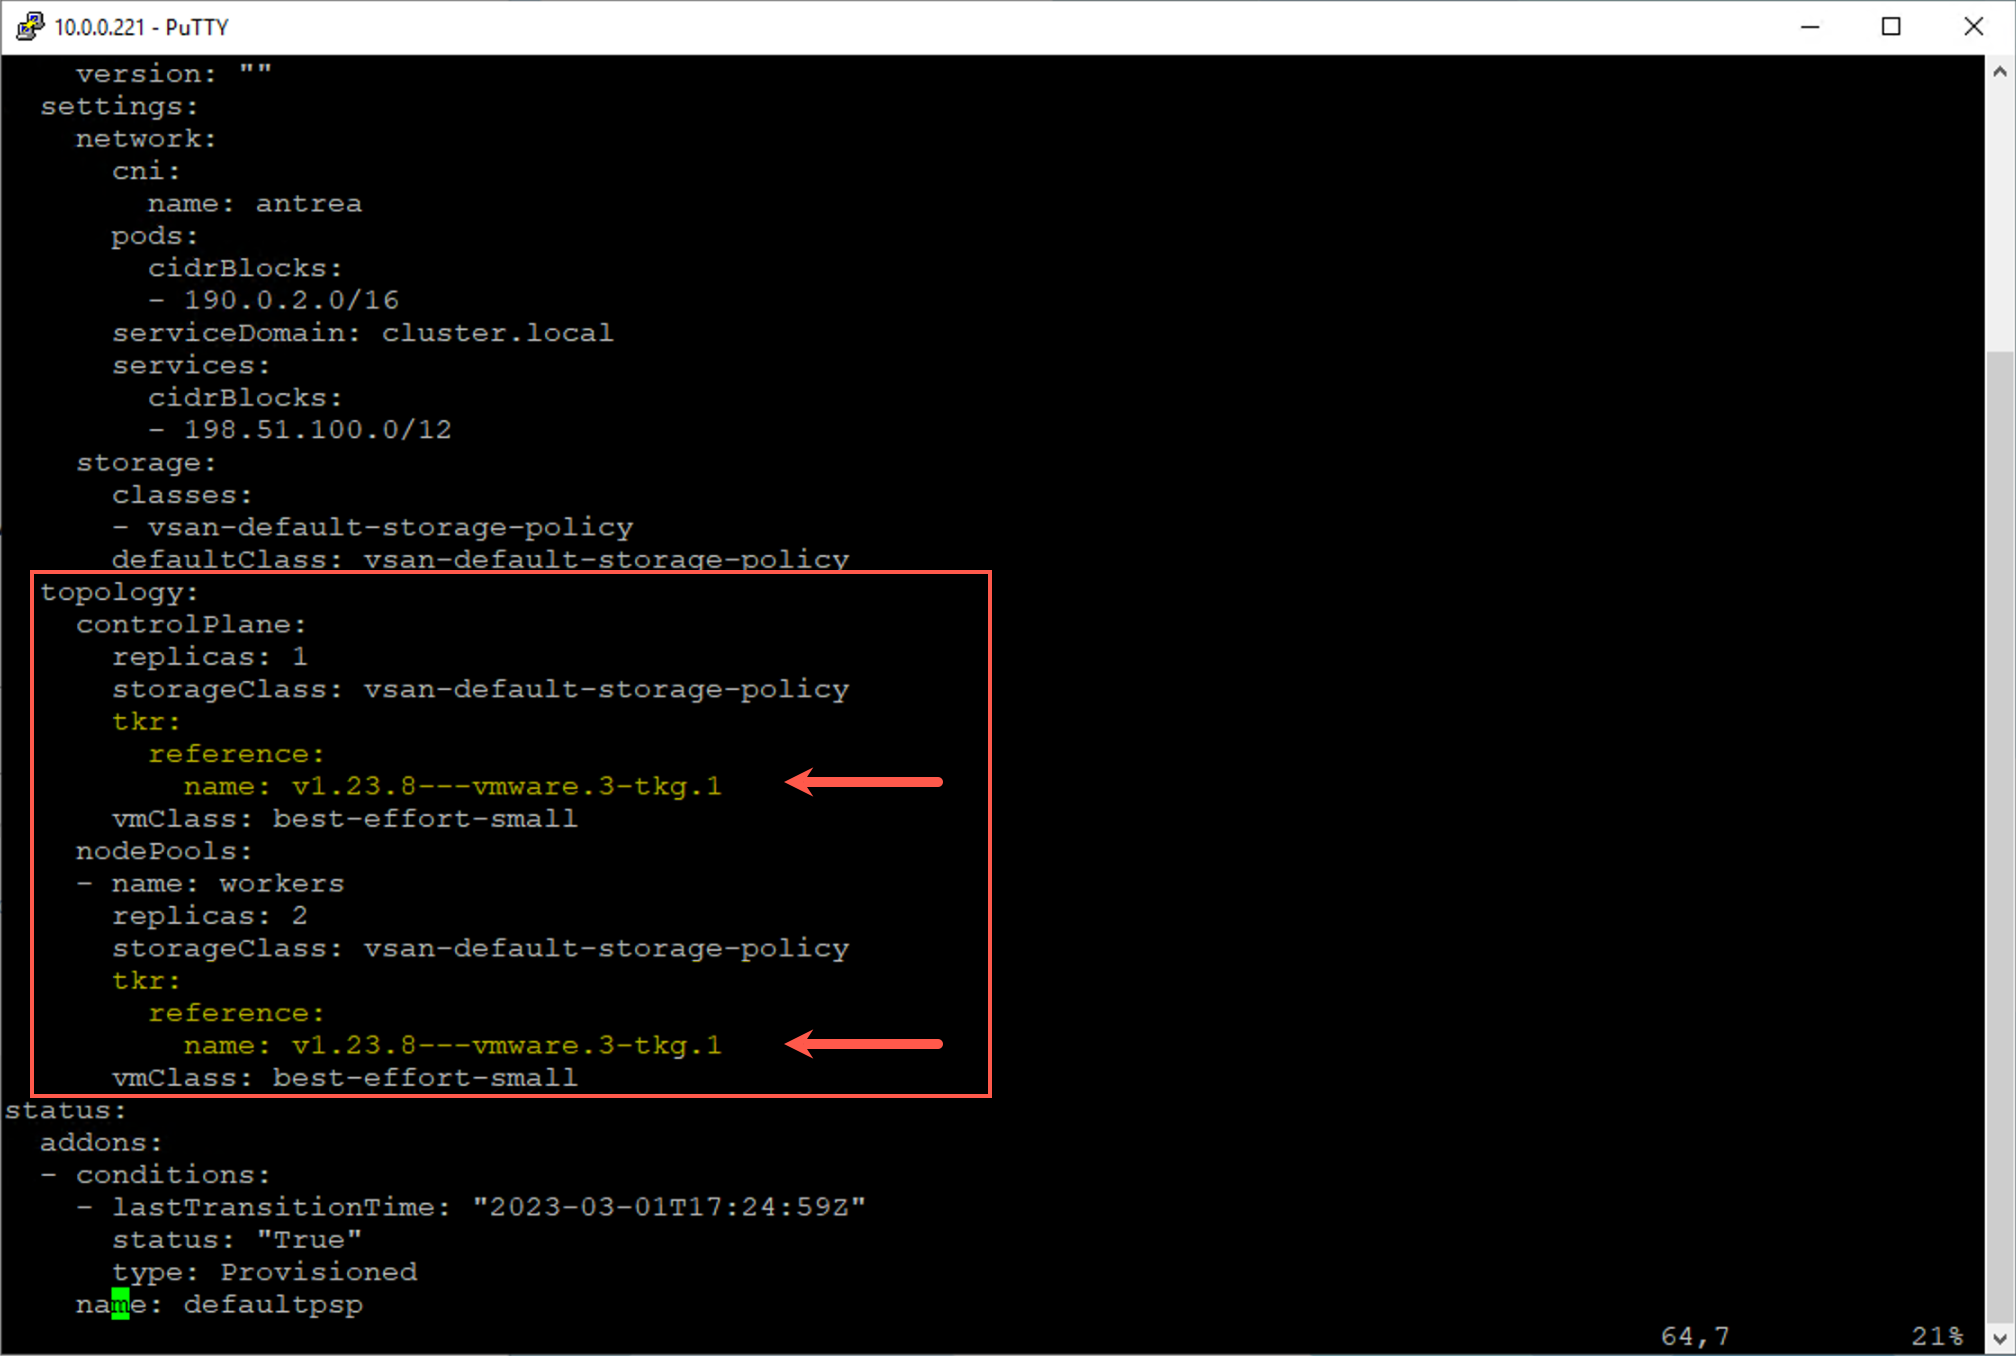
The YAML configuration for ‘tkc01’ will open in the vi editor. Use the arrow keys to navigate to the topology section where the TKR reference names are shown for the control plane and worker nodes as shown in the example below.

In the editor, change the TKR reference name for both the control plane and worker nodes to the value shown in the output of the ‘kubectl get tkr’ command (‘v1.23.8---vmware.3-tkg.1’ in this example).
The following image shows what the PuTTY terminal will look like after making the updates:
If you are not familiar with the ‘vi’ editor, the following tables will guide you through the steps to make the changes.
Note that the vi editor has two modes. By default, you start in the “command mode”. While in this mode you use the arrow keys to scroll through the doc and run ‘vi’ commands. To edit/change the contents of the file you press lowercase ‘i’ to switch to “input mode”. After making changes, you press the “esc” key to switch back to command mode. The command ‘:wq’ will save the changes and exit the vi editor.
To update the version of the control plane node:
|
|
|
|
Press the |
Place the editor in command mode |
|
Use the arrow keys to navigate to the TKR reference section for the ControlPlane |
|
|
Use the arrow keys to place the cursor on the lowercase “v” in the string ‘ |
|
|
Press |
name: |
|
Press |
|
|
Press the |
Switch back to command mode |
To update the version of the worker nodes:
|
|
|
|
Press the escape key (esc) |
Place the editor in command mode |
|
Use the arrow keys to navigate to the TKR reference section for the worker nodes |
|
|
Use the arrow keys to place the cursor on the lowercase “v” in the string ‘ |
|
|
Press |
|
|
Press |
|
|
Press the |
Switch back to command mode |
After you change the TKR reference name for both the control plane and worker nodes, save the changes and exit the vi editor:
|
|
|
|
Type ‘ |
Save the changes and exit the vi editor |
When you exit the vi editor, the changes are applied immediately. You will be notified that ‘tkc01’ has been edited.
To monitor the progress of the upgrade, run the ‘kubectl get tkc tkc01’ command:
# kubectl get tkc tkc01
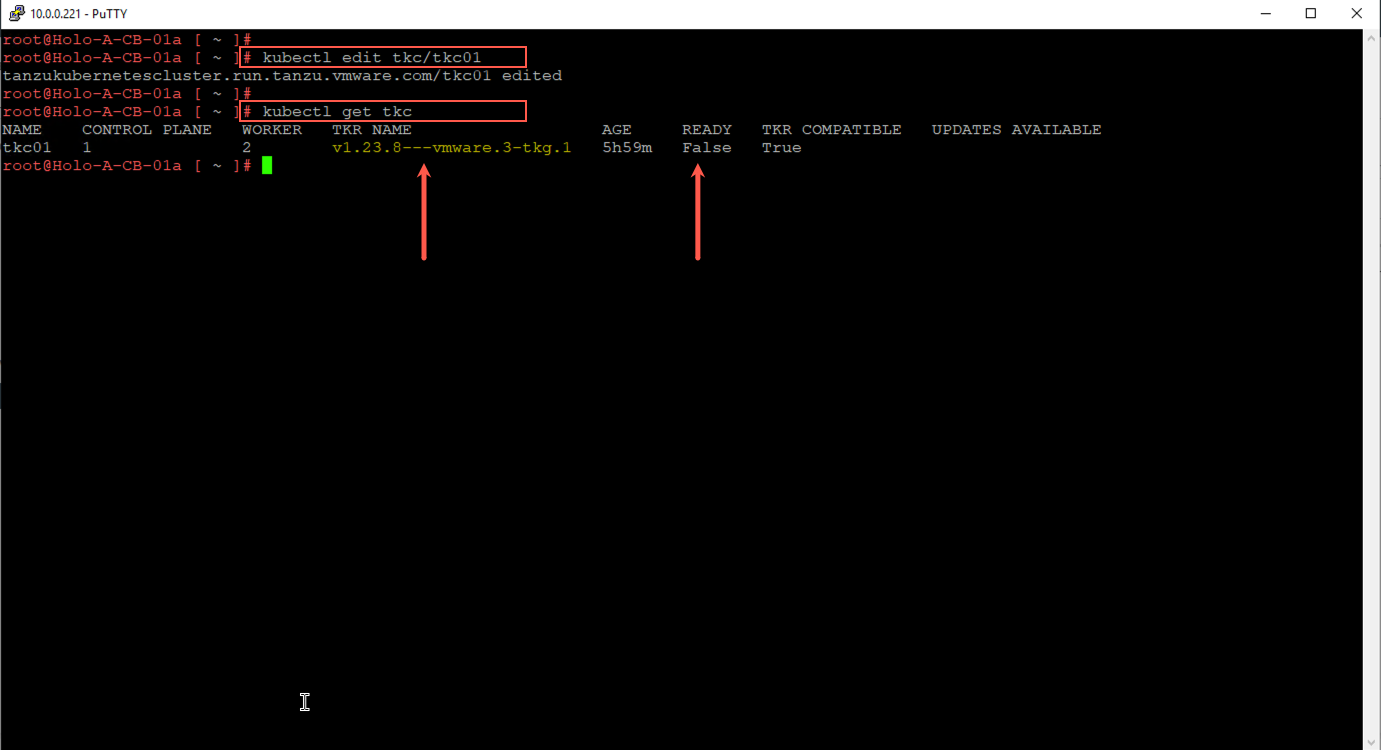
In the output of the ‘kubectl get tkc’ command, we see that the TKR NAME is immediately updated to reflect the new version. However, the READY status has changed from ‘true’ to ‘false’. The READY status will continue to show ‘false’ until the upgrade completes. When the upgrade is complete the READY status will be set back to ‘true’.
To monitor the upgrade progress, use the the Recent Tasks pane in the vSphere client. Here you will be able to watch as the new VMs are deployed and the old VMs are deleted.
- Click the vSphere browser tab to return to the vSphere Client
- Expand the Recent Tasks pane

Monitor the recent tasks pane in the vSphere client to see the new VMs get deployed and the old VMs removed. Wait until the control plane and both worker nodes have been upgraded. After the nodes have been updated, refresh the browser page and verify the “Phase” status transitions from “updating” to “Running”.
- Click the refresh icon
Note that it typically takes 10 to 15 minutes for the upgrade to complete. You may need to refresh the page several times before the Phase status is updated to “Running”.
Step 2 Summary
In step 2 we used the ‘kubectl edit tkc/tkc01’ command to edit the TKC configuration where we changed the TKR version number 1.22.9 to version 1.23.8. The supervisor cluster detected the change and began the steps to perform a rolling upgrade. This was accomplished by sequentially deploying new control plane and work VMs, adding them to the TKC, and then removing the old VMs.
Step 3: Confirm TKC Cluster Upgrade
When the “Phase” status for the TKC returns to the ‘Running’ state, the upgrade is complete.
To confirm that the TKC upgrade has completed successfully, return to the PuTTY terminal.
- Click the Putty icon to return to the Putty terminal
Run the commands:
# kubectl get tkc

# kubectl get virtualmachines -o wide
The output of the ‘kubectl get tkc’ command shows that the TKC is now running Kubernetes v1.23.8 and the READY state is again set to ‘true’.
The output of the ‘kubectl get virtualmachines -o wide’ command confirms that TKR version for the control plane and worker nodes is Kubernetes v1.23.8.

This completes the TKC upgrade.
Step 3 Summary
In Step 3 we returned to the PuTTY terminal where we used the ‘kubectl get tkc’ and ‘kubectl get virtualmachines’ commands to verify the upgrade completed successfully and that VMs that comprise ‘tkc01’ are all running the new Kubernetes version.
Module Summary
This module showed how to upgrade a Tanzu Kubernetes Cluster (TKC) inside a vSphere Namespace.
When you upgrade a Tanzu Kubernetes cluster, new virtual machines get deployed with the updated Kubernetes version. These new nodes then replace the existing nodes, which are subsequently removed. Both the control plane and worker nodes are updated using this approach. The nodes are updated sequentially.
Module Key Takeaways
- TKC upgrades are done using a “rolling upgrade”.
- New control plane and worker nodes are deployed (using the newer Kubernetes version) and used to replace the existing nodes.
- The TKC nodes are updated sequentially.