
HyperStore-C Quick Start Guide
HyperStore Service Introduction
Cloudian HyperStore® is an S3-compatible object storage system. HyperStore-C is a containerized version of HyperStore, designed to run on the VMware vSAN Data Persistence platform. VI Admins can enable the HyperStore service in the vCenter UI, and DevOps users can then create HyperStore service instances either through a VC UI plugin -- which is automatically activated in the VC UI when the VI Admin enables the HyperStore service -- or by using the Kubernetes command-line tool kubectl. Each HyperStore instance has its own unique S3 service endpoint that can be accessed by S3 client applications. HyperStore instances can be monitored through the VC UI's Skyline Health facility for overall health or through the VC UI plugin for more detail. Each HyperStore instance also includes its own web-based UI that supports service management functions such as user provisioning and service usage reporting.
The VC UI plugin or the kubectl command line tool can be used to scale out a HyperStore instance, or to delete a HyperStore instance that is no longer needed.
Enabling the HyperStore Service
As a VI Admin you can enable the HyperStore service in the VC UI. Doing so will create and deploy a HyperStore service Operator in the workload cluster, activate the HyperStore plugin in the VC UI, and enable DevOps users with appropriate permissions to create HyperStore service instances.
In the VC UI, from the Workload-Cluster, select Configure -> Supervisor Services -> Services, and then select Cloudian HyperStore from the list of available services. Then click ENABLE.

This brings up the Enable Supervisor Service screen where you can set the HyperStore service Operator version and other parameters.
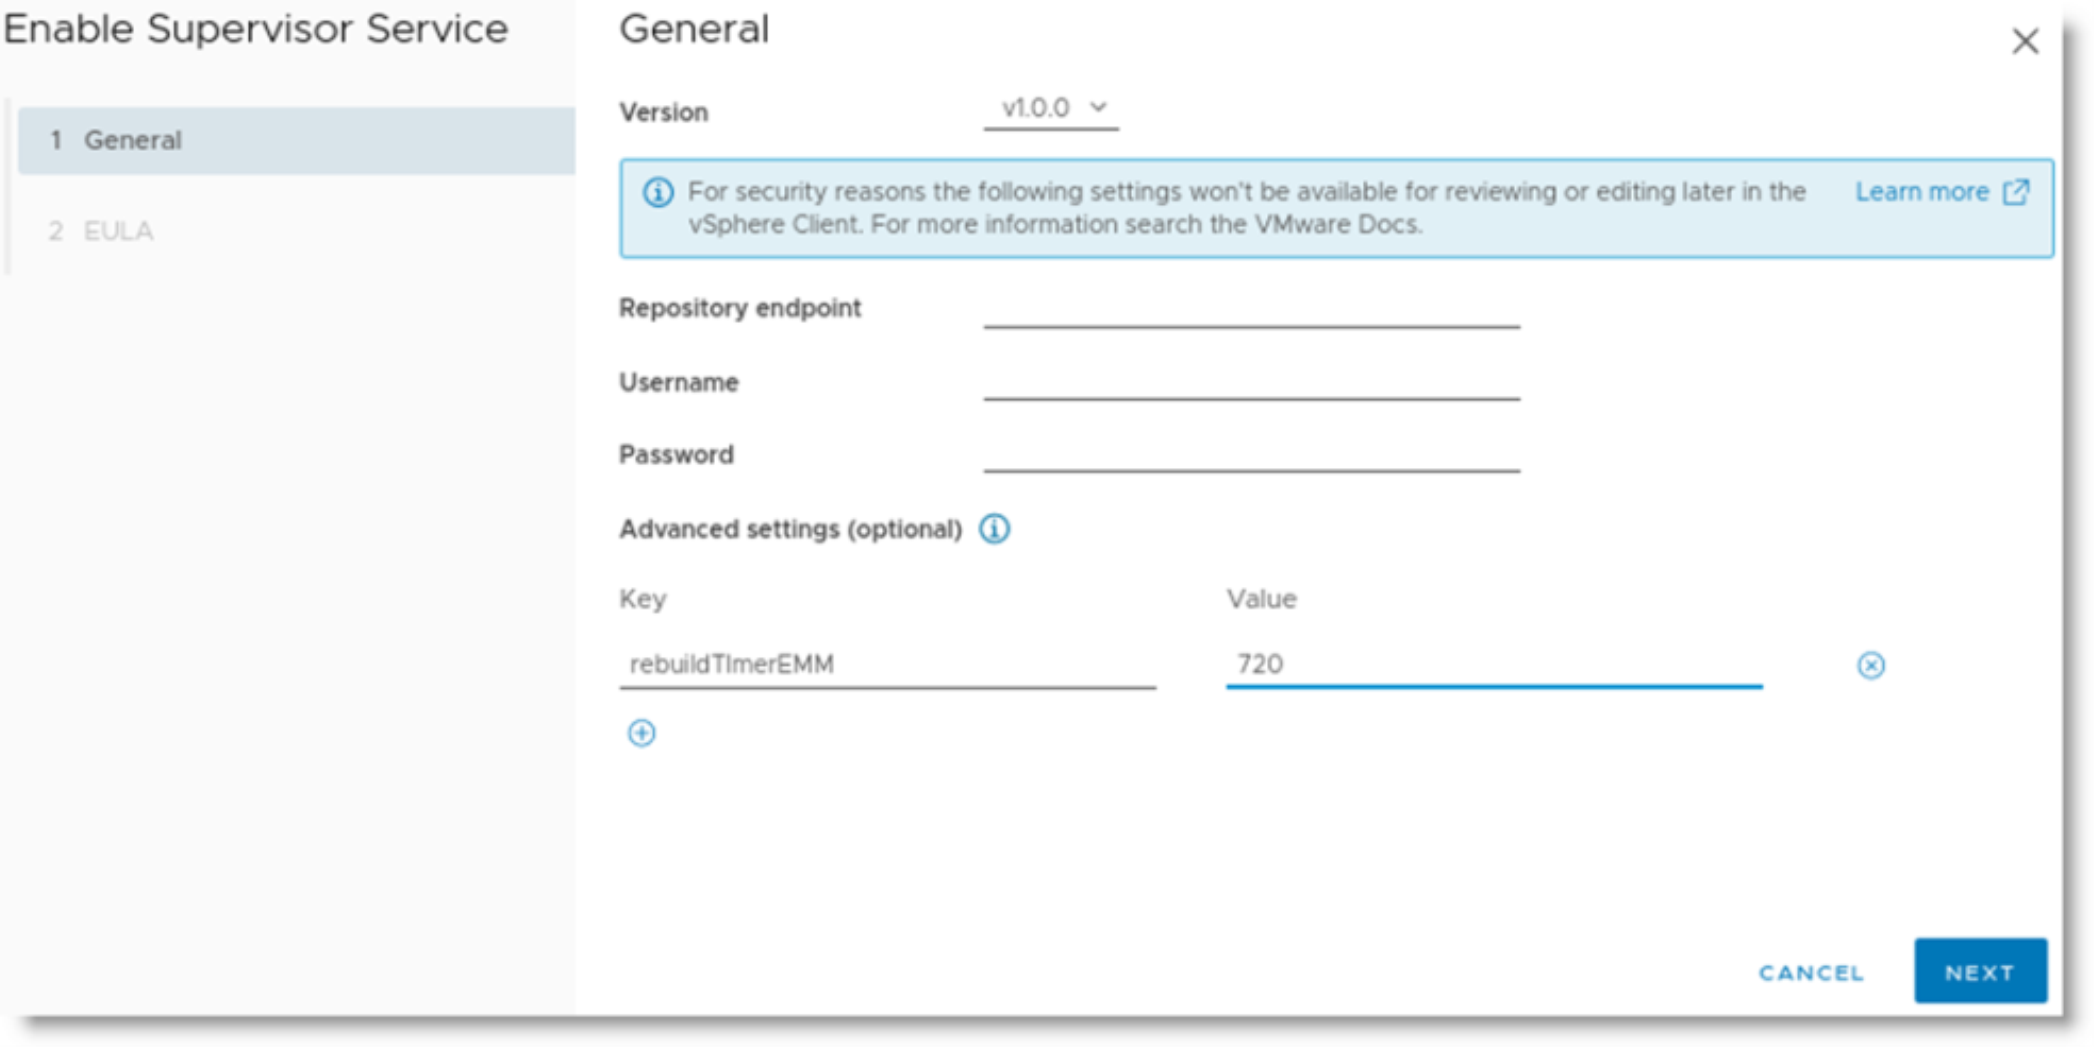
For the “Version” field, select “v1.0.0”. If you want to use a custom Docker image repository in which the HyperStore-C images have been stored, set the "Repository endpoint", "Username", and "Password" parameters. This method is how an air-gapped installation can be done. If you do not specify a repository endpoint, then the default is to use https://quay.io as the registry from which to download the HyperStore-C images.
|
Parameter |
Description |
|
Repository endpoint |
The IP address or hostname of the Docker image registry to use. If not set, the HyperStore-C Docker images are downloaded from https://quay.io. Default: empty. |
|
Username |
If the Repository endpoint is set, then this is the username to authenticate to that registry for the Docker image downloads. Default: empty. |
|
Password |
If the Repository endpoint is set, then this is the password to authenticate to that registry for the Docker image downloads. Default: empty. |
Optionally, you can customize the following settings under the “Advanced settings” section, if you wish to use values different than the defaults:
|
Parameter |
Description |
|
rebuildTimerEMM |
When a VI Admin enters a HyperStore host node into Maintenance Mode with "Ensure accessibility": If this much time passes and the node has still not exited from Maintenance Mode, then the HyperStore Operator will attempt to rebuild the HyperStore Pod and PVCs on another node. Default: 360. Unit: minutes. |
|
rebuildTimerNode |
When a HyperStore host node fails (becomes unresponsive to the rest of the cluster): If this much time passes and the node has still not recovered, then the HyperStore Operator will attempt to rebuild the HyperStore Pod and PVCs on another node. Default: 360. Unit: minutes. |
|
rebuildTimerPVC |
When a PVC becomes inaccessible on a HyperStore host node: If this much time passes and the PVC is still inaccessible, then the HyperStore Operator will attempt to rebuild the PVC on the same node. Default: 60. Unit: minutes. |
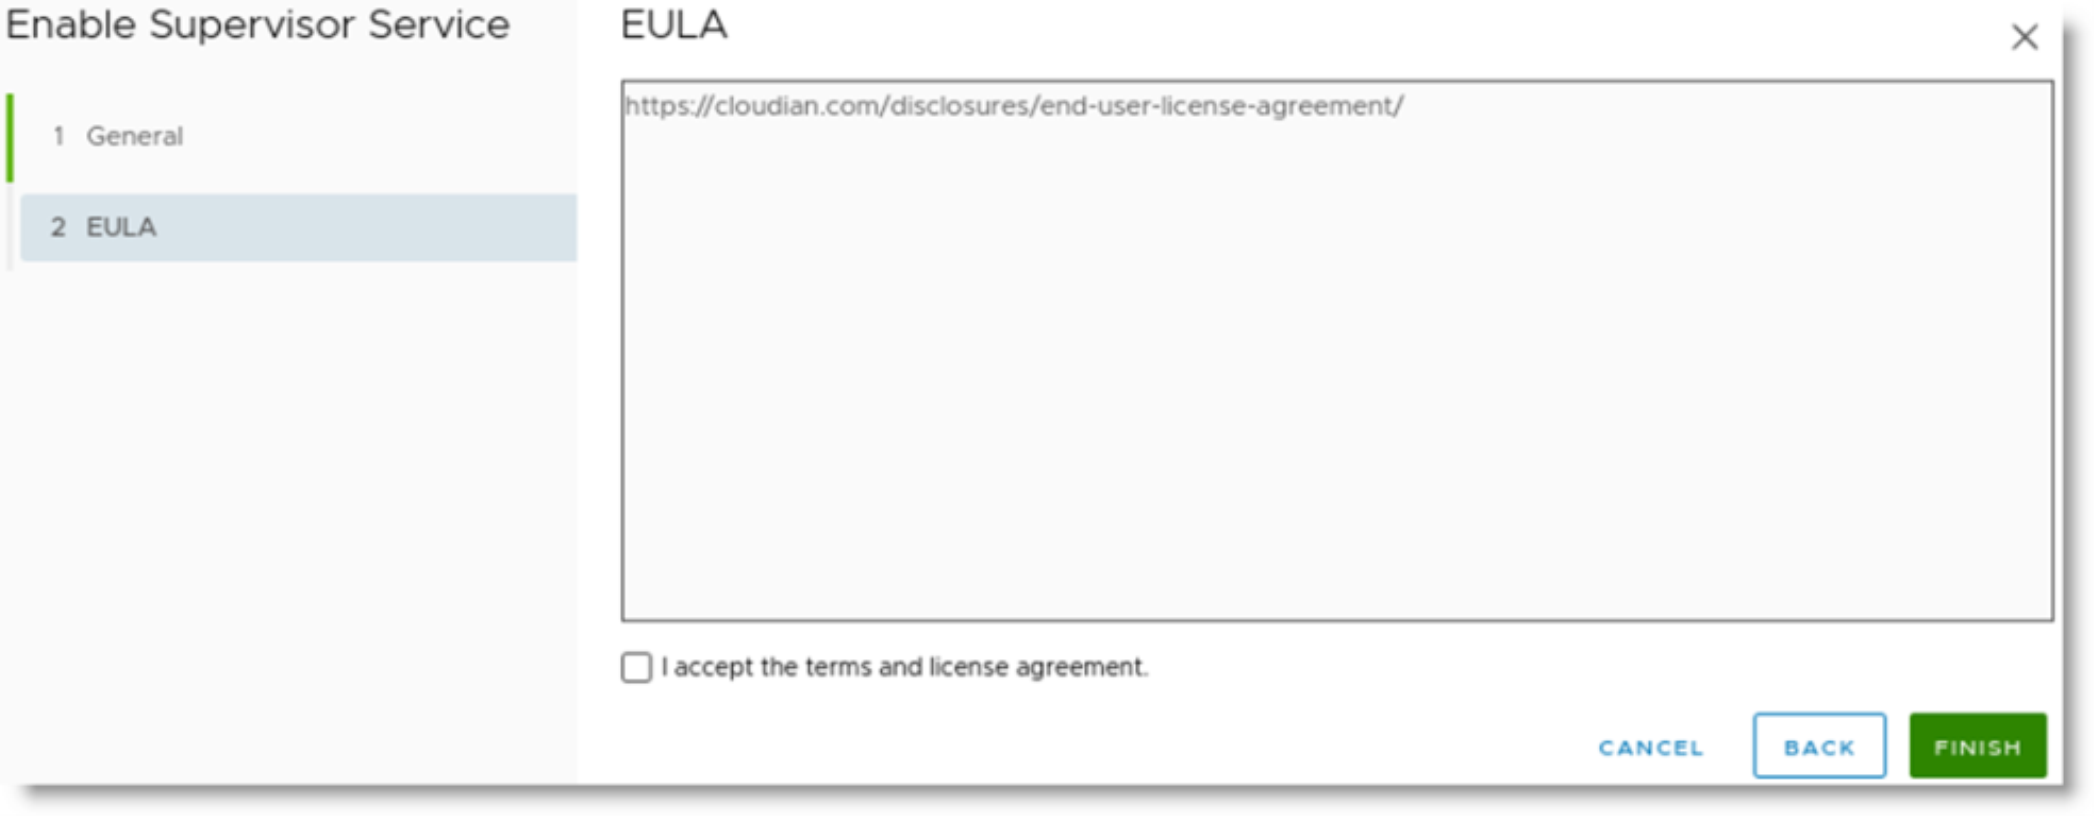
When you are done editing settings, click Next. The Cloudian End-User License Agreement (EULA) URL is displayed. Click through the URL link and read the agreement carefully before selecting the checkbox to accept the terms of the license agreement. Then click FINISH.
The HyperStore Service is now enabled. This creates a new namespace and starts a HyperStore Operator Pod and a VC UI plugin Pod in that namespace. In the screen shot below, in the left pane you can see the newly created namespace “hyperstore-domain-c[x]” and the Operator and UI plugin Pods.
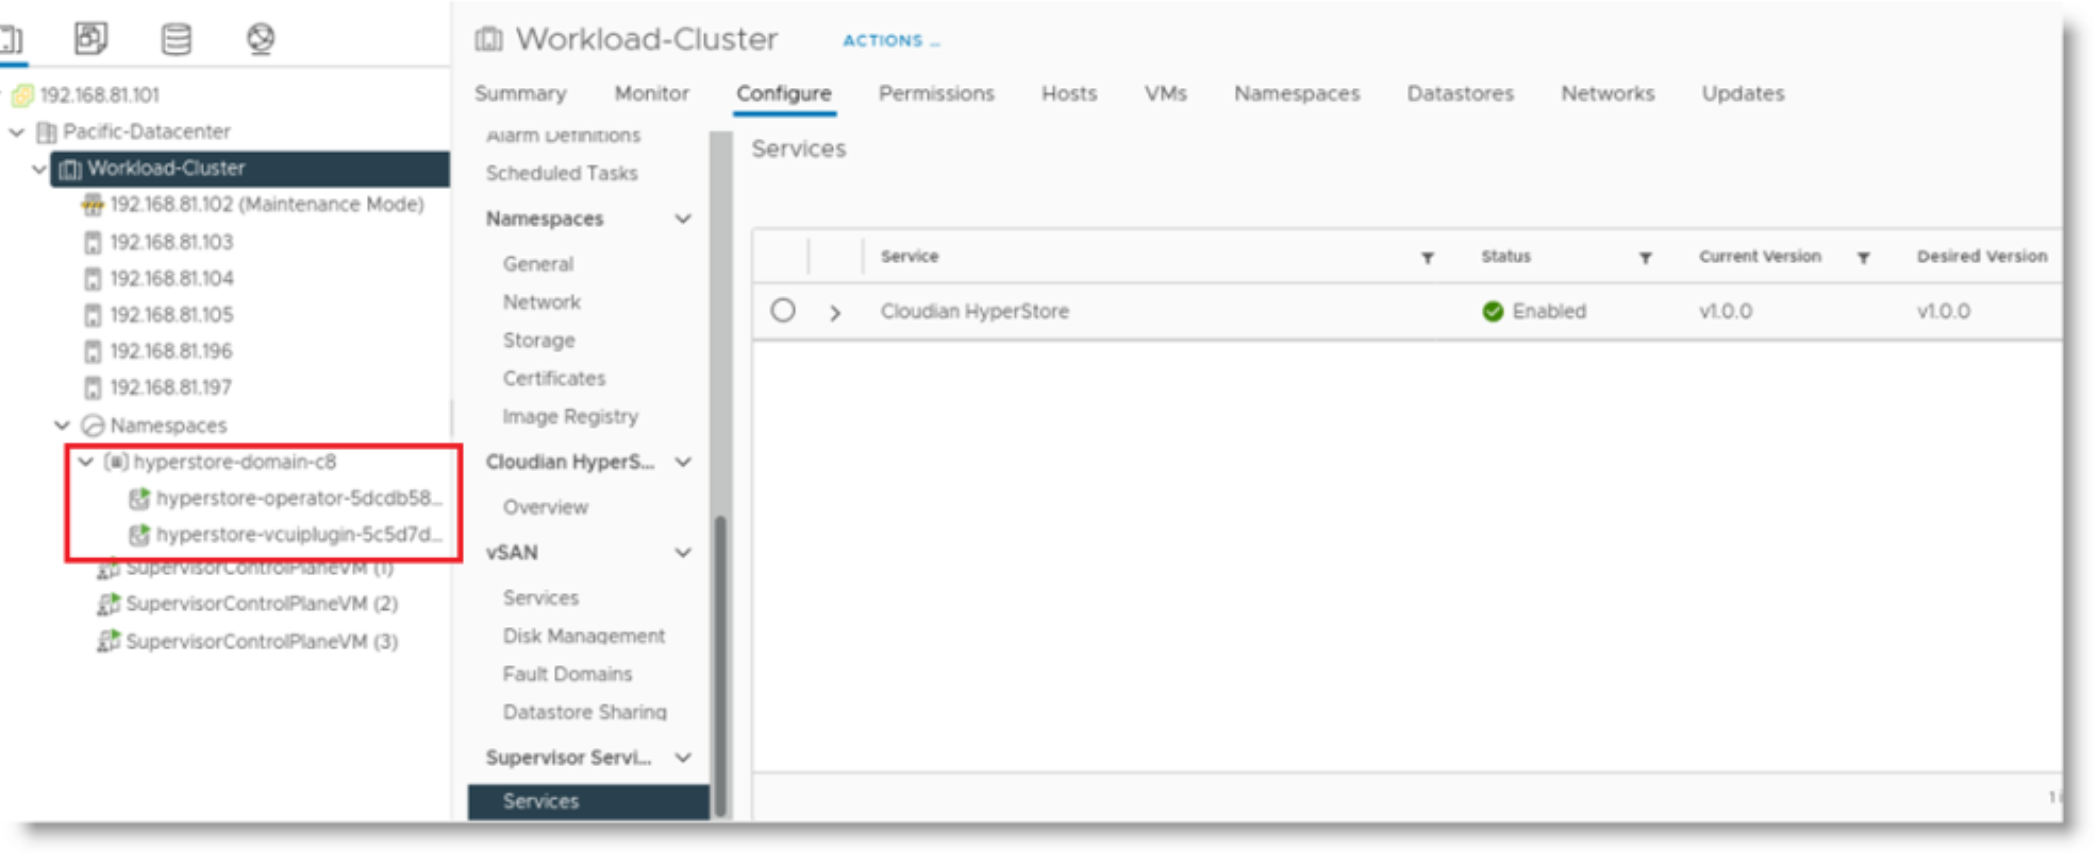
Also when the HyperStore Service is enabled, custom Storage Classes for HyperStore are created and available for namespaces to use.
Note: If you later want to disable the HyperStore Service: From the Workload-Cluster, select Configure -> Supervisor Services -> Services, and then select Cloudian HyperStore from the services list. Then click DISABLE. This will delete all HyperStore instances including all stored data, all related resources such as Pods and PVCs, and the namespace created for the HyperStore Operator and UI Plugin.
Setting up Namespaces for HyperStore Instance Creation
After enabling the HyperStore Service, for each namespace in which you want to allow the creation of HyperStore instances do the following:
- Enable these storage policies:
- vSAN Default Storage Policy
- hyperstore-vsan-direct-thick (if vSAN-Direct disks have been claimed in the cluster)
- hyperstore-vsan-sna-thick
|
Note: The latter two policies become available to namespaces when you enable the HyperStore Service. |
- Grant edit permissions for the namespace to users who you want to be able to create HyperStore instances. Only users with edit permissions on the namespace will be allowed to create a HyperStore instance in the namespace.
Creating a HyperStore Instance
In the current version of HyperStore-C, the recommended way to create a new HyperStore instance is by using kubectl. Although it is possible to create a HyperStore instance by using the VC UI plugin, the UI plugin method currently has the significant limitation that the HyperStore instance's domain will automatically be set to example.com and cannot be customized. As a consequence of the UI plugin's lack of support for creating a unique domain per HyperStore instance (and thus a unique S3 service endpoint per instance), in the entire Kubernetes workload cluster only one HyperStore instance created through the VC UI plugin can be used for S3 storage services, and that one instance must use example.com as its domain.
By contrast, when you create a HyperStore instance by using kubectl you can set a unique customized domain for the instance. In this way, each HyperStore instance created by using kubectl can have its own unique S3 service endpoint, and multiple HyperStore instances can deliver separate S3 storage services within the workload cluster. There can even be multiple HyperStore instances within the same namespace -- each with its own unique S3 service endpoint.
Using kubectl to Create a HyperStore Instance
To use kubetcl to create a new HyperStore instance:
- Create a YAML-formatted Custom Resource (CR) manifest file that specifies the desired attributes of the HyperStore instance. Below is an example HyperStore CR manifest file, with the customizable attribute values highlighted in bold. For description of the customizable attributes, see the table further below.
|
apiVersion: hs.cloudian.com/v1alpha1 |
- Use kubectl apply to create the HyperStore instance in the cluster:
|
# kubectl apply -f <YAML filename> |
The table below describes the attributes that are customizable when you create a HyperStore CR manifest file.
|
Attribute |
Description |
|
name |
Name of this HyperStore instance. This will be the prefix of the HyperStore Pod names. For example if you specify “hs” as the name, a StatefulSet of Pods will be created named “hs-0”, “hs-1”, and so on. The name must be unique within the namespace. |
|
namespace |
The namespace in which to create the HyperStore instance. The namespace must have already been created and configured with Storage Classes. You must have edit permission on this namespace. |
|
cpuRequire |
Used for the “resources.limits” and “resources.requests” spec of CPU for each HyperStore Pod. For example the value of “2” will provision 2 CPUs. In the vSphere case, this will be 2 CPU physical cores, not vCPUs. For production workloads, a minimum of 8 CPUs is recommended. Range: [1, 32], default 2. |
|
memoryRequire |
Used for the “resources.limits” and “resources.requests” spec of Memory for each HyperStore Pod. For example the value of “16” will provision 16 Gigabytes of memory per Pod. For production workloads, a minimum of 64 GiB is recommended. Range: [12, 128], default 16. Unit: Gigabytes. |
|
nodes |
The number of Nodes to use for HyperStore Pods in the instance. Each Pod is assigned to a unique physical ESXi node in the cluster. Number of nodes can never exceed the physical number of nodes in the VC cluster. Note This is distinct from the number of object data replicas, which is determined by the HyperStore storage policy. By default, for a HyperStore instance with 3, 4, or 5 nodes an RF3 storage policy (replication factor = 3) is automatically created. For a HyperStore instance with 6 or more nodes, a 4+2 erasure coding storage policy and an RF3 storage policy are automatically created. For more information on HyperStore storage policies (including how to create additional storage policies for an instance after you've created the instance), see "Getting Started with a HyperStore Instance”. |
|
metadataVolumeSize |
The volume size on a single disk to use for object metadata. The recommended metadata volume size is related to the number of objects that you expect to be stored: at least 1 GiB per 1 million objects stored. Default value is 30Gi. Unit: Gigabytes. |
|
totalStorageSize |
The total amount of raw storage capacity of object data required for the instance as a whole. Default: 100Gi. Unit: Gigabytes. Note The actual or "net" object storage capacity is a fraction of the raw storage capacity, depending on the HyperStore storage policy used. For example, if RF3 (replicas=3) is used, then the raw storage is divided by 3 and assuming spare overhead of 20%, then a raw capacity of 100 GiB is 26.7 GiB of actual object capacity (100 GiB minus 20% overhead = 80 GiB, divided by 3 = 26.7 GiB). |
|
pvcsize |
The volume size on a single disk to use for object data. This must not exceed the size of disks available to the HyperStore nodes. Default value is 10Gi. Unit: Gigabytes. Note Each node will have the same number of PVCs of this size, and enough PVCs of this size will be created per HyperStore node so that your specified total object data storage size for the instance as a whole is met or exceeded. For example, if you specify a 3-node cluster with total object storage size of 100GiB and object data volume size of 30GiB, then two 30GiB PVCs will be created per node for a total of 180GiB raw storage space for the instance as a whole (since creating just one 30GiB PVC on each of the three nodes would not suffice to meet your 100GiB total raw storage requirement). |
|
metadataStorageClassName |
The storage class to use for object metadata. The available options are from the selected namespace’s configured storage classes. The recommended value is "vsan-default-storage-policy". |
|
objectDataStorageClassName |
The storage class to use for object data. The available options are from the namespace’s configured storage classes. |
|
topDomain |
The fully qualified domain name (FQDN) to assign to this HyperStore instance. This will become part of the instance's S3 service endpoint, and must be unique for each HyperStore instance in the Kubernetes workload cluster (so that each HyperStore instance has a unique S3 service endpoint). To ensure uniqueness, the recommended format for the topDomain value is: <HyperStore instance name>.<namespace>.<organization domain> For example: hs.ns1.enterprise.com Note After you've created a HyperStore instance, additional steps are required to facilitate access to the instance's S3 service endpoint from third party S3 applications, as described in "S3 Service Access Using a Third Party S3 Client Application". |
After creating the new HyperStore instance with kubectl apply, you can monitor the initialization of the instance in the VC UI: from the Workload-Cluster, select Configure -> Cloudian HyperStore -> Overview. When the instance is up and ready, a green check-mark displays in the "Health" column.

Using the VC UI to Create a HyperStore Instance
For the reason described in the introduction to "Creating a HyperStore Instance", the recommended method for creating a new HyperStore instance is to use kubectl, not the VC UI. However, if you wish you can have one UI-created HyperStore instance running and provising S3 services in the workload cluster, and that instance's top domain will be fixed to example.com (and cannot be modified). In that scenario, when you set up access to the instance's S3 service (as described in "S3 Service Access"), you will specify example.com as the instance's top domain value.
To use the VC UI to create a HyperStore instance, from the Workload-Cluster select Configure -> Cloudian HyperStore -> Overview and then click NEW INSTANCE. Complete all the fields and then click OK. For setting descriptions see the table in "Using kubectl to Create a HyperStore Instance". You will not be able to set a topDomain value through the UI -- instead the topDomain defaults to example.com and you cannot change this at creation instance time or afterwards.
Note: In the new instance UI, "Object data volume size" corresponds to "pvcsize" from the CR attribute table.
Getting Started with a HyperStore Instance
This section covers the following topics:
- HyperStore Management Tools and Documentation
- Updating Your HyperStore License
- Editing or Adding Storage Policies
- Adding HyperStore S3 Service Users
- S3 Service Access
- IAM Service Access
- HyperStore-C Limitations
HyperStore Management Tools and Documentation
Comprehensive HyperStore product documentation is available to you in two formats:
- HyperStore Administrator's Guide (PDF). Use kubectl exec to enter your HyperStore pod that has the suffix "-0" in its name, and then go to the /opt/cloudian-staging/7.2.1/doc/HyperStorePDFManuals directory. For example with a HyperStore pod named hs-0in namespace ns1:
|
# kubectl exec -it -n ns1 hs-0 -- bash Or, to copy the HyperStore PDF manuals from the pod to your local directory: # kubectl cp <namespace>/<podname>:/opt/cloudian-staging/7.2.1/doc/HyperStorePDFManuals ./ In the manuals directory, only the HyperStoreAdminGuide_v-7.2.1.pdf document is applicable to HyperStore-C. |
- HyperStore Help (HTML). After logging in to the Cloudian Management Console (as described below), in the upper right of the interface click Help.
The HyperStore Administrator's Guide and the HyperStore Help have the exact same content and use the exact same section numbering. So for example section 4.2.1 in the Admin Guide has the same content as section 4.2.1 of the Help.
HyperStore provides the following management tools and interfaces:
|
Tool or Interface |
Description |
|
Cloudian Management Console (CMC) (web-based GUI) |
The CMC is the main way through which you will manage your HyperStore instance. It supports a range of tasks including cluster monitoring, node operations, user provisioning, and usage reporting. It also includes a built-in S3 client UI that can be used to perform basic S3 operations such as creating a bucket and uploading an object. To access the CMC, first find the CMC service's external IP address by using kubectl get svc -n <namespace>. For example if your HyperStore instance is in namespace "ns2":
Then use a browser to go to https://<EXTERNAL-IP>:8443. The default System Administrator username is “admin” and the default password is “public”. After logging in you can change the password, under the Admin user menu in the upper right of the GUI. For more information, in the HyperStore Help or HyperStore Admin Guide see Section 5 "Using the Cloudian Management Console". |
|
HyperStore installer (cloudianInstall.sh) (interactive command line tool) |
You may want to use this tool occasionally to apply changes that you have made to a HyperStore configuration file, or to perform advanced configurations such as enabling HTTPS for the S3 Service, or to restart specific HyperStore services such as the S3 Service or Cassandra. To access this tool use kubectl exec to enter your HyperStore Pod that has the suffix "-0" in its name (this is the "Puppet Master" node), then change into the /opt/cloudian-staging/7.2.1 directory and launch the installer. For example, for pod hs-0 in namespace ns1: # kubectl exec -it -n ns1 hs-0 -- bash For more information, in the HyperStore Help or HyperStore Admin Guide see Section 9.2 "Installer Advanced Configuration Options" and Section 9.3 "Pushing Configuration File Edits to the Cluster and Restarting Services". |
|
hsstool (command line tool) |
This tool supports various node operations (such as data repair and data cleanup) and cluster status checks. This tool's commands can also be run through the CMC's Cluster -> Nodes -> Advanced page, so typically the only reason to use hsstool directly is if you prefer to use a command line tool rather than the CMC. To access this tool, enter the HyperStore Pod on which you want to perform an operation and run the desired hsstool command. For example, for pod hs-0 in namespace ns1: # kubectl exec -it -n ns1 hs-0 -- bash For more detail than is provided in the command line help, in the HyperStore Help or HyperStore Admin Guide see Section 11.1 "hsstool". |
|
HyperStore Admin API (HTTP-based RESTful API) |
HyperStore provides a RESTful Admin API through which can be performed many of the same operations that the CMC supports, such as user provisioning and usage data retrieval. You can submit calls to the Admin API by using a command line tool such as cURL or a custom script or application that you write. You can use kubectl exec to enter any HyperStore Pod and then use cURL to submit Admin API requests to https://localhost:19443. Alternatively, from any Pod in the same namespace as the HyperStore instance, you can access the Admin API at this service endpoint: https://<instanceName>-admin.<namespace>.svc.cluster.local:19443 For example with instance name "hs" and namespace "ns1": https://hs-admin.ns1.svc.cluster.local:19443 The Admin API service endpoint uses HTTP Basic Authentication and the default username is "sysadmin" and default password is "public". For a sample cURL request to the Admin API, see below. For more information, in the HyperStore Help or HyperStore Admin Guide see Section 12 "Admin API". |
|
This example enters the Pod hs-0 in namespace ns1 and then uses cURL to submit an Admin API request to retrieve the current HyperStore license attributes: # kubectl exec -it -n ns1 hs-0 -- bash |
|

Updating Your HyperStore License
When a HyperStore instance is created, a temporary trial HyperStore license is installed for evaluation purposes only. For extended use or production use, contact Cloudian Sales or cloudian-license@cloudian.com to obtain another license. To apply a new license file once you've received it from Cloudian, log into the CMC and go to Cluster -> Cluster Config -> Cluster Information.
For more information, while on the CMC's Cluster Information page click Help.
Editing or Adding Storage Policies
The HyperStore storage policy defines how an S3 bucket’s objects are stored in HyperStore including replication or erasure coding, compression, encryption, and consistency level. When you create a HyperStore instance with 3, 4, or 5 nodes, a 3X replication (RF3) storage policy is automatically created in the system. When you create a HyperStore instance with 6 or more nodes, a 4+2 erasure coding (k=4, m=2) storage policy and a 3X replication storage policy are automatically created in the system. When users of the HyperStore S3 Service create buckets, they can choose which storage policy to apply to each bucket, from among the storage policies that have been created in the system.
To review or edit the storage policies in your HyperStore instance, or to create additional storage policies, log into the CMC and go to Cluster -> Storage Policies.
For more information, while on the CMC's Storage Policies page click Help.
Note: In HyperStore-C it is not mandatory for you to create any storage policies yourself, since at least one storage policy is created automatically as described above.
Note: The HyperStore storage policy is unrelated to the vSphere/vSAN storage policy.
Adding HyperStore S3 Service Users
To create S3 Service users for your HyperStore instance, log into the CMC and go to Users & Groups -> Manage Groups. Create one or more user groups. Then go to Users & Groups -> Manage Users to create users within the user group(s) that you've created. When you create users, those users can then log into a restrictive version of the CMC in which they can use a simple S3 client interface to perform basic actions like creating a bucket, choosing a storage policy for the bucket, and uploading and downloading objects. Also in the CMC, users can retrieve their S3 security credentials so that they can supply those credentials to a third party S3 client application (if you are having your users access the HyperStore S3 Service with a third party S3 application).
Note: When regular users log into the CMC they cannot see or access any of the HyperStore management functions that you see when logged in as an administrator.
For more information, while on the CMC's Manage Groups page or Manage Users page click Help.
S3 Service Access
This section describes two ways of accessing your HyperStore instance's S3 storage service:
- "S3 Service Access Using the CMC"
- "S3 Service Access Using a Third Party S3 Client Application"
S3 Service Access Using the CMC
Each HyperStore instance includes its own instance of the Cloudian Management Console (CMC). The CMC has a built-in S3 client with which HyperStore users -- who you have provisioned through the CMC or the Admin API -- can perform S3 storage tasks such as creating and configuring a storage bucket and uploading and downloading objects. From a browser on their local machines, users can access the CMC at:
https://<CMC service external IP address>:8443
For instructions on obtaining the external IP address of the CMC service for your HyperStore instance (so you can share it with your users), see "HyperStore Management Tools and Documentation".
Optionally, you can add a record to your DNS server -- not the Kubernetes CoreDNS but rather the DNS server for the surrounding environment --that points a fully qualified domain name (FQDN) to the CMC service external IP address for your HyperStore instance. The FQDN can be any FQDN of your choosing. Your users can then use that FQDN to access the CMC, rather than directly using the CMC's external IP address.
Note: When you are logged into the CMC as a system administrator (with the administrator login credentials noted in "HyperStore Management Tools and Documentation"), the CMC's S3 client is not available to you because the system administrator role cannot have an S3 storage account. However if you wish you can use the CMC to create a regular user, then log out of the CMC and log back in as that regular user. As that regular user, you can use the CMC's S3 client to create a bucket, upload objects, and so on.
S3 Service Access Using a Third Party S3 Client Application
IMPORTANT! As noted in "Creating a HyperStore Instance", each HyperStore instance must have a unique topDomain value which you specify when you create the instance, and the recommended topDomain format to ensure uniqueness per HyperStore instance is <instanceName>.<namespace>.<organizationDomain>.
{b}Note {/b}Users will need to provide the third party S3 application their S3 security credentials (access key and secret key). After you have created users in the CMC, the users can get their S3 credentials by logging in to the CMC and then going to <LoginName> -> Security Credentials. Alternatively you as the administrator can retrieve users' security credentials from the CMC and then provide the credentials to the users -- in the HyperStore Help or HyperStore Admin Guide see Section 5.5.1.4 "View or Edit a User's Security Credentials".
In the current version of HyperStore-C, additional set-up steps are required to facilitate access to a HyperStore instance's S3 Service from third party S3 client applications. This section describes first the steps required for S3 Service access from applications within the Kubernetes cluster, and then the steps required for S3 Service access from applications outside the Kubernetes cluster. If you know for sure that your HyperStore instance will be accessed only by applications within the cluster, or only by applications outside the cluster, you can follow just the applicable procedure.
To facilitate access to a HyperStore instance's S3 Service from third party S3 client applications that are running within the Kubernetes workload cluster, add a rewrite rule to the Kubernetes cluster's CoreDNS configuration so that *.<topDomain> for the HyperStore instance maps to <instance>-s3.<namespace>.svc.cluster.local, as follows:
Access the CoreDNS ConfigMap for editing:
# kubectl edit -n kube-system configmap coredns
At the end of the Corefile section of the ConfigMap, prior to the final closing brace, add a rewrite rule as follows:
rewrite name regex .*\.<domainpart>\.<domainpart>\.$ <instance>-s3.<namespace>.svc.cluster.local
In the rule include a <domainpart> for each part in the HyperStore instance's top domain.
For example, if your HyperStore instance name is qa and the namespace is eng and the top domain for your HyperStore instance is qa.eng.enterprise.com, the rewrite rule would be:
rewrite name regex .*\.qa\.eng\.enterprise\.com\.$ qa-s3.eng.svc.cluster.local
Within the context of the end part of a sample CoreDNS ConfigMap, the addition would look like this (addition is highlighted in bold):
...
cache 30
loop
reload
loadbalance
rewrite name regex .*\.dev\.eng\.enterprise\.com\.$ dev-s3.eng.svc.cluster.local
rewrite name regex .*\.qa\.eng\.enterprise\.com\.$ qa-s3.eng.svc.cluster.local }
Note: In this example there is already a rewrite line for a different HyperStore instance (dev) in the ConfigMap. Each HyperStore instance gets its own rewrite line.
CoreDNS will automatically reload the edited ConfigMap after a few minutes.
The HyperStore instance's S3 Service can be accessed by S3 client applications within the Kubernetes cluster, at this service endpoint:
http://s3-region1.<topDomain>:80
For example:
http://s3-region1.qa.eng.enterprise.com:80
To facilitate access to a HyperStore instance's S3 Service from third party S3 client applications that are running outside the Kubernetes workload cluster, do the following:
- Use kubectl patch to change the HyperStore instance's S3 Service type from ClusterIP to LoadBalancer:
|
# kubectl patch -n <namespace> service <instance>-s3 -p '{"spec":{"type":"LoadBalancer"}}' For example, if the namespace is "eng" and the HyperStore instance name is "qa": # kubectl patch -n eng service qa-s3 -p '{"spec":{"type":"LoadBalancer"}}' |
- Wait a couple of minutes, then retrieve the external IP address that the load balancer has allocated to the instance's S3 Service:
|
# kubectl get services -n <namespace> For example, with namespace "eng" and instance "qa": # kubectl get services -n eng |
- In your DNS system -- not the Kubernetes cluster's CoreDNS but your surrounding environment's DNS that facilitates the routing of requests originating from outside the Kubernetes cluster -- add DNS records that point the following domains to the S3 service's external IP address:
For example, if the top domain for the HyperStore instance is qa.eng.enterprise.com:
Note The wildcard record is not mandatory -- but if it is not present, S3 client applications will have to use "path style" URLs and will not be able to use "virtual hosted style" URLs. If you want users to be able to configure buckets as static websites, then also add DNS records that point these domains to the S3 service's external IP address:
|
After you complete the steps above, the HyperStore instance's S3 Service can be accessed by S3 client applications outside the Kubernetes cluster, at this service endpoint:
http://s3-region1.<topDomain>:80
For example:
http://s3-region1.qa.eng.enterprise.com:80
Note: By default, only HTTP access to the S3 Service is supported and HTTPS access is disabled. For information on enabling HTTPS access to the S3 Service, in the HyperStore Help or HyperStore Admin Guide see Section 4.3.5 "HTTPS Support (TLS/SSL)".
IAM Service Access
Note: This section is applicable only if you want HyperStore users (who you've created in the CMC) to be able to use a third party IAM client application to create IAM groups and users under their HyperStore user account.
HyperStore supports the AWS Identity and Access Management (IAM) protocol. If you want your HyperStore users to be able to access the HyperStore IAM service with a third party IAM client application:
- Complete the procedure(s) described in "S3 Service Access Using a Third Party S3 Client Application", for client applications running inside the Kubernetes cluster, or outside the cluster, or both (depending on your use case).
- Create a YAML-formatted manifest file to modify your HyperStore instance's S3 Service so that it supports dedicated IAM listening ports, as follows:
|
apiVersion: v1 |
- Apply the change:
|
# kubectl apply -f <YAML filename> |
After you complete the steps above, third party IAM clients can access the HyperStore IAM service at either of these endpoints:
- http://s3-region1.<topDomain>:16080
- https://s3-region1.<topDomain>:16443
For example:
HyperStore-C Limitations
HyperStore-C is designed to install and run on the VMware vSAN Data Persistence platform, and will not currently work in other Kubernetes environments.
Note that the HyperStore product documentation (introduced in "HyperStore Management Tools and Documentation" is the standard HyperStore documentation and is not specifically for HyperStore-C. Consequently, the documentation includes discussion of some features that are not applicable to HyperStore-C:
- HyperStore-C does not support multi-datacenter or multi-region deployments.
- In HyperStore-C, do not enable the HyperStore Shell.
- HyperStore-C does not support Object Lock.
- In HyperStore-C, certain CMC functions are disabled because for HyperStore-C these tasks are not performed through the CMC:
- Add Node / Add DC / Add Region
- Uninstall Node
- DisableDisk / ReplaceDisk
Monitoring a HyperStore Instance
HyperStore is integrated with the VC UI's Skyline Health functionality. For each HyperStore instance:
- Green means completely healthy and compliant. All Pods in the instance are healthy.
- Yellow means some degradation of Pod availability, but still the HyperStore instance is accessible for reads and writes. One or more pods may be down, but still the read and write consistency requirements can be met for all HyperStore storage policies being used in the instance.
- Red means the HyperStore instance is not accessible for reads or writes. Consistency requirements cannot be met for one or more storage policies being used in the instance.
For a single HyperStore Pod:
- Green means the Pod's S3 Service is responsive.
- Red means the Pod's S3 Service is unresponsive.
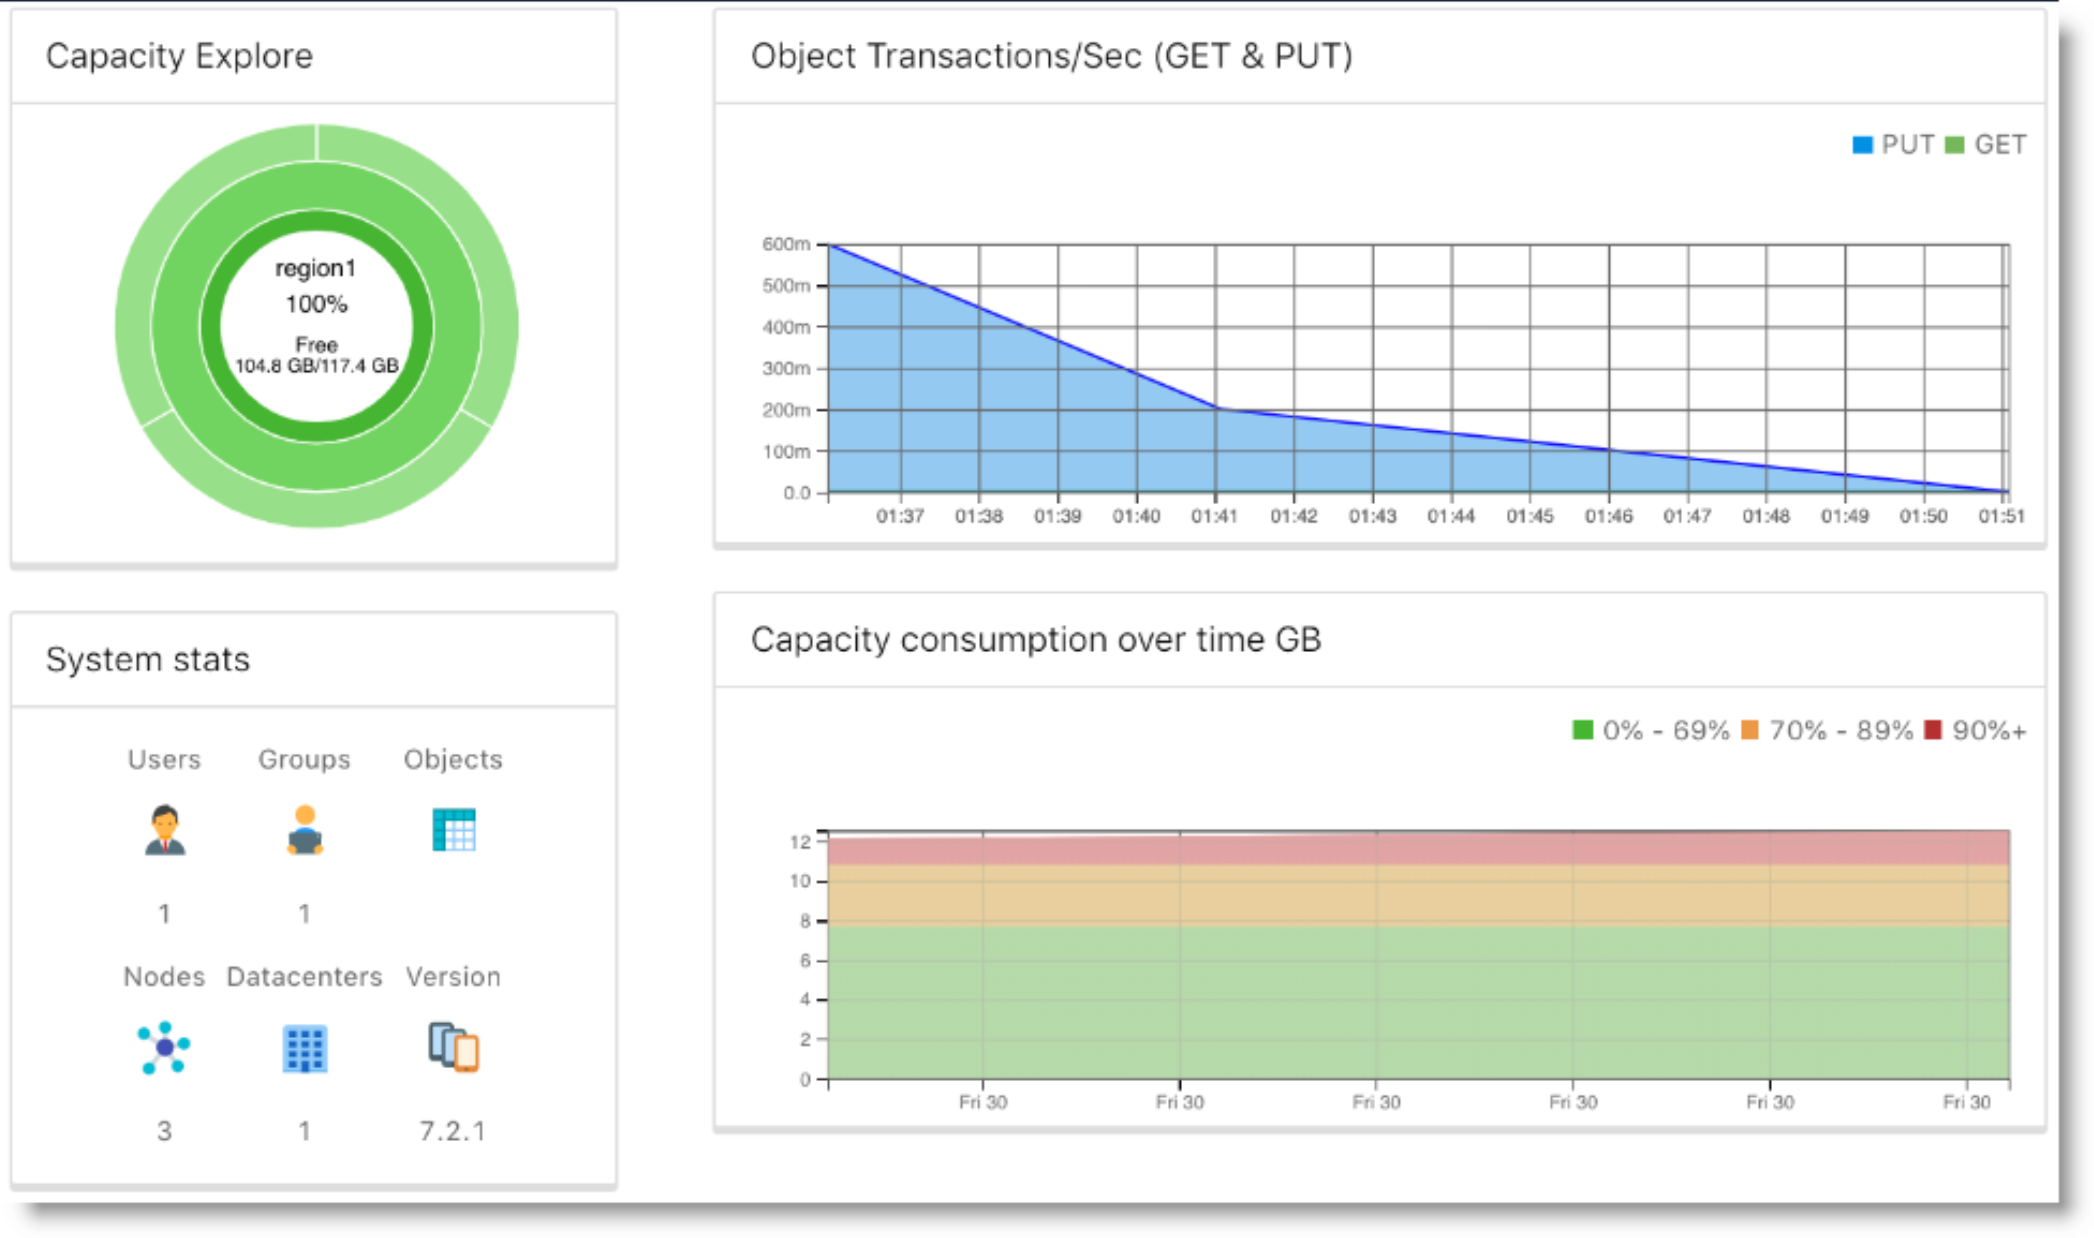
Also, from the Workload-Cluster Monitor -> Cloudian HyperStore-> Overview, you can select a HyperStore instance to view information about capacity consumption and availability, transactions per second, and instance statistics such as number of users and number of stored objects.
Scaling Out a HyperStore Instance
You can use either the VC UI or kubectl to scale out a HyperStore instance so that it runs on more nodes than it currently does.
Using the VC UI to Scale Out a HyperStore Instance
In the VC UI, from the Workload-Cluster, select Configure -> Cloudian HyperStore-> Overview and then select the target HyperStore instance from the instance list. Then click Edit. This displays the instance configuration parameters and their current values. Increase the "Number of Nodes" to your desired number of nodes. Note that the number of nodes can never exceed the physical number of nodes in the VC cluster. Click OK to apply the change to the cluster.
Note: The number of nodes is the only editable attribute of a HyperStore instance.
Using kubectl to Scale Out a HyperStore Instance
You can scale out an existing HyperStore instance by doing a kubectl apply of a revised CR manifest file for the instance. Revise only the "nodes" value. In this example the "name" value and all other attributes are the same as the example manifest from "Using kubectl to Create a HyperStore Instance", except the "nodes" value has been increased to 5.
apiVersion: hs.cloudian.com/v1alpha1
kind: Hyperstore
metadata:
name: hs
namespace: ns1
spec:
cpuRequire: "2"
memoryRequire: "16Gi"
nodes: 5 metadataVolumeSize: "30Gi"
totalStorageSize: "60Gi"
pvcsize: "10Gi"
metadataStorageClassName: "vsan-default-storage-policy"
objectDataStorageClassName: "hyperstore-vsan-sna-thick"
topDomain: "hs.ns1.enterprise.com"
After revising the manifest file, apply the change to the HyperStore instance:
# kubectl apply -f <YAML filename>
Deleting a HyperStore Instance
You can use either the VC UI or kubectl to delete a HyperStore instance. Doing so will delete all user data stored in the HyperStore instance, as well as all Kubernetes resources associated with the instance (StatefulSet, Pods, and so on).
Using the VC UI to Delete a HyperStore Instance
In the VC UI, from the Workload-Cluster, select Configure -> Cloudian HyperStore-> Overview and then select the target HyperStore instance from the instance list. Then click Delete.
Using kubectl to Delete a HyperStore Instance
The following kubectl command will delete a HyperStore instance:
# kubectl delete hyperstore <instance-name> -n <instance-namespace>
HyperStore Handling of Host Operations and Failures
The HyperStore Operator responds automatically to events associated with the hosts on which a HyperStore instance is running:
- Host Decommission
- Host Maintenance
- Host Failure
- Pod Stuck in Pending Status
- Drive Failure
Note: The rebuild timers mentioned in the sections that follow are configured when enabling the HyperStore Service, as described in "Enabling the HyperStore Service".
Note: The alerts mentioned in the sections that follow will display in the VC UI at Workload Cluster -> Monitor -> Cloudian HyperStore-> Overview
Host Decommission
If the VI Admin enters a host into Maintenance Mode with "Full data migration", the HyperStore Operator makes sure that the data for every HyperStore instance on the host is moved to a spare host (not being used by that instance yet).
If there is no spare host available, the HyperStore Operator will reject the Enter Maintenance Mode (EMM) request and generate an alert.
In other scenarios in which the HyperStore Operator cannot allow the EMM to proceed -- such as if doing so would put the HS instance into RED health status -- the Operator will generate an alert.
Host Maintenance
If the VI Admin enters a host into Maintenance Mode with "Ensure accessibility" -- such as for temporary maintenance purposes, or for implementing a rolling upgrade where every host goes down in sequence -- the HyperStore Operator responds as follows:
- If the host exits Maintenance Mode before the rebuildTimerEMM period expires, the HyperStore Pod recovers on that host and a data repair is automatically triggered.
- If the host has not yet exited Maintenance Mode and the rebuildTimerEMM period expires, then the Operator deletes the local Pod and PVC(s) and creates a new Pod and PVC(s) on a spare host (not being used by that instance yet), and then runs data repair.
- If the host has not yet exited Maintenance Mode and the rebuildTimerEMM period expires, but there is no spare host available, then the Operator does nothing except generate an alert.
- In other scenarios in which the HyperStore Operator cannot allow the EMM to proceed -- such as if doing so would put the HS instance into RED health status -- the Operator will generate an alert.
Host Failure
Note: The HyperStore Operator can execute the failure handling described below only if the VI Admin manually removes the failed ESXi host from the supervisor cluster.
When there is a failed host, the HyperStore Operator will wait for the rebuildTimerNode period to expire, and then attempt to start the Pod on a spare host (not being used by that instance yet), create PVs, and run data repair.
If there is no spare host available, the HyperStore Operator does nothing except generate an alert.
Pod Stuck in Pending Status
If a HyperStore Pod stays in Pending status for a duration of time longer than the rebuildTimerEMM period, the HyperStore Operator will start the Pod on a spare host, create PVCs, and run data repair.
If there is no spare host available, the HyperStore Operator does nothing except generate an alert.
There is a special case of the Pod stuck in Pending status caused by a race condition of deleting a PVC and restarting the Pod. This may cause the Pod to be stuck in Pending status due to a PVC missing. In this case, the Operator waits 120 seconds and then attempts to restart the Pod again on the same host.
Drive Failure
HyperStore is designed to be resilient to temporary disk failures and continues to operate using available distributed data.
If a drive fails and there is an extra disk on the same host with enough available capacity, the HyperStore Operator waits for rebuildTimerPVC to expire, then deletes the inaccessible PVC, and recreates the PVC using the extra disk on the same host and restarts the Pod.
If there is no extra disk on the same host with enough capacity, the Operator generates an alert.
After the disk is replaced by the administrator and a corresponding PV is created, the PVC will be recreated on the same host and available to the Pod.
Alternatively, if the administrator does not replace the disk and there is a spare host, the administrator can trigger an EMM with "Full data migration" on the host with the failed disk. This will cause the Pod to be rebuilt on a spare host. If there are any other applications and data on the host with the failed disk, those applications and data will be moved to a spare host as well.
Adding HyperStore S3 Service Users
To create S3 Service users for your HyperStore instance, log into the CMC and go to Users & Groups -> Manage Groups. Create one or more user groups. Then go to Users & Groups -> Manage Users to create users within the user group(s) that you've created. When you create users, those users can then log into a restrictive version of the CMC in which they can use a simple S3 client interface to perform basic actions like creating a bucket, choosing a storage policy for the bucket, and uploading and downloading objects. Also in the CMC, users can retrieve their S3 security credentials so that they can supply those credentials to a third party S3 client application (if you are having your users access the HyperStore S3 Service with a third party S3 application).
Note: When regular users log into the CMC they cannot see or access any of the HyperStore management functions that you see when logged in as an administrator.
For more information, while on the CMC's Manage Groups page or Manage Users page click Help.
S3 Service Access
This section describes two ways of accessing your HyperStore instance's S3 storage service:
- "S3 Service Access Using the CMC"
- "S3 Service Access Using a Third Party S3 Client Application"
S3 Service Access Using the CMC
Each HyperStore instance includes its own instance of the Cloudian Management Console (CMC). The CMC has a built-in S3 client with which HyperStore users -- who you have provisioned through the CMC or the Admin API -- can perform S3 storage tasks such as creating and configuring a storage bucket and uploading and downloading objects. From a browser on their local machines, users can access the CMC at:
https://<CMC service external IP address>:8443
For instructions on obtaining the external IP address of the CMC service for your HyperStore instance (so you can share it with your users), see "HyperStore Management Tools and Documentation".
Optionally, you can add a record to your DNS server -- not the Kubernetes CoreDNS but rather the DNS server for the surrounding environment --that points a fully qualified domain name (FQDN) to the CMC service external IP address for your HyperStore instance. The FQDN can be any FQDN of your choosing. Your users can then use that FQDN to access the CMC, rather than directly using the CMC's external IP address.
Note: When you are logged into the CMC as a system administrator (with the administrator login credentials noted in "HyperStore Management Tools and Documentation"), the CMC's S3 client is not available to you because the system administrator role cannot have an S3 storage account. However if you wish you can use the CMC to create a regular user, then log out of the CMC and log back in as that regular user. As that regular user, you can use the CMC's S3 client to create a bucket, upload objects, and so on.
S3 Service Access Using a Third Party S3 Client Application
IMPORTANT! As noted in "Creating a HyperStore Instance", each HyperStore instance must have a unique topDomain value which you specify when you create the instance, and the recommended topDomain format to ensure uniqueness per HyperStore instance is <instanceName>.<namespace>.<organizationDomain>.
{b}Note {/b}Users will need to provide the third party S3 application their S3 security credentials (access key and secret key). After you have created users in the CMC, the users can get their S3 credentials by logging in to the CMC and then going to <LoginName> -> Security Credentials. Alternatively you as the administrator can retrieve users' security credentials from the CMC and then provide the credentials to the users -- in the HyperStore Help or HyperStore Admin Guide see Section 5.5.1.4 "View or Edit a User's Security Credentials".
In the current version of HyperStore-C, additional set-up steps are required to facilitate access to a HyperStore instance's S3 Service from third party S3 client applications. This section describes first the steps required for S3 Service access from applications within the Kubernetes cluster, and then the steps required for S3 Service access from applications outside the Kubernetes cluster. If you know for sure that your HyperStore instance will be accessed only by applications within the cluster, or only by applications outside the cluster, you can follow just the applicable procedure.
To facilitate access to a HyperStore instance's S3 Service from third party S3 client applications that are running within the Kubernetes workload cluster, add a rewrite rule to the Kubernetes cluster's CoreDNS configuration so that *.<topDomain> for the HyperStore instance maps to <instance>-s3.<namespace>.svc.cluster.local, as follows:
Access the CoreDNS ConfigMap for editing:
# kubectl edit -n kube-system configmap coredns
At the end of the Corefile section of the ConfigMap, prior to the final closing brace, add a rewrite rule as follows:
rewrite name regex .*\.<domainpart>\.<domainpart>\.$ <instance>-s3.<namespace>.svc.cluster.local
In the rule include a <domainpart> for each part in the HyperStore instance's top domain.
For example, if your HyperStore instance name is qa and the namespace is eng and the top domain for your HyperStore instance is qa.eng.enterprise.com, the rewrite rule would be:
rewrite name regex .*\.qa\.eng\.enterprise\.com\.$ qa-s3.eng.svc.cluster.local
Within the context of the end part of a sample CoreDNS ConfigMap, the addition would look like this (addition is highlighted in bold):
...
cache 30
loop
reload
loadbalance
rewrite name regex .*\.dev\.eng\.enterprise\.com\.$ dev-s3.eng.svc.cluster.local
rewrite name regex .*\.qa\.eng\.enterprise\.com\.$ qa-s3.eng.svc.cluster.local }
Note: In this example there is already a rewrite line for a different HyperStore instance (dev) in the ConfigMap. Each HyperStore instance gets its own rewrite line.
CoreDNS will automatically reload the edited ConfigMap after a few minutes.
The HyperStore instance's S3 Service can be accessed by S3 client applications within the Kubernetes cluster, at this service endpoint:
http://s3-region1.<topDomain>:80
For example:
http://s3-region1.qa.eng.enterprise.com:80
To facilitate access to a HyperStore instance's S3 Service from third party S3 client applications that are running outside the Kubernetes workload cluster, do the following:
- Use kubectl patch to change the HyperStore instance's S3 Service type from ClusterIP to LoadBalancer:
|
# kubectl patch -n <namespace> service <instance>-s3 -p '{"spec":{"type":"LoadBalancer"}}' For example, if the namespace is "eng" and the HyperStore instance name is "qa": # kubectl patch -n eng service qa-s3 -p '{"spec":{"type":"LoadBalancer"}}' |
- Wait a couple of minutes, then retrieve the external IP address that the load balancer has allocated to the instance's S3 Service:
|
# kubectl get services -n <namespace> For example, with namespace "eng" and instance "qa": # kubectl get services -n eng |
- In your DNS system -- not the Kubernetes cluster's CoreDNS but your surrounding environment's DNS that facilitates the routing of requests originating from outside the Kubernetes cluster -- add DNS records that point the following domains to the S3 service's external IP address:
For example, if the top domain for the HyperStore instance is qa.eng.enterprise.com:
Note The wildcard record is not mandatory -- but if it is not present, S3 client applications will have to use "path style" URLs and will not be able to use "virtual hosted style" URLs. If you want users to be able to configure buckets as static websites, then also add DNS records that point these domains to the S3 service's external IP address:
|
After you complete the steps above, the HyperStore instance's S3 Service can be accessed by S3 client applications outside the Kubernetes cluster, at this service endpoint:
http://s3-region1.<topDomain>:80
For example:
http://s3-region1.qa.eng.enterprise.com:80
Note: By default, only HTTP access to the S3 Service is supported and HTTPS access is disabled. For information on enabling HTTPS access to the S3 Service, in the HyperStore Help or HyperStore Admin Guide see Section 4.3.5 "HTTPS Support (TLS/SSL)".
IAM Service Access
Note: This section is applicable only if you want HyperStore users (who you've created in the CMC) to be able to use a third party IAM client application to create IAM groups and users under their HyperStore user account.
HyperStore supports the AWS Identity and Access Management (IAM) protocol. If you want your HyperStore users to be able to access the HyperStore IAM service with a third party IAM client application:
- Complete the procedure(s) described in "S3 Service Access Using a Third Party S3 Client Application", for client applications running inside the Kubernetes cluster, or outside the cluster, or both (depending on your use case).
- Create a YAML-formatted manifest file to modify your HyperStore instance's S3 Service so that it supports dedicated IAM listening ports, as follows:
|
apiVersion: v1 |
- Apply the change:
|
# kubectl apply -f <YAML filename> |
After you complete the steps above, third party IAM clients can access the HyperStore IAM service at either of these endpoints:
- http://s3-region1.<topDomain>:16080
- https://s3-region1.<topDomain>:16443
For example:
HyperStore-C Limitations
HyperStore-C is designed to install and run on the VMware vSAN Data Persistence platform, and will not currently work in other Kubernetes environments.
Note that the HyperStore product documentation (introduced in "HyperStore Management Tools and Documentation" is the standard HyperStore documentation and is not specifically for HyperStore-C. Consequently, the documentation includes discussion of some features that are not applicable to HyperStore-C:
- HyperStore-C does not support multi-datacenter or multi-region deployments.
- In HyperStore-C, do not enable the HyperStore Shell.
- HyperStore-C does not support Object Lock.
- In HyperStore-C, certain CMC functions are disabled because for HyperStore-C these tasks are not performed through the CMC:
- Add Node / Add DC / Add Region
- Uninstall Node
- DisableDisk / ReplaceDisk
Monitoring a HyperStore Instance
HyperStore is integrated with the VC UI's Skyline Health functionality. For each HyperStore instance:
- Green means completely healthy and compliant. All Pods in the instance are healthy.
- Yellow means some degradation of Pod availability, but still the HyperStore instance is accessible for reads and writes. One or more pods may be down, but still the read and write consistency requirements can be met for all HyperStore storage policies being used in the instance.
- Red means the HyperStore instance is not accessible for reads or writes. Consistency requirements cannot be met for one or more storage policies being used in the instance.
For a single HyperStore Pod:
- Green means the Pod's S3 Service is responsive.
- Red means the Pod's S3 Service is unresponsive.
Also, from the Workload-Cluster Monitor -> Cloudian HyperStore-> Overview, you can select a HyperStore instance to view information about capacity consumption and availability, transactions per second, and instance statistics such as number of users and number of stored objects.
Scaling Out a HyperStore Instance
You can use either the VC UI or kubectl to scale out a HyperStore instance so that it runs on more nodes than it currently does.
Using the VC UI to Scale Out a HyperStore Instance
In the VC UI, from the Workload-Cluster, select Configure -> Cloudian HyperStore-> Overview and then select the target HyperStore instance from the instance list. Then click Edit. This displays the instance configuration parameters and their current values. Increase the "Number of Nodes" to your desired number of nodes. Note that the number of nodes can never exceed the physical number of nodes in the VC cluster. Click OK to apply the change to the cluster.
Note: The number of nodes is the only editable attribute of a HyperStore instance.
Using kubectl to Scale Out a HyperStore Instance
You can scale out an existing HyperStore instance by doing a kubectl apply of a revised CR manifest file for the instance. Revise only the "nodes" value. In this example the "name" value and all other attributes are the same as the example manifest from "Using kubectl to Create a HyperStore Instance", except the "nodes" value has been increased to 5.
apiVersion: hs.cloudian.com/v1alpha1
kind: Hyperstore
metadata:
name: hs
namespace: ns1
spec:
cpuRequire: "2"
memoryRequire: "16Gi"
nodes: 5 metadataVolumeSize: "30Gi"
totalStorageSize: "60Gi"
pvcsize: "10Gi"
metadataStorageClassName: "vsan-default-storage-policy"
objectDataStorageClassName: "hyperstore-vsan-sna-thick"
topDomain: "hs.ns1.enterprise.com"
After revising the manifest file, apply the change to the HyperStore instance:
# kubectl apply -f <YAML filename>
Deleting a HyperStore Instance
You can use either the VC UI or kubectl to delete a HyperStore instance. Doing so will delete all user data stored in the HyperStore instance, as well as all Kubernetes resources associated with the instance (StatefulSet, Pods, and so on).
Using the VC UI to Delete a HyperStore Instance
In the VC UI, from the Workload-Cluster, select Configure -> Cloudian HyperStore-> Overview and then select the target HyperStore instance from the instance list. Then click Delete.
Using kubectl to Delete a HyperStore Instance
The following kubectl command will delete a HyperStore instance:
# kubectl delete hyperstore <instance-name> -n <instance-namespace>
HyperStore Handling of Host Operations and Failures
The HyperStore Operator responds automatically to events associated with the hosts on which a HyperStore instance is running:
- Host Decommission
- Host Maintenance
- Host Failure
- Pod Stuck in Pending Status
- Drive Failure
Note: The rebuild timers mentioned in the sections that follow are configured when enabling the HyperStore Service, as described in "Enabling the HyperStore Service".
Note: The alerts mentioned in the sections that follow will display in the VC UI at Workload Cluster -> Monitor -> Cloudian HyperStore-> Overview
Host Decommission
If the VI Admin enters a host into Maintenance Mode with "Full data migration", the HyperStore Operator makes sure that the data for every HyperStore instance on the host is moved to a spare host (not being used by that instance yet).
If there is no spare host available, the HyperStore Operator will reject the Enter Maintenance Mode (EMM) request and generate an alert.
In other scenarios in which the HyperStore Operator cannot allow the EMM to proceed -- such as if doing so would put the HS instance into RED health status -- the Operator will generate an alert.
Host Maintenance
If the VI Admin enters a host into Maintenance Mode with "Ensure accessibility" -- such as for temporary maintenance purposes, or for implementing a rolling upgrade where every host goes down in sequence -- the HyperStore Operator responds as follows:
- If the host exits Maintenance Mode before the rebuildTimerEMM period expires, the HyperStore Pod recovers on that host and a data repair is automatically triggered.
- If the host has not yet exited Maintenance Mode and the rebuildTimerEMM period expires, then the Operator deletes the local Pod and PVC(s) and creates a new Pod and PVC(s) on a spare host (not being used by that instance yet), and then runs data repair.
- If the host has not yet exited Maintenance Mode and the rebuildTimerEMM period expires, but there is no spare host available, then the Operator does nothing except generate an alert.
- In other scenarios in which the HyperStore Operator cannot allow the EMM to proceed -- such as if doing so would put the HS instance into RED health status -- the Operator will generate an alert.
Host Failure
Note: The HyperStore Operator can execute the failure handling described below only if the VI Admin manually removes the failed ESXi host from the supervisor cluster.
When there is a failed host, the HyperStore Operator will wait for the rebuildTimerNode period to expire, and then attempt to start the Pod on a spare host (not being used by that instance yet), create PVs, and run data repair.
If there is no spare host available, the HyperStore Operator does nothing except generate an alert.
Pod Stuck in Pending Status
If a HyperStore Pod stays in Pending status for a duration of time longer than the rebuildTimerEMM period, the HyperStore Operator will start the Pod on a spare host, create PVCs, and run data repair.
If there is no spare host available, the HyperStore Operator does nothing except generate an alert.
There is a special case of the Pod stuck in Pending status caused by a race condition of deleting a PVC and restarting the Pod. This may cause the Pod to be stuck in Pending status due to a PVC missing. In this case, the Operator waits 120 seconds and then attempts to restart the Pod again on the same host.
Drive Failure
HyperStore is designed to be resilient to temporary disk failures and continues to operate using available distributed data.
If a drive fails and there is an extra disk on the same host with enough available capacity, the HyperStore Operator waits for rebuildTimerPVC to expire, then deletes the inaccessible PVC, and recreates the PVC using the extra disk on the same host and restarts the Pod.
If there is no extra disk on the same host with enough capacity, the Operator generates an alert.
After the disk is replaced by the administrator and a corresponding PV is created, the PVC will be recreated on the same host and available to the Pod.
Alternatively, if the administrator does not replace the disk and there is a spare host, the administrator can trigger an EMM with "Full data migration" on the host with the failed disk. This will cause the Pod to be rebuilt on a spare host. If there are any other applications and data on the host with the failed disk, those applications and data will be moved to a spare host as well.