
Load Balancing CockroachDB on VMware Cloud Foundation
Executive Summary
Business Case
CockroachDB provides the flexibility, scalability, and resilience required to power modern applications. With its intrinsic elasticity, CockroachDB administrators can effortlessly scale clusters or create multi-site solutions that span private and public clouds. A database can start small, then later expand to any scale without compromising performance. Multi-site availability can geo-distribute a database across regions to ensure availability or meet data sovereignty requirements. Harnessing CockroachDB’s elasticity requires a cloud scale platform that accommodates its dynamic nature across the diversity of public and private cloud environments.
VMware Cloud Foundation™ is an integrated software platform that automates the deployment and lifecycle management of a complete software-defined data center (SDDC) on a standardized hyperconverged architecture. It can be deployed on premises on a broad range of supported hardware or consumed as a service in the public cloud (VMware Cloud™ on AWS or a VMware Cloud Provider™). With the integrated cloud management capabilities, the end result is a hybrid cloud platform that can span private and public environments, offering a consistent operational model based on well-known VMware vSphere® tools and processes, and the freedom to run apps anywhere without the complexity of app re-writing.
VMware NSX-T™ Data Center is an integral component of VMware Cloud Foundation that provides network virtualization and advanced network services, such as load balancing. Through NSX-T network virtualization, CockroachDB nodes are decoupled from the physical network. CockroachDB is then enhanced with NSX-T load balancing to provide a unified interface. This unified interface provides users and applications with a seamless interface to a dynamic pool of CockroachDB nodes.
This paper expands on the CockroachDB on VMware Cloud Foundation reference architecture by leveraging the native NSX-T capabilities included within VMware Cloud Foundation.
Business Values
Here are the top benefits of using NSX-T Load Balancing when deploying CockroachDB on VMware Cloud Foundation:
- Scalability: Load balancers simplify adding or removing CockroachDB nodes. Abstracting clients from the CockroachDB nodes lets administrators adjust the number of nodes without impacting clients. A cluster can be scaled up to meet demand or scaled down to save costs.
- Performance: Load balancers spread client traffic across nodes and provide intelligent distribution options. A uniform traffic distribution prevents any one node from being overwhelmed and improves the overall cluster performance.
- Reliability: Load balancers decouple clients from the health of a single CockroachDB node. If a node fails, the load balancer redirects the client traffic to any other available nodes without any reconfiguration of the client.
Intended Audience
This design is intended for cloud architects, infrastructure administrators, and cloud administrators who are familiar with and want to use VMware software to provide high availability to a CockroachDB cluster. The information is written for experienced system administrators who are familiar with virtual machine technology and networking concepts.
Technology Overview
The solution technology components are listed below:
• VMware Cloud Foundation
- VMware vSphere
- VMware NSX® Data Center
• CockroachDB
VMware vSphere
VMware vSphere is VMware's virtualization platform, which transforms data centers into aggregated computing infrastructures that include CPU, storage, and networking resources. vSphere manages these infrastructures as a unified operating environment and provides operators with the tools to administer the data centers that participate in that environment. The two core components of vSphere are VMware ESXi™ and VMware vCenter® Server. ESXi is the virtualization platform where you create and run virtual machines and virtual appliances. vCenter Server is the service through which is used to manage multiple hosts connected in a network and pool host resources.
VMware vSAN
VMware vSAN is the industry-leading software powering VMware’s software defined storage and HCI solution. vSAN helps customers evolve their data center without risk, control IT costs and scale to tomorrow’s business needs. vSAN, native to the market-leading hypervisor, delivers flash-optimized, secure storage for all of your critical vSphere workloads, and is built on industry-standard x86 servers and components that help lower TCO in comparison to traditional storage. It delivers the agility to easily scale IT and offers the industry’s first native HCI encryption.
vSAN simplifies day-1 and day-2 operations, and customers can quickly deploy and extend cloud infrastructure and minimize maintenance disruptions. Stateful containers orchestrated by Kubernetes can leverage storage exposed by vSphere (vSAN, VMFS, NFS) while using standard Kubernetes volume, persistent volume, and dynamic provisioning primitives.
VMware NSX Data Center
VMware NSX Data Center is the network virtualization and security platform that enables the virtual cloud network, a software-defined approach to networking that extends across data centers, clouds, and application frameworks. With NSX Data Center, networking and security are brought closer to the application wherever it’s running, from virtual machines to containers to bare metal. Like the operational model of VMs, networks can be provisioned and managed independent of underlying hardware. NSX Data Center reproduces the entire network model in software, enabling any network topology—from simple to complex multitier networks—to be created and provisioned in seconds. Users can create multiple virtual networks with diverse requirements, leveraging a combination of the services offered via NSX or from a broad ecosystem of third-party integrations ranging from next-generation firewalls to performance management solutions to build inherently more agile and secure environments. These services can then be extended to a variety of endpoints within and across clouds.
CockroachDB
CockroachDB is a distributed SQL database built on a transactional and strongly consistent key-value store. It scales horizontally; survives disk, machine, rack, and even datacenter failures with minimal latency disruption and no manual intervention; supports strongly consistent ACID transactions; and provides a familiar SQL API for structuring, manipulating, and querying data.
Solution Overview
This section provides an overview of the solution and design.
Direct Connection
In a CockroachDB cluster, any node is a suitable SQL gateway for the cluster. Since clients can query any node, a simple approach is to configure clients to directly query any of the CockroachDB nodes (Figure 1).

Figure 1. CockroachDB using Direct Connections
While this approach works, it limits the ability to effectively leverage CockroachDB’s scalability and resilience in a production environment.
- Changing the number of nodes in a CockroachDB cluster is a simple and automated process. As nodes are added or removed, CockroachDB automatically handles the rebalancing of the data without user intervention. In contrast, each client must be reconfigured to reflect the new cluster configuration.
- Clients are not aware of the node traffic load or resource utilization. This can result in some nodes receiving a greater proportion of the requests while others remain underutilized. This imbalance can lead to performance problems that are difficult to solve because of the distributed nature of the clients.
- Node failures are visible to the clients. When a node fails each client must take action to fail over to the remaining nodes then fail back when the node is available again. In this scenario a misconfigured client might not handle the failure correctly and an outage might occur.
Using direct connections adds risk and complexity to day 2 operations. Changes require more coordination, efficient resource utilization cannot be guaranteed, and failures require greater client awareness.
Load Balanced
As recommended by CockroachDB implementation guidelines[1], the challenges with clients connecting directly are solved by decoupling the clients from the nodes by inserting a load balancer. A load balancer acts as an intelligent proxy between the clients and the available nodes. In a load balanced architecture, clients are only configured with the load balancer address and do not need any awareness of the actual membership of the CockroachDB cluster (Figure 2).

Figure 2. CockroachDB Load Balanced Architecture Overview
Scalability
With a load balancer, adding or removing nodes is transparent to the clients. As CockroachDB nodes become available, the load balancer redirects some of the incoming client requests to the new resource (Figure 3). Because clients are connecting to the load balancer, the addition does not require any change to the client. Node removal is equally simple. Prior to the removal, the load balancer is configured to stop using the node to be removed. After all connections are closed, the node is safely removed without impacting clients.

Figure 3. Node Addition with a Load Balancer
Efficiency
Because the load balancer is responsible for distributing the client connections to the CockroachDB nodes, it has a global view of client traffic. By leveraging configuration options such as round-robin or least connections, the load balancer can achieve uniform resource utilization across all the nodes (Figure 4).

Figure 4. Least Connection Load Balancing
Reliable
Handling node failures is simplified since they are masked from the clients. The load balanced is configured to periodically monitor the health of the nodes. Health monitors can be a basic ICMP request, a complex request to a REST interface, or a combination of conditions. When a node fails a health check, it is removed from the pool of active nodes and no further connections are sent to the node (Figure 5). When a node returns to service and passes the health checks, it is automatically added back to the active pool.

Figure 5. Failed Node in a Pool
Solution Configuration
This section introduces the architecture and configuration of the CockroachDB load balancing solution for VMware Cloud Foundation.
Architecture Diagram
VMware Cloud Foundation is deployed in a standard architecture. Infrastructure management for the environment runs in the dedicated Management Domain. CockroachDB VM are deployed in a cluster in a Workload Domain. Network services for the Workload Domain, such as routing and load balancing, provided the NSX-T Edges running in another cluster within the Workload Domain (Figure 6). Storage for both Management and Workload domains is provided by vSAN.

Figure 6. VMware Cloud Foundation Standard Architecture with Edge Cluster
The CockroachDB Load Balancing solution on NSX-T is comprised of the following components:
- Server Pool: A server pool consists of one or more servers that are configured and running the same application. A single pool can be associated to both Layer 4 and Layer 7 virtual servers.
- Monitor: An active health monitor is used to test whether a server is available. The active health monitor uses an HTTP request to the CockroachDB web management interface to determine if the server is both alive and ready.
- Virtual Server: A virtual servers receive all the client connections and distributes them among the pool servers. A virtual server has an IP address, a port, and a protocol.
- Load Balancer: A load balancer is connected to a Tier-1 logical router and hosts one or multiple virtual servers.

Figure 7. Architectural Diagram
Software Resources
The solution testing was based on the following software resources.
Table 1. Software Resources
|
Software |
Version |
Purpose |
|
VMware Cloud Foundation |
4.2.0 |
A unified SDDC platform that brings together VMware ESXi, vSAN, NSX, and optionally, vRealize Suite components, into a natively integrated stack to deliver enterprise-ready cloud infrastructure for the private and public cloud. See BOM of VMware Cloud Foundation for details. |
|
Centos |
8.3.2011 |
Operating System |
|
CockroachDB |
20.2.5 |
Database |
|
HA Proxy |
1.8.23 |
Open-source load balancer used for comparison testing. |
Network Configuration
The solution builds on a VMware Cloud Foundation environment with NSX-T deployed and configured. The environment has an edge cluster with both Tier-0 and Tier-1 routers routing configured to the physical environment. CockroachDB VM are connected to an overlay backed segment connected to the Tier-1 gateway where the load balancer is deployed.
A detailed configuration based on a sample environment can be found in Appendix A – Sample Deployment.
The TOR networking in our test environment is provided by a pair of Dell S6000-ON switches. The TOR switches provide both L2 switching and L3 routing between the subnets in our environment.
Table 2. Dell S6000-ON Switch Characteristics
|
PROPERTY |
SPECIFICATION |
|
Switch model name |
Dell S6000-ON |
|
Number of ports |
32 x 40GbE QSFP+ |
|
Switching bandwidth |
Up to 2.56Tbps non-blocking (full duplex) |

Figure 8. Solution Environment
The deployment of the load balancer is accomplished by creating and configuring 5 components in the NSX-T manager:
- Active monitor
- Inventory group
- Server pools
- Load balancer
- Virtual servers
Active Monitor
The solution uses an HTTP active monitor that connects to the default CockroachDB management interface on port 8080. Monitoring is set to use an interval of 2 seconds with the timeout period of 6 seconds. The fall count is set to 2 and the rise count set to 3.
The active monitor request is configured to send an HTTP/1.1 GET “/health?ready=1” query against a target CockroachDB node. If the monitor receives an HTTP 200 status code, the node is ready and available to handle client queries. No response or any other HTTP code indicates that the node is not in a state for client handling.
Note: The NSX-T monitor parameters may require tuning to provide the optimal responsiveness for a given use case. These values should be carefully evaluated with the concerned stakeholders.
Inventory Group
Grouping of the CockroachDB nodes is accomplished with a single NSX-T inventory group. Inventory groups can select VM using static methods such as an IP list or dynamic methods such as using criteria like VM name prefix. This solution uses a dynamic group with a single criterion that selects VM based on their name prefix (Figure 9). In larger environments, additional criteria such as tags can be used to ensure group captures the intended VM.
Using a dynamic group has the advantage of automatically selecting or removing VM based on vCenter inventory. For instance, when a new CockroachDB VM is created, the dynamic criteria automatically selects and adds the VM to the group. The use of an active monitor prevents the load balancer from using the node until it is ready to handle client connections.
![]()
Figure 9. Criteria using VM Name Prefix
Server Pools
A server pool consists of one or more application nodes that are configured and running the same application. The solution uses one server pool for CockroachDB’s HTTP management interface (DB Console) and one for CockroachDB’s SQL interface (Figure 10). Server pool configuration provides the option to select a load balancing algorithm based on round-robin, least-connection, or IP hash.
Note: The selection of the algorithm should take the workload and environment into consideration to ensure the optimal resource utilization. For testing that uses a fairly uniform request, the round robin algorithm provides the optimal results.

Figure 10. HTTP and SQL Server Pools
Load Balancer
The load balancer provides the attachment for the virtual servers to a Tier-1 gateway. To ensure the optimal performance, the load balancer should use the same Tier-1 gateway as the logical segment used by the CockroachDB nodes.

Figure 11. NSX-T Load Balancer
Virtual Servers
A virtual server provides the endpoint that receives incoming client traffic and handles the distribution to the configured server pool. Virtual server can be Layer 4 or Layer 7, and include configurations such as application profiles, persistent profiles, and load balancer rules.
This solution requires an HTTP virtual server for the HTTP management interface on port 8080, and a L4 TCP virtual server for the SQL interface on port 26257. If the CockroachDB nodes use SSL on the management interface, the management virtual server should be changed to L4 TCP. Since the servers in our solution use different ports, the same IP address can be used for both virtual servers (Figure 12). Both HTTP and SQL virtual servers are configured with the load balancer created for CockroachDB.
The persistence profile is used to ensure that connections from one client are serviced by the same node. This option is required on the management virtual server to ensure a client session is handled by the same server. The SQL virtual server should not use persistence since the SQL client connections do not depend on the state of a previous connection.

Figure 12. CockroachDB Management and SQL Virtual Servers
Virtual Machine Configuration
This solution does not prescribe the specific VM sizing. The proposed architecture is flexible and able to accommodate a large range of workloads based on user requirements. The major solution components that need adjustment based on the workloads are the CockroachDB VM and the NSX-T edge cluster VM.
Table 3. Solution Virtual Machine Configuration
|
VM Role |
Note |
|
CockroachDB Node |
Sizing of the CockroachDB node VM should follow both Cockroach Labs and VMware guidelines. All VM should be configured with the same amount of vCPU, memory, and storage. |
|
NSX-T Edge Nodes |
Routing and load balancing is handled by the nodes in the NSX-T edge cluster. Sizzing of the NSX-T edge VM should provide sufficient resources to handle the expected workload. |
Solution Validation
Test Overview
The solution testing focuses on the functionality and basic performance comparison.
Test Methodology
We use the built-in Cockroach TPCC on-line transaction processing (OLTP) workload.
Database Initialization
The following command is used to create and populate a TPCC database in the target CockroachDB cluster. The drop flag removes any pre-existing database and creates a new database with the number of warehouses specified by the warehouses flag.
cockroach workload fixtures import tpcc –-warehouses=2000
Workload
The following command is used to execute a TPCC workload against the CockroachDB cluster. The duration flag controls the duration of the test. The warehouses flag is set to the same value as specified during the initialization of the TPCC database. A small ramp time is configured to allow the system to stabilize prior to capturing metrics.
cockroach workload run tpcc --warehouses=2000 –-duration=1800s –-ramp=60s
Test Case – Direct Connections, HA Proxy, and NSX-T Load Balancing
This case provides a performance comparison between 3 different approaches to handling client connections.
- Direct Connection: The client is configured to connect directly and load balance queries across all the CockroachDB nodes using a round-robin algorithm.
- HA Proxy: An HA Proxy VM is deployed according to the Cockroach Labs On-Premises deployment guide [2]. The configuration for HA Proxy is generated using the “cockroach gen haproxy” command.
- NSX-T Load Balancer: The NSX-T logical load balancer is configured as per this solution.
The goal of this test is to demonstrate the NSX-T logical load balancer does not result in a performance penalty compared to the direct connections or another common software load balancer. Code to deploy and test CockroachDB can be found on the code VMware site in the CockroachDB sample.
Results
Test results indicate that all three methods offer comparable performance with only a minor increase in average latency when using the NSX-T logical load balancer. This small increase in latency compares favorably to the other methods when considering the NSX-T load balancer uses multiple edges to provide a redundant load balancing solution.
Table 4. Comparison Results
|
|
Direct Connection |
HA Proxy |
NSX-T Load Balancer |
|
TPMC |
24857.4 |
24829.2 |
24833.8 |
|
Efficiency (%) |
96.6 |
96.5 |
96.6 |
|
Average Latency (ms) |
128.0 |
139.7 |
142.5 |
|
95th Percentile Latency (ms) |
285.2 |
302.0 |
285.2 |
Best Practices
The following sections outline the best practices implemented in the deployment of this solution.
NSX-T
Networking
- CockroachDB VM should use overlay backed network segments connected to an NSX-T Tier-1 router.
- The logical load balancer should be connected to the same Tier-1 gateway as the logical segments.
- The Edge clusters should have at least 2 edges for redundancy.
- The Edge nodes should be sized to have enough resources for load balancing, routing, and any other services running on them.
Load Balancing
- The selection of the load balancing algorithm depends largely on the actual workload. Users should carefully evaluate and select the algorithm that provides the optimal resource utilization for their workload.
- Load balancing the CockroachDB management interface requires the use of a persistent profile.
- Using dynamic inventory groups facilitate scaling CockroachDB. As CockroachDB nodes are created or deleted, the group membership updates automatically without user intervention.
Conclusion
VMware Cloud Foundation is a Software-Defined Data Center (SDDC) built on a market-leading infrastructure platform combined with a cloud management solution that incorporates compute (VMware vSphere), networking (VMware NSX), storage (VMware vSAN), and management services through the SDDC Manager interface.
VMware Cloud Foundation offers a simple path to hybrid cloud by using a common platform for both private and public clouds, eliminating problems with compatibility. This also makes for a consistent operational experience. The same tools and processes can be used on both the public and private clouds, so there is no need to bring in new staff or for existing staff to learn new processes and procedures. The unified SDDC platform is an enterprise-ready cloud infrastructure for public and private clouds.
Administrators deploying CockroachDB on VMware Cloud Foundation benefit from a standard infrastructure across their public and private clouds. With NSX-T, an integral component of VMware Cloud foundation, the load balancing solution outlined in this paper offers a design that is convenient and universal. Implemented entirely using native VMware Cloud Foundation capabilities, the tight cohesion between compute, storage, and networking components allows for frictionless CockroachDB deployments and scaling.
References
About the Authors
Charles Lee, Solutions Architect in the VMware Cloud Platform Business Unit and Chen Wei, Staff Solutions Architect in the VMware Cloud Platform Business Unit wrote the original version of this paper.
The following reviewers also contributed to the paper contents:
- Alex Entin, Enterprise Architect, Cockroach Labs
- Dimity Desmidt, Senior Technical Product Manager, Networking Services Business Unit
- Samuel Kommu, Senior Technical Product Manager, Networking Services Business Unit
Appendix A – Detailed Test Results and Configuration
The following section provides additional detail about the validation test environment.
Table 5. Test VM Sizing and Count
|
VM Role |
VM Count |
vCPU |
Memory (GB) |
Data Disk (GB) |
Nb. Data Disk |
|
CockroachDB Client |
1 |
8 |
16 |
n/a |
n/a |
|
CockroachDB Node |
3 |
16 |
64 |
100 |
2 |
|
HA Proxy VM |
1 |
2 |
4 |
n/a |
n/a |
|
NSX-T Edge |
2 |
2 |
4 |
n/a |
n/a |
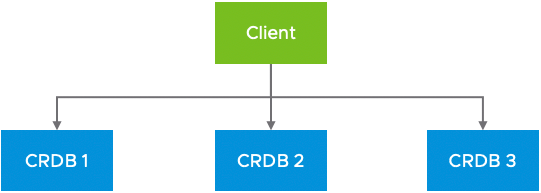
Table 6. Direct Connection Topology

Table 7. HA Proxy Topology
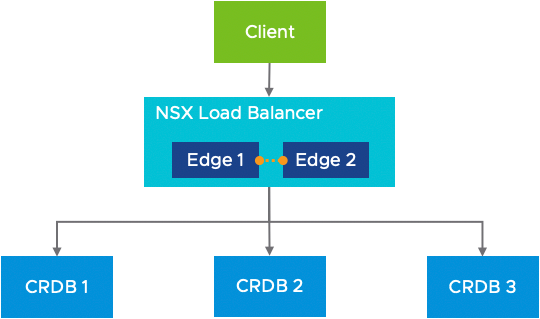
Table 8. NSX-T Logical Load Balancer Topology using Redundant Edges
Table 9. NSX-T Load Balancer Traffic Distribution
Table 10. HAProxy Traffic Distribution
Appendix B – Sample Deployment
This section provides complete a step-by-step configuration based on a sample VMware Cloud Foundation 4.2 environment.
Prepare the NSX-T Environment for the CockroachDB Deployment
Before starting the configuration of a load balancer for CockroachDB the environment must meet networking prerequisites. NSX-T should be prepared by configuring the required networking components prior to deploying CockroachDB in the environment.
Create an Overlay backed NSX-T segment for the CockroachDB nodes
Prior to deploying CockroachDB in the environment it is necessary to create the network segment that will be used by CockroachDB. The segment will be used for E/W communication between the nodes as well as N/S communication.
Prerequisites
To create a new segment the NSX-T environment must be deployed with an edge cluster, Tier-0 and Tier-1 routers, and routing on the Tier-0 router configured. With VMware Cloud Foundation this networking is provisioned for the management workload domain during the initial deployment. Starting in VMware Cloud Foundation 4.1 the SDDC manager provides a workflow to automatically deploy and configure networking in workload domains. In our example environment we have a Tier-1 router connected to a Tier-0 router peering with upstream routers using BGP (Figure 13).

Figure 13. NSX-T Networking Deployed and Configured
Procedure
- From your browser, log in with admin privileges to an NSX manager at https://<nsx-manager-hostname>.
- In the navigation pane, select Networking > Segments.
- Click Add Segment.
- Enter a name and description for the segment.
- On the configuration page fill in the following fields.
|
Setting |
Value |
Description |
|
Name |
<segment-name> |
In our sample we use ls-crdb. |
|
Connected Gateway |
<tier-1-gateway> |
Tier-1 gateway where the segment will be connected. In our sample we use wdc-m01-ec01-t1-gw01. |
|
Transport Zone |
<overlay-transport-zone> |
Overlay transport zone common to the hosts and edges. In our sample we use wdc-m01-tz-overlay01. |
|
Subnets (Gateway CIDR IPV4) |
<ipv4-subnet> |
IP address for the default gateway for the subnet assigned to the segment. In our sample we use 10.159.228.161/27. |
- Click Save.
Recommended Content
Deploy CockroachDB Nodes to the NSX-T Segment
With the basic networking in place, the CockroachDB VMs are deployed. During this step, the VM network adapter must be connected to the NSX logical segment created in the previous step.
Create the CockroachDB VM
Create the VM that will be used for CockroachDB and attach them to the NSX logical segment.
Note: This document focuses on the networking aspects of the creation and deployment of CockroachDB in an NSX-T environment. For detailed design, sizing, and configuration, consult appropriate Cockroach Labs and VMware documentation.
Prerequisites
The NSX logical segment must be created and presented to the hosts where the CockroachDB nodes will be deployed (Figure 14).

Figure 14. CockroachDB Logical Segment Created and Configured
Procedure
- From your browser, log in with admin privileges to vCenter https://<vcenter-hostname>.
- Right-click the vSphere cluster or resource pool and select New Virtual Machine.
- Enter the name for the VM. In our sample, we create names using the prefix crdb-01.
- Follow guidelines for CockroachDB VM configuration and sizing.
- At Customize Hardware, ensure the following network adapter settings.
|
Setting |
Value |
|
New Network |
Select the network segment created in the previous section. In our sample, we use ls-crdb. |
|
Status |
Ensure Connect at Power On is enabled. |
|
Adapter Type |
Select VMXNET 3. |
- Repeat steps 2 to 4 to create the required number of CockroachDB nodes.
- CockroachDB on VMware Cloud Foundation
- About vSphere Virtual Machine Administration
- Sample CockroachDB Terraform and Ansible Automation
Install the Operating System and CockroachDB
Configure the operating system in the CockroachDB VM.
Note: This document focuses on the networking aspects of the creation and deployment of CockroachDB in an NSX-T environment. For detailed design, sizing, and configuration, consult appropriate Cockroach Labs and VMware documentation.
Prerequisites
The VMs are created and connected to the NSX logical segment (Figure 15). The subnet for the segment must have enough IP address for the number of CockroachDB nodes deployed on the segment.

Figure 15. CockroachDB VM Connected to the NSX Logical Segment
Procedure
- Install a supported operating system.
- Configure the networking with an available IP for the logical segment.
- Download and install CockroachDB.
- Configure the CockroachDB service and configure to run at startup.
Recommended Content
Create the NSX Load-Balancer
Create an Active Monitor
The active health monitor is used to test whether a server is available. The active health monitor uses several types of tests such as sending a basic ping to servers or advanced HTTP requests to monitor an application health.
Servers that fail to respond within a certain time period or respond with errors are excluded from future connection handling until a subsequent periodic health check finds these servers to be healthy.
Active health checks are performed on server pool members after the pool member is attached to a virtual server and that virtual server is attached to a tier-1 gateway. The tier-1 uplink IP address is used for the health check.
Note: The following configuration assumes CockroachDB is configured for HTTP on the default port management port (8080).
Procedure
- From your browser, log in with admin privileges to an NSX Manager at https://<nsx-manager-ip-address>.
- Select Networking > Load Balancing > Monitors.
- Click Add Active Monitor.
- Select the HTTP protocol.
- Configure the values to monitor a service pool.
|
Option |
Value |
Description |
|
Name |
<monitor-name> |
Enter a name and description for the active health monitor. In our sample, we use crdb-http-lb-monitor. |
|
Monitoring Port |
8080 |
Set the value of the monitoring port. |
|
Monitoring Interval |
2 |
Set the time in seconds that the monitor sends another connection request to the server. |
|
Timeout Period |
10 |
Set the number of times the server is tested before it is considered as DOWN. |
|
Fall Count |
3 |
Set a value when the consecutive failures reach this value, the server is considered temporarily unavailable. |
|
Rise Count |
3 |
Set a number after this timeout period, the server is tried again for a new connection to see if it is available. |
- Click HTTP Request > Configure.
- Select HTTP Request Configuration.
- Configure the values for the HTTP request.
|
Setting |
Value |
Description |
|
HTTP Method |
get |
The method to detect the server status from the drop-down menu. |
|
HTTP Request URL |
/health?ready=1 |
Enter the request URI for the method. |
|
HTTP Request Version |
1.1 |
The supported request version. |
- Select HTTP Response Configuration.
- Configure the values for the HTTP response.
|
Setting |
Value |
Description |
|
HTTP Response Code |
200 |
The string that the monitor expects to match in the status line of HTTP response body. |
- Click Apply.
- Click Save.
Recommended Content
Create an Inventory Group
Groups include different objects that are added both statically and dynamically, and can be used as the source and destination of a firewall rule.
Groups can be configured to contain a combination of virtual machines, IP sets, MAC sets, segment ports, segments, AD user groups, and other groups. Dynamic inclusion of groups can be based on tag, machine name, OS name, or computer name.
This step creates a dynamic group that automatically select all the CockroachDB nodes in the NSX manager inventory based on the VM name prefix. As VM are created and deleted the inventory group updates the membership to reflect current inventory.
Note: It is possible to create a static group membership or use different combinations of criteria. In our sample we use the virtual machine name prefix (crdb-01).
Procedure
- From your browser, log in with admin privileges to an NSX manager at https://<nsx-manager-hostname>.
- Select Inventory > Groups from the navigation panel.
- Click Add Group.
- Enter a group name. In our sample we use the name crdb-01-group.
- Click Set Members.
- On the Membership Criteria tab click Add Criteria.
- On Criteria 1 select the following parameters.
|
Criteria 1 |
|||
|
Virtual Machine |
Name |
Starts With |
crdb-01 |
- Click Apply.
- Click Save.
Validation
To verify the criteria is working as expected, the group membership can be viewed by selecting Compute Members > View Members. In our sample, we see the group contains all the VM with a name prefix of crdb-01 (Figure 16).

Figure 16. Inventory Dynamic Group Membership
Recommended Content
Create an HTTP Server Pool
A server pool consists of one or more servers that are configured and running the same application. A single pool can be associated to both Layer 4 and Layer 7 virtual servers.
This step creates an HTTP server pool for the CockroachDB management interface.
Note: Once created, the status of the pool will show deactivated because it is not associated any load-balancer or virtual server. Once associated, the status will automatically change from deactivated to enabled.
Prerequisites
CockroachDB VM are created and connected to the NSX logical segment. Both the active monitor and inventory group are created.
Procedure
- From your browser, log in with admin privileges to an NSX Manager at https://<nsx-manager-hostname>.
- In the navigation pane, select Networking > Load Balancing > Server Pools.
- Click Add Server Pool.
- Enter a name and description for the load balancer server pool. In our sample we use crdb-01-http-pool
- On the configuration page fill in the following fields.
|
Setting |
Value |
|
Algorithm |
Load balancing algorithm controls how the incoming connections are distributed among the members. In our sample we use Round-Robin. |
- Click Select Members.
- Click Select a group.
- Select the CockroachDB group. In our sample we select crdb-01-group.
- Click Apply.
- Click Active Monitor > Set.
- Select the CockroachDB monitor. In our sample, we use the monitor named crdb-http-lb-monitor.
- Click Apply.
- Click Save.
Recommended Content
Create a SQL Server Pool
A server pool consists of one or more servers that are configured and running the same application. A single pool can be associated to both Layer 4 and Layer 7 virtual servers.
This step creates a server pool for the CockroachDB SQL interface.
Note: Once created, the status of the pool will show deactivated because it is not associated any load-balancer or virtual server. Once associated, the status will automatically change from deactivated to enabled.
Prerequisites
CockroachDB VMs are created and connected to the NSX logical segment. Both the active monitor and inventory group are created.
Procedure
- From your browser, log in with admin privileges to an NSX Manager at https://<nsx-manager-hostname>.
- In the navigation pane, select Networking > Load Balancing > Server Pools.
- Click Add Server Pool.
- Enter a name and description for the load balancer server pool. In our sample, we use crdb-01-sql-pool
- On the configuration page, fill in the following fields.
|
Setting |
Value |
|
Algorithm |
Load balancing algorithm controls how the incoming connections are distributed among the members. In our sample, we use Round-Robin. |
- Click Select Members.
- Click Select a group.
- Select the CockroachDB group. In our sample we select crdb-01-group.
- Click Apply.
- Click Active Monitor > Set.
- Select the CockroachDB monitor. In our sample we use the monitor named crdb-http-lb-monitor.
- Click Apply.
- Click Save.
Recommended Content
Create a Load Balancer
A load balancer is created and attached to the tier-1 gateway.
Procedure
- From your browser, log in with admin privileges to an NSX Manager at https://<nsx-manager-hostname>.
- In the navigation pane, select Networking > Load Balancing > Load Balancers.
- Click Add Load Balancer.
- Enter a name and description for the load balancer. In our sample, we use crdb-01-lb.
- On the configuration page, fill the following fields.
|
Setting |
Value |
Description |
|
Name |
<load-balancer-name> |
In our sample we use crdb-01-lb. |
|
Size |
<load-balancer-size> |
Select the load balancer size based on your needs of virtual servers and pool members and available resources. In our sample we use small. |
|
Attachment |
<tier-1-gateway> |
From the drop-down menu select an already configured tier-1 gateway to attach to the load balancer. In our sample we use our wdc-m01-ec01-t1-gw. |
|
Error Log Level |
Info |
Select the severity level of the error log from the drop-down menu. Avoid setting the log level to DEBUG on load balancers with a significant traffic due to the number of messages printed to the log that affect performance. In our sample we use the default Info. |
- Click Save.
- When prompted to continue configuring, click No.
Recommended Content
Create a HTTP Virtual Server
You can set up the Layer 4 and Layer 7 virtual servers and configure several virtual server components such as, application profiles, persistent profiles, and load balancer rules.
This step creates the virtual server for the CockroachDB management interface.
Prerequisites
Both the load balancer and HTTP server pool are created and configured. The virtual server requires a single routable IP with a 32-bit netmask (CIDR /32).
Procedure
- From your browser, log in with admin privileges to an NSX manager at https://<nsx-manager-hostname>.
- In the navigation pane, select Networking > Load Balancing > Load Balancers.
- Click Add Virtual Server, and select L7 HTTP.
- On the configuration page fill the following fields.
|
Setting |
Value |
Description |
|
Name |
<virtual-server-name> |
In our sample we use crdb-01-http-vs. |
|
IP Address |
<virtual-server-ip> |
The virtual server IP address. Both IPv4 and IPv6 addresses are supported. In our sample we use 10.159.228.192. |
|
Ports |
8080 |
The virtual server port number. In our sample we use the default port 8080. |
|
Load Balancer |
<load-balancer> |
An existing load balancer to attach to this virtual server. In our sample we use crdb-01-lb. |
|
Server Pool |
<server-pool> |
An existing server pool. The server pool consists of one or more servers, also called pool members that are similarly configured and running the same application. In our sample we use crdb-01-http-vs. |
|
Application Profile |
<http-application-profile> |
In our sample, we use the default application profile default-http-lb-app-profile. |
|
Persistence |
Source IP |
An existing persistence profile. Persistence profile can be enabled on a virtual server to allow Source IP and Cookie related client connections to be sent to the same server. In our sample we use Source IP with the default persistence profile default-source-ip-lb-persistence-profile. |
- Click Save.
Recommended Content
Create a L4 TCP Virtual Server
You can set up the Layer 4 and Layer 7 virtual servers and configure several virtual server components such as application profiles, persistent profiles, and load balancer rules.
This step creates the virtual server for the CockroachDB management interface.
Prerequisites
Both the load balancer and HTTP server pool are created and configured. The virtual server requires a single routable IP with a 32-bit netmask (CIDR /32).
Procedure
- From your browser, log in with admin privileges to an NSX Manager at https://<nsx-manager-hostname>.
- In the navigation pane, select Networking > Load Balancing > Load Balancers.
- Click Add Virtual Server and select L4 TCP.
- On the configuration page fill the following fields.
|
Setting |
Value |
Description |
|
Name |
<virtual-server-name> |
In our sample we use crdb-01-sql-vs. |
|
IP Address |
<virtual-server-ip> |
The virtual server IP address. Both IPv4 and IPv6 addresses are supported. In our sample we use 10.159.228.192. |
|
Ports |
26257 |
The virtual server port number. In our sample we use the default port 26257. |
|
Load Balancer |
<load-balancer> |
An existing load balancer to attach to this virtual server. In our sample we use crdb-01-lb. |
|
Server Pool |
<server-pool> |
An existing server pool. The server pool consists of one or more servers, also called pool members that are similarly configured and running the same application. In our sample we use crdb-01-sql-vs. |
|
Application Profile |
<http-application-profile> |
In our sample we use the default application profile default-tcp-lb-app-profile. |
|
Persistence |
Disabled |
An existing persistence profile. Persistence profile can be enabled on a virtual server to allow Source IP and Cookie related client connections to be sent to the same server. In our sample, we do not use a persistence profile. |
- Click Save.
Recommended Content