
Multi-NIC, Multi-VDS, vSphere Cluster in VCF 4.0
It seems like a good time to have an update post on Multi-NIC “stuff” in VCF 4.0. Before we get to the creation of the cluster, I think it’s important to go over one of the biggest networking changes in VCF 4.0/vSphere 7.0. With vSphere 7.0 came the introduction of the vSphere Distributed Switch 7.0 and with that, some welcome changes that I haven’t really seen mentioned anywhere.
In previous versions of VCF, and vSphere for that matter, when you used NSX-T, a required “N-VDS” was installed on your transport nodes. It was difficult to see the properties of this switch from anywhere except the CLI on the hosts, NSX Manager, or the UI in NSX Manager. While you could see the NVDS in the UI of the hosts, you couldn’t really see any properties. Now it’s been integrated into the actual VDS 7.0 so that you’re able to see most properties from vCenter;
- Who is managing the switch (and the portgroups)
- Properties to help you locate the correct (Segment) Logical Switch in NSX
- Hosts and VMs that are connected

If the portgroup isn’t a NSX portgroup you can configure all the same things you are used to configuring, and you can mix NSX and standard distributed portgroups on the new switch. If it is an NSX portgroup, those changes will need to be made on the NSX manager that there is a handy link for in the portgroup properties!

Ok, on to what you came here for!
If you’ve done multi-nic and multi-switch clusters in 3.9.1 you should be able to see that having a “converged” distributed switch simplifies things quite a bit when it comes to creating clusters. The biggest point being that there is no longer a need to create a VDS and then migrate to a NVDS.
High level steps:
- Create hosts
- Commission hosts (using the UI or API)
- Create Cluster using the API
We’ll focus on the API for the last 2 steps as the only way to create a multi-nic, multi-vds cluster is through the API. By default in the UI VCF will create a cluster using vmnic0 and vmnic1 as uplinks for a sinlge vSphere Distributed Switch.
Step 1: Create Hosts
You’ll just need to ensure that your hosts are being provisioned to the correct portgroup or network (in case of physical) to get the networks (VLANs) they’ll need. Also, make sure to add some NIC’s since that’s what we’re working on! This is done after the creation of the hosts in the case of nested. With physical you’ll likely have these populated before the vSphere install.

Step 2: Commission Hosts Using API
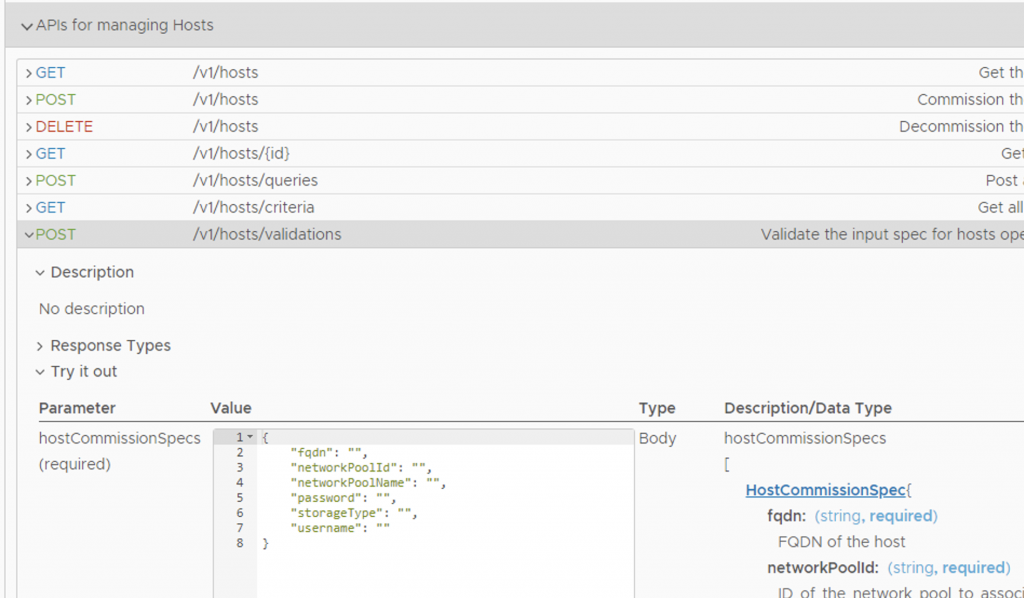
You’ll want to download the HostCommissionSpec JSON from the Developer Center -> API Explorer -> API’s for Managing Hosts -> POST /v1/hosts/validations and click on HostCommissionSpec link and copy the text that appears in the “Value” box and place in a text editor.
You’ll then need to identify the Network Pool Name and it’s ID you’ll place the hosts in, the easiest way I’ve found to do this is navigate to Administration -> Network Settings and click in the target network pool, the areas highlighted are the name and in the URL you’ll see the ID.

Copy them both and place them into the HostCommissionSpec in the text editor and add [] around the stanza. Once you have this in place you can add a few more details that will be the same across the hosts you are adding like, password, storageType and username.
[
{
"fqdn": "",
"networkPoolId": "9f85f459-e804-4afe-b30e-fccd3028411f",
"networkPoolName": "network-pool-2",
"password": "VMware123!",
"storageType": "VSAN",
"username": "root"
}
]
Then you can copy this stanza putting a comma after each except the last for each host you plan to commission, filling in the FQDN for each;
[
{
"fqdn": "esx20.vcf.sddc.lab",
"networkPoolId": "9f85f459-e804-4afe-b30e-fccd3028411f",
"networkPoolName": "network-pool-2",
"password": "VMware123!",
"storageType": "VSAN",
"username": "root"
},
{
"fqdn": "esx21.vcf.sddc.lab",
"networkPoolId": "9f85f459-e804-4afe-b30e-fccd3028411f",
"networkPoolName": "network-pool-2",
"password": "VMware123!",
"storageType": "VSAN",
"username": "root"
},
{
"fqdn": "esx22.vcf.sddc.lab",
"networkPoolId": "9f85f459-e804-4afe-b30e-fccd3028411f",
"networkPoolName": "network-pool-2",
"password": "VMware123!",
"storageType": "VSAN",
"username": "root"
}
]
Next, you’ll need something to execute the API, while curl is the most accessible it gets a bit cumbersome when using the new Bearer Token authentication scheme in VCF 4.0 APIs. I’ve done most of my API work in Postman, or ARC.. both are top notch and I really like that I can bundle a set of API’s into a collection as well. The screenshots in this post will be from Postman and here is a link to download the collection.
The first thing you’ll need to do is obtain an access token, for that you’ll need to pass in the administrator credentials (API docs can be found at https://code.vmware.com/apis/921/vmware-cloud-foundation)

Once you have that, you’ll need to Validate the Host Input Spec we built before.

Then, you’ll want to check the validation result until it comes back successful.

Last in the host commissioning step, we’ll actually commission the hosts. After running the API you will be able to monitor the task in the SDDC Manager UI Tasks pane.


Step 3: Create Cluster using the API
Now that we’ve got some unused hosts in VCF we can assign those to an existing or new cluster. In this case we’re creating a new cluster with multi-nic and multi-dvs. First, let’s take a look at the JSON for creation a cluster (ClusterCreationSpec), you can download it from the SDDC Manager Developer Center -> API Explorer -> API’s for managing Clusters -> POST /v1/clusters/validations -> Click on “ClusterCreationSpec” and then the download body link below the Value box. Open this file in a text editor… Or you can copy the file below, which has been whittled down to the bare minimum needed to create a cluster.
{
"computeSpec": {
"clusterSpecs": [ {
"advancedOptions": {
"evcMode": "",
"highAvailability": {
"enabled": false
}
},
"name": "",
"datastoreSpec": {
"vsanDatastoreSpec": {
"datastoreName": "",
"dedupAndCompressionEnabled": false,
"failuresToTolerate": 0,
"licenseKey": ""
}
},
"hostSpecs": [ {
"hostNetworkSpec": {
"vmNics": [ {
"id": "",
"vdsName": ""
} ]
},
"id": "",
"licenseKey": "",
"username": ""
} ],
"networkSpec": {
"nsxClusterSpec": {
"nsxTClusterSpec": {
"geneveVlanId": 0
}
},
"vdsSpecs": [ {
"isUsedByNsxt": false,
"name": "",
"portGroupSpecs": [ {
"name": "",
"transportType": ""
} ]
} ]
}
} ]
},
"domainId": ""
}
The main things we’ll need are:
- ID of the domain to add the cluster to
- Name you would like to give the cluster
- ID of each host and the vmnic # of each NIC you intend to map to a VDS
- Name of each VDS
- License keys for vSAN (if using) and ESXi
Here is a completed file that has, (3) VDS switches in the networkSpec section, (3) Hosts in the hostSpecs section – each with 6 vmnics. Note that one of the VDS switches has “isUsedByNSXT” set to True. When I tried to create this switch without a portgroup it threw an error stating that it must have a portgroup. This is why there is a portgroup with a type of PUBLIC associated with this switch. I don’t actually intend to pass any traffic over it and am “dedicating” this switch and it’s NICs from each host to all NSX traffic on VLAN 10. You can also see a vSAN datastore and the name and some advanced settings for the cluster.
{
"domainId" : "857ace78-5763-442e-a46d-d03bb568b94c",
"computeSpec" : {
"clusterSpecs" : [ {
"name" : "Multi-NIC-Cluster",
"hostSpecs" : [ {
"id" : "db5c105e-28e3-475c-948c-ba6cc1e4c6f1",
"licenseKey" : "XXXXX-XXXXX-XXXXX-XXXXX-XXXXX",
"username" : "root",
"hostNetworkSpec" : {
"vmNics" : [ {
"id" : "vmnic0",
"vdsName" : "SDDC-Dswitch-Mgmt-vMotion"
}, {
"id" : "vmnic1",
"vdsName" : "SDDC-Dswitch-Mgmt-vMotion"
}, {
"id" : "vmnic2",
"vdsName" : "SDDC-Dswitch-Storage"
}, {
"id" : "vmnic3",
"vdsName" : "SDDC-Dswitch-Storage"
}, {
"id" : "vmnic4",
"vdsName" : "SDDC-Dswitch-NSX"
}, {
"id" : "vmnic5",
"vdsName" : "SDDC-Dswitch-NSX"
}]
}
}, {
"id" : "4c9ec5de-6303-429a-9885-6691d1976c05",
"licenseKey" : "XXXXX-XXXXX-XXXXX-XXXXX-XXXXX",
"username" : "root",
"hostNetworkSpec" : {
"vmNics" : [ {
"id" : "vmnic0",
"vdsName" : "SDDC-Dswitch-Mgmt-vMotion"
}, {
"id" : "vmnic1",
"vdsName" : "SDDC-Dswitch-Mgmt-vMotion"
}, {
"id" : "vmnic2",
"vdsName" : "SDDC-Dswitch-Storage"
}, {
"id" : "vmnic3",
"vdsName" : "SDDC-Dswitch-Storage"
}, {
"id" : "vmnic4",
"vdsName" : "SDDC-Dswitch-NSX"
}, {
"id" : "vmnic5",
"vdsName" : "SDDC-Dswitch-NSX"
}]
}
}, {
"id" : "8397bba8-f998-4fc9-9561-afc3c47afa03",
"licenseKey" : "XXXXX-XXXXX-XXXXX-XXXXX-XXXXX",
"username" : "root",
"hostNetworkSpec" : {
"vmNics" : [ {
"id" : "vmnic0",
"vdsName" : "SDDC-Dswitch-Mgmt-vMotion"
}, {
"id" : "vmnic1",
"vdsName" : "SDDC-Dswitch-Mgmt-vMotion"
}, {
"id" : "vmnic2",
"vdsName" : "SDDC-Dswitch-Storage"
}, {
"id" : "vmnic3",
"vdsName" : "SDDC-Dswitch-Storage"
}, {
"id" : "vmnic4",
"vdsName" : "SDDC-Dswitch-NSX"
}, {
"id" : "vmnic5",
"vdsName" : "SDDC-Dswitch-NSX"
}]
}
} ],
"datastoreSpec" : {
"vsanDatastoreSpec" : {
"failuresToTolerate" : 1,
"licenseKey" : "XXXXX-XXXXX-XXXXX-XXXXX-XXXXX",
"datastoreName" : "vSanDatastore"
}
},
"networkSpec" : {
"vdsSpecs" : [ {
"name" : "SDDC-Dswitch-Mgmt-vMotion",
"isUsedByNsxt" : false,
"portGroupSpecs" : [ {
"name" : "SDDC-DPortGroup-MANAGEMENT",
"transportType" : "MANAGEMENT"
}, {
"name" : "SDDC-DPortGroup-VMOTION",
"transportType" : "VMOTION"
} ]
}, {
"name" : "SDDC-Dswitch-Storage",
"isUsedByNsxt" : false,
"portGroupSpecs" : [ {
"name" : "SDDC-DPortGroup-VSAN",
"transportType" : "VSAN"
}]
}, {
"name" : "SDDC-Dswitch-NSX",
"isUsedByNsxt" : true,
"portGroupSpecs" : [ {
"name" : "SDDC-DPortGroup-Public",
"transportType" : "PUBLIC"
}]
}
],
"nsxClusterSpec" : {
"nsxTClusterSpec" : {
"geneveVlanId" : 10
}
}
},
"advancedOptions" : {
"evcMode" : "",
"highAvailability" : {
"enabled" : false
}
}
} ]
}
}
Now we’ll run the validation API to make sure our JSON is correct, and once that is successful we’ll run the API to create the cluster.


Once you’ve run the API to create the cluster you’ll be able to follow the progress in SDDC Managers UI Task pane.

Finally, when the workflow is successful, you’ll be able to see your new cluster and all the new networks and VDSs’ that were created.


In this example we;
Isolated Management and vMotion traffic to a single VDS and a pair of NICs on each host.
Isolated vSAN traffic to a single VDS and a pair of NICs on each host.
Isolated NSX traffic to a single VDS and a pair of NICs on each host.
Based on customer interaction an additional thing that’s asked for is adding a portgroup for backup traffic, with your new knowledge that shouldn’t be a problem!
Thank you for reading this lengthy post, I hope you got something out of it!