
Post-Upgrade Considerations
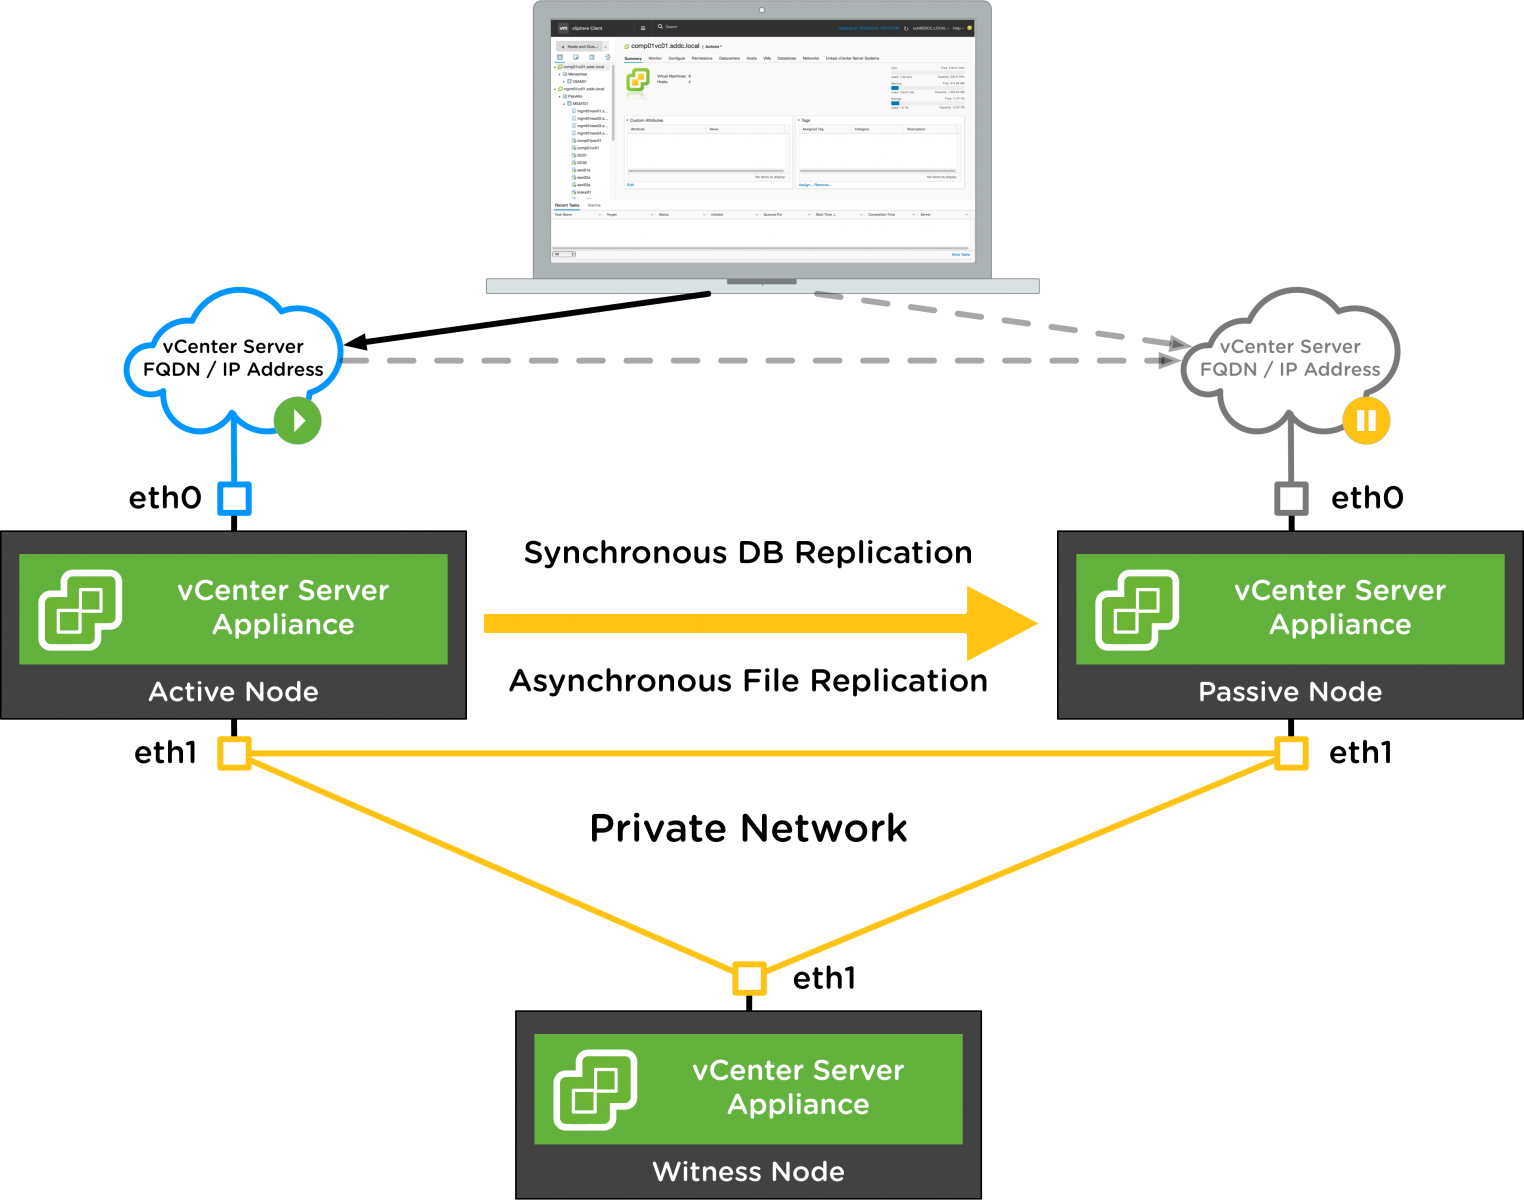
vCenter High Availability
If you aren’t familiar with vCenter High Availability, it is a new feature introduced in vSphere 6.5 and exclusively available for the vCenter Server Appliance (VCSA). When vCenter HA is enabled, a three-node vCenter Server cluster (Active, Passive, and Witness nodes) is deployed. vCenter HA provides an RTO of about 5 minutes for vCenter Server greatly reducing the impact of host, hardware, and application failures with automatic failover between the Active and Passive nodes. vCenter HA is included with the vCenter Server Standard license which means that no additional licensing is required. vCenter HA can also be activated, deactivated, or destroyed at any time allowing customers to easily take advantage of this new capability. There is also a maintenance mode that prevents planned maintenance from causing an unwanted failover.
.png)
From an architecture perspective, vCenter HA supports both embedded and external Platform Services Controllers. An embedded Platform Services Controller instance can be used when there are no other vCenter Server or Platform Services Controller instances within the single sign-on domain. In other words, an external Platform Services Controller instance is required when there are multiple vCenter Server instances in an Enhanced Linked Mode configuration. When using vCenter HA with an external Platform Services Controller deployment, an external load balancer is required to provide high availability to the Platform Services Controller instances. There is little bene t to using vCenter HA without also providing high availability at the Platform Services Controller layer. Supported load balancers for Platform Services Controller instances in vSphere 6.5 include VMware NSX®, F5 BIG-IP LTM, and Citrix NetScaler.
vCenter High Availability Deployment - Basic workflow
The basic workflow can be used in most scenarios in which all vCenter HA nodes run within the same cluster. As its name suggests, this workflow is very simple and automatically creates the passive and witness nodes. It also creates VMware vSphere Distributed Resource Scheduler (vSphere DRS) antiaffnity rules if vSphere DRS is enabled on the destination cluster and uses VMware vSphere Storage DRS for initial placement if enabled. Some flexibility is built into this workflow, so you can choose specific destination hosts, datastores, and networks for each node. This is a very simple, easy way to get a vCenter HA cluster up and running.

vCenter Server High Availability (vCenter HA) is a brand new feature in vSphere 6.5 that brings native high availability to the vCenter Server Appliance 6.5. There are two workflows through which to enable vCenter HA - Basic and Advanced. The following walkthrough will demonstrate how to enable vCenter HA through the Basic workflow.
vCenter HA Architecture
vCenter HA uses an Active/Passive architecture. An additional ethernet interface (eth1) is used for replication traffic and cluster communication between the Active, Passive, and Witness nodes. For more information about the vCenter HA architecture please see http://www.vmware.com/go/vcha65docs Note: The vCenter Server Appliance will only support multiple NICs in the case of vCenter HA.

There are only a few prerequisites for enabling vCenter HA through the Basic workflow.

A vCenter HA (VCHA) network is required. This can simply be a VM Port Group on either a Virtual Standard Switch (VSS) or a Virtual Distributed Switch (VDS). The only requirement is that the VCHA network is different than the vCenter Server Management network. These two networks can be separated by VLAN, physical switch or switch ports, or by physical uplink. The enablement workflow will block progress if the IP addresses of the VCHA network and the vCenter Server management interface are on the same subnet.

Let's start by logging into the vCenter Server on which vCenter HA will be enabled. You can do this by pointing your web browser to https://<vCenter Server FQDN>/vsphere-client.

Now that we're logged in, vCenter HA can be enabled by going to the Configure tab.

Next, locate vCenter HA under the Settings menu and click.

In the upper right hand side of the vCenter HA configuration page, click on the [Configure] button to start the vCenter HA wizard.

The initial screen of the Configure vCenter HA wizard has two options - Basic and Advanced. Note the prerequisites of each option. Click the 'Basic' radio button and then click on [Next].

This Basic workflow will automatically add an Ethernet adapter (eth1) to the vCenter Server Appliance. An IP address and subnet mask is required for this step. An option to use either an IPv4 or IPv6 address is available but note that both can not be used at the same time. Enter an appropriate IP address and subnet mask or prefix length for your environment. Click [Browse] to choose the port group that will be dedicated to vCenter HA.

A Port Group just for vCenter HA should have been created prior to this step. Select it and click [OK]. If not, you may cancel out of this screen and hit the >> in the upper right of the wizard to put the current state into Work In Progress. Next, simply create a new VM Port Group on your Standard or Distributed switch and configure it with the appropriate network settings for your environment. Once the port group has been configured, return to the vCenter HA wizard, select that port group, and click [OK].

Verify the settings on this page and then click [Next] to continue.

Enter in the IP addresses for both the Passive and Witness nodes. These IP addresses must be on the same network as the vCenter HA network used on the previous screen. Note that the network is displayed at the top to make it easier to input correct IP addresses in the boxes below. Click [Next]

This screen can be used to validate the configuration and also allows some customization of the deployment. If DRS and Storage DRS are not available on the cluster, this screen can be used to manually select different hosts and datastores for each node. Also note that this workflow will automatically create DRS anti-affinity rules for the nodes to ensure they remain separated. Click [Next] to continue.

This is the final step of the wizard and is used to once more review the configuration settings. When ready, click [Finish] to start the vCenter HA cluster configuration.

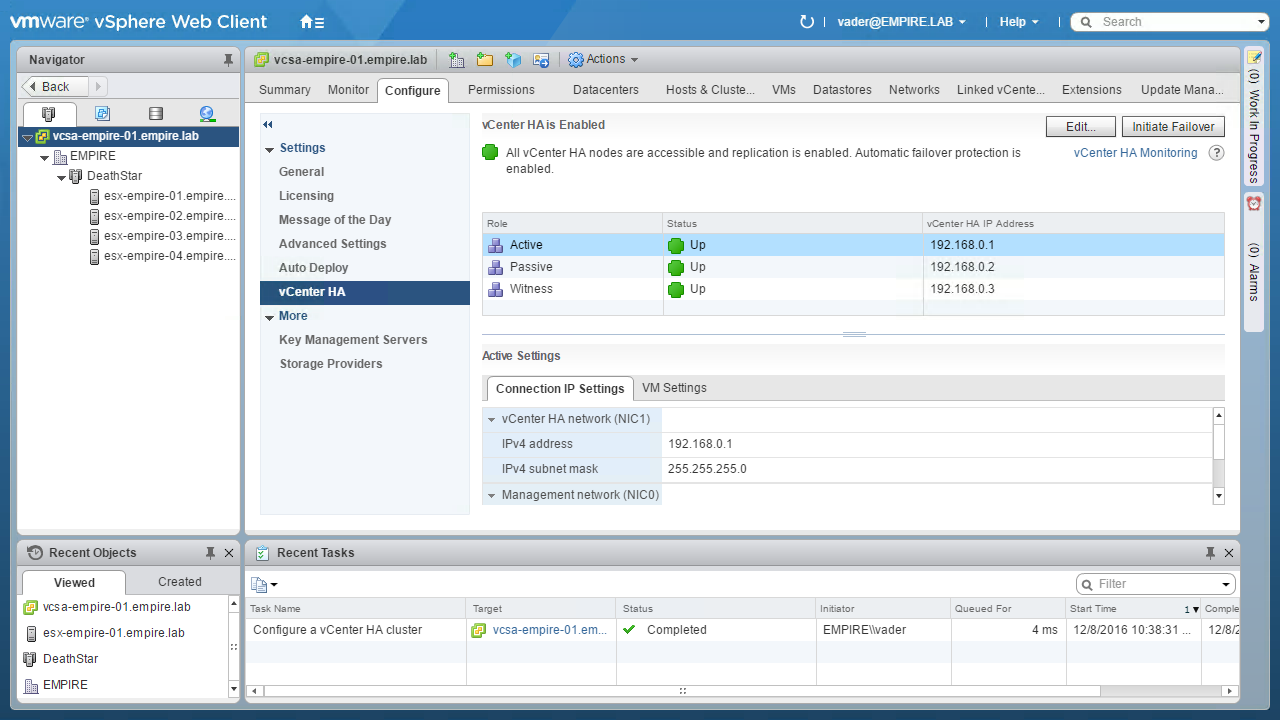
A process now commences so that two new VMs are created - the Passive (also named the Peer) and Witness nodes. These nodes are clones of the original vCenter Server Appliance. Once the cloning process completes, the Active node establishes communication with the Passive and Witness nodes on the vCenter HA network. A final configuration script is executed to configure replication before the process is complete and the page will refresh to show this status page with information about each node in the cluster

To view more details about the status of the vCenter HA cluster, click the [vCenter HA Monitoring] link in the upper right.

The vCenter HA Monitoring page shows details about the individual nodes, their health, and the replication status of the vCenter Server Database and filesystem. It is worth reviewing the available operational modes for vCenter HA. Click the vCenter HA Settings link in the upper right-hand side to return to the settings page.

Click the Edit button in the upper right to show the additional modes of operation.

If there will be planned maintenance of the data center infrastructure it would be good to enable Maintenance Mode in order to prevent a transient network problem from initiating a failover event. More details can be found in the vCenter HA documentation. Click [Cancel] to exit the Edit vCenter HA dialogue

Also, as part of the Basic workflow, some DRS rules are created for you if the destination cluster is enabled and licensed for DRS. This rule ensures that the Active, Passive, and Witness nodes run on different hosts.

Finally, the Witness node runs a minimal set of services. Therefore, the Witness VM is automatically resized to 1 vCPU and 1 GB RAM. This concludes the feature walkthrough of vCenter HA on vSphere 6.5.
vCenter High Availability Deployment - Advanced workflow
The Advanced workflow is an alternative that can be used when the active, passive, and witness nodes are to be deployed to different clusters, vCenter Server instances, or even other data centers. This process requires the customer to manually clone the source vCenter Server instance for the passive and witness nodes and to then place those nodes in the chosen locations with the appropriate IP address settings. This is a more involved process, but it enables greater flexibility for those customers that require it.

vCenter Server High Availability (vCenter HA) is a brand new feature in vSphere 6.5 that brings native high availability to the vCenter Server Appliance 6.5. There are two workflows through which to enable vCenter HA - Basic and Advanced. The following walkthrough will demonstrate how to enable vCenter HA through the Advanced workflow.

vCenter HA Architecture
vCenter HA uses an Active/Passive architecture. An additional ethernet interface is used for replication traffic and cluster communication between the Active, Passive, and Witness nodes. For more information about the vCenter HA architecture please see http://www.vmware.com/go/vcha65docs

There are only a few prerequisites for enabling vCenter HA through the Advanced workflow.

A vCenter HA (VCHA) network is required. This can simply be a VM Port Group on either a Virtual Standard Switch (VSS) or a Virtual Distributed Switch (VDS). The only requirement is that the VCHA network is different than the vCenter Server Management network. These two networks can be separated by VLAN, physical switch or switch ports, or by physical uplink. The enablement workflow will block progress if the IP addresses of the VCHA network and the vCenter Server management interface are on the same subnet.

Let's start by logging into the vCenter Server on which vCenter HA will be enabled. You can do this by pointing your web browser to https://<vCenter Server FQDN>/vsphere-client.

This vCenter Server has four ESXi hosts but you can see that the vCenter Server Appliance VM is not running in this cluster. It is running inside of a management cluster in a separate SSO Domain. Because of this, the Advanced workflow is required to enable vCenter HA. Next, we'll need to log into the management vCenter Server so we can add the second vNic to this vCenter Server Appliance.

Open a new browser window or tab and point it to the management vCenter Server.

Locate the VM of the vCenter Server on which vCenter HA will be enabled. Right-click on the VM object in inventory and select Edit Settings.

At the bottom of the Edit Settings dialogue box, click on the dropdown box for New Device and select Network from the list of devices. Then click [Add].

There are some settings to verify and change before clicking OK. First, click the dropdown menu that lists the available port groups and choose the port group designated for vCenter HA. If there are many available port groups, the port group may not be shown in the list so click the "Show more networks…" item and choose the correct port group on the resulting screen.

Next, click on the New Network name to expand the network adapter details. Verify that Connected at Power On is selected and that the Adapter Type is VMXNET3. Then, click [OK] to close the Edit Settings dialogue and finish adding the network adapter.

Next, configure the IP address settings of the new network adapter by logging into the VMware vSphere Appliance Management UI (VAMI) on port 5480 of the vCenter Server Appliance on which vCenter HA is being enabled.
Click the [Networking] object on the left side navigation tree.

Click on the [Manage] tab to continue.

Click the [Edit] button in the Networking Interfaces section.

Click [nic1] to expand its settings

Select the radio button next to "Use the following IPv4 settings" and enter in the IP address for this adapter on the vCenter HA network. Note that an IPv6 address may be used but using both an IPv4 and IPv6 address at the same time is not supported. Click [OK] to continue.

Now that the vCenter HA adapter has been added and configured on the vCenter Server, the vCenter HA configuration wizard can be launched. Log into the vCenter Server on which vCenter HA will be enabled. Be sure to login with a user account that has Administrative permissions on the vCenter Server.

Once logged into vCenter Server make sure that the vCenter Server node is highlighted in the navigation tree on the left. Click the [Configure] tab at the top.

Click [vCenter HA] in the Settings menu on the left side.

Click the [Configure] button in the upper right to start the vCenter HA configuration wizard

Select the radio button next to Advanced and then click [Next].

On the Connection IP Settings page, enter the IP addresses that the Passive and Witness nodes will use on the vCenter HA network. Before clicking Next note the warning at the top of this screen. It is important to make sure the IP settings on this page are correct. A vCenter HA preparation script will be run on the vCenter Server when clicking Next. If there is a failure or an incorrect IP address the vCenter HA configuration will need to be destroyed before re-attempting the configuration. Click [Next] to continue.

On the Clone VMs screen, verify the IP settings for the Passive and Witness nodes are correct. Then, as the note at the top indicates, the next step is to create the Passive and Witness nodes by cloning the vCenter Server. Before clicking [Finish], switch back to the management vCenter Server

Now, the vCenter Server VM will need to be cloned to create the Passive and Witness nodes.

Locate the vCenter Server VM in the inventory for which vCenter HA is being enabled. Right-click on the VM and select Clone --> Clone to Virtual Machine

In the Clone Existing Virtual Machine wizard, enter an appropriate name for the Passive node VM object. Keep in mind that when a failover occurs the name of the VM will not change. Once the name is input select the appropriate data center and folder where this VM should be placed. Click [Next].

Select the appropriate cluster or host to place this VM. If DRS is enabled, selecting a cluster will intelligently place the node based on resources available to the cluster. If DRS is not enabled, choose a specific host. Click [Next] to continue.

Select the desired datastore for this VM. Click on [Next] to continue.

In order to properly prepare this node for vCenter HA some guest OS customization is required. Select the checkboxes for "Customize the operating system" and "Power on virtual machine after creation". Then click [Next].

A new customization specification will be created to facilitate the required changes for the Passive and Witness VM nodes. Note that this customization specification will only be used for this specific VM (the vCenter HA Passive node in this case). This will make it easier and more efficient should the vCenter HA cluster need to be re-setup in the future. Click the New Customization Spec button.

Provide a name for this customization spec. Since this is the only VM this specification will be used for it is recommended to name the spec after the VM. The Description field is optional. Click [Next].

Next, the VM name that is reflected by the guest operating system will be the same for all three nodes of the vCenter HA cluster. Input the name of the original vCenter Server Appliance VM. Next, input the domain name that this system is using for its FQDN. Click [Next] to continue.
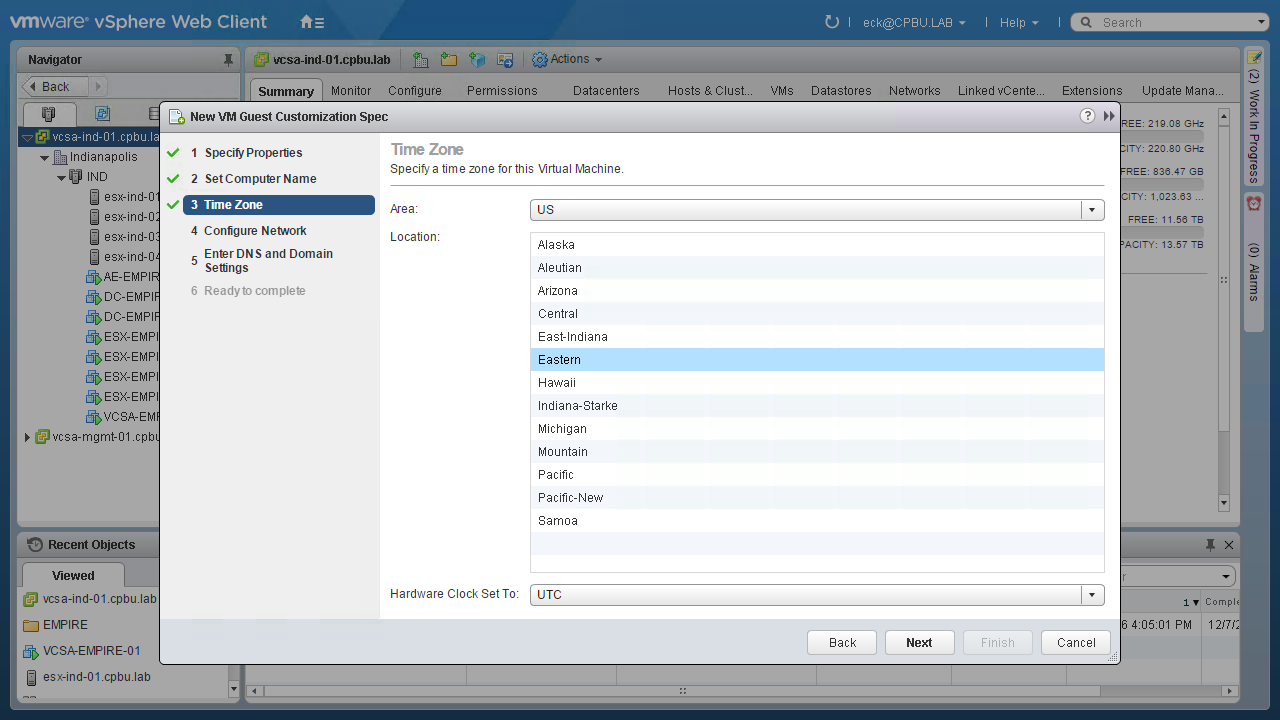
Choose the appropriate time zone for your environment. In this example environment the time zone is set to Eastern. Click [Next] to continue.

Next, the IP settings of both Ethernet adapters need to be configured. Select NIC1 and then click the [Pencil] icon to edit the settings.

These IP settings should match the primary interface settings of the original vCenter Server. Fill in the appropriate settings for your environment. Click [OK] to continue.

Select NIC2 and then hit the [Pencil] icon to edit its settings

This interface requires a unique IP address on the vCenter HA network. Click [OK] to continue

Click [Next] to continue to the DNS and Domain Settings page.

Enter the DNS server settings that are appropriate for your environment. Next, input the DNS Search Path. Click the [Add] button

Click [Next] to continue

Verify the settings on the summary page and click [Finish].

Now that the Passive node's Customization Spec has been configured, select it on the Customize Guest OS screen. Click [Next].

Verify all the settings are correct on the next screen and click [Next].

Click [Finish] to initiate the cloning of the Passive vCenter Server node.

The cloning process can be monitored via the Recent Tasks pane in the vSphere Web Client. Once the cloning process for the Passive node completes

Once the clone operation completes, the second clone operation can be started to create the Witness node. Right-click on the original vCenter Server VM and select Clone --> Clone to Virtual Machine.

In the Clone Existing Virtual Machine wizard, enter an appropriate name for the Passive node VM object. Once the name is input select the appropriate data center and folder where this VM should be placed. Click [Next].

Select the appropriate cluster or host to place this VM. If DRS is enabled, selecting a cluster will intelligently place the node based on resources available to the cluster. If DRS is not enabled, choose a specific host. Click [Next] to continue.

Select the desired datastore for this VM. Click on [Next] to continue.

In order to properly prepare this node for vCenter HA some guest OS customization is required. Select the checkboxes for "Customize the operating system" and "Power on virtual machine after creation". Then click [Next]. Note: The Witness node can be resized to 1 vCPU and 1 GB RAM. You can accomplish this by choosing the middle checkbox here or by editing the VM settings after the VM has been cloned. Changing any other VM settings such as NIC or Disk settings is unsupported and could lead to vCenter HA failure.

Another new customization specification will be created to facilitate the required changes for the Witness VM node. Note that this customization specification will only be used for this specific VM (the vCenter HA Witness node in this case). This will make it easier and more efficient should the vCenter HA cluster need to be re-setup in the future. Click the New Customization Spec button.

Provide a name for this customization spec. Since this is the only VM this specification will be used for it is recommended to name the spec after the VM. The Description field is optional. Click [Next].

Recall that the VM name that is reflected by the guest operating system will be the same for all three nodes of the vCenter HA cluster. Input the name of the original vCenter Server Appliance VM. Next, input the domain name that this system is using for its FQDN. Click [Next] to continue.

Choose the appropriate time zone for your environment. Click [Next] to continue.

Next, the IP settings of the Ethernet adapter for VCHA needs to be configured. For the Witness node, only NIC2 needs to be configured as NIC1 will not be used since the Witness will never become an Active node. NIC1 can just be left as the default settings. Do not remove it. Select NIC2 and then click the [Pencil] icon to edit the settings.

This interface requires a unique IP address on the vCenter HA network. Click [OK] to continue.

Click [Next] to continue to the DNS and Domain Settings page.

Enter the DNS server settings that are appropriate for your environment. Next, input the DNS Search Path. Click the [Add] button

Click [Next] to continue

Verify the settings on the summary page and click [Finish].

Now that the Witness node's Customization Spec has been configured, select it on the Customize Guest OS screen. Click [Next].

Verify all the settings are correct on the next screen and click [Next].

Click [Finish] to initiate the cloning of the Witness node.

The cloning process can be monitored via the Recent Tasks pane in the vSphere Web Client. Once the cloning process for the Witness node completes.

Now that the clones have been completed, return to the vSphere Web Client for the vCenter Server on which vCenter HA is being enabled, Click [Finish] to complete the vCenter HA configuration.

Monitor the Recent Tasks pane for the vCenter HA task to complete.
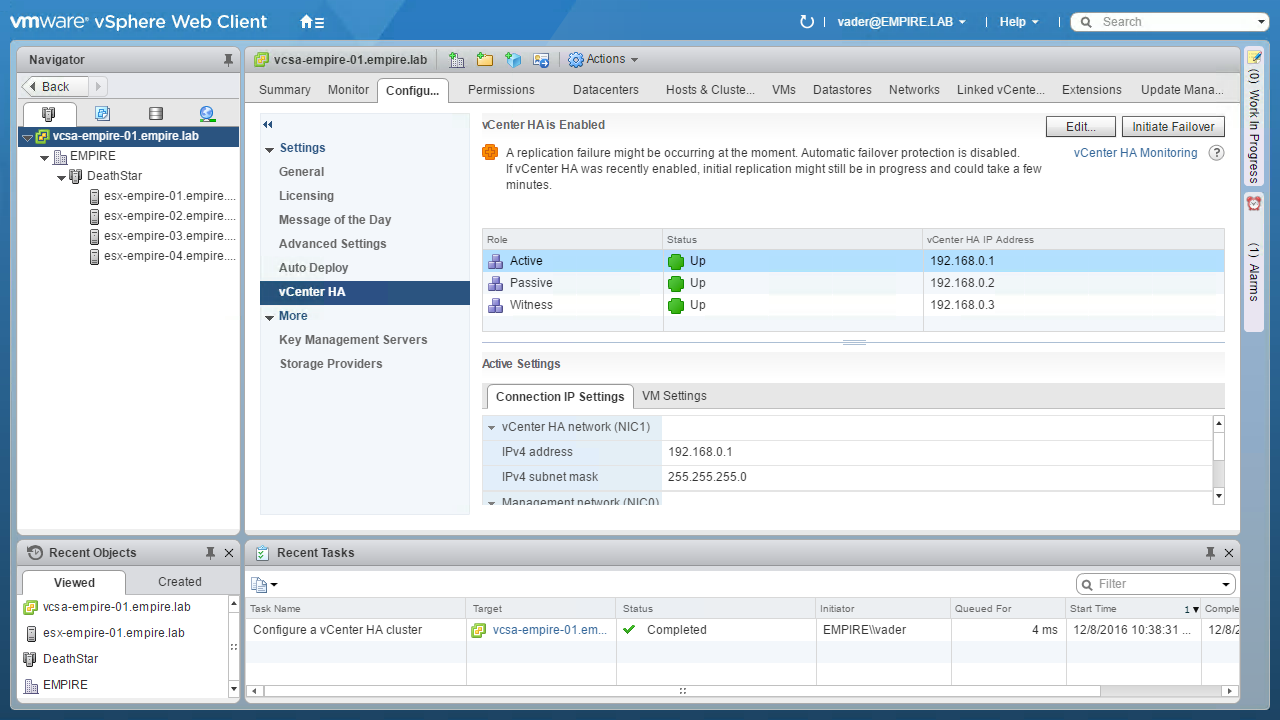
Once complete and vCenter HA is fully configured, the vCenter HA configuration page will refresh to show the status of the vCenter HA cluster. Note that this page may show a warning after initial configuration. This is normal while the initial replication completes. In a few minutes the cluster will enter a healthy state.

After the initial replication completes the page refreshes and shows a green, healthy state. To view more details about the status of vCenter HA, click the vCenter HA Monitoring link in the upper right.

The vCenter HA Monitoring page shows details about the individual nodes, their health, and the replication status of the vCenter Server Database and filesystem. Before concluding this walkthrough, it is worth reviewing the available operational modes for vCenter HA. Click the vCenter HA Settings link in the upper right-hand side to return to the settings page
Click the Edit button in the upper right to show the additional modes of operation.

If there will be planned maintenance of the data center infrastructure it would be good to enable Maintenance Mode in order to prevent a transient network problem from initiating a failover event. More details can be found in the vCenter HA documentation. Click [Cancel] to exit the Edit vCenter HA dialogue.

A recommended action once vCenter HA is configured is to setup a DRS anti-affinity rule for the vCenter HA nodes. In the DRS settings of the cluster (if the managing vCenter Server is licensed for DRS), create a rule that will separate the VMs and keep them running on different ESXi hosts.

Finally, it is also recommended to resize the Witness node to reclaim some of the resources. The Witness can fully perform its functions with only 1 vCPU and 1 GB of RAM. Power the VM off and adjust the settings as in the screenshot to the left. Changing any other VM settings such as NIC or Disk settings is unsupported and could lead to vCenter HA failure. This concludes the feature walkthrough of vCenter HA on vSphere 6.5.
File-Based Backup and Restore
File-Based Backup and Restore 6.7 Overview
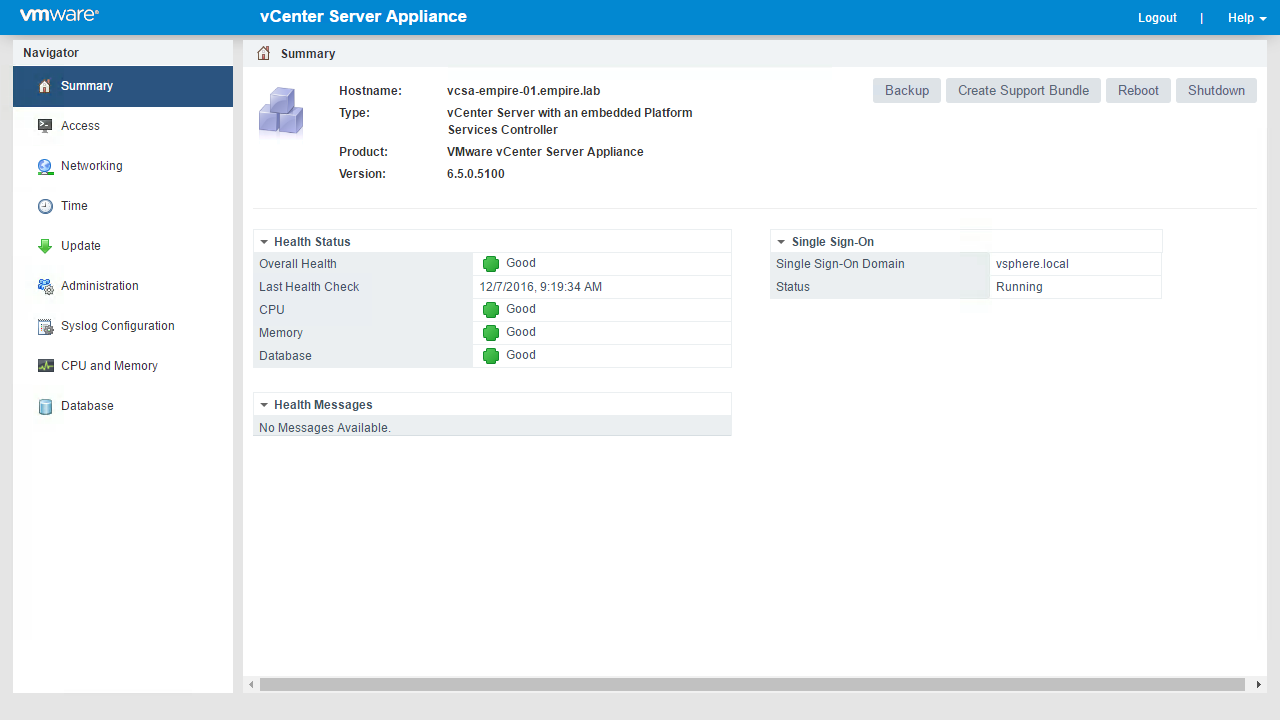
The vCenter Server Appliance (VCSA) had several exclusive features introduced in vSphere 6.5. One of those features was the built-in file-based backup and restore. This native backup solution is available within the VMware Appliance Management Interface on port 5480. It supports backing up both the vCenter Server Appliance or Platform Services Controller (PSC). There is no need for any type of backup agents, nor is any quiescing or downtime of the VCSA or PSC required. The backup files are then streamed to a backup target using one of the supported protocols: FTP(s), HTTP(s), and SCP. These are all the files that make-up the VCSA, including the database.
Restoring the VCSA or PSC only requires mounting the VCSA ISO used during its deployment. Select the restore option and point to the backup protocol used. The restore workflow first deploys a new appliance, retaining its original identity. This is key since other solutions communicating to the VCSA will continue to do so as its UUID remains the same. Then it imports the backup files from the selected backup bringing the VCSA back online. Now with the release of vSphere 6.7 comes new enhancements for file-based backup and restore.
File-Based Backup 6.7
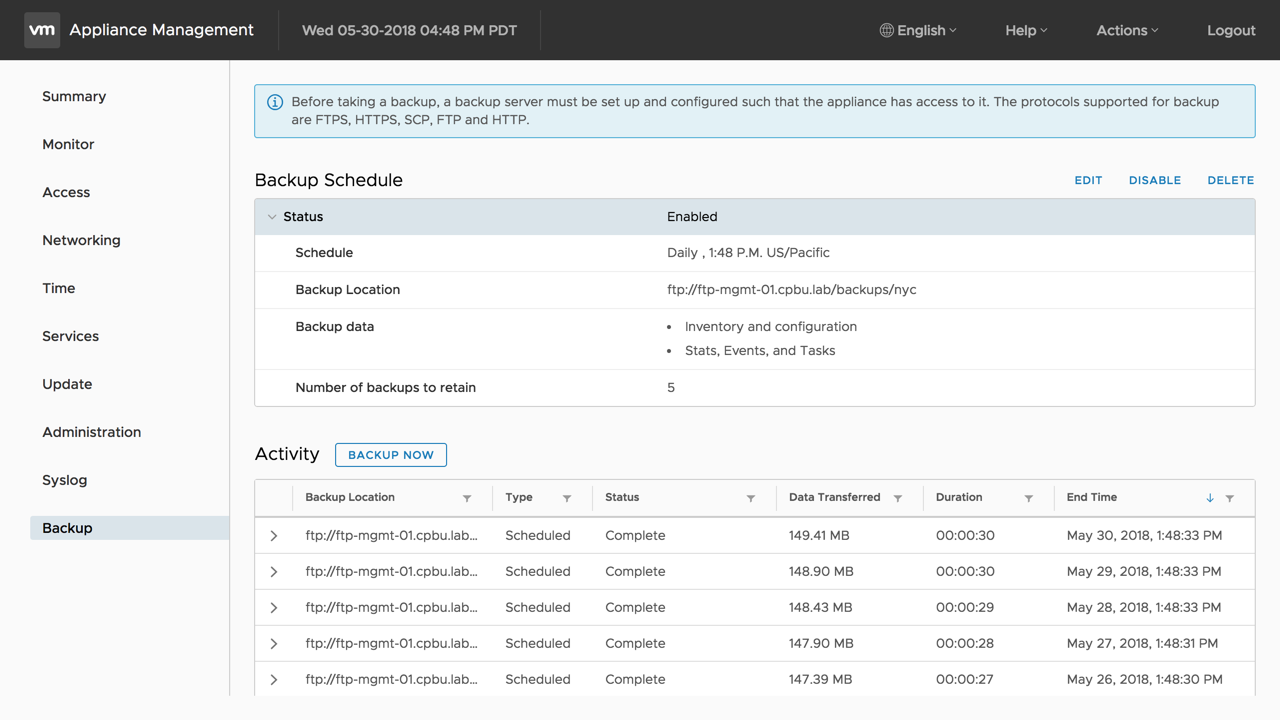
File-Based Backup has moved from under the summary tab and to its own backup tab. Front and center are several noticeable changes when going into the new backup tab. At the top, there is now an informational banner about the supported backup protocols. One of these protocols must be set up and accessible to the VCSA before taking a backup. Right below is the new built-in backup scheduling option. Here we can configure the backup schedule including location, frequency, and time. The backup location format has changed from vSphere 6.5. Now the backup protocol is part of the backup location, using the following format: Protocol://Server Address: Port/Backup Folder/Subfolder. The backup folder and subfolder do not need to be created before running the backup schedule wizard. A default backup folder called vCenter will be created during the backup if one is not supplied. Subfolders with the corresponding VCSA FQDN will also be created.

Also included in the backup schedule configuration is a new retention option. The retention option allows the selection of the number of backups to keep. Two options are available, keep all backups or specify the number of backups to keep. When the backup location reaches the retention number, the oldest backup gets removed. After completing the backup schedule configuration, its information is available by expanding the backup schedule status. The backup schedule also includes options to edit, delete, or disable as needed. Right below the backup schedule section is another new section named activities. The activities section logs detailed information about each backup job.
File-Based Restore 6.7
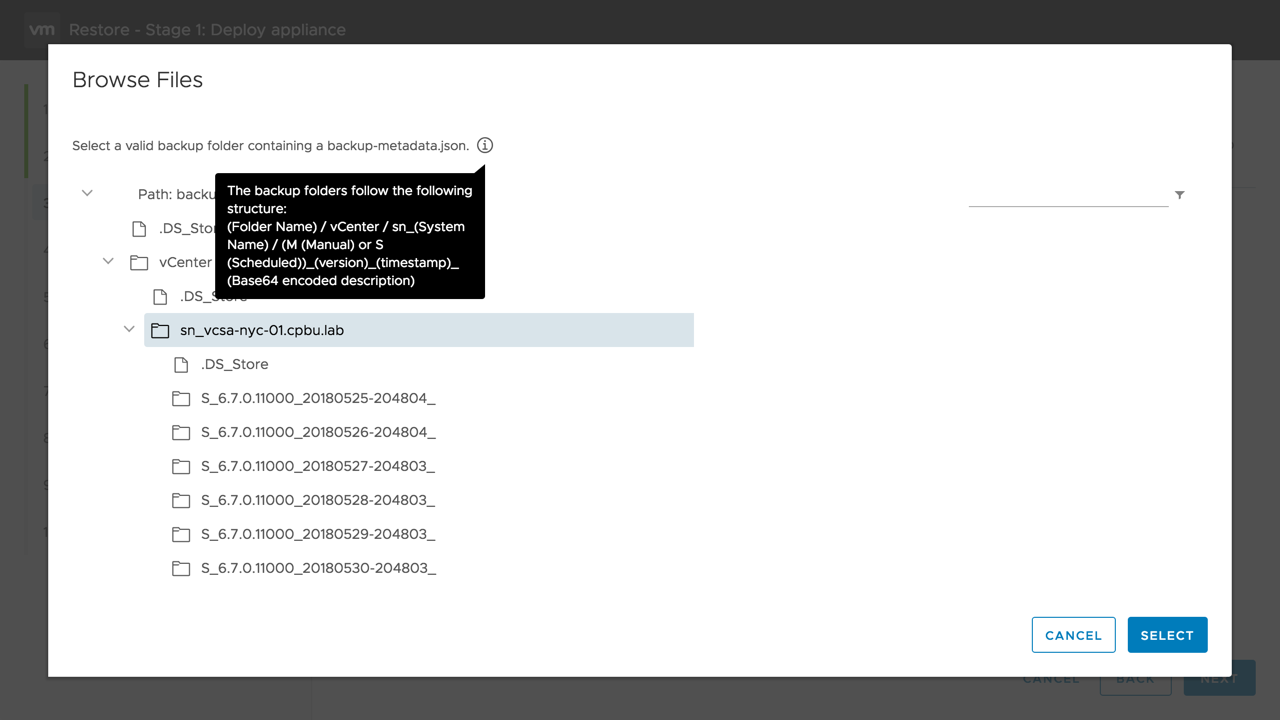
The restore workflow in vSphere 6.7 has also improved. Now included is a backup archive browser. After entering the backup location details, the backup archive browser will launch. This is a great improvement over having to remember the entire backup location path. There is also a search option, handy if the same backup server is being used for several VCSAs within your environment. The backup archive browser displays the following information for each backup directory:
- If the backup was done manually (M) or scheduled (S).
- Version information found in the VAMI summary tab 6.7.0.10000 (6.7 GA), 6.7.0.11000 (6.7.0a).
- Timestamp of when the backup was taken
- Description, if one was provided during backup. It's base64 and not human readable.
During the restore of VCSA, the vSphere SSO credentials are required for reconciliation. In the past, a restore script was required after restoring a vCenter Server registered to a PSC for reconciliation. This is no longer the case or required for either embedded and external deployments. Restoring an external PSC while other replication partners are available is no longer allowed. Since the PSCs are multi-primary the same data is being replicated in the vSphere SSO domain. Now simply decommission the external failed PSC from the vSphere SSO domain using the cmsso-util unregister command. Then deploy a new external PSC which will get its data from the existing replication partners. This ensures that all external PSC have the most current data within the vSphere SSO domain.
vCenter Server Appliance 6.7 File-Based Backup

This walkthrough demonstrates backup of the vCenter Server Appliance 6.7.

vCenter Server File-Based Backup is exclusive to the vCenter Server Appliance. This feature supports the scheduling and retention of backups for both embedded and external deployments of the vCenter Server Appliance and Platform Services Controller. The following protocols are supported as backup destinations HTTP, HTTPS, FTP, FTPS, SCP.

Let's begin by logging into the VMware Appliance Management Interface of the vCenter Server Appliance or the Platform Services Controller that needs to be backed up. To access, open a web browser and go to https://FQDN or IP Address of the vCenter Server Appliance or Platform Services Controller:5480. Log in using the root credentials supplied when initially setting up the vCenter Server Appliance or Platform Services Controller.

Once logged into the VMware Appliance Management Interface the default navigation goes to the Summary pane. In the bottom right-hand corner of the VMware Appliance Management Interface, go to the [Backup] tab.

Click [Configure] to start the Backup Schedule wizard. Note: There is also an option to manually backup clicking [Backup Now].

The Backup Schedule wizard will now appear. Enter the backup location using one of the supported backup protocols (HTTPS, HTTP, SCP, FTPS, FTP). The backup location uses the following format: Protocol://Server Address/Backup Folder/Subfolder followed by the backup destination credentials. Note: The backup folder does not have to be created prior to running the Backup Schedule wizard.

Enter the backup schedule information including frequency, select daily, weekly, or, custom. Enter the time for the scheduled back. The backup schedule time corresponds to the Appliance server time in the Time tab. Optional: encrypt backup data using AES 256. If selected, the backup password will be required during the restore workflow. Note: The backup password is not stored and therefore the backup cannot be restored without the password.

Select the number of backups to retain. Either selecting to keep all backups or specifying the number of backups to retain. Now select the components to backup. The vCenter Server Appliance inventory and configuration is backed up by default. There is an option to also backup Historical data (Stats, Events, Alarms, and Tasks). Each component will show the space required. Click on [Create] when finished.

The backup schedule status can be viewed from the backup tab. Expand the [Status] to view its configuration. In the right-hand corner, there are options to edit, disable, and delete the backup schedule.

The backup status will be displayed in the activity pane.
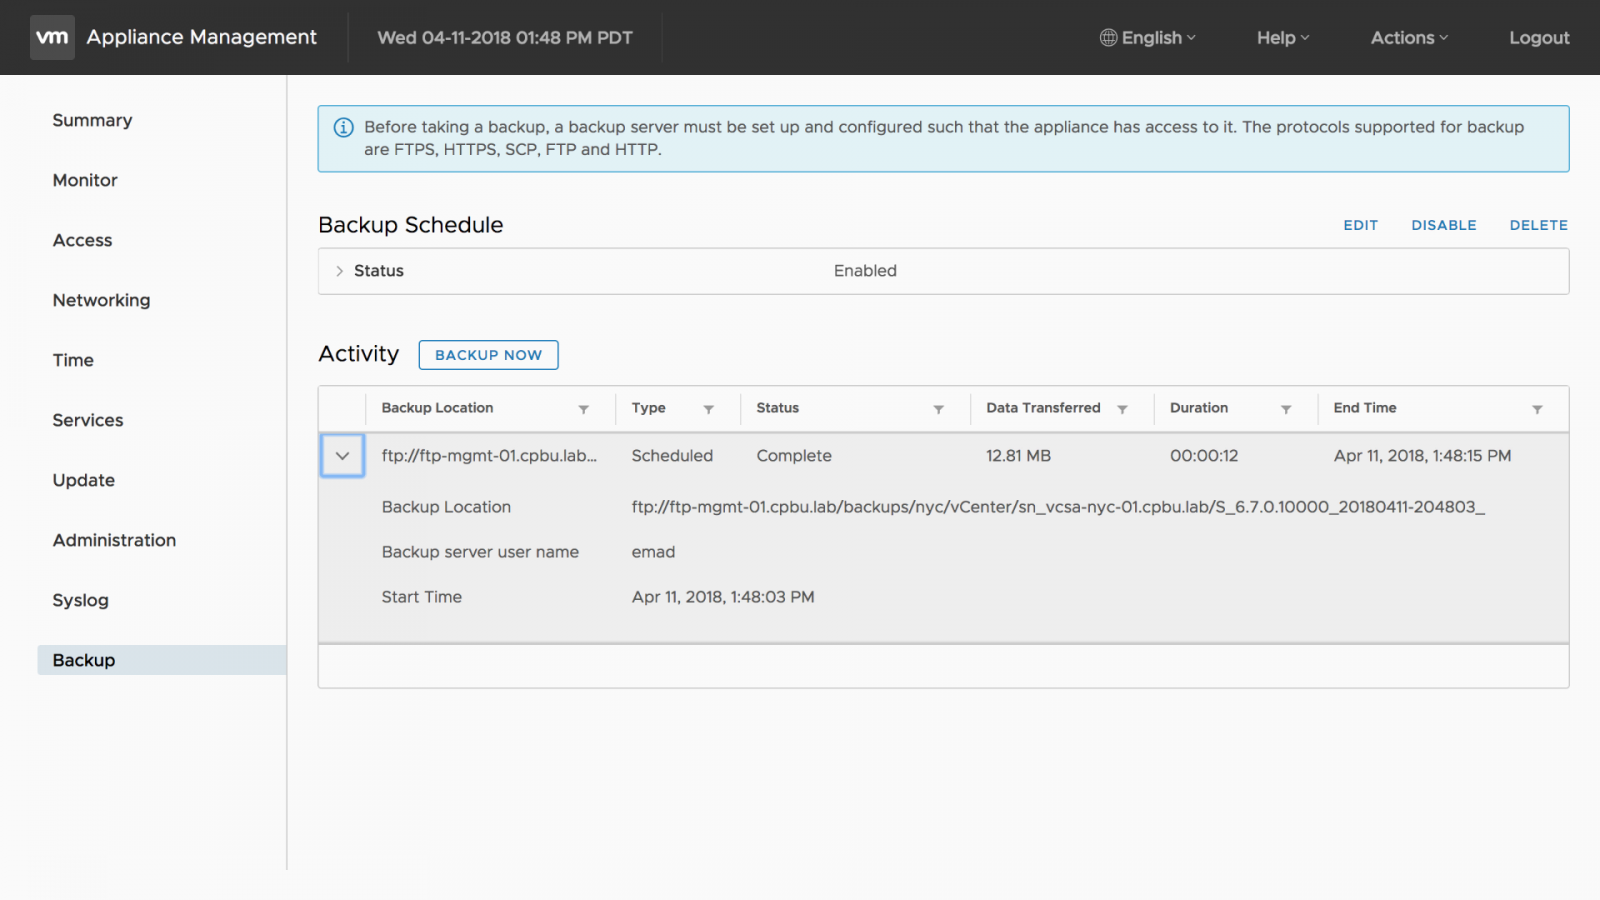
The activity pane also retains a log for each backup taken. After the backup job is completed click on [Logout] in the upper right-hand corner to exit the VMware Appliance Management Interface.

The backup destination will contain the necessary files to restore the vCenter Server Appliance or Platform Services Controller when needed.

This concludes the vCenter Server Appliance File-Based Backup Walkthrough. To learn more, visit vSphere Central at vspherecentral.vmware.com
vCenter Server Appliance 6.7 File-Based Restore

This walkthrough demonstrates restore of the vCenter Server Appliance 6.7.

vCenter Server File-Based Restore is exclusive to the vCenter Server Appliance. This feature supports restoring the vCenter Server Appliance and Platform Services Controller directly from the vCenter Server Appliance ISO used during deployment. The identity of the vCenter Server Appliance is retained which includes: FQDN, Certs, UUID, etc. A backup archive browser is included for easy visibility and searching of backups during the restore workflow

Mount the vCenter Server Appliance ISO downloaded from My VMware. Click on the mounted media and navigate to the vcsa-ui-installer directory. Select an operating system and launch the vCenter Server Appliance Installer. Note: The installer supports macOS, Linux, and Windows operating systems

Select [Restore] to start the vCenter Server Appliance Restore process.
![Select [Restore] to start the vCenter Server Appliance Restore process.](/sites/default/files/1a297ea5-29ef-4551-8956-c0dc081cfeff.png)
The Restore workflow is a two-stage process. The first stage deploys a new vCenter Server Appliance or Platform Services Controller. The second stage restores the Appliance from backup. Click [Next] on the introduction screen.

Review and accept the terms of the license agreement to continue. Click [Next].
![Review and accept the terms of the license agreement to continue. Click [Next].](/sites/default/files/e3f9d9f5-b22f-48cf-9fa1-95e7dc9f9095.png)
Next, enter the location of the backup destination using the following format: Server Address/Path/Backup Folder/subfolder followed by the backup destination credentials. Note: minimum requirement is the protocol and server address, a backup archive browser will appear.

From the backup archive browser, select the backup location of the vCenter Server Appliance to restore from and click [Select].
![From the backup archive browser, select the backup location of the vCenter Server Appliance to restore from and click [Select].](/sites/default/files/0576baae-7ed3-46da-bfa5-b075d7fa99c7.png)
After selecting the backup location, click [Next].
![After selecting the backup location, click [Next].](/sites/default/files/07ab73f8-19bb-492f-9346-ede81cc437dc.png)
Review the backup information displayed and then click on [Next].
![Review the backup information displayed and then click on [Next].](/sites/default/files/027fbe3e-f0d7-40a4-b112-4abcfbf17cd7.png)
Provide the fully qualified domain name (FQDN) of the vSphere ESXi host or management vCenter Server. This will be the initial deployment target for the restored appliance. Provide a User Name and Password with privileges to create a VM. Click on [Next].

Accept the SSL SHA1 thumbprint by clicking on [Yes].
![Accept the SSL SHA1 thumbprint by clicking on [Yes].](/sites/default/files/ba58766a-554f-4612-a3b7-9d9a8738746f.png)
Select a VM folder to deploy the vCenter Server Appliance to and click [Next].
![Select a VM folder to deploy the vCenter Server Appliance to and click [Next].](/sites/default/files/9eba3a69-ba6a-4b08-8229-fda2c62123ca.png)
Select the compute resource to deploy the vCenter the vCenter Server Appliance to and click [Next].
![Select the compute resource to deploy the vCenter the vCenter Server Appliance to and click [Next].](/sites/default/files/3d5c1431-05bb-4b77-9471-ee314d42047b.png)
Provide a VM name (inventory name) for the vCenter Server Appliance. The VM name can be a new name from the previous or the same. If the same VM name will be used, then the previous vCenter Server Appliance will need to be removed from inventory prior or renamed. Enter a secure password and click on [Next].

The installer provides the option to select an [Appliance size] and [Storage size]. By default, the installer reverts to the original vCenter Server Appliance deployment and storage sizes. The Restore workflow provides the option to increase both the Appliance and Storage sizes. Select the required deployment and storage size, then click on [Next].

Select a datastore from the list provided and click on [Next].
![Select a datastore from the list provided and click on [Next].](/sites/default/files/a1c49fa6-6561-4a2c-8b5d-4b96cc833f03.png)
Provide the necessary network configuration settings and click on [Next]. Note: A different IP address from the original vCenter Server Appliance deployment can be used, but the FQDN will remain the same. Ensure that the FQDN has been provided A and PTR DNS records for both forward and reverse DNS resolution.

Review the vCenter Server Appliance settings and click [Finish].
![Review the vCenter Server Appliance settings and click [Finish].](/sites/default/files/e7177c5b-84f3-4148-9681-9035b18b8d79.png)
The installer will begin to deploy the vCenter Server Appliance to the specified deployment target. Monitor the deployment progress.

The deployment of vCenter Server Appliance (Stage 1) has completed. Click on [Continue] to restore the appliance data from backup. Note: If Close is selected, Stage 2 can be continued from the VMware Appliance Management Interface on port 5480 of the newly deployed vCenter Server Appliance or Platform Services Controller.

Start Stage 2 (Restore from backup) by clicking on [Next].
![Start Stage 2 (Restore from backup) by clicking on [Next].](/sites/default/files/63e6a5fc-13c9-4418-b33b-8fb7637b65bc.png)
Validate the backup details and enter the encryption password (if used during the backup process) and click on [Next].
![Validate the backup details and enter the encryption password (if used during the backup process) and click on [Next].](/sites/default/files/882ad263-5b9d-4069-a004-e61288e3345e.png)
Enter the vSphere Single Sign-On credentials to reconsolidation between vCenter Server and the Platform Services Controller.

Review the backup and restore details from the summary. Click on [Finish] to start the restore process. Note: The original appliance will need to be shutdown prior to avoid any network conflicts.

A warning is displayed that once the restore process is started it cannot be paused or stopped. Click [OK] to continue.

The installer will start the restore process. Monitor the progress until it is finished.

The restore of vCenter Server Appliance has completed. Click on the link provided by the installer to launch the getting started page. Here the option to launch either the vSphere Client (HTML5) or the vSphere Web Client (Flash) is available. Click on [Close] to exit from the installer. Note: The VMware Appliance Management Interface can also be used to validate.

On the VMware Appliance Managment, provide the vCenter Server root account and password. Click on [Login].
![On the VMware Appliance Managment, provide the vCenter Server root account and password. Click on [Login].](/sites/default/files/f4230c72-360d-4864-90bf-e67361bad657.png)
Confirm vCenter Server Appliance restore is successful.

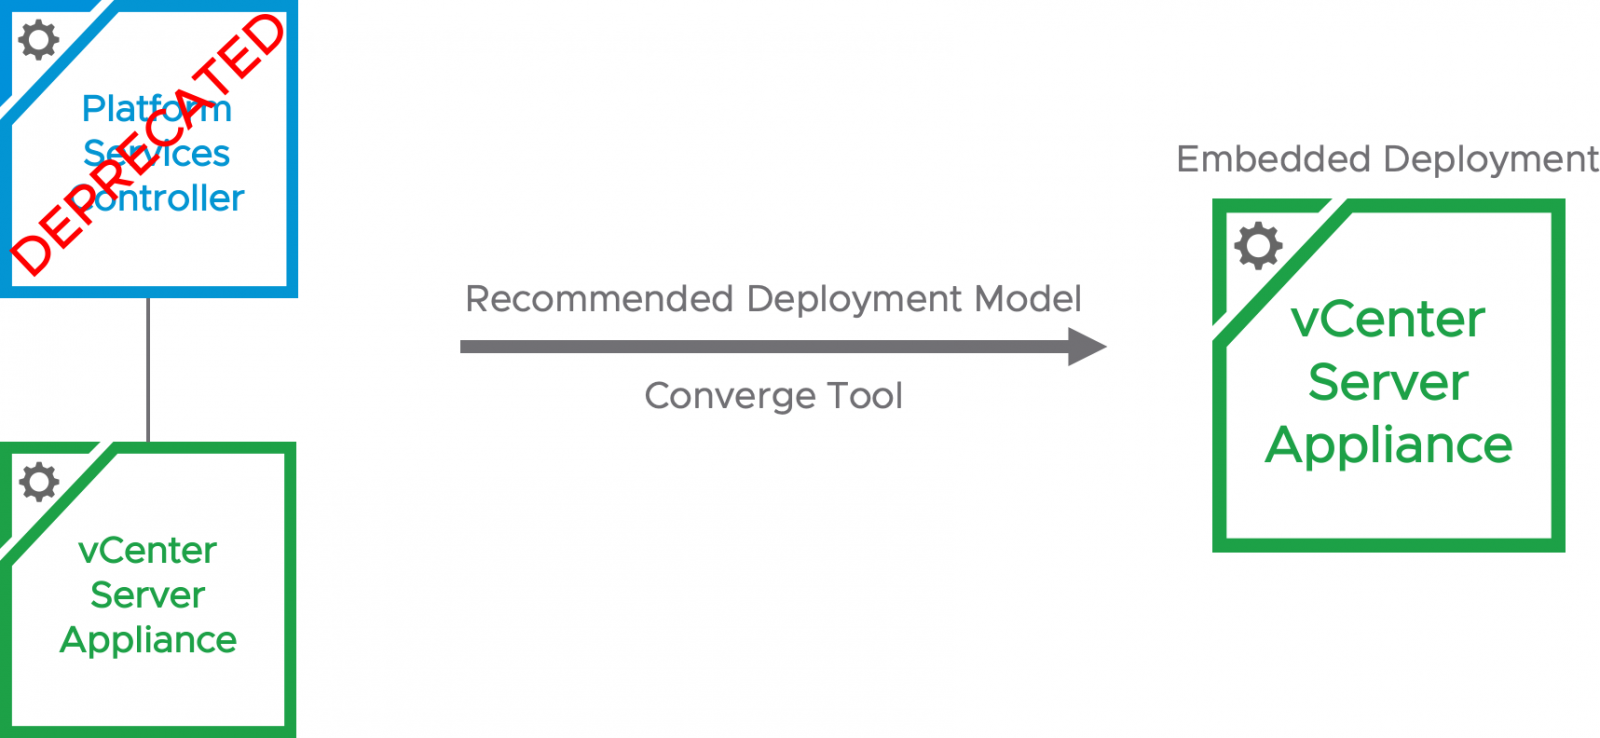
Walkthrough: Converging an External vCenter Deployment
Announced in November 2018, VMware has stated that the External Platform Services Controller will be deprecated in a future vSphere release. As the External Platform Services Controller (PSC) is going away, a Converge Tool has been provided to migrate you from an External PSC Deployment to an Embedded PSC Deployment. This walkthrough will cover how to use the Converge Tool using the vSphere Client.
A high level overview on how we will migrate to an Embedded PSC Deployment is as follows:
- We will run the Converge Tool against all vCenter Servers within the Single-Sign On domain
- If any solutions are registered against the Platform Services Controller Lookup Service such as NSX or Site Recovery Manager, we will repoint and update to use the new Embedded PSC URL.
- We will run the Converge Tool to decommission the External Platform Services Controllers within the Single-Sign On Domain.
More information on how to use the vCenter Server Converge Tool can be found in the following blog posts.
- Understanding the vCenter Server Converge Tool
- vCenter Server Converge Tool Enhancements in vSphere 6.7 Update 2

To begin, let's select Administration.

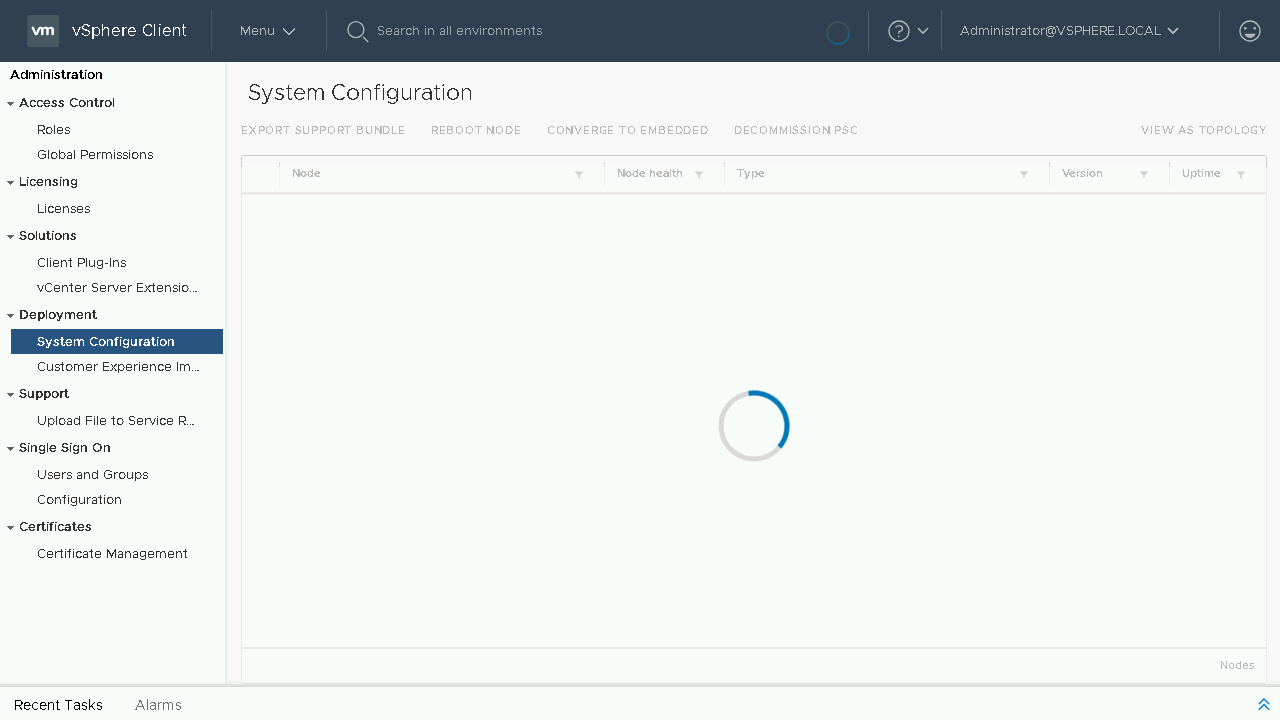
Once we are in the Administration section, we will select System Configuration.
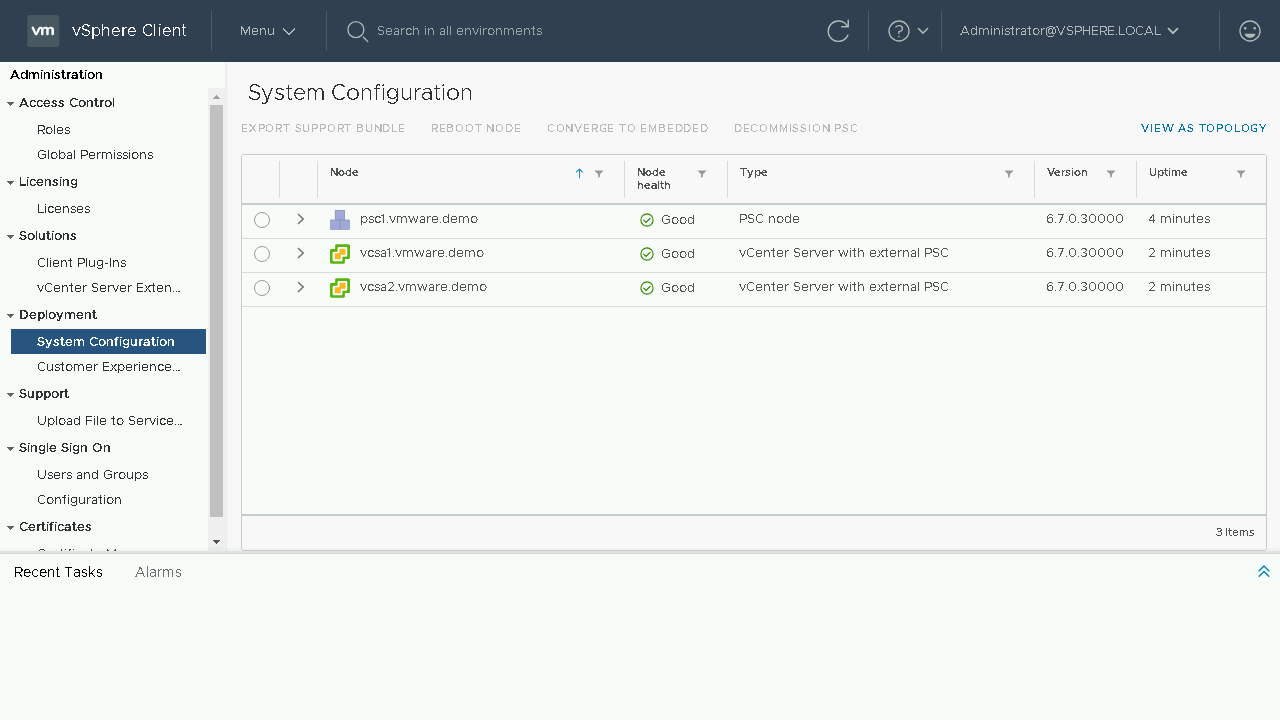
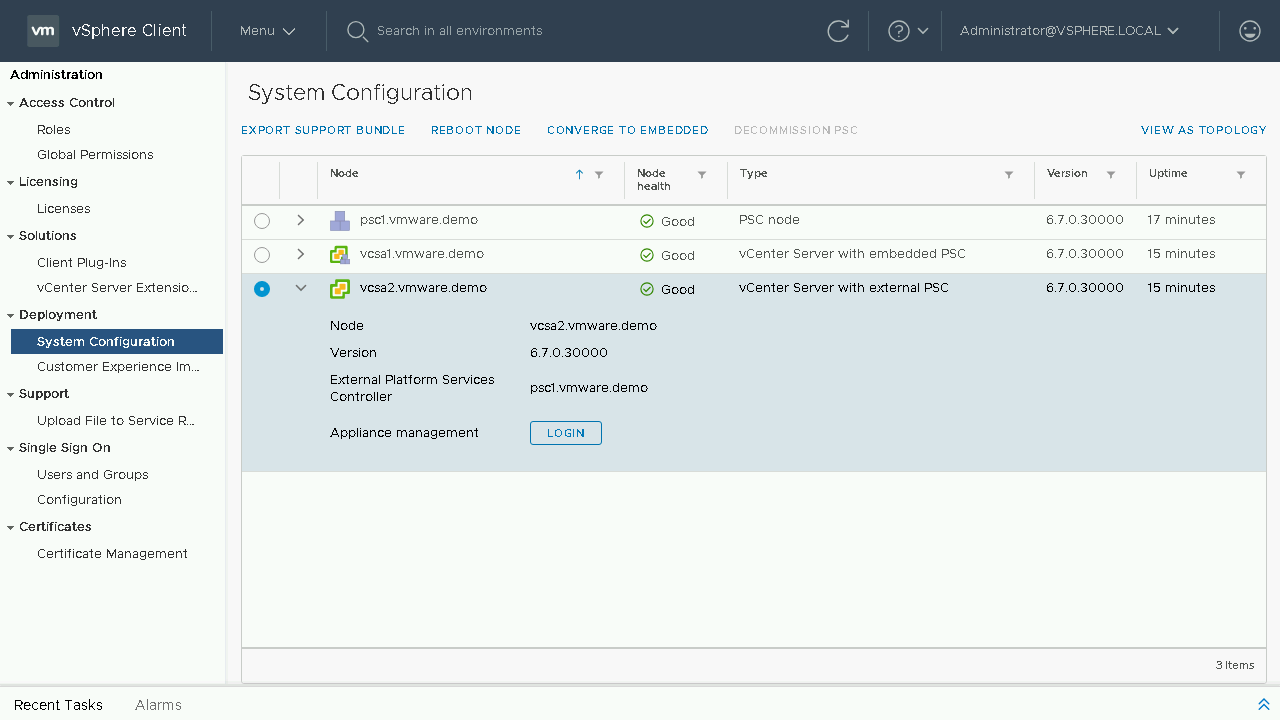
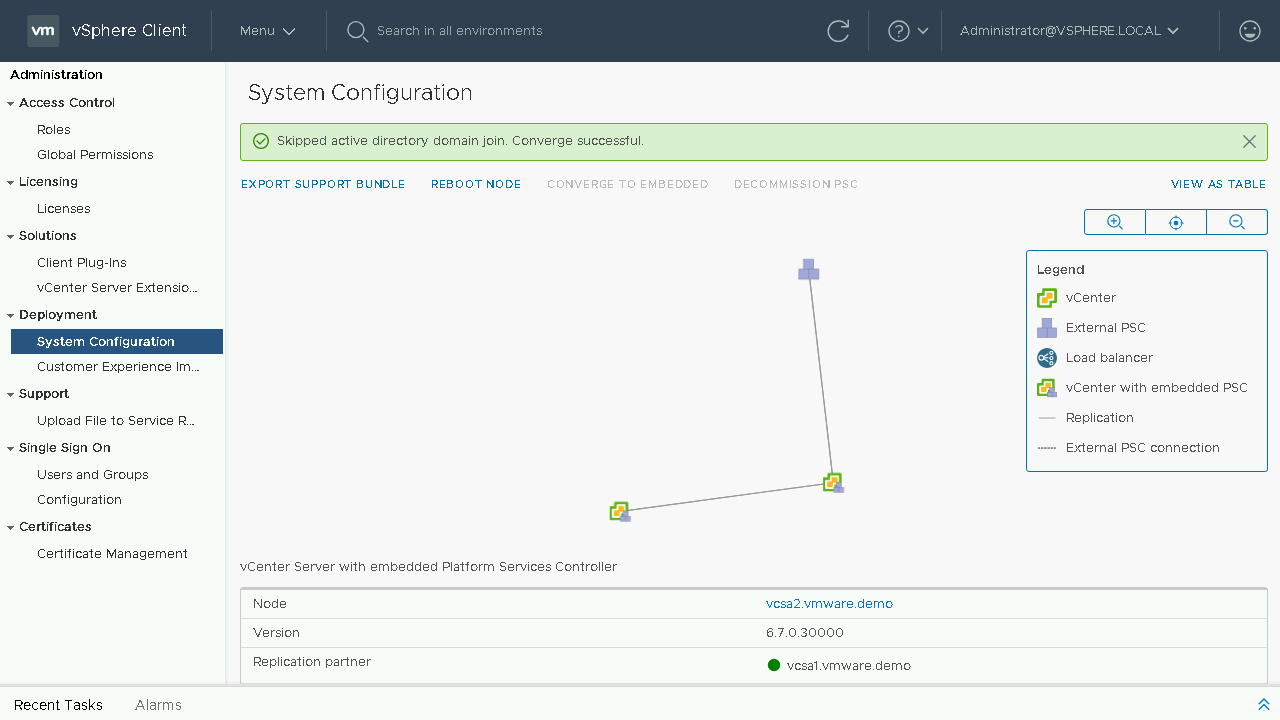
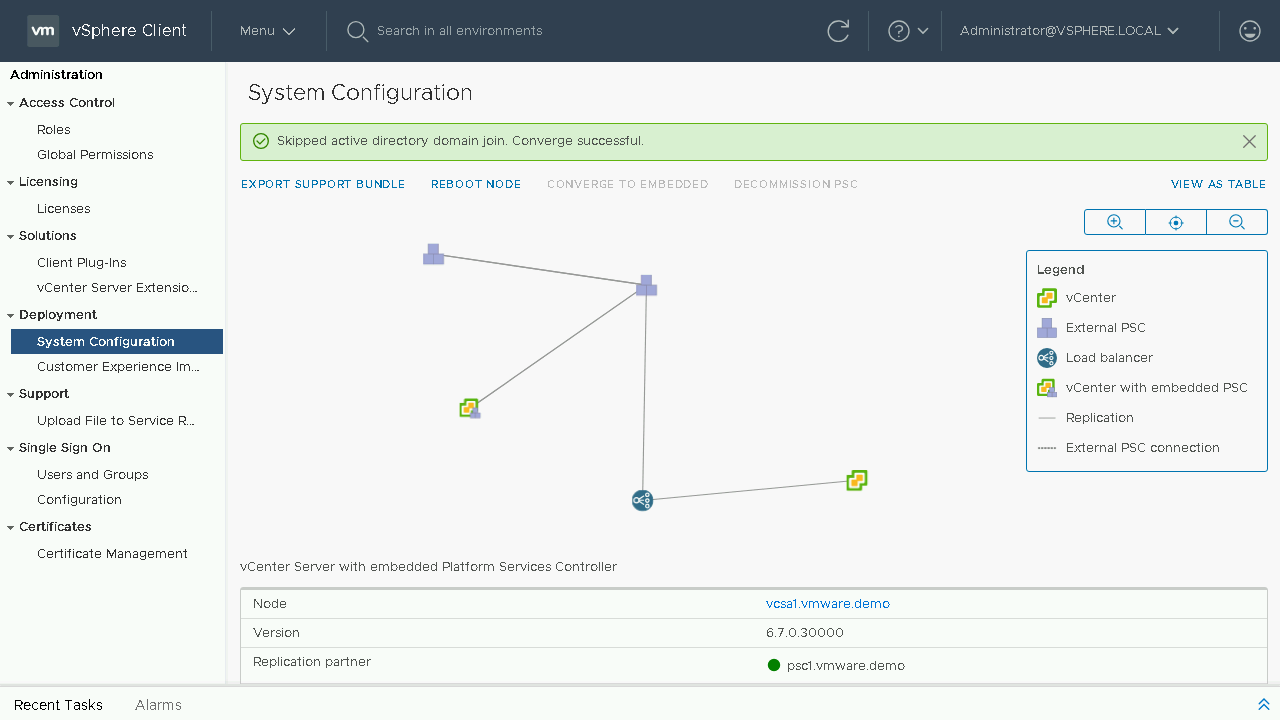
Included in the System Configuration page is an overview of nodes in your SSO domain, you will see the load balancers, platform services controllers and vCenter Servers. You will also have insight into which node is an External PSC, which node is an Embedded vCenter Server and even see details such as which nodes are its replication partners. Let's proceed to click on the View as Topology and see what is new here.
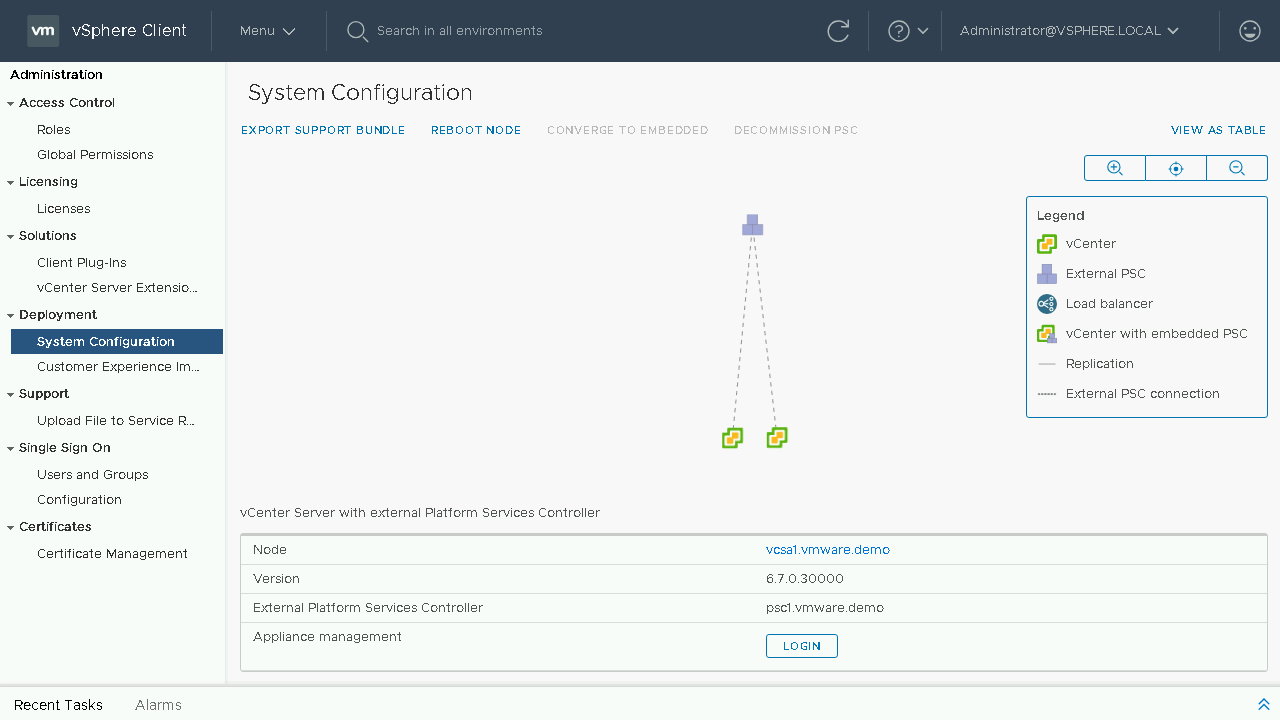
Included in the System Configuration page is also a toplogy view of nodes in your SSO domain, you will see the load balancers, platform services controllers and vCenter Servers. You will also have insight into which node are which with a graphical representation of Load Balancers, Platform Services Controllers, Embedded vCenter Servers as well as Replications and External PSC Connections. Let's proceed back to the table view to begin our converge process.
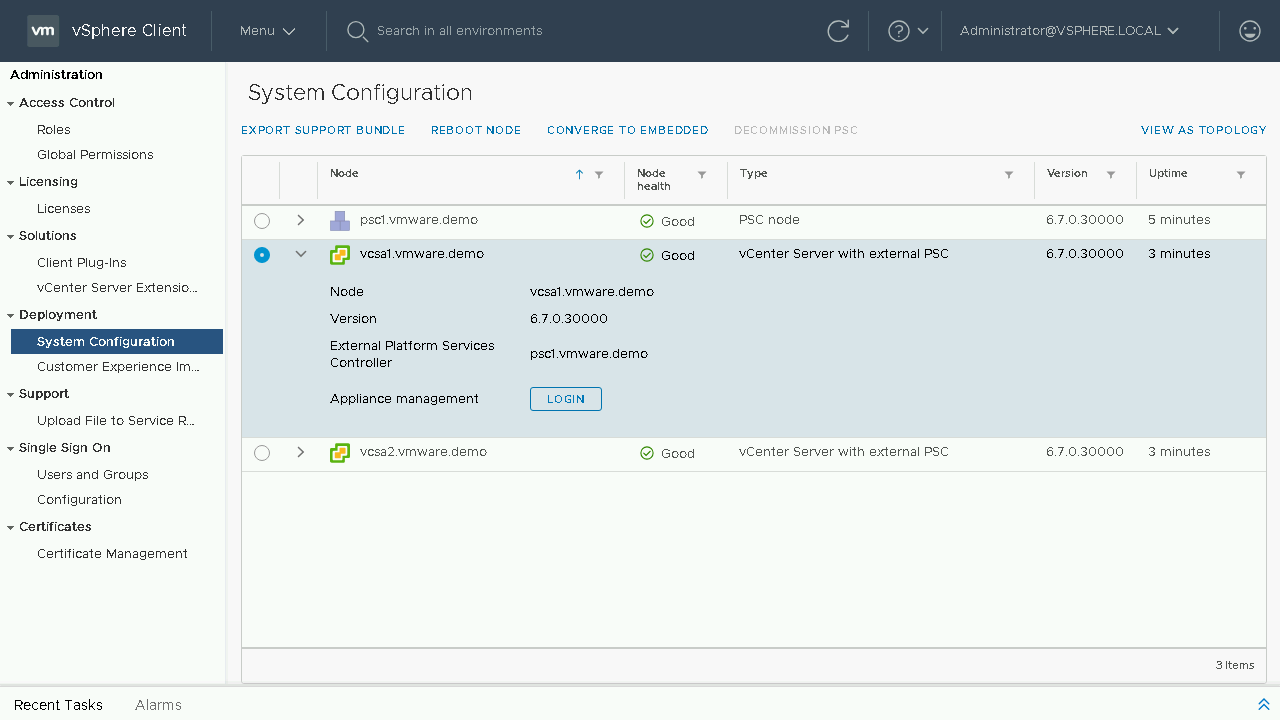
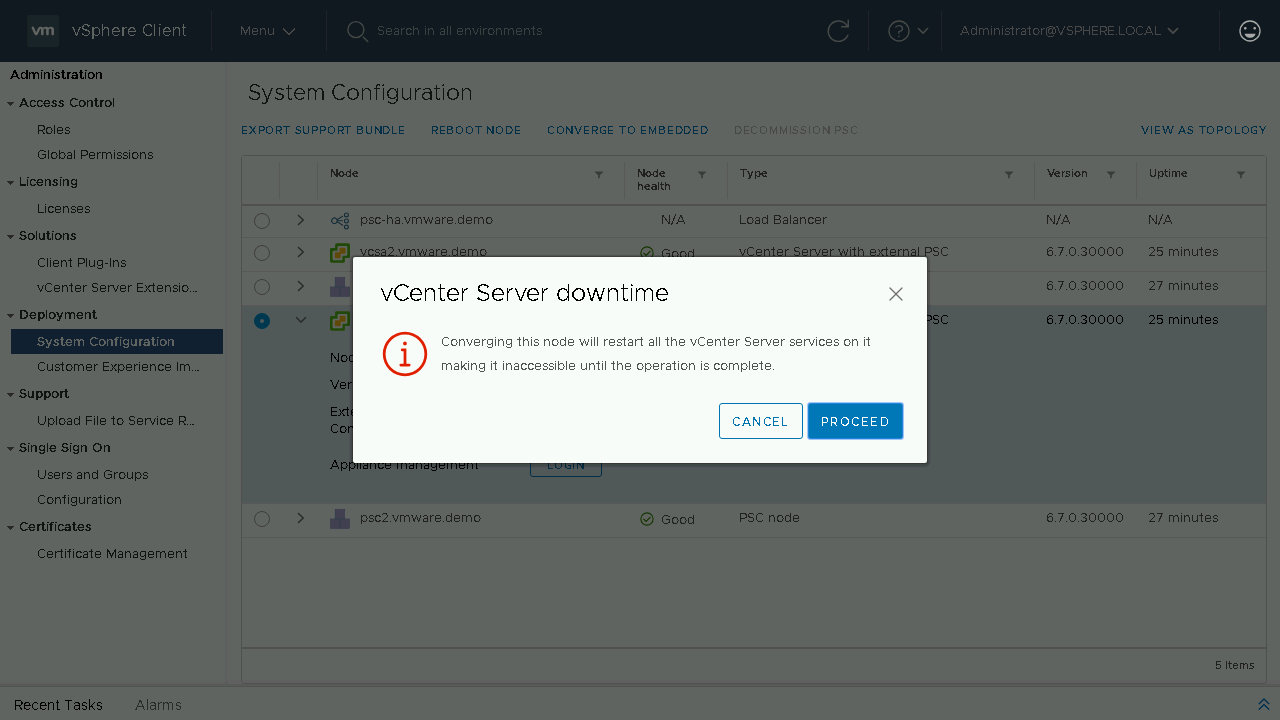
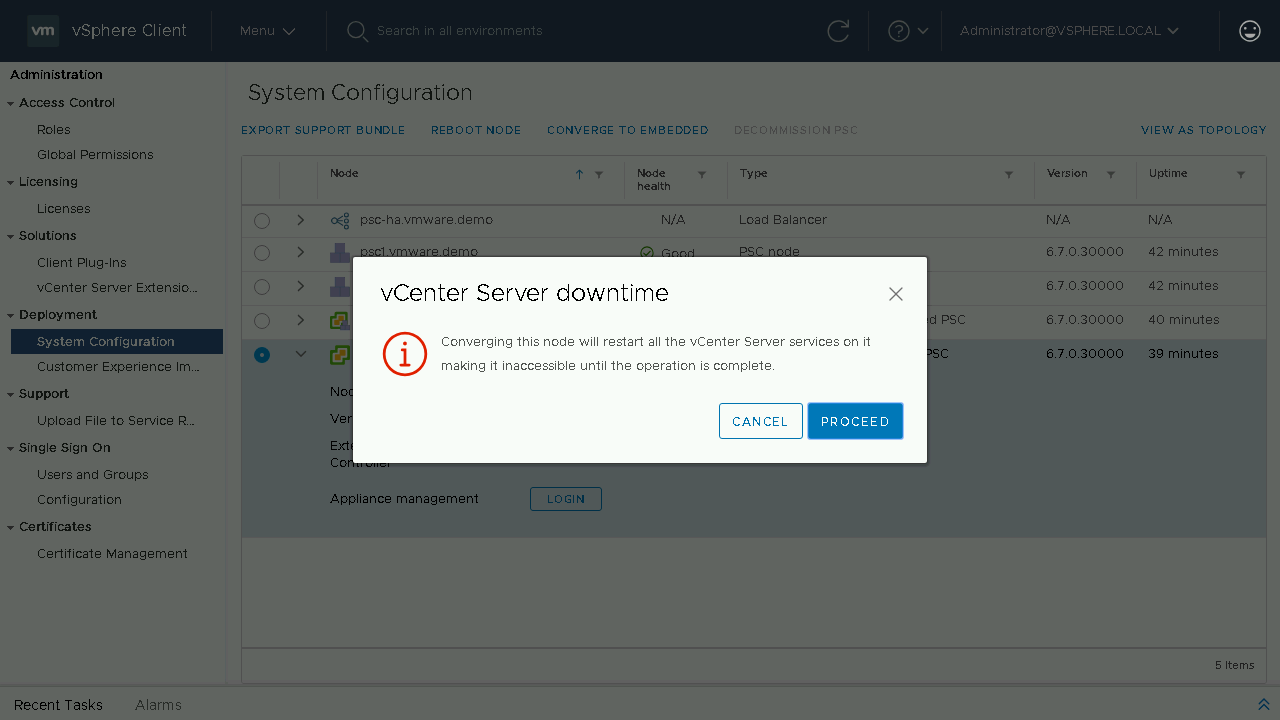
To begin our converge process we will select our first vCenter Server Appliance we wish to converge. We will then choose the Converge to Embedded option.Note: Converging through the vSphere Client will default to downloading the latest RPM's from the VMware Online Repository. If your vCenter Server does not have internet access you will either need to configure a custom repository or proceed to download and mount the VCSA ISO to the vCenter Server Appliance.
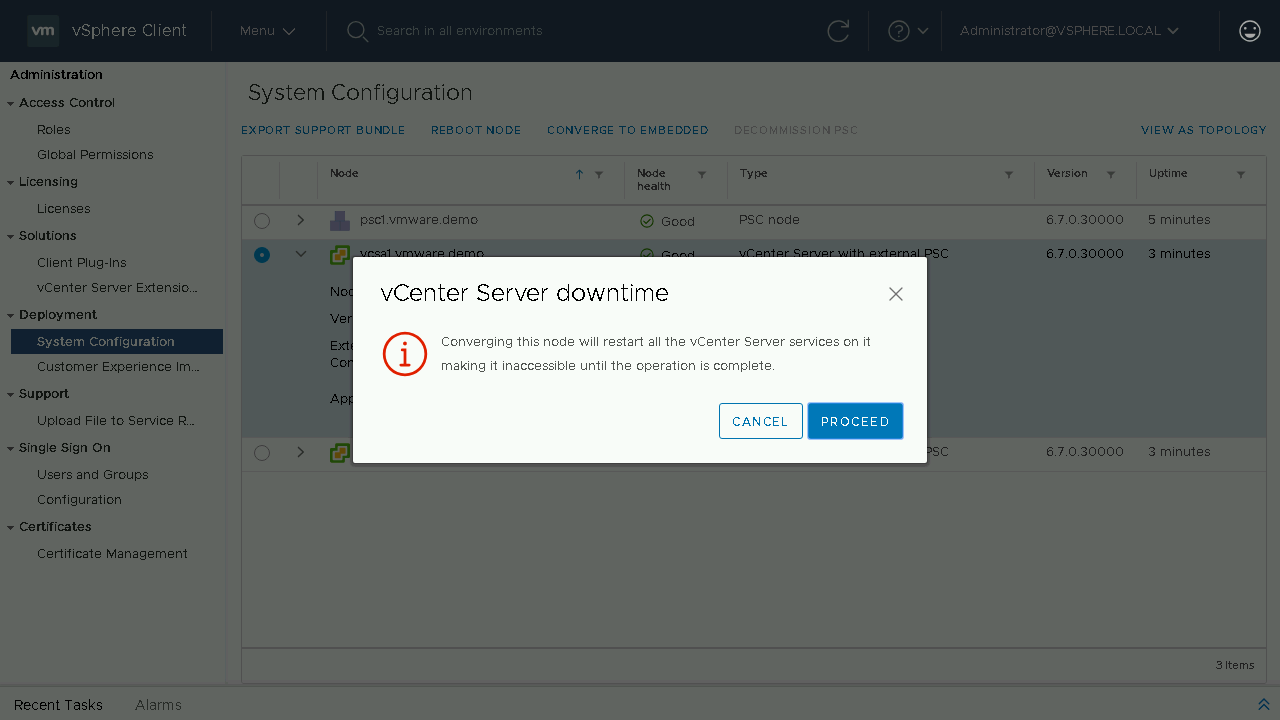
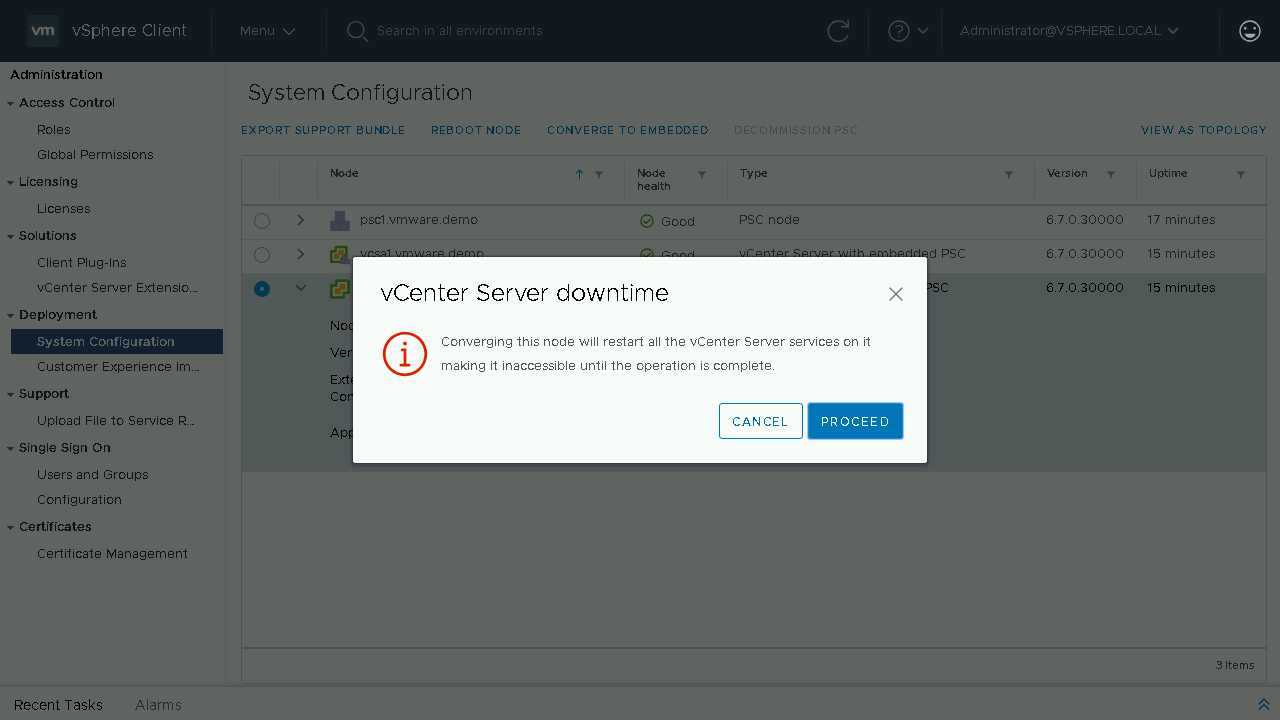
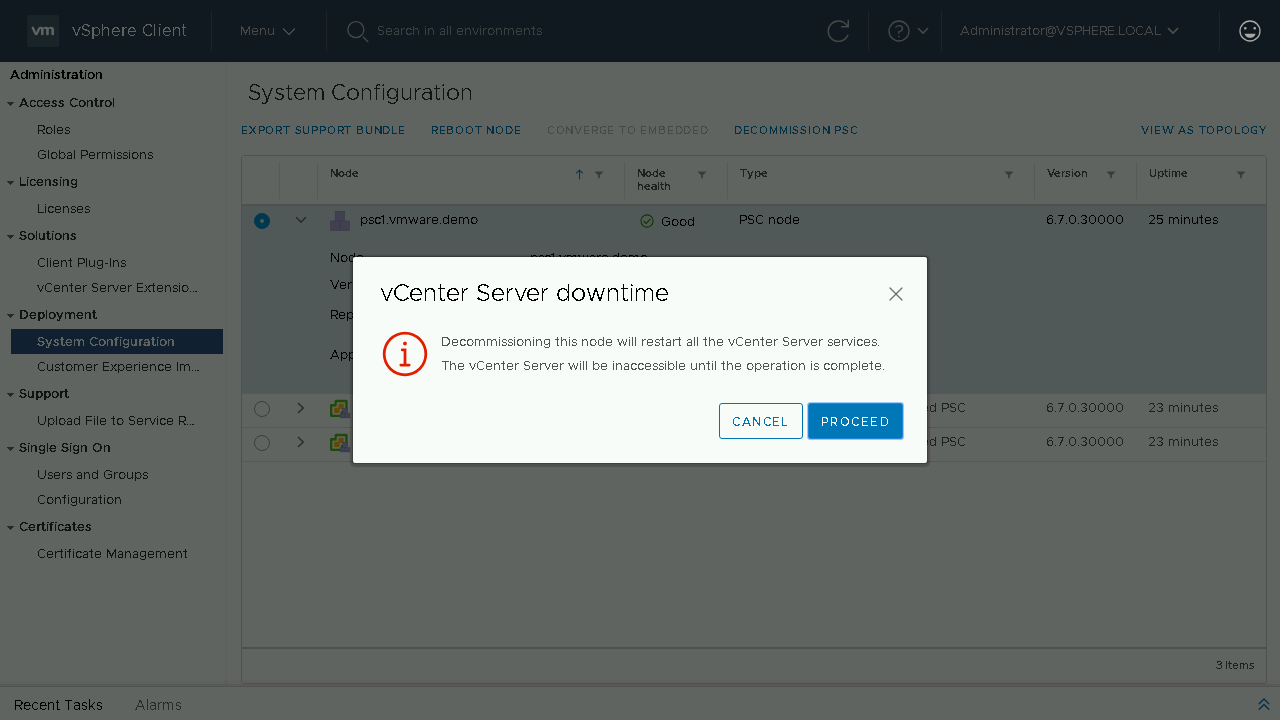
You will need to click Proceed on the warning that states that during the converge process the vCenter Server that you are converging will have its services restarted during the process

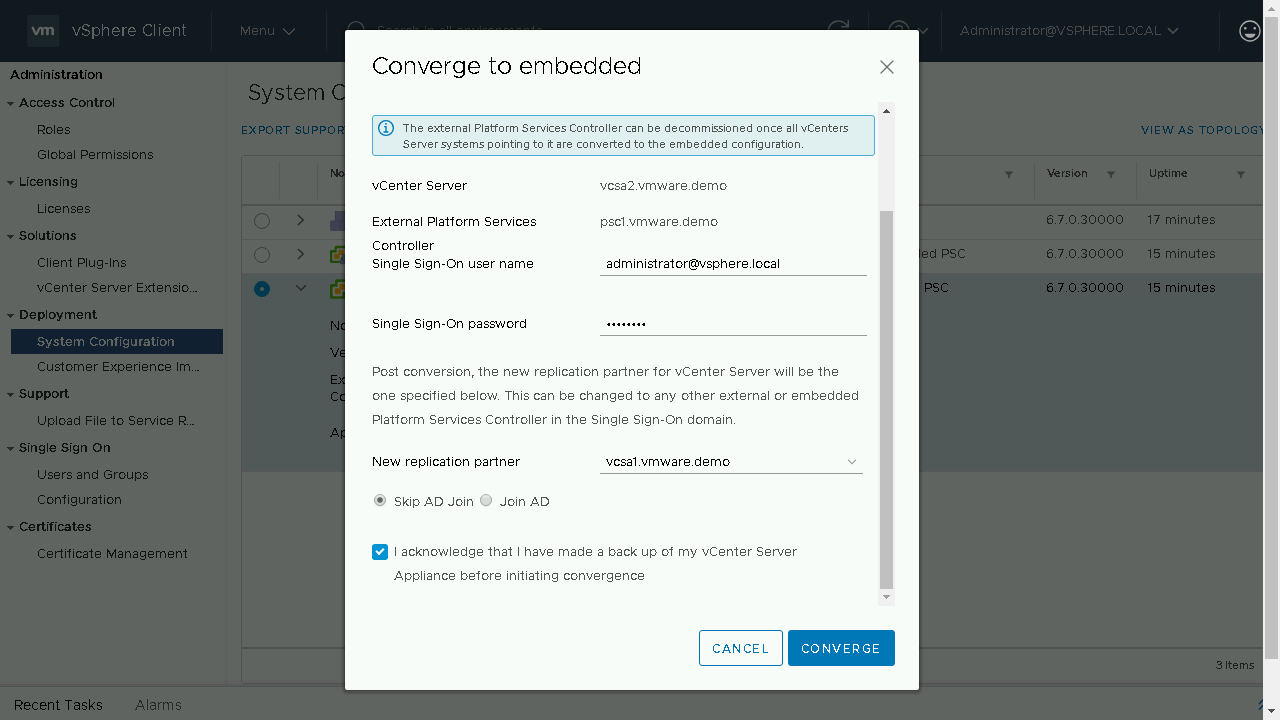
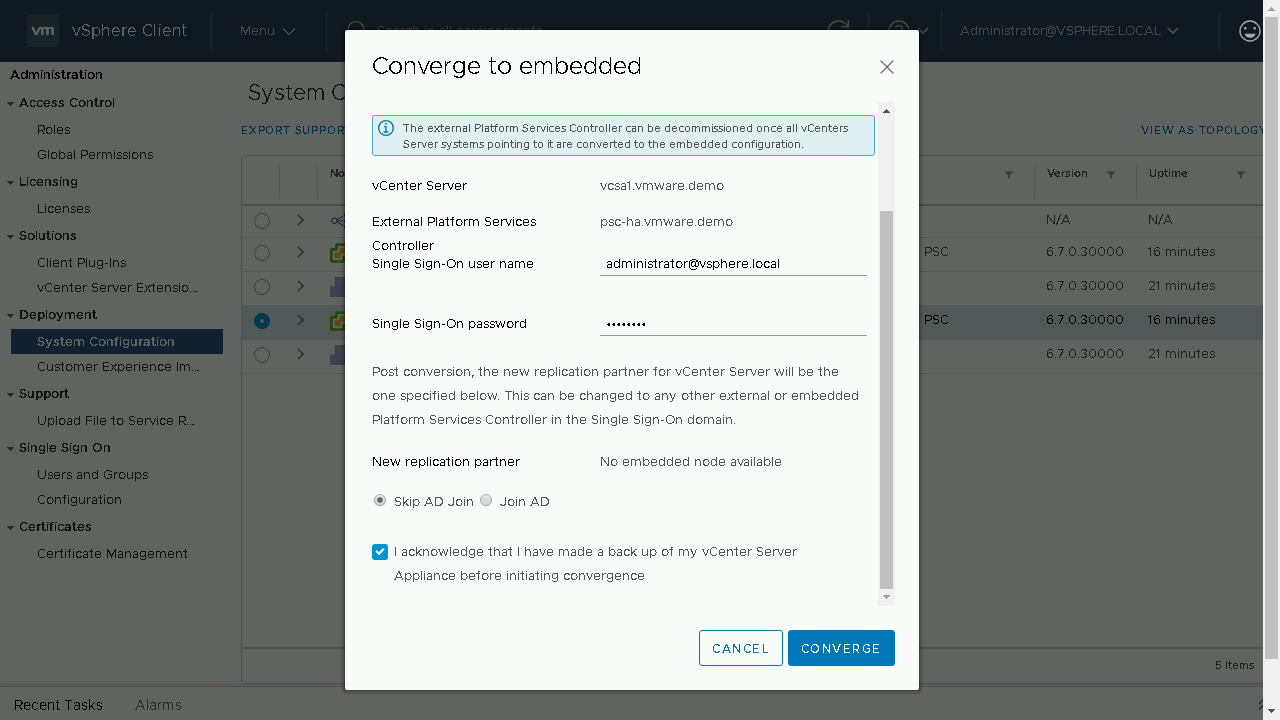
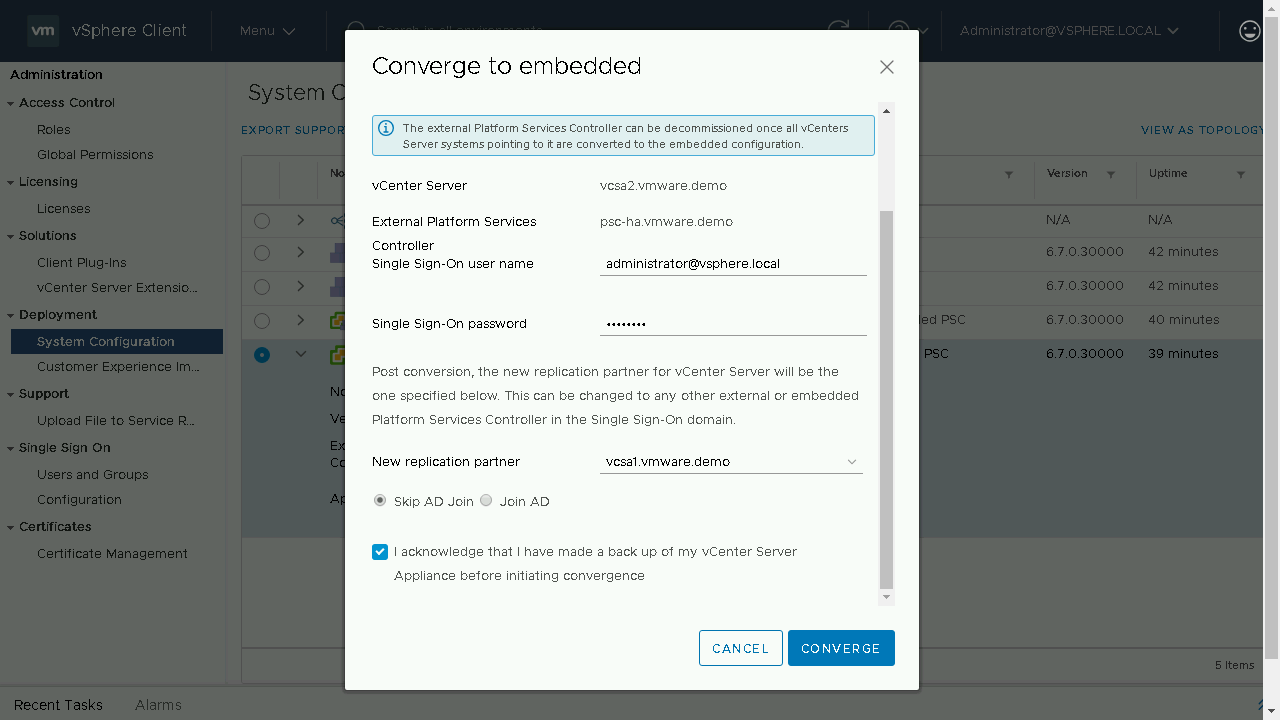
We will be prompted to enter in the details of our Single-Sign On administrator account. We will be notified of the new replication partner for this Embedded vCenter Server. As this is the first vCenter Server we are converting it will show that there is No embedded node available, this server will use its existing replication data to syncronize its data. (Optional) If you wish to join your vCenter Server appliance to Active Directory you can proceed to enter in the details on this screen. Once the information has been entered, we will acknowledge that we have made a backup of the vCenter Server appliance before proceeding.
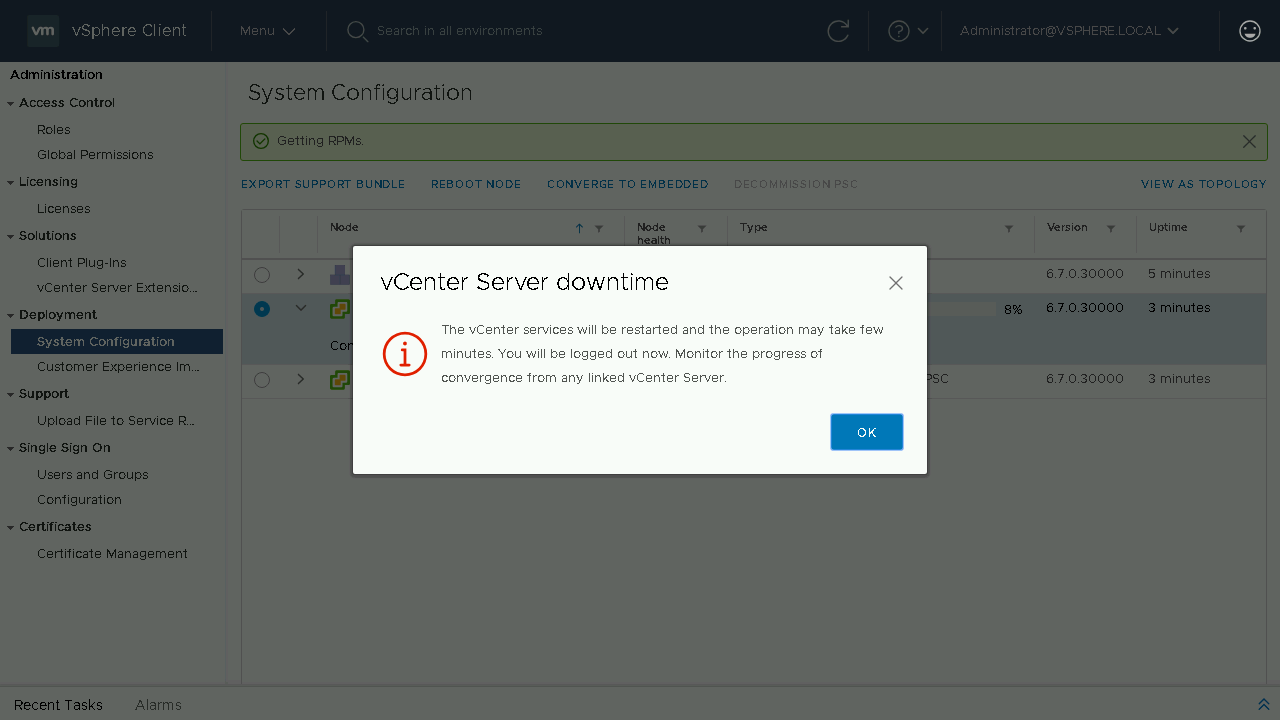
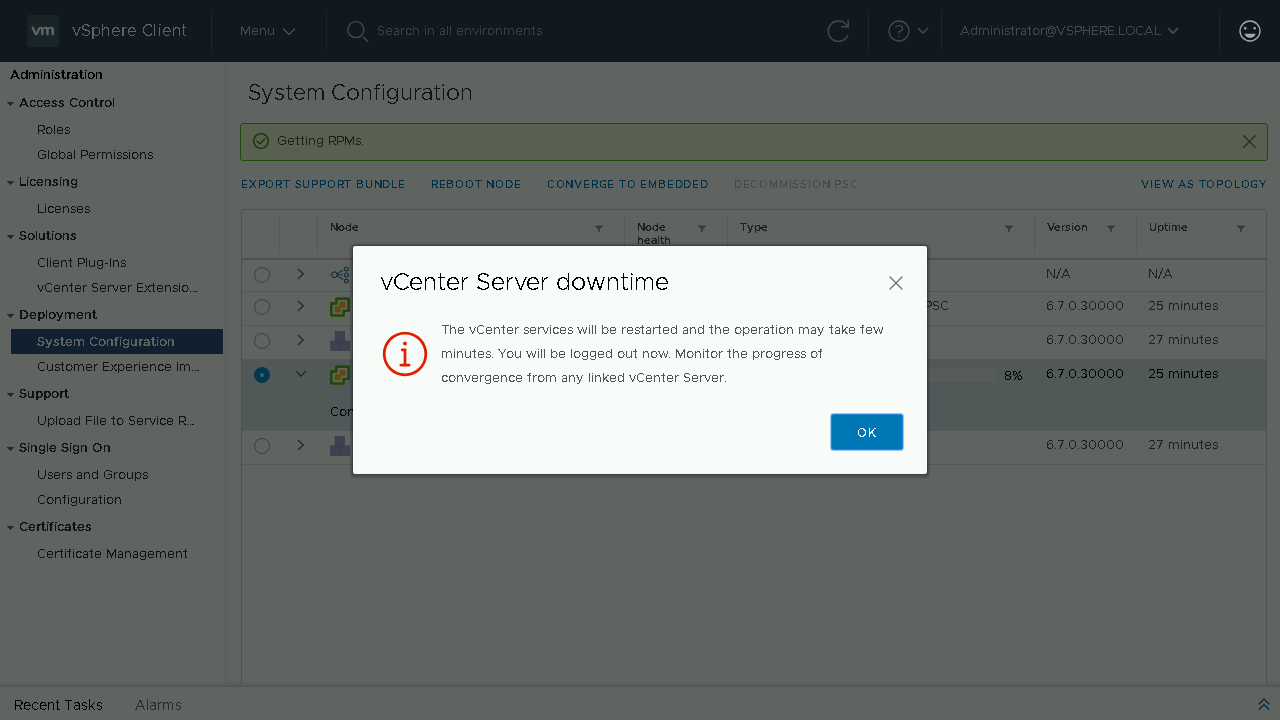
During the converge process a Pre-Check will be run to identify any issues. If no issues exist it will proceed to install the PSC components on the vCenter Server from the configured repository. Once the converge process is complete, you will be notified that the services will need to restart and that you will be logged off. If you have another linked vCenter Server you can log onto that server to monitor the convergence or wait a few minutes until the original vCenter Server comes back online.
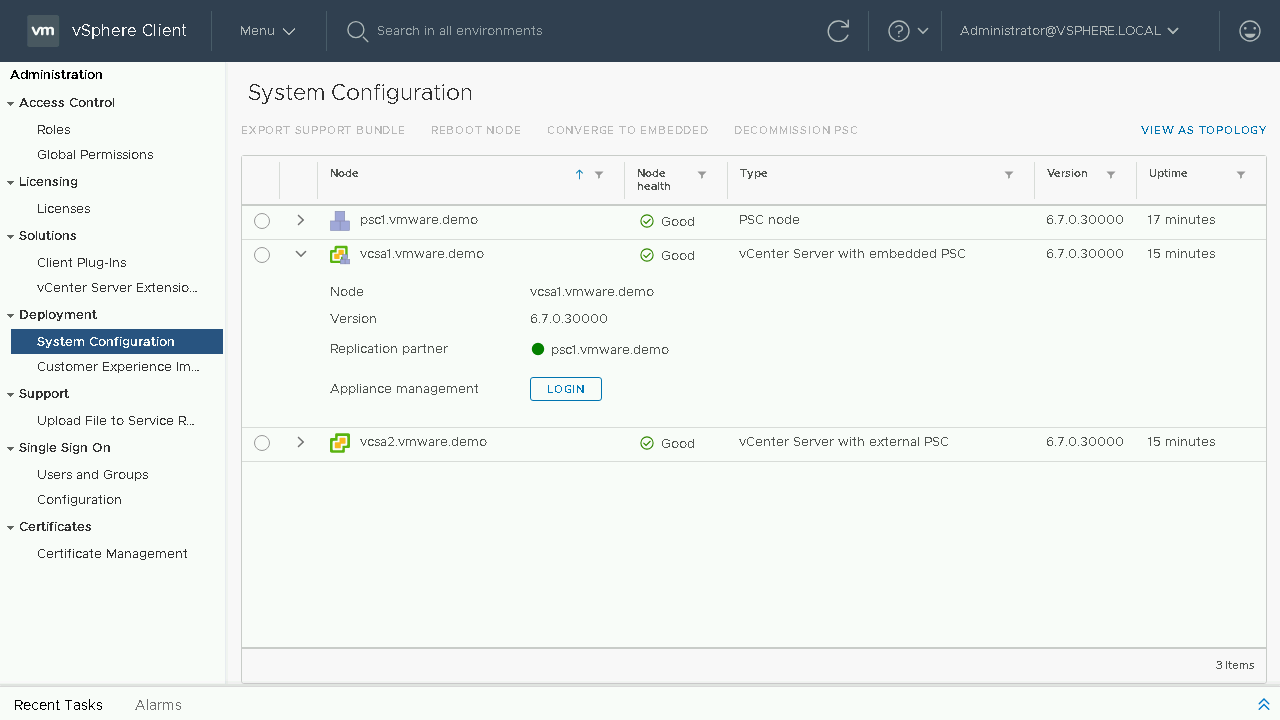
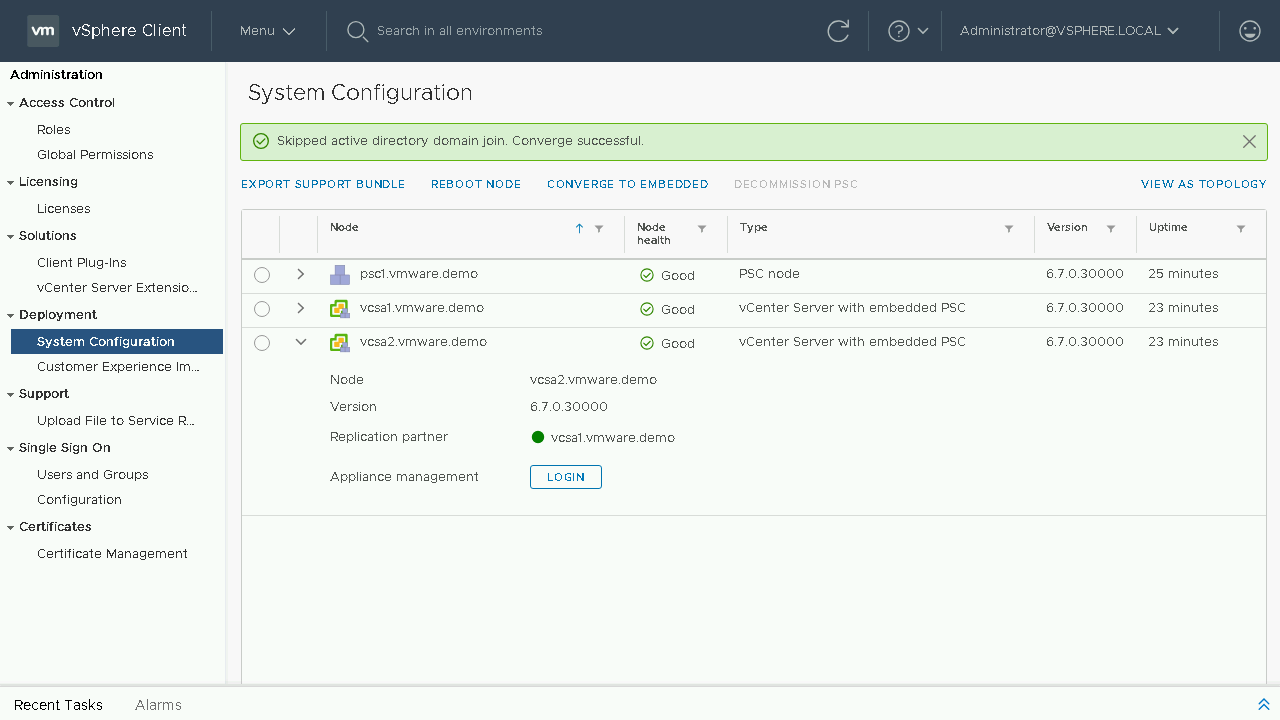
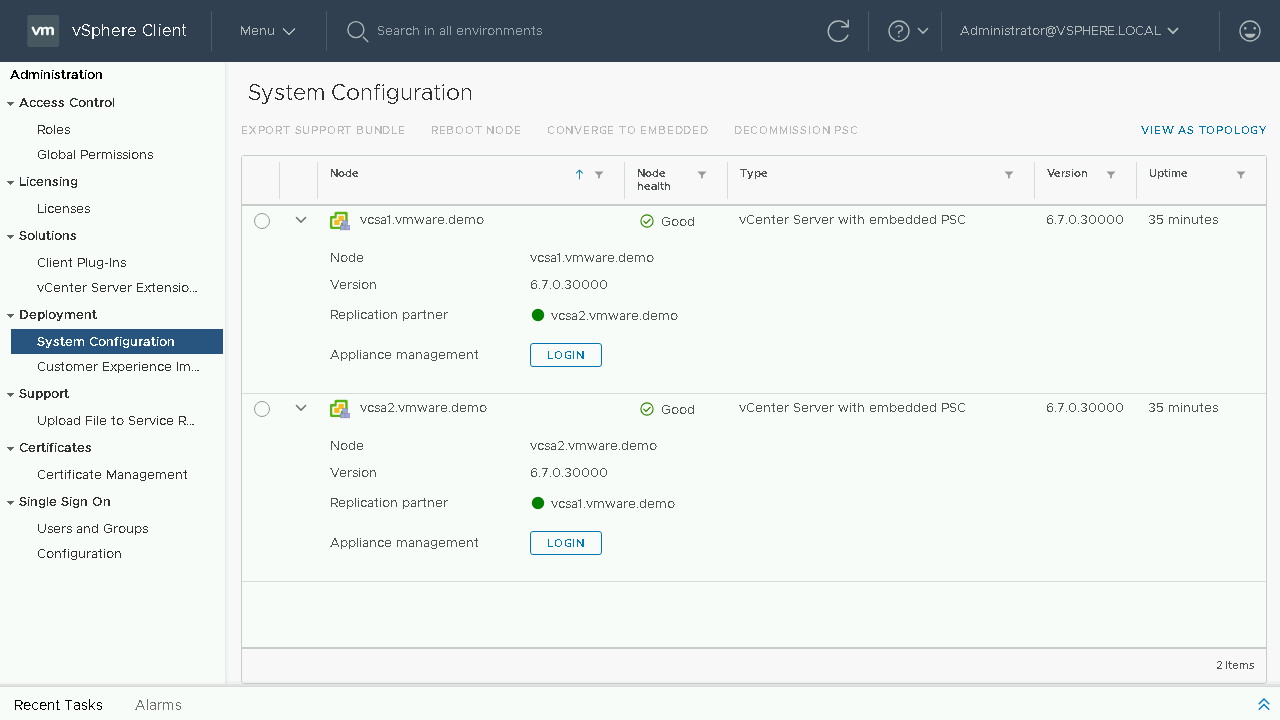
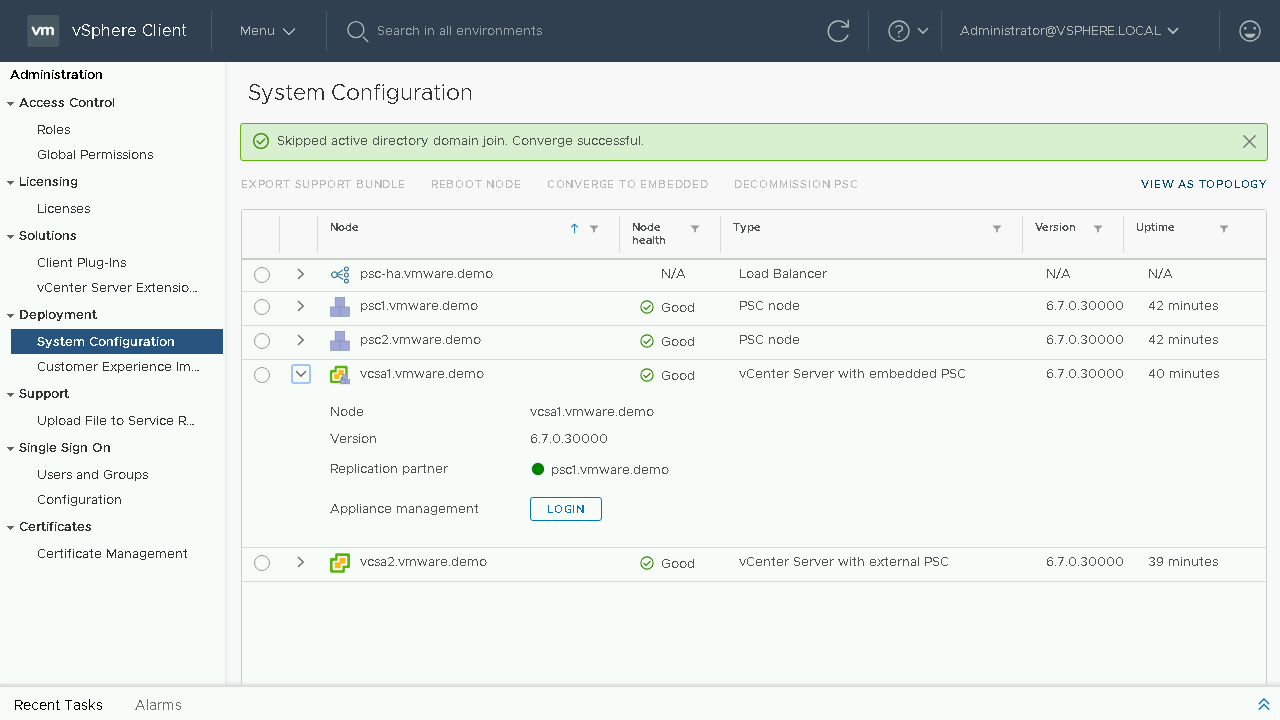
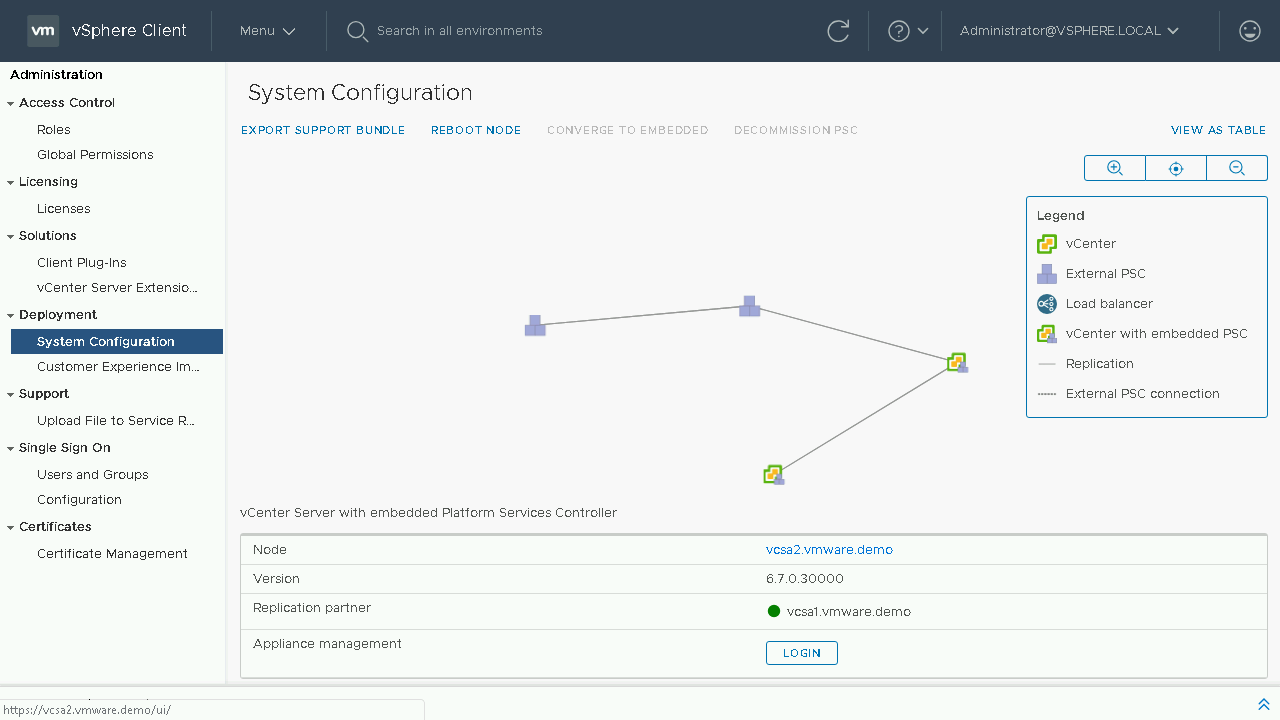
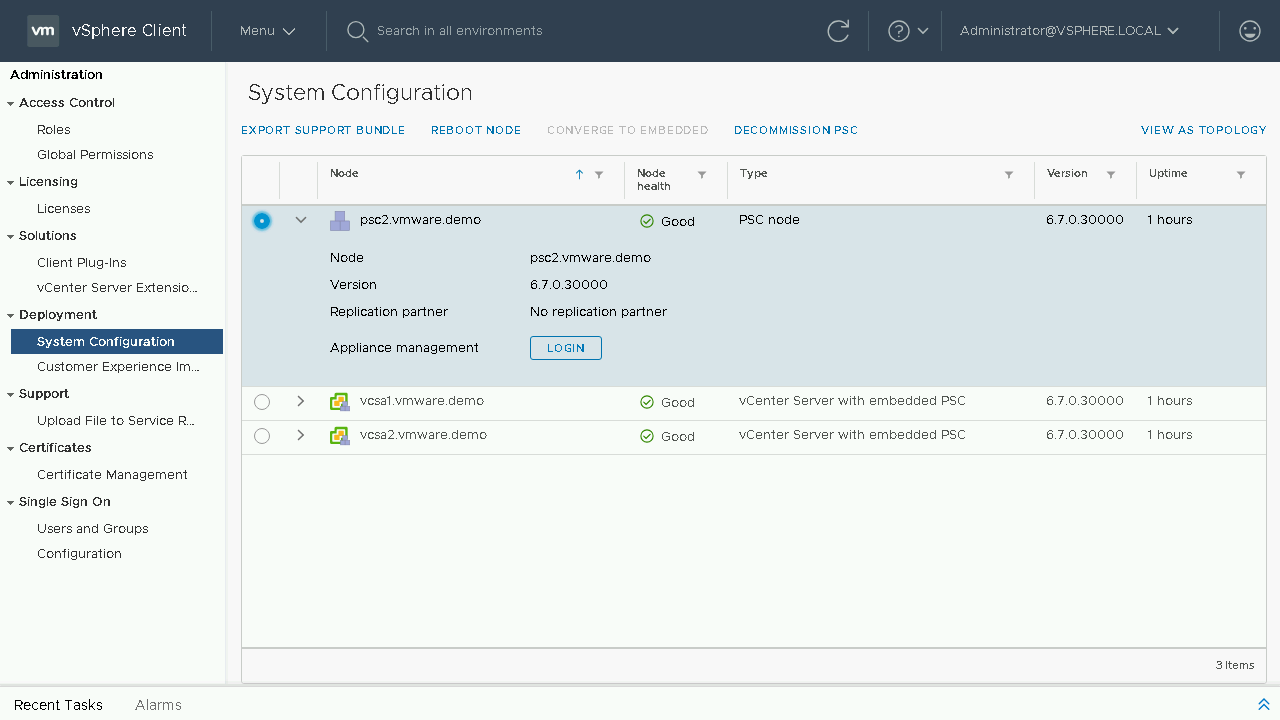
Once we are able to log back in we will see that the convergence of our vCenter Server is complete and in the table it now shows it as a vCenter Server with embedded PSC. Let's head back to the Topology View and see how our systems are shown.

We can now see our updated topology view. Let's proceed back to the Table View to proceed with the process to converge our next vCenter Server.
Continuing our converge process we will select our next vCenter Server Appliance we wish to converge. We will then choose the Converge to Embedded option. Note: Converging through the vSphere Client will default to downloading the latest RPM's from the VMware Online Repository. If your vCenter Server does not have internet access you will either need to configure a custom repository or proceed to download and mount the VCSA ISO to the vCenter Server Appliance.
You will need to click Proceed on the warning that states that during the converge process the vCenter Server that you are converging will have its services restarted during the process
We will be prompted to enter in the details of our Single-Sign On administrator account. We will be notified of the new replication partner for this Embedded vCenter Server. As this is the next vCenter Server we are converting it will show the existing Embedded vCenter Servers that are available. (Optional) If you wish to join your vCenter Server appliance to Active Directory you can proceed to enter in the details on this screen. Once the information has been entered, we will acknowledge that we have made a backup of the vCenter Server appliance before proceeding.

During the converge process a Pre-Check will be run to identify any issues. If no issues exist it will proceed to install the PSC components on the vCenter Server from the configured repository. Once the converge process is complete, you will be notified that the services will need to restart and that you will be logged off. If you have another linked vCenter Server you can log onto that server to monitor the convergence or wait a few minutes until the original vCenter Server comes back online.
Once we are able to log back in we will see that the convergence of our vCenter Server is complete and in the table it now shows it as a vCenter Server with embedded PSC. Let's head back to the Topology View and see how our systems are shown.
We can now see our updated topology view. Let's proceed back to the Table View to proceed with the process to converge our next vCenter Server

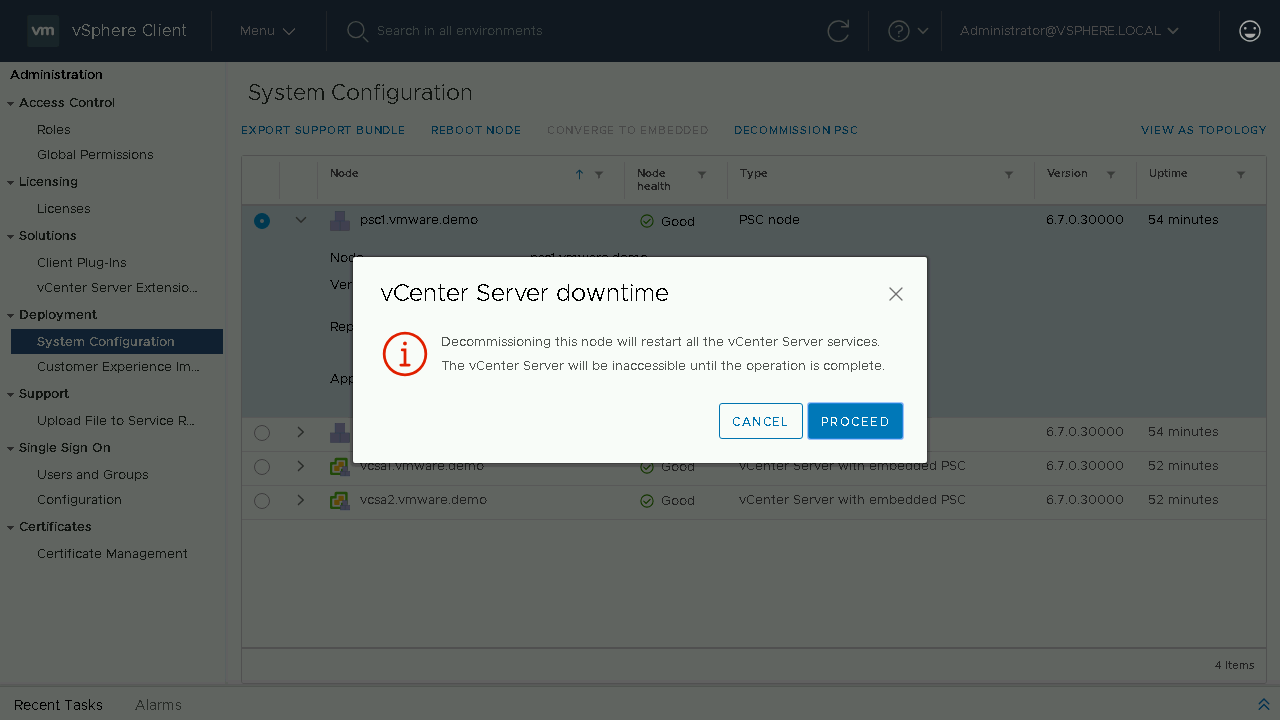
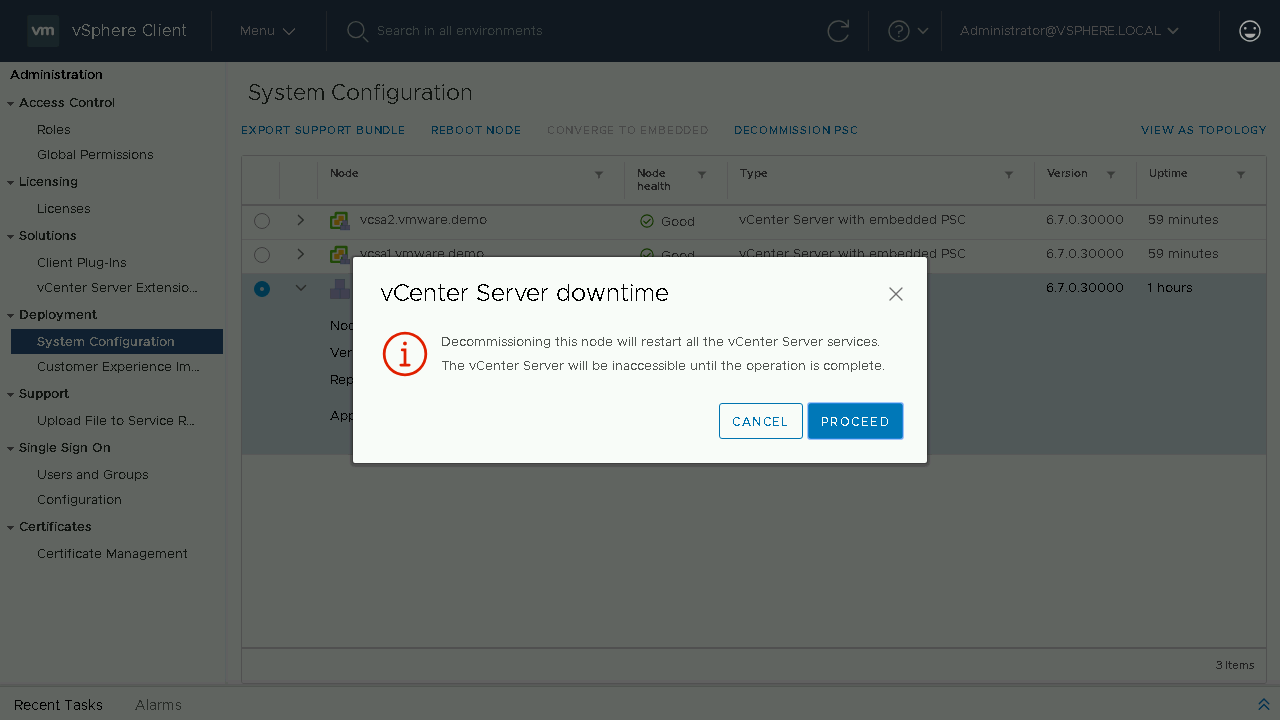
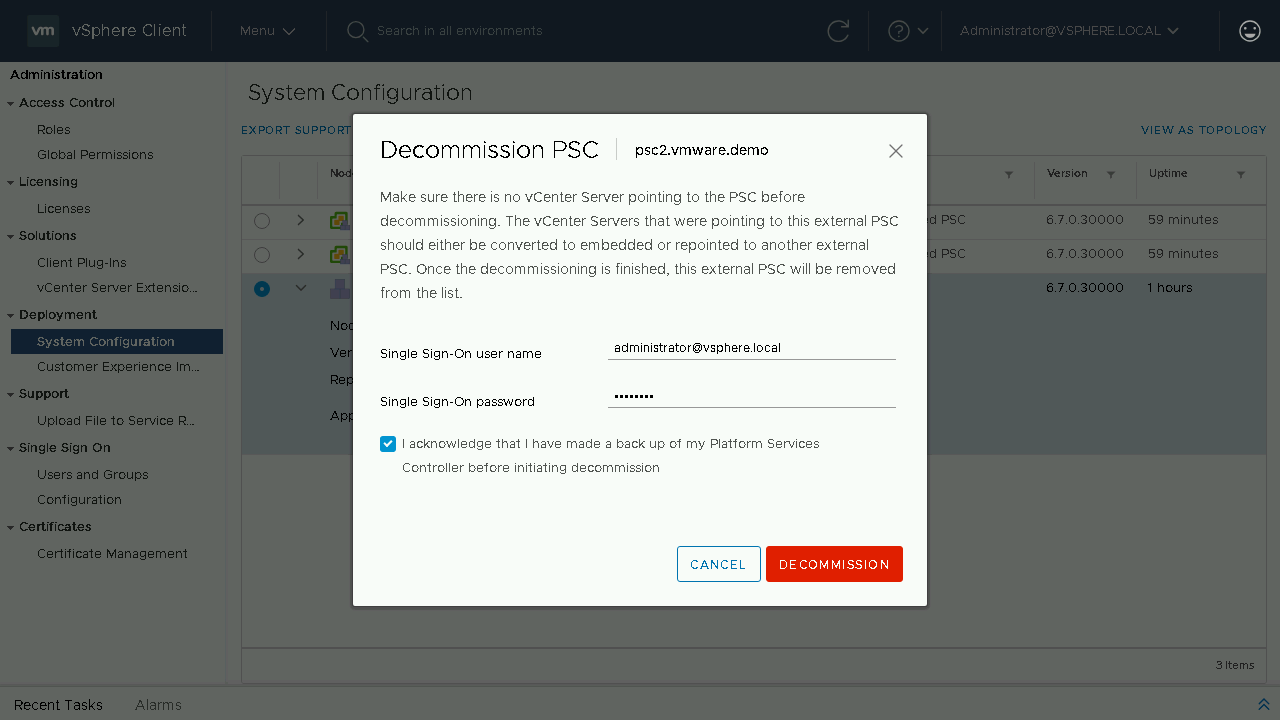
IMPORTANT: Prior to starting the decommission process we need to make sure we re-register any solution that is currently registered with an External PSC to now use the Embedded vCenter Server such as NSX or SRM. To begin our decommission process, we will select our first External PSC and select Decommission PSC.
During the decommission process the External PSC will be shutdown and unregistered from the SSO domain. During the process the currently logged on vCenter Server services will also be restarted.
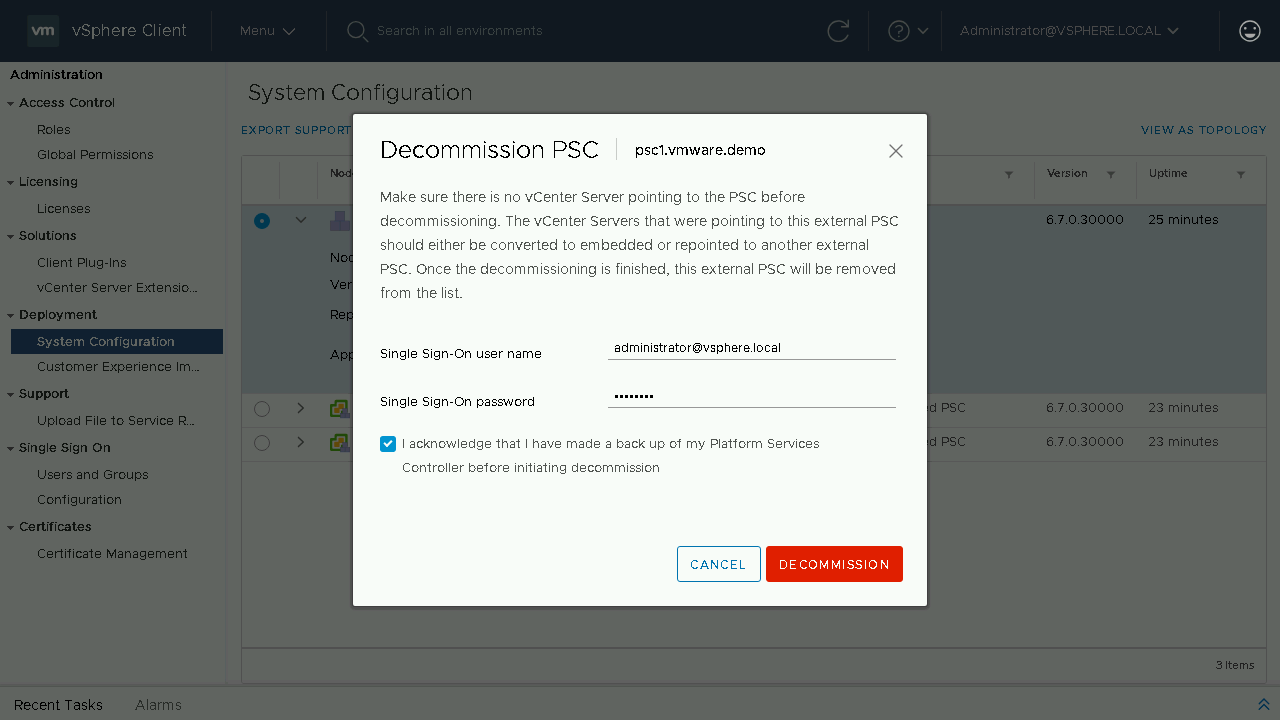
You will once again be reminded to make sure that there are no solutions or vCenter Servers pointing to the External PSC. Once it is decommissioned it will be fully removed from your environment. Enter in your SSO credentials and proceed to click Decommission.
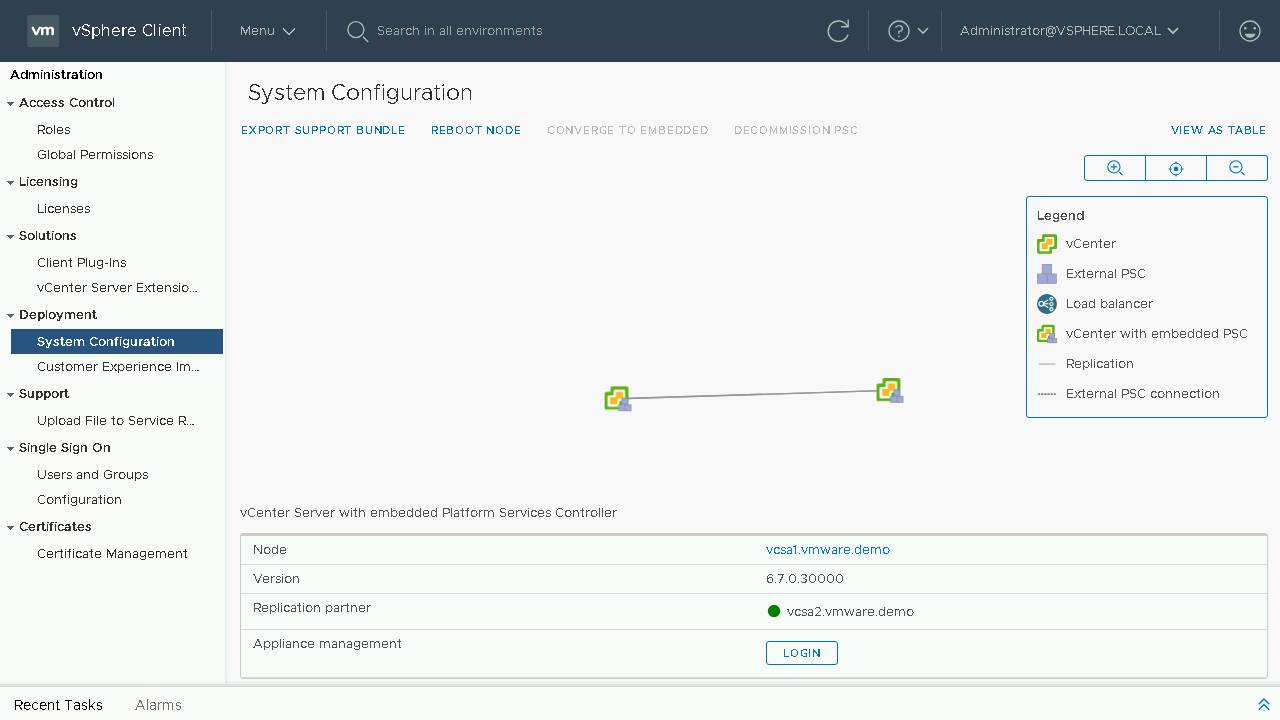
At this point we can now see that our External PSC has now been decommissioned. Let's take one last look at our topology view.

We can now see our final topology for our environment. We have successfully converged our environment from utilizing External PSC's to only utilizing Embedded vCenter Servers.

Thank you for completing the converge walkthrough. You can find more information on our vSphere Blogs.
Walkthrough: Converging a Load Balanced External vCenter Deployment

Announced in November 2018, VMware has stated that the External Platform Services Controller will be deprecated in a future vSphere release. As the External Platform Services Controller (PSC) is going away, a Converge Tool has been provided to migrate you from an External PSC Deployment to an Embedded PSC Deployment. This walkthrough will cover how to use the Converge Tool using the vSphere Client.
.png)
A high level overview on how we will migrate to an Embedded PSC Deployment is as follows:
- We will run the Converge Tool against all vCenter Servers within the Single-Sign On domain
- If any solutions are registered against the Platform Services Controller Lookup Service such as NSX or Site Recovery Manager, we will repoint and update to use the new Embedded PSC URL.
- We will run the Converge Tool to decommission the External Platform Services Controllers within the Single-Sign On Domain.
More information on how to use the vCenter Server Converge Tool can be found in the following blog posts.
- Understanding the vCenter Server Converge Tool
- Using the vCenter Server Converge Tool in the vSphere Client - vSphere 6.7 Update 2

To begin, let's navigate to Administration.
Once we are in the Administration section, we will select System Configuration.
Included in the System Configuration page is an overview of nodes in your SSO domain, you will see the load balancers, platform services controllers and vCenter Servers. You will also have insight into which node is an External PSC, which node is an Embedded vCenter Server and even see details such as which nodes are its replication partners. Let's proceed to click on the View as Topology and see what is new here.
Included in the System Configuration page is also a toplogy view of nodes in your SSO domain, you will see the load balancers, platform services controllers and vCenter Servers. You will also have insight into which node are which with a graphical representation of Load Balancers, Platform Services Controllers, Embedded vCenter Servers as well as Replications and External PSC Connections. Let's proceed back to the table view to begin our converge process.
To begin our converge process we will select our first vCenter Server Appliance we wish to converge. We will then choose the Converge to Embedded option. Note: Converging through the vSphere Client will default to downloading the latest RPM's from the VMware Online Repository. If your vCenter Server does not have internet access you will either need to configure a custom repository or proceed to download and mount the VCSA ISO to the vCenter Server Appliance.
You will need to click Proceed on the warning that states that during the converge process the vCenter Server that you are converging will have its services restarted during the process.
We will be prompted to enter in the details of our Single-Sign On administrator account. We will be notified of the new replication partner for this Embedded vCenter Server. As this is the first vCenter Server we are converting it will show that there is No embedded node available, this server will use its existing replication data to syncronize its data. (Optional) If you wish to join your vCenter Server appliance to Active Directory you can proceed to enter in the details on this screen. Once the information has been entered, we will acknowledge that we have made a backup of the vCenter Server appliance before proceeding.
During the converge process a Pre-Check will be run to identify any issues. If no issues exist it will proceed to install the PSC components on the vCenter Server from the configured repository. Once the converge process is complete, you will be notified that the services will need to restart and that you will be logged off. If you have another linked vCenter Server you can log onto that server to monitor the convergence or wait a few minutes until the original vCenter Server comes back online.
Once we are able to log back in we will see that the convergence of our vCenter Server is complete and in the table it now shows it as a vCenter Server with embedded PSC. Let's head back to the Topology View and see how our systems are shown.
We can now see our updated topology view. Let's proceed back to the Table View to proceed with the process to converge our next vCenter Server.

Continuing our converge process we will select our next vCenter Server Appliance we wish to converge. We will then choose the Converge to Embedded option. Note: Converging through the vSphere Client will default to downloading the latest RPM's from the VMware Online Repository. If your vCenter Server does not have internet access you will either need to configure a custom repository or proceed to download and mount the VCSA ISO to the vCenter Server Appliance.
You will need to click Proceed on the warning that states that during the converge process the vCenter Server that you are converging will have its services restarted during the process.
We will be prompted to enter in the details of our Single-Sign On administrator account. We will be notified of the new replication partner for this Embedded vCenter Server. As this is the next vCenter Server we are converting it will show the existing Embedded vCenter Servers that are available.(Optional) If you wish to join your vCenter Server appliance to Active Directory you can proceed to enter in the details on this screen. Once the information has been entered, we will acknowledge that we have made a backup of the vCenter Server appliance before proceeding.

During the converge process a Pre-Check will be run to identify any issues. If no issues exist it will proceed to install the PSC components on the vCenter Server from the configured repository. Once the converge process is complete, you will be notified that the services will need to restart and that you will be logged off. If you have another linked vCenter Server you can log onto that server to monitor the convergence or wait a few minutes until the original vCenter Server comes back online.

Once we are able to log back in we will see that the convergence of our vCenter Server is complete and in the table it now shows it as a vCenter Server with embedded PSC. Let's head back to the Topology View and see how our systems are shown.
We can now see our updated topology view. Let's proceed back to the Table View to proceed with the process to converge our next vCenter Server.

IMPORTANT: Prior to starting the decommission process we need to make sure we re-register any solution that is currently registered with an External PSC to now use the Embedded vCenter Server such as NSX or SRM. To begin our decommission process, we will select our first External PSC and select Decommission PSC.
During the decommission process the External PSC will be shutdown and unregistered from the SSO domain. During the process the currently logged on vCenter Server services will also be restarted.

You will once again be reminded to make sure that there are no solutions or vCenter Servers pointing to the External PSC. Once it is decommissioned it will be fully removed from your environment. Enter in your SSO credentials and proceed to click Decommission.
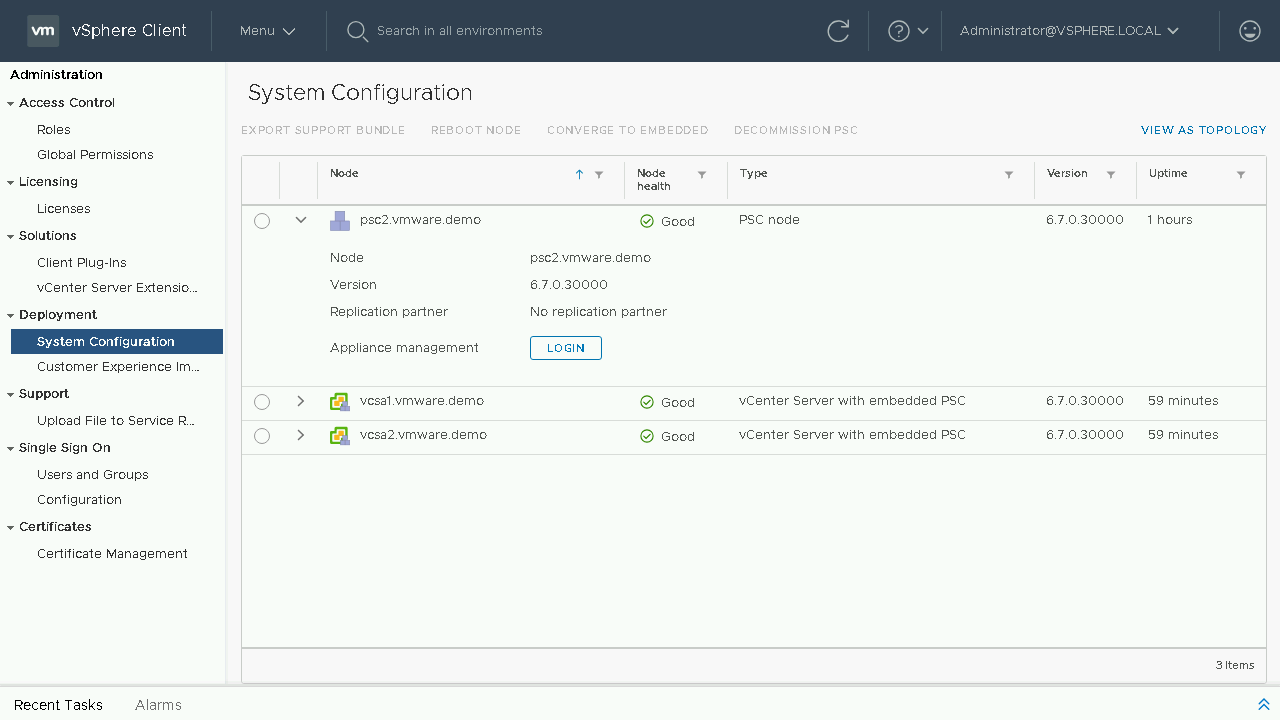
At this point our first External PSC has been decommissioned. Let's proceed to review our current topology.
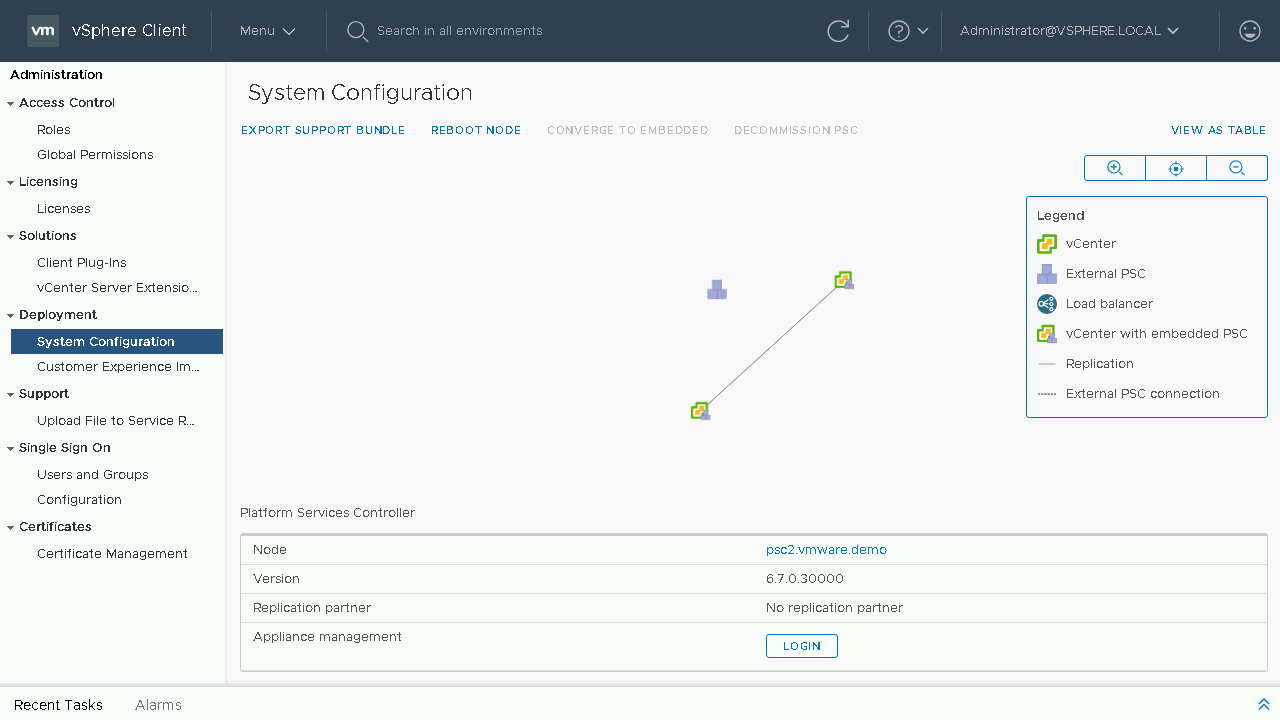
We can see that the first PSC has been removed from our topology diagram and we can go back to the table view to proceed with decommissioning our final External PSC.
IMPORTANT: Prior to starting the decommission process we need to make sure we re-register any solution that is currently registered with an External PSC to now use the Embedded vCenter Server such as NSX or SRM. To begin our decommission process, we will select our next External PSC and select Decommission PSC.
During the decommission process the External PSC will be shutdown and unregistered from the SSO domain. During the process the currently logged on vCenter Server services will also be restarted.
You will once again be reminded to make sure that there are no solutions or vCenter Servers pointing to the External PSC. Once it is decommissioned it will be fully removed from your environment. Enter in your SSO credentials and proceed to click Decommission.

At this point we can now see that our load balancer and External PSC's have now been decommissioned. Let's take one last look at our topology view.
We can now see our final topology for our environment. We have successfully converged our environment from utilizing External PSC's to only utilizing Embedded vCenter Servers.
Thank you for completing the converge walkthrough. You can find more information on our vSphere Blogs.