
Upgrading vCenter Server
Upgrading vCenter Server 6.5 to vCenter Server 6.7 using VCSA CLI
This walkthrough will educate you on how to use the VCSA CLI installer to upgrade an Embedded vCenter Server from vSphere 6.5 to vSphere 6.7
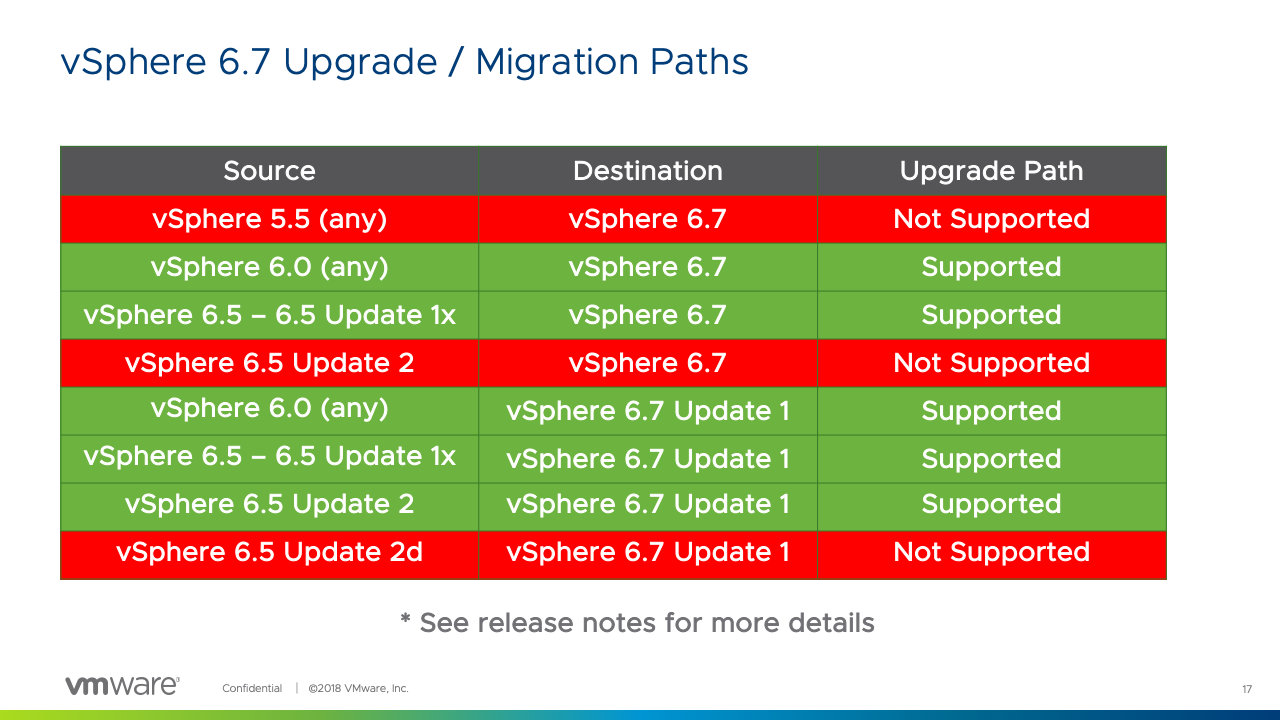
Prior to upgrading your vCenter Server we should make sure we have a supported upgrade path. You cannot currently upgrade from vSphere 6.5 Update 2d to vSphere 6.7.
http://www.vmware.com/go/interop should be used to check for supported upgrade paths within vCenter Server and other VMware products.
Prepare Your JSON Configuration File for CLI Upgrade
In order to use the vCenter Server Appliance CLI you must use the supplied JSON templates. This section will cover how to prepare your JSON configuration file for CLI based upgrades. You can read more about the JSON configuration file within our documentation.
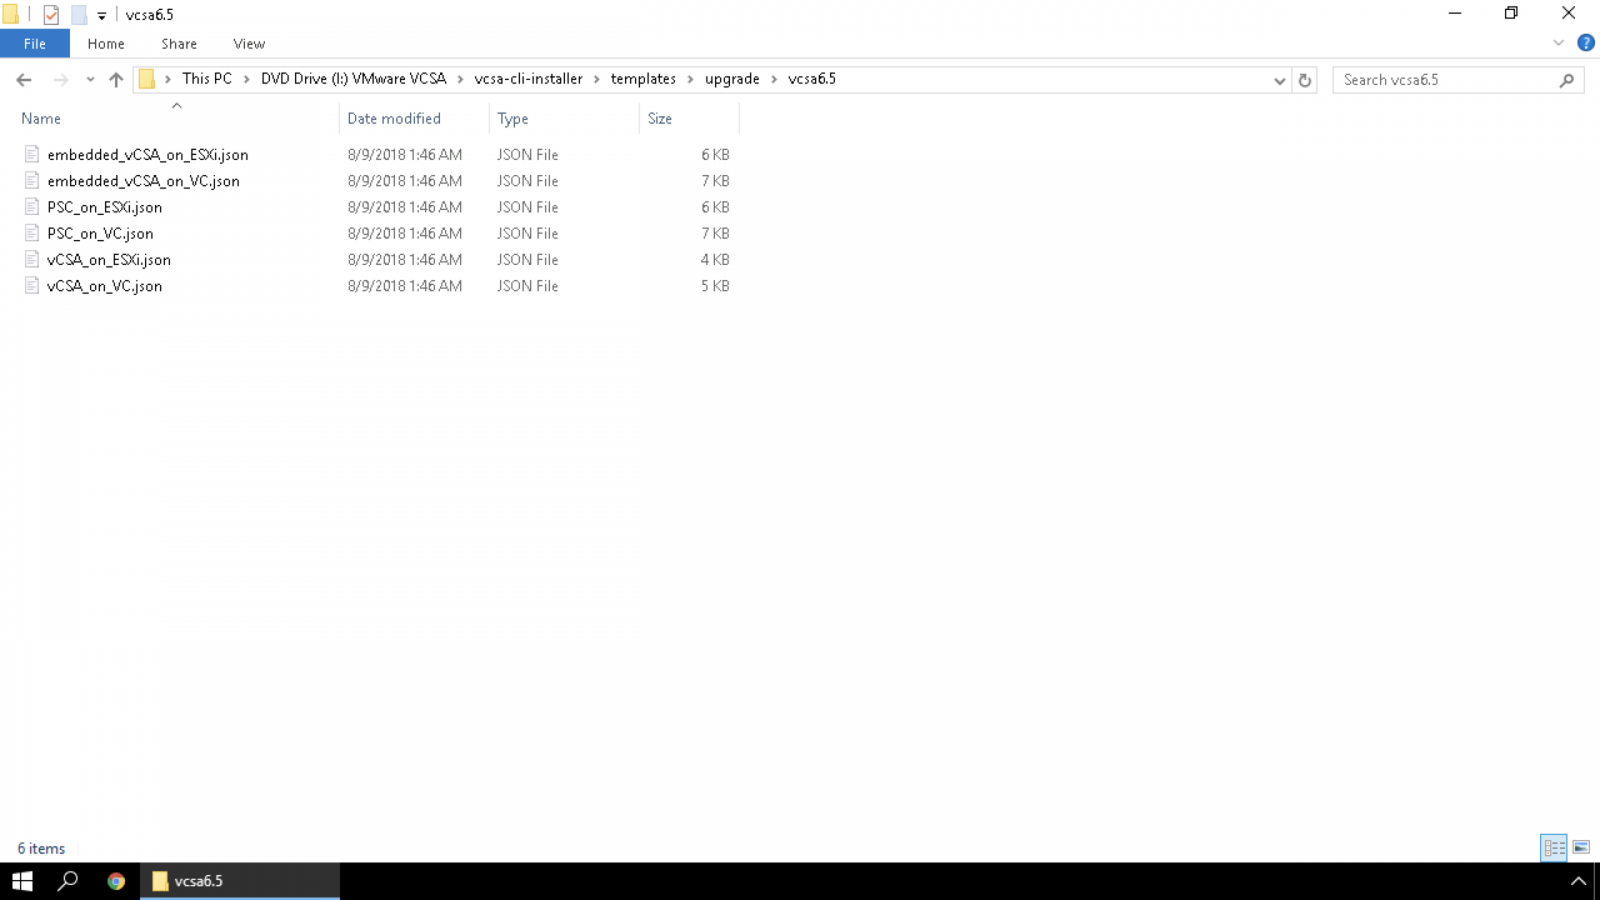
To access the CLI JSON templates we first need to navigate to our vCenter Server Appliance ISO and browse to the vcsa-cli-installer folder. Within this folder will be a folder called templates, and then we will drill down to the upgrade template for vcsa6.5. Once here you can see there are different templates for Embedded and External Deployments as well as if you will deploy your new VCSA to an ESXi host or VC.
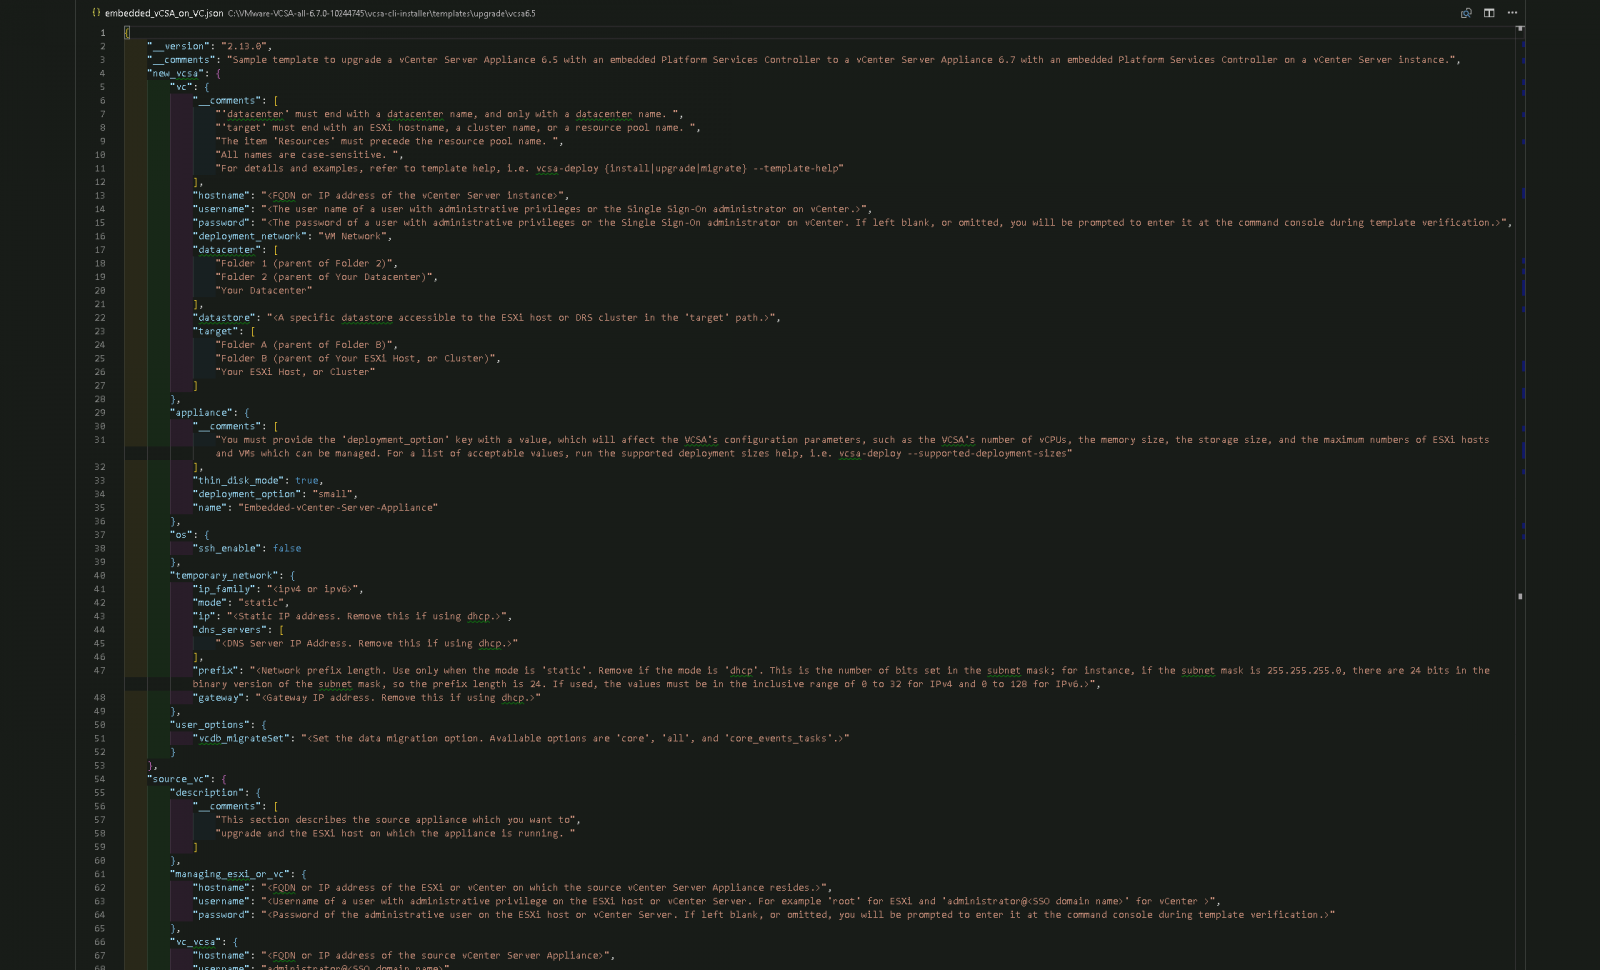
Here is an example of the JSON we will use, it is to upgrade an embedded vCenter Server 6.5 to vCenter Server 6.7. When looking at this template first it may seem overwhelming but do not worry we will cover each section in more depth.
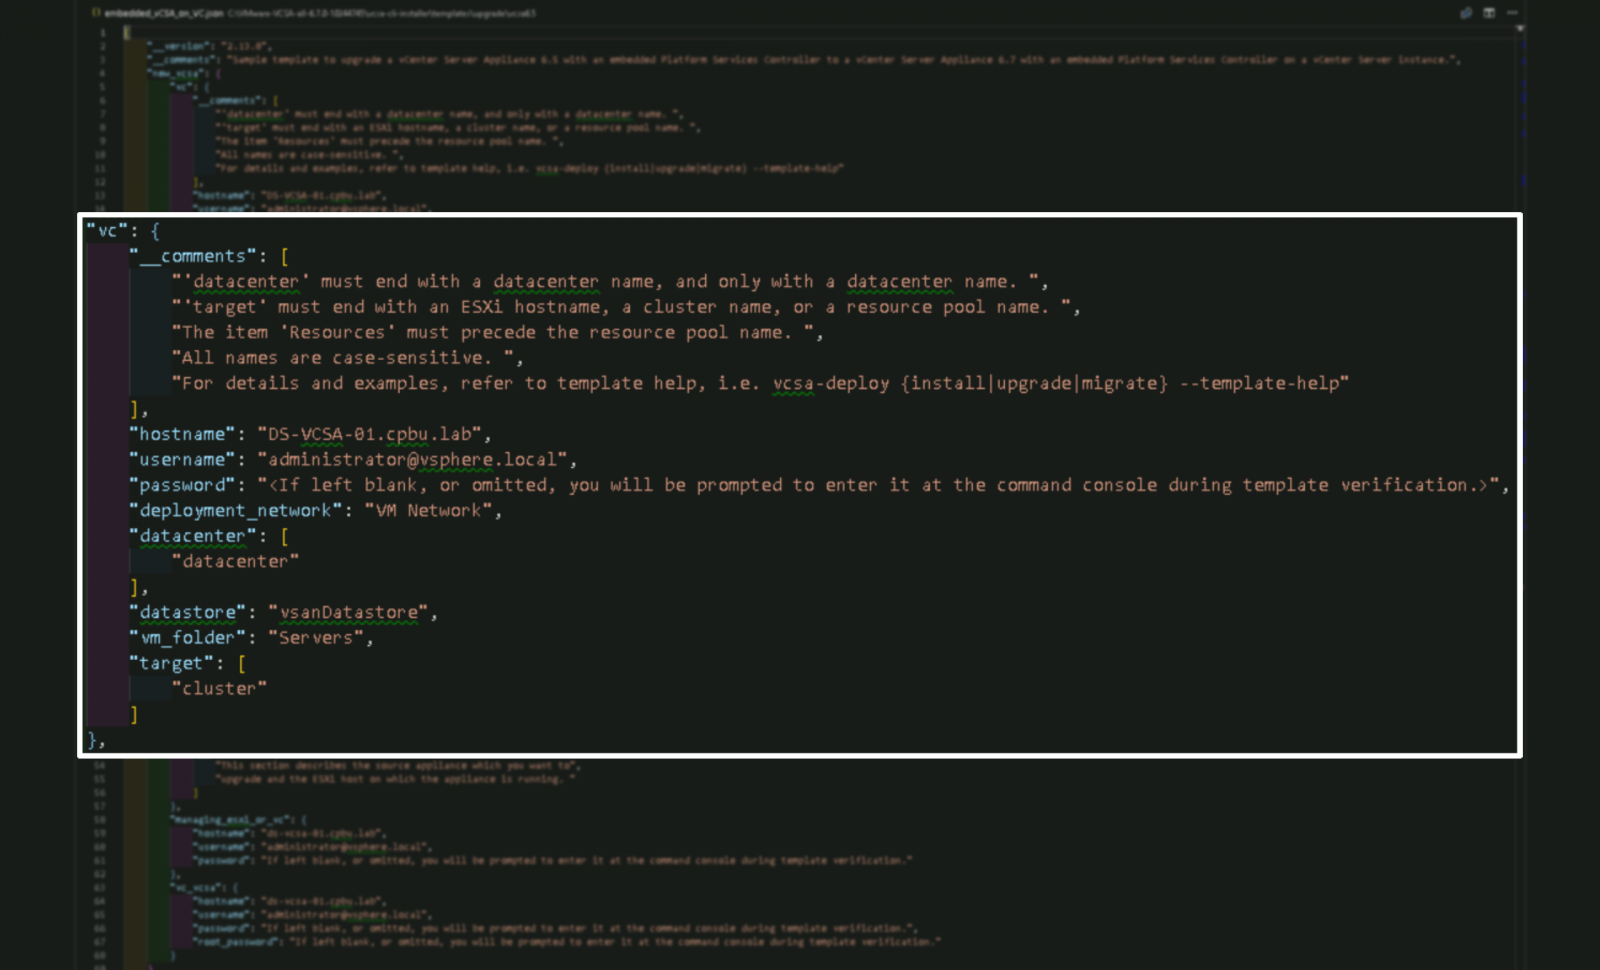
The first section we will look at is the section for the destination vCenter Server (VC). When upgrading from vSphere 6.5 to vSphere 6.7 the upgrade is not done in place, we deploy a brand new vCenter Server 6.7 and import the configuration from the vCenter Server 6.5 appliance. This will ask for for information on where you want to deploy the new vCenter Server Appliance 6.7. Here you will enter in the hostname, username, password, deployment network, datacenter, datastore, vm folder and cluster for the destination vCenter Server.
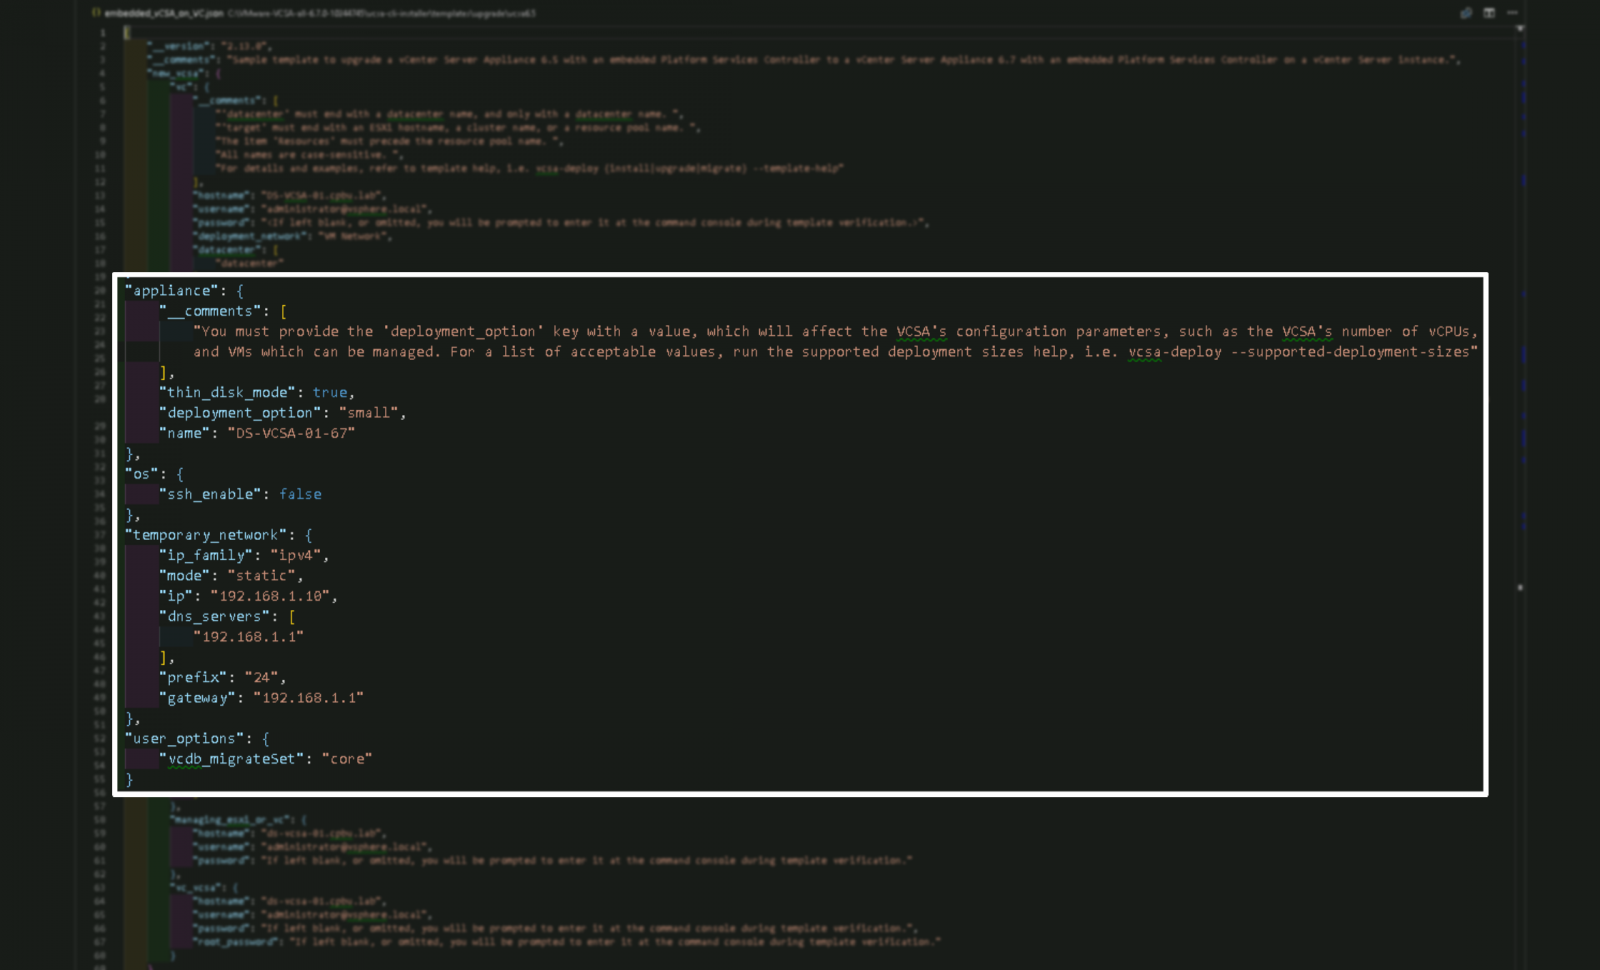
The next section covers configuring the vCenter Server Appliance 6.7. The JSON prompts for information such as thin provisioning, deployment size, inventory name, ssh status, temporary IP information and which user options you wish to migrate. We recommend using core as it will just move the configuration and inventory. For a full list of options please consult the documentation.
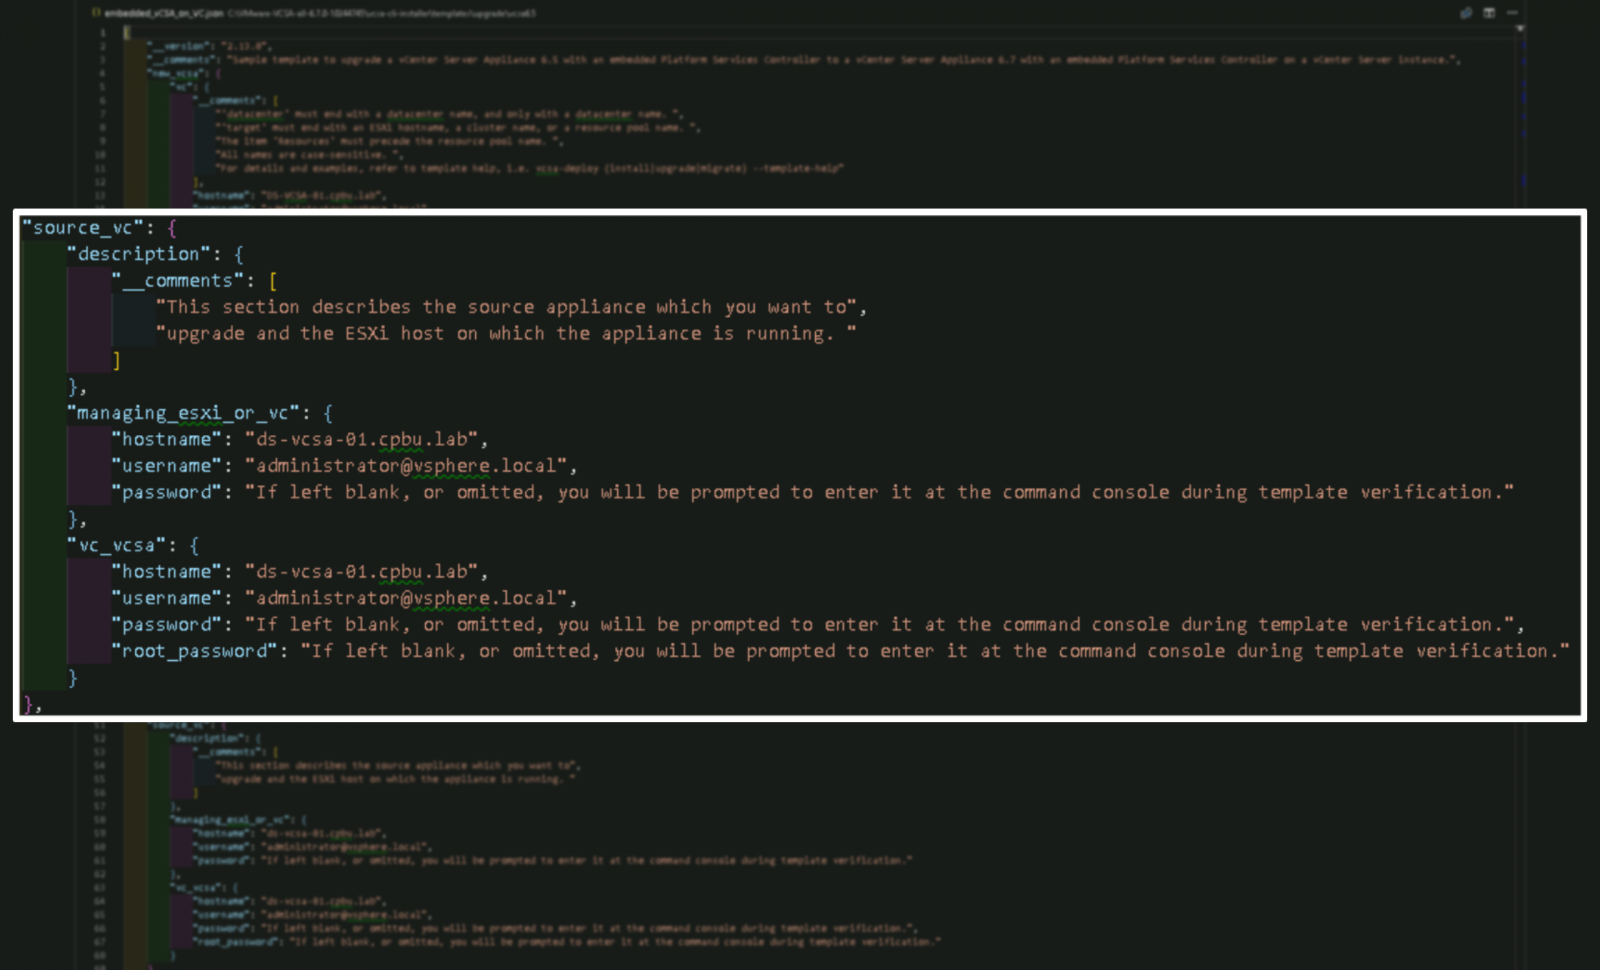
The next section will gather information about the source vCenter Server Appliance 6.5. We need to input information such as the vCenter Server that is managing our source appliance as well as credentials to access our source vCenter Server Appliance.
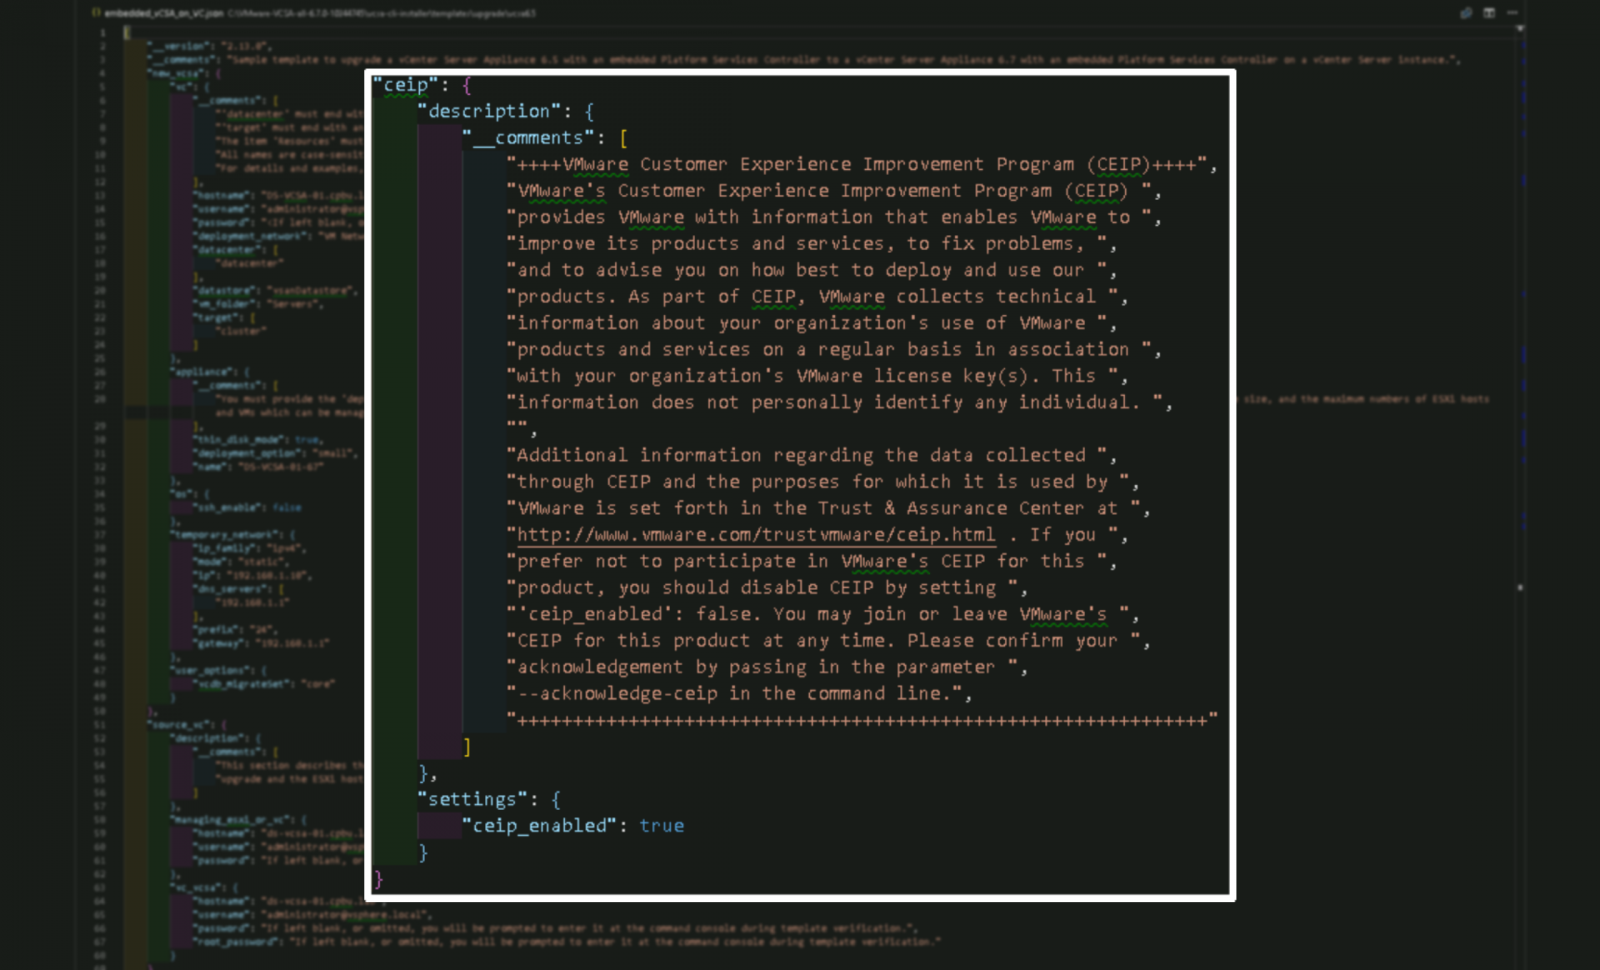
The last section will ask if you wish to enable CEIP. It is recommended to enable CEIP when upgrading to take advantage of Proactive Health Checks such as vSAN Health Checks, vSphere Health and Skyline. To learn more about what information is gathered please view: https://www.vmware.com/solutions/trustvmware/ceip.html
Syntax of the CLI Upgrade Command
Once your JSON template is filled out you can now move forward to execute the CLI upgrade. Before we do that lets explore the syntax of the CLI upgrade command.
vcsa-deploy upgrade path_to_the_json_file list_of_arguments
There are quite a few arguments that can be used, but i want to highlight the two most important ones --verify-template-only and --precheck-only.
You can find more about the syntax of the CLI upgrade command within the vSphere Documentation here or by running vcsa-deploy upgrade --help.
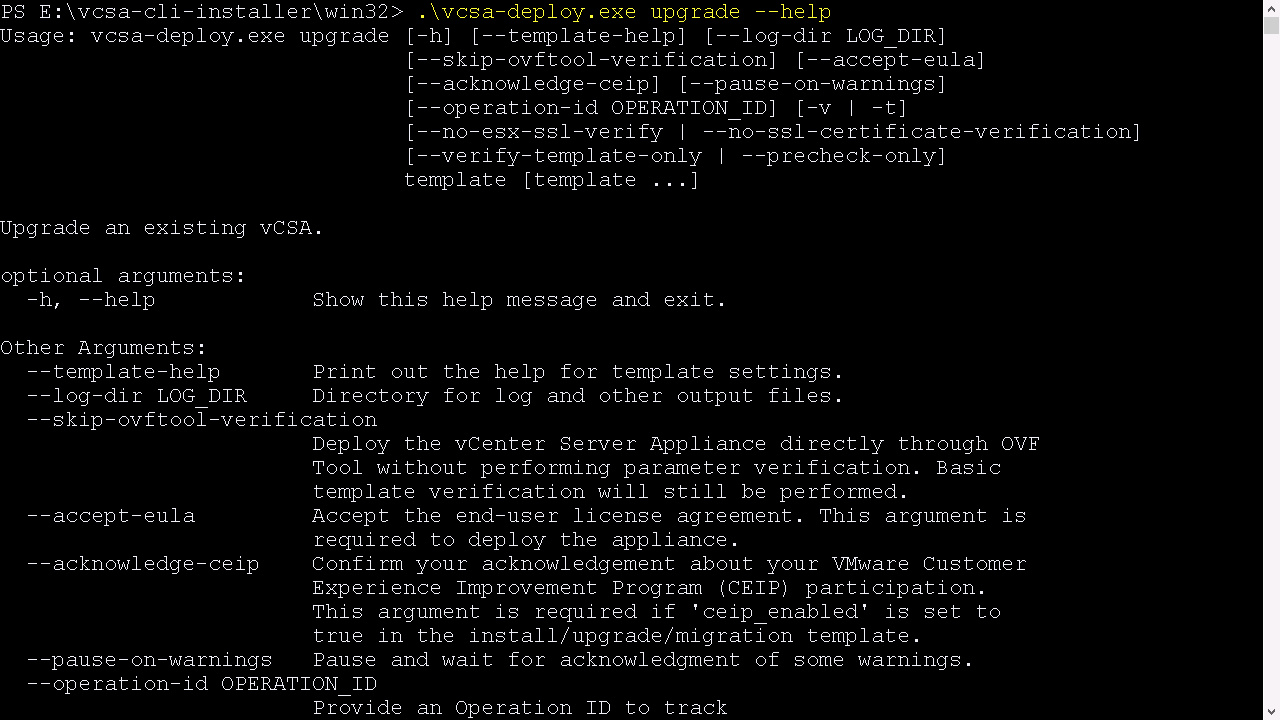
To investigate how to use the vcsa-cli-installer we can run the vcsa-deploy command using the help option. This will give us syntax help as well as understand what each of the arguments do.
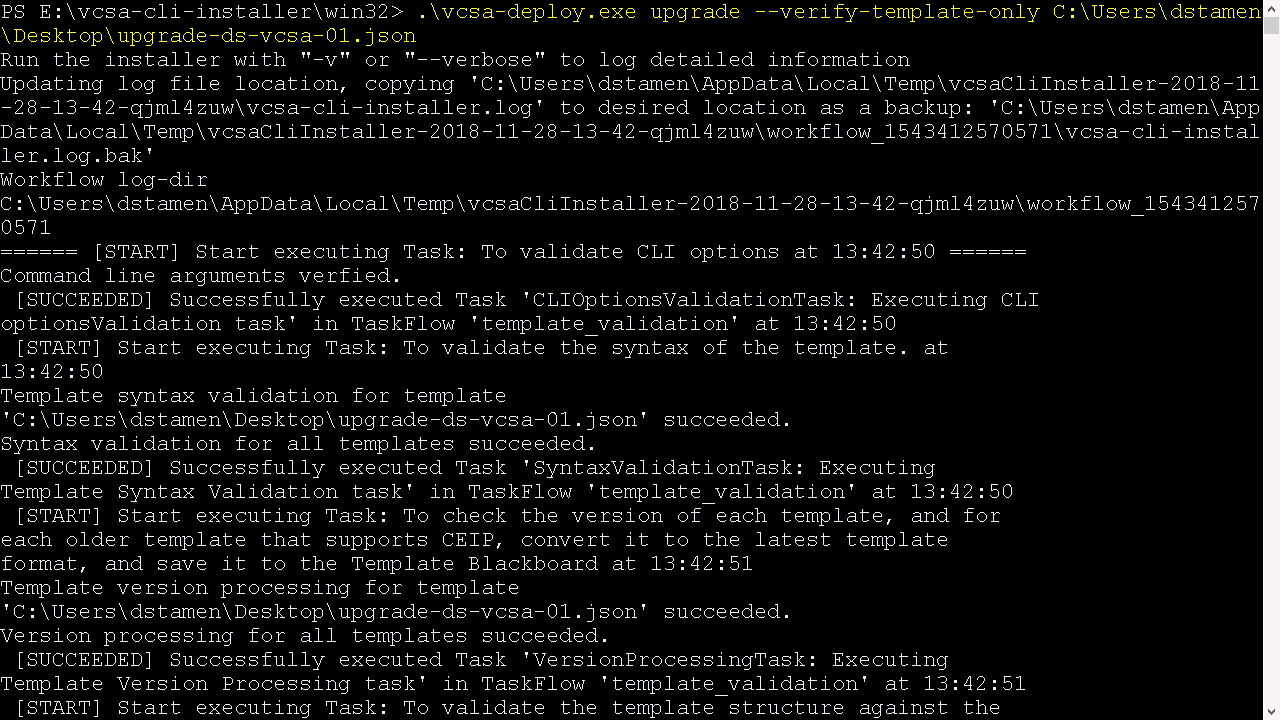
Prior to executing our CLI upgrade against our live environment we should use the --verify-template-only argument to make sure we properly filled out our JSON template. If there are any errors we can remediate them now prior to moving forward to the next step.
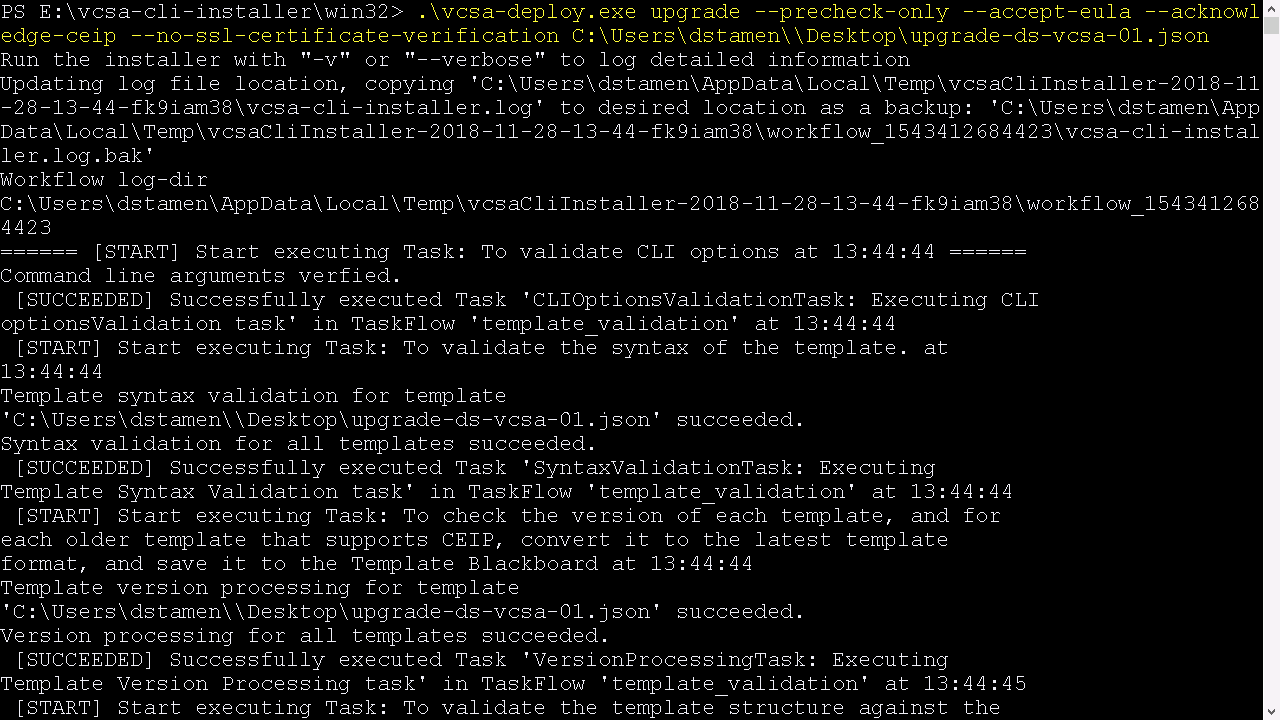
Once we have successfully ran our template verification we can move forward with a precheck. This precheck is a dry-run of the upgrade that will not impact the live environment. It will run through the upgrade making sure there are no issues. Some of these checks make sure you have chosen the correct VCSA size and have provided valid credentials
Please note to successfully execute the precheck you will need to accept the eula and acknowledge the CEIP if that option was chosen.
If our pre-check has succeeded we can move forward with the execution of our upgrade.
If it has failed, you will be notified in the CLI of the errors and can consult the log files for more details.
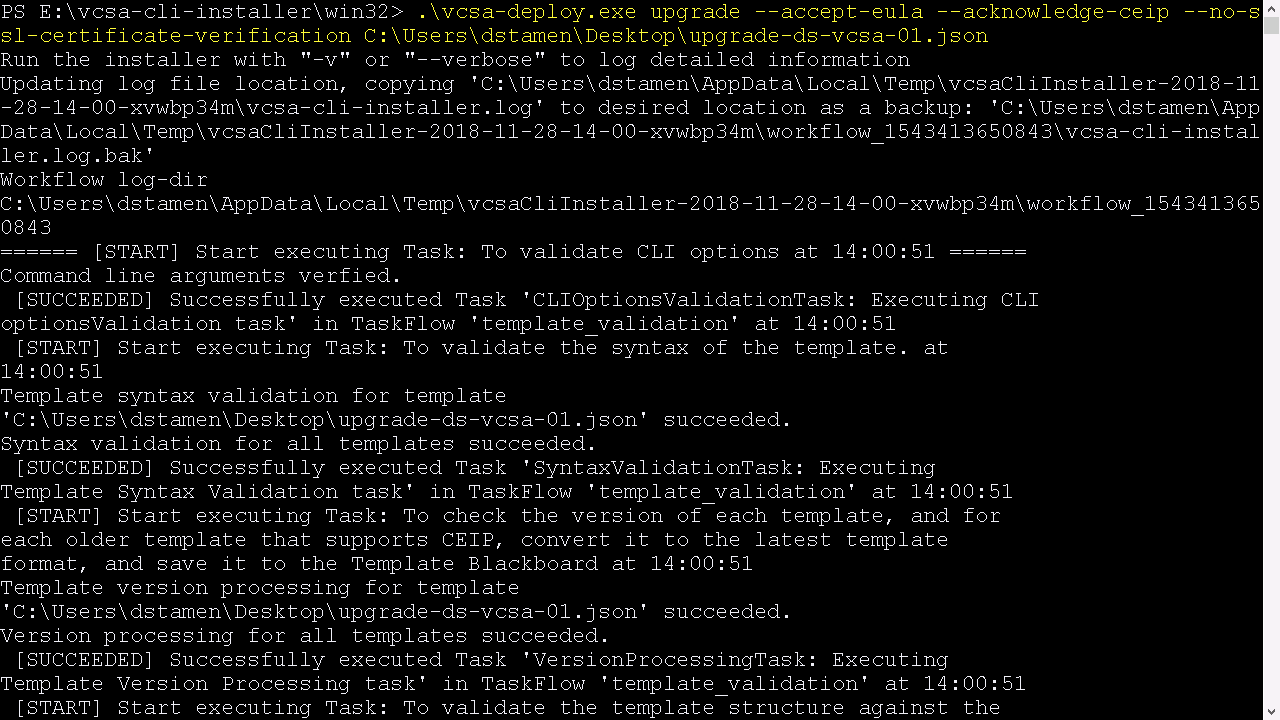
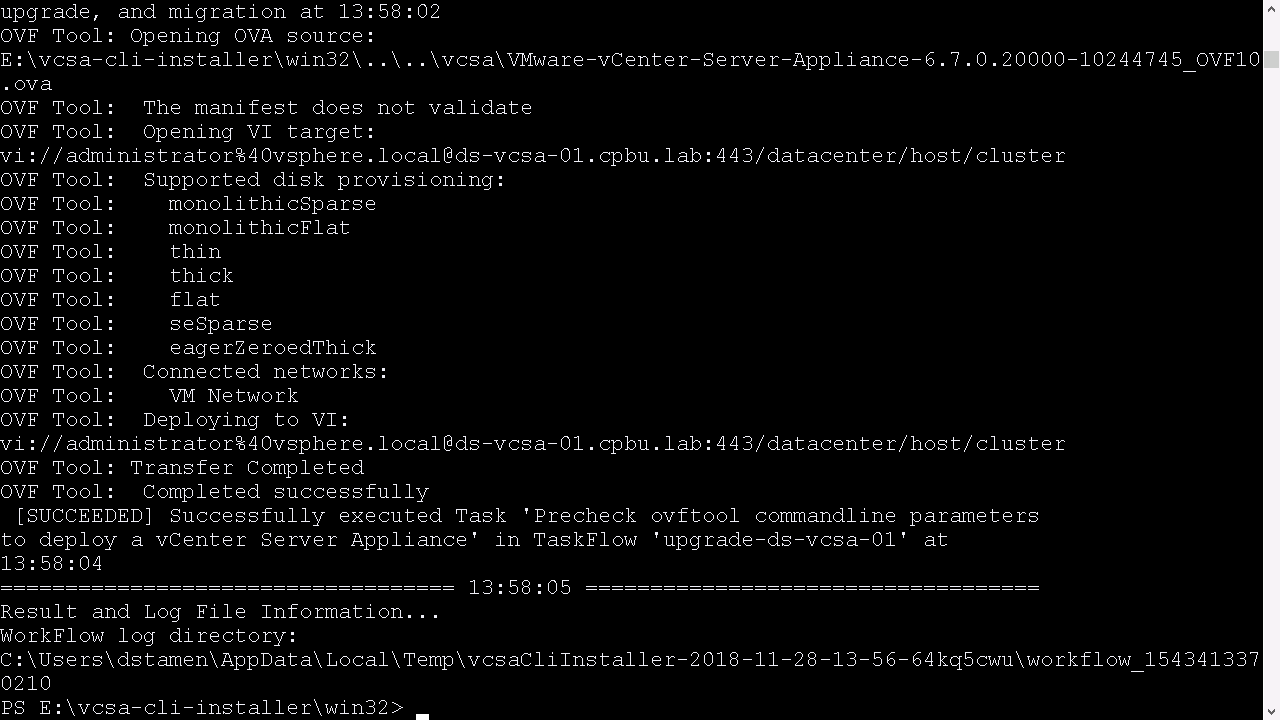
To execute the upgrade we run the same syntax as previous just removing the --pre-check-only flag. Please note to successfully execute the upgrade you will need to accept the eula and acknowledge the CEIP if that option was chosen.
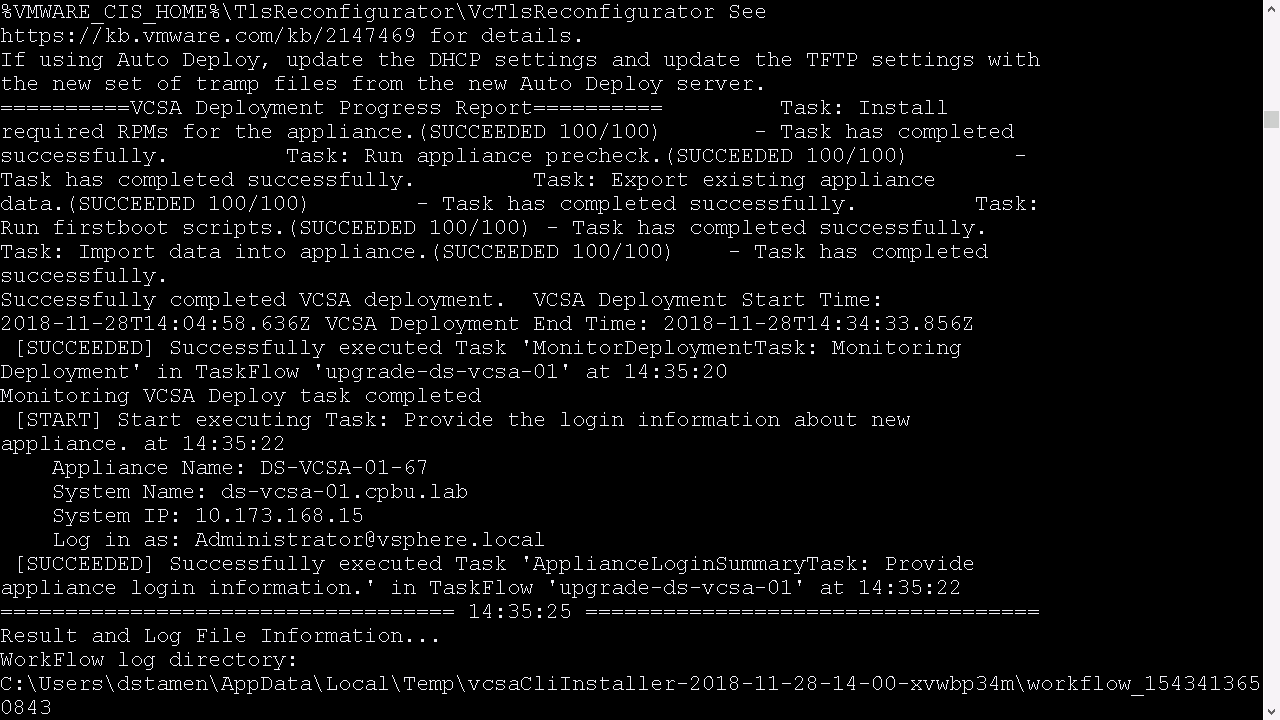
If the upgrade succeeded we will be notified and will be given the system information for the upgraded appliance.
If the upgrade failed for whatever reason we would be notified with an error message and the location to the log files.
Thank You
Thank you for following along to upgrade your vCenter Server via the CLI. Hopefully this has helped educate you on the process to automate the upgrade of your vCenter Server.
You can find out more about automating the upgrade of the vCenter Server and Platform Services Controller in the following blog:
Upgrading vCenter Server 6.5 to vCenter Server 6.7
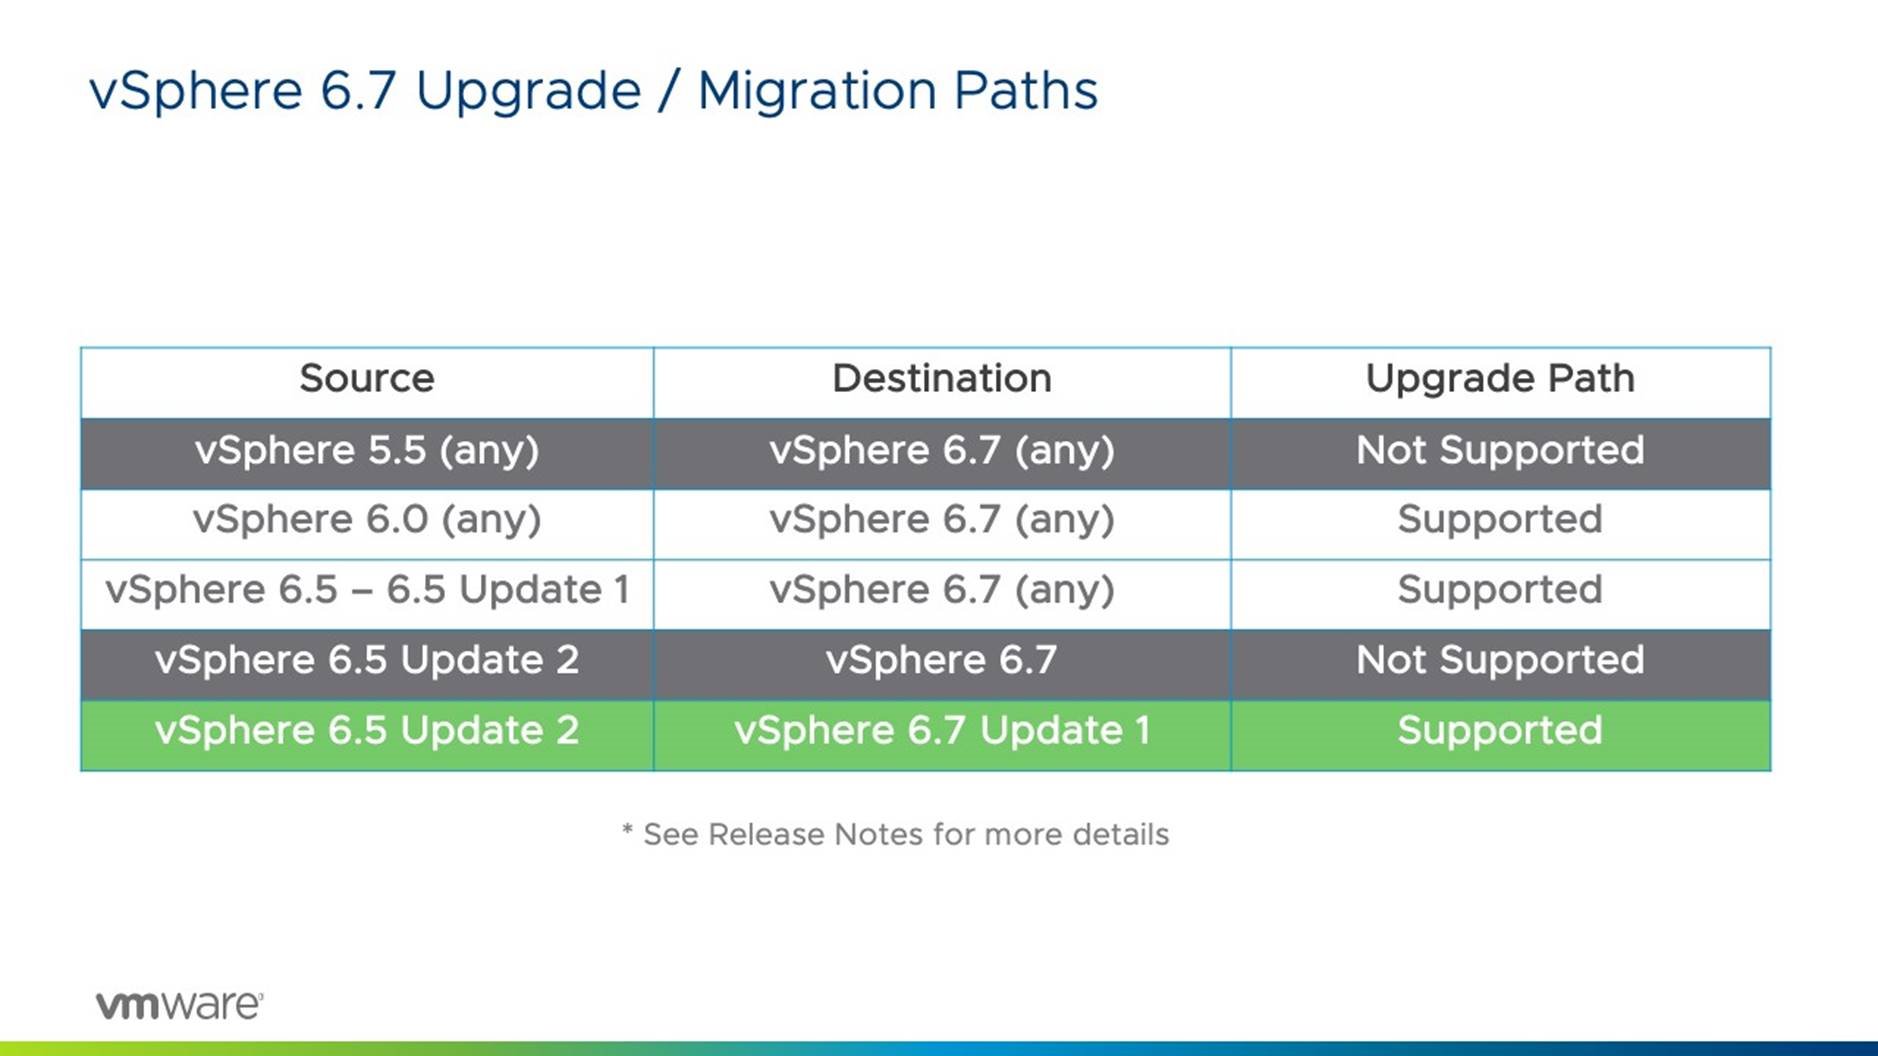
Prior to upgrading your vCenter Server, please make sure you are using a supported upgrade path.
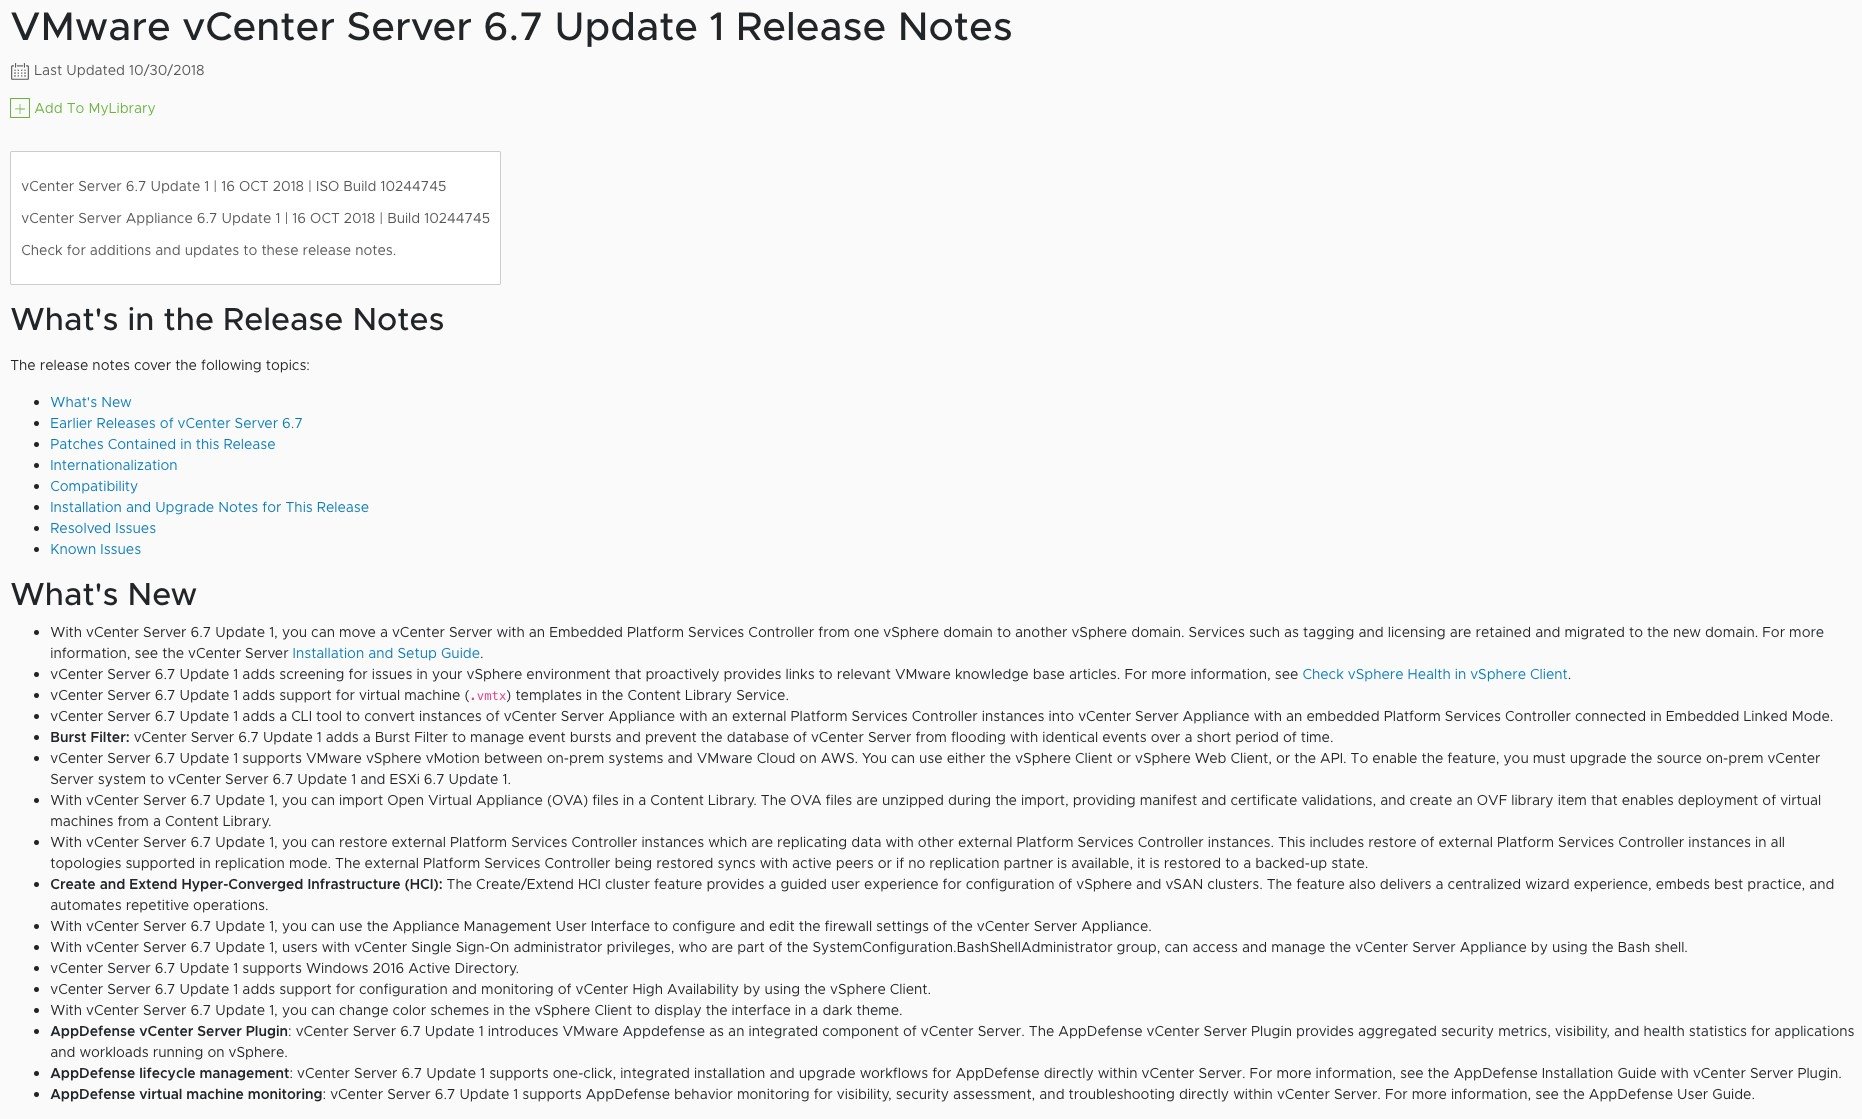
We always recommend reading the release notes prior to upgrading. The release notes will provide details not only covering What's New, but information on Installation and Upgrade Notes for the release you will be upgrading to.
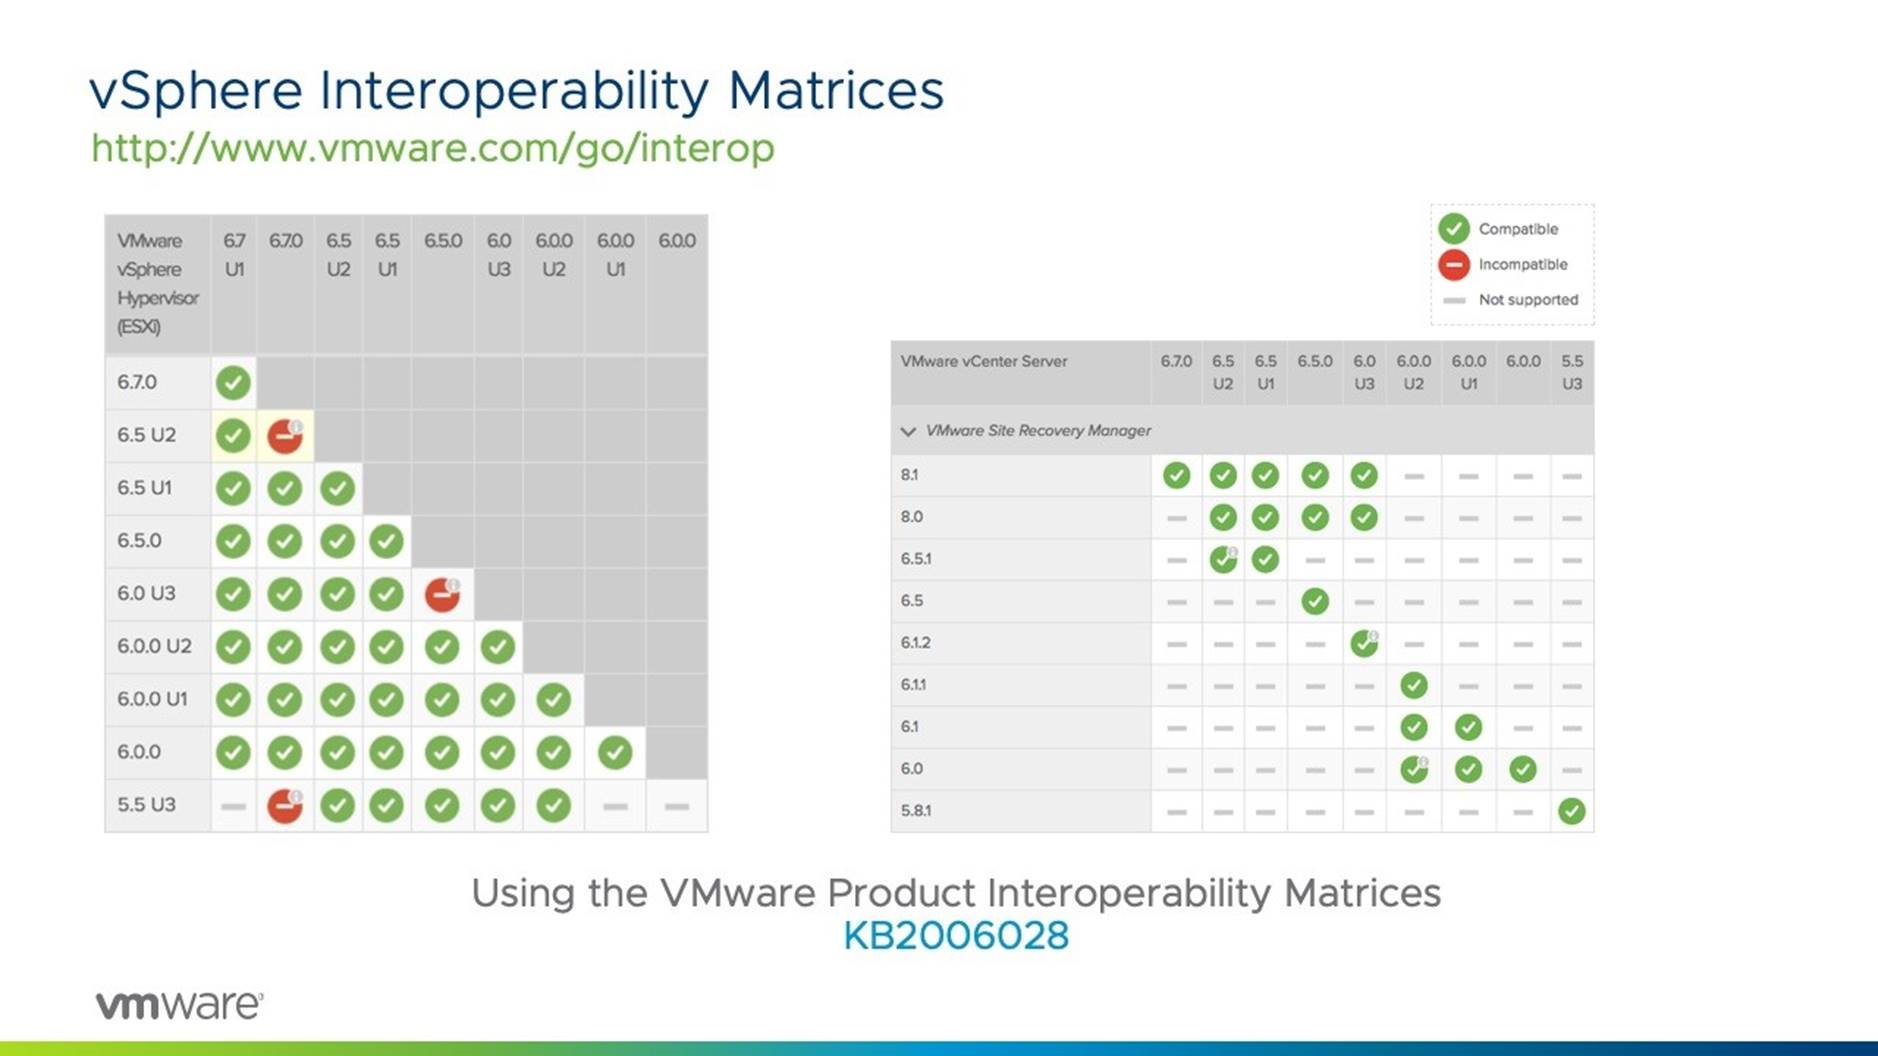
One last thing to verify prior to upgrading is making sure your upgrade path and vSphere Product Interop is supported. You can utilize our interoperability matrices to validate VMware products are compatible with one another.
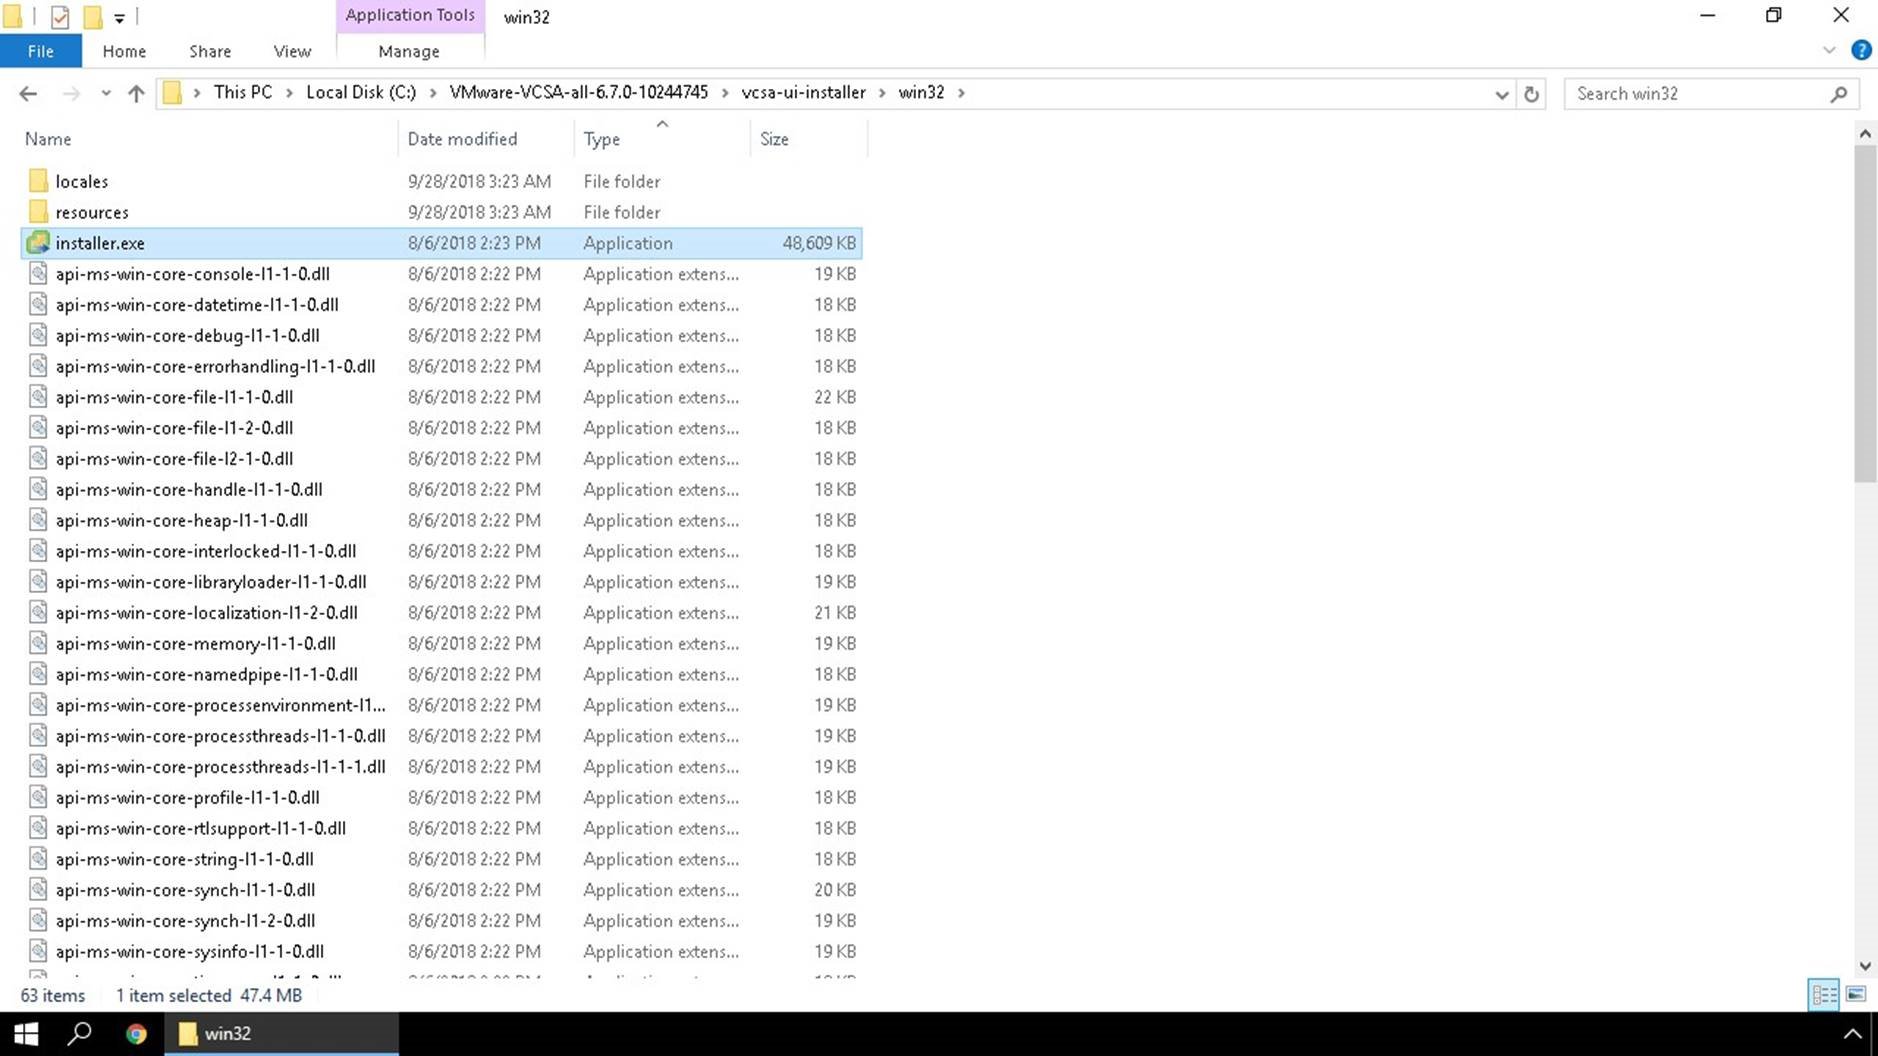
Download the VCSA installer to your local machine and run the installer from the vcsa-ui-installer directory.You can run the installer from windows, linux or mac OS.
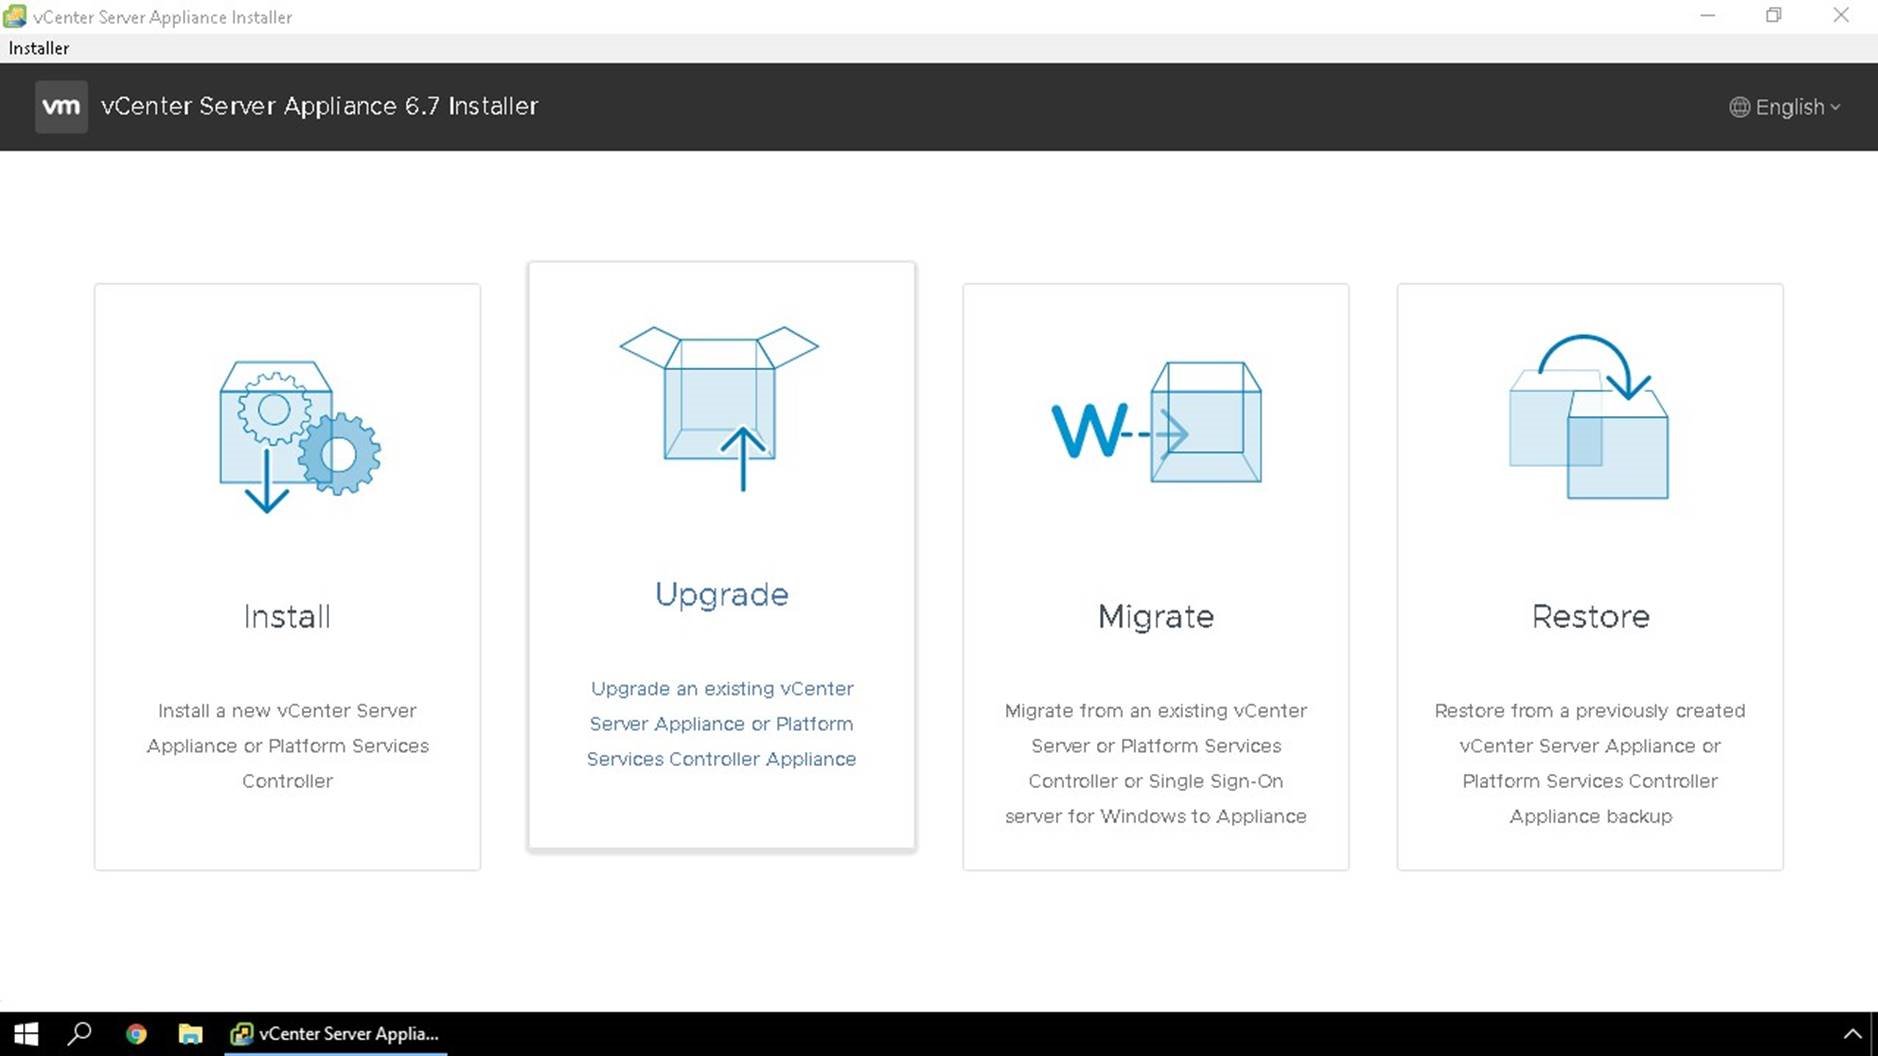
Once the installer is launched, we will use the Upgrade option.
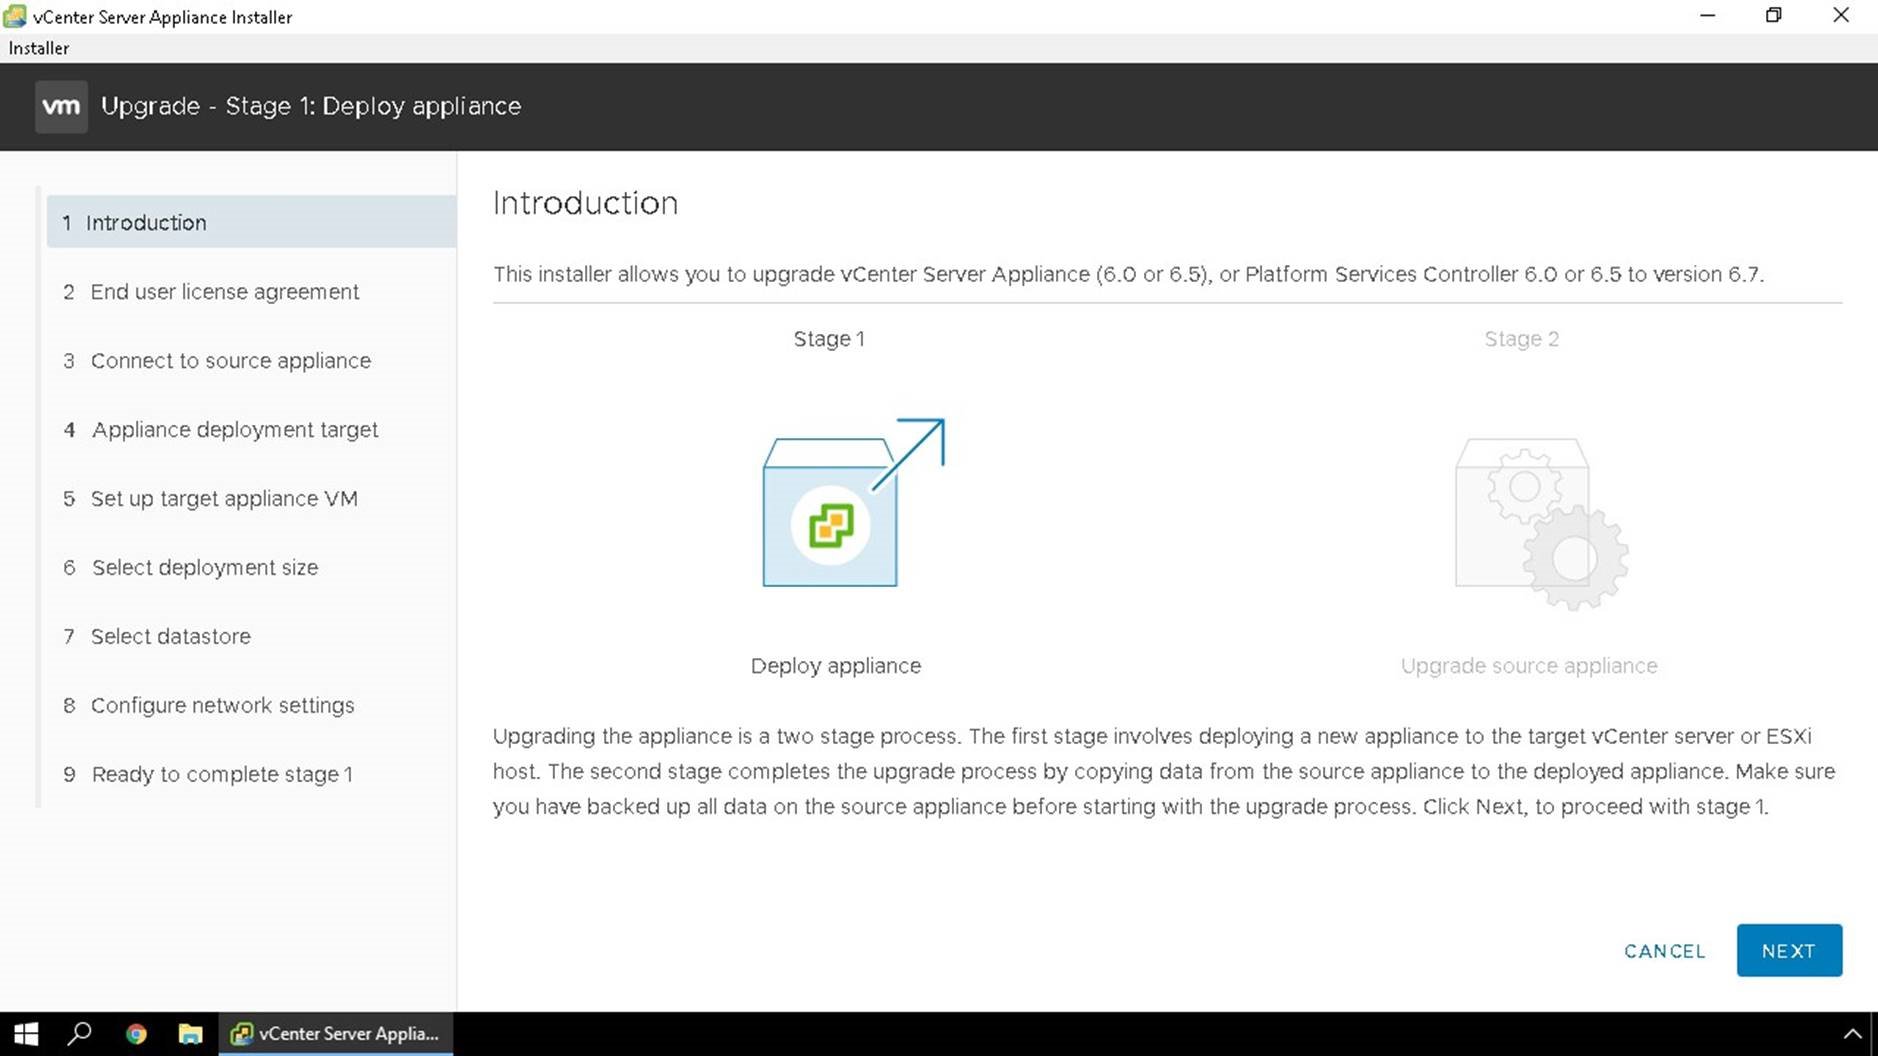
This screen explains how the upgrade process works, it will be a two stage process. Stage 1 a new appliance will be deployed, and Stage 2 is where we will export the data from the old appliance and import it into the new one.
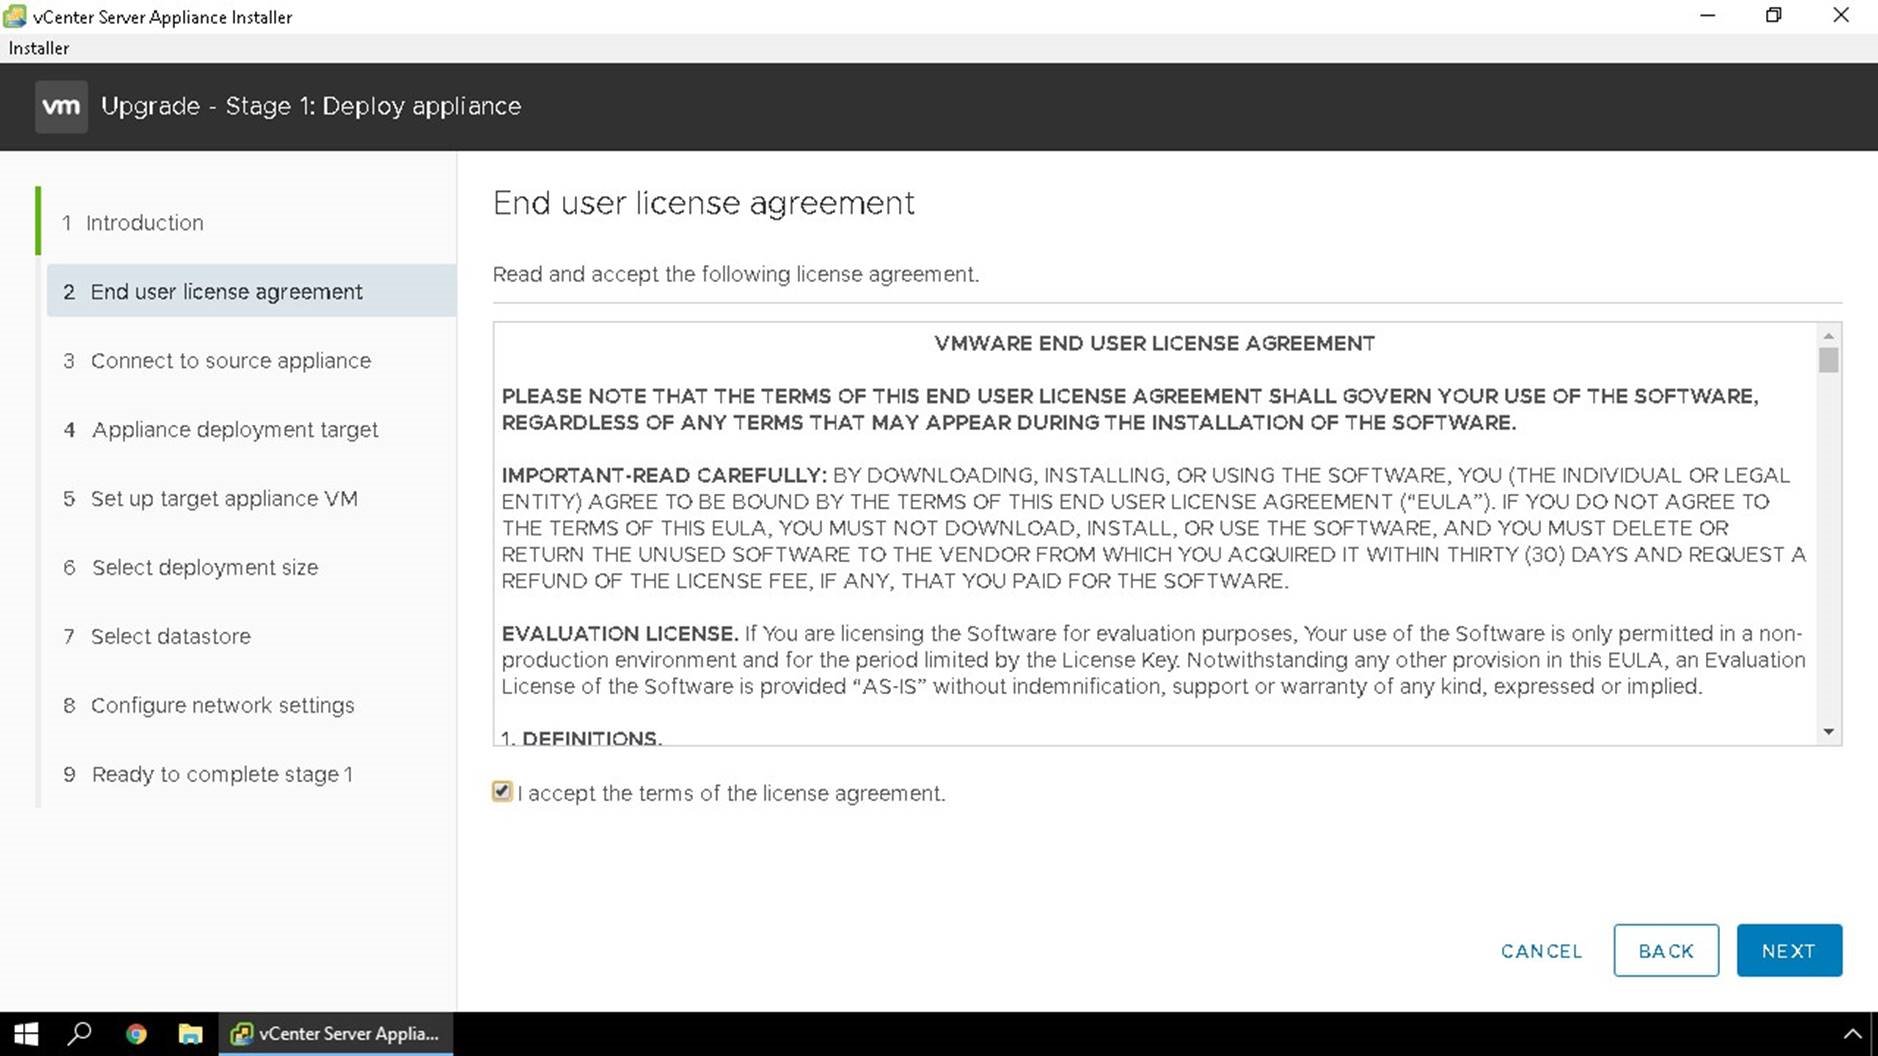
Accept the End user license agreement
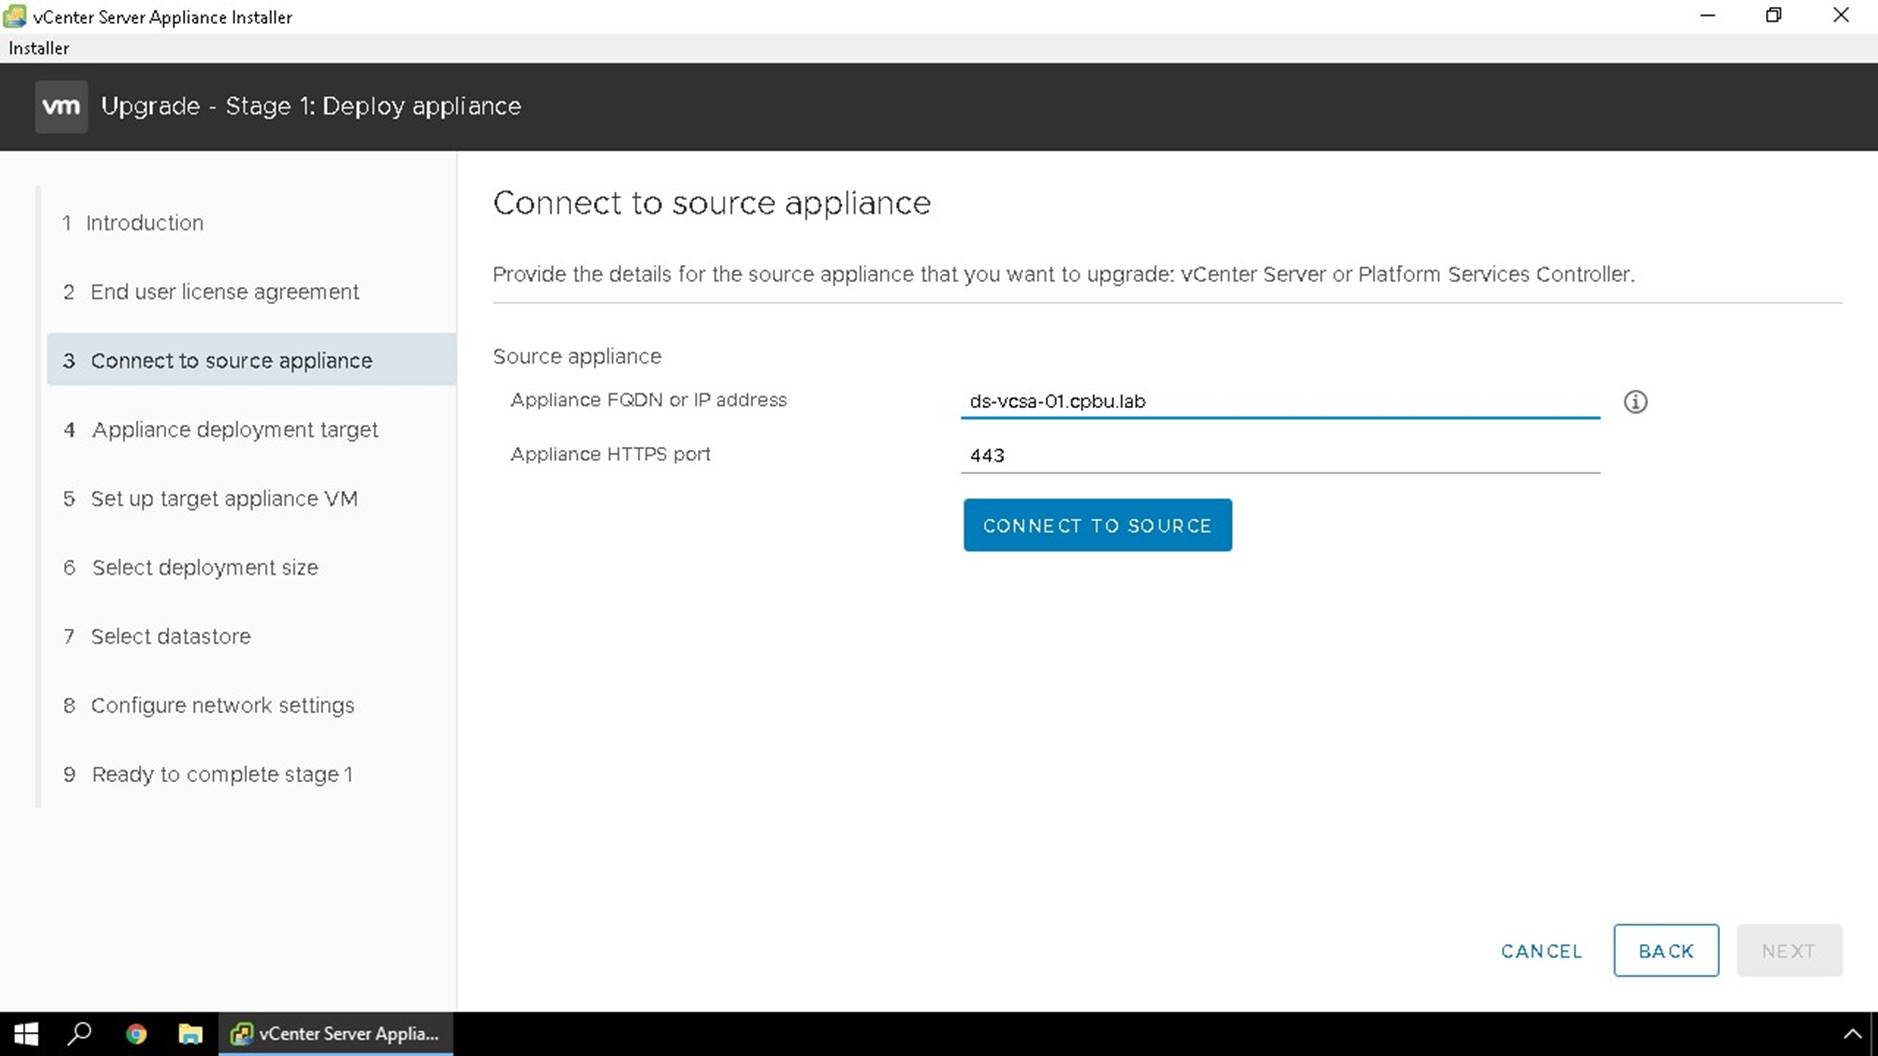
Enter the FQDN or IP Address of the vCenter Server Appliance you wish to upgrade and hit Connect Source.
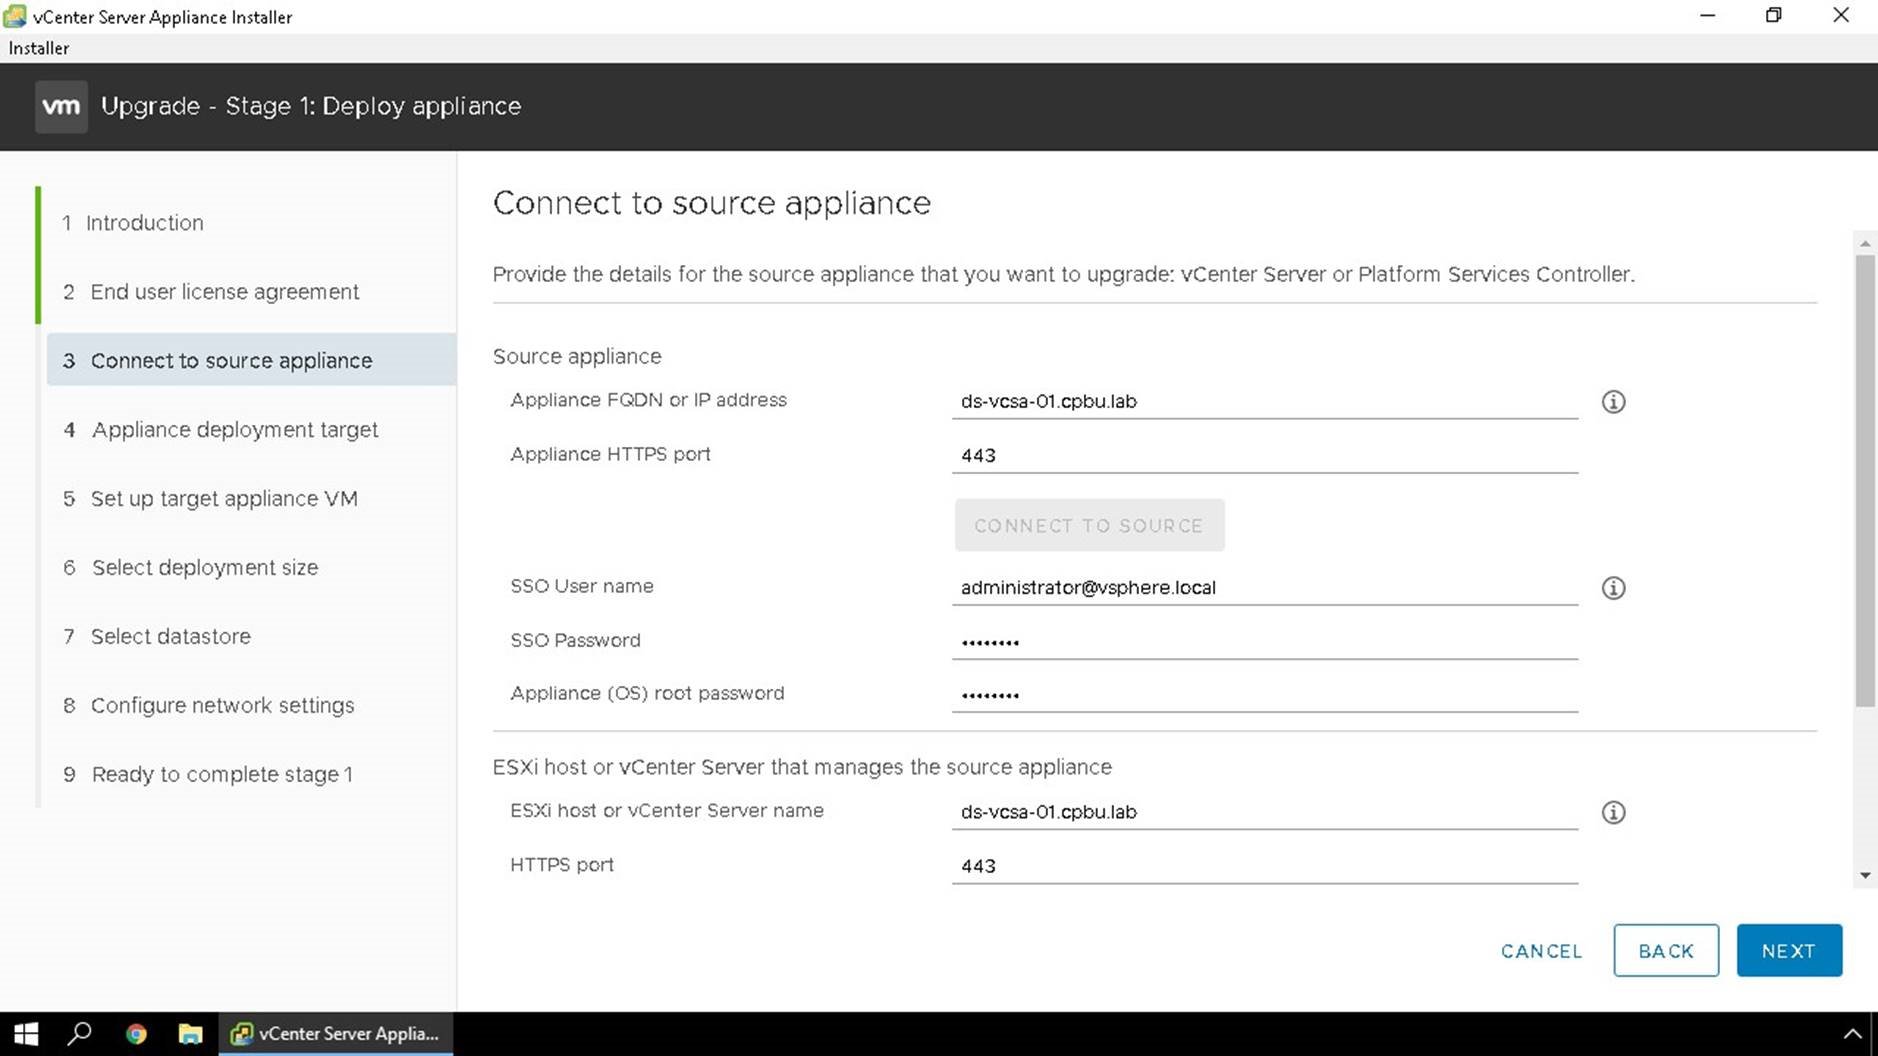
Enter in the details of the source appliance, here we can use the FQDN or IP address. We will also enter in the SSO administrator username and password, the root OS password for your original appliance and we will input the https port and username/password of the ESXi Host or vCenter Server that is managing the source appliance
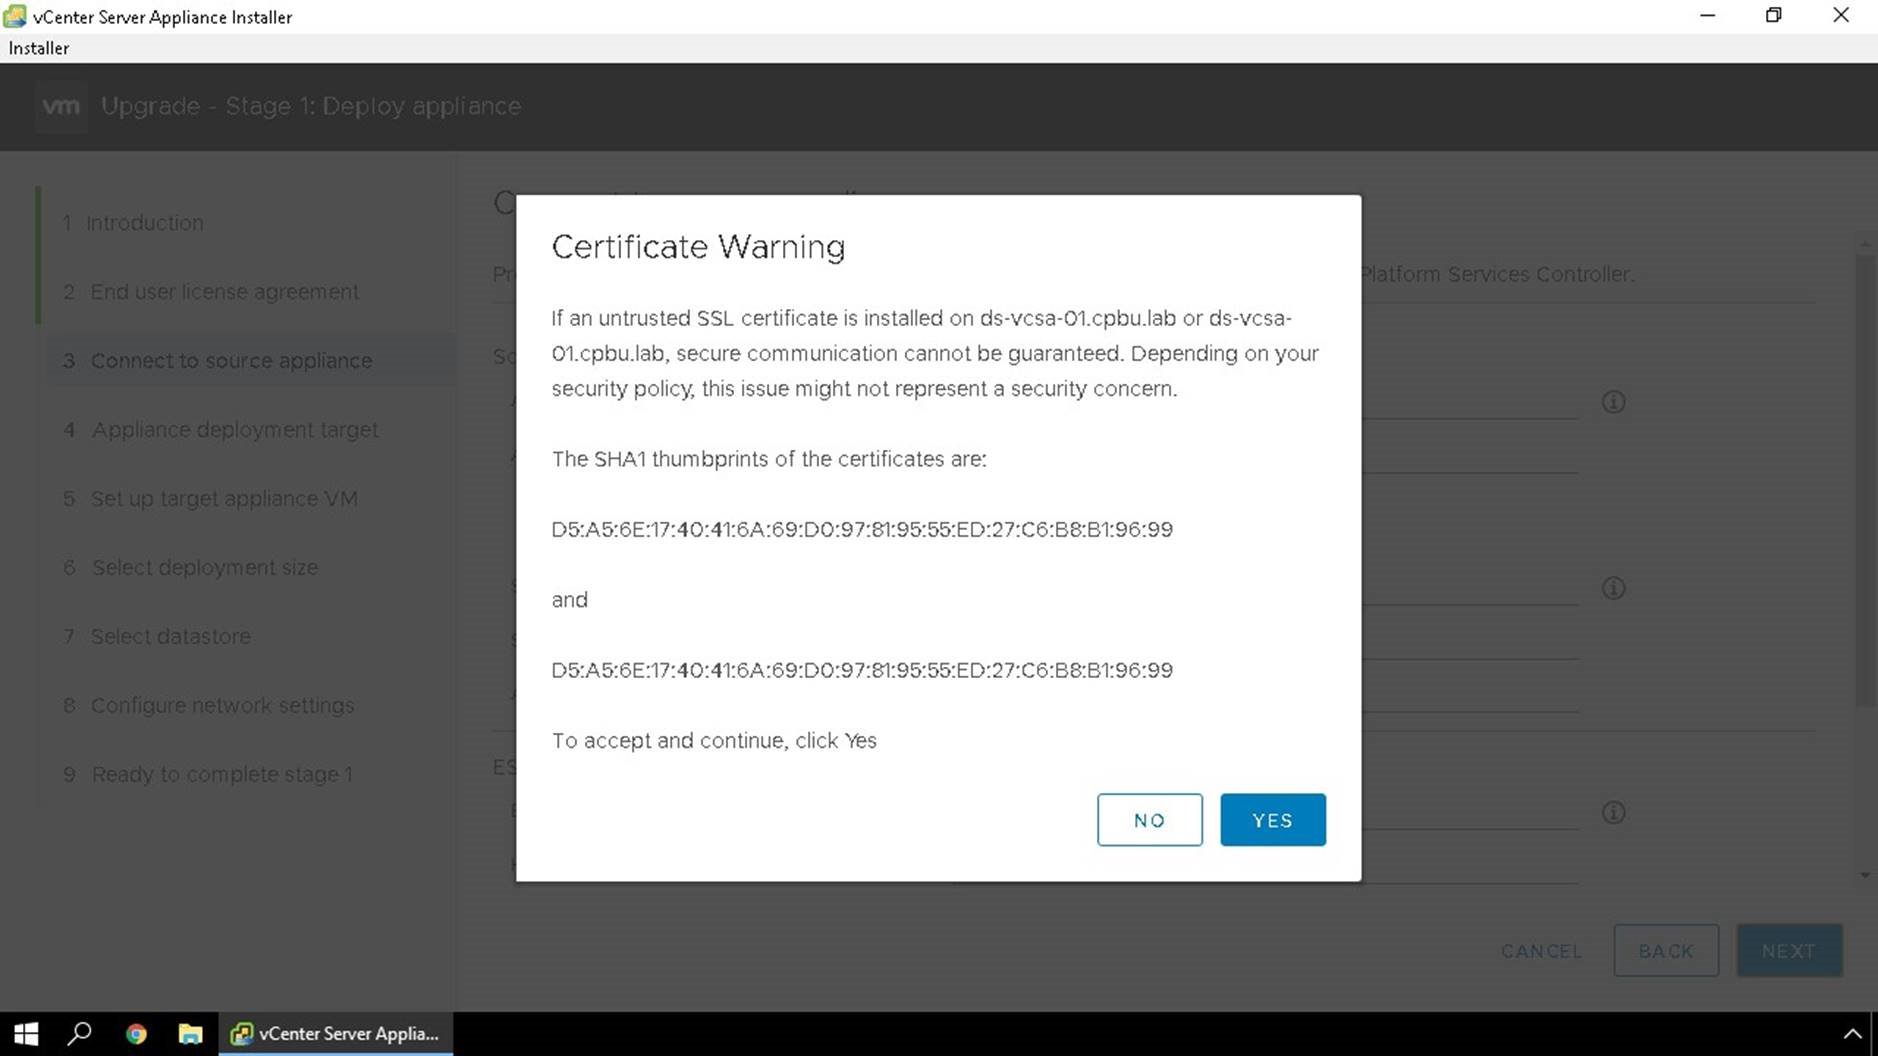
You will need to accept the SSL thumbprints.
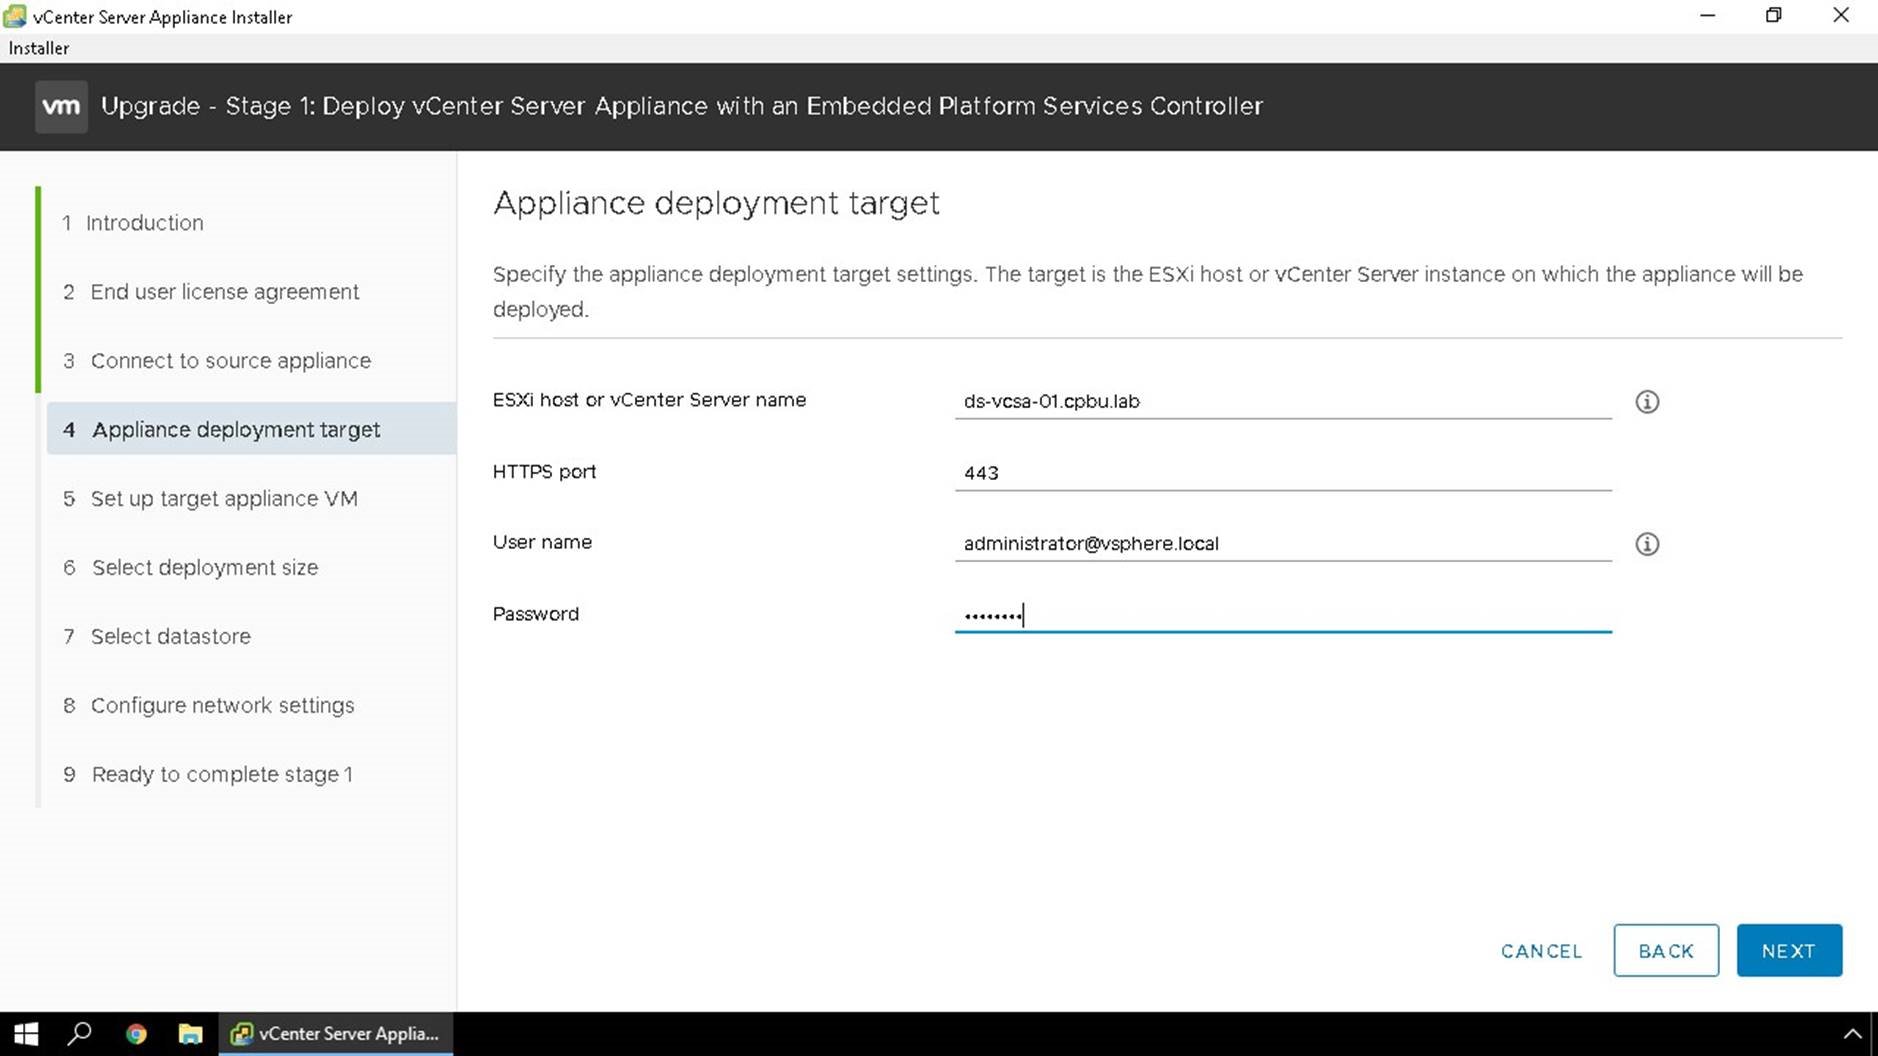
Here you will specify the destination where you want the new appliance to be deployed.
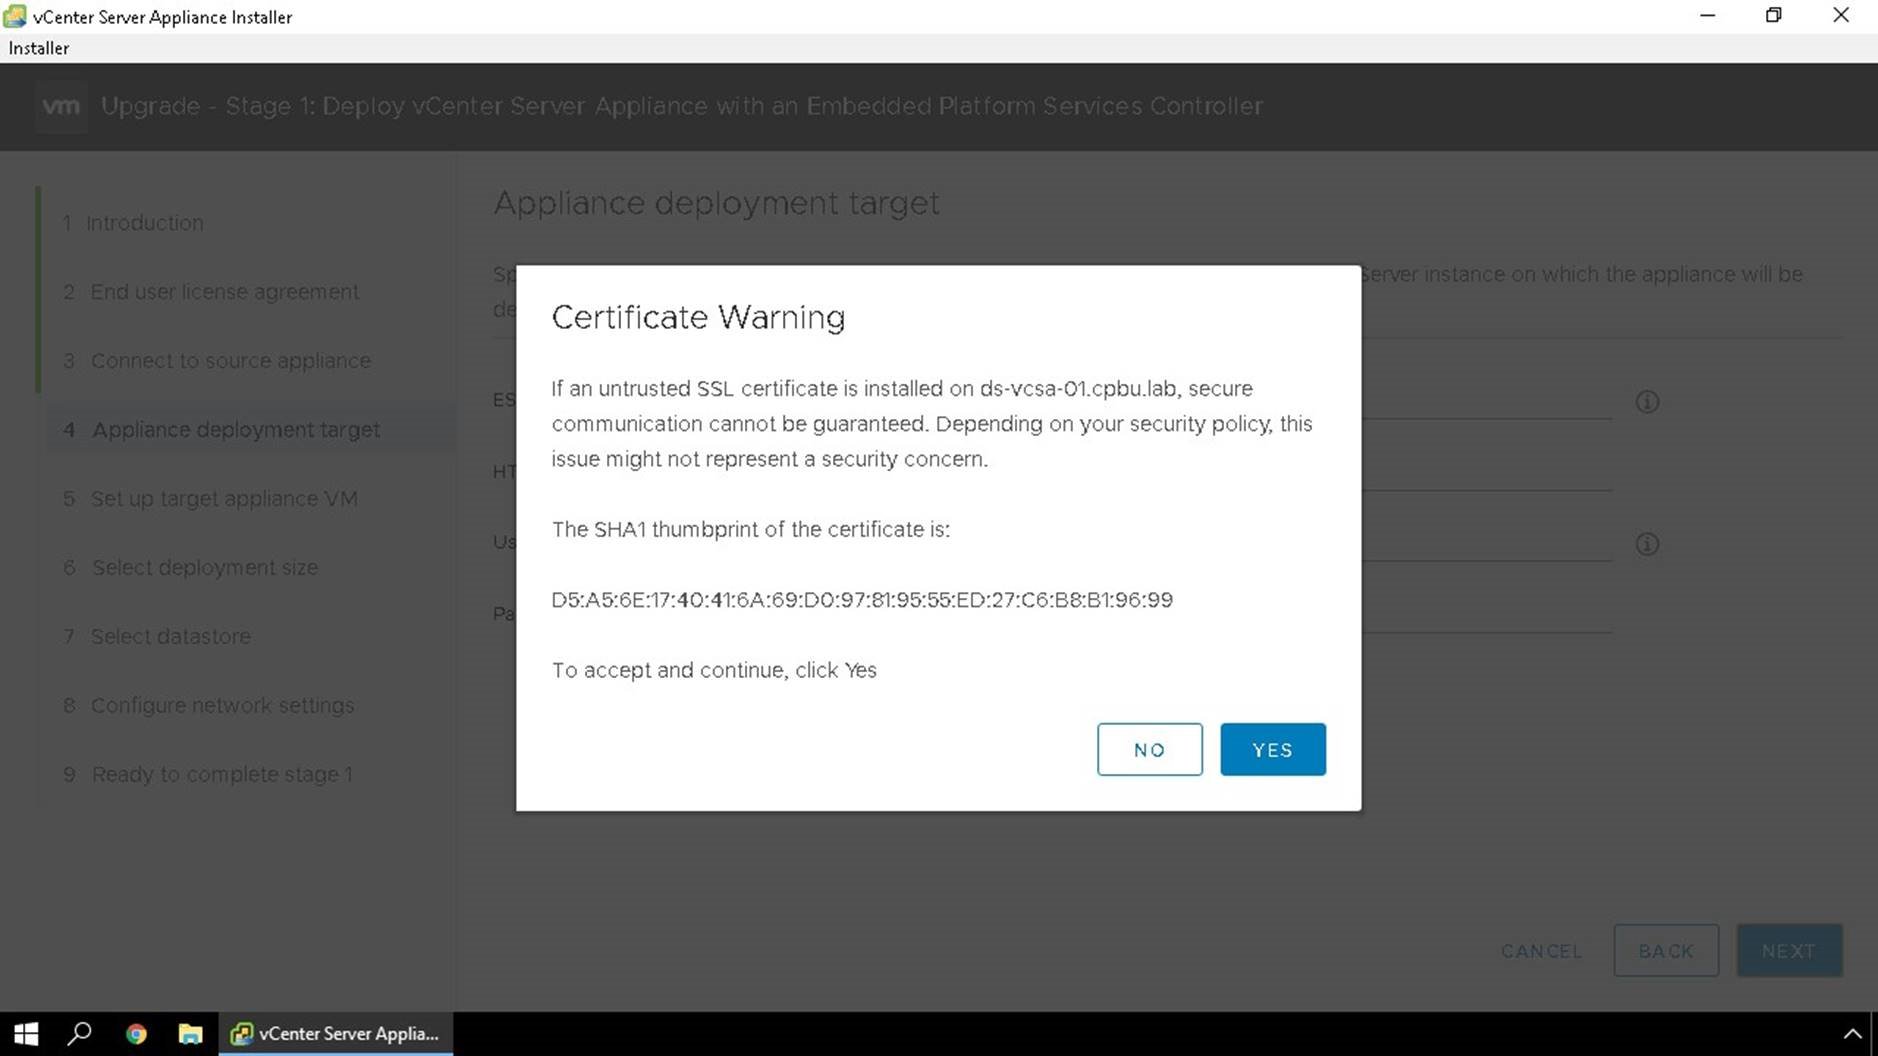
You will need to accept the SSL thumbprints.
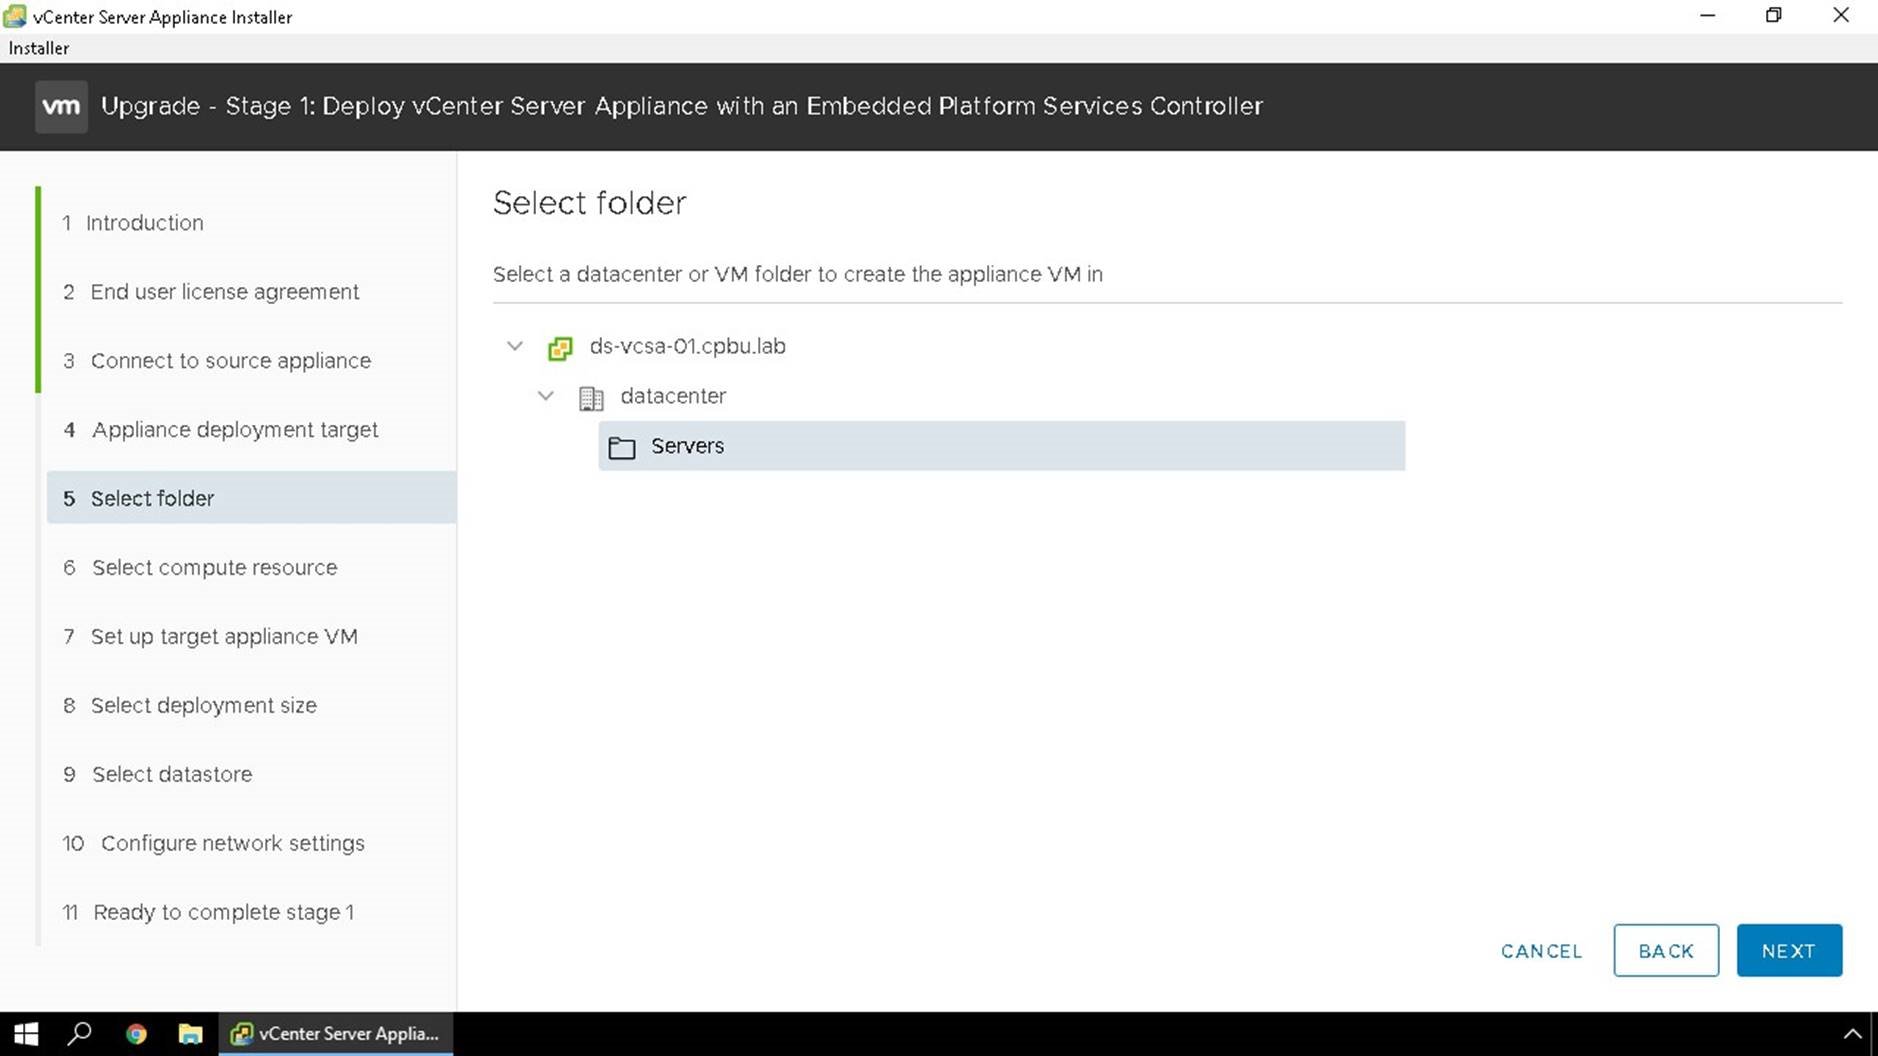
Select VM folder you wish the appliance to be deployed in
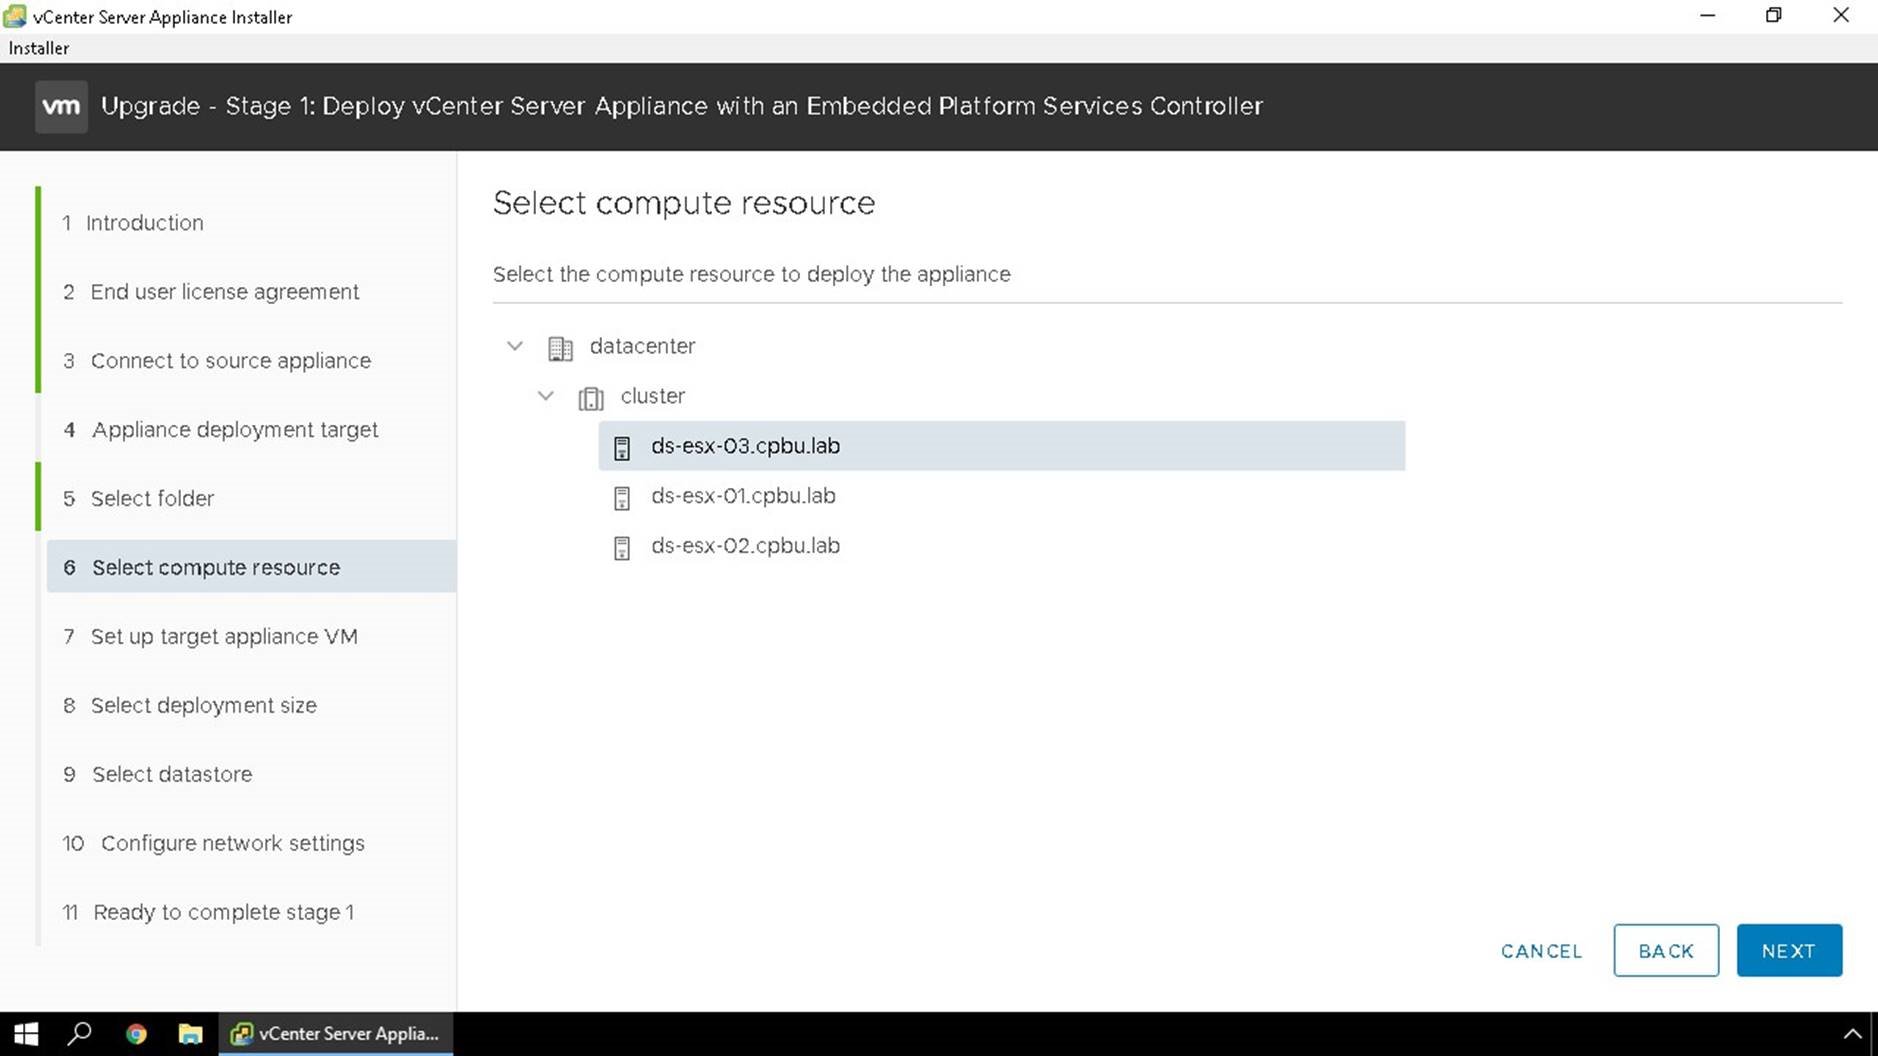
Select the compute resource you would like to deploy the appliance to. You can specify a cluster, or standalone host.
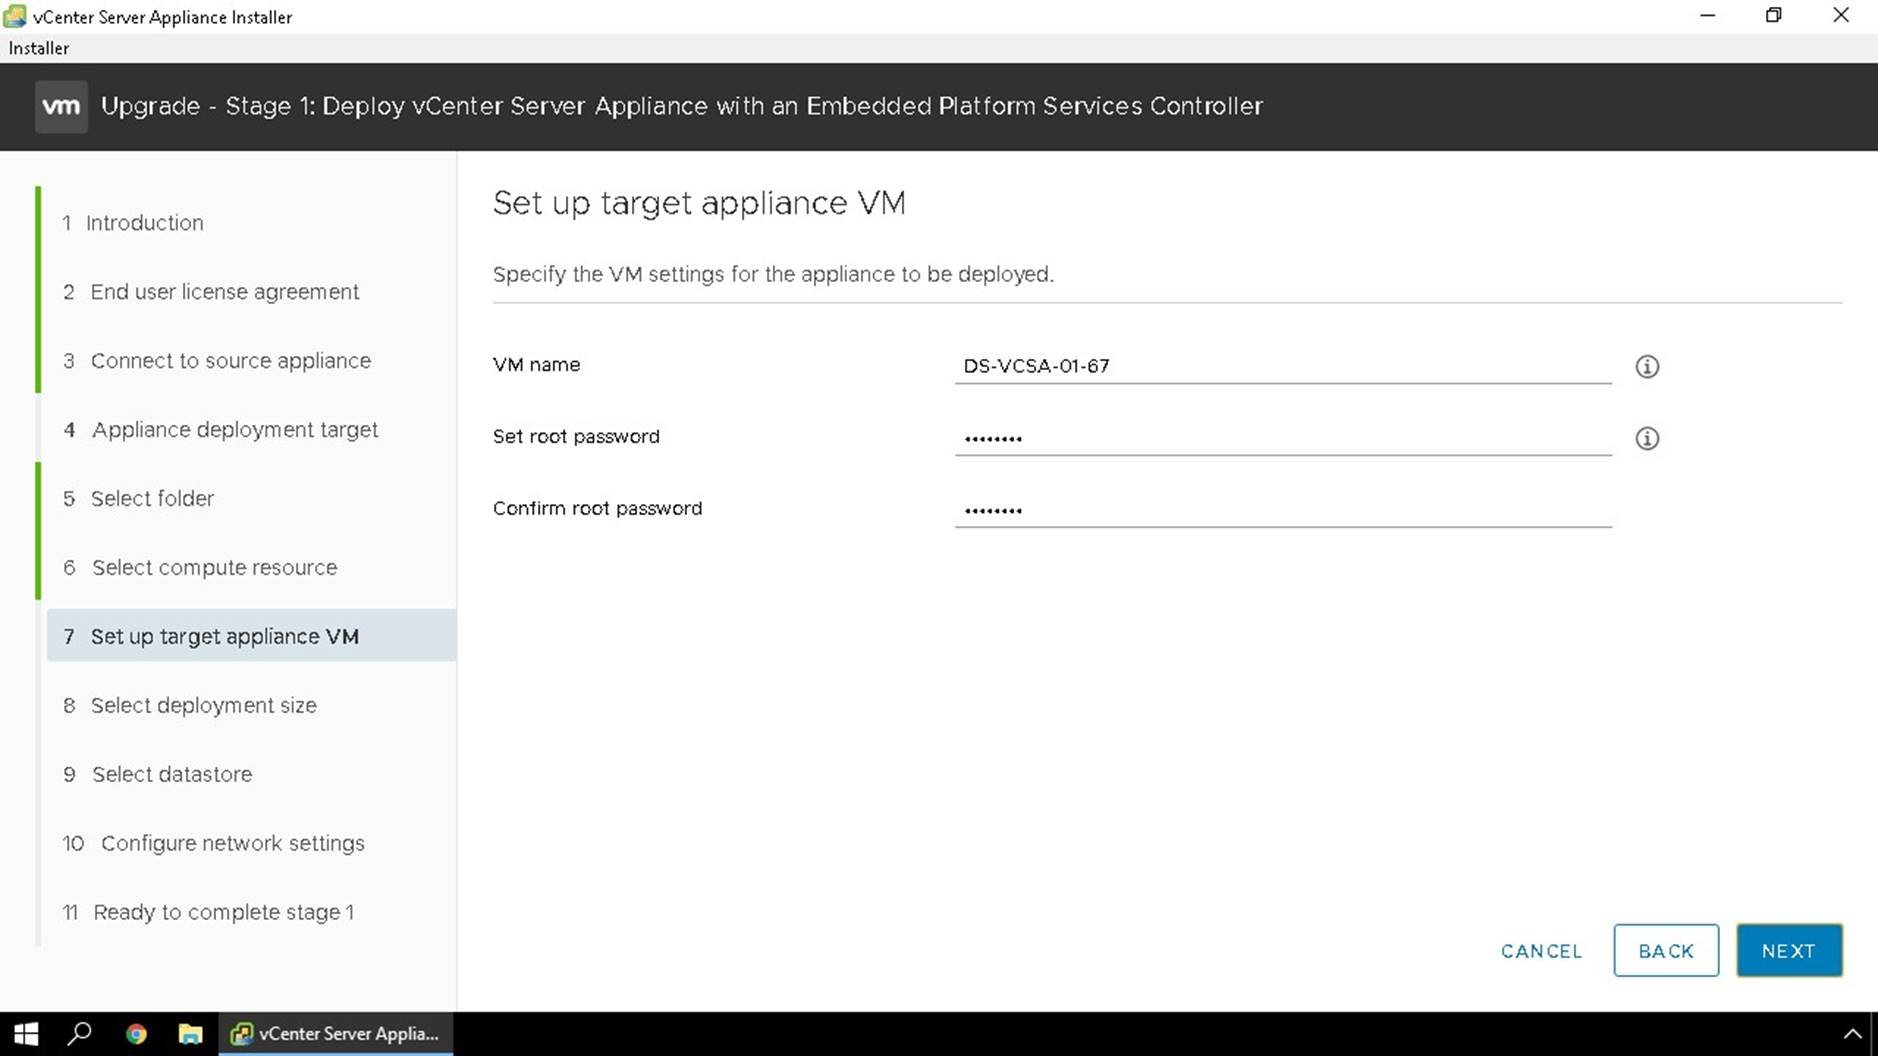
Here we will specify the display name for our new appliance in vCenter inventory, it must be unique. We will also set a new root password for the appliance. You do have the option to re-use the same password.
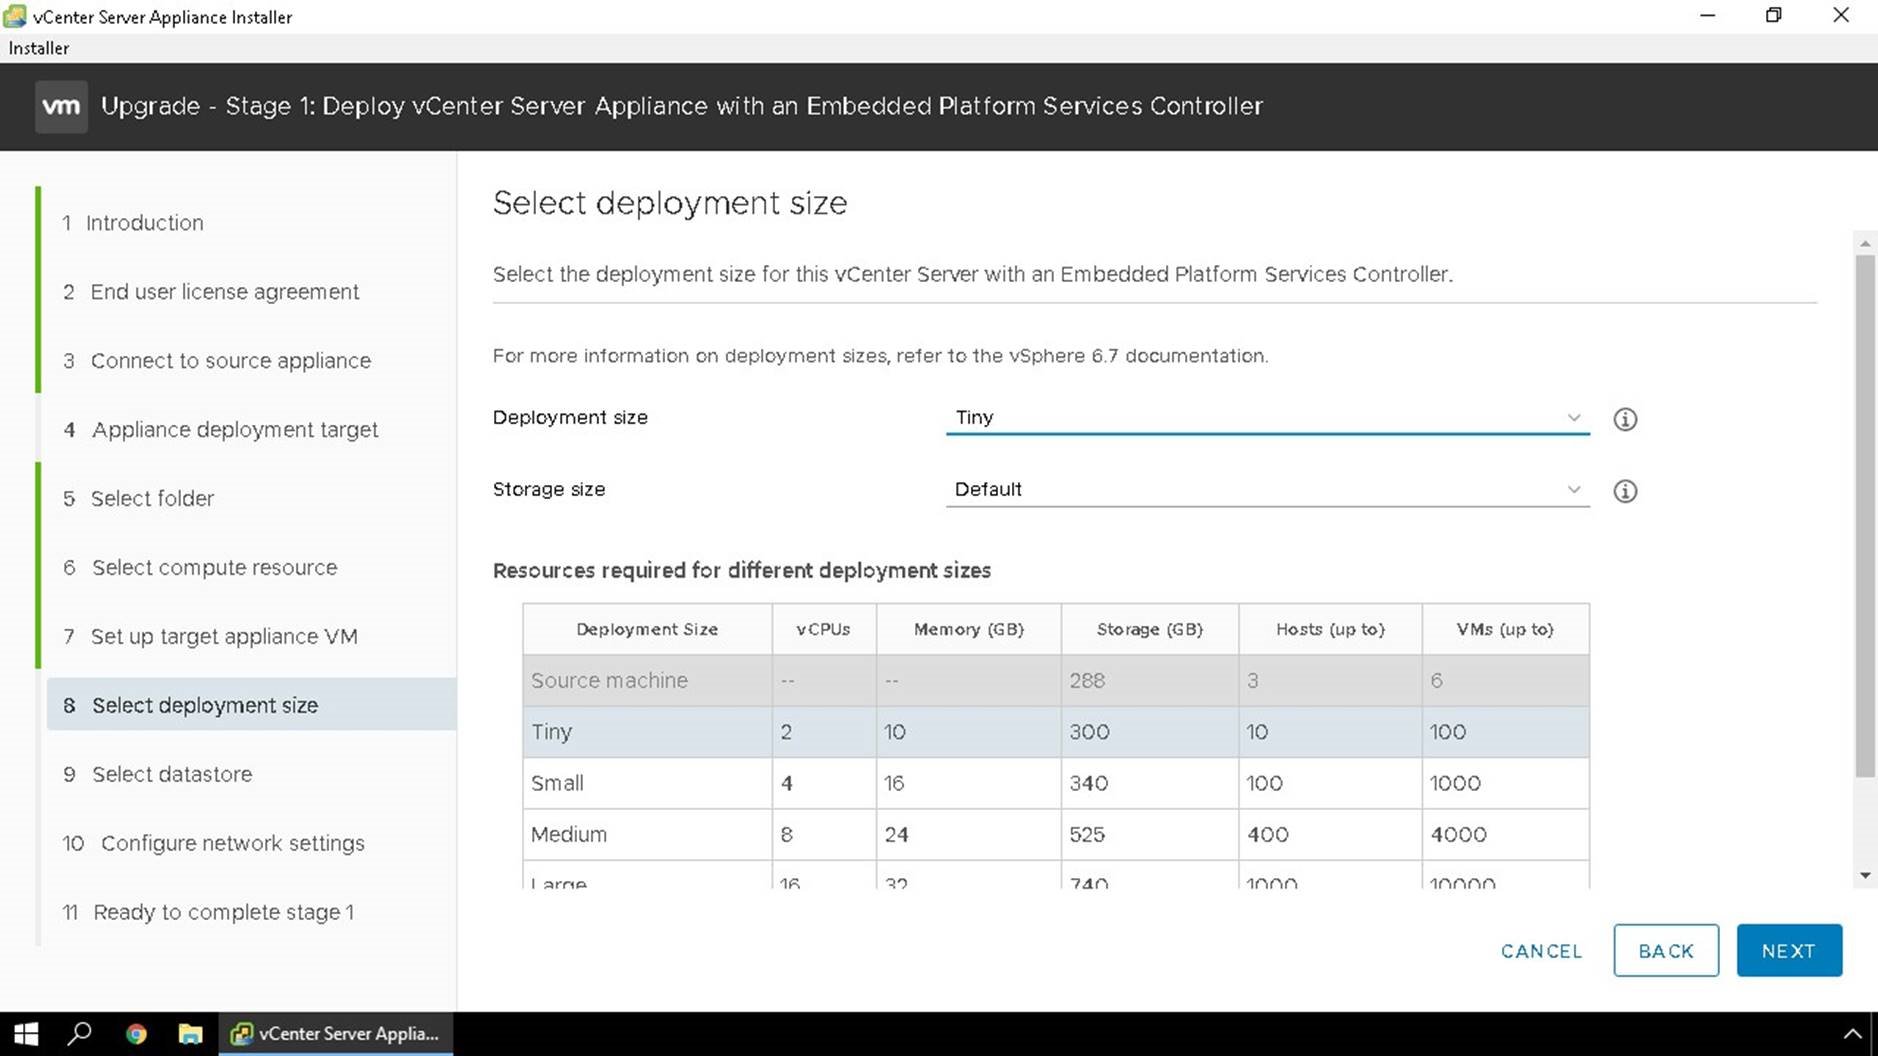
We will chose a deployment size and storage size for our new appliance. Please make note you can increase the size from the previous appliance we are upgrading.Note: If you plan to use vCenter High Availability a deployment size of Small or larger is required. vCenter High Availability is not supported on Tiny deployments.
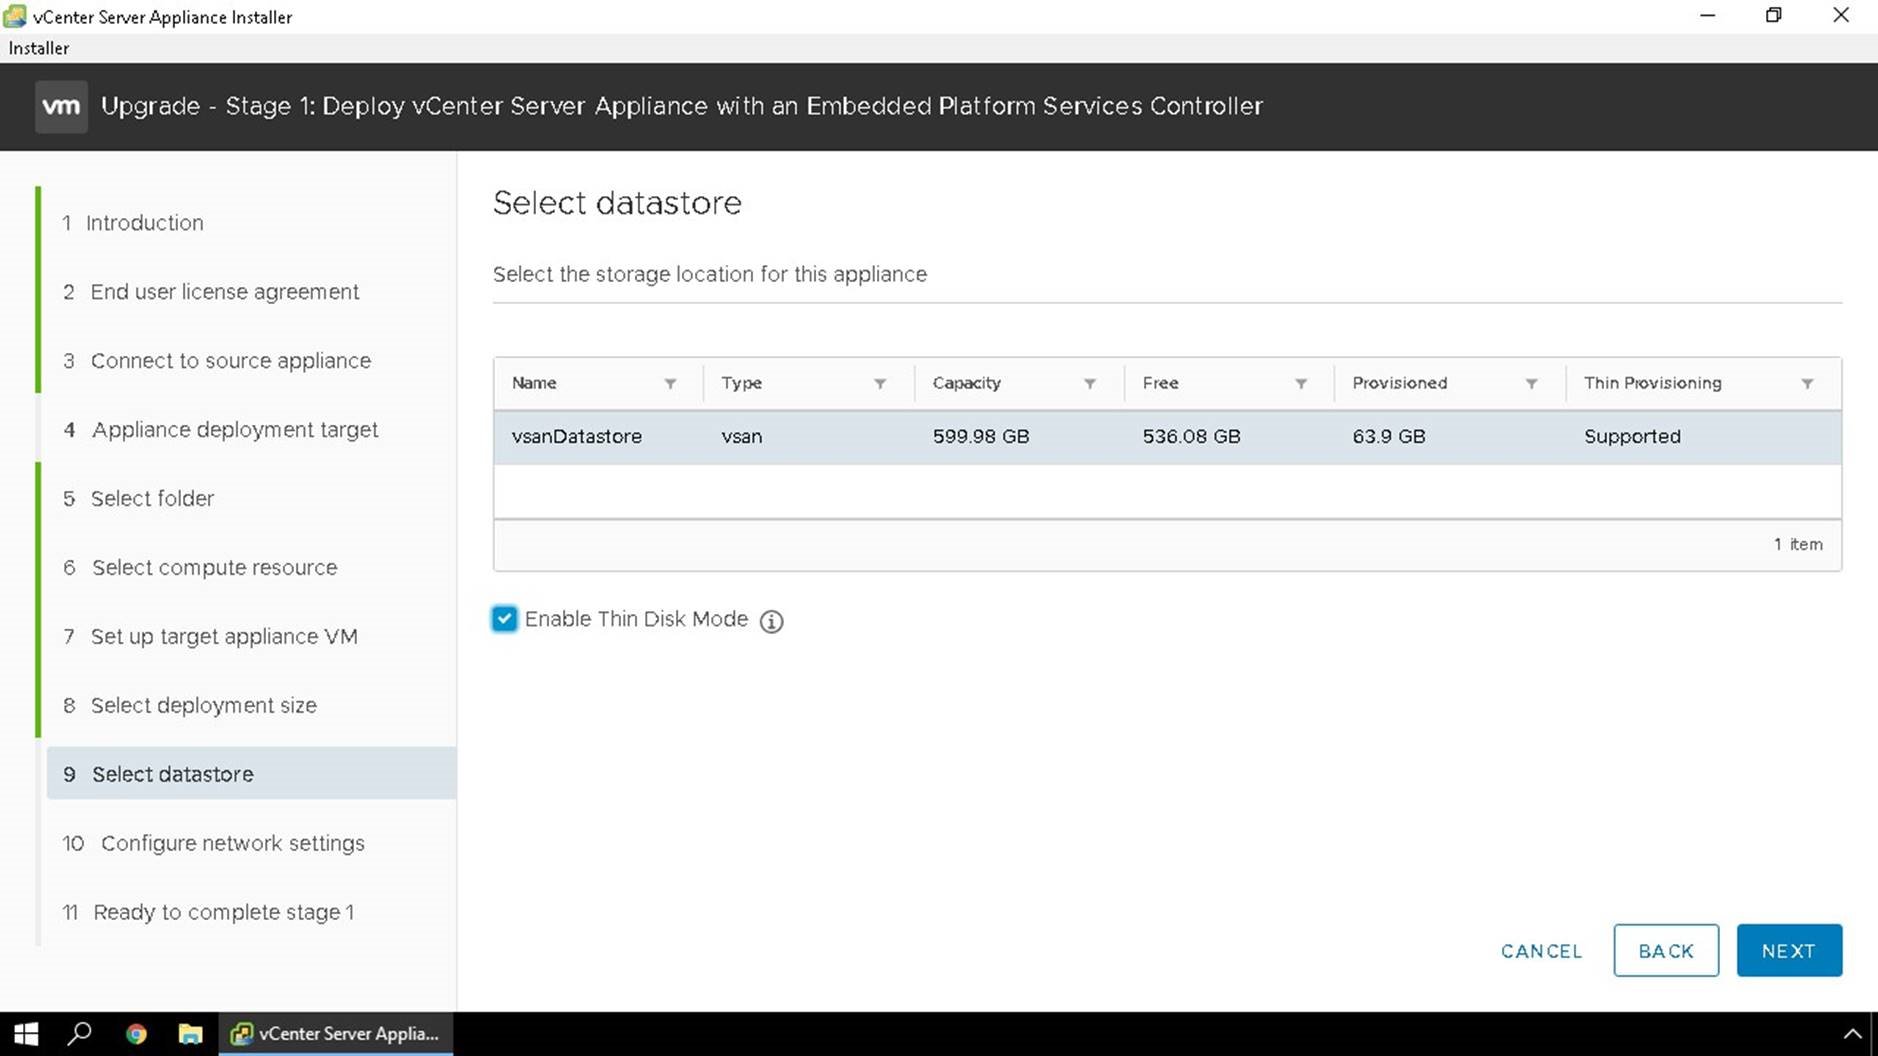
Specify the storage location for the new appliance and if you would like it to be thin provisioned you will check the box.
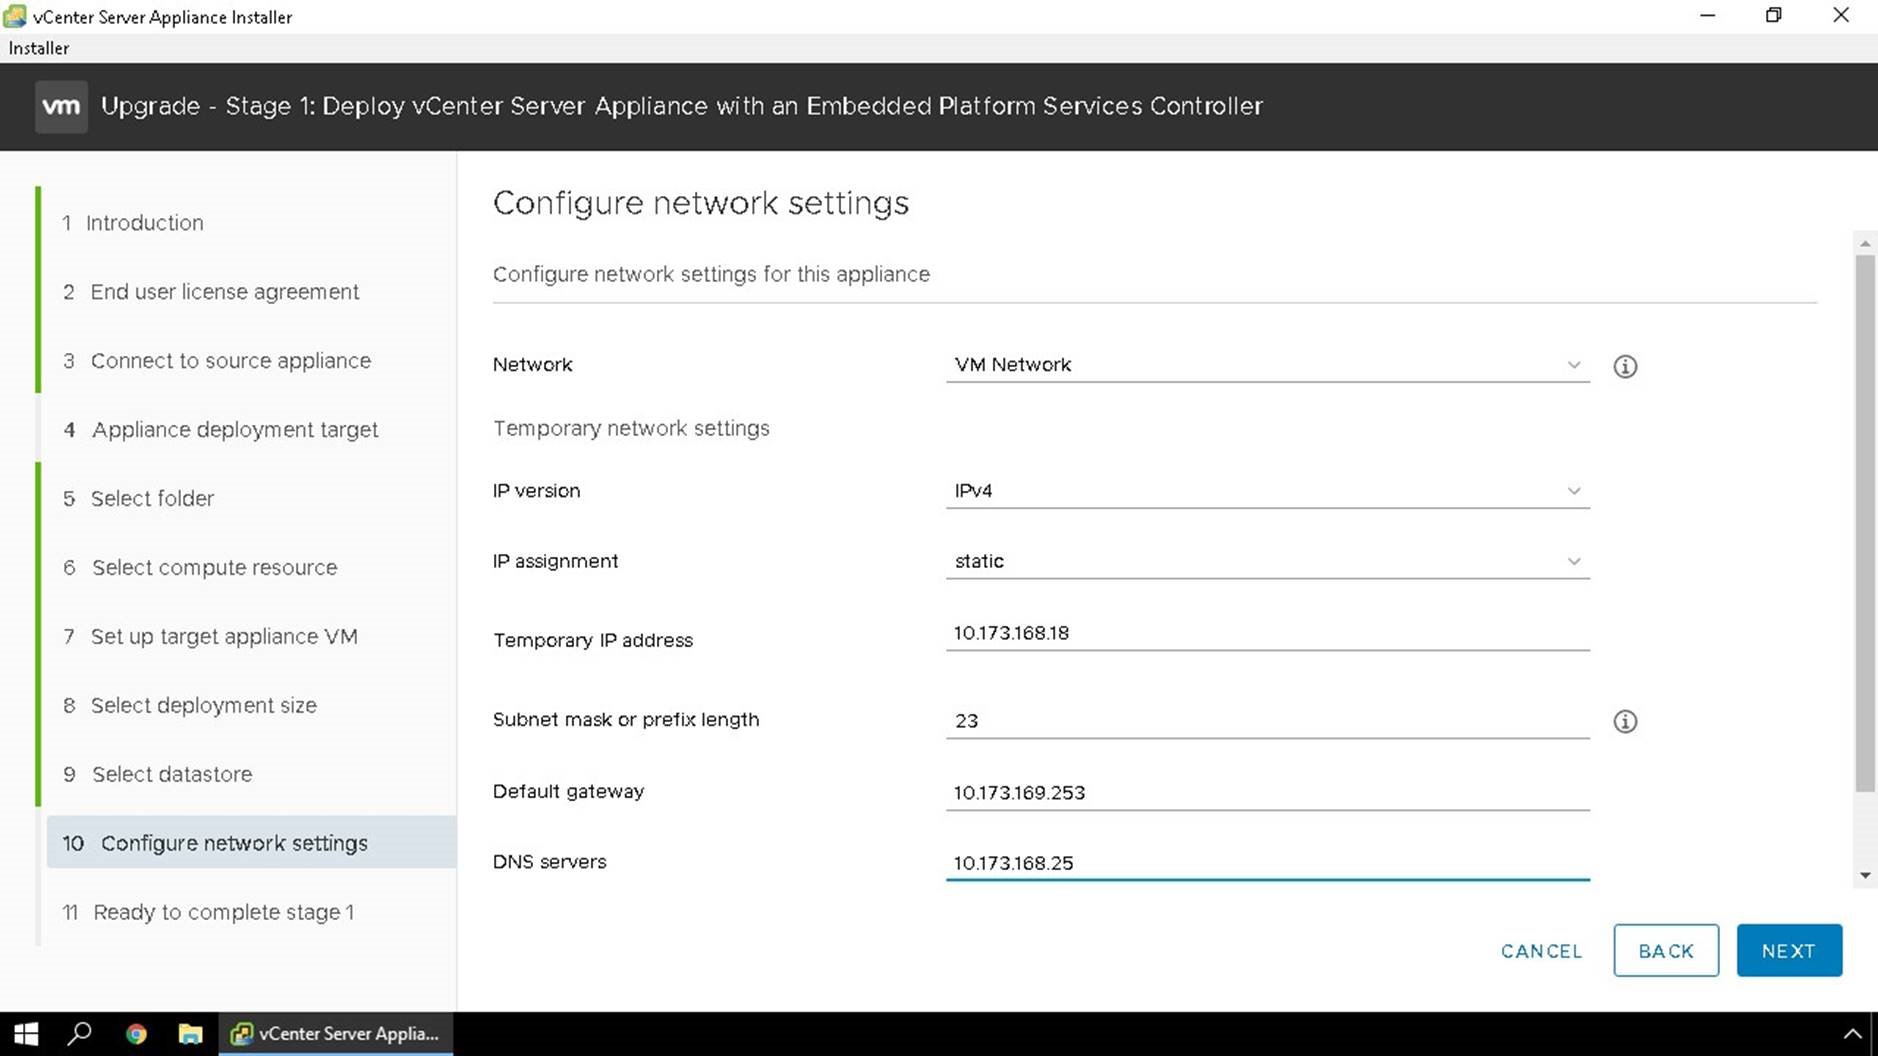
Specify a VM network and IP that will be used for the temporary network. This is only used during the export and import process. Once the upgrade is complete, the IP will become unused.
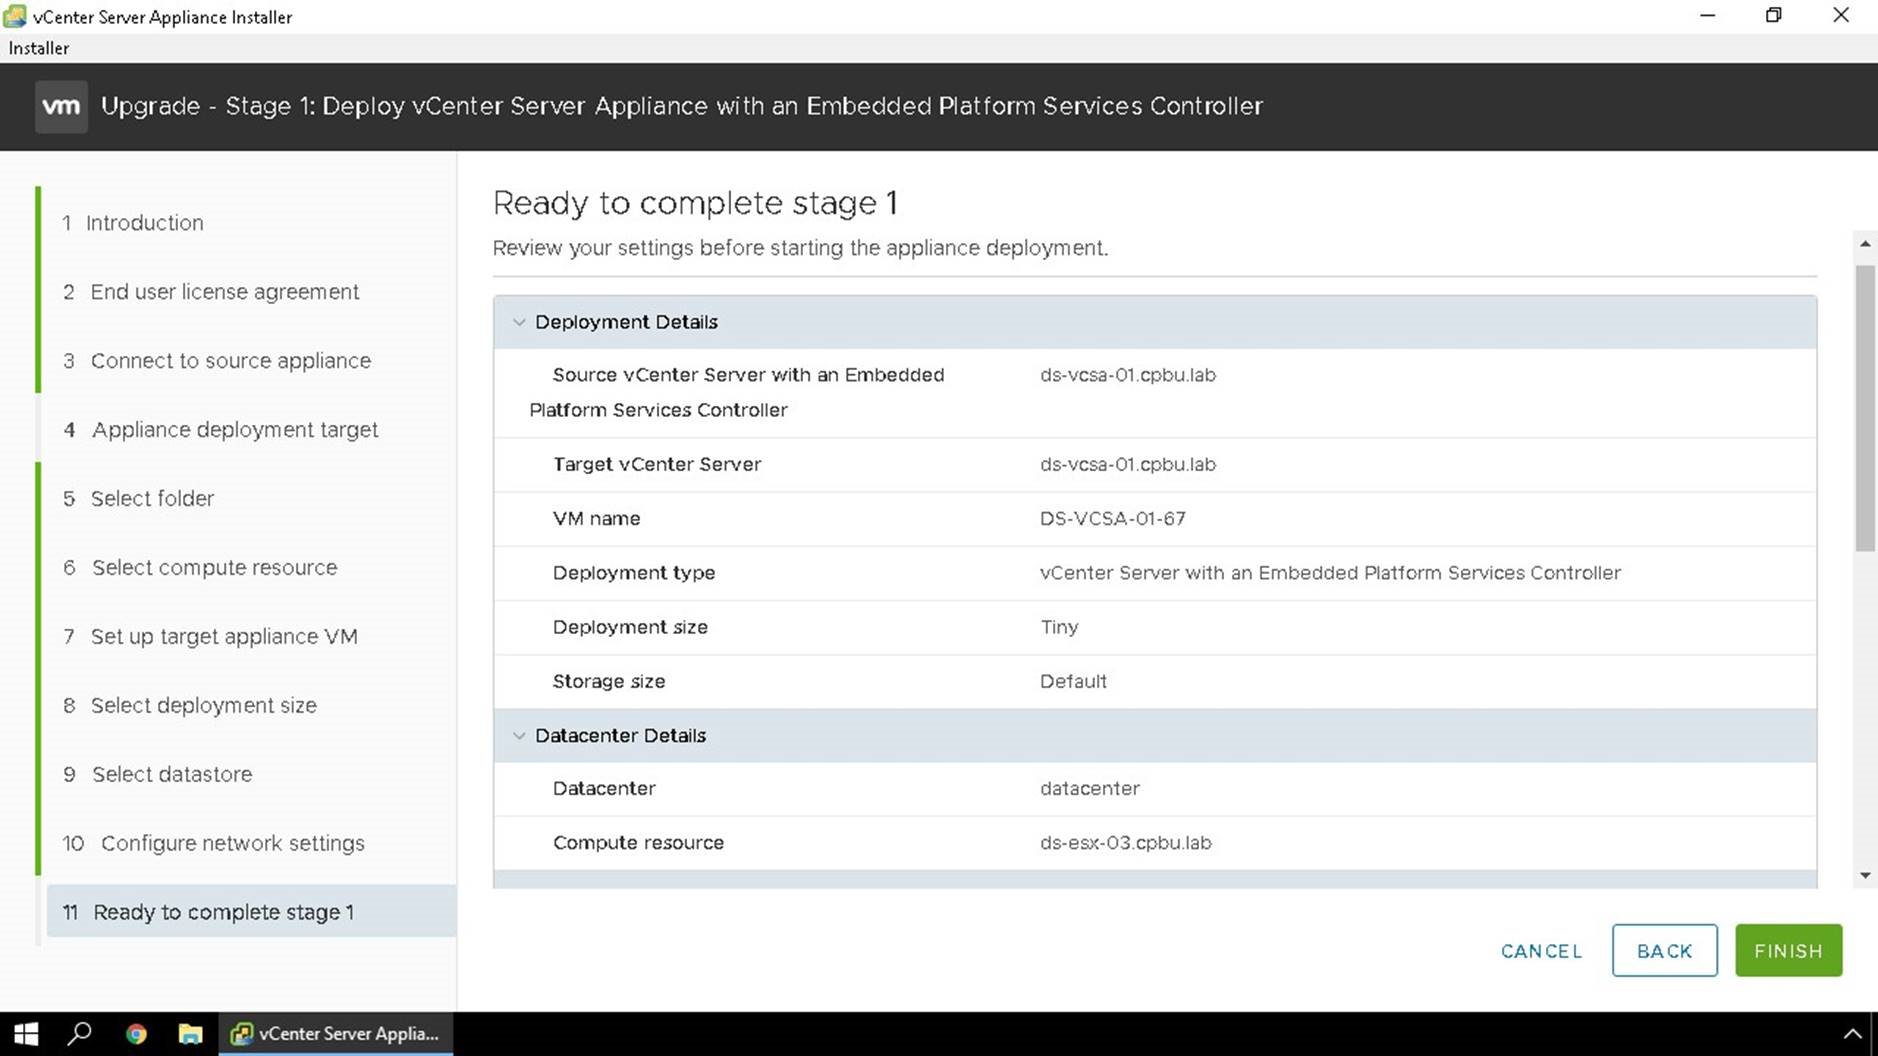
Validate all the information you entered is complete and we will finalize stage 1 of the upgrade process.
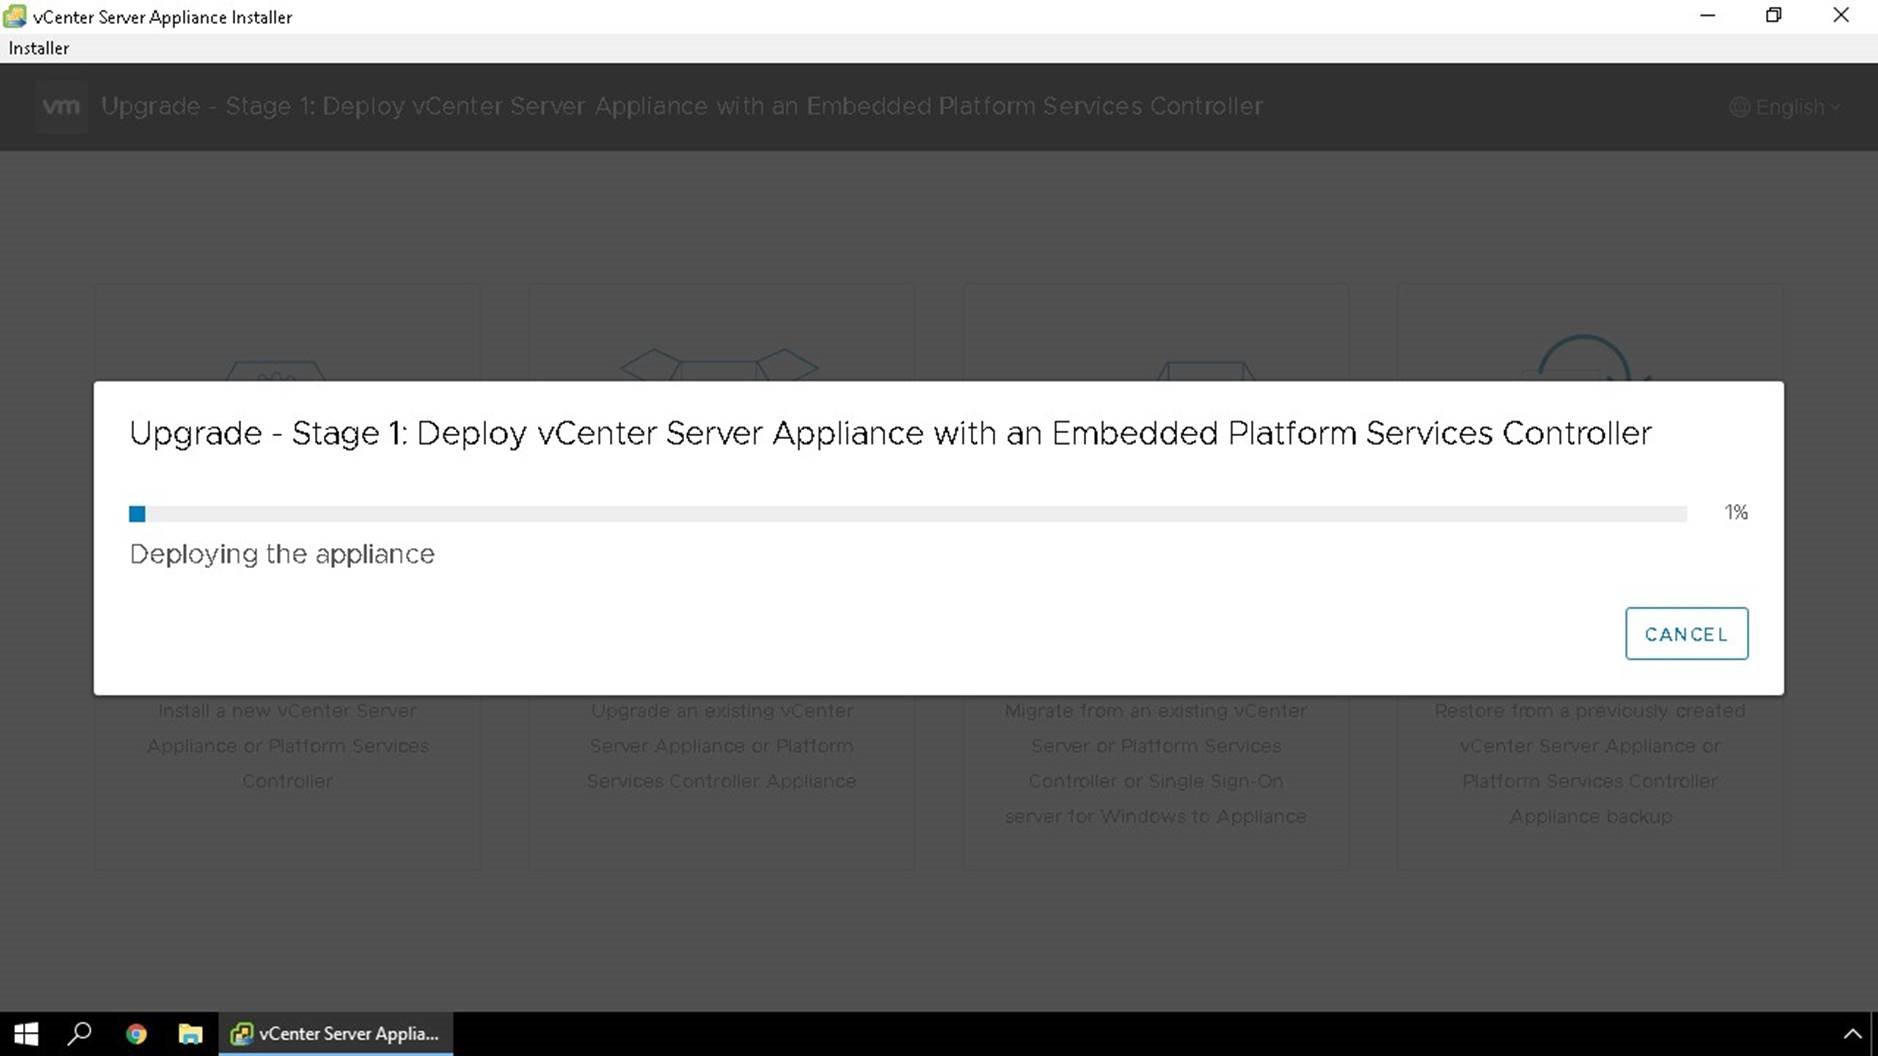
First step of stage 1 is the appliance is deployed.
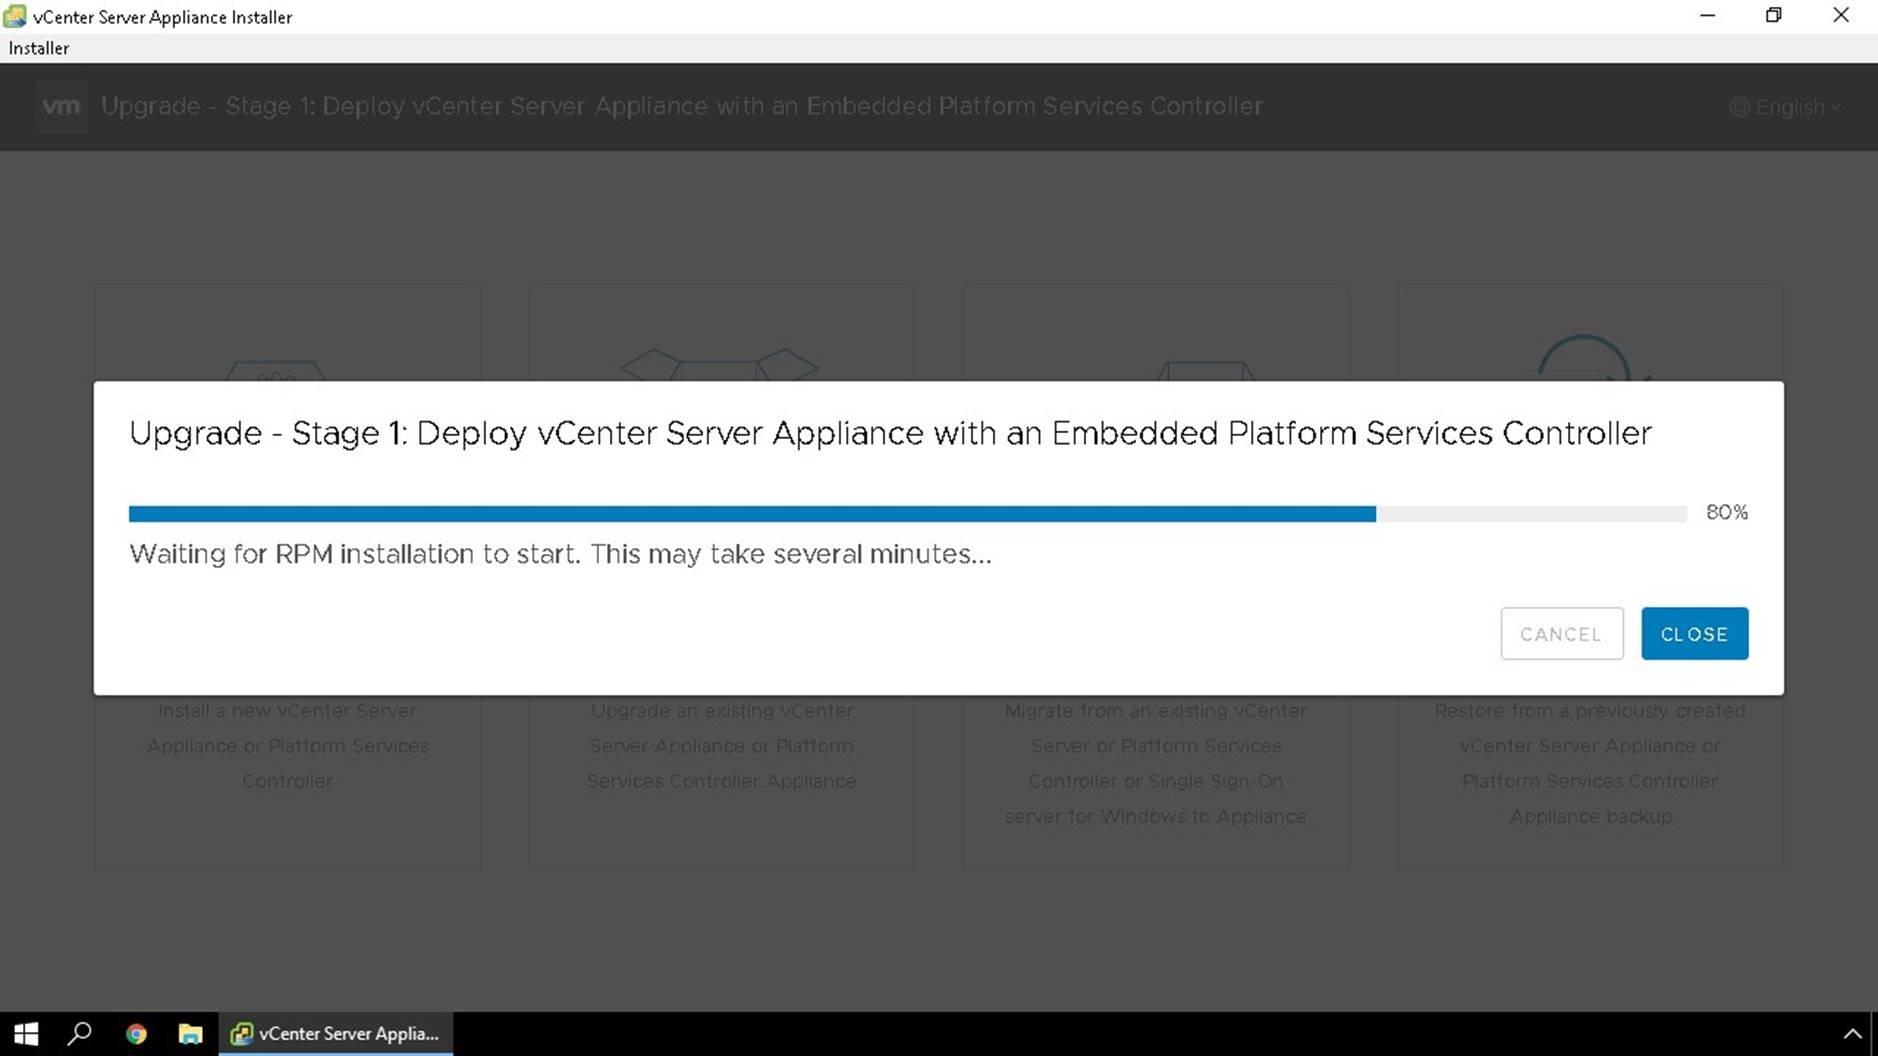
Additional configuration to the deployment where RPM's are loaded and installed.
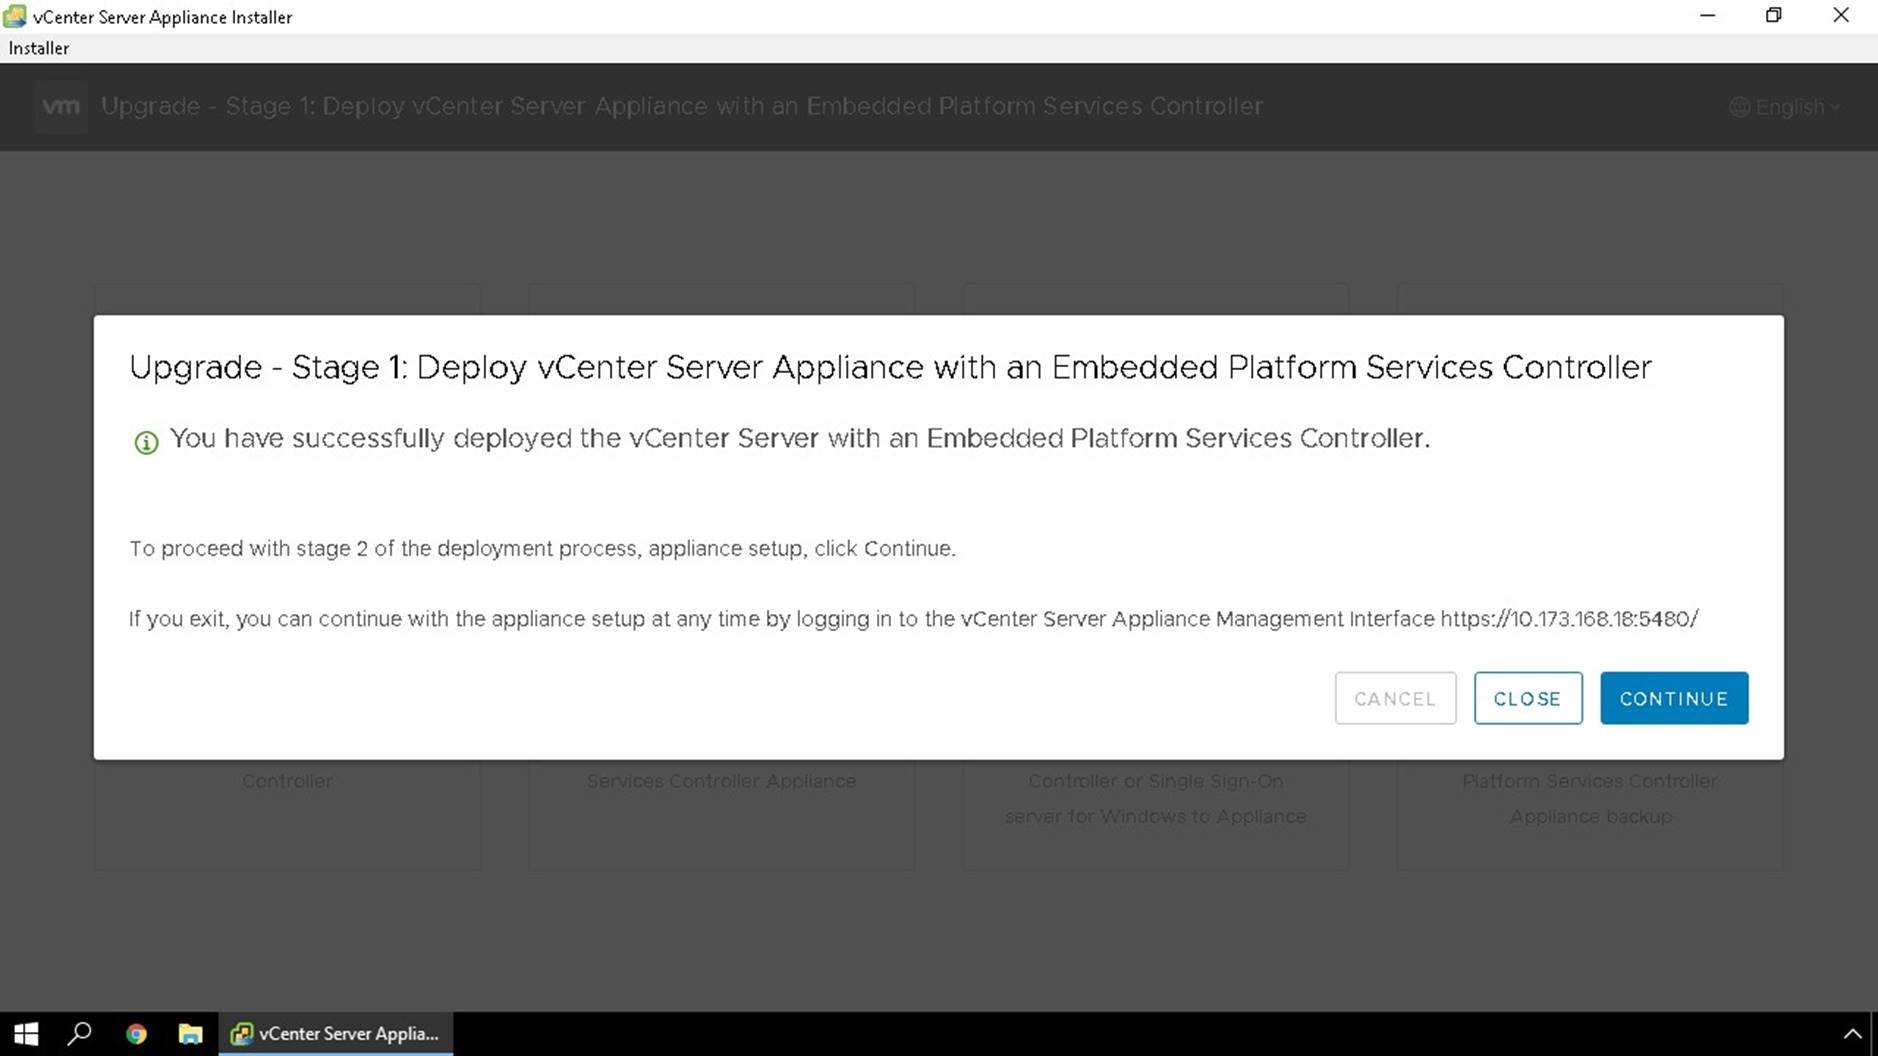
Once stage 1 is complete, we can continue the upgrade wizard to start stage 2. If the installer closes or you wish to continue this step later you can re-start the upgrade wizard through the VMware Appliance Management Interface (VAMI) on port 5480 of the temporary IP address.
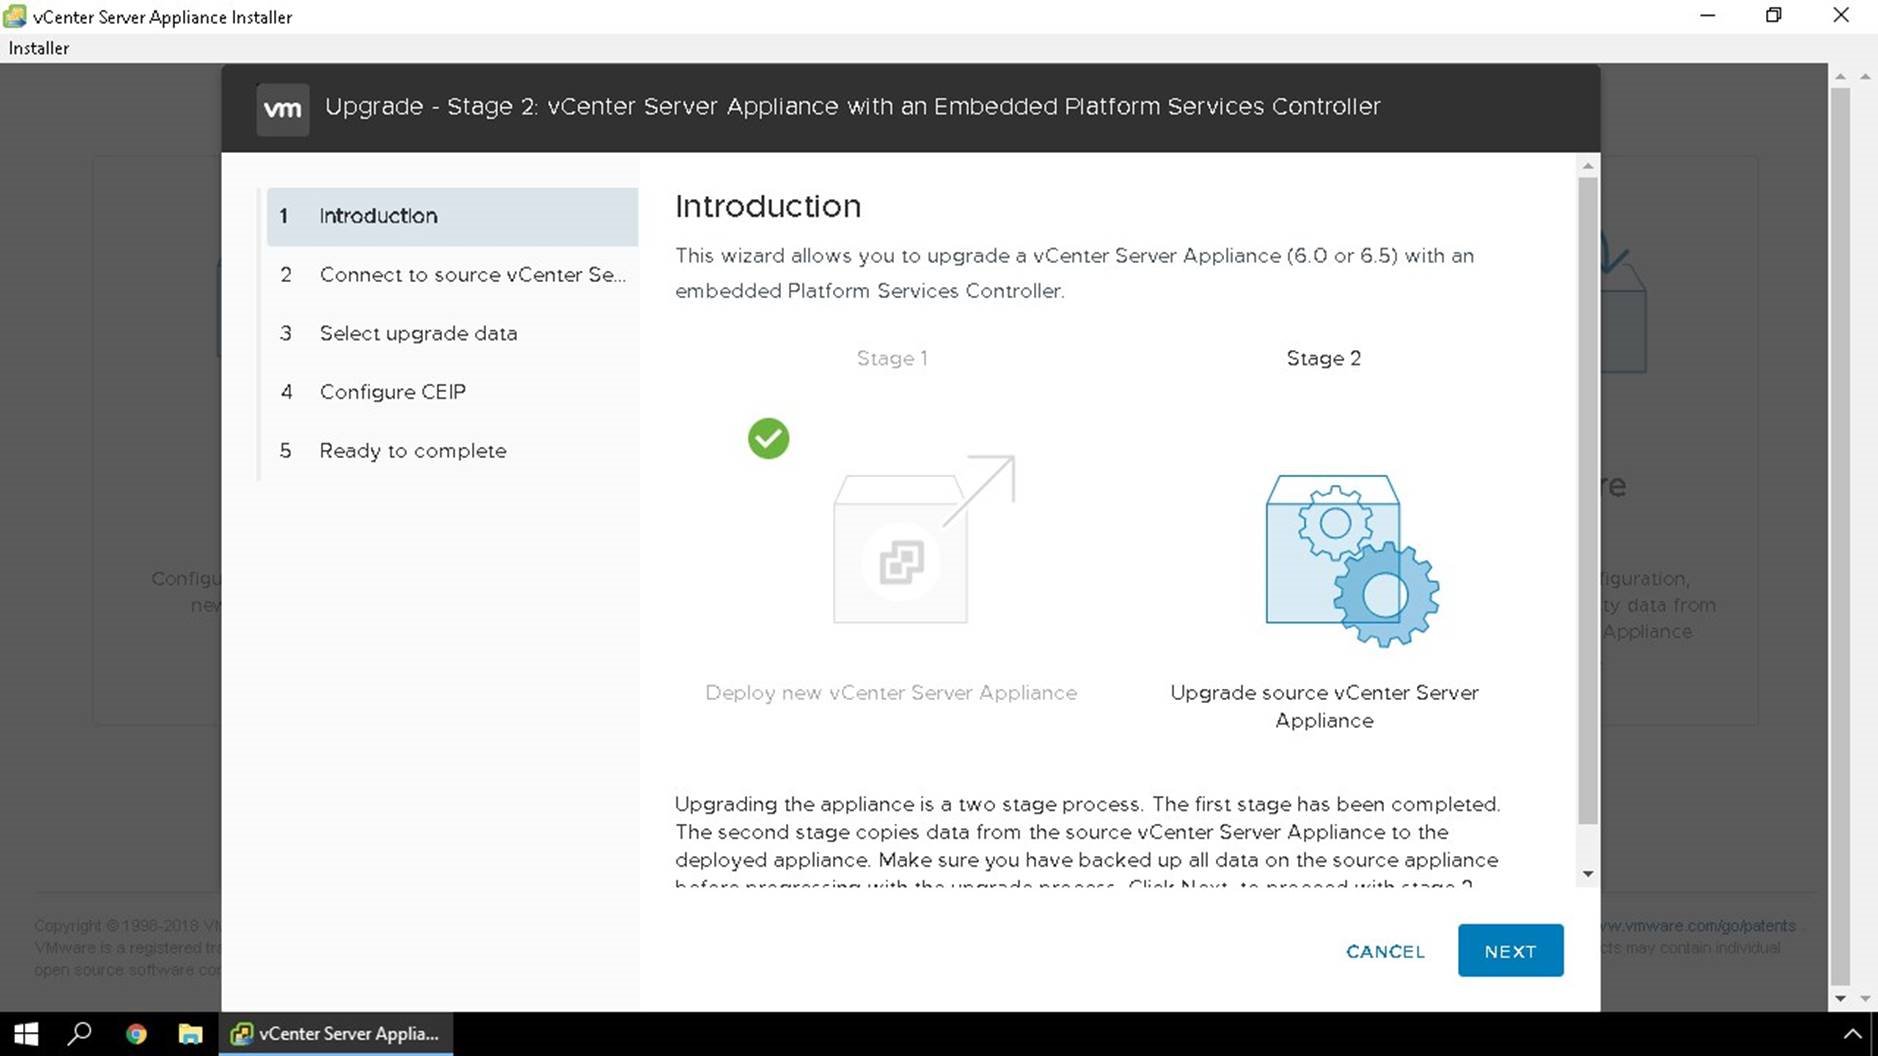
We will now start the process of migrating data from source appliance to the new appliance.
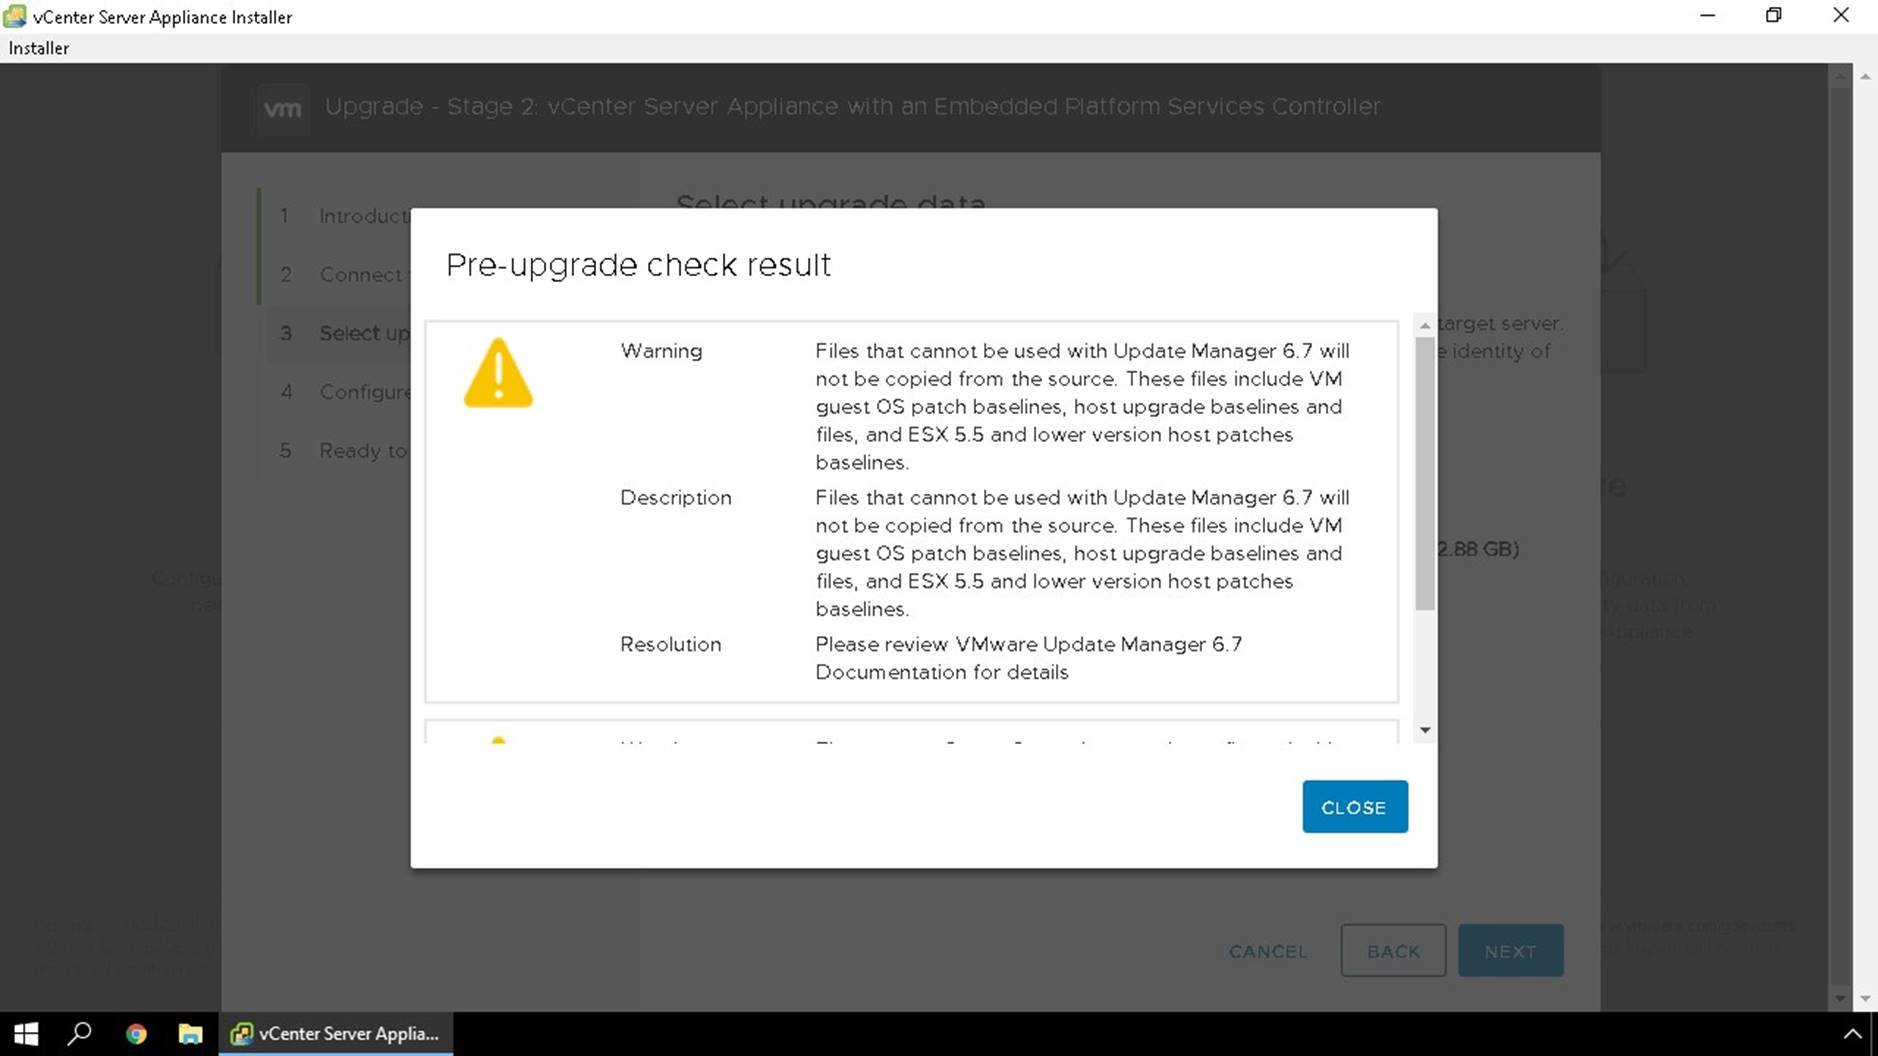
Pre-upgrade checks will run, and will inform you if you have any errors or warnings.If any errors or warnings occur, you can review the VMware KB or vSphere documentation site for more information.
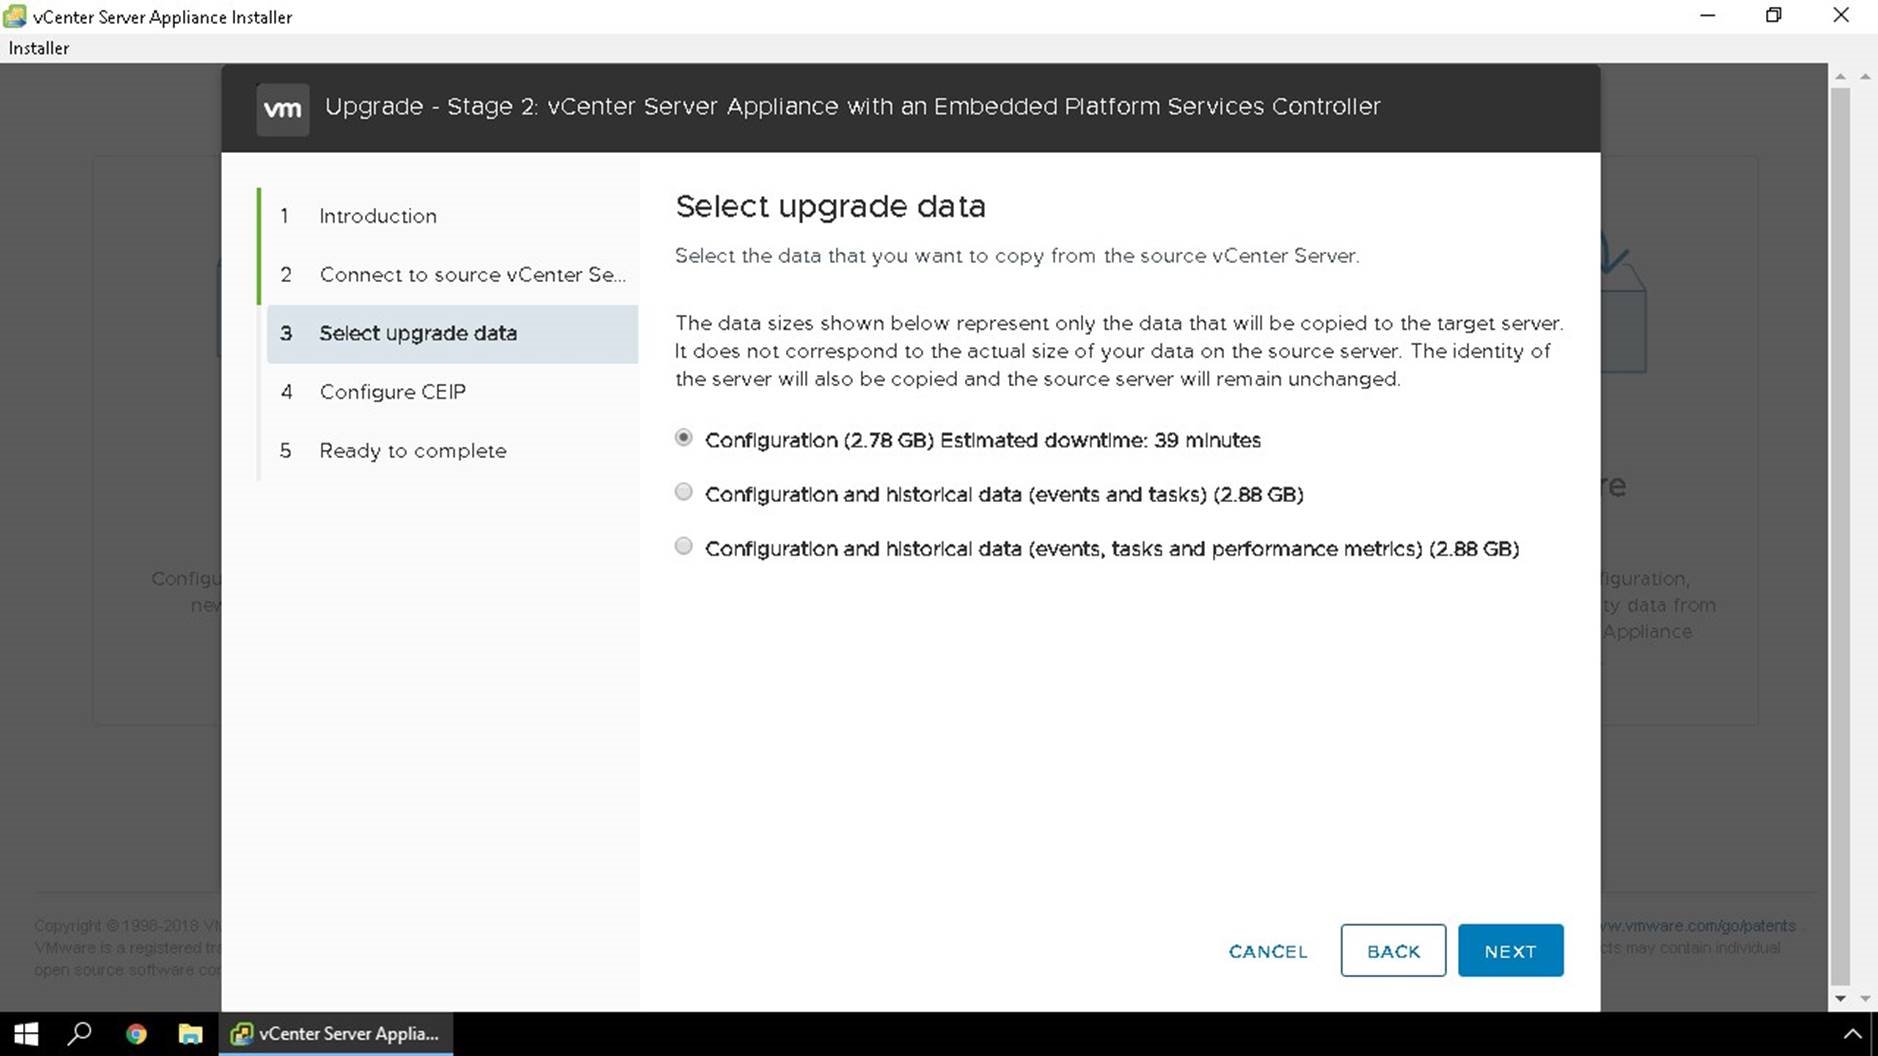
You can choose to only migrate your configuration and inventory, or if you choose to you can move over the entire dataset from the old appliance.The more information you choose to copy, the longer the upgrade process will take. If you are using vRealize Operations or vRealize Log Insight, this data should already exist in an external system.
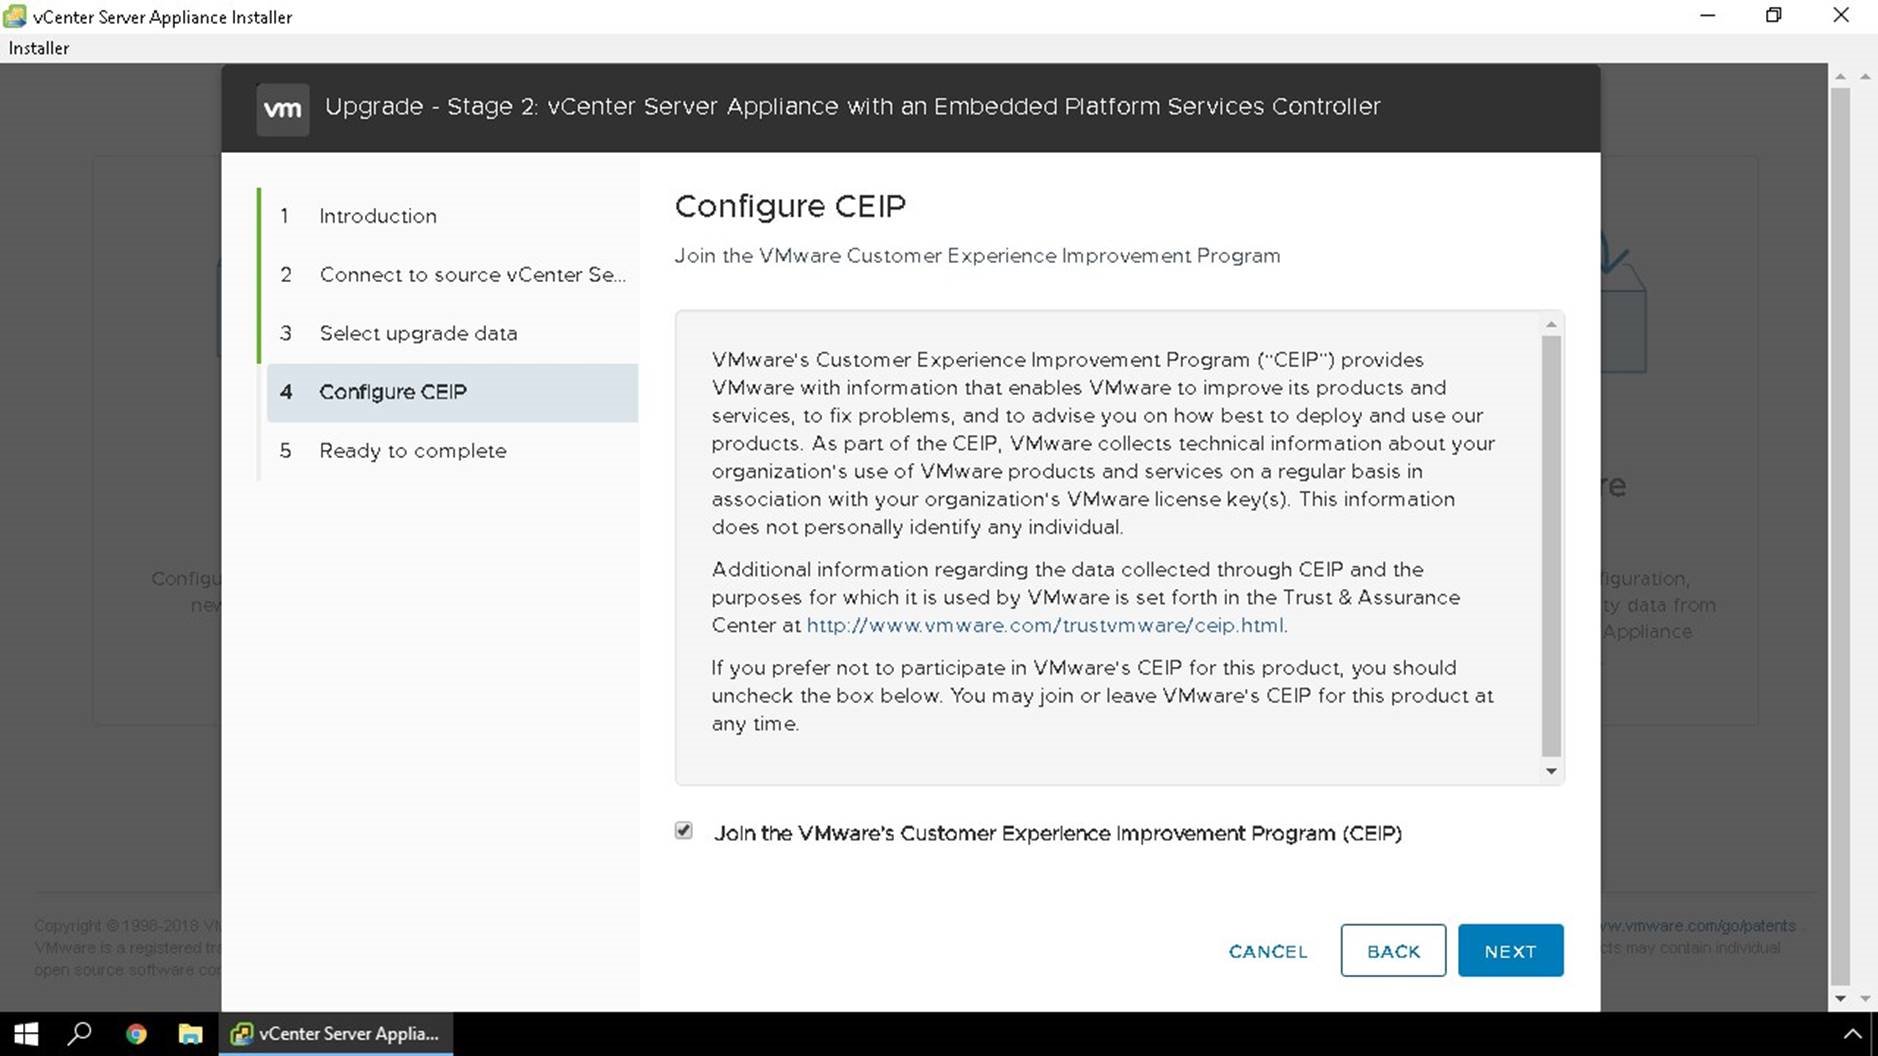
Specify if you would like to join the Customer Experience Improvement Program (CEIP) or not.CEIP data is completely anonymous and helps us with proactive support and metrics.
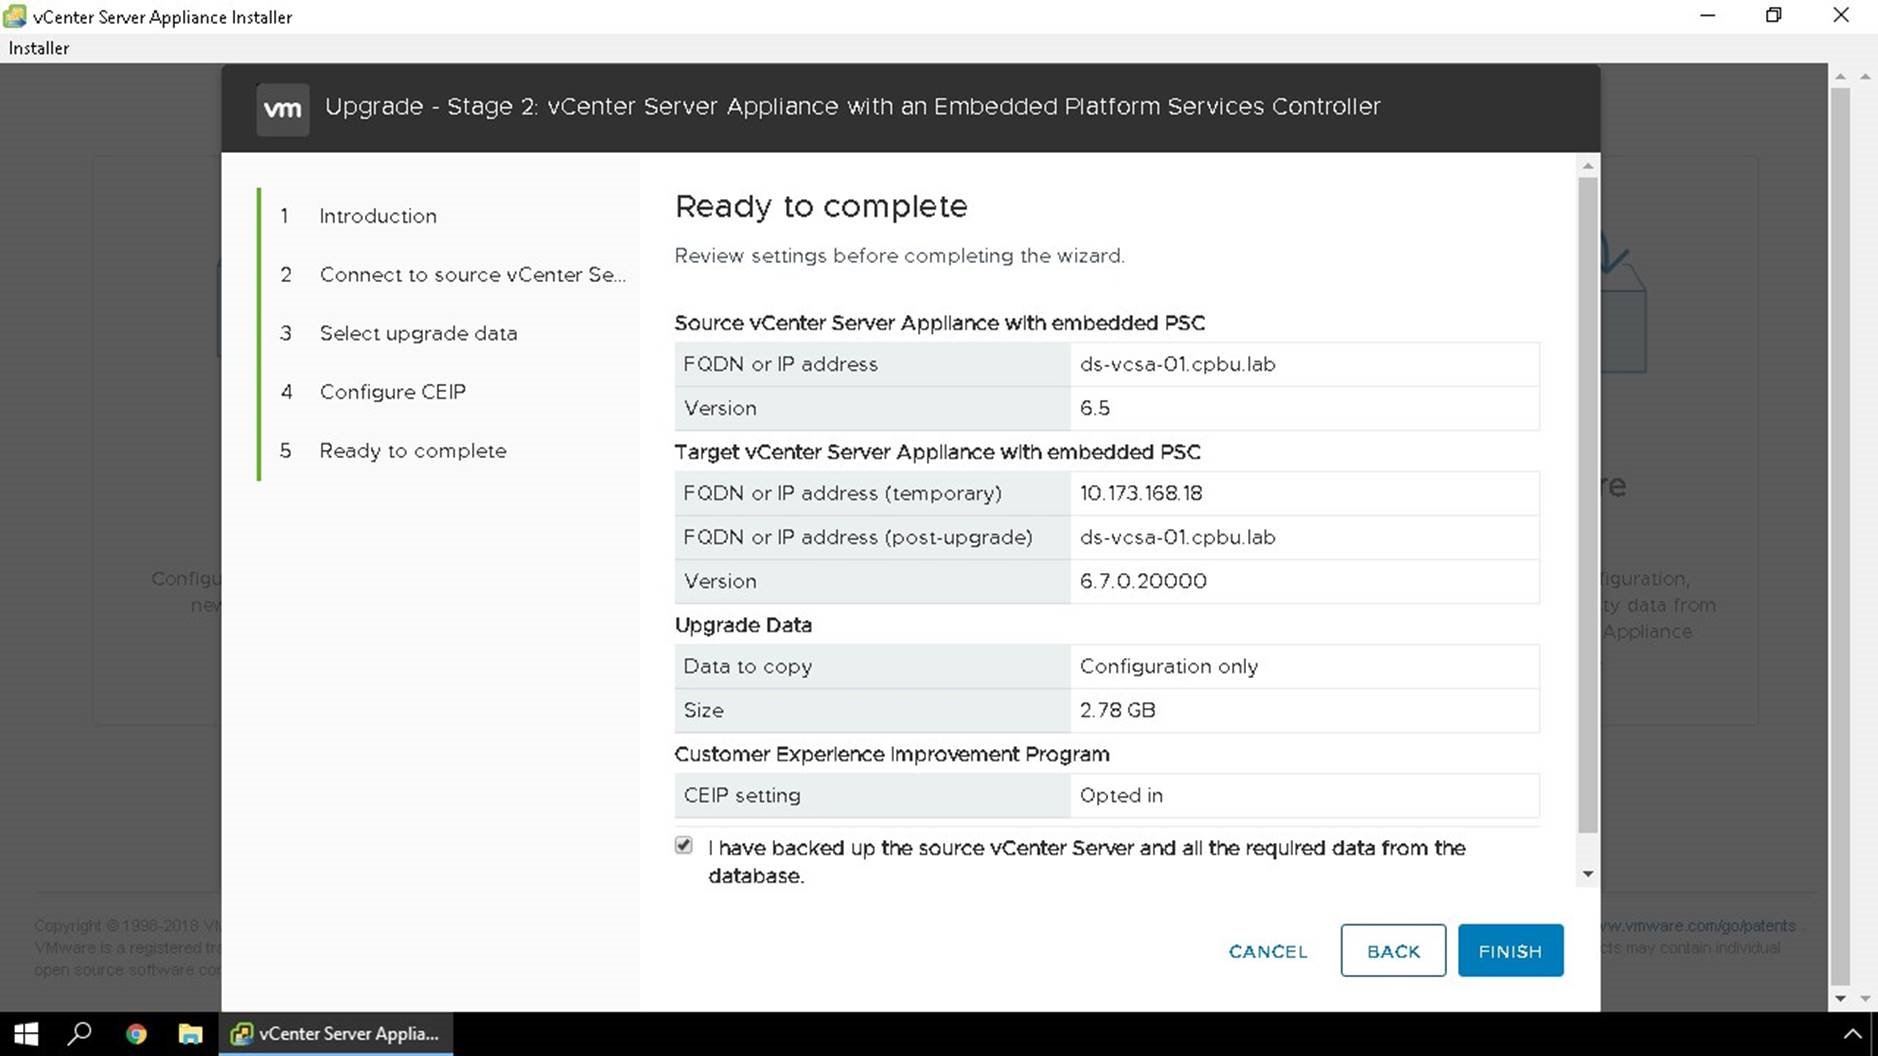
Acknowledge that you have a backup in place, and continue with the final step of stage 2.With vSphere 6.5 we now have a built in file-based backup utility built into the VAMI. We highly recommend having a file-based or image based (VADP) backup in place in case of error.
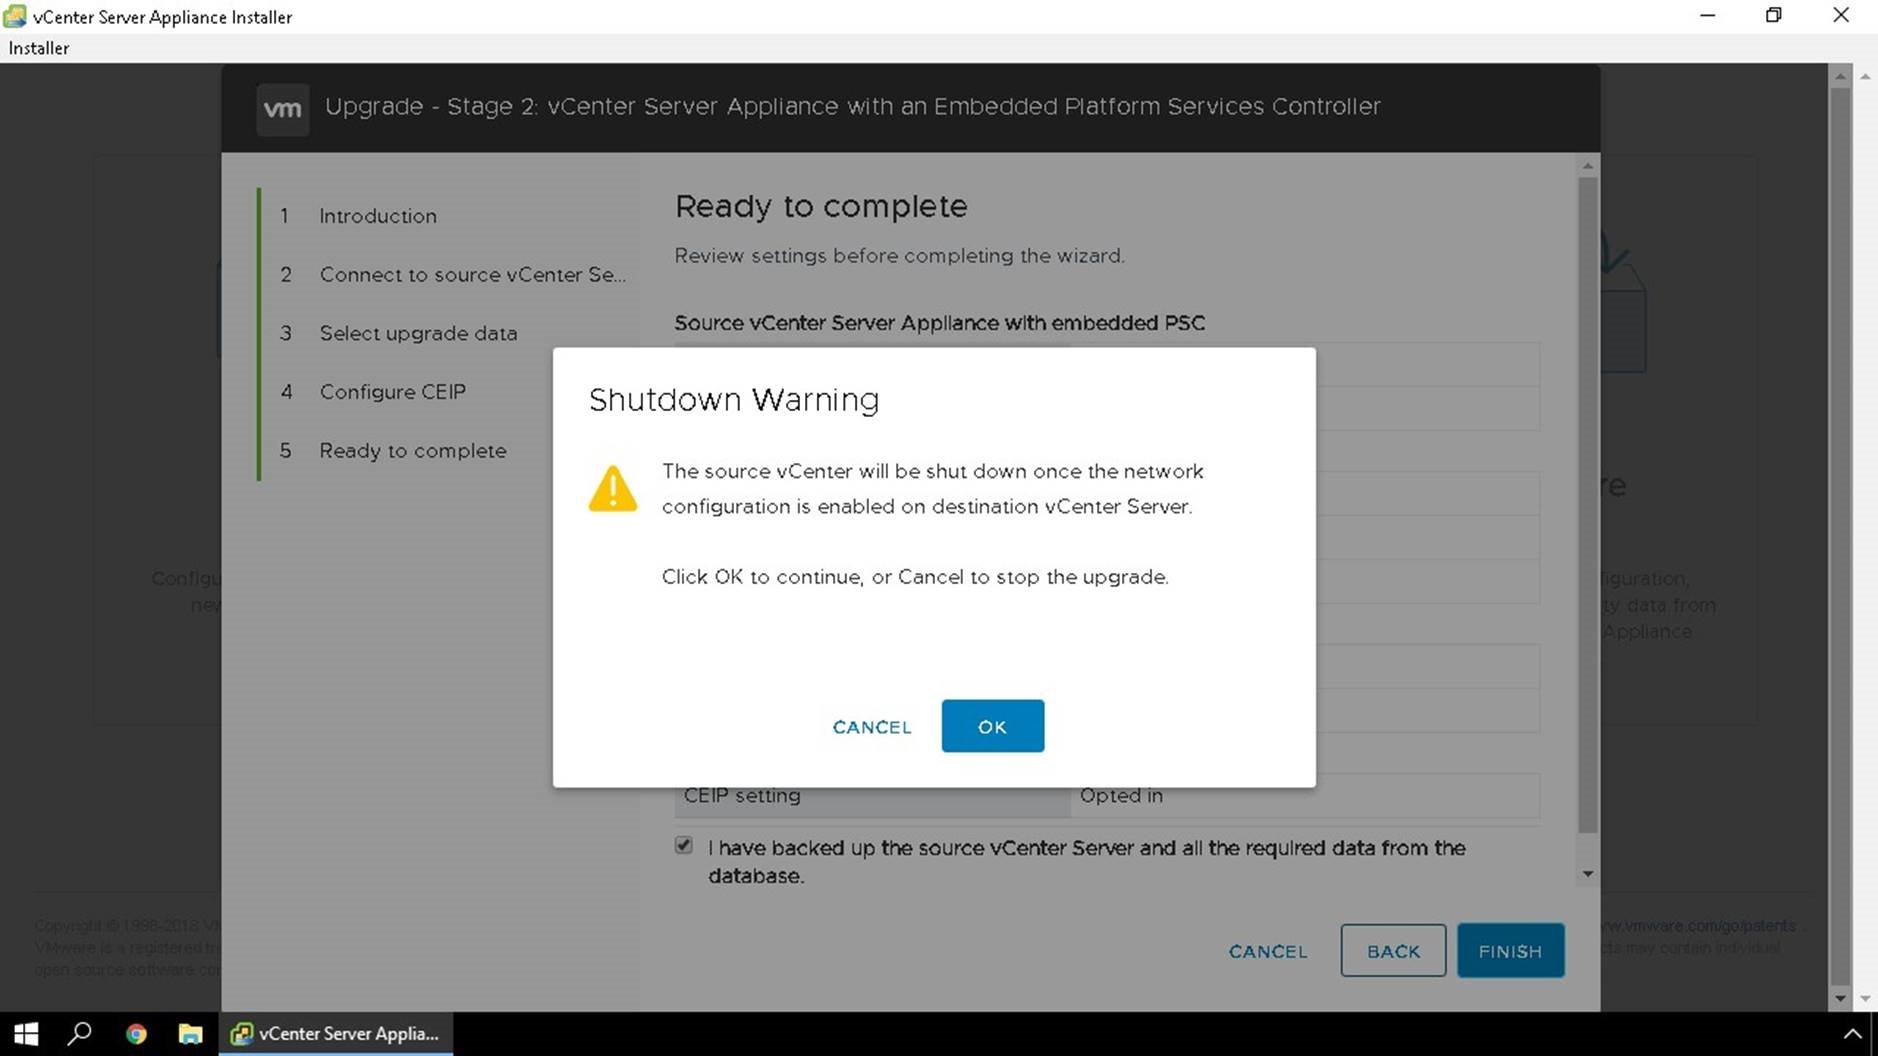
Warning will show you that during this process the source vCenter Server appliance will be shutdown.

Step 1, the data will be exported from the source appliance.
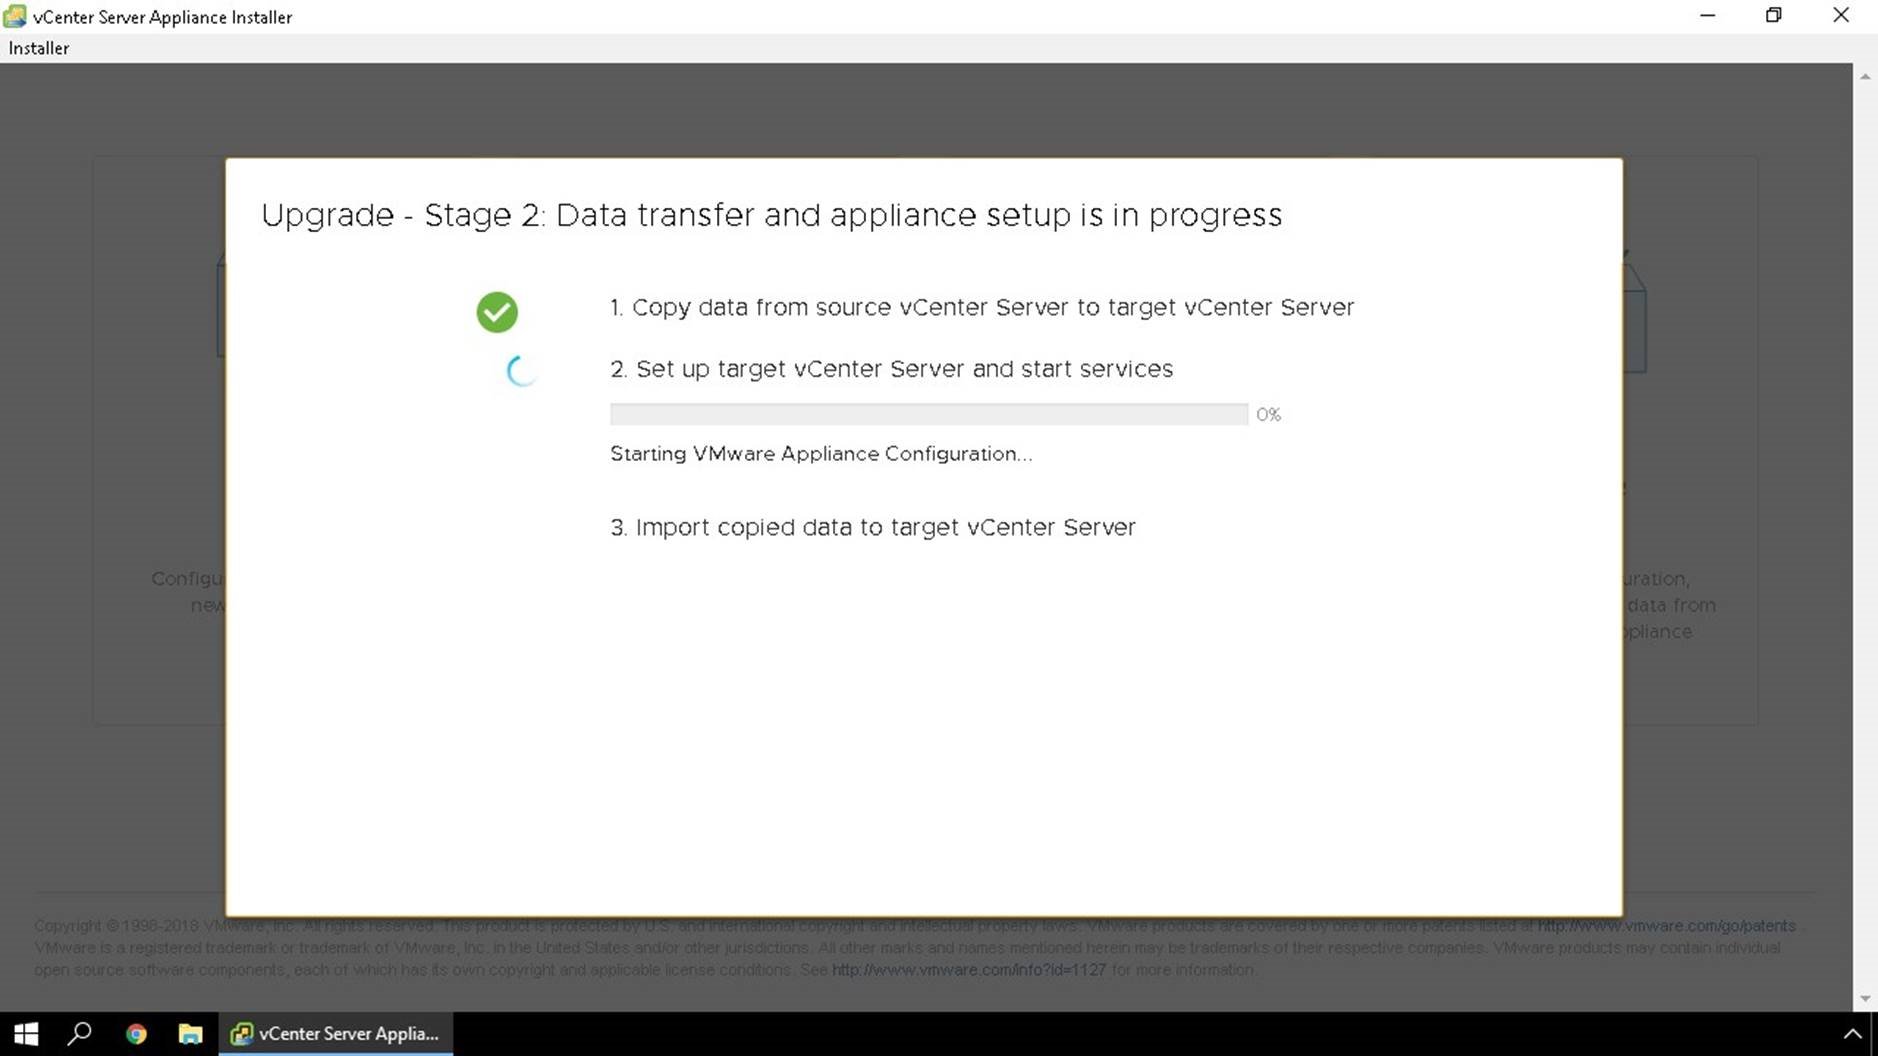
Step 2, the source appliance will be shutdown, and the new appliance will now maintain the identity of the old appliance configuring FQDN, IP and services.
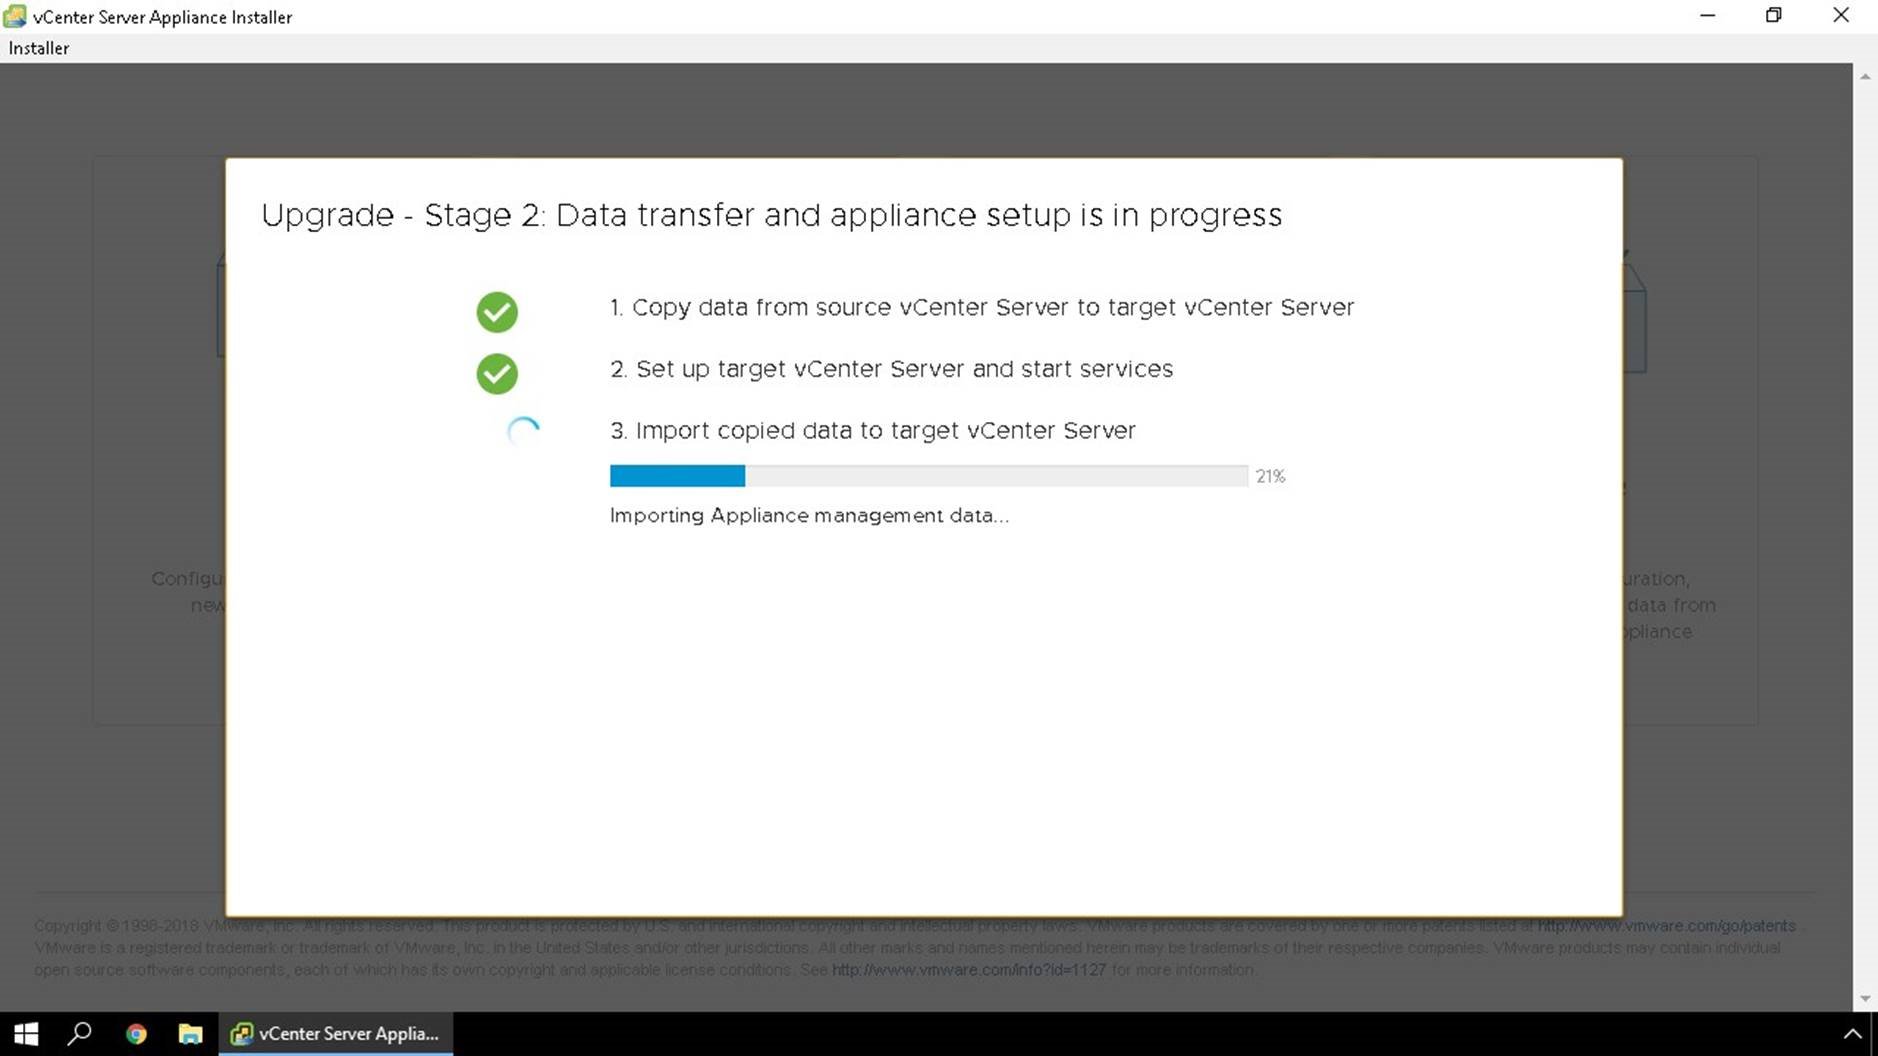
Step 3 begins, where we import data from the source appliance.
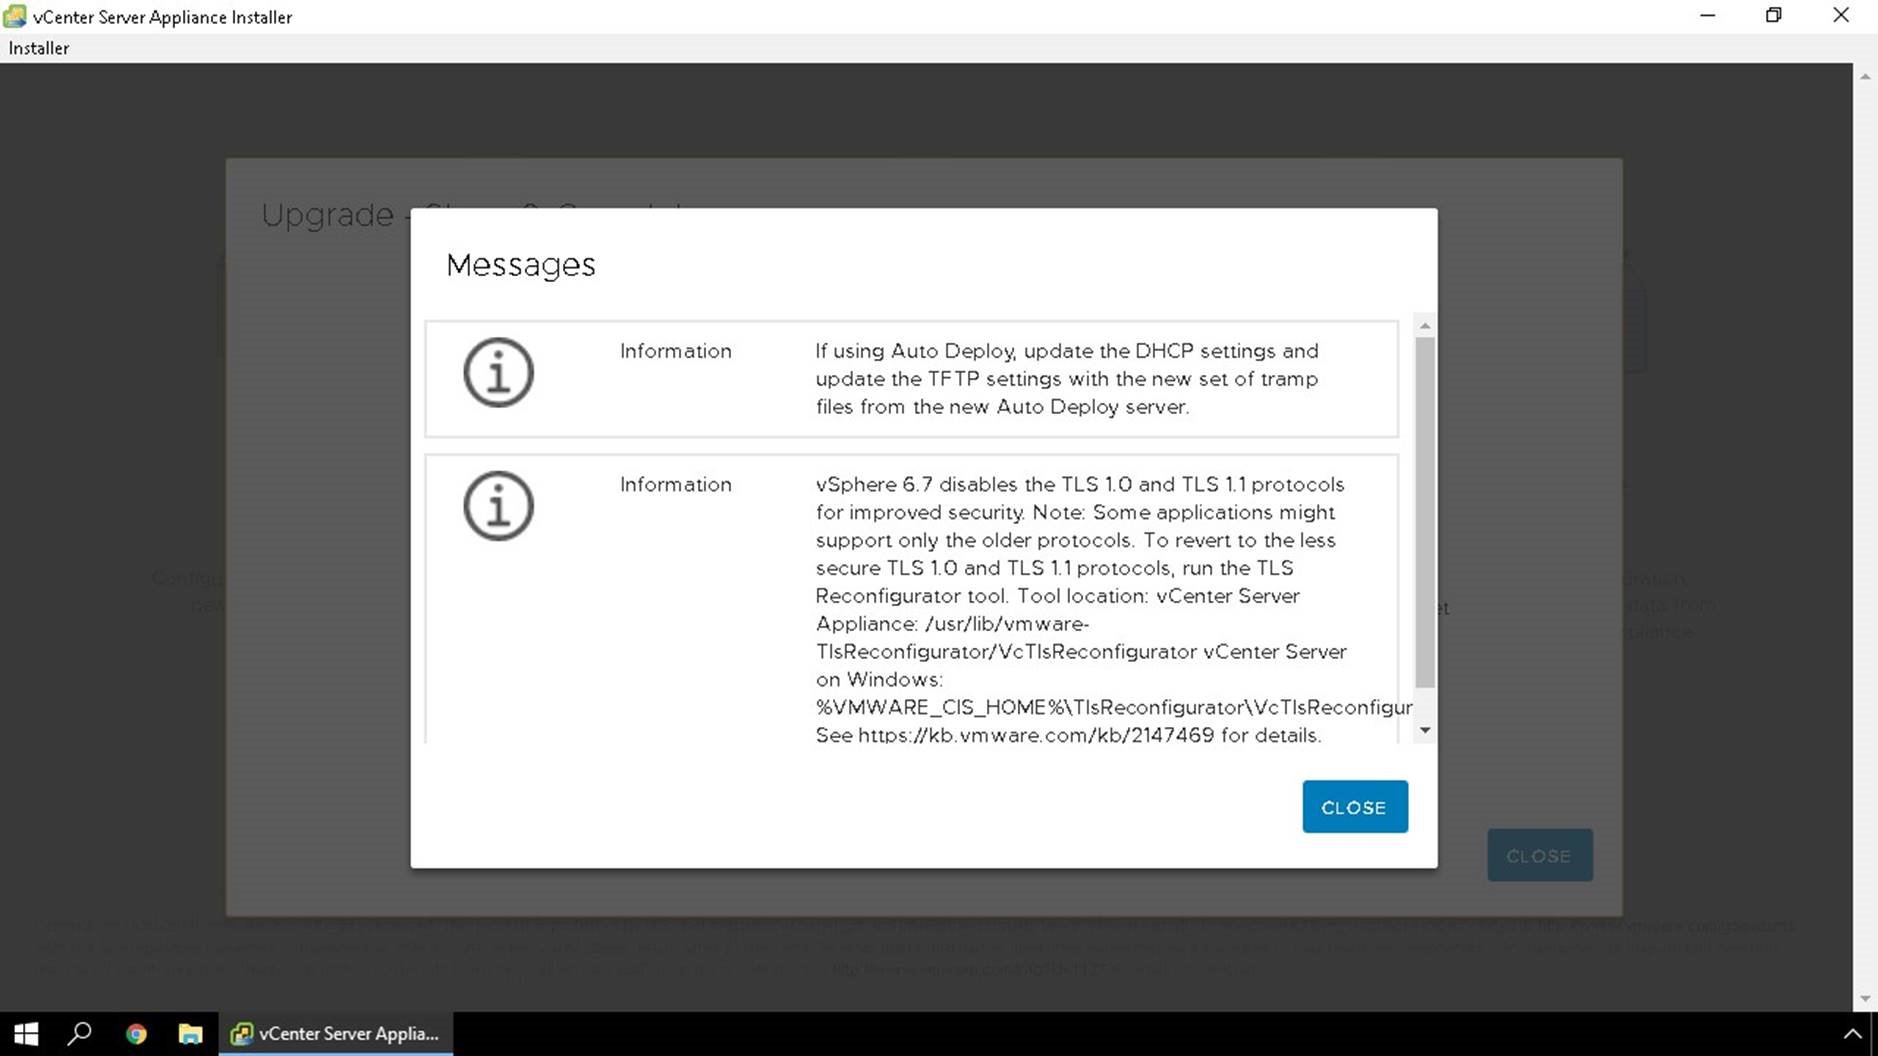
Post-upgrade tasks will display and inform you if additional action is needed.
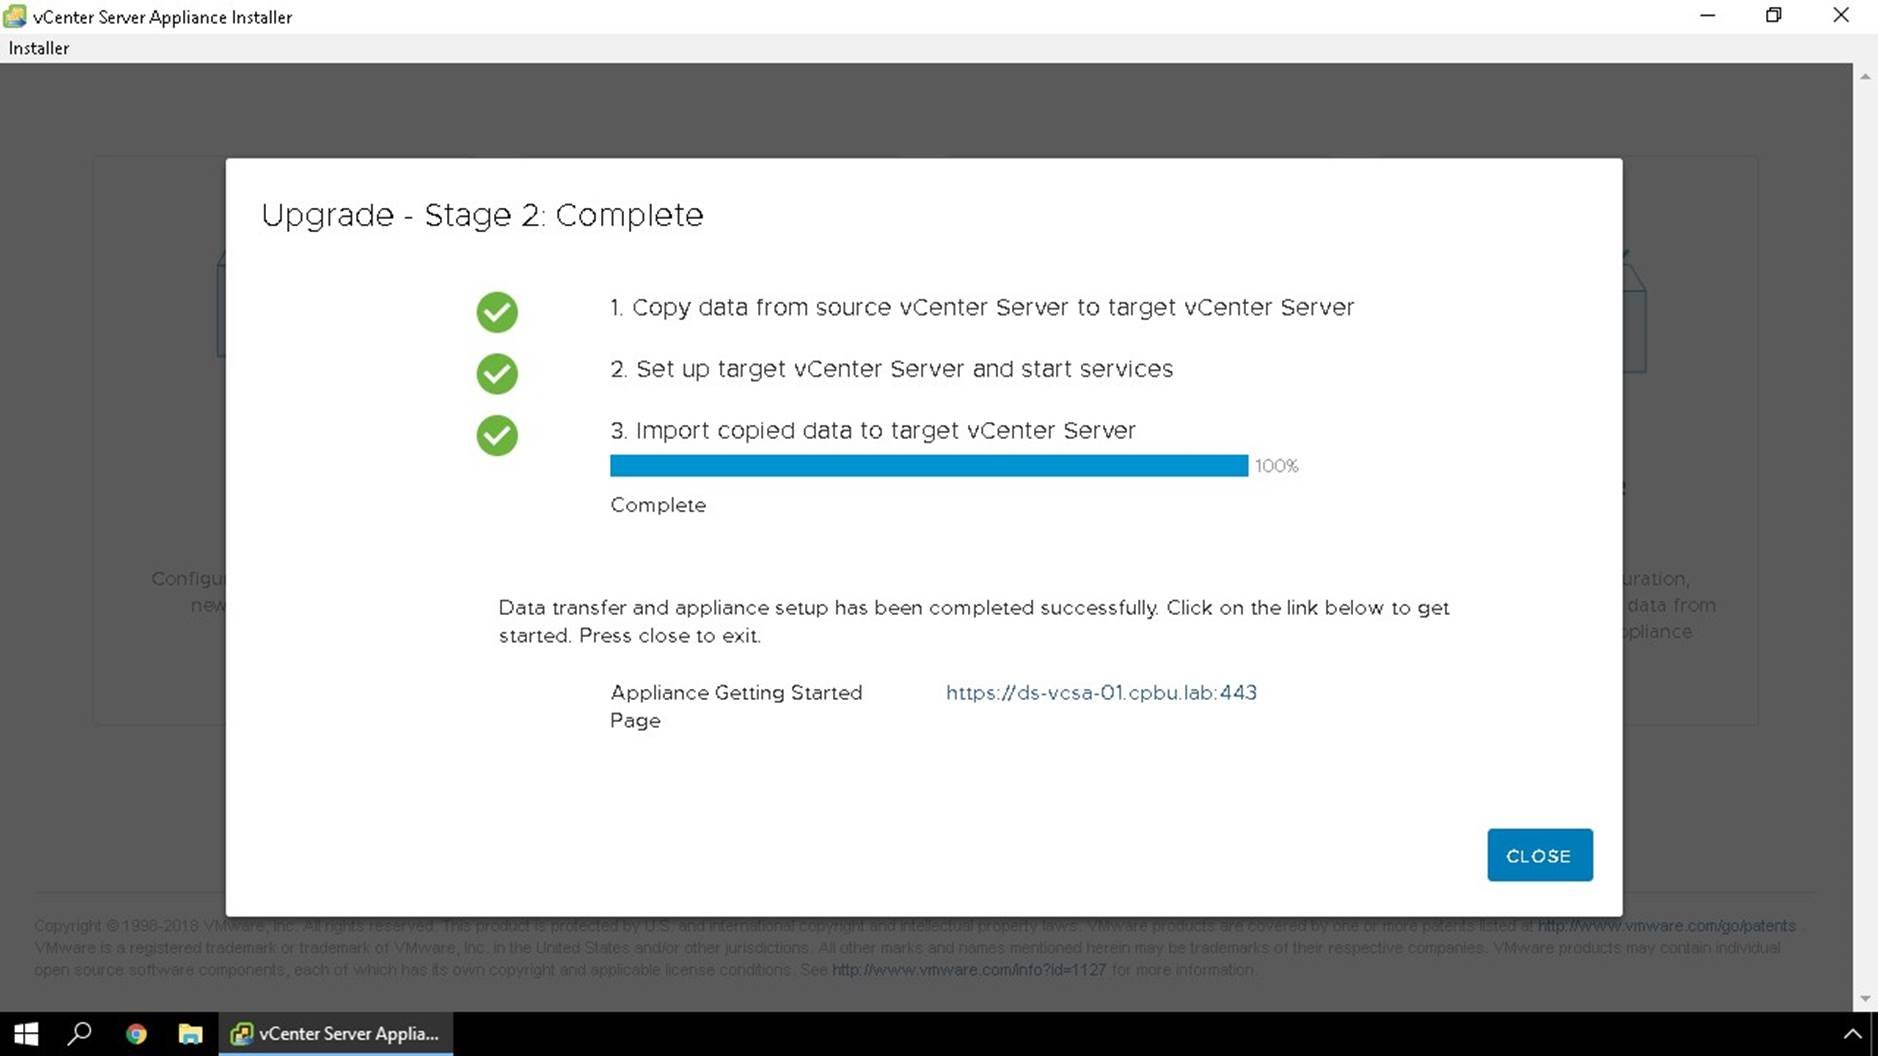
Your upgrade is now complete, and you can now access the vSphere Client!
Next Steps...
Your vCenter Server is now upgraded. Whats Next? We now will proceed on with upgrading the rest of the vSphere infrastructure. You can check the update sequence to update the rest of your remaining products including ESXi, VMware Tools, VM Compatibility and more. See the below links for more information.
- Update sequence for vSphere 6.7 and its compatible VMware products
- vSphere 6.7 Product Documentation
- Important information before upgrading to vSphere 6.7
- Upgrading ESXi

You can access additional resources our on vSphere Blogs.
vSphere 6.5 Upgrade Considerations
vSphere 6.5 Upgrade Considerations, Part 1
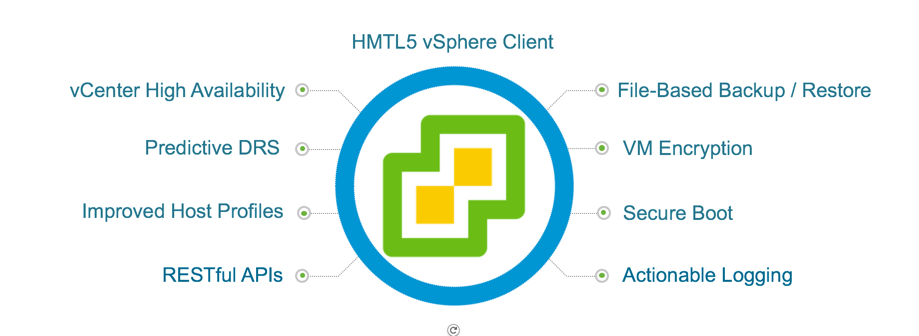
The release of vSphere 6.5 in November 2016 introduced many new features and enhancements. These include the vCenter Server Appliance (VCSA) now becoming the default deployment. vCenter Server native high availability, which protects vCenter Server from application failure. Built-in File-Based backup and restore allows customers the ability to backup their vCenter Server from the VAMI or by API. The VCSA restore can simply be done by mounting the original ISO used to deploy the VCSA and selecting the restore option. These features and more are exclusive only to the vCenter Server Appliance. The new HTML5 vSphere Client is making its first official product debut with vSphere 6.5.
Did someone say security? We now have better visibility of vSphere changes with actionable logging. VM Encryption allows the encryption of a virtual machine, including disks and snapshots. Secure Boot for ESXi ensures that only digitally signed code runs on the hypervisor. Secure Boot for VM’s is as simple as checking a box. We’ve only begun to scratch the surface of all the new vSphere 6.5 features.
Product Education
As you start preparing for your vSphere 6.5 upgrade, a checklist will be the run book used to ensure its success. The upgrade process can be divided into three phases:
Phase 1: Pre-upgrade – all the upfront work that should be done before starting an upgrade.
Phase 2: Upgrade – mapping the steps of each component that will be upgraded.
Phase 3: Post-upgrade – validation to ensure everything went according to plan.
The first part of any successful upgrade is determining the benefits of the new features and the value add they will provide to your business. Next is getting familiar with these new features and how they will be implemented in your environment. The following list will get you started learning each of the new vSphere 6.5 features and their benefits.
Another consideration to getting familiar with the new features and upgrade process is the hands on approach in a lab environment. If you have a lab environment at your disposal, try building it as close to your production environment as possible to simulate both the upgrade process and new feature implementation. If a lab environment is not available, there are options like VMware’s Workstation or Fusion if you have the resources to run them. Last, but not least, there is also the Hands on Labs that do not require any resources and provide a guided approach. No matter which option you select, the key is getting familiar and comfortable with the upgrade process.
Health Assessment

Doing a health assessment of your current environment is critical. Nothing is worse than being in the middle of an upgrade and having to spending hours troubleshooting an issue only to find out it was related to a misconfiguration with something as simple as DNS or NTP. Another advantage to doing a health assessment is discovering wasted resources. For example, virtual machines that are no longer needed but have yet to be decommissioned. The health assessment should cover all components (Compute, Storage, Network, 3rd party) that interact with your vSphere environment. Please consult with your compute, storage, and network vendors for health assessment best practices and tools. Environmental issues are high on the list when it comes to upgrade show stoppers. The good news is that they can be prevented.
There are also VMware and community tools that can help by providing reports on your current environment. Most of these tools come with a 60-day evaluation period, which is enough time to get the information needed. When using community tools please keep in mind they are not officially supported by VMware. Finally, there is also the VMware vSphere health check done by a certified member of VMware’s professional services team. Check with your VMware representative for more information.
- VMware’s vRealize Operations Manager (60 day evaluation provided)
- vSphere Optimization Assessment (60 day evaluation provided)
- VMware {code} vCheck vSphere (community)
- VMware vSphere Health Check (professional services)
- Hardware / Storage / Network / 3rd party (check with each vendor)
Conducting the health assessment could lead to discovering an issue that requires the help of support and opening a ticket. Do not proceed with the upgrade until all open support tickets have been resolved. There are instances where an issue can be fixed by applying a patch or an update, but make sure that any environmental problems have completely been resolved prior to proceeding. This not only includes VMware support tickets, but also compute, storage, network, and 3rd party that interact with your vSphere environment.
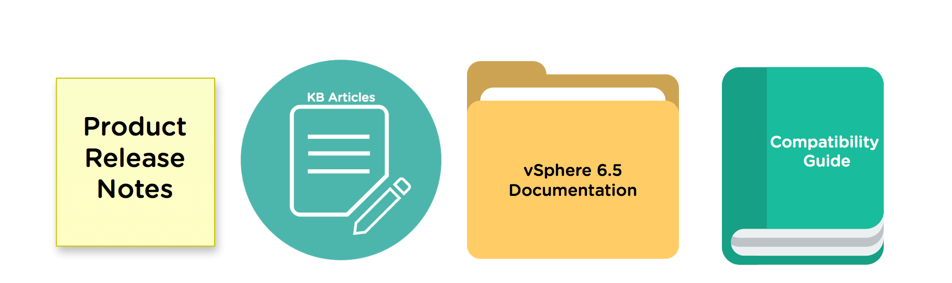
Important Documents
Now that we’ve learned about the features and completed a health assessment of our current vSphere environment, it’s time to start mapping out the upgrade process. The first step is looking at important documents like the vSphere 6.5 documentation, product release notes, knowledge base articles, and guides. Each of these documents have pieces of information which are vital to ensuring a successful upgrade. Product release notes, for example, provide information such as what’s new but also information about upgrades, any known issues, and all key pieces of information. Reading the vSphere 6.5 upgrade guide will give you an understanding of the upgrade process. The VMware compatibility guide and Product interoperability matrices will ensure components and upgrade paths are supported. Here is a breakdown of the important vSphere 6.5 documentation that should be viewed prior to upgrading.
Product Release Notes
- VMware vCenter Server 6.5.0
- VMware vCenter Server 6.5.0 a (Support for NSX 6.3.0)
- VMware vCenter Server 6.5.0 b (Additional functionality added to html5 vSphere Client)
- VMware vCenter Server 6.5.0 c (Apache BlazeDS security fix)
- VMware vCenter Server 6.5.0 d (New features for vSAN 6.6)
Knowledge Base Articles
- Information before upgrading to vSphere 6.5 (2147548)
- VMware vSphere Upgrade Policies (2149713)
- Update Sequence for vSphere 6.5 and its compatible VMware products (2147289)
- Best Practices for upgrading to vCenter Server 6.5 (2147686)
- Supported and Deprecated Topologies for VMware vSphere 6.5 (2147672)
- Supported Upgrade paths for vSAN 6.6 (2149840)
- Migrating VMFS 5 datastore to VMFS 6 datastore (2147824)
- Devices deprecated and unsupported in ESXi 6.5 (2145810)
Guides
- Upgrade Guide for vSphere 6.5
- vSphere 6.5 Configuration Maximums Guide
- VMware Compatibility Guide (HCL)
- Guest Operating System Installation Guide
- http://partnerweb.vmware.com/GOSIG/home.html
- vSphere 6.5 Security Configuration Guide (Hardening Guide)
Documentation
Upgrades need to be done with a holistic view from the hardware layer all the way to the application layer. With this philosophy in mind, a successful upgrade requires advance prep work to be done to avoid any potential roadblocks. Things like health assessments shouldn’t only be done when preparing for an upgrade, but also routinely. Think of it as a doctor’s visit for your environment and getting a clean bill of health. vSphere 6.5 has been released now for six months and since then four patches are now available providing bug fixes and product updates. The HTML5 vSphere Client now has added features in the release of vSphere 6.5.0 patch b and vSAN easy install is available in 6.5.0 patch d . This agile release of patches means customers no longer need to wait on the first update to consider upgrading to vSphere 6.5. The next few parts in this series will cover mapping out the upgrade process whiteboard style, architecture considerations for the vSphere Single Sign-On domain, migration, and upgrade paths.
At this point it is worth noting that the vSphere upgrade process can seem complex if not overwhelming, especially for our customers who use other tools that depend on vSphere and vCenter Server. We hear you. VMware is certainly working to make this better. I hope to be able to write about those improvements in the future. Until then you have upgrade homework to do!
Article: https://blogs.vmware.com/vsphere/2017/05/vsphere-6-5-upgrade-considerat…
Date: 2017-10-26
vSphere 6.5 Upgrade Considerations, Part 2
The first part in this series covered Phase 1 of the vSphere 6.5 upgrade process. Phase 1 consists of all the upfront work that one should do before starting an upgrade. This includes getting familiar with the new vSphere 6.5 features and the necessary documents. Hopefully, by now you’ve done your homework and are ready to move on to Phase 2 which is planning out the upgrade steps of all the components, scheduling meetings with the business owners to gather requirements, submitting the necessary change controls, and executing the upgrade.
Over the course of the next couple of parts, we will be going through a couple of scenarios that will help you see how to plan an upgrade to vSphere 6.5. Each scenario will also include a set of requirements and decisions used to determine the upgrade path. These examples may or may not relate to your current environment. The intent is to help familiarize you with the upgrade process and concepts and then apply them to your specific situation.
Scenario
The Amazing T-Shirt company currently has two datacenter sites, California and New York. The company recently acquired a third site that will help with their distributions located in Texas. Each site is running vSphere 5.5 using an embedded vCenter Server deployment on Windows. Other products in the environment include NSX, vRealize Automation (vRA), vRealize Operations (vROPS), and vRealize Log Insight (vRLI). vRA is using a separate vCenter Server endpoint from the previously mentioned vCenter Server. The example chart below represents the current version of each product and target (upgrade to) version. Accompanying each product are comments taken from the install or upgrade section found in its release notes. Also, do not forget to add any 3rd party products (ex. Backup) that are in use to determine if they support or have an upgrade path in order to be compatible with vSphere 6.5.

After reading about all the new vSphere 6.5 features, Adam, the company’s new lead virtualization architect has decided that it’s time to upgrade. Before starting the upgrade process he has compiled a list of business requirements and then will map out the associated upgrade path. The vSphere 6.5 upgrade project is estimated to take three months to complete. This includes planning, coordinating, submitting change controls, and validation. One of Adam’s main objectives is not to over complicate his design while meeting the business’s requirements. Here is a list of the requirements that Adam has compiled after his meeting with the business’s key stakeholders.
Requirements and Decisions
vSphere Single Sign-On Domain Consolidation
Having a single vSphere Single Sign-On (SSO) domain will simplify management after the upgrade process. Starting with vSphere 6.0, licensing, global permissions, custom roles, single sign-on, and certificates are replicated throughout the SSO domain and make it easier and more efficient to manage these shared services across multiple vCenter Servers.
- Can only be done in vSphere 5.5
- This will require an architecture change from embedded to external PSC deployment
- Will need to be done prior to the upgrade process
- A separate change control and validation are required
- The outage will only affect IT management of the environment
Enhanced Linked Mode
Today each site is operating autonomously which means each site is managed separately. This is not efficient for Adam and his team. Their goal is to have visibility to all three sites no matter what vSphere Client they use.
- Requires external deployment which will be completed with the vSphere SSO domain consolidation
- Automatically inherited when new vCenter Servers are added to the same vSphere SSO domain; no action required
Migrate to the vCenter Server Appliance
The vCenter Server Appliance 6.5 surpasses its Windows counterpart when it comes to features and performance. The VCSA is VMware’s direction for vCenter Server and all new features starting with vSphere 6.5 will only be in the VCSA:
- Native vCenter Server High Availability
- Built-In File-Based Backup Restore
- vSphere Update Manager no longer requires a separate Windows Server
- Supported Migration Tool from Windows to VCSA
High Availability
To meet their current 10 minute RTO Adam has decided to leverage both vSphere HA and vCenter Server High Availability (VCHA). This will ensure the company is protected from host and vCenter Server (application) failure.
- vSphere HA will protect again host failure
- vCenter Server VM restart priority setting to highest
- vCenter Server HA requires a load balancer for Platform Services Controller high availability
- Load Balancers supported: F5, NetScaler, and NSX
- VCHA provides 5 minute RTO
Centralized Logging per Site
Currently, there is no centralized logging within each site. The hosts and vCenter Server are using the default settings and logs are maintained on each individual node. VMware provides a 25-OSI pack with each vCenter Server license for free.
- No additional cost for logging solution at each site (budget)
- Content Packs available
- Dashboard and Analytics of logging data helpful for troubleshooting
- Not limited to vSphere products, Windows and Linux agents available
- Limited feature set would need to be upgraded to the full version of Log Insight for additional features such as clustering, event forwarding, archiving, etc.
- More hands on experience with Log Insight and can upgrade in the future as budget permits
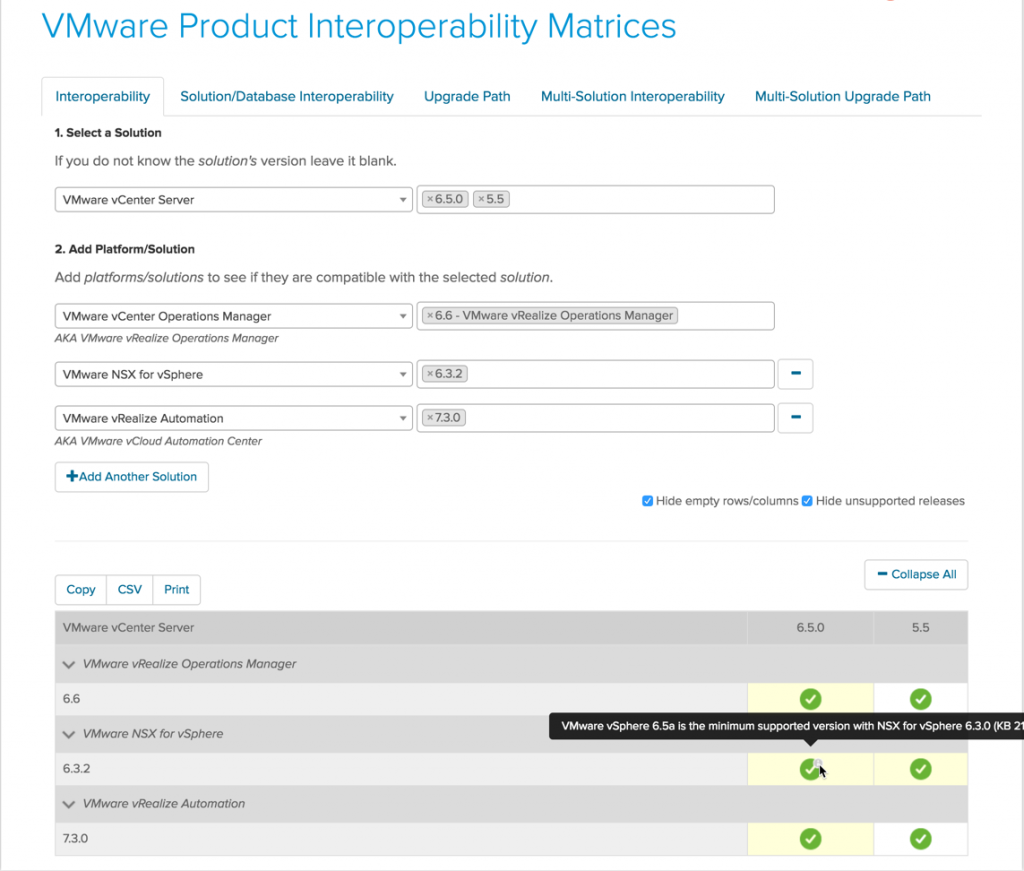
Compatibility
Now that Adam has a set of upgrade requirements, the next step is validating the compatibility of each product. This can be achieved by using the VMware Product Interoperability Matrices which is one of the documents he is now familiar with as part of his upgrade preparation during Phase 1. Since all the products communicate with vCenter Server as an end point, it should be selected in step one, labeled “Select a Solution”. There is the option to list all versions or specify particular version numbers. vCenter Server will now be displayed in the main horizontal header of the table. The next step is to list other solutions that will also be upgraded under the “Add Platform/Solution” section. The example below illustrates both the current version of vCenter Server 5.5 and the version that Adam will be upgrading to 6.5. Each of the products show the version that Adam plans to upgrade to ensure they are compatible with vSphere 6.5. As a result, Adam learns that NSX is the only product which has a requirement of vCenter Server 6.5a (also noted in the release notes), which is the version Adam must download.
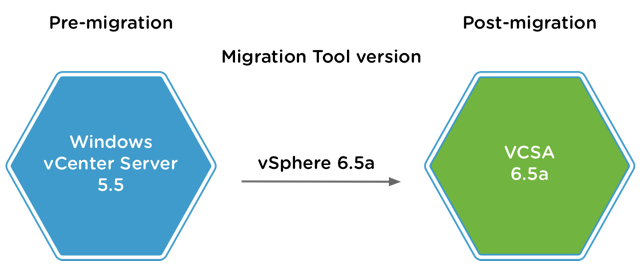
Upgrade Order
The final step before performing the upgrade is listing the order of operations. This order is listed in VMware vSphere upgrade documentation and has not changed over time.
Note: The image above is related to the current scenario. The migration tool in vSphere 6.5 supports migrations from both vSphere 5.5 or 6.0.
- vSphere SSO domain consolidation will be the first task that needs to be completed since it is one of Adam’s requirements. Keep in mind this can only be done on vSphere 5.5 , once the first node is updated to vSphere 6.5 the ability to consolidate is no longer available. The other item to note is that this may not be a requirement for everyone. If it is not part of your requirements then move forward with the next step of upgrading the vCenter Server components. The following KB provides the details needed to consolidate a vSphere SSO domain in version 5.5. Also, don’t forget to look at the vSphere 6.5 maximums guide to ensure the supported number of Single Sign-On servers in a vSphere SSO domain.

- If your deployment is embedded then proceed directly with your vCenter Server upgrade. In this example, there is an external deployment spanning multiple sites. One of the requirements is migrating from a Windows based vCenter Server to the vCenter Server Appliance. A migration also falls under the upgrade category since it is not only copying data (configuration/inventory by default) from one platform to another (Windows to Photon OS) but also going from version 5.5 to 6.5. The first step in an external deployment is upgrading or migrating all the Single Sign-On servers within the vSphere SSO domain first. This will leave the environment in mixed mode since the Single Sign-On Servers version 5.5 have been upgraded to Platform Services Controllers version 6.5 and vCenter Servers are still on version 5.5. The migration process provides an easy rollback plan since the original source machine is not being changed. This also satisfies the requirement of Enhanced Linked Mode (ELM) because ELM was enabled through the domain consolidation procedure performed in Step 1.
Note: If Linked Mode is configured in vSphere 5.5, you will have to break it before starting the migration process. - vCenter Server upgrade or migration is next. Now that the environment is in mixed mode it is important to upgrade or migrate all the vCenter Servers within the vSphere SSO domain as soon as possible. There is no enforced time limit on mixed mode, but it is better to get both vCenter Server Components (PSC and vCenter Server) on the same version from a troubleshooting perspective and to gain all the new functionality in vCenter Server 6.5.
- Now that vCenter Server has been migrated to the vCenter Server Appliance 6.5 we can focus on upgrading the other products in the management plane. Referring back to the chart above we can determine that the other solutions currently in the environment (NSX, vRA, vROPS) will need to be upgraded to support vSphere 6.5. This should include any 3rd party products as well.
- All ESXi hosts should be upgraded and not left for maximum uptime bragging rights. While vSphere 5.5 ESXi hosts are supported in a vSphere 6.5 environment, they should not be left as such. Upgrading the hosts provides support for the latest server hardware, an increase in scalability, vMotions enhancements, and security improvements. Host upgrades can be completed by using vSphere Update Manager (VUM) either at the cluster or host level. A vSphere Update Manager baseline applied at the cluster level can leverage DRS to automatically move the virtual machines from a host, then place a host in maintenance mode, and automatically start the upgrade process. Once the upgrade of a host has completed, it will exit maintenance mode and move to the next host in the cluster until all hosts are within compliance of the baseline.
- Virtual Machines need love too!
- Having VMware Tools up to date ensures the performance and management of a virtual machine are enhanced. Although a guest operating system can run without VMware Tools, failure to install or update a VMware Tools can result in poor operating system performance and lack of features.
- Next is virtual machine hardware, which reflects the supported virtual machine hardware features. This includes the virtual machine BIOS, the number of supported CPUs and memory, and the other hardware related features for a virtual machine. The virtual machine hardware version can remain at the current version and upgraded if newer hardware capabilities are needed.
- We can’t forget about storage! vSphere 6.5 introduces VMFS6 which includes many enhancements over the previous version of VMFS5. VMFS6 now includes automatic space reclamation at the datastore level as well as from the guest operating system. More information about all the VMFS enhancements in vSphere 6.5 can be found here . There are multiple approaches to getting a VMFS datastore to version 6. The first, if space is available, would be to create a new datastore and Storage vMotion the virtual machines from the existing datastore. If space is a constraint, then Storage vMotion all of the virtual machines from an existing datastore then, once empty, upgrade from VMFS5 to VMFS6, and repeat the process until all datastores have been upgraded.
- Upgrade vSphere licensing from vSphere 5.x to vSphere 6.x. from the myvmware portal . Apply the new vSphere 6.x licenses to your vCenter Server and then to your ESXi hosts. There will be a 60 day grace period during the upgrade or migration to allow for the license upgrade.

- Adam will be deploying vRLI to meet his centralized logging requirement at each site. Then we will configure VCHA to meet his vCenter Server high availability requirement. Any new VMware or 3rd party products or features can be deployed or configured after the entire upgrade has been completed.
Adam was able to satisfy the company’s requirements and upgrade successfully from vSphere version 5.5 to 6.5 because he did his due diligence. Keep in mind this is just an example scenario and may or may not cover your particular environment. Again the important key takeaway is understanding the upgrade process and concepts and applying them to your own environment . Reviewing the release notes for each product and knowing not only upgrading process but also known issues is valuable. Opening an SR with VMware support prior to starting the upgrade process can ensure you’ve validated the process them and if any issues occur this will expedite the support process. Don’t forget to ensure that you have a backup prior to starting the upgrade process and also a recovery plan in case you need to revert back. Making a schedule within the product upgrade chart will also be helpful to determine not only when a product will be upgraded but also how an upgrade of one product like vCenter Server will affect other products. In the next part, we will cover another upgrade scenario, this time covering vSphere 6.0 to 6.5.
Article: https://blogs.vmware.com/vsphere/2017/07/vsphere-6-5-upgrade-considerations-part-2.html
Date: 2017-10-26
vSphere 6.5 Upgrade Considerations, Part 3
We’ve started out by discussing the concepts and processes that make up a successful vSphere 6.5 Upgrade. Then it was time to take what we’ve learned in the first part of this series and apply it to a particular scenario. The first scenario covered upgrading an environment from vSphere 5.5 to 6.5. Now let’s focus on how to upgrade an environment from vSphere 6.0 to 6.5 Update1. We will be walking through another example scenario which may or may not cover your particular environment. The key takeaway is understanding the upgrade process and concepts so you can apply them to your own environment.
Scenario
The Awesome Sticker company has five datacenter sites, three in the US and two in Europe. Each site is running vSphere 6.0 using the vCenter Server Appliance (VCSA). They are using an external deployment model for enhanced linked mode. There are three vSphere Single Sign-On domains (SSO) US, Europe, and VDI. Unlike the other deployments, the VDI environment is using an embedded Windows vCenter Server. vSAN is the company’s primary storage. The company also uses SRM for disaster recovery in currently only the US data centers.
Management has tasked Kyle, their new systems engineer, with upgrading the environment to vSphere 6.5. Kyle has already verified the current Dell hardware at each site is compatible with vSphere 6.5 from the hardware compatibility list . He was also proactive and started whiteboarding the upgrade path of each product.

Environment Discovery
Being new to the environment Kyle wanted to take some time and do an assessment of the environment. The current environment is running vSphere 6.0 Update 3. Reviewing the release notes, Kyle notices upgrades from 6.0 Update 3 to vSphere 6.5 are not supported. An avid reader of the vSphere blog, Kyle learned vSphere 6.5 Update 1 was now available and supports upgrades from vSphere 6.0 Update 3. He can now proceed with upgrading. He also wanted to take some time and do an assessment of the environment. Kyle is also planning to setup a meeting with the business owners of each department. In the meantime he started noting his observations about the environment:
- Each site only has one Platform Services Controller (PSC).
- vCenter Servers at each site are not properly backed up.
- There is a Nexus 1000v running in one of the European data centers.
- Windows vCenter Server used for VDI environment.
- SRM is only used in the US datacenter, no DR solution in the Europe sites.
- Virtual Standard Switches used for host management and vMotion.
- No centralized management of ISOs.
- Clean up of virtual switch port names. Currently, portgroup names are inconsistent and need to be cleaned up.

Requirements and Decisions
External Deployment with single PSC
As noted previously, Kyle observed that there is only a single external PSC at each site and could be a single point of failure. Kyle is considering changing to multiple PSCs per site. This all comes down to the availability needs of the company and knowing what role the PSC plays in the environment. The PSC provides authentication and management of the vSphere SSO domain. We also can’t talk about availability without mentioning Service Level Agreements (SLAs). The discussion Kyle is having with the different BUs in the company is a must and will help determine RPO and RTO requirements. All this information will factor in if a secondary PSC at each site is actually required or an overhead. Let’s consider what happens when a PSC is not online and its role in the vSphere SSO domain.
- Users cannot login and manage the vCenter Server registered to the PSC that is not online. A single PSC can have as many as 15 vCenter Server registered in a vSphere 6.5 Update 1 SSO domain (not recommended). vCenter Server can only be registered with one PSC at a time (1:1).
- Workloads are still running, but no new changes or deployments can take place.
- External PSC is required only for enhanced linked mode, otherwise, use an embedded deployment.
- Repointing across sites is not supported in vSphere 6.5 – only intra-site. This requires having a secondary PSC at each site.
- A load balancer provides automatic failover for vCenter Server and other products using PSC for authentication. The trade-off is the added complexity.
- A load balancer is optional for external deployments without vCenter Server High Availability (VCHA).
- An external deployment with VCHA requires a load balancer for the PSCs as it’s not aware of the manual repoint. Also if protecting vCenter Server, PSC should be protected as well.
- Manual repoint of vCenter Server and other products using PSC for authentication via cmsso-util . The trade-off is manual intervention.
- Linear topology within the vSphere SSO domain, easier to manage and provides no extra overhead on the PSCs. The recommendation is to create a ring by adding a replication agreement using vdcrepadmin to have a secondary data path.
- During patching or upgrades repointing can reduce downtime of vCenter Server.
Important resources to help guide with vSphere topology planning and upgrades
vCenter Server Backups
In case of a vCenter Server failure, it is important to ensure a proper backup is available to recover from. The Awesome Sticker company has a backup team that uses a 3rd party backup product for all workloads. vCenter Server and PSC were never included as part of the backup solution and schedule.
- Kyle is working with them to ensure it supports VADP (VMware vSphere Storage APIs – Data Protection) and can take image level backups.
- vCenter Server Appliance 6.5 has built-in file-based backup & restore . This supports both embedded and external PSC deployments.
- Backup can be taken while VCSA or PSC is running, no quiescing.
- Restore using the VCSA 6.5 ISO which was used to deploy from, no agents needed.
- REST APIs available for automation.
- Windows vCenter Server for VDI will use 3rd party backup solution for image-level backups until migrated
Important References for VCSA backups
Network
Kyle noticed there is a Nexus 1000v running in one of the European datacenters. In reading the vSphere 6.5 Update 1 release notes he discovered this will be the last release to support a 3rd party switch such as the Cisco Nexus 1000. Kyle has decided to take the opportunity to migrate to the VMware Virtual Distributed Switch (VDS). He will also use this time to clean up a few other network items he wants to address.
- He will use the Nexus 1000v to VDS migration tool to move this environment to a Virtual Distributed Switch (VDS).
- Kyle wrote a powercli script to find any empty portgroups in the environment and plans to have them decommissioned.
- The portgroups will be renamed to something meaningful since each is listed as portgroup with a random number.
- vSphere 6.5 allows only unique names across all VDS and Distributed portgroups in the same network folder. Prior versions of vSphere allowed the same name KB 2147547 .
- Since Kyle is migrating to a VDS he also plans to migrate the management and vMotion portgroups from a VSS to VDS .
Important References for VDS
- Exporting/importing/restoring Distributed Switch configs using vSphere Web Client
- KB 2120663 Link Aggregation Control Protocol (LACP) with VMware vSphere 5.1.x, 5.5.x and 6.x
- FAQ: Discontinuation of third party vSwitch program (2149722)
Content Management
The company’s ISOs are all over the place and has become a management nightmare. Kyle noticed that some are placed on different vSAN datastores. Also, the business owners have several stored on their local machines, taking up large amounts of space. Kyle has been looking at creating a centralized library and having the different business owners subscribe. He has come up with the following list :
- Implementing Content Library at each datacenter in a subscription model
- vSphere 6.5 uses Content Library as an option to install new operating systems and applications on VMs using Content Library ISO file option. This will help ensure that ISOs don’t get copied to a datastore or local machine.
- Business owners can now check their content library before downloading an ISO to avoid duplicates.
- After ISOs Kyle will look at VM templates. VM templates can be managed by content library, but currently in OVF format.
Upgrade Order
Kyle opened a proactive SR with VMware Global Support Services (GSS) as the first step in getting ready for his upcoming upgrade. Since there are three different vSphere SSO domains, Kyle has decided that he will tackle the smallest footprint and work his way up. His plan of attack starts with the VDI environment, then the European datacenters, and finally the US datacenters.
VDI Environment
Before starting the VDI environment upgrade Kyle took a backup prior to starting.
Note: Run the following script here to get an estimated time of how long the migration process will potentially take. Add buffer to the estimated time in case of issues.
- The embedded vCenter Server 6.0 U3 will need to be migrated to 6.5 U1. All of the components (PSC, VC, VUM) reside on one virtual machine and will be migrated to a VCSA with embedded PSC. This will be done using the migration tool included in the VCSA 6.5 Update 1 ISO.
- Upgrade Horizon View server from 7.0 to 7.2. Make sure to upgrade the horizon view components in the correct order.
- Use VUM to upgrade the ESXi hosts for the VDI environment.
- Upgrade VM tools, then upgrade the horizon agent in the virtual desktops.
- Configure vCenter Server protocol (FTP, FTPS, HTTP, HTTPS, SCP) for backup. The native backup can be done manually or can be automated using the APIs.
European Datacenters
- Use the Nexus 1000v to VDS migration tool and complete network cleanup tasks.
- Backup the PSCs and vCenter Servers prior to upgrading. Yes, you can take a snapshot, but there is no need to shut down all the PSCs to do so. Remember the PSCs are multi-primary so all the information is replicated across the vSphere domain.
- Upgrade all the PSCs in the vSphere SSO domain from 6.0 U3 to 6.5 U1 first. In this case, we only have two, but will be adding additional PSCs later. Mount the VCSA 6.5 U1 ISO and selecting the upgrade option from the installer menu and go through the wizard to upgrade the PSCs. Now that the environment is in mixed mode and it is important to upgrade all the vCenter Servers appliances within the vSphere SSO domain as soon as possible. There is no enforced time limit on mixed mode, but it is better to get both vCenter Server Components (PSC and vCenter Server) on the same version from a troubleshooting perspective and to gain all the new functionality in vCenter Server 6.5.
- Upgrade all vCenter Server Appliances within the vSphere SSO domain from 6.0 U3 to 6.5 U1 by mounting the VCSA 6.5 U1 ISO and selecting the upgrade option from the installer menu.
- Since there are only two PSCs, one at each site we will have to make sure that we clean up some replication agreements once we are done using vdcrepadmin . This will also give Kyle the ability to manually repoint within each site in case of a PSC failure. Although he liked the idea of the automated failover using the load balancer, he didn’t want the added complexity it brings.
- Original PSC #1 in the London site connected to original PSC #2 in the Berlin site.
- Deploy a new secondary PSC # 2 in the London site London, replication partner is the original PSC # 1 in the London site.
- Deploy new a secondary PSC #2 in the Berlin site, replication partner is the original PSC # 1 in the Berlin site.
- Use vdcrepadmin to create a new replication agreement from PSC # 2 in the Berlin site to PSC # 1 in the London site.
- Clean up old replication agreement between original PSC #1 in the London site and original PSC #1 in the Berlin site.

- Upgrade vSAN .
- Upgrade SRM .
- Upgrade ESXi hosts using VUM.
- Upgrade VM tools / compatibility.
- Upgrade VMFS.
- Configure vCenter Server protocol (FTP, FTPS, HTTP, HTTPS, SCP) for backup . The native backup can be done manually or can be automated using the APIs. You only need to backup one of the PSCs in the vSphere SSO domain, but there is no harm in backing all of them up. The restore process of a PSC is only required if they all go down otherwise just deploy new.

US Datacenters
- Complete network cleanup tasks.
- Backup the PSCs and vCenter Servers prior to upgrading. Yes, you can take a snapshot, but there is no need to shut down all the PSCs to do so. Remember the PSCs are multi-primary so all the information is replicated across the vSphere domain.
- Upgrade all the PSCs in the vSphere SSO domain from 6.0 U3 to 6.5 U1 first. In this case, we only have two, but will be adding additional PSCs later. Mount the VCSA 6.5 U1 ISO and selecting the upgrade option from the installer menu and go through the wizard to upgrade the PSCs. Now that the environment is in mixed mode and it is important to upgrade all the vCenter Servers appliances within the vSphere SSO domain as soon as possible. There is no enforced time limit on mixed mode, but it is better to get both vCenter Server Components (PSC and vCenter Server) on the same version from a troubleshooting perspective and to gain all the new functionality in vCenter Server 6.5.
- Upgrade all vCenter Server Appliances within the vSphere SSO domain from 6.0 U3 to 6.5 U1 by mounting the VCSA 6.5 U1 ISO and selecting the upgrade option from the installer menu.
- Add a secondary PSC at each site, one at each site we will have to make sure that we clean up some replication agreements once we are done using vdcrepadmin.
- Original PSC #1 in the Seattle site connected to original PSC#2 in the Austin site.
- Original PSC#2 in the Austin site connected to the original PSC in the Tampa site.
- Deploy a new secondary PSC # 2 in the Seattle site, replication partner is the original PSC # 1 in the Seattle site.
- Deploy a new secondary PSC #2 in the Austin site, replication partner is the original PSC # 1 in the Austin site.
- Deploy a new secondary PSC #2 in the Tampa site, replication partner is the original PSC # 1 in the Tampa site.
- Use vdcrepadmin to create a new replication agreement from PSC # 2 in the Tampa site to PSC # 1 in the Seattle site for the ring.
- Create a new replication agreement between newly deployed PSC #2 in the Seattle site with PSC #1 in the Austin site.
- Create a new replication agreement between newly deployed PSC #2 in the Austin site with PSC #1 in the Tampa site.
- Clean up the old replication agreement between original PSC #1 in the Seattle site and the original PSC #1 in the Austin site.
- Clean up the old replication agreement between the original PSC #1 in the Austin site and the original PSC # 1 in the Tampa site.
- Use vdcrepadmin to validate you have nice linear topology
- Upgrade vSAN
- Upgrade SRM.
- Upgrade ESXi hosts using VUM.
- Upgrade VM tools / compatibility.
- Upgrade VMFS.
- Configure vCenter Server protocol (FTP, FTPS, HTTP, HTTPS, SCP) for backup. The native backup can be done manually or can be automated using the APIs. You only need to backup one of the PSCs in the vSphere SSO domain, but there is no harm in backing all of them up. The restore process of a PSC is only required if they all go down otherwise just deploy new.

Validation
Kyle kept the business owners in the loop during the entire upgrade process. This started from the initial meeting to explain what the upgrade process was and what it would mean to them. The meetings also serve as a vehicle to interview the business and get a sense of their current issues and requirements. Kyle was also proactive having the business owners test their applications in a vSphere 6.5 Update 1 lab environment. This was also documented in the details of change control Kyle submitted. The change control also included a rollback plan and what testing the business owners would do in their validation testing. Once the business owners signed off on their application, Kyle was able to move to the next environment.
Conclusion
Kyle was tasked with upgrading an environment from vSphere 6.0 U3 to vSphere 6.5 Update 1. Before starting he did his research getting up to speed on what’s new with vSphere 6.5 Update 1. He also watched the new vCenter Server light board videos to learn about vCenter Server architecture, deployment, and availability as part of this upgrade process. Since vCenter High Availability was not a requirement, Kyle was able to add a secondary PSC at each site without the required load balancer reducing complexity. He backed up prior to starting the upgrade process and had a recovery/backout plan in case he needed to revert back. The important key takeaway is understanding the upgrade process and concepts and applying them to your own environment. Happy upgrading!
Article: https://blogs.vmware.com/vsphere/2017/08/vsphere-6-5-upgrade-considerations-part-3.html
Date: 2017-10-26
Top Upgrade Knowledge Base Articles
| Title | Description |
| How to repoint and re-register vCenter Server 5.1 / 5.5 and components (2033620) | This article covers the procedure that can be used when preparing for a vSphere 5.5 to 6.5 upgrade where vSphere SSO Domain consolidation is required. |
| Supported and deprecated topologies for VMware vSphere 6.5 (2147672) | This article describes the currently supported and deprecated topologies in vSphere 6.5. This should be a reference when planning the desired vSphere SSO Domain and vCenter Server 6.5 architecture. |
| Best practices for upgrading to vCenter Server 6.5 (2147686) | This article should be reviewed before planning a vSphere 6.5 upgrade. |
| Estimating the time for migration of vCenter Server 5.5 or 6.0 to vCenter Server Appliance 6.5 (2147711) | This article provides scripts and procedures in order to estimate the downtime and migration time involved when migrating to the vCenter Server Appliance 6.5. |