
VMware Tools and Virtual Machine Hardware
VMware Tools Lifecycle Video from VMworld 2017
Configure a Centralized VMware Tools Installation Repository
VMware Tools is the collection of drivers and in-guest utilities that offer improved performance and manageability of virtual machines running on VMware vSphere. By default, VMware ESXi includes a subset of Tools installers for supported Windows and Linux guest operating systems. Occasionally, updated VMware Tools packages are delivered through ESXi patches and updates by way of a VIB called tools-light, which can be deployed through typical vSphere Update Manager workflows. This article describes an alternative approach that is suitable for environments requiring enhanced control or optimization over VMware Tools delivery.
In 2015, VMware Tools 10 marked the introduction of an asynchronous release model. Customers can log into their My VMware account and download the latest release of VMware Tools, separate from VMware ESXi. This offers the benefit of getting the latest releases without waiting for ESXi patch releases.
Since the release of VMware Tools 10.1 the following year, only a subset of guest operating systems are covered by the installers packaged with VMware ESXi. Environments that are running the less-common guests, such as FreeBSD, MacOS, or Solaris must download the Tools installers from My VMware and make them accessible to VMs for installation.
For most vSphere environments, the default VMware Tools configuration is adequate and offers a frictionless workflow for consuming new releases. Certain vSphere customers prefer to standardize on a particular release of VMware Tools at the enterprise, datacenter, or cluster level. One effective method of standardizing Tools versions is to set up a centralized repository instead of using the installers that are bundled with VMware ESXi.
Setting up a shared VMware Tools repository is an optional deployment model that facilitates the above use cases of standardization, faster consumption of the latest Tools releases, or broader coverage of diverse guest operating systems.
There are three steps required to implement a shared repository, also known as the “product locker”:
- Copy desired VMware Tools installers to a folder on an existing or new shared datastore
- Update the "UserVars.ProductLockerLocation" on each VMware ESXi host
- Reboot or manually make the changed configuration effective
The remainder of this article provides details on each of the steps. The Appendix contains a sample script to assist in automating the configuration process.
Step 1 - Acquire and Create Directory of Desired VMware Tools Installers
Determine which release of VMware Tools to provide in your datacenter. It is normally preferable to use the latest release, since Tools is backward compatible with many versions of VMware ESXi. Download the latest from My
VMware, shortcut: https://vmware.com/go/tools
Recall that VMware Tools 10.0.12 is for frozen, legacy guests only. This package may be needed in addition to the current VMware Tools releases.
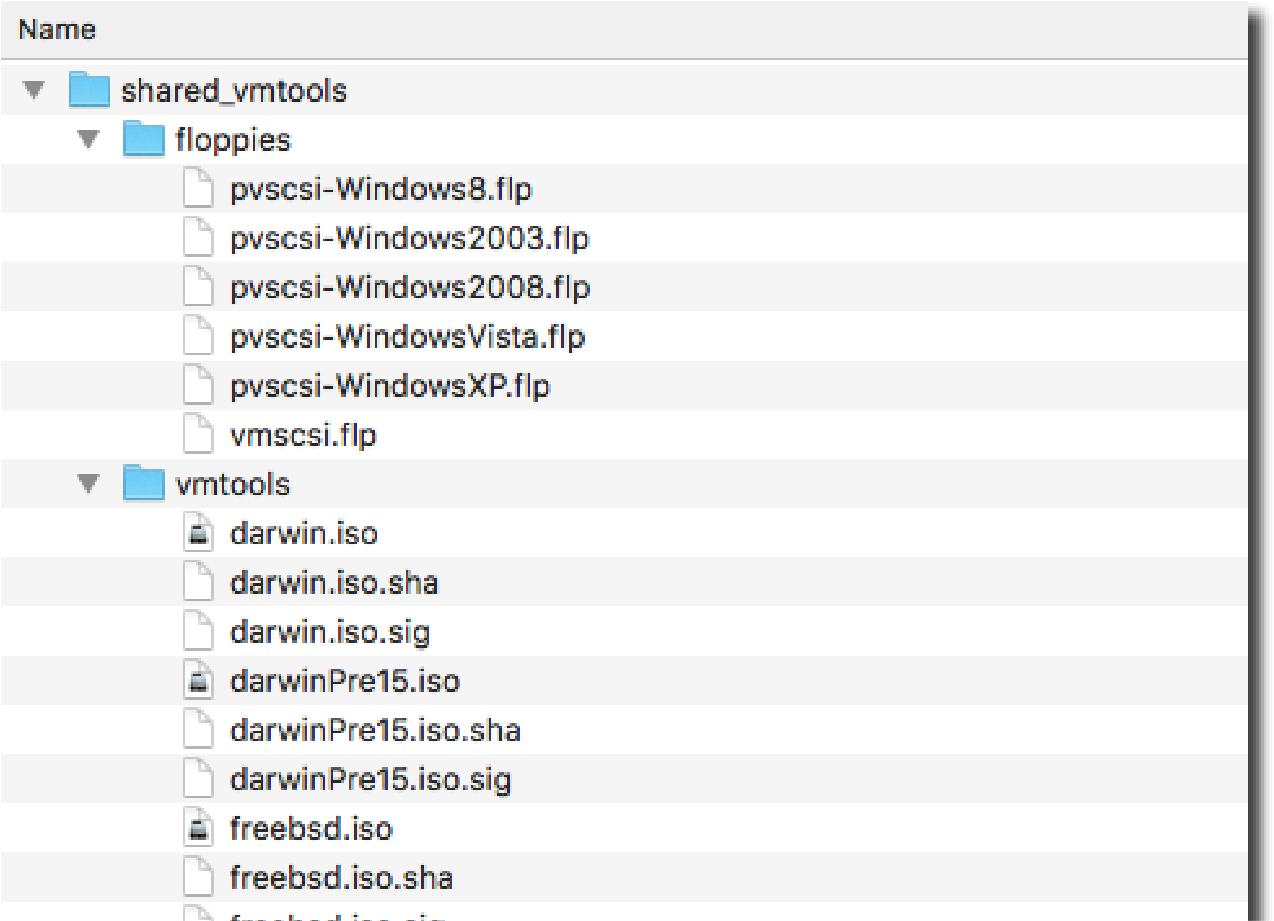
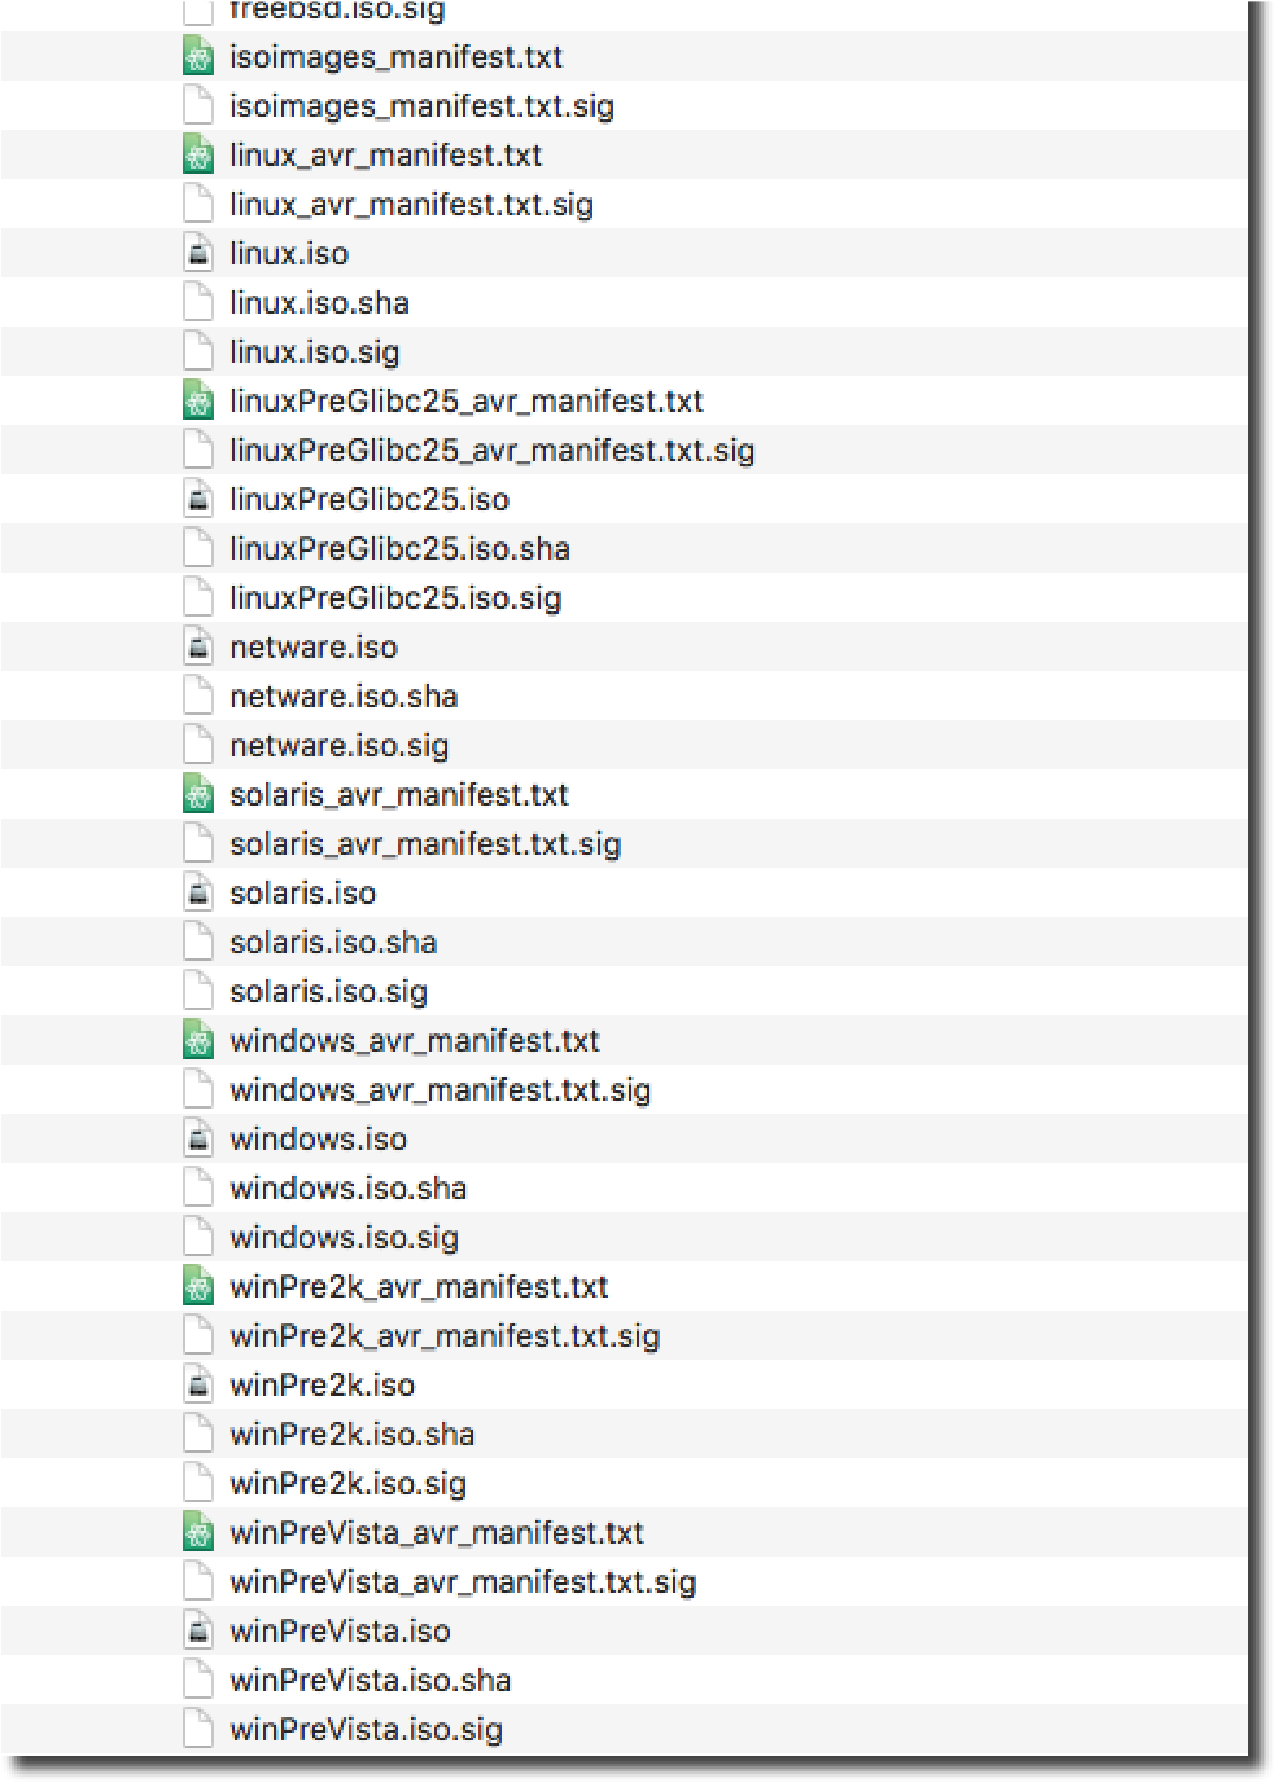
Unzip the downloaded Tools files and combine the contents into a new directory, keeping the “vmtools” and “floppies” folders as part of the hierarchy. Be sure to include all of the manifest and signature files contained in the archives.
Copy the entire directory of consolidated Tools installers to a shared datastore with scp, for example:
scp -r shared_vmtools root@host75:/vmfs/volumes/WEST002/
Step 2 - Reconfigure VMware ESXi UserVars.ProductLockerLocation
Update the configuration for each VMware ESXi host that has access to the new shared repository. This can be done manually in the vSphere Client, or through automation with PowerCLI, Host Profiles, or custom command-line scripts.
To edit the setting with the vSphere Client, search for “productLocker” in the dialog box.

To configure a cluster with PowerCLI:

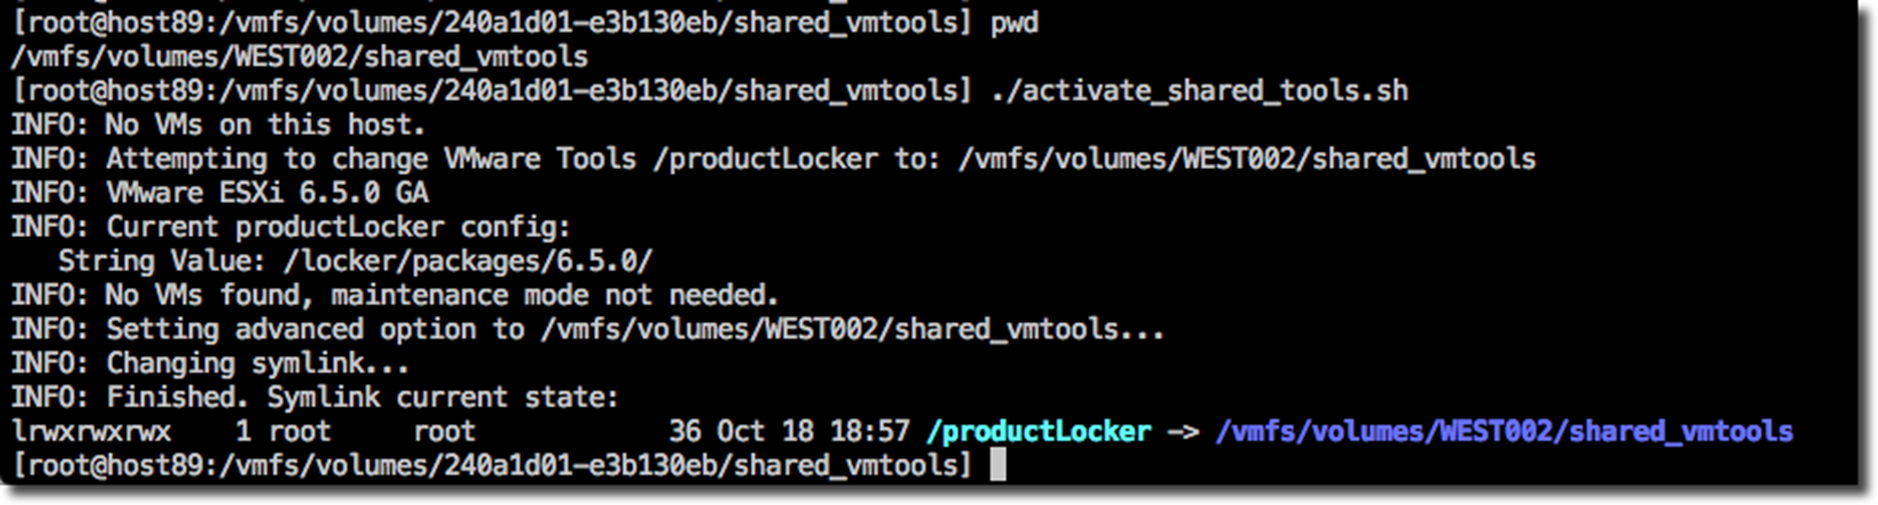
See Appendix A for a VMware ESXi shell script that can re-configure and activate the change in one step.
Step 3 Activate the Configuration Change
The setting change explained in step 2 dictates the target of a symbolic link (symlink) named “/productLocker” in the root of the ESXi filesystem and takes effect on next reboot of the host.
If rebooting is not possible, each host can be individually updated via command-line from the ESXi shell to make the configuration active. Sophisticated customers may prefer to automate this process across many hosts through scripted SSH commands or other techniques.
The exact procedure required to safely change the /productLocker symlink varies according to VMware ESXi release version. Maintenance mode may, or may not, be required - please see the sections below to determine how to safely configure each version of vSphere.
To determine the release of your host, run the following command:
[root@host85:~] vmware -vl
VMware ESXi 6.5.0 build-4564106
VMware ESXi 6.5.0 GA
The general procedure is to delete the existing /productLocker symlink and create a new one that points to the updated VMware Tools location. For example:
rm /productLocker
ln -s /vmfs/volumes/DATASTORE_NAME/TOOLS_FOLDER_NAME /productLocker
However, prior to executing the above commands, note the following caveats:
VMware ESXi 6.5 Update 1
The current release at the time of this writing is VMware ESXi 6.5 Update 1. This version includes a new command-line utility that allows vSphere administrators to safely update the /productLocker symlink without requiring maintenance mode. See KB article 2129825 for details, and also note that the shell script in Appendix A of this guide leverages this tool.
VMware ESXi 6.5 GA
Due to enhanced security policies introduced with vSphere 6.5, it is not safe to modify the /productLocker symlink on a host with running virtual machines. Therefore, these hosts must be placed in maintenance mode prior to updating the symlink.
VMware ESXi 6.0 and prior
Older releases of vSphere do not have any special constraints around updating the /productLocker symlink, so vSphere administrators may do so with, or without, maintenance mode in effect.
The shell script in Appendix A aligns with the above guidance and can be used as a basis by vSphere administrators skilled in command-line tools. The script is not supported by VMware and must be reviewed and edited prior to executing. Please keep in mind that certain behaviors may change in future releases, after vSphere 6.5 Update 1.
Takeaway
VMware vSphere customers seeking to standardize on a particular VMware Tools release may find that the shared repository approach offers this benefit, along with the abilities to consume the absolute latest releases of Tools or accommodate environments with a higher diversity of guest operating systems in use.

Appendix A: Sample VMware ESXi Script to Update productLocker
This sample shell script is intended for use by experienced vSphere administrators and is not officially supported by VMware GSS. It is highly recommended to test this in a non-production environment first.
For best results, copy the script to the shared datastore containing the VMware Tools repo and execute once from each host in the cluster.
Below are some sample runs from various versions of vSphere.


#!/bin/sh # Sample VMware ESXi script for updating VMware Tools repo, # a.k.a. "product locker" and making configuration active with out
# a host reboot. 19 Oct 2017
# Please review and validate this script as needed for your pa rticular
# environment, use cases, and workflow.
# This behavior may change in the future, please see
# https://kb.vmware.com/kb/2129825for the latest information
# Usage: Copy this script to the new VMware Tools repo, typica lly on
# a shared datastore, and execute once from each VMware ESXi h ost.
if [ -z "$1" ]; then vmtools_repo=$(pwd) elif [ -d "$1" ]; then vmtools_repo=$1 else echo "Error: $1 is not a directory." echo "Usage:"
echo "$0 [path to new VMware Tools repository (default is 'pwd
')]" exit 1 fi
vmpresent=1 relink=0 vmver=$(vmware -l)
# Check for any in-progress Tools activity first...
vmlist=$(vim-cmd vmsvc/getallvms | tail -n +2) if [ "x$vmlist" == "x" ]; then echo "INFO: No VMs on this host." vmpresent=0 else echo "INFO: Found VMs on this host, checking VMware Tools inst all/upgrade activity..."
OLDIFS=$IFS IFS=$'\n' for vm in $vmlist; do vmid=$(echo $vm | awk '{print $1}') vmname=$(echo $vm | awk '{print $2}')
installer_mounted=$(vim-cmd vmsvc/get.runtime $vmid | grep too lsInstallerMounted | sed 's| ||g; s|,||g' | cut -d'=' -f2) if [ $installer_mounted == true ]; then
echo "ERROR: [$vmid] $vmname has VMware Tools install/upgrade in progress! Aborting." exit 1 fi done IFS=$OLDIFS echo "INFO: No VMware Tools install/upgrade activity detected. Continuing..." fi
echo "INFO: Attempting to change VMware Tools repo to: $vmtool s_repo" echo "INFO: $vmver"
echo "INFO: Current VMware Tools repo config:"
esxcli system settings advanced list -o /UserVars/ProductLocke rLocation | grep String | grep -v Default
# The following behavior may change in the future, please veri fy before using with later releases case "$vmver" in
"VMware ESXi 6.5.0 Update 1")
if [ ! -x /bin/updateProductLockerPolicy ]; then echo "ERROR: /bin/updateProductLockerPolicy not an executable, but expected." relink=0 else
## get existing /productLocker symlink target known to ESXi ke rnel old_repo=$(secpolicytools -d | grep $(basename $(readlink /pro ductLocker)) | cut -d' ' -f2 | head -n 1)
echo "INFO: Previous VMware Tools repo target is ${old_repo}"
/bin/updateProductLockerPolicy "$old_repo" "$vmtools_repo" && relink=1 || relink=0 fi ;;
"VMware ESXi 6.5.0 GA") if [ $vmpresent == "0" ]; then
echo "INFO: No VMs found, maintenance mode not needed." relink=1
elif [ $(esxcli system maintenanceMode get) == "Enabled" ]; th en echo "INFO: Maintenance mode is enabled." relink=1 else echo "ERROR: Maintenance mode is not enabled, but required for ESXi 6.5 GA."
echo " Please put host in maintenance mode before modifying t he VMware Tools repo configuration." relink=0 fi ;;
*)
echo "INFO: Not ESXi 6.5+, so no special precautions necessary
." relink=1 ;; esac
if [ $relink == "1" ]; then
# This host config can be set here, but also with PowerCLI or Host Profiles
echo "INFO: Setting advanced option to $vmtools_repo ..." esxcli system settings advanced set -o /UserVars/ProductLocker Location -s "$vmtools_repo"
echo "INFO: Changing /productLocker symlink..." rm /productLocker
ln -s "$vmtools_repo" /productLocker else echo "WARNING: VMware Tools repo configuration not changed." exit 1 fi
echo "INFO: Finished. VMware Tools repo status:" ls -ald /productLocker
Overview of 3 Types of Tools
There are three different types of VMware Tools, also known as VM Tools, to accommodate the complete range of workflows required in heterogeneous data centers. This article provides an overview of these three types of VM tools and the next covers the available options for keeping them up to date.
The Classic VM Tools ISOs for all Supported Guests
The most familiar mechanism for consuming VM Tools is the collection of ISO images containing installers that are mounted to virtual machines for use by Windows, Linux, Solaris, FreeBSD, Mac OS X, and other supported guests.
There are two different sources for the VM Tools ISOs. Appropriate versions are bundled with the ESXi installer, and when applicable, ESXi patches in the form of a VIB called tools-light. Additionally, starting with version 10, VM Tools ISOs are also available for download directly from MyVMware. Installers for current guests are separated from those that are for older legacy guests, and each is available in both tar and zip archive formats for convenience. ISOs for guests other than Windows and Linux are available exclusively via download and not bundled with ESXi. The choice between using VM Tools ISOs that are ESXi bundled or downloadable is subject to customer preference and operational requirements. For environments using traditional ESXi installations and managing updates with VMware Update Manager, one can opt for the original bundled approach. When using a shared Tools repository, perhaps in conjunction with stateless Auto Deploy hosts, it may be advantageous to use the latest bundle of Tools downloaded directly from VMware. VUM can be used to update Windows and Linux VMs using the downloaded tools, as long as the ISOs have been placed in appropriate ESXi local or shared product lockers.
Initial installation of VM Tools is typically done immediately upon fresh guest OS install, often for a gold template VM that will be subsequently cloned for workload VMs. This infrequent operation is initiated through the VMware vSphere interface and manually executed via familiar GUI or CLI installers.

Once the VM Tools ISOs for Windows or Linux guests are installed, administrators can update to subsequent releases through a range of techniques optimized for either automation or separation of responsibilities. Other supported guests, such as FreeBSD and Solaris, must be updated using the same interactive process that is used for installation.
The key methods of updating VM Tools ISOs for Windows and Linux:
- Automatic update on VM boot
- Initiate update to one or more VMs through the vSphere UI
- VMware Update Manager: immediate, scheduled, or on boot
- In-guest update – delegating control to app owners
- Mass updates through PowerCLI automation
One more note about Linux terminology: The Linux Tools ISOs are also known as “tar tools” to distinguish them from the packaged tools that will be described next.
VM Tools Packages for Linux Guests: OSP and OVT
In recent years, two Linux-specific VM Tools offerings have been released. Both consist of binary packages for particular Linux distributions that are easily installed and updated without dependencies such as kernel development utilities – something that is not always the case with the “tar installer” from VM Tools ISOs for Linux guests.
The initial effort for this approach was known as Operating System Specific Packages, or OSPs. These binary packages are built, signed, and hosted by VMware and are virtually identical to the components distributed in the VM Tools ISOs.
Building on that momentum, VMware released the code for VM Tools as open source, allowing individual Linux distributions to directly consume these utilities for their releases at their respective paces. Open VM Tools, or OVT, is currently present in recent versions of all major Linux distributions.
Distro maintainers can now pick and choose the Open VM Tools components they want to include. They can also choose the version of OVT they want incorporated with a release so they can confidently offer full support. VMware has strong support agreements in place with major Linux vendors and is committed to working together as needed to support customers using Open VM Tools. More details on Open VM Tools, including the support policy, can be found in KB 2073803.
While the Open VM Tools source is available to anyone via GitHub, end customers are not expected to download and build OVTs themselves. In fact, only the binary OVT packages of distributed with Linux distributions are supported.
While there are two different models of packaged Linux Tools, there is actually no decision to be made by administrators. For any given Linux distribution there is only one offering – either OSP or OVT – which is determined by the version. For instance, older releases such as RHEL 6 use the original OSPs, while newer releases like RHEL 7 come integrated with OVT.
OSPs are available at packages.vmware.com – a VMware-managed repository that is publicly accessible without need for authentication. It was recently enhanced to https-only for improved security. For environments without direct access to the Internet, it would be feasible for customers to privately mirror applicable portions of the repository internally.
OSP installation involves one-time guest OS setup of the appropriate repository on packages.vmware.com; subsequent updates are handled just like any other Linux package using familiar tools like Yum and Apt.
In contrast, individual Linux vendors provide OVT packages directly since they are part of their respective distributions. In fact, OVTs are often installed during the initial guest OS deployment process without any additional effort. This integration enables a single workflow for guest OS patching. For instance, administrators can update OpenSSH, foundational libraries, and VM Tools using a single process with the added advantage that the vendor has tested all of the components together.
It’s worthwhile to know these two things about OVT:
- GUI functionality is not normally installed by default in OVT, as many Linux environments are headless servers without X. For environments that desire features such as dynamic desktop resizing and copy/paste, simply install the auxiliary ‘open-vm-tools-desktop’ package to enable those abilities.
- OVT version 9.4 and its predecessor had an external dependency for one capability – customers that required Linux VM customization after cloning from template also needed to install a separate ‘deployPkg’ component from the OSP repository. However, as of 9.10, it is no longer necessary to install any additional OSP packages.
Summary
It is easy to understand why there are three types of VMware Tools, multiple ways to obtain them, and several approaches to install and keep the tools up to date. Each of these options has specific use cases that ultimately give administrators the flexibility to architect a process that works best for their environment.
Updating Tools in a vSphere environment

For keeping VMware Tools up to date, there are six different approaches that vSphere administrators can use to accommodate nearly any workflow required for flexible datacenter operations. These different techniques allow optimizing either for automation and standardization or for separation of responsibilities. A previous article provides an overview of the three types of VM Tools.
VMware Tools Status is Relative to Underlying Host
Each ESXi host has a storage location for VM Tools installers, which is a configurable option and visibly referenced by the /productLocker symlink. The target can be either local to each host or point to a centralized repository of VM Tools on a shared datastore. For more information about setting up a shared Tools repository, see this earlier post or KB 2004018.

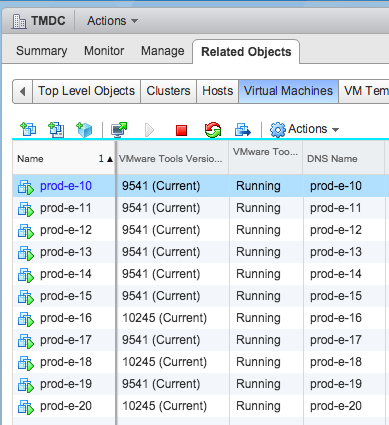
The VM Tools status for any given VM is always in the context of the underlying host. As demonstrated below, two different versions of Tools are considered “Current” because the underlying hosts are not identical.
In vSphere 6.5, the version of VM Tools running on each guest is compared to the version associated with the underlying ESXi host on a periodic schedule. In vSphere 6.0 and prior this check is performed when certain virtual machine events occur, such as power-on or vMotion,. If the host has a newer version, the VM is considered out of date.
Note that there is no mechanism for VMs running on vSphere to contact the mother ship and learn about new versions of VM Tools – only the VM-to-host relationship is relevant. This explains why a VM may suddenly complain about having outdated VM Tools after migrating from one host to another – it is because the destination host has a more recent version in the product locker.

VM Tools Type Determines Update Choices
A previous article explains why there are three types of VM Tools: the familiar Tools ISOs for all supported operating systems, plus two additional offerings in the form of binary packages for Linux. There are several ways to initiate VM Tools updates from vSphere or from within a guest. The following applies only to Windows and Linux guests using VM Tools ISOs except where noted. The VM Tools Linux packages – OVT and OSP – are not managed via vSphere, so they can only be installed and updated from within each guest OS using native package management tools.
Six Ways to Keep VM Tools Updated
1. Automatic update on VM boot
The easiest way to keep VM Tools up to date is to check a box and forget about managing this element of infrastructure. Upon VM reboot, such as after installing guest OS patches, the VM Tools status will be checked and updated when necessary. In many cases, this will result in one additional reboot after the VM Tools installation completes.

This approach may be viable for less-critical workloads, such as labs or test/dev environments. Imagine a scenario where VMs are rebooting unexpectedly due to a widespread infrastructure outage. After scrambling to get applications back online, administrators could find themselves facing unanticipated subsequent reboots if a VM Tools update happened to be available. This is an edge case, but one to keep in mind.
2. Initiate update to one or more VMs through the vSphere UI
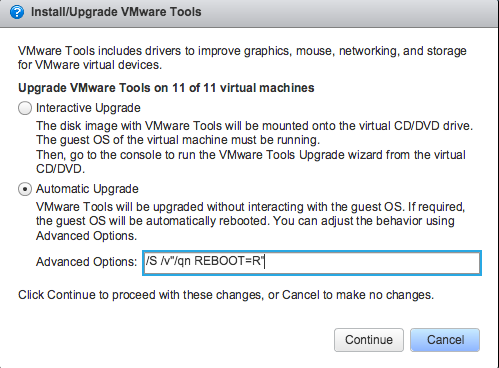
In the vSphere Web Client, when a VM indicates that VM Tools are outdated, the adjacent button can be used to automatically initiate an update. This can be done interactively or in a completely hands-off fashion. In the latter case, administrators also have the option of suppressing any potential reboots on Windows VMs – this is a good option that enables coordination of reboots required after routine guest OS patching.
Important note for guests other than Windows and Linux: Solaris, FreeBSD, and Mac OS - VM Tools can only be updated using the manual interactive method. Currently, there is no automatic Tools update for these guests.
Going a step further, it is also possible to select multiple VMs in the Web Client UI and initiate a VM Tools update on all of them at once.
3. VMware Update Manager: immediate, scheduled, or on boot
VMware Update Manager (VUM) has two very different roles to play when it comes to updating VM Tools. The first one fetches updated VM Tools ISOs in the form of the ‘tools-light’ VIB that is offered when needed in the normal ESXi patch stream. This patch is then pushed out to all managed hosts, in accordance to the baselines established by administrators. Once this occurs, individual VMs will begin to detect that a new version of VM Tools is available and ready for update.

The second role VUM has in managing VM Tools is to trigger updates for individual VMs in accordance to baselines. Keep in mind that VUM does this work by leveraging the vSphere methods described in the two previous sections. In one mode, VUM can be used to make various configuration changes to multiple VMs so that a Tools update is checked and performed as necessary on each guest reboot, just like an administrator can do using the technique shown in #1 above. The advantage of using VUM is that many VMs can be configured or un-configured for this option at once.

The other mode VUM uses is to trigger a VM Tools update either immediately or at a scheduled time, just as an administrator can do manually as described in #2 above. One added benefit of using VUM to initiate these updates in this way is the ability to also remediate powered-off or suspended VMs, subsequently returning them to their initial state after update.
4. In-guest update – delegating control to app owners
![]()
For scenarios where application owners demand tight control over activities that occur in the guest OS, there is an option to allow in-guest updates of VM Tools. A tray icon in Windows will indicate that an update is available, and the VM Tools configuration dialog box will permit interactive initiation of an update at a convenient time.
For equivalent functionality from a command-line utility, vmware-toolbox-cmd is offered for Linux as well as Windows guests. Keep in mind that for Linux this is only for the VM Tools ISOs, since OVT and OSP use a different process, as described in #6 below.
5. Mass updates through PowerCLI automation
For very large environments or for those that have established more mature operational processes, PowerCLI provides a powerful option for updating VM Tools. This approach can target particular groups of VMs in many convenient ways, such as by cluster, by guest OS version, tags, VM state, or other vSphere attributes.

6. Native Linux package management processes
By nature of their design, Linux guests running OSPs or OVTs update VM Tools as part of a broader patching and updating workflow used for other components. This allows administrators to leverage existing Linux package managers or broader patch management and monitoring solutions without the need to coordinate with vSphere administrators.
# yum update open-vm-tools
7. BONUS: VM Tools Upgrade Method (pardon the pun)
For advanced use cases where vSphere APIs are being used for deeper integration with other processes, consider the UpgradeTools_Task for programmatic upgrades of VM Tools.
Summary
With these flexible means of updating VM Tools, there is a suitable approach for any VMware datacenter, whether the requirement is centralized control, automation, delegation to app owners, or integration with existing patch management processes.
Correlating Tools versions with ESXi releases
VMware ESXi GA releases, and certain patch releases, include VMware Tools installers for the most common guest OSs. A helpful resource that customers use to map ESXi releases to VM Tools versions is available online at: https://packages.vmware.com/tools/versions
In addition to the ESXi build-number-to-Tools-version mapping, the file is also useful to correlate the version code shown in the vSphere Client with the actual x.y.z version number that humans tend to use, as depicted below.

The release of Tools 10 and the asynchronous model that is driving a looser coupling with ESXi. All VM Tools releases are now listed in the file. For those Tools releases that were never bundled with ESXi, a placeholder value is present in the second column. If an ESXi patch or release subsequently ends up consuming one of those Tools versions, the value will be updated accordingly.
The placeholder value is esx/0.0 as seen in the image below:
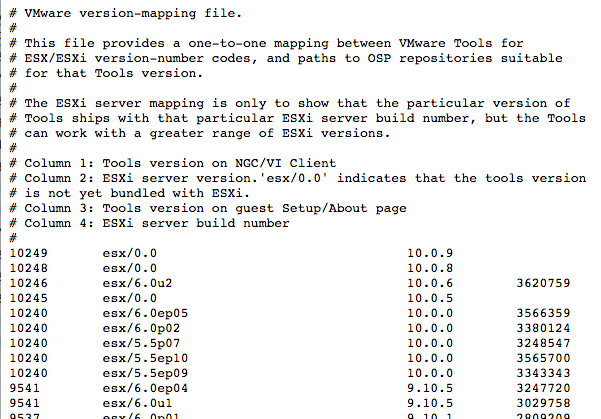
Please keep in mind that VM Tools are compatible with a wide range of VMware ESXi releases – there is normally no requirement to update when new versions are available. For the source of truth , consult the Interoperability Matrix.
Tools 10.1 and 10.0.12 overview
VMware vSphere 6.5 was released with a new version of VMware Tools -- the collection of in-guest drivers and agents that optimize VM performance and increase manageability. This version of VMware Tools can also be downloaded from MyVMware, and is compatible with previous vSphere releases. Several enhancements improve the overall manageability experience, when used in conjunction with vSphere 6.5.
Bundling of Tools for most popular guests only
VMware ESXi 6.5 includes VMware Tools for the most commonly used guest operating systems; Tools for other guests are available for download from My VMware. Similarly, Tools updates for those same bundled guests will be distributed through Update Manager, as they have been in the past, via the tools-light VIB.
Bifurcation of Tools for legacy and current guests
This release of VMware Tools is comprised of two separate delivery vehicles. VM Tools 10.1 will be available for OEM-supported guest operating systems only. Legacy guests that no longer receive support from their respective vendors will be covered by “frozen” VM Tools 10.0.12. The frozen Tools will not receive feature enhancements going forward. Note, therefore, that the logical upgrade from 10.0.9 is not to 10.0.12 for the vast majority of workloads – rather, it is to 10.1. For more information about support categorization for guest operating systems, see KB 2015161.
The following table depicts the two changes described above:
| Tools Version | Bundled with vSphere | Downloadable Only |
|---|---|---|
| 10.1 | Windows Vista+ Linux glibc2.5+ |
Solaris FreeBSD Mac OS X 10.11+ |
| 10.0.12 | Windows Pre-Vista | Windows Pre-2000 Mac OS X Pre-10.11 Linux pre-glibc2.5 Netware |
Guest OS granularity changes
With VMware Tools 10.1 and 10.0.12, there are now two ISO images for certain families of guest operating systems, in order to accommodate the bifurcation described above. Consequently, the configurable guest OS attribute for some guests in vSphere 6.5 has become more precise in order to support this change.
The most notable example of this change is CentOS – in vSphere 6.5, CentOS guest selections are available for CentOS 7, CentOS 6, and CentOS 4/5. In previous vSphere releases, these versions were all combined into a single selection: CentOS 4/5/6/7. Administrators can either edit the guest OS type or leverage the new VM configuration option to ensure the proper ISO image is mounted to these VMs to install and upgrade Tools.
Current Linux distributions ship with Open VM Tools (OVT), so most CentOS 7 VMs are likely running OVTs, and are not affected by the above scenario. However, for those customers that have chosen to run the vSphere-bundled “Tar Tools” instead, please keep this change in mind.
Detailed display of type and version information in the Web Client
VMware Tools have always had two different designations: one is a human-readable version number, such as 10.0.7, and the other is an internal code, like 10247. With vSphere 6.5, the Web Client now displays both variations of the version number as well as the specific type of Tools installed in the guest OS, such as MSI, OSP, OVT, or TAR Tools.

Signed ISO images
VMware Tools have always been distributed as ISO images that can be mounted to individual VMs in order to install or upgrade them. VMware ESXi 6.5 introduces a new layer of security by cryptographically verifying these ISO images each time they are accessed. To facilitate this verification, Tools distributions now include additional files with appropriate hashes. If manually extracting, moving, or curating a Tools repository, please ensure that all of the supporting bundled files remain together.
Future Tools upgrades for older vSphere VMs
Given the very broad backward and forward compatibility of VMware Tools, it is possible that some customers are running VMs with the Tools that shipped as part of out-of-date vSphere releases. vSphere 5.0 and 5.1 recently reached end of support, and the VMware Tools that were bundled with those releases are also destined for a similar fate. Therefore, this is a great time to start planning to upgrade Tools 8.x and 9.0.x to the current version. In the future, these older Tools releases will not be directly upgradable to the latest versions; instead, a two-phase upgrade will be required.
New and more detailed documentation
One of the goals of decoupling the release of VMware Tools and vSphere was to enable more detailed information about updates through release notes. Starting with Tools 10.1, release notes will be further enhanced to include a table documenting the precise version number of each individual driver and component. Going beyond release notes, we now also offer stand-alone documentation for VMware Tools 10.1, including more information about management and functionality of the various elements.
Concluding
The new efforts to treat VMware Tools as top-tier products will benefit customers. The enhanced documentation, security, and product functionality should be welcome news to vSphere administrators everywhere. The continued bundling of certain popular Tools versions for supported and legacy guests, along with updates through VUM, will surely alleviate some of the concerns raised when VMware Tools 10 was first announced.
Upgrading VM Compatibility using vSphere Update Manager
This product walkthrough will cover the steps to upgrade VM Compatibility using vSphere Update Manager
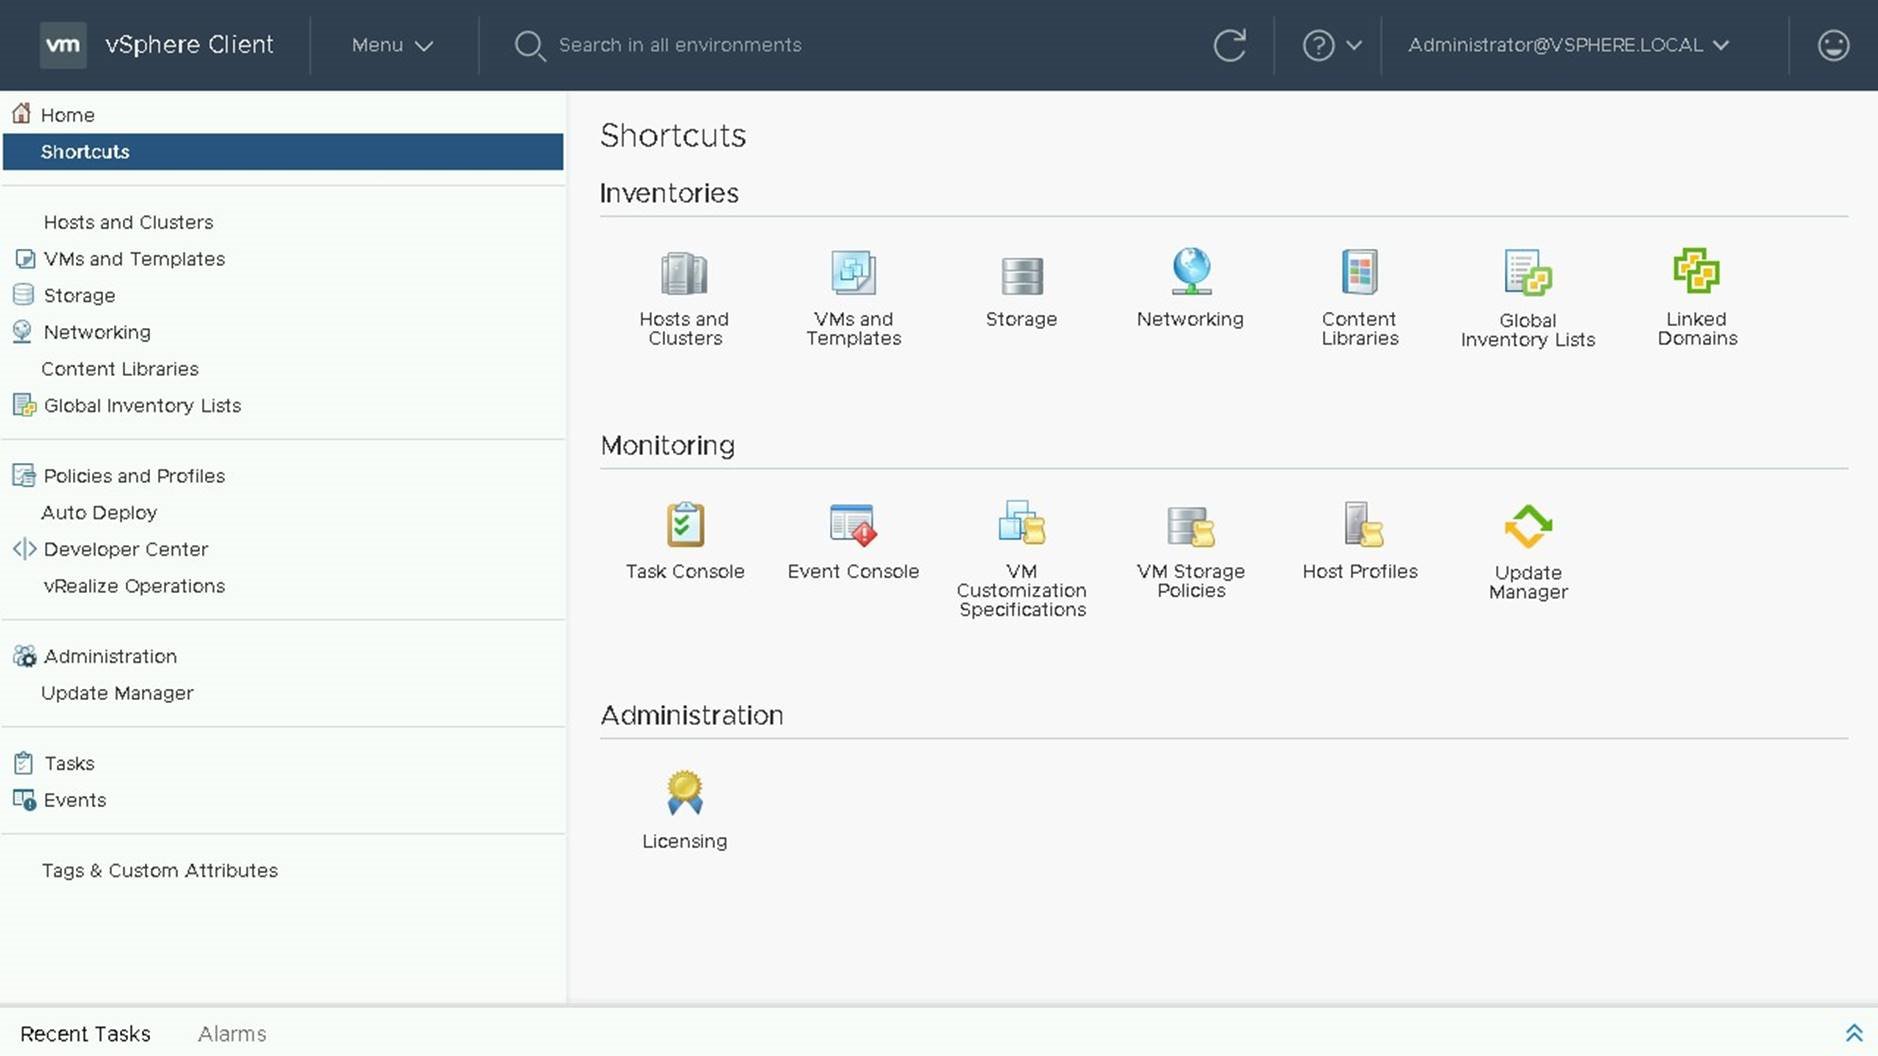
Before we begin the upgrade of VM Compatibility, lets navigate to the Update Manager Settings for VMs.
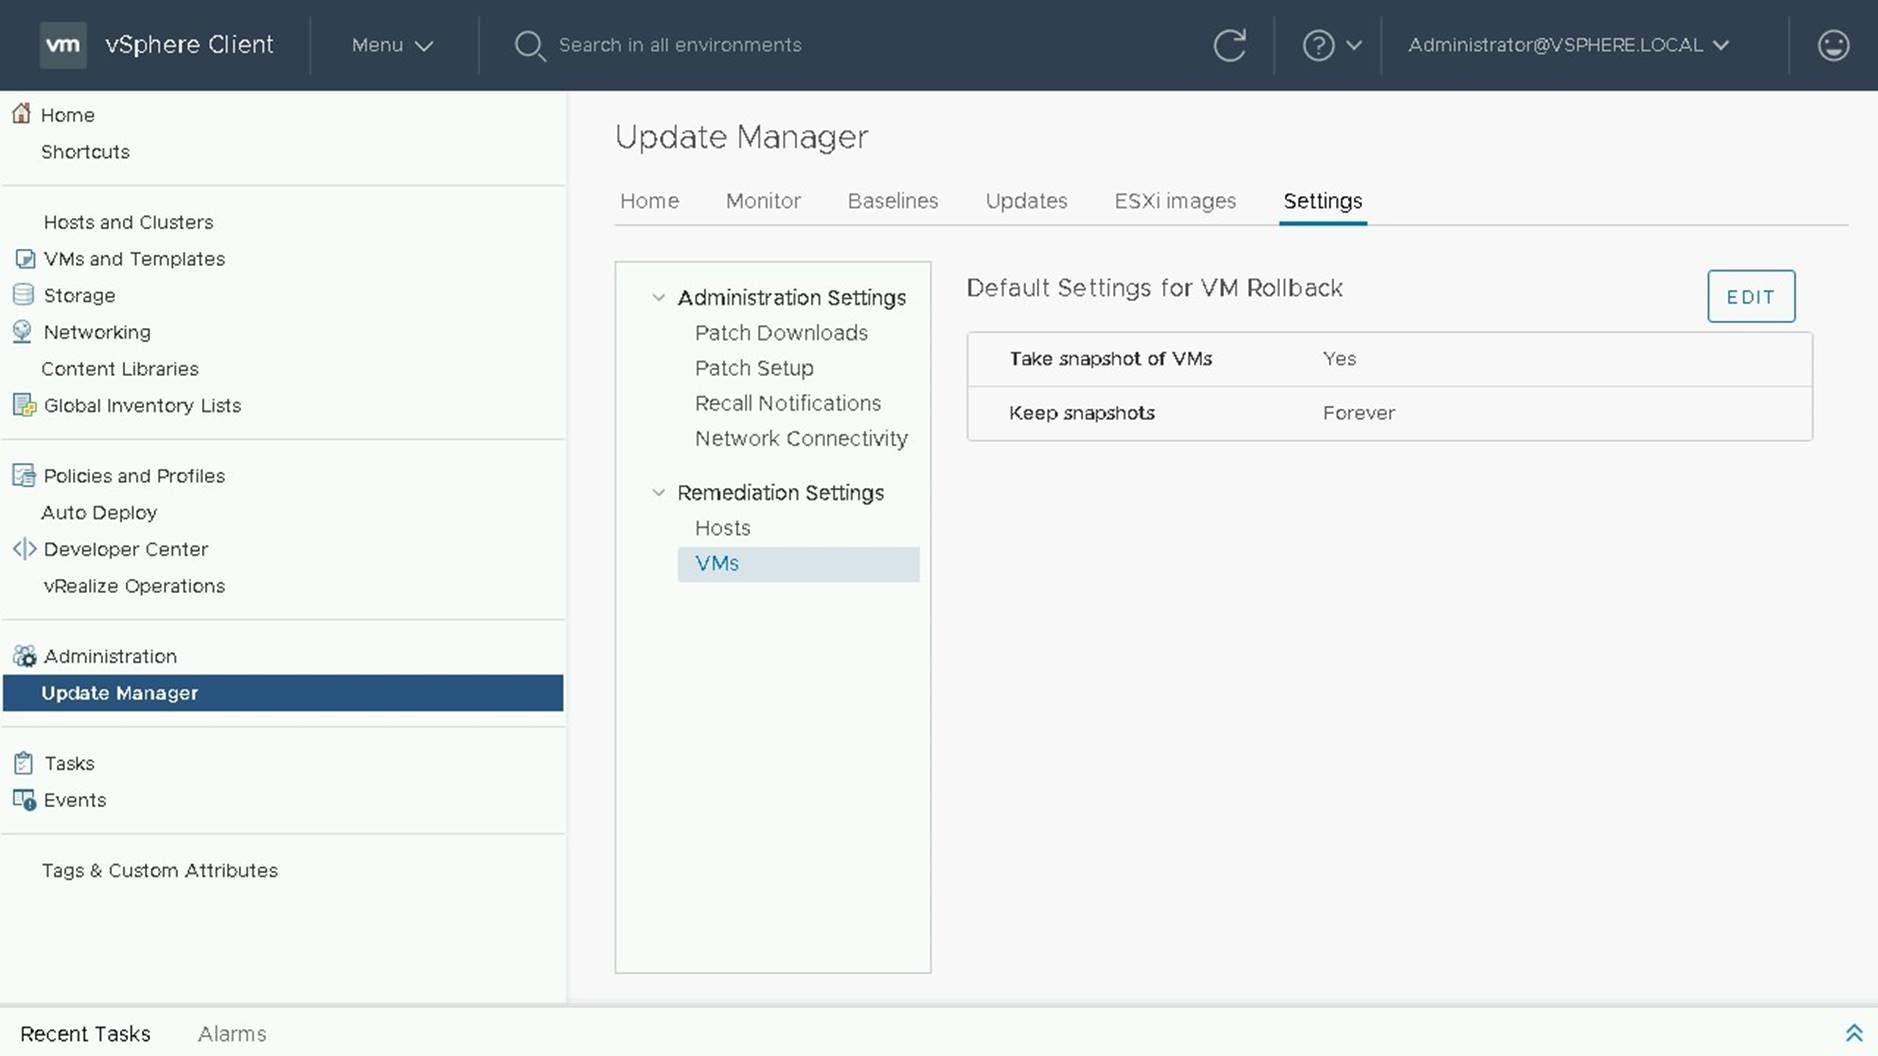
On the current screen you can set the default settings for VM Rollback. This includes whether or not a snapshot should be taken of the VM and the time to retain the snapshot.Let's navigate to VMs and Templates view to begin our VM Compatibility Update.
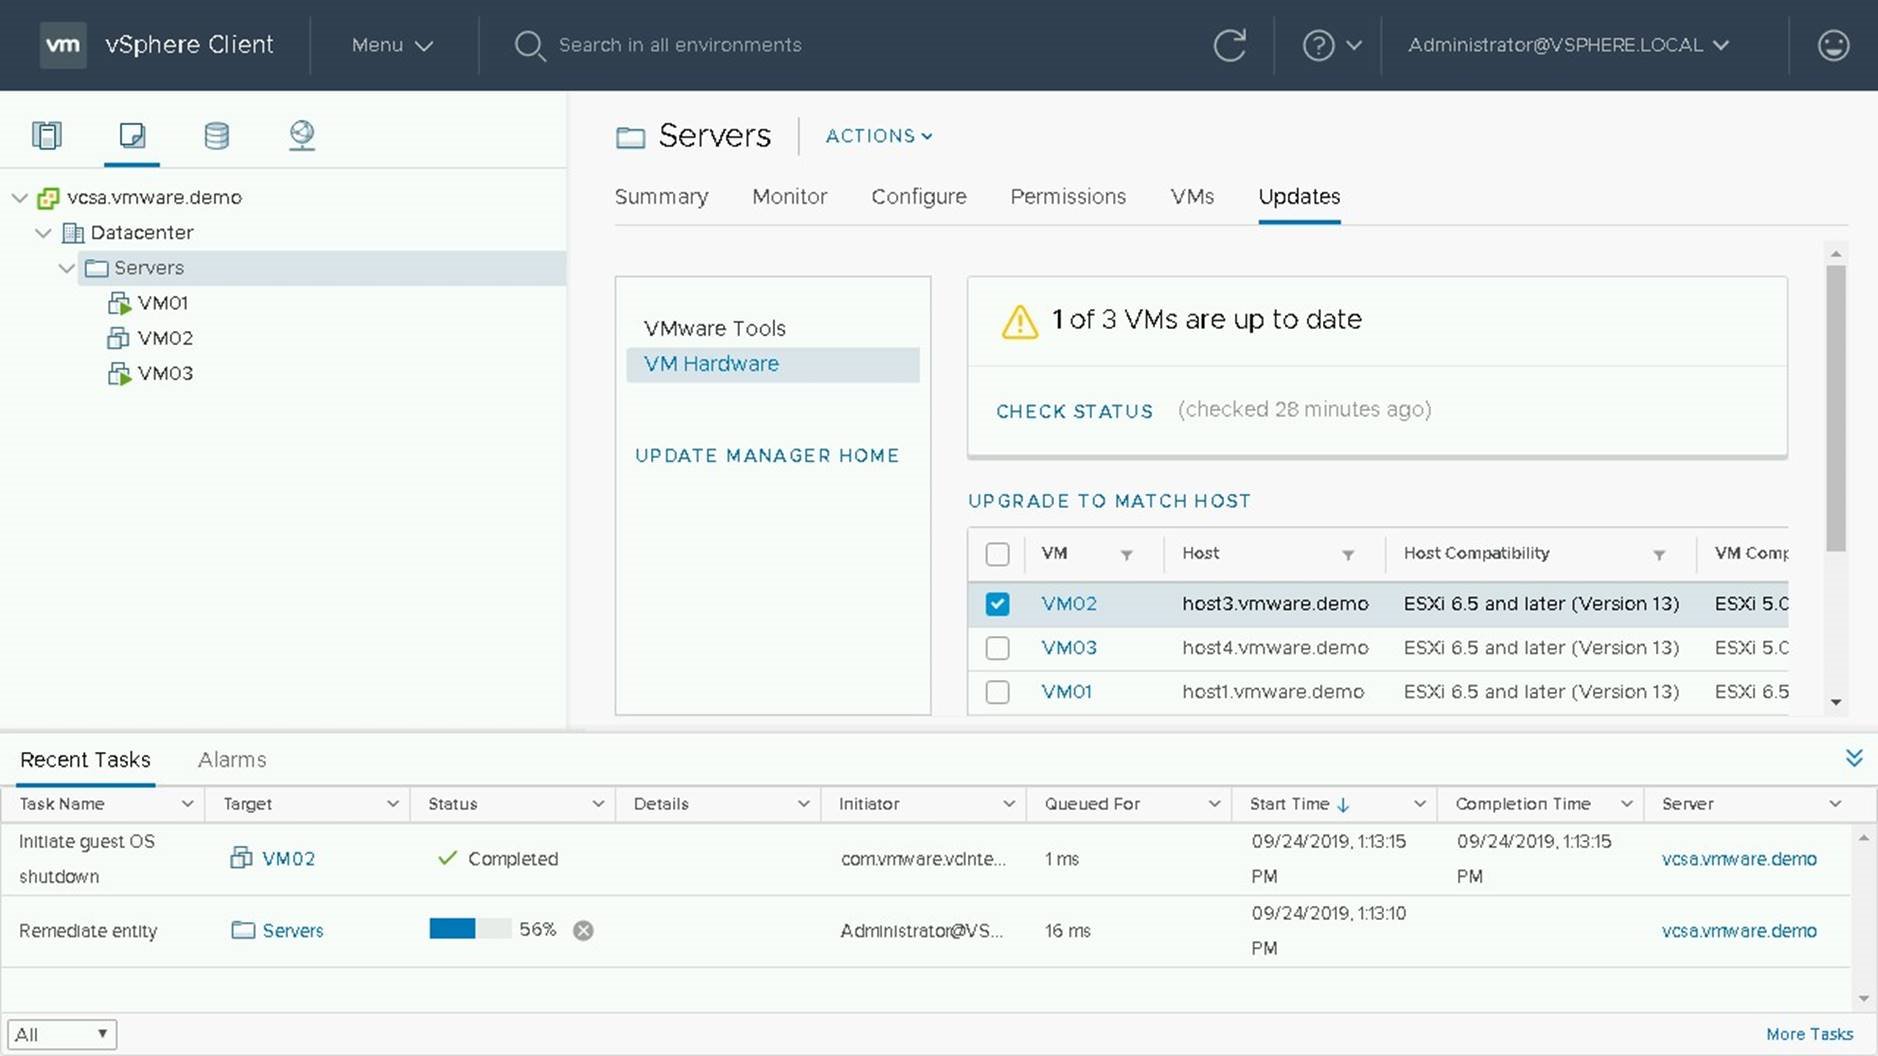
Select the VM Folder or VM Object you wish to update and select the Updates Tab.

If the status is unknown or not current, click on check status to get the latest versions of compatibility.
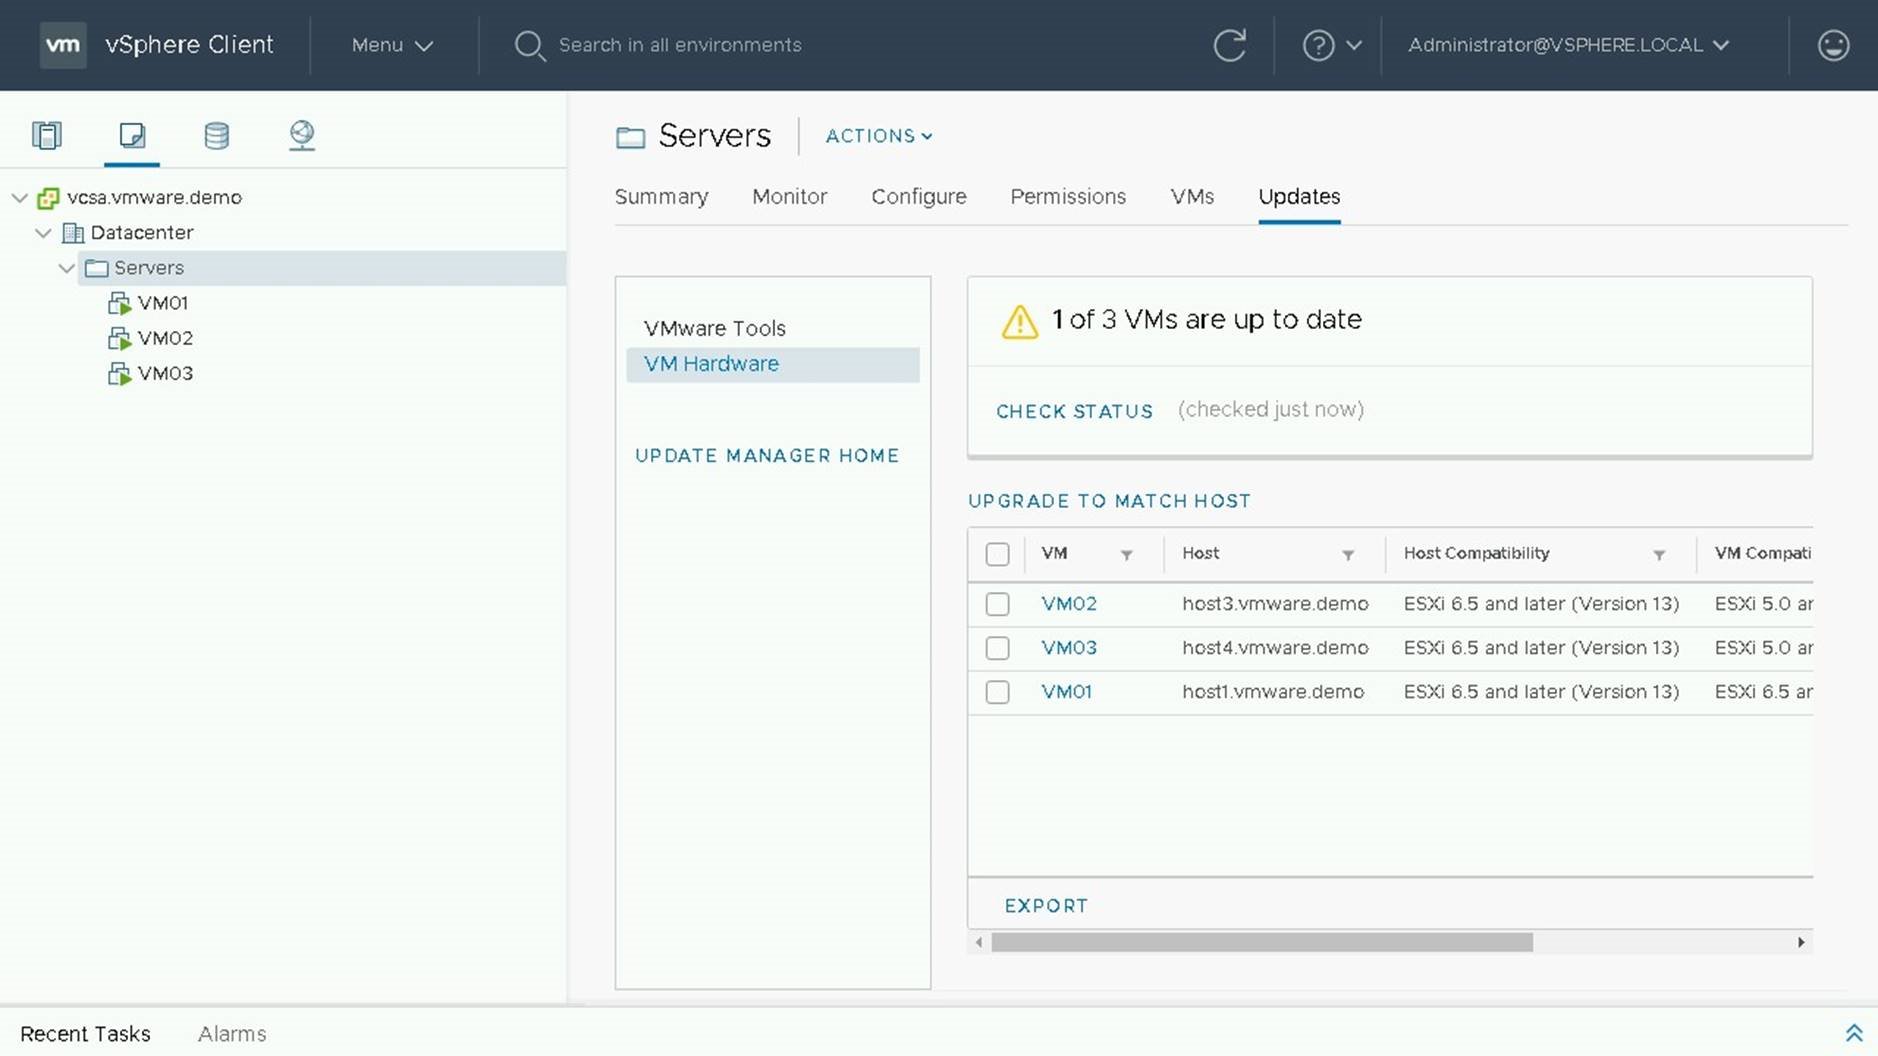
VM02 is currently out of date, so we will select it to perform our upgrade.
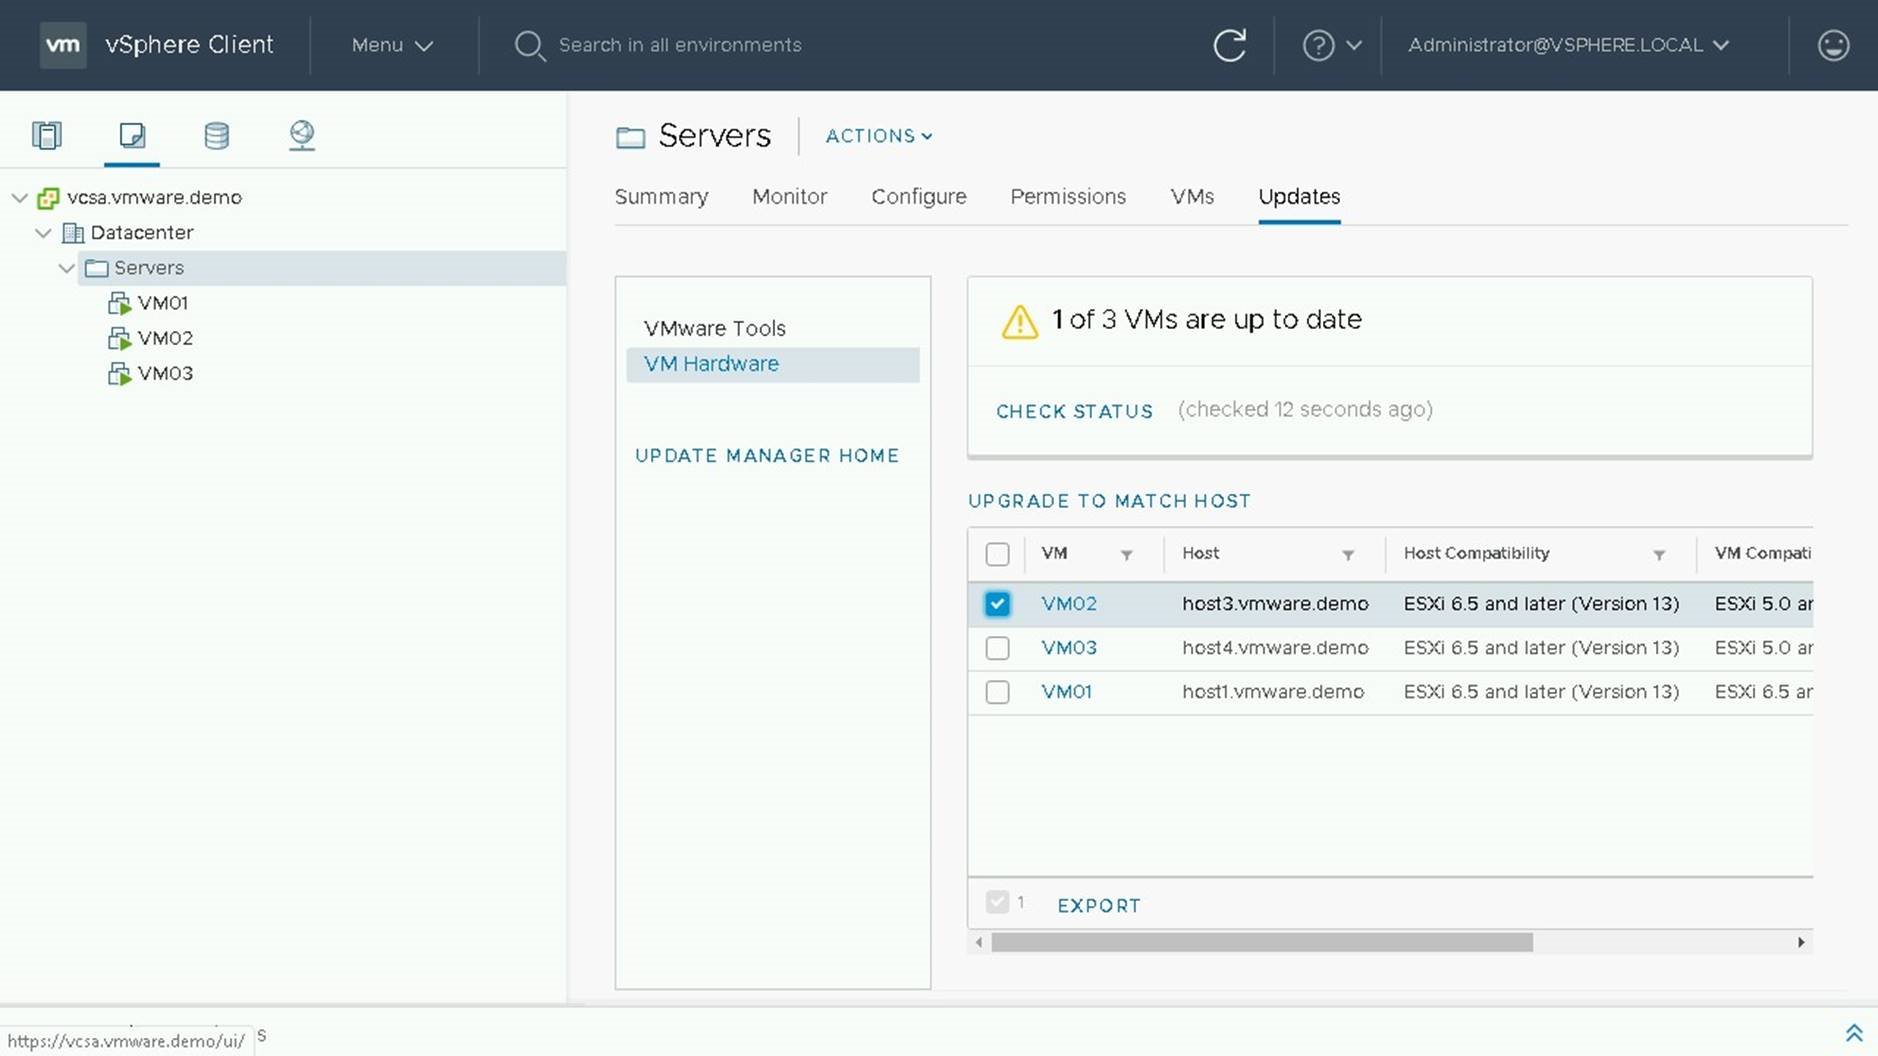
To perform our upgrade we will chose "Upgrade to Match Host"
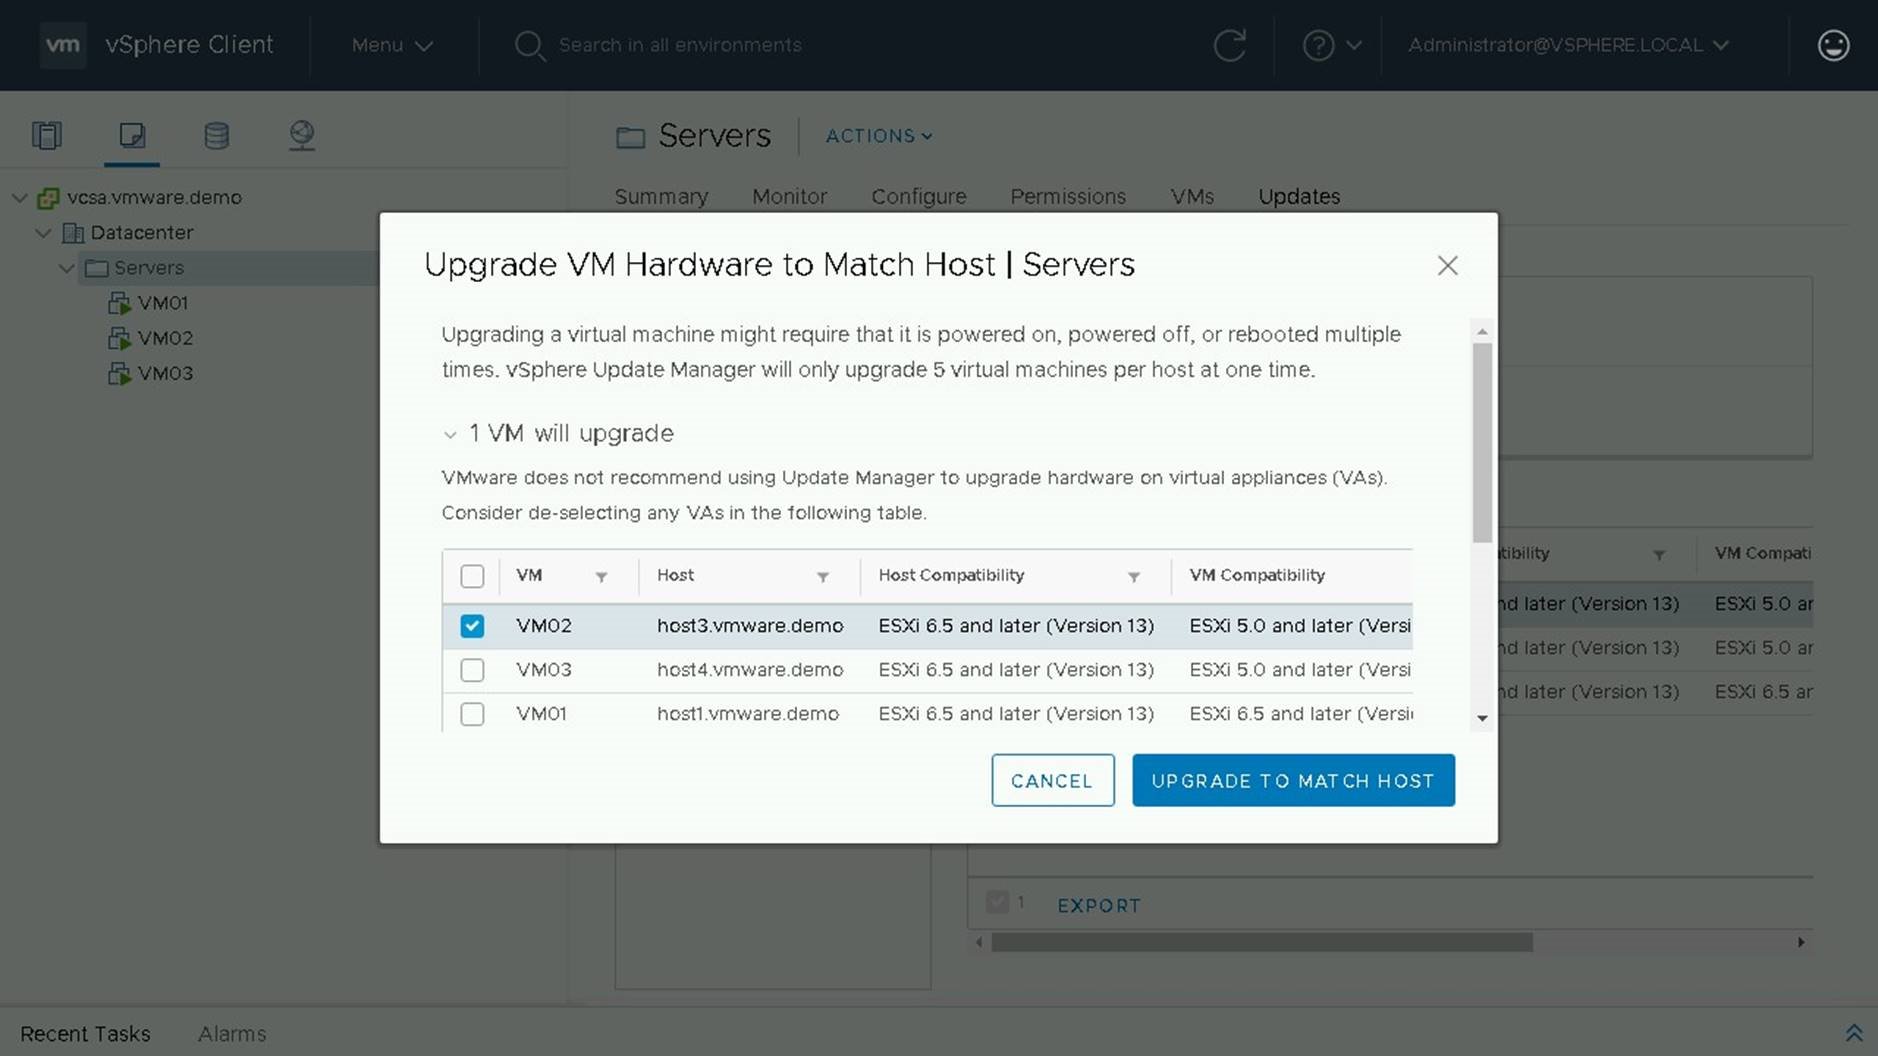
On the following screen will be a summary of changes being done. We see that 1 VM will upgrade and that VM02 is currently VM Version 10 and is going to be upgraded to VM Version 13.
During the upgrade process the VM will be shutdown, compatibility upgraded, and then powered back on.

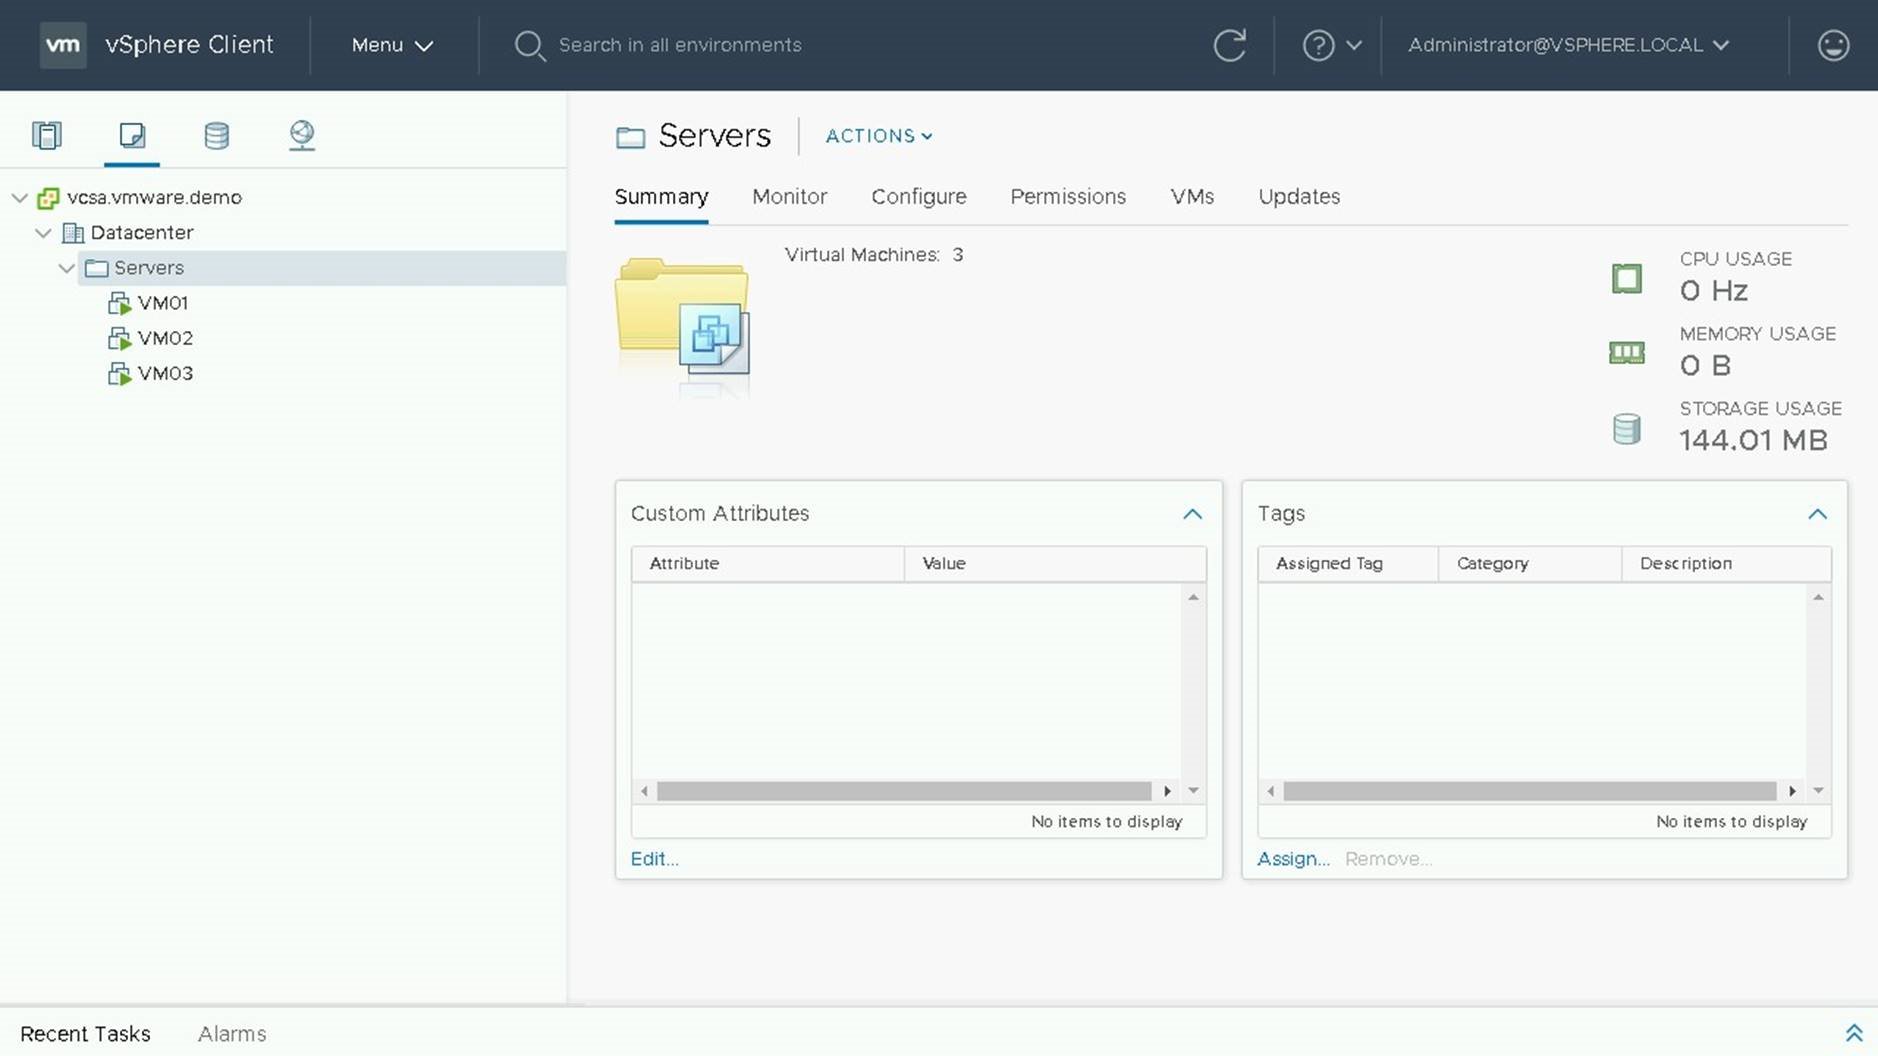
Once the Upgrade is complete, click on the Summary Tab to View the current version of VM Compatibility.
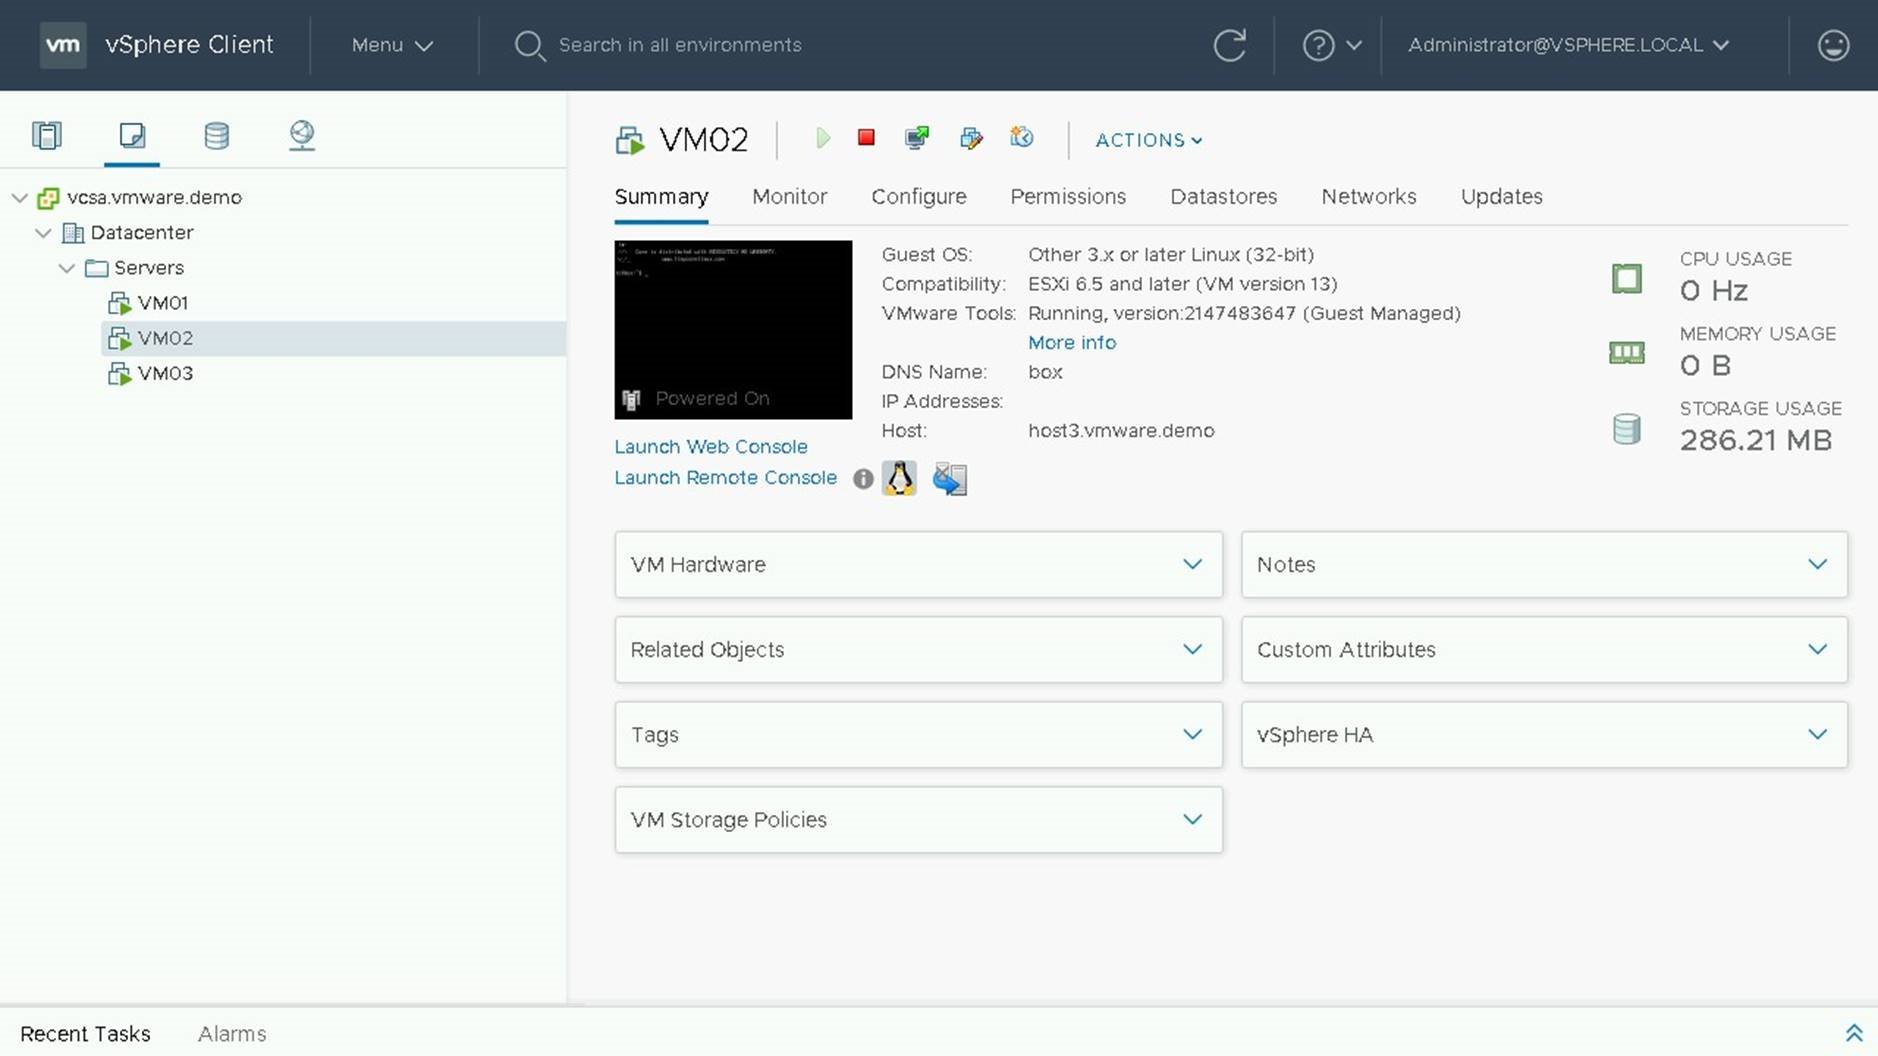
VM Compatibility upgrade is now complete.

Upgrading VM Tools using vSphere Update Manager

This product walkthrough will cover the steps to upgrade VM Tools using vSphere Update Manager

Before we begin the upgrade of VM Tools, lets navigate to the Update Manager Settings for VMs.

On the current screen you can set the default settings for VM Rollback. This includes whether or not a snapshot should be taken of the VM and the time to retain the snapshot.Let's navigate to VMs and Templates view to begin our VM Tools Upgrade.
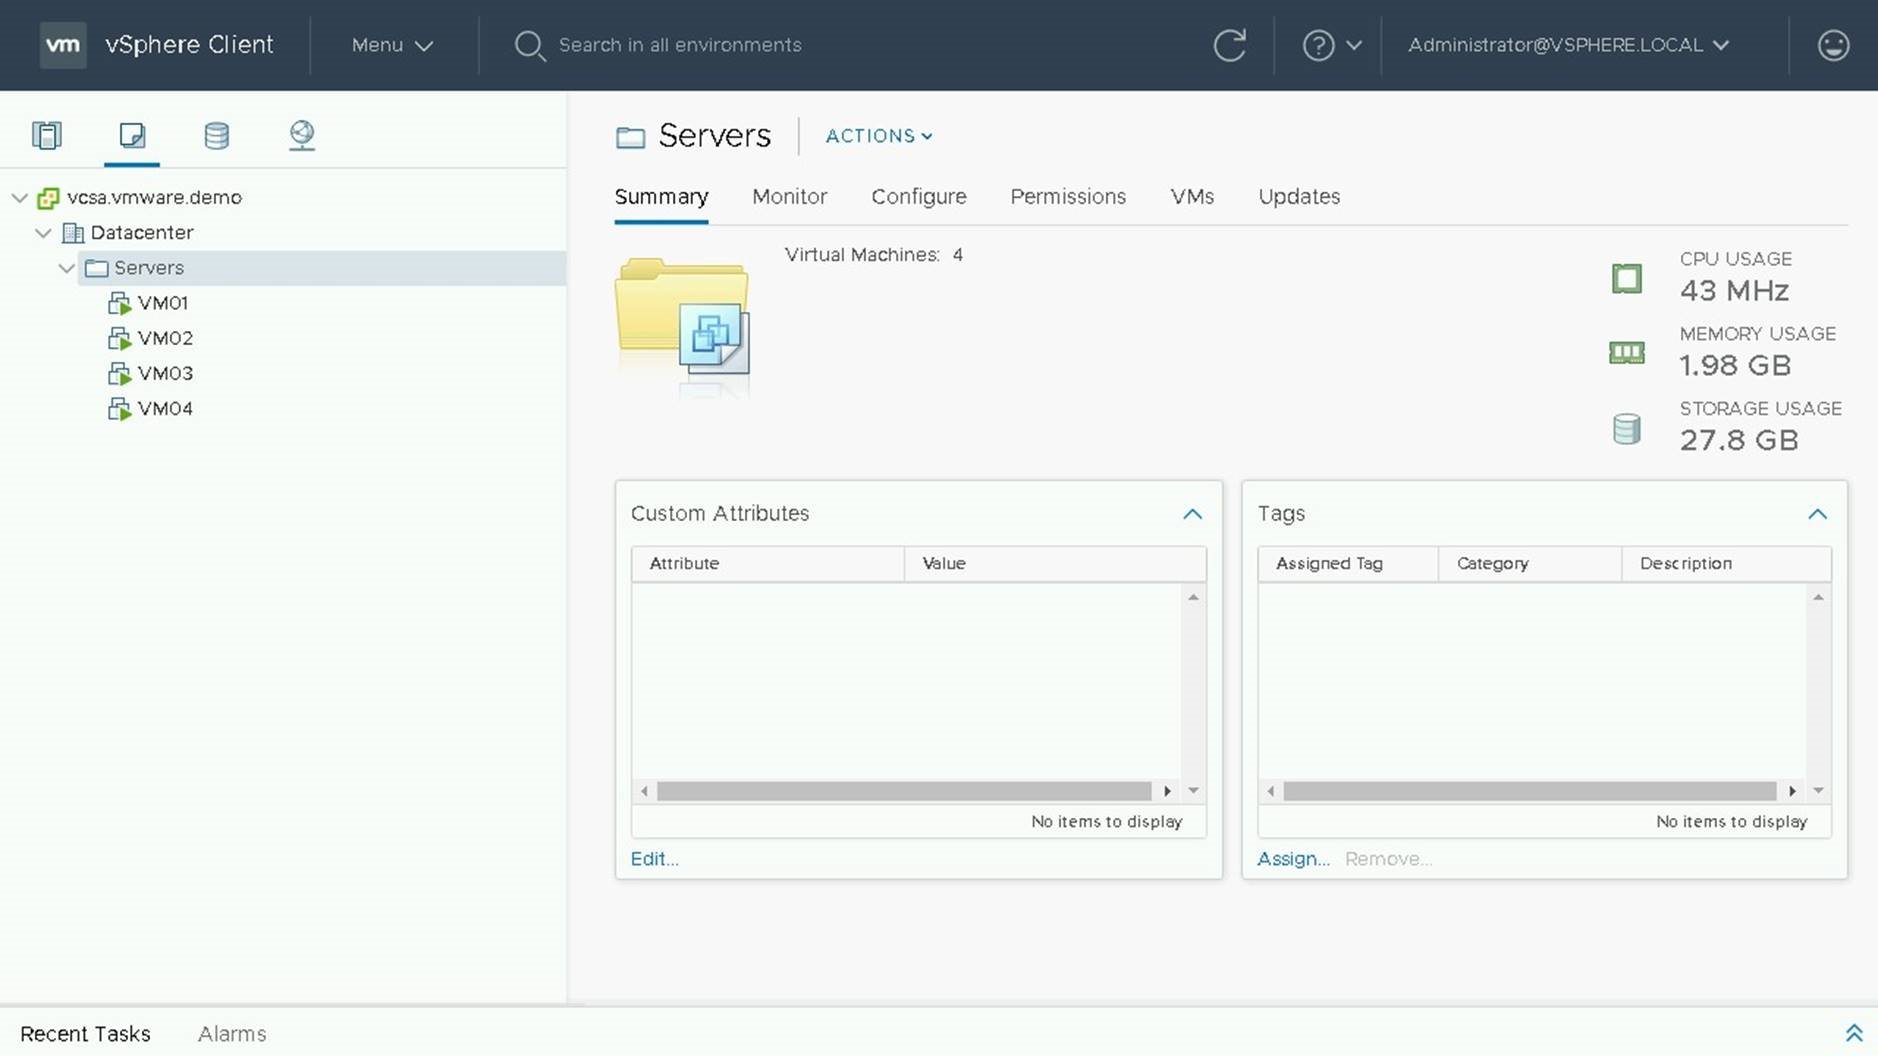
Select the VM Folder or VM Object you wish to update and select the Updates Tab.
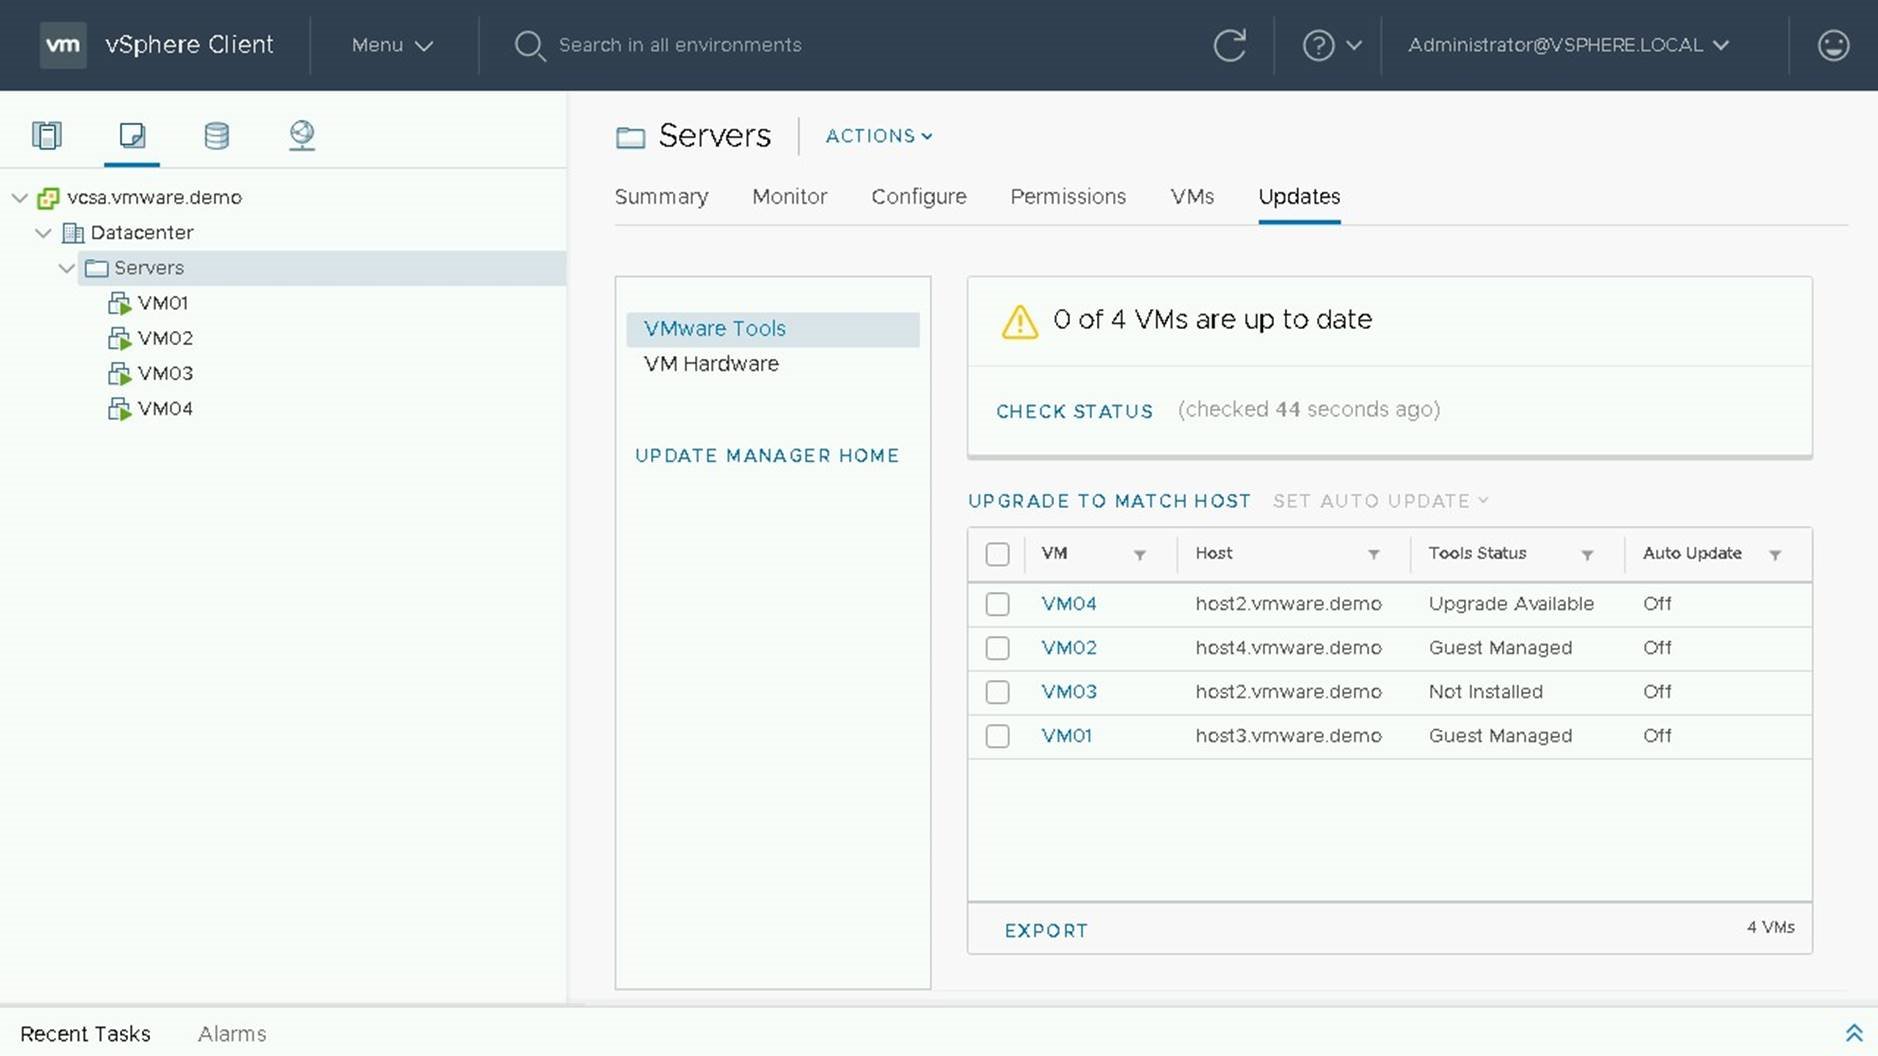
If the status is unknown or not current, click on check status to get the latest versions of tools.

VM04 currently has an upgrade available, so we will select it to perform our upgrade.If tools are not installed or are guest managed they cannot be upgraded through Update Manager
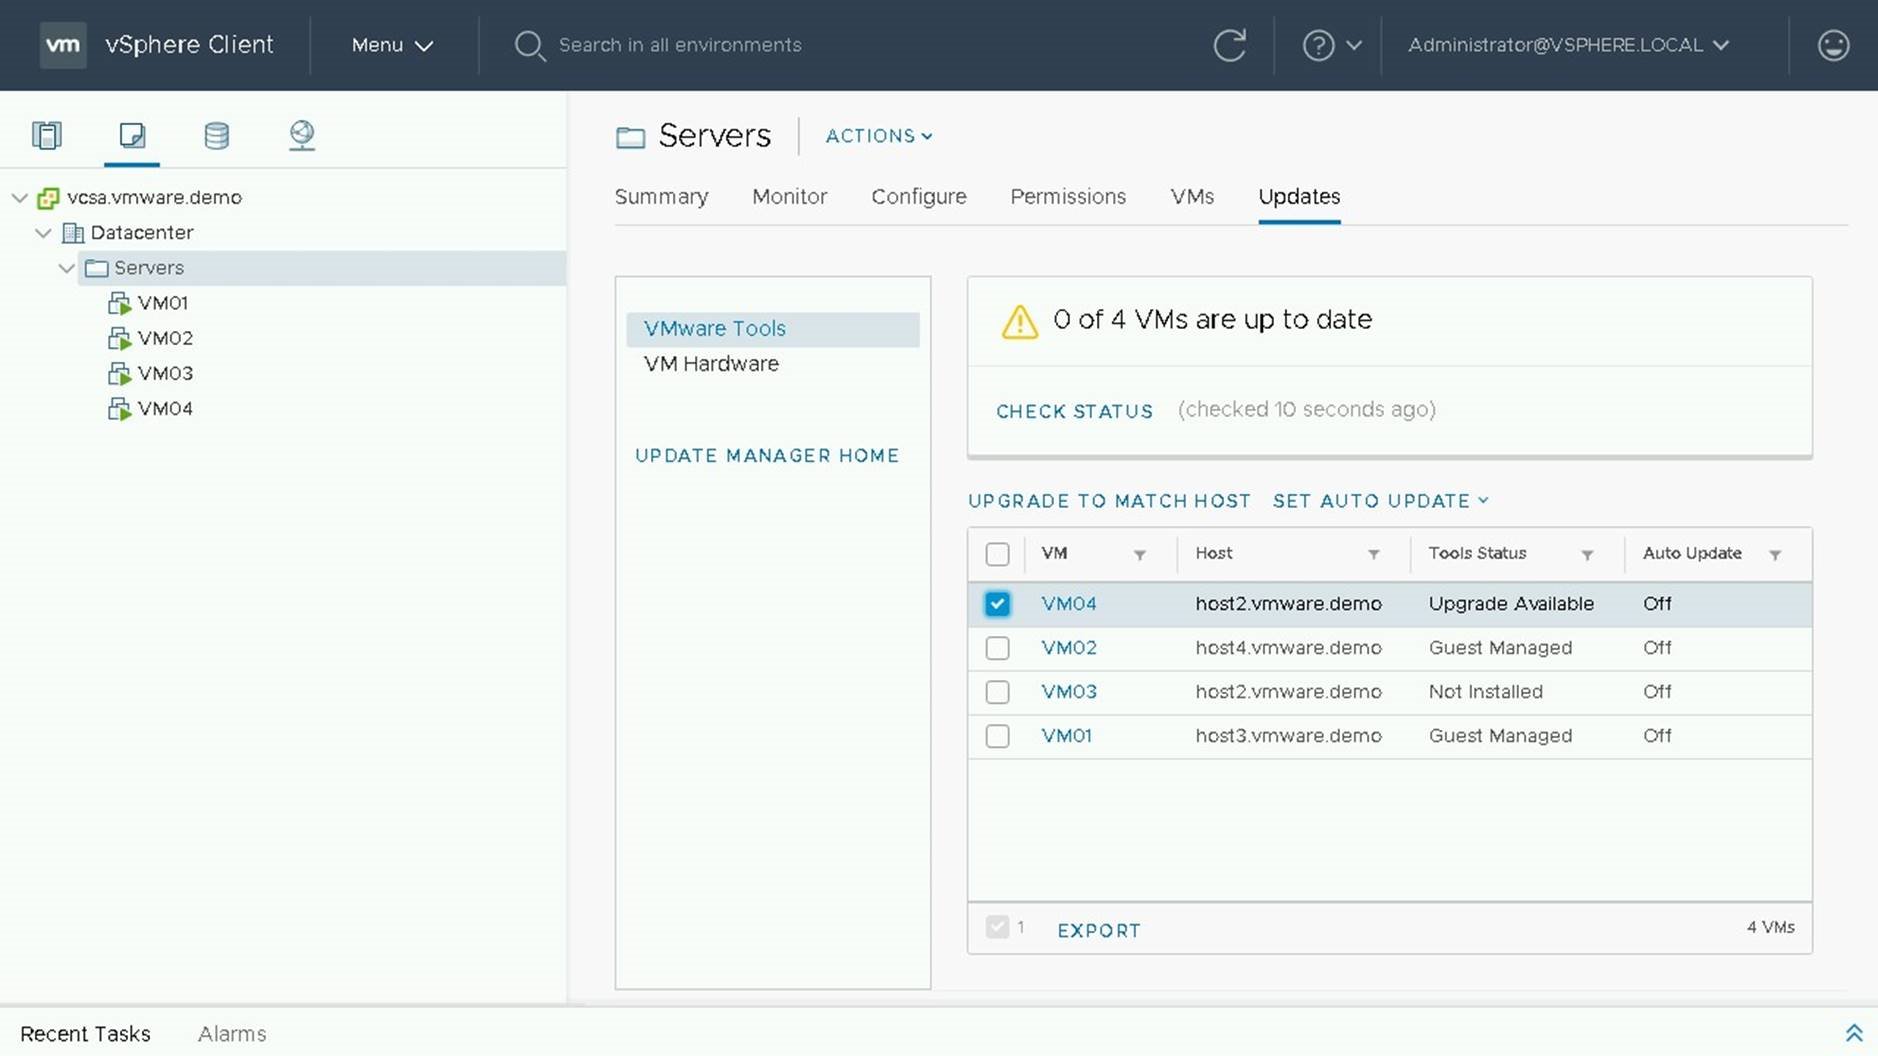
To perform our upgrade we will chose "Upgrade to Match Host"

On the following screen will be a summary of changes being done. We see that 1 VM will be upgraded and that is VM04.
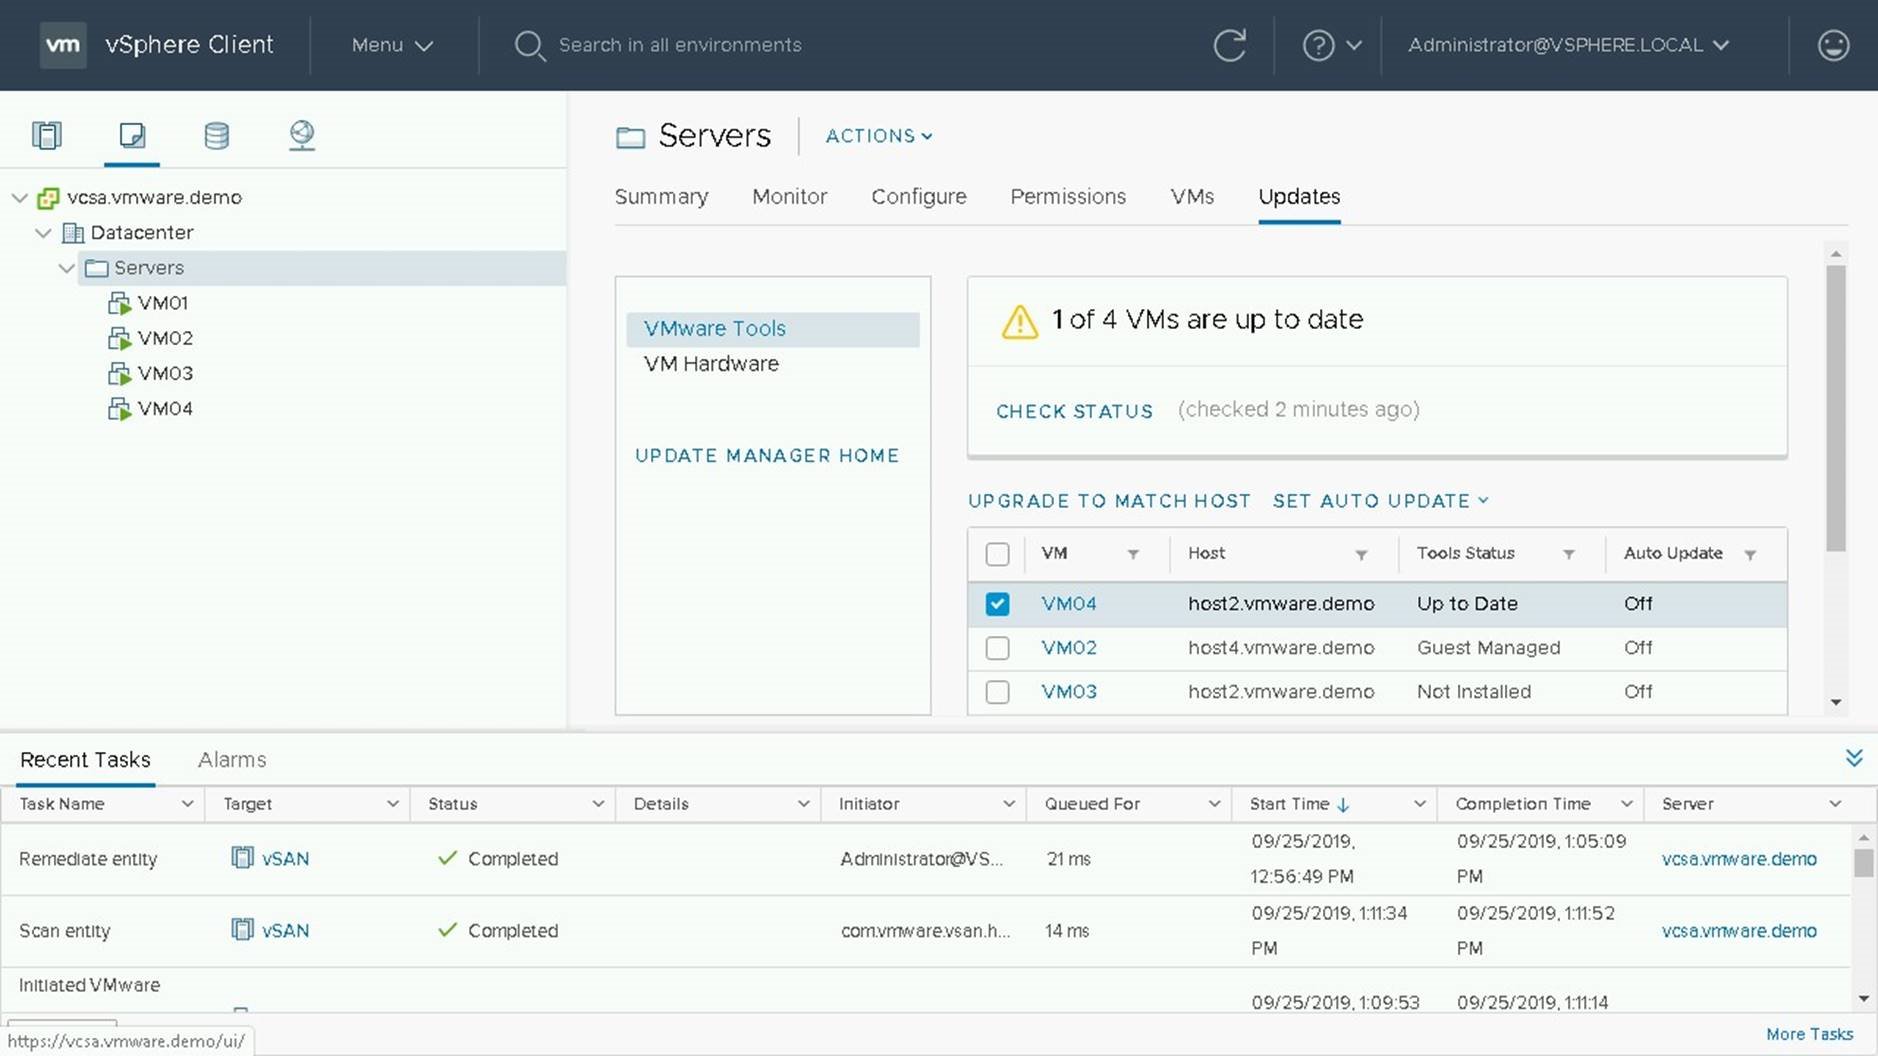
During the upgrade process the VM Tools will be updated and the VM will be rebooted if required.
