
Microsoft SQL Server on VMware vSAN - Day 2 Operations and Management
Executive Summary
This section covers the executive summary of this guide.
Business Summary
This solution addresses common business challenges that CIOs face today for an online transaction processing (OLTP) environment that requires Day 2 operations like backup, restore and operation monitoring using Hyperconverged solution. This solution helps customers design and implement optimal configurations specifically for Microsoft SQL Servers on VMware ® vSAN™.
Customers deploying production SQL Server workloads have stringent requirements to support and maintain critical database operational tasks known as Database Day 2 Management Operations such as:
- Backup and recovery
- Cloning
- Data refresh for development and test environments from production
- Database usage metering and reporting for chargeback purposes
- Capacity planning and reporting
- Troubleshooting
Once the major challenge of ensuring Day 1 Operations including deployment and provisioning is completed, the next hurdle is Day 2 Operations in the background to ensure continued business without any service disruption and with acceptable performance.
Common issues in using traditional storage solutions for business-critical applications include performance, storage inefficiency, complex management, high deployment and operating costs. With more and more virtualized production servers, the demand for highly converged server-based storage is surging.
vSAN has been widely adopted as an HCI solution for business-critical applications like Microsoft SQL Server. vSAN aims at providing a highly scalable, available, reliable and high-performance HCI solution using cost-effective hardware, specifically direct-attached disks in VMware ESXi™ hosts. vSAN adheres to a new policy-based storage management paradigm, which simplifies and automates complex management workflows that exist in traditional enterprise storage systems with respect to configuration and clustering.
vSAN has a performance advantage thanks to its native vSphere ® architecture. vSAN 6.6 introduces further optimizations to deliver up to 50% higher flash performance, enabling over 150K IOPS per host.
[1] These performance enhancements mean you can run both traditional enterprise workloads more efficiently and with greater consolidation while also having the confidence to deploy new workloads like big data. Specifically, some of the performance enhancements include reduced overhead of checksum; improved deduplication and compression; destaging optimizations; and object and management improvements. All of these performance improvements benefit this solution.
[1] For details see https://core.vmware.com/resource/performance-improvements-vsan-66
Solution Overview
The Microsoft SQL Server 2014 on vSAN 6.1 Hybrid reference architecture addressed the common business challenges that CIOs face today in an online transaction processing (OLTP) environment that requires availability, reliability, scalability, predictability and cost-effective storage, which helps customers design and implement optimal configurations specifically for Microsoft SQL Server on vSAN.
This Microsoft SQL Server 2014 on VMware vSAN 6.2 All-Flash reference architecture addressed the common business challenges that CIOs face today in an online transaction processing (OLTP) environment that requires predictable performance and cost-effective storage.
Having addressed the Day 1 operations including deployment and provisioning of critical SQL Server workloads on VMware vSAN, this solution focuses on the Day 2 Operations of SQL Server on vSAN including backup and recovery, database usage measurement, monitoring and troubleshooting.
VMware vSAN snapshot and clone technologies are primarily used for providing support to VM level backup and restore for SQL Server Day 2 Operations. Veeam backup and recovery provides application-level backup and restore since it internally integrated with Microsoft Volume Snapshot Service (VSS) Writer for application quiescing methodology to provide point-in-time backup and restore, which simplifies the database maintenance in a VMware virtualized environment for DBAs. vRealize Operations
Manager with native management pack and Blue Medora VMware vRealize Operations Management Pack for Microsoft SQL Server provides simplified management and centralized monitoring function. These technologies together constitute solid support for SQL Server Day 2 operations and management.
Key Highlights
This reference architecture focuses on Day 2 Operations of Microsoft SQL Server on vSAN including backup and recovery.
VMware vSphere snapshot and clone technologies are used for providing support to Microsoft SQL Server Day 2 backup and recovery operations. This capability applies to standalone databases and databases configure with AlwaysOn Availability Groups.
Veeam, as a backup and recovery partner of VMware, provides the database or application consistency capability to perform a backup of the transactions logs of all changes after the point-in-time backup of
VMs and can help to recover VMs to the point-in-time. This capability applies to standalone and SQL Server Availability Groups.
Database operational and optimization consideration, centralized monitoring and management are crucial to operators. vRealize Operations Manager with Management packs provides this capability.
This reference architecture validates vSAN to be an HCI platform that is capable of delivering efficient SQL Server Database Day 2 Operations. It demonstrates improved data protection, cloning, and day-today management and troubleshooting functions, achieved by integrating SQL Server database technologies with vSAN, Veeam and the Blue Medora VMware vRealize Operations Management Pack for SQL Server.
Introduction
This section provides the purpose, scope and intended audience of this document.
Purpose
This operation guide validates the capability to manage Day 2 Operations for SQL Server workloads on vSAN.
Scope
This reference architecture:
Provides operational procedures for Day 2 Operations using native vSphere or Veeam for the following backup and recovery scenarios:
- VM level:
- Standalone SQL Server in a VM
- AlwaysOn Availability Groups enabled SQL Server in two VMs
- Database level
Provides an overview of the various features of vRealize Operations with native management pack, and the Blue Medora VMware vRealize Operations Management Pack for SQL Server with the following database Day 2 Operations:
- Cluster monitoring
- SQL Server and VM monitoring
- SQL Server AlwaysOn Availability Group monitoring
- vSAN troubleshooting
Audience
This reference architecture is intended for SQL Server database administrators, virtualization and storage architects involved in planning, architecting, and administering a virtualized SQL Server environment on vSAN.
Technology Overview
This section provides an overview of the technologies used in this solution.
Overview
This section provides an overview of the technologies used in this solution:
- VMware vSphere 6.5
- VMware vSAN 6.6
- VMware vRealize® Operations Manager™ 6.6
- VMware PowerCLI™
- VMware vmkfstool
- Virtual machine snapshots
- Virtual machine clones
- Virtual machine disk mode
VMware vSphere 6.5
VMware vSphere 6.5 is the next-generation infrastructure for next-generation applications. It provides a powerful, flexible, and secure foundation for business agility that accelerates the digital transformation to cloud computing and promotes success in the digital economy.
vSphere 6.5 supports both existing and next-generation applications through its:
- Simplified customer experience for automation and management at scale
- Comprehensive built-in security for protecting data, infrastructure, and access
- Universal application platform for running any application anywhere
With vSphere 6.5, customers can run, manage, connect, and secure their applications in a common operating environment, across clouds and devices.
VMware vSAN 6.6
VMware vSAN is the industry-leading software powering HCI solution. HCI, or HyperConverged Infrastructure, converges traditional IT infrastructure silos onto industry-standard servers and virtualizes physical infrastructure to help customers easily evolve their infrastructure without risk, improve TCO over traditional resource silos, and scale to tomorrow with support for new hardware, applications, and cloud strategies. HCI originally included just virtual compute and virtual storage but can now be extended with virtualized network resources for a fully software-defined data center.
The industry’s first HCI encryption solution and a highly available control plane is delivered in vSAN 6.6 to help customers evolve without risk and without sacrificing flash storage efficiencies. Operational costs are reduced with 1-click firmware and driver updates. vSAN 6.6 significant enhancements enable customers to scale to tomorrow’s IT demands. See VMware vSAN 6.6 Technical Overview for details.

Figure 1. vSAN HCI Advantages
VMware vRealize Operations Manager 6.6
vRealize Operations Manager 6.6 delivers intelligent operations management with application-tostorage visibility across physical, virtual, and cloud infrastructures. Using policy-based automation, operations teams automate key processes and improve IT efficiency. vRealize Operations Manager 6.6
focuses on enhancing product usability, accelerating time to value and improving troubleshooting capabilities by integrating with vSAN and vRealize Automation. Specifically, vRealize Operations Manager 6.6 adds Native vSAN management capabilities to:
- Provide centralized management across stretched clusters
- Provide complete vSAN management, which includes administering performance, capacity, logs, and configuration and health
We used the following add-ons for SQL Server centralized management and monitoring:
- vRealize Operations Native Management Pack for Storage Devices: provides visibility into vSAN storage environment for performance, capacity, and health monitoring. Predefined dashboards allow you to follow the path from a virtual machine to vSAN and identify any problems that might exist along that path which enables you to monitor the SQL Server Database VM.
- Blue Medora VMware vRealize Operations Management Pack for Microsoft SQL Server collects performance data from Microsoft SQL Server resources and provides predictive analysis and real-time information through customized dashboards, views, alerts/symptoms/recommendations, and reports.
Using these management packs extends the capability of vRealize Operations Manager to provide an end-to-end view of the solution, to make informed decisions, and to avoid costly application downtime.
VMware PowerCLI
VMware PowerCLI™ provides a Windows PowerShell interface to the VMware vSphere, VMware vCloud ® , vRealize Operations Manager and VMware Horizon ® APIs. VMware PowerCLI includes numerous cmdlets, sample scripts, and a function library. VMware PowerCLI provides more than 500 cmdlets for managing and automating vSphere, vCloud, vRealize Operations Manager, and VMware Horizon environments. See VMware PowerCLI documentation for more information.
VMware vmkfstools
vmkfstools is one of the ESXi Shell commands for managing VMFS volumes, storage devices, and virtual disks. You can perform many storage operations using the vmkfstools command. For example, you can create and manage VMFS datastores on a physical partition, or manipulate virtual disk files, stored on datastores. See the “ Using vmkfstools ” topic on VMware vSphere 6.5 Documentation Center for detailed information.
Virtual Machine Snapshots
Snapshots are the state of any system at a particular point-in-time when the snapshot is taken.
Snapshots for SQL Server databases on VMware vSphere can be performed on three different levels:
- Database level snapshots
- vSphere level using VMware Snapshots
- Storage level using snapshots from traditional storage-based arrays
VMware vSphere, through the use of virtual machine (VM) snapshots, provides the ability to capture a point-in-time (PIT) state and data of a VM. The snapshots include the VM’s storage, memory and other devices such as virtual NICs.
Snapshots are useful for creating a PIT state of VM for backup or archival purposes and for creating test and rollback environments for applications. Snapshots can capture VMs that are powered-on, poweredoff, or even suspended. When the VM is powered on, there is an option to capture the VM’s memory state, and allow the VM to be reverted to a powered-on point-in-time.
For further information about how to use virtual machine snapshots in vSphere environments, see Using Snapshots To Manage Virtual Machines .
Things to keep in mind while using snapshots:
- Typically, snapshots are used for short-term ad hoc backups or temporarily as a predecessor to a clone operation.
- Snapshots will never grow larger than the size of the original base disk. However, the size of the delta will be dependent on the number of changes made since the snapshot was taken.
- Proactively monitor the vSAN datastore capacity and read cache consumption on a regular basis when using snapshots intensively on vSAN.
- VMware supports the full maximum chain length of 32 snapshots when vsanSparse snapshots, which is enabled by default to improve the snapshot functionality and is transparent to users, are used.
- Even with the improved snapshot capabilities with vSAN, the recommendation is to have few snapshots for a short term because even though vSAN uses a sparseSnapshot mechanism, there can be some level of amplification of I/O that occurs through a snapshot chain.
See Tech Note for vSAN 6.0 Snapshots for best practices.
A (VM) snapshot can be taken through:
- vSphere Web Client GUI: see Taking a Snapshot for detailed information.
- PowerCLI commands: see PowerCLI Reference: New-Snapshot for details.
Virtual Machine Clones
Clones are a replica or a duplicate of a system, which functions exactly like the parent system. Clones for SQL databases on VMware vSphere can be performed on three different levels: at the database level with online backup, at the storage level using traditional storage-array-based cloning, and at the vSphere level using VMware cloning technology. For this paper, we only discuss the latter.
vSphere through the use of VM clones provides the ability to create a VM that is a copy of the original. The new VM is configured with the same virtual hardware, installed software and other properties that were configured for the original.
There are three types of clones:
- Full clone—A full clone is an independent copy of a VM that shares nothing with the parent after the cloning operation. The ongoing operation of a full clone is entirely separate from the parent VM.
- Linked clone—A linked clone is a copy of a VM that shares virtual disks with the parent in an ongoing manner. This type of cloning conserves disk space and allows multiple VMs to use the same software installation.
- Instant clone—Like a linked clone, an instant clone shares virtual disks with the replica VM after the linked clone is created. The process of creating instant clones differs from that used for linked clones in the following way. The cloning process creates a running parent VM from the replica VM. At the time of creation, the instant clone shares the memory of the running parent VM from which it is created. The typical use case is for VDI Deployment .
In this reference architecture, the full clone functionality is used since our primary concern was backup and recovery. Using the full clone provides the easiest recovery scenario given the clone is independent of the parent VM. For further details on clones, see Clone a Virtual Machine .
There are two types of cloning operations performed in the reference architecture:
- Cloning of an entire VM that contains all vmdks including the operating system, SQL binaries, and SQL data vmdks
- Cloning the database vmdks of a VM alone
A VM full clone operation can be triggered through either:
- vSphere Web Client or
- PowerCLI with vSphere APIs
VM Cloning using vSphere Web Client GUI
The vSphere Web Client GUI only allows cloning of an entire VM. Cloning of individual vmdks of a VM is not allowed. See Clone a Virtual Machine for more information
When you clone a VM from the vSphere Web Client these steps are automatically done:
- A temporary snapshot of the VM is made
- The clone is made from the snapshot of the VM
- After the clone is created, the snapshot is then deleted
In case the VM is powered off, the clone is made directly from the VM. This method also provides an option to specify a target datastore and VM storage policy for the cloned VM.
vSAN is using Storage Policy Based Management (SPBM) framework that provides storage policy based management at the VM object level. This framework can be used to turn on or turn off specific features like erasure coding for the cloned VM. For example, the production VM can be configured RAID 1 for performance reasons, but the cloned VM for test and development can be RAID 5 for space efficiency.
VM Cloning using PowerCLI and vSphere API
For cloning an entire VM, vSphere API contains a Clone VM _Task , which includes the ability to clone a VM. It also allows us to clone a VM from a snapshot using Data Object VirtualMachineCloneSpec. Further Data Object VirtualMachineRelocateSpec provides an option to provide the target datastore and VM storage policy for the cloned VM.
PowerCLI also has an option to clone individual vmdks of a virtual machine, using the Copy-Hardisk command with the following restrictions:
- Only works when the VM is powered off.
- Cloned VMDK will inherit the default vSAN policy. We cannot specify a vSAN SPBM policy for cloned vmdk.
As this method of cloning individual vmdks results in a downtime for the database, PowerCLI option using the vSphere API is deployed only to clone an entire VM.
The vmkfstools command can be used to clone individual vmdks only and not the entire VM.
Since VM disk files are locked while in use by a running VM, use one of the following methods to use the vmkfstools command to clone individual disks:
- VM should be powered off first and then clone the vmdks.
- A snapshot of the VM is taken, so a child delta disk is created, and the lock and updates are moved to child delta disk.
- The parent base disk is considered as a point-in-time copy. This disk is used as a source for cloning using vmkfstools.
A caveat, only the default vSAN storage policy is applied to the cloned vmdks using this method. However, the vSAN storage policy for vmdk can be subsequently be changed and verified for policy compliance.
See Cloning individual virtual machine disks via the ESX/ESXi host terminal (1027876) for more information.
Virtual Machine Disk Mode
Table 1 shows the various disk modes, namely dependent, independent-persistent, and independent-non-persistent. It is important to note that independent disks, persistent or non-persistent, are omitted from snapshots. Hence any VM disks that need to be included in the snapshot must be dependent . See Change the Virtual Disk Configuration for detailed information.
Table 1. Virtual Machine Disk Mode
| Option | Description |
|---|---|
| Dependent | Dependent disks are included in snapshots. |
| Independent- persistent | Disks in persistent mode behave like conventional disks on your physical computer. All data written to a disk in persistent mode is written permanently to the disk. |
| Independent– non-persistent | Changes to disks in non-persistent mode are discarded when you turn off or reset the VM. With non-persistent mode, you can restart the VM with a virtual disk in the same state every time. Changes to the disk are written to and read from a redo log file that is deleted when you turn off or reset the VM. |
Veeam Backup & Replication for SQL Server in vSAN
Veeam Backup & Replication Overview
Veeam® Backup & Replication TM is a powerful, easy-to-use and affordable backup and availability solution. It provides fast, flexible and reliable recovery of virtualized applications and data, bringing VM backup and replication together in a single software solution.
To protect a virtualized Microsoft SQL Server in a vSphere environment, you will create a backup of the SQL Server VM at a specific point-in-time. Veeam backs up the transactions logs of all changes after the point-in-time backup. When you recover a VM, you will restore the VM backup to the point-in-time and then apply the transactions logs to restore the database completely. Veeam integrates all SQL Server native functions to perform I/O quiesce and resume using Microsoft VSS writer to ensure the database integrity.
Supportability for SQL Server
Veeam Backup & Replication supports Microsoft SQL Server from Release 2005 SP4 and later. AlwaysOn Availability Groups is supported for Microsoft SQL Server 2012 and later.
Backup Repository
Before you can use Veeam Backup & Replication software, you need to prepare a backup repository. A Veeam backup repository is a server that hosts both the transport service and the storage of your VM and transactional logs backups. Veeam is compatible with the following backup repositories:
- Microsoft Windows Server
- Linux server
- CIFS shared folders
- Deduplication enabled storage appliance including Dell EMC Data Domain , ExaGrid , Quantum DXi and HPE StoreOnce
For detailed information and correct sizing see Know your Infrastructure Resources.
Backup Proxy
A backup proxy is an architecture component that sits between the backup server and other components of the backup infrastructure. While the backup server administers tasks, the proxy processes jobs and directs backup traffic. By default, the role of the proxy is assigned to the backup server itself. However, this is sufficient only for small installations with low traffic load. For large installations, it is recommended to deploy dedicated backup proxies.
Backup Configuration
The following configuration parameters are important to understand with Veeam Backup & Replication:
- Deduplication and compression is built-in to Veeam Backup & Replication software. This reduces the bandwidth needed to move to the backup repository and the disk spaced required on the backup repository.
- Application-aware processing must be enabled for the Veeam backup job. This Microsoft VSS based proprietary technology ensures that are no incomplete transactions when the backup is performed.
- AlwaysOn Availability Groups are supported by Veeam Backup & Replication starting with version 8.0. The image-level backup of the SQL Server VM is aware if the VM is the hot-standby or active. The transactional log backup can be from either the primary or secondary node.
Solution Configuration
This section describes the hardware and software resources; network configuration and test tools used for this solution. Architecture diagrams are provided for the specific subset of the solution.
Hardware Resources for Backup and Recovery
We used direct-attached SSDs on VMware ESXi™ servers to provide a vSAN datastore. Each ESXi server has two disk groups each consisting of one cache-tier SSD and four capacity-tier SSDs.
For backup and restore test purpose, we leveraged two clusters: All-Flash and Hybrid vSAN vSphere clusters.
In the All-Flash configuration, each ESXi Server in the vSAN Cluster has the following configuration as shown in Table 2.
Table 2. Hardware Resources for Backup and Recovery per ESXi server
| Property | Specification |
| Server | Dell PowerEdge R630 |
| CPU | 2 sockets, 24 cores each are 2.6Hz with hyper-threading enabled |
| RAM | 256GB DDR4 RDIMM |
| Network adapter | 2 x Intel 10 Gigabit X540-AT2, + I350 1Gb Ethernet |
| Storage adapter | 2 x 12Gbps SAS PCI-Express (Dell PowerEdge RAID H730 mini) |
| Disks | SSD: 2 x 400GB drive as cache SSD SSD: 4 x 400GB drive as capacity SSD (ATA Intel SSD SC2BX40) |
In the Hybrid configuration, each ESXi Server in the vSAN Cluster has the following configuration as shown in Table 3.
Table 3. Hardware Resources for Remote Backup and Recovery per ESXi server
| Property | Specification |
| Server | Dell PowerEdge R720 |
| CPU | 2 sockets, 8 cores each are 2.6GHz with hyper-threading enabled |
| RAM | 128GB DDR4 RDIMM |
| Network adapter | 2 x Intel 10 Gigabit X540-AT2, + I350 1Gb Ethernet |
| Storage adapter | 2 x 12Gbps SAS PCI-Express (Dell PowerEdge RAID H730 mini) |
| Disks | SSD: 1 x 400GB drive as cache drives (ATA Intel SSD SC2BX40) HDD: 3 x 1000GB drive as capacity drives |
Software Resources
Table 4 shows the software resources used in this solution.
Table 4. Software Resources
| Software | Version | Purpose |
|---|---|---|
| VMware vCenter Server ® and ESXi | 6.5.0d (vSAN 6.6 is included) |
ESXi Cluster to host virtual machines and provide vSAN Cluster. VMware vCenter Server provides a centralized platform for managing VMware vSphere environments |
| VMware vSAN | 6.6 | Software-defined storage solution for hyperconverged infrastructure |
| Microsoft SQL Server 2016 | Enterprise Edition, Service Pack 1 | Database software |
| Windows Server 2016 | 2016 R2 x 64, Standard Edition | SQL Server database virtual machines Load generation virtual machines Domain controller |
| HammerDB | 2.22 | Open-sourced database load testing and benchmark tool |
| Veeam Backup & Replication | 9.5 | Veeam Backup & Replication solution |
Network Configuration
We created a vSphere Distributed Switch™ to act as a single virtual switch across all associated hosts in the data cluster. We enabled jumbo frames on the vSphere Distributed Switch to improve throughput and reduce CPU utilization.
Table 5. MTU Setting
| NIC Setting | Value |
|---|---|
| MTU | 9.000 |
The vSphere Distributed Switch uses two 10GbE adapters for the teaming and failover. A port group defines properties regarding security, traffic shaping, and NIC teaming. To isolate vSAN and node VM/primary VM/vMotion traffic, we used the default port group settings except for the uplink failover order. We assigned one dedicated NIC as the active link and assigned another NIC as the standby link. For vSAN and vMotion, the uplink order is reversed. See Table 6.
Table 6. Network Configuration
| Distributed Port Group | Active Uplink | Standby Uplink |
|---|---|---|
| VMware vSAN | Uplink2 | Uplink1 |
| VM vSphere vMotion | Uplink1 | Uplink2 |
Test Tools and Settings
HammerDB
The HammerDB tool is an open-sourced tool that can run these benchmarking tests against SQL Server, Oracle, MySQL, and PostgreSQL installations. It is open-sourced and freely available at http://hammerdb.com . It generates a benchmark value in the form of ‘transactions placed per minute’ and ‘orders placed per minute’ per test cycle and tests the performance of the instance configuration and the infrastructure underneath it. All I/O is generated in the guest application. In this case, SQL Server.
Solution Validation - SQL Server Backup and Recovery using vSphere
In this section, we discuss different backup and restore scenarios using vSphere.
Solution Validation using vSphere Overview
In this section we discuss different backup and restore scenarios using vSphere:
- Single-Instance SQL Server VM
- AlwaysOn Availability Groups VMs
- Database VMDK (VM disk)
To accomplish this, we used the following techniques:
- VM-level Snapshot and Clone for Standalone SQL Server
- VM-level Snapshot and Clone for SQL Servers with AlwaysOn Availability Groups enabled
- VMDK-level Backup
NOTE : The SQL Server has a backup and restore methods like native backup/snapshot, and can leverage SAN-based backup/restore. These are out of scope for this reference architecture.
In all of these test scenarios of our validations, vSAN was configured with the default policy.
VM-level Snapshot and Clone for a Standalone SQL Server Validation
Test Overview
In this scenario, we accomplish backup and recovery by using a combination of VM-level snapshots and VM clones of a standalone SQL Server in a VM. The recovery process will power on the cloned VM, and the SQL Server will be recovered, equivalent to a cold reboot. This scenario is the simplest method of back and recovery.
The high-level steps for this use case are:
Clone the SQL Server VM with an OLTP Workload Running
- Run HammerDB workload, a transactional TPC-C workload, against the single instance SQL Server in a VM running on a vSAN Cluster
- While the workload is running, create a crash-consistent backup of the SQL Server by either of these methods:
1) Use vSphere web Client to Clone the SQL Server VM. This process will create a temporary snapshot used for cloning and then deletes the temporary snapshot after the cloning operation is complete
2) Use PowerCLI to:
- Create a VMware snapshot of the SQL Server VM
- Clone the snapshot VM
- Delete the snapshot
Power on the Cloned VM and Recover the Database
- After powering on the cloned virtual machine, the cloned database is then started and recovered using the SQL Server Instance recovery mechanism
- A copy of the production database at a point-in-time is now available
Figure 2 illustrates this process.

Figure 2. VM-level Snapshot and Clone for Standalone DB Server Process
Test Procedures
This test validates the procedure for backup and recovery for one VM with a single-instance SQL Server with a single user database. This procedure is also applicable to multiple instances running in one VM with multiple databases on each instance.
The following is the detailed description of the VM-level snapshot and clone backup and recovery procedures used in this reference architecture. We used the PowerCLI method to create the snapshot and clone of the Database VM.
Snapshot and Clone the SQL Server VM
1) We ran HammerDB, a transactional TPC-C workload, against the Standalone SQL Server to simulate a production OLTP workload for one hour. We ran 16 virtual users in HammerDB generating a moderate workload and achieved around 6000 Transactions per Second (TPS). The VM configuration is:
- 32GB memory
- 8 vCPU
- 180GB virtual disks configured (80GB for OS, and 100GB for database data and log files)
2) While the workload was running, we used the PowerCLI command, New-Snapshot , to create a snapshot of the database VM, ‘sql2016-sa-01’. The snapshot name is ‘sql2016-sa-01_CrashConsistent_Snap’.
NOTE: During this snapshot process, we DO NOT need to stop the workload. The disks are crash-consistent with this method.
New-Snapshot -VM sql2016-sa-01 -Name ‘sql2016-sa-01_CrashConsistent_Snap’ -description sql2016-sa-01-CrashConsistent_Snap |
When a vsanSparse snapshot is taken, child delta disks are created for every parent base disks. The parent based disk is now considered a point-in-time.
The following is a list of all the files of the SQL Server VM after the snapshot was created. It includes:
vmname-number-delta.vmdk
vmname-number.vmdk
vmname.vmsd
vmname.Snapshotnumber.vmsn
Refer to Snapshot Files for detailed information about snapshot files. Observe that the disks ending with -000001.vmdk are the child disks.
[root@w2-pe-vsan-esx-022:/vmfs/volumes/vsan:52768ff5f8735cf5-23ca32709d65347a/f0702e59-f26c-b53c-41cf-ecf4bbdab348] ls -alt
-rw-------    1 root     root       1929342 Jul 18 09:32 sql2016-sa-01-Snapshot1.vmsn
-rw-------    1 root     root          8684 Jul 18 09:13 sql2016-sa-01.nvram
-rw-------    1 root     root           342 Jul 18 09:13 sql2016-sa-01-000001.vmdk
-rw-------    1 root     root           345 Jul 18 09:13 sql2016-sa-01_1-000001.vmdk
-rw-r--r-- 1 root root 525 Jul 18 09:12 sql2016-sa-01.vmsd |
3) We used a PowerCLI script to clone the virtual machine snapshot, ‘s ql2016-sa-01_CrashConsistent_Snap’, and named it ‘sql2016-sa-01-Clone’. The cloned VM was placed on the same vSAN datastore in this case.
This PowerCLI script uses the vSphere API interface for virtual machine managed objects. It contains the Clone_VM task and includes the ability to specify a snapshot to clone using the VirtualMachineCloneSpec .
SourceVM = "sql2016-sa-01"
$Cluster = "SQLServerSite"
$Datastore = "vsanDatastore"
$Snapshot_view = Get-View ( Get-Snapshot $SourceVM )
$Default_ClusterResourcePool_view = Get-View ( Get-Cluster $Cluster | Get-ResourcePool "Resources" )
$Target_Datastore_view = Get-View (Get-Datastore -Name $Datastore)
$SourceVM_view = Get-View ( Get-VM -name $SourceVM )
$CloneName = $SourceVM_view.name+"-Clone"
$CloneFolder = $SourceVM_view.parent
$CloneSpec = New-Object Vmware.Vim.VirtualMachineCloneSpec
$CloneSpec.Snapshot = $Snapshot_view.MoRef
$CloneSpec.Location = New-Object Vmware.Vim.VirtualMachineRelocateSpec
$CloneSpec.Location.Pool = $Default_ClusterResourcePool_view.MoRef
$CloneSpec.Location.Datastore = $Target_Datastore_view.MoRef
$CloneSpec.Location.DiskMoveType =
[Vmware.Vim.VirtualMachineRelocateDiskMoveOptions]::moveAllDiskBackingsAndDisallowSharing
$SourceVM_view.CloneVM_Task($CloneFolder, $CloneName, $CloneSpec) |
NOTE: Always wait for the cloning task to complete before proceeding.
4) For fault isolation and data availability, we manually moved the cloned VM to an independent datastore. We could have also cloned the virtual machine to an NFS datastore or traditional VMFS datastore. Further, the cloned virtual machine can be sent to backup media using third-party-backup software for onsite protection or to a remote site for offsite protection.
5) We deleted the snapshot ‘sql2016-sa-01_CrashConsistent_Snap’ after the cloning operation was completed.
Power on the Cloned VM and Recover the SQL Server
In the case of any data loss in the production database, you can restore the cloned VM ‘sql2016-sa-01-Clone’. We used the following procedure to recover the SQL Server from the Cloned VM.
1) Added the restored VM ‘sql2016-sa-01-Clone’ to vSphere Client inventory.
2) Powered on the VM ‘sql2016-sa-01-Clone’.
3) For the use case where the recovered SQL Server VM ‘sql2016-sa-01-Clone’ replaces the original production server VM, the original IP address and hostname remain the same.
NOTE: For the use case where you do not want to replace the original production server, you can:
- Opened the VM ‘sql2016-sa-01-Clone’ console and assigned an IP address. You can optionally keep the same IP address if you want the recovered SQL Server to replace the original production server.
- Rename the computer name running SQL Server. Refer to Rename a Computer that Hosts a Stand-Alone Instance of SQL Server for detailed information.
4) After the cloned VM ‘sql2016-sa-01-Clone’ was powered on, the SQL Server brought up the database automatically. There are cases it may need to be brought up manually by performing a media recovery.
5) We validated the SQL Server recovery process from the ERRORLOG.
2017-07-19 01:28:18.010 Recovery of database 'tpcc' (5) is 0% complete (approximately 93 seconds remain). Phase 2 of 3. This is an informational.... 2017-07-19 01:28:18.890 Recovery completed for database tpcc (database ID 5) in 2 second(s) (analysis 644 ms, redo 820 ms, undo 27 ms.) This is an informational message only. No user action is required. 2017-07-19 01:28:24.040 Recovery is complete. This is an informational message only. No user action is required. |
Test Results
A point-in-time copy of the Single-Instance SQL Server was available from using snapshot and clone with SQL crash-consistent recovery technologies.
VM-level Snapshot & Clone - AlwaysOn Availability Groups Enabled Validation
Test Overview
In this scenario, we accomplish backup and recovery by using a combination of VM-level snapshots and VM clones of a standalone AlwaysOn Availability Groups enabled SQL Server in a VM The recovery process powers on the cloned VM and the SQL Server automatically recovers, equivalent to a cold reboot. This scenario is the simplest method of back and recovery.
This test case has two VMs with an AlwaysOn Availability Groups enabled production databases running, which need to be backed up and restored in case of any data loss. The environment also has a Domain Controller for failover clustering and AlwaysOn Availability Groups setup and user authentication. Users may choose to backup and restore the AlwaysOn Availablity Groups enabled SQL Server VMs with the Domain Controller VM, or just backup the AlwaysOn Availablity Groups enabled SQL Server VMs only. Note that only a dedicated Domain Controller for SQL Server environment is verified for the backup and recovery in this guide. In a real environment, a DC may be a part of a group of DCs taking distributed responsibilities, and the backup and recovery of the DC needs to be carefully scrutinized.
The high-level test steps for the use case are similar to the Standalone SQL VM. The difference is there are multiple SQL Server VMs to be backed up and restored. In addition, you can optionally backup and restore the Domain Controller VM. If you do not want to perform backup and restore for the Domain Controller, you need to restore the AlwaysOn Availablity Groups enabled SQL Server VMs into the same environment as the original Domain Controller.
The high-level steps for this use case are:
Clone the AlwaysOn Availability Groups Enabled SQL Server VMs with an OLTP Workload
- Run HammerDB, a transactional TPC-C workload, against the primary AlwaysOn Availablity Groups enabled SQL Server in a VM running on a vSAN Cluster
- While the workload is running, take a crash-consistent backup of the AlwaysOn Availablity Groups enabled SQL Server by creating a VMware snapshot of both VMs by either of these methods:
- Use vSphere web Client to Clone the AlwaysOn Availablity Groups enabled SQL Server VMs. This process will create a temporary snapshot used for cloning and then deletes the temporary snapshot after the cloning operation is complete.
- Use PowerCLI to:
- Create a VMware snapshot of the AlwaysOn Availablity Groups enabled SQL Server VMs
- Clone the snapshot VMs
- Delete the snapshots
- Clone the Domain Controller
Power on the Cloned VMs and Recover the Database
- To make sure the AlwaysOn Availablity Group database can restore properly, we need to verify the same Domain Controller is running in the recovered environment. You have two options:
- Use the current DC environment if it is the same or
- Restore the backed up Domain Controller to the environment.
- After powering on the cloned virtual machines, the cloned database in an AlwaysOn Availability Group is then started and recovered using the AlwaysOn Availablity Group database recovery mechanism.
- A copy of the production AlwaysOn Availablity Groups enabled SQL Server at a point-in-time is now available.
Figure 3 illustrates this process without backup and restore of the Domain Controller.
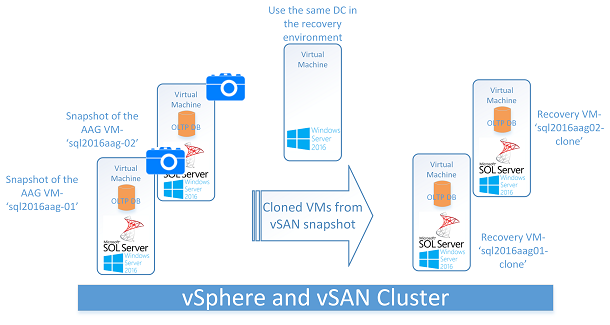
Figure 3. VM-level Snapshot and Clone for AlwaysOn Availability Groups Enabled Server Backup and Recovery Process using the Same Domain Controller Environment
Figure 4 illustrates the process with the additional steps of backup and restore of the Domain Controller.

Figure 4. VM-level Snapshot and Clone for AlwaysOn Availability Groups Enabled Server Backup and Recovery Process with Backup and Restore of the Domain Controller
Test Procedures
The test used two VMs with AlwaysOn Availability Groups already configured to validate the procedure. This procedure is also applicable to multiple AlwaysOn Availability Groups running in more than two VMs.
In our test environment, VM ‘sql2016aag01’ and ‘sql2016aag02’ have an AlwaysOn Availability Group production database running, which needs to be backed up and restored in case of any data loss. The environment has a Domain Controller, ‘sql2016dc’, for failover cluster and AlwaysOn Availability Group setup and user authentication.
This test is identical to the previous section except for a second AlwaysOn Availability Groups enabled SQL Server VM and the Domain Controller portion.
Snapshot and Clone the AlwaysOn availability Groups Enabled SQL Server VMs
1) We ran HammerDB, a transactional TPC-C workload, against the AlwaysOn Availablity Groups enabled SQL Server database to simulate a production OLTP workload for one hour. We ran 16 virtual users in HammerDB generating a moderate workload and achieved around 6000 Transactions per Second (TPS). The VM configuration is:
- 32GB memory
- 8 vCPU
- 180GB virtual disks configured (80GB for OS, and 100GB for database data and log files)
2) While the workload was running, we used the PowerCLI command, New-Snapshot , to create snapshots of the database VM, ‘sql2016aag-01’ and 'sql2016aag-0s’. The snapshots were named ‘sql2016aag01_CrashConsistent_Snap’ and ‘sql2016aag02_CrashConsistent_Snap’. The files listed are similar to those from the previous section.
NOTE: During this snapshot process, we DO NOT need to stop the workload. The disks are crash-consistent with this method.
New-Snapshot -VM sql2016aag-01 -Name ‘sql2016aag-01_CrashConsistent_Snap’ -description sql2016aag-02_CrashConsistent_Snap
New-Snapshot -VM sql2016aag-02 -Name ‘sql2016aag-02_CrashConsistent_Snap’ -description sql2016aag-02_CrashConsistent_Snap |
When a vsanSparse snapshot is taken, child delta disks are created for every parent base disks. The parent base disk is now considered a point-in-time.
The following is a list of all the files of the AlwaysOn Availablity Groups enabled SQL Server VM after the snapshot was created. It includes:
vmname-number-delta.vmdk
vmname-number.vmdk
vmname.vmsd
vmname.Snapshotnumber.vmsn
Refer to Snapshot Files for detailed information about snapshot files. Observe that the disks ending with -000001.vmdk are the child disks.
-rw-------    1 root    root   1929342 Jul 19 09:32 sql2016aag-01-Snapshot1.vmsn
-rw-------    1 root    root      8684 Jul 19 09:13 sql2016aag-01.nvram
-rw-------    1 root    root       342 Jul 19 09:13 sql2016aag-01-000001.vmdk
-rw-------    1 root    root       345 Jul 19 09:13 sql2016aag-01_1-000001.vmdk
-rw-r--r--    1 root    root       525 Jul 19 09:12 sql2016aag-01.vmsd
-rw-------    1 root    root   1929342 Jul 19 09:32 sql2016aag-02-Snapshot1.vmsn
-rw-------    1 root    root      8684 Jul 19 09:13 sql2016aag-02.nvram
-rw-------    1 root    root       342 Jul 19 09:13 sql2016aag-02-000001.vmdk
-rw-------    1 root    root       345 Jul 19 09:13 sql2016aag-02_1-000001.vmdk
-rw-r--r-- 1 root root 525 Jul 19 09:12 sql2016aag-02.vmsd |
3) We used a PowerCLI script to clone the virtual machine snapshots and named them ‘sql2016aag01-Clone’ and ‘sql2016aag02-Clone'. The cloned VMs were placed on the same vSAN Datastore as the original VM.
See the sample PowerCLI script in the previous section.
4) We deleted the snapshots ‘sql2016aag-01_CrashConsistent_Snap’ and ‘sql2016aag-02_CrashConsistent_Snap’ after the cloning operation was completed.
Clone the Domain Controller for SQL Server Cluster on WSFC
Preparation
Starting in Windows Server 2016, Microsoft supports DC cloning as well as snapshot restoration of domain controllers. This section demonstrates how to clone virtual domain controllers with Windows Server 2016.
In our test environment, we have a Domain Controller as the primary DC, (pDC) named ‘sql2016-dc’ which we cloned.
Supportability of VM-GenerationID
To satisfy the requirement for cloneable Domain Controller, the hypervisor must support VM-GenerationID. Within a VMware environment, there are two ways to find out whether your Windows Server 2016 and Windows Server 2016 R2-based Virtual Machines (VMs) leverage the VM-GenerationID, they can be found:
- Listed in the Virtual Machine Configuration (*.vmx) file on the host
When you have access to the files of a VMware-based Virtual Machine, you can check the Virtual Machine Configuration file (*.vmx) file. When you open this file with your favorite text editor (for instance, Notepad), you can search for the line that starts with vm-genid like follows.
vm.genid = "-8989846975843478385"
- Listed as a (hidden) system device in the guest.
After running the VMware tools, this Microsoft Hyper-V Generation Counter device can be found in Device Manager (devmgmt.msc) under the hidden view.
Cloneable Domain Controllers Group
There’s a new group called Cloneable Domain Controllers and you can find it in the Users container. Membership in this group dictates whether a DC can or cannot be cloned. This group has some permissions set on the domain head that should not be removed. Removing these permissions will cause cloning to fail. We need to add the source DC to the Cloneable Domain Controllers group. Follow the steps below to add the DC to the Cloneable Domain Controllers group.
1) For the parent domain controller (henceforth known as 'sql2016dc’), in Server Manager, click Tools , and then click Active Directory Administrative Center
2) In Active Directory Administrative Center, double-click your local domain , and then, in the details pane, double-click the Domain Controllers OU (Organizational Unit).
3) In the details pane, select ‘sql2016dc’ and then, in the Tasks pane, in the ‘sql2016dc' section, click Add to group
4) In the Select Groups dialog box, in the Enter the object names to select box, type Cloneable, and then click Check Names
5) Ensure that the group name is expanded to Cloneable Domain Controller, click OK
Clone Domain Controller for the AlwaysOn Availablity Groups enabled sql server Environment
1) We created a VMware snapshot called ‘sql2016dc_CrashConsistent_Snap’ using PowerCLI.
2) We created a clone of the virtual machine called ‘sql2016dc -Clone’ from the snapshot using PowerCLI command:
New-Snapshot -VM sql2016dc -Name ‘sql2016dc_CrashConsistent_Snap’ -description sql201dc-CrashConsistent_Snap |
3) We deleted the snapshot after the cloning operation was completed.
Verify or Restore the DC Environment
Before you can restore the AlwaysOn Availablity Groups enabled SQL Server, you need to verify that the Domain Controller is working properly. If the DC is working, no action is needed. If not, you should restore the DC from the Clone.
Power on the Cloned DC VM and Recover the Database
- We powered on the cloned virtual machine ‘sql2016dc-Clone’, the Domain Controller was then able to bring up all services normally needed for the SQL Server AlwaysOn Availability Group mechanism.
- We removed the Cloneable Domain Controllers permission from the DC.
Power on the Cloned VM and Recover the SQL Server
We recovered the AlwaysOn Availablity Groups enabled SQL Server from the cloned VMs. In the case of any data loss in the production database, you can restore the cloned VMs ‘sql2016aag01-Clone’ and ‘sql2016aag02-Clone’. In this test we:
1) Added the Cloned VMs ‘sql2016aag01-Clone’ and ‘sql2016aag02-Clone’ to vSphere Client inventory
2) Powered on the VMs ‘sql2016aag01-Clone’ and ‘sql2016aag02-Clone’
3) After the cloned VMs ‘sql2016aag01-Clone’ and ‘sql2016aag02-Clone’ were powered on, the SQL Server brought up the database automatically
4) We validated the AlwaysOn Availability Groups enabled SQL Server recovery process from the ERRORLOG
Test Results
A point-in-time copy of the AlwaysOn Availablity Groups enabled SQL Server and the Domain Controller was made available using snapshot and clone and recovery technologies.
VMDK-level Backup for Standalone SQL Database Validation
There may be cases when the user wants to back up just the SQL Server database disks and not the entire virtual machine. In this case, users may want to backup one or more databases running in a VM rather than the entire VM itself. For example, a VM might have multiple databases on different disks and the user may want to back and restore only one of them.
The best practice is to have every SQL Server database on its own set of dedicated disks to avoid the ‘noisy neighbor’ effect.
This use case is based on the following assumptions:
- It is recommended that both production and recovery VM have the same version of OS and SQL Server binaries. The recovery VM can have higher SQL Server version.
- The recovered database must be compatible with the original production database.
The difference between previous backup and recovery use cases and this method is in the cloning process where:
- The vmkfstools command is used to clone database VMDK only.
- The cloned VMDKs are attached to a new VM for recovery; this VM has another SQL Server instance running.
- The cloned database is restored to a new VM.
Figure 5 illustrates this process.
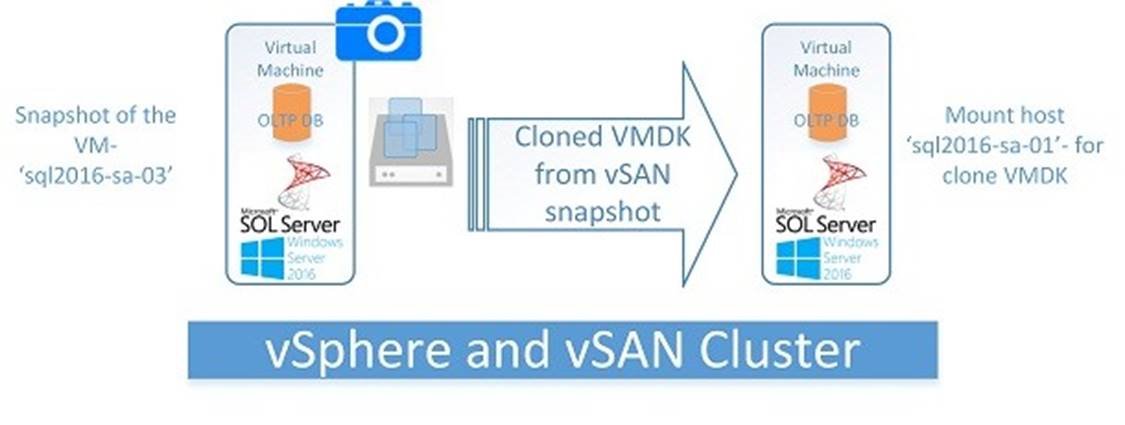
Figure 5. VMDK-level Backup for Standalone SQL DB Process
Test Overview
The ‘sql2016-sa-03’ VM has a Single-Instance production database that needs to be backed up and restored in case of any data loss using the VMDK-level backup.
The high-level steps for this use case are:
Clone the Database Disks (vmdk)
- Run HammerDB, a transactional TPC-C workload, against the Single-Instance SQL Server database in a VM running on a vSAN Cluster.
- While the workload is running, take a snapshot of the VM named ‘sql2016-sa-03_ CrashConsistent_Snap’ by using web client or through PowerCLI without quiescing the VM I/O or including the virtual memory.
- Clone the virtual machine database disks only using vmkfstools commands and place the cloned vmdks into a new datastore. In this test, we use the local datastore to store the cloned VMDK.
- Delete the snapshot after the cloning operation is completed.
Attach Cloned disks (vmdks) to Recovery VM and Recover Database
- Attach the cloned database VMDK to the recovery VM that pre-exists with OS and SQL Server binaries installed and configured.
- Scan the operating system to see new disk attached.
- Mount the new disk.
- Attach the database to the SQL Server instance, and the SQL Server instance will start rollback and roll forward automatically.
- A copy of the production database at a point-in-time is now available for any data recovery scenario. The transaction committed and updated records in the database can be queried from the database.
Test Procedures
Clone the Database Disks (vmdk)
1) We ran HammerDB, a transactional TPC-C workload, against the Standalone SQL Server database VM to simulate a production OLTP workload for one hour. We ran 16 virtual users in HammerDB generating a moderate workload and achieved around 6000 Transactions per Second (TPS). The VM configuration is:
- 32GB memory
- 8 vCPU
- 180GB virtual disks configured (80GB for OS, and 100GB for database data and log files).
2) While the workload was running, we used the PowerCLI command, New-Snapshot , to create a snapshot of the database VM, ‘sql2016-sa-03’. The snapshot name is ‘sql2016-sa-03_CrashConsistent_Snap’.
NOTE: During this snapshot process, we DO NOT need to stop the workload. The disks are crash-consistent with this method.
New-Snapshot -VM sql2016-sa-03 -Name ‘sql2016-sa-03_CrashConsistent_Snap’ -description sql2016-sa-02-CrashConsistent_Snap |
When a vsanSparse snapshot is taken, child delta disks are created for every parent base disks. The parent base disk is now considered a point-in-time.
The following is a list of all the files of the SQL Server DB VM after the snapshot was created. It includes:
vmname-number.vmdk
vmname-number-delta.vmdk
vmname.vmsd
vmname.Snapshotnumber.vmsn
Refer to Snapshot Files for detailed information about snapshot files. Observe that the disks ending with -000001.vmdk are the child disks.
/vmfs/volumes/vsan:52768ff5f8735cf5-23ca32709d65347a/4e796c59-1d9e-992c-37d0-ecf4bbdab170] ls -al….
-rw-------    1 root     root     546 Aug  7 05:57 sql2016-sa-03_1.vmdk
-rw-------    1 root     root     600 Aug  7 05:57 sql2016-sa-03.vmdk
-rw-------    1 root     root     344 Aug  7 07:27 sql2016-sa-03_1-000001.vmdk
-rw------- 1 root root 342 Aug 7 07:27 sql2016-sa-03-000001.vmdk |
Note: ‘sql2016-sa-03.vmdk’ is the operating system vmdk and ‘sql2016-sa-03_1.vmdk’ is the vmdk to be cloned for the database.
3) We cloned the database vmdks only from the snapshot of VM1 data vmdk into a new folder on the same vSAN datastore ‘testclone' on the ESXi host using vmkfstools. The base disk is a point-in-time copy of the database hence it is used as the source for cloning.
vmkfstools -i "/vmfs/volumes/vsanDatastore/sql2016-sa-03/sql2016-sa-03_1.vmdk" "/vmfs/volumes/vsanDatastore/testclone/sql2016-sa-03_1-clone.vmdk" -d thin |
4) We can also clone the vmdk to the local datastore, or an NFS datastore, or traditional VMFS datastore and back up the cloned virtual machine to backup media for onsite protection or to a remote site for offsite protection.
5) We deleted the snapshot ‘sql2016-sa-02-CrashConsistent_Snap’ after the cloning operation was completed.
6) We validated the cloned vmdks under the folder ‘testclone'.
vmfs/volumes/vsan:52768ff5f8735cf5-23ca32709d65347a/c5178859-4890-771c-236b-ecf4bbdab170] ls -al
 -rw-------    1 root   root    546 Aug  7 07:55 sql2016-sa-03_1-clone.vmdk
…. |
Attach Cloned Disks (vmdk) to Recover the VM and Recover the Database
In the case of any data loss in the production database, you can restore the cloned vmdk. We used the following procedure:
1) The recovery VM ‘sql2016-sa-01' pre-exists with the same OS – Windows 2016 and SQL Server binary – SQL Server 2016. To speed up the database recovery process, the VM has the SQL Server instance running.
2) We attached the restored cloned database vmdk to the recovery VM ‘sql2016-sa-01’. By default, it attaches the VMDK to the VM at the next available SCSI address, which in this case was SCSI 0:2.
3) After database vmdk was attached, using the Disk Management we assigned the drive the disk drive letter E:
4) We opened SQL Server Management Studio and connected to the instance on VM ‘sql2016-sa-01’ and attached the database to the running instance. You may also use SQL Server stored procedure ‘sp_attach_db’ to attach the DB.
5) The SQL Server started and the database recovery process started automatically.
6) We validated the SQL Server database recovery process from the ERRORLOG.
2017-08-07 01:48:10.380 spid53       Starting up database 'tpcc'.
2017-08-07 01:48:14.870 spid53       Recovery of database 'tpcc' (7) is 0% complete
 (approximately 729 seconds remain). Phase 2 of 3. This is an informational message only.
 No user action is required.
2017-08-07 01:48:19.150 spid53       Recovery of database 'tpcc' (7) is 99% complete
 (approximately 1 seconds remain). Phase 2 of 3. This is an informational message only.
 No user action is required.
2017-08-07 01:48:19.210 spid53       304505 transactions rolled forward in database 'tpcc'
 (7:0). This is an informational message only. No user action is required.
2017-08-07 01:48:19.220 spid53       Recovery of database 'tpcc' (7) is 99% complete
 (approximately 1 seconds remain). Phase 3 of 3. This is an informational message only.
 No user action is required.
2017-08-07 01:48:19.240 spid53       3 transactions rolled back in database 'tpcc'
 (7:0). This is an informational message only. No user action is required.
2017-08-07 01:48:19.240 spid53       Recovery is writing a checkpoint in database 'tpcc'
 (7). This is an informational message only. No user action is required.
2017-08-07 01:48:19.440 spid53       Recovery completed for database tpcc (database ID 7)
 in 9 second(s) (analysis 4215 ms, redo 4281 ms, undo 19 ms.) This is an informational
 message only. No user action is required
|
Test Results
A point-in-time copy of the Single-Instance production database was made available using VMware Snapshot with cloning the database vmdks only for data recovery purposes.
Solution Validation - SQL Server Backup and Recovery using Veeam
In this section, we discuss different backup and restore scenarios using Veeam Backup and Replication software.
Solution Validation using Veeam Overview
In this section we discuss different backup and restore scenarios using Veeam Backup and Replication software:
- SQL Server single DB server
- AlwaysOn Availablity Groups enabled SQL Server DB servers
To accomplish this, we will use the following techniques:
- DB level backup and restore using Veeam
- AlwaysOn Availablity Groups backup and restore using Veeam
The primary purpose of backup is to protect loss of data. If you store your backup on the primary datastore, it is possible to lose both your production data and backup data at the same time. Therefore, remote backup or copying backups to remote storage is a necessity. Veeam has three options for users to perform backups:
- Backup on the local datastore
- Backup on a remote datastore
- Backup to a local datastore and copy backups to a remote datastore
In our validations, we verified the local and remote backup for single SQL Server VM and local restore. For AlwaysOn Availablity Groups enabled DB servers, we verified the local backup and restore scenario. The restore from remote datastore uses the same restore methodology but performance will be impacted. For backup, from local backups to remote datastore, use the copy from local repository to remote repository and the restore needs to be done from the remote repository so that the methodology is also the same.
Database Level Backup for a Single SQL Server Validation
Two different backup repository architectures were explored: a remote vSAN Datastore and a local vSAN datastore.
Architecture of Backup and Restore on a Remote vSAN Datastore
This section describes the direct backup to remote vSAN datastore.
Remote repository for backup and restore needs another vSAN datatstore to host the Veeam Backup server, and other Veeam backup infrastructure like Backup repository and Proxy (Proxy component can be run on the Backup server too). Figure 6 shows the architecture where the production environment is an All-Flash vSAN cluster and the backup environment utilizes the Hybrid vSAN environment.
The advantages of this architecture are:
- The backup does not consume the space of the production All-Flash vSAN storage.
- The write-intensive operations will be moved to the target vSAN datastore; therefore, the performance impact can be reduced.
It should be noted that throughput and speed of backup and restore are often limited by the network bandwidth between the two vSAN clusters, which is often using a 1GE network.
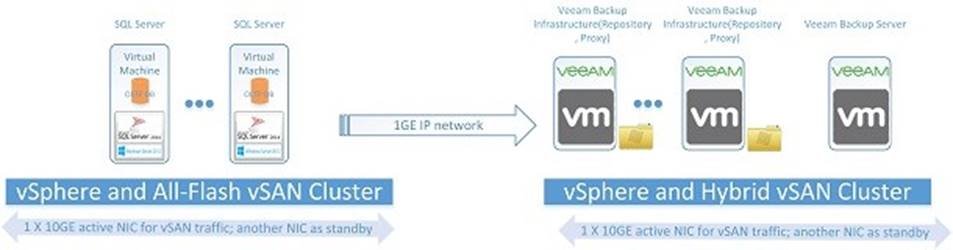
Figure 6. DB Level Backup and Restore using a Remote vSAN Datastore
Architecture of Backup and Restore on a Local vSAN Datastore
An alternative is to store the backup of the VM of the SQL Server on the same vSAN datastore as the SQL Server VM. See Figure 7 below for the architecture of backup and restore on a local All-Flash vSAN datastore.
This architecture should be used with caution. If the local Datastore fails, the backup file can also be lost since it is on the local Datastore.
The advantages of this architecture are:
- The backup and restore can leverage high-speed local network NIC (often 10GE) to accelerate the backup and restore process.
- The optimal performance is found with this architecture.

Figure 7. DB Level Backup and Restore using a Local vSAN Datastore
Local Datastore Test Overview
In this scenario, we accomplish backup and recovery within a local vSAN datastore by using VM level backup and SQL Server Log backup periodically for the database in a VM using Veeam Backup & Replication 9.5. With this approach, the database can be recovered to a point-in-time. To perform backup and restore of a standalone SQL Server VM with log backup, follow the steps introduced in Creating Backup Jobs in Veeam Backup & Replication 9.5.
This test used the backup repository on the local vSAN datastore as the backup destination. Thus we can leverage the high-speed NIC (10GE) for backup and restore traffic. We expected high backup throughput.
Test Procedure
This test validates the procedure for backup and recovery for one VM with a single-instance SQL Server with a single user database.
The database size was around 50GB. We have one Veeam Backup server which also worked as Proxy, one Veeam backup repository, one SQL Server VM on separate hosts in our four-node vSAN cluster. This procedure is also applicable to multiple instances running in one VM with multiple databases on each instance.
The following figure describes the test environment and VMs.
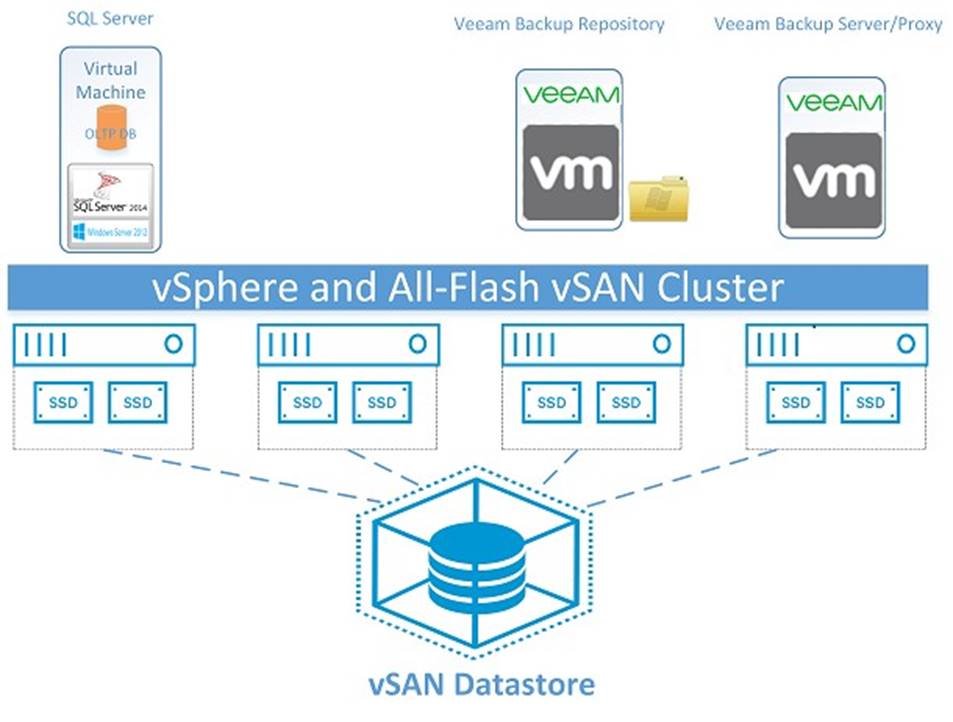
Figure 8: Validation of DB Level Backup and Restore using a Local vSAN Datastore
The following is the detailed description of the VM-level backup with log backup periodically in this operation guide.
The virtual servers’ configuration is shown in Table 7. We ran HammerDB, a transactional TPC-C workload, against the Standalone SQL Server database to simulate a production OLTP workload during the backup window.
Table 7. Server Configuration for DB-level Backup and Restore using Veeam
| Server Usage | vCPU | Memory (GB) | Disks |
| Veeam Server | 8 | 8 | OS: 40GB |
| Veeam Backup Server 1 | 4 | 4 | OS: 40GB; Repository: 1200GB |
| SQL Server | 8 | 32 | OS: 80GB; DB Disk: 150GB |
We set up the backup job using the following parameters for a given SQL VM named 'sql2016-sa-03':
- Enable application-aware processing and perform backup logs every 15 minutes.
- Set a periodic backup for every 24 hours.
Test results
Backup Results
Figure 9 shows the results of one of the multiple test results of a full backup and log backup. This result demonstrates the backup was finished in 10 minutes. With the built-in deduplication and compression function of Veeam, the backup size was reduced to 84.3GB from the original size of 230GB.

Figure 9: Backup Results using Veeam Backup & Replication
Since we enabled the application-aware processing, every database including system databases like master (primary), model and msdb , as well as the user database named tpcc were all processed by the Veeam backup process, as shown in Figure 10. We can use this function to restore the database to the point-in-time as needed.

Figure 10: Veeam Application-Aware Backups
Backup Performance
Table 8 shows the average backup performance measured for the SQL VM named 'sql2016-sa-03'.
Table 8. Veeam Backup Performance Statistics
| VM Size | Backup Duration (HH:MM:SS) | Backup Throughput | AVG Veeam Server CPU UT(%) | AVG Backup Server CPU UT(%) |
|---|---|---|---|---|
| 230GB | 0:10:14 | 336MB/s | 51.26% | 49.00% |
Database Behavior During Backup
Backup is at the database level; therefore, I/O will be frozen during the backup window. From the SQL Server ERROLOG you may find the I/O will be frozen for a few seconds, and then VSS Writer, triggered by Veeam backup process, will resume the I/O.
2017-08-17 21:15:42.870 spid59 I/O is frozen on database model. No user action is required. However, if I/O is not resumed promptly, you could cancel the backup. 2017-08-17 21:15:42.870 spid60 I/O is frozen on database msdb. No user action is required. However, if I/O is not resumed promptly, you could cancel the backup. 2017-08-17 21:15:42.870 spid61 I/O is frozen on database tpcc. No user action is required. However, if I/O is not resumed promptly, you could cancel the backup. 2017-08-17 21:15:42.870 spid62 I/O is frozen on database master. No user action is required. However, if I/O is not resumed promptly, you could cancel the backup. 2017-08-17 21:15:48.400 spid62 I/O was resumed on database master. No user action is required. 2017-08-17 21:15:48.400 spid59 I/O was resumed on database model. No user action is required. 2017-08-17 21:15:48.400 spid60 I/O was resumed on database msdb. No user action is required. 2017-08-17 21:15:48.400 spid61 I/O was resumed on database tpcc. No user action is required. 2017-08-17 21:15:48.820 Backup Database backed up. Database: master, creation date(time): 2017/08/17(21:04:44), pages dumped: 483, first LSN: 614:232:94, last LSN: 614:272:1, number of dump devices: 1, device information: (FILE=1, TYPE=VIRTUAL_DEVICE: {'{F1C688F8-D781-43AD-8C34-DF4230AA 2017-08-17 21:15:48.820 Backup Database backed up. Database: model, creation date(time): 2003/04/08(09:13:36), pages dumped: 314, first LSN: 33:506:37, last LSN: 33:523:1, number of dump devices: 1, device information: (FILE=1, TYPE=VIRTUAL_DEVICE: {'{F1C688F8-D781-43AD-8C34-DF4230AA234 2017-08-17 21:15:48.830 Backup Database backed up. Database: msdb, creation date(time): 2016/04/30(00:46:38), pages dumped: 2173, first LSN: 142:115:180, last LSN: 142:190:1, number of dump devices: 1, device information: (FILE=1, TYPE=VIRTUAL_DEVICE: {'{F1C688F8-D781-43AD-8C34-DF4230AA 2017-08-17 21:15:48.830 Backup BACKUP DATABASE successfully processed 0 pages in 5.945 seconds (0.000 MB/sec). 2017-08-17 21:15:48.830 Backup Database backed up. Database: tpcc, creation date(time): 2017/08/17(20:49:28), pages dumped: 5170263, first LSN: 873:126320:195, last LSN: 873:126710:1, number of dump devices: 1, device information: (FILE=1, TYPE=VIRTUAL_DEVICE: {'{F1C688F8-D781-43AD-8C34 2017-08-17 21:15:48.840 Backup BACKUP DATABASE successfully processed 0 pages in 6.673 seconds (0.000 MB/sec). 2017-08-17 21:15:48.840 Backup BACKUP DATABASE successfully processed 0 pages in 6.635 seconds (0.000 MB/sec). 2017-08-17 21:15:48.850 Backup BACKUP DATABASE successfully processed 0 pages in 6.050 seconds (0.000 MB/sec). |
Restore Results
The restore operation allows you to recover your database to a specific point-in-time (which may differ from the current SQL Server restore point). The database will be recovered to the closest VM restore point before the moment you specify, and then transaction log replay will be performed on the target server to bring the database to the necessary state.
From restore options, choose the Application items and then select Microsoft SQL Server, then you may restore the user DB (system database in SQL Server like master , model and msdb are not permitted to be restored). The restore process can replace the existing DBs to their original server.
Figure 11 shows the successful backup for the specified VM - “sql2016-sa-03” that can be restored with restore points. In this instance we have one VM restore point and eight transaction log restore points.

Figure 11. Veeam Backup Files
After we finished the Restore Wizard, the Veeam Explorer for Microsoft SQL Server window popped up, and gave us the option to select the point-in-time to restore, or to a specific point in time using the transaction logs, or to another server. Figure 12 shows the Restore Wizard for the specified database –'tpcc' on the VM – 'sql2016-sa-03'.
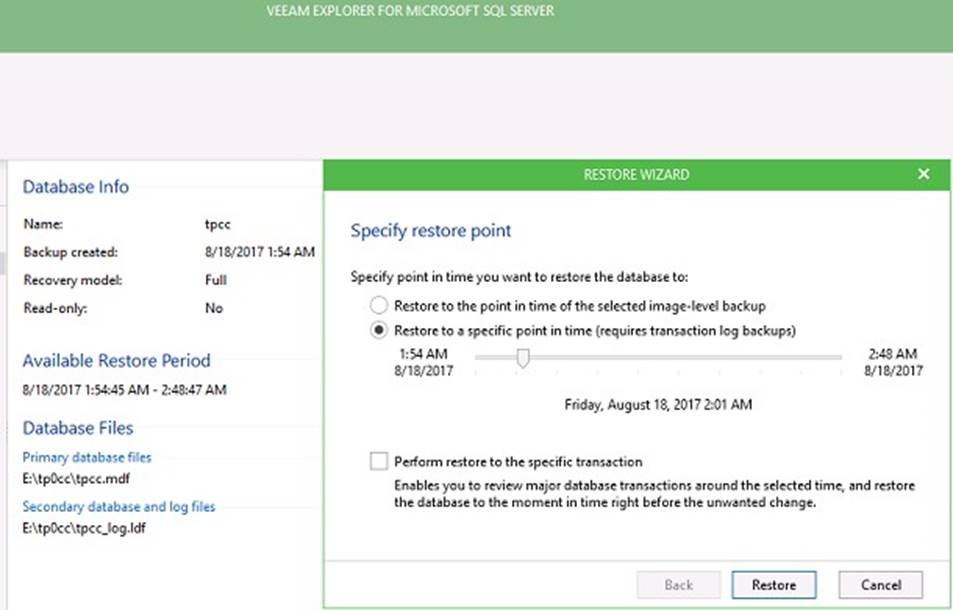
Figure 12. Veeam Explorer Restore Wizard
You may monitor the restore process by using Veeam Explorer, and you may also check the restore process from SQL Server ErrorLog. The following is the log of the restore process in SQL Server ERRORLOG in our validation test.
2017-08-17 23:16:47.690 spid52 Setting database option SINGLE_USER to ON for database for 'tpcc'. 2017-08-17 23:18:28.490 Logon Error: 18456, Severity: 14, State: 73. 2017-08-17 23:18:28.490 Logon Login failed for user 'SQL2016-SA-03\Administrator'. Reason: Failed to open the database 'tpcc' configured in the session recovery object while recovering the connection. [CLIENT: <local machine>] 2017-08-17 23:18:31.330 Logon Error: 18456, Severity: 14, State: 38. 2017-08-17 23:18:31.330 Logon Login failed for user 'SQL2016-SA-03\Administrator'. Reason: Failed to open the explicitly specified database 'tpcc'. [CLIENT: <local machine>] 2017-08-17 23:18:43.190 Logon Error: 18456, Severity: 14, State: 38. 2017-08-17 23:18:43.190 Logon Login failed for user 'SQL2016-SA-03\Administrator'. Reason: Failed to open the explicitly specified database 'tpcc'. [CLIENT: <local machine>] 2017-08-17 23:18:53.210 Logon Error: 18456, Severity: 14, State: 38. 2017-08-17 23:18:53.210 Logon Login failed for user 'SQL2016-SA-03\Administrator'. Reason: Failed to open the explicitly specified database 'tpcc'. [CLIENT: <local machine>] 2017-08-17 23:23:53.100 Backup Error: 18210, Severity: 16, State: 1. 2017-08-17 23:23:53.100 Backup BackupIoRequest::ReportIoError: read failure on backup device 'E:\tp0cc\tpcctmp\04112b48-2b06-4c18-bef0-75235a8c259b.metadata'. Operating system error 87(The parameter is incorrect.). 2017-08-17 23:23:53.130 spid52 Starting up database 'tpcc'. 2017-08-17 23:23:53.140 spid52 The database 'tpcc' is marked RESTORING and is in a state that does not allow recovery to be run. 2017-08-17 23:23:53.640 Backup Database was restored: Database: tpcc, creation date(time):2017/08/17(20:49:28), first LSN: 873:126320:195, last LSN: 873:126710:1, number of dump devices:1, device information: (FILE=1, TYPE=VIRTUAL_DEVICE: {'a2554e20-1896-4226-9975-e35c07be36a1'}). Inf 2017-08-17 23:23:53.660 Backup RESTORE DATABASE successfully processed 0 pages in 0.541 seconds (0.000 MB/sec). 2017-08-17 23:25:22.580 Backup Log was restored. Database: tpcc, creation date(time): 2017/08/17(20:49:28), first LSN: 873:115372:1, last LSN: 880:115567:1, number of dump devices: 1, device information: (FILE=1, TYPE=DISK: {'E:\tp0cc\tpcctmp\53807837-ab44-4a4d-8542-262fc877ba9e.bak'}). 2017-08-17 23:27:12.450 Backup Log was backed up. Database: model, creation date(time): 2003/04/08(09:13:36), first LSN: 33:548:1, last LSN: 33:552:1, number of dump devices: 1, device information: (FILE=1, TYPE=DISK: {'C:\ProgramData\Veeam\Backup\SqlLogBackup\ {f332b4a5-61cc-4e35-84a8-f 2017-08-17 23:27:35.630 Backup Log was restored. Database: tpcc, creation date(time): 2017/08/17(20:49:28), first LSN: 880:115567:1, last LSN: 975:7945:1, number of dump devices: 1, device information: (FILE=1, TYPE=DISK: {'E:\tp0cc\tpcctmp\2f50e721-0a6b-445a-8ef4-83c069d69ee1.bak'}). T 2017-08-17 23:27:36.090 spid52 Starting up database 'tpcc'. 2017-08-17 23:27:38.270 spid52 Recovery of database 'tpcc' (5) is 0% complete (approximately 401 seconds remain). Phase 2 of 3. This is an informational message only. No user action is required. 2017-08-17 23:27:40.450 spid52 217606 transactions rolled forward in database 'tpcc' (5:0). This is an informational message only. No user action is required. 2017-08-17 23:27:40.480 spid52 1 transactions rolled back in database 'tpcc' (5:0). This is an informational message only. No user action is required. 2017-08-17 23:27:40.480 spid52 Recovery is writing a checkpoint in database 'tpcc' (5). This is an informational message only. No user action is required. 2017-08-17 23:27:40.590 spid52 Recovery completed for database tpcc (database ID 5) in 5 second(s) (analysis 2113 ms, redo 2118 ms, undo 9 ms.) This is an informational message only. No user action is required. 2017-08-17 23:27:40.800 Backup Restore is complete on database 'tpcc'. The database is now available. 2017-08-17 23:27:40.800 Backup RESTORE DATABASE successfully processed 0 pages in 5.158 seconds (0.000 MB/sec). 2017-08-17 23:27:40.810 spid52 Setting database option AUTO_CLOSE to OFF for database 'tpcc'. |
From the log you can see:
- The full database was restored in around 7 minutes.
- The three log backups were restored to our required time-in-point.
- The user DB was put into single user mode to perform an exclusive restoration.
Comparison between a Local and Remote Backup Repository
We also validated the procedure using a remote backup repository by using a 4-node Hybrid vSAN cluster as the backup destination. See Table 3 for the detailed configuration for the remote backup servers.
To compare the backup performance of the local All-Flash vSAN datastore and the remote vSAN datastore, we used the same VM described in the section of Veeam Backup & Replication suite for single SQL Server VM. Figure 13 describes the test environment.

Figure 13. Validation of DB Level Backup and Restore using a Remote vSAN Datastore
The following table shows the average backup performance of local and remote backup for the same SQL VM named “sql2016-sa-03”. Comparing with backup to local All-Flash vSAN datastore, backup on remote Hybrid vSAN datastore over 1GE network needs around 3 hours and 50 minutes to finish, and the bandwidth was around 11MB/s.
Table 9. Veeam Backup Performance Statistics comparing Backup Methods
| Backup Method | Backup Duration(HH:MM:SS) | Backup Throughput | AVG Veeam Server CPU UT(%) | AVG Backup Server CPU UT(%) |
|---|---|---|---|---|
| Local Backup | 0:10:14 | 336MB/s | 51.26% | 49.00% |
| Remote Backup | 3:49:29 | 11MB/s | 10.50% | 6.50% |
Test Summary
- Local backup can be very quick for a 230GB VM. The full VM backup can be finished in approximately 10 minutes.
- Restore from a backup can be any point-in-time if log backup is engaged. This is the smallest granularity for SQL Server database and is highly welcomed by DBAs.
- Backing up the same VM to local vSAN datastore can achieve the best backup performance and the shortest duration since it can leverage the local 10GE network. However, this needs additional space from the production environment, and the planned backup window to reduce the performance impact to the same vSAN datastore.
AlwaysOn Availability Groups Backup and Restore Validation
Test Overview
In this scenario, we accomplish backup and recovery within a local vSAN datastore by using VM level backup and SQL Server Log backup periodically for an AlwaysOn Availability Group in two VMs using Veeam Backup & Replication 9.5. With this approach, the AlwaysOn Availablity Groups can be recovered to the point-in-time. This procedure is also applicable to multiple databases running in the same configuration.
This test used the repository on the local vSAN datastore as the backup destination. Thus we can leverage the high-speed NIC (10GE) for backup and restore traffic.
Test Procedure
This test validates the procedure for backup and recovery for two VMs with one AlwaysOn Availablity Group built already. The database size was around 100GB. We have one Veeam Backup server which also worked as Proxy, one Veeam backup repository, two AlwaysOn Availablity Group VMs on separate hosts in our four-node vSAN cluster.
To back up the two VMs together we put them in one backup job. It is permitted to adjust the backup order and backup job will perform backup one VM after another.
The following is the detailed description of the VM-level backup with log backup periodically in this operation guide.
The virtual servers’ configuration is shown in 10. We ran HammerDB, a transactional TPC-C workload, against the 100GB AlwaysOn Availablity Groups enabled SQL Server database to simulate a production OLTP workload during the backup window. The average TPS was around 1500 before we started our backup job.
Table 10. Server Configuration AlwaysOn Availability Group Backup and Restore using Veeam
| Server Usage | vCPU | Memory (GB) | Disks |
|---|---|---|---|
| Veeam Server | 8 | 8 | OS: 40GB |
| Veeam backup server 1 | 4 | 4 | OS:40GB; Repository 1200GB |
| SQL Server 1 | 8 | 32 | OS disk: 200GB;DB disk:300GB |
| SQL Server 2 | 8 | 32 | OS disk: 200GB;DB disk:300GB |
We set up the backup job using the following parameters for a given SQL VM named “sql2016aag01” and “sql2016aag02”:
- Enable application-aware processing and perform backup logs per 30 minutes
- Set a periodic backup every 24 hours
Test Results
Backup Results
Figure 14 is one of the test results of a full backup and log backup for the AlwaysOn Availability Group. This result demonstrated the full backup was finished in 17.5 minutes. With the built-in deduplication and compression function, the backup size was reduced to 180GB from the original size - 1004GB.

Figure 14. Backup Results using Veeam Backup & Replication with AlwaysOn Availability Groups

Figure 15. Veeam Application-Aware Backups with AlwaysOn Availability Groups
Backup Performance
Table 11 is the average full backup performance we measured for the SQL AlwaysOn Availability Group VMs.
Table 11. Veeam Backup Performance Statistics with AlwaysOn Availability Groups
| Actual VM Size | Backup Duration(HH:MM:SS) | Backup Throughput | AVG Veeam Server CPU UT(%) | AVG Backup Server CPU UT(%) |
|---|---|---|---|---|
| 1004GB | 0:19:40 | 334MB/s | 39.4% | 21.1% |
Database Behavior During Backup
Backup is at the database level; therefore, I/O will be frozen during the backup window. From the SQL Server Errorlog you may find the I/O will be frozen for few seconds, and then VSS Writer, triggered by Veeam backup process, will resume the I/O. See the Errorlog below for the database operations; they are in bold.
[Errorlog of SQL Server in the VM –“sql2016aag01”] 2017-08-24 00:32:57.740 spid67 I/O is frozen on database model. No user action is required. However, if I/O is not resumed promptly, you could cancel the backup. 2017-08-24 00:32:57.740 spid68 I/O is frozen on database msdb. No user action is required. However, if I/O is not resumed promptly, you could cancel the backup. 2017-08-24 00:32:57.740 spid69 I/O is frozen on database tpccaag. No user action is required. However, if I/O is not resumed promptly, you could cancel the backup. 2017-08-24 00:32:57.740 spid70 I/O is frozen on database master. No user action is required. However, if I/O is not resumed promptly, you could cancel the backup. 2017-08-24 00:33:01.140 spid70 I/O was resumed on database master. No user action is required. 2017-08-24 00:33:01.140 spid69 I/O was resumed on database tpccaag. No user action is required. 2017-08-24 00:33:01.140 spid68 I/O was resumed on database msdb. No user action is required. 2017-08-24 00:33:01.140 spid67 I/O was resumed on database model. No user action is required. 2017-08-24 00:33:01.330 Backup Database backed up. Database: master, creation date(time): 2017/08/24(00:22:02), pages dumped: 483, first LSN: 666:209:88, last LSN: 666:247:1, number of dump devices: 1, device information: (FILE=1, TYPE=VIRTUAL_DEVICE: {'{3FDA4999-43E9-4A6E-94D5-DF2FE5E0 2017-08-24 00:33:01.330 Backup Database backed up. Database: model, creation date(time): 2003/04/08(09:13:36), pages dumped: 321, first LSN: 33:588:1, last LSN: 33:595:1, number of dump devices: 1, device information: (FILE=1, TYPE=VIRTUAL_DEVICE: {'{3FDA4999-43E9-4A6E-94D5-DF2FE5E05B6A 2017-08-24 00:33:01.340 Backup BACKUP DATABASE successfully processed 0 pages in 3.613 seconds (0.000 MB/sec). 2017-08-24 00:33:01.350 Backup BACKUP DATABASE successfully processed 0 pages in 3.685 seconds (0.000 MB/sec). 2017-08-24 00:33:01.350 Backup Database backed up. Database: msdb, creation date(time): 2016/04/30(00:46:38), pages dumped: 2180, first LSN: 142:417:142, last LSN: 142:478:1, number of dump devices: 1, device information: (FILE=1, TYPE=VIRTUAL_DEVICE: {'{3FDA4999-43E9-4A6E-94D5-DF2FE5E0 2017-08-24 00:33:01.350 Backup Database backed up. Database: tpccaag, creation date (time):2017/08/23(23:07:56), pages dumped: 5147673, first LSN: 3701:99786:1, last LSN: 3701:99791:1, number of dump devices: 1, device information: (FILE=1, TYPE=VIRTUAL_DEVICE: {'{3FDA4999-43E9-4A6E-94D 2017-08-24 00:33:01.360 Backup BACKUP DATABASE successfully processed 0 pages in 3.683 seconds (0.000 MB/sec). 2017-08-24 00:33:01.370 Backup BACKUP DATABASE successfully processed 0 pages in 3.658 seconds (0.000 MB/sec). |
[Errorlog of SQL Server in the VM –“sql2016aag02”]
2017-08-24 00:43:46.520 spid55       I/O is frozen on database model. No user action is
 required. However, if I/O is not resumed promptly, you could cancel the backup.
2017-08-24 00:43:46.520 spid57       I/O is frozen on database msdb. No user action is
 required. However, if I/O is not resumed promptly, you could cancel the backup.
2017-08-24 00:43:46.520 spid59       I/O is frozen on database tpccaag. No user action is
 required. However, if I/O is not resumed promptly, you could cancel the backup.
2017-08-24 00:43:46.520 spid60       I/O is frozen on database master. No user action is
 required. However, if I/O is not resumed promptly, you could cancel the backup.
2017-08-24 00:43:51.720 spid57       I/O was resumed on database msdb. No user action is required.
2017-08-24 00:43:51.720 spid55       I/O was resumed on database model. No user action is required.
2017-08-24 00:43:51.720 spid60       I/O was resumed on database master. No user action is required.
2017-08-24 00:43:51.720 spid59       I/O was resumed on database tpccaag. No user action is required.
2017-08-24 00:43:52.020 Backup       Database backed up. Database: master, creation date(time):
 2017/08/23(21:37:34), pages dumped: 483, first LSN: 671:301:92, last LSN: 671:340:1, number of
 dump devices: 1, device information: (FILE=1, TYPE=VIRTUAL_DEVICE: {'{8B685116-099F-4989-B590-BE239DBB
2017-08-24 00:43:52.030 Backup       Database backed up. Database: model, creation date(time):
 2003/04/08(09:13:36), pages dumped: 314, first LSN: 33:480:37, last LSN: 33:497:1, number of
 dump devices: 1, device information: (FILE=1, TYPE=VIRTUAL_DEVICE: {'{8B685116-099F-4989-B590-BE239DBB4E1
2017-08-24 00:43:52.040 Backup       BACKUP DATABASE successfully processed 0 pages in 5.496
 seconds (0.000 MB/sec).
2017-08-24 00:43:52.040 Backup       Database backed up. Database: msdb, creation date(time):
 2016/04/30(00:46:38), pages dumped: 2173, first LSN: 141:534:180, last LSN: 141:609:1, number
 of dump devices: 1, device information: (FILE=1, TYPE=VIRTUAL_DEVICE: {'{8B685116-099F-4989-B590-BE239DBB
2017-08-24 00:43:52.040 Backup       Database backed up. Database: tpccaag, creation date(time):
 2017/08/23(23:11:06), pages dumped: 5147674, first LSN: 3701:99792:1, last LSN: 3701:99816:1, number
 of dump devices: 1, device information: (FILE=1, TYPE=VIRTUAL_DEVICE: {'{8B685116-099F-4989-B59
2017-08-24 00:43:52.040 Backup       BACKUP DATABASE successfully processed 0 pages in 5.654
 seconds (0.000 MB/sec).
2017-08-24 00:43:52.060 Backup       BACKUP DATABASE successfully processed 0 pages in 5.616
 seconds (0.000 MB/sec).
 2017-08-24 00:43:52.060 Backup      BACKUP DATABASE successfully processed 0 pages in 5.546
seconds (0.000 MB/sec). |
Restore Results
The restore operation allows you to recover your AlwaysOn Availability Group to a specific point-in-time (which may differ from the current SQL Server restore point). The database will be recovered to the closest VM restore point before the moment you specify in restoration, and then transaction log replay will be performed on the target server to bring the database to the necessary state.
With AlwaysOn Availablity Groups enabled we can only restore the primary replica in the AlwaysOn Availability Group. The following is the steps to restore an SQL Server with AlwaysOn Availablity Groups enabled.
1) Make sure the AlwaysOn Availability Group is in a synchronized state, and you suspend AlwaysOn Availablity Groups using
T-SQL ALTER DATABASE ‘aag_db_name’ SET HADR SUSPEND |
2) Restore the AlwaysOn Availablity Groups database using Veeam Restore. From restore options, choose the Application items and then select Microsoft SQL Server, then you may restore the user DB (system database in SQL Server like master , model and msdb are not permitted to be restored due to their simple recovery mode). Restore process can replace the existing DBs on their original server.
The following shows the restore process in the SQL Server Errorlog.
2017-08-24 20:20:43.050 spid61       Always On Availability Groups data movement for database
 'tpccaag' has been suspended for the following reason: "user" (Source ID 0; Source string:
 'SUSPEND_FROM_USER'). To resume data movement on the database, you will need to resume the
 database manually
2017-08-24 20:20:43.050 spid32s      DbMgrPartnerCommitPolicy::SetSyncAndRecoveryPoint:
 55F738AA-972A-4D59-9E10-A1AE89222969:4
2017-08-24 20:20:43.050 spid32s      DbMgrPartnerCommitPolicy::SetSyncAndRecoveryPoint:
 55F738AA-972A-4D59-9E10-A1AE89222969:1
2017-08-24 20:20:43.050 spid32s      DbMgrPartnerCommitPolicy::SetSyncAndRecoveryPoint:
 55F738AA-972A-4D59-9E10-A1AE89222969:1
2017-08-24 20:20:43.050 spid32s      DbMgrPartnerCommitPolicy::SetSyncState: 55F738AA-972A
-4D59-9E10-A1AE89222969:1
2017-08-24 20:23:09.400 spid61       ALTER DB param option: RESUME
2017-08-24 20:23:09.400 spid61       Always On Availability Groups data movement for database
 'tpccaag' has been resumed. This is an informational message only. No user action is required.
2017-08-24 20:23:09.400 spid54s      DbMgrPartnerCommitPolicy::SetSyncAndRecoveryPoint:
 55F738AA-972A-4D59-9E10-A1AE89222969:1
2017-08-24 20:23:09.400 spid54s      DbMgrPartnerCommitPolicy::SetSyncAndRecoveryPoint:
 55F738AA-972A-4D59-9E10-A1AE89222969:1
2017-08-24 20:23:09.400 spid54s      Always On Availability Groups connection with secondary
 database established for primary database 'tpccaag' on the availability replica
 'SQL2016AAG02' with Replica ID: {55f738aa-972a-4d59-9e10-a1ae89222969}. This is an
 informational message only. No user a
2017-08-24 20:23:09.400 spid54s      DbMgrPartnerCommitPolicy::SetSyncAndRecoveryPoint:
 55F738AA-972A-4D59-9E10-A1AE89222969:1
2017-08-24 20:23:09.410 spid59s      DbMgrPartnerCommitPolicy::SetSyncAndRecoveryPoint:
 55F738AA-972A-4D59-9E10-A1AE89222969:1
2017-08-24 20:23:09.410 spid59s      DbMgrPartnerCommitPolicy::SetSyncAndRecoveryPoint:
 55F738AA-972A-4D59-9E10-A1AE89222969:4
2017-08-24 20:23:09.410 spid59s      DbMgrPartnerCommitPolicy::SetSyncAndRecoveryPoint:
 55F738AA-972A-4D59-9E10-A1AE89222969:4
2017-08-24 20:23:09.410 spid59s      DbMgrPartnerCommitPolicy::SetSyncState: 55F738AA-972A-4D59
-9E10-A1AE89222969:4
2017-08-24 20:24:45.000 spid61       ALTER DB param option: SUSPEND
2017-08-24 20:24:45.000 spid59s      DbMgrPartnerCommitPolicy::SetSyncAndRecoveryPoint:
 55F738AA-972A-4D59-9E10-A1AE89222969:4
2017-08-24 20:24:45.000 spid61       Always On Availability Groups data movement for database
 'tpccaag' has been suspended for the following reason: "user" (Source ID 0; Source string:
 'SUSPEND_FROM_USER'). To resume data movement on the database, you will need to resume the
 database manually
2017-08-24 20:24:45.000 spid59s      DbMgrPartnerCommitPolicy::SetSyncAndRecoveryPoint:
 55F738AA-972A-4D59-9E10-A1AE89222969:1
2017-08-24 20:24:45.000 spid59s      DbMgrPartnerCommitPolicy::SetSyncAndRecoveryPoint:
 55F738AA-972A-4D59-9E10-A1AE89222969:1
2017-08-24 20:24:45.000 spid59s      DbMgrPartnerCommitPolicy::SetSyncState: 55F738AA-972A
-4D59-9E10-A1AE89222969:1
2017-08-24 20:26:40.530 spid58s      DbMgrPartnerCommitPolicy::SetSyncAndRecoveryPoint:
 55F738AA-972A-4D59-9E10-A1AE89222969:1
2017-08-24 20:26:40.530 spid58s      DbMgrPartnerCommitPolicy::SetSyncAndRecoveryPoint:
 55F738AA-972A-4D59-9E10-A1AE89222969:0
2017-08-24 20:26:40.700 spid30s      Always On Availability Groups connection with secondary
 database terminated for primary database 'tpccaag' on the availability replica 'SQL2016AAG02'
 with Replica ID: {55f738aa-972a-4d59-9e10-a1ae89222969}. This is an informational message
 only. No user ac
|
2017-08-24 20:26:40.720 spid59 Setting database option SINGLE_USER to ON for database 'tpccaag'. 2017-08-24 20:35:25.330 Backup Error: 18210, Severity: 16, State: 1. 2017-08-24 20:35:25.330 Backup BackupIoRequest::ReportIoError: read failure on backup device 'C:\Program Files\Microsoft SQL Server\MSSQL13.MSSQLSERVER\MSSQL\DATA\tpccaagtmp\7840796b-1549 -4699-bc96-cf389fb6bcd2.metadata'. Operating system error 87(The parameter is incorrect.). 2017-08-24 20:35:25.410 spid54 Starting up database 'tpccaag'. 2017-08-24 20:35:25.430 spid54 The database 'tpccaag' is marked RESTORING and is in a state that does not allow recovery to be run. 2017-08-24 20:35:25.710 Backup Database was restored: Database: tpccaag, creation date(time): 2017/08/23(23:07:56), first LSN: 3701:99831:3, last LSN: 3701:99974:1, number of dump devices: 1, device information: (FILE=1, TYPE=VIRTUAL_DEVICE: {'94ca7cd8-bfa9-440c-80f4-e12bc436dcf6'}). In 2017-08-24 20:35:25.740 Backup RESTORE DATABASE successfully processed 0 pages in 0.385 seconds (0.000 MB/sec). 2017-08-24 20:35:27.160 Backup Log was restored. Database: tpccaag, creation date(time): 2017/08/23(23:07:56), first LSN: 3701:99969:1, last LSN: 3701:100005:1, number of dump devices: 1, device information: (FILE=1, TYPE=DISK: {'C:\Program Files\Microsoft SQL Server\MSSQL13.MSSQLSERVER 2017-08-24 20:35:27.290 Backup Log was restored. Database: tpccaag, creation date(time): 2017/08/23(23:07:56), first LSN: 3701:100005:1, last LSN: 3701:100009:1, number of dump devices: 1, device information: (FILE=1, TYPE=DISK: {'C:\Program Files\Microsoft SQL Server\MSSQL13.MSSQLSERVE 2017-08-24 20:35:31.090 Backup Log was restored. Database: tpccaag, creation date(time): 2017/08/23(23:07:56), first LSN: 3701:100009:1, last LSN: 3701:100013:1, number of dump devices: 1, device information: (FILE=1, TYPE=DISK: {'C:\Program Files\Microsoft SQL Server\MSSQL13.MSSQLSERVE 2017-08-24 20:35:31.130 spid54 Starting up database 'tpccaag'. 2017-08-24 20:35:31.170 spid54 4 transactions rolled forward in database 'tpccaag' (5:0). This is an informational message only. No user action is required. 2017-08-24 20:35:31.190 spid54 0 transactions rolled back in database 'tpccaag' (5:0). This is an informational message only. No user action is required. 2017-08-24 20:35:31.330 Backup Restore is complete on database 'tpccaag'. The database is now available. 2017-08-24 20:35:31.330 Backup RESTORE DATABASE successfully processed 0 pages in 0.218 seconds (0.000 MB/sec). 2017-08-24 20:35:31.330 spid54 Setting database option AUTO_CLOSE to OFF for database 'tpccaag'. 2017-08-24 20:35:31.360 spid58s DbMgrPartnerCommitPolicy::SetSyncAndRecoveryPoint: 55F738AA-972A-4D59-9E10-A1AE89222969:0 2017-08-24 20:35:31.360 spid58s DbMgrPartnerCommitPolicy::SetSyncAndRecoveryPoint: 55F738AA-972A-4D59-9E10-A1AE89222969:0 |
From the log you can see:
- The full database was restored in around 15 minutes.
- Three transaction log backups were restored to our required time-in-point.
- The user DB was put into single user mode to exclusively perform restoring and AlwaysOn Availability Groups can be resumed automatically after the DB has completed restoring. However, the original primary will be changed to secondary because of the role change during the restore process. NOTE: you need to perform manual failover on the AlwaysOn AvailabilityGroup database to the original primary role.
Test Summary
- AAG VMs can be backed up by a Veeam backup job.
- We only need to recover the primary database to the point-in-time.
- Before we restore the primary DB, we need to suspend the synchronization of the AlwaysOn Availability Group and the AlwaysOn Availability Groups enabled SQL Server can resume the resynchronization automatically after restoration.
Veeam Backup & Replication Summary
- Veeam Backup & Replication is a highly efficient backup and restore solution. Veeam Backup & Replication 9.5 can perform DB level backup. With log backup enable, it can perform a point-in-time restore. vSAN is a viable option for SQL Server backup and recovery, without using the traditional FC/iSCSI SAN storage you can have the enterprise storage features like high availability and resiliency.
- Veeam Backup & Replication can restore AlwaysOn Availability Groups enabled DBs, which is very attractive to DBA to save time rebuilding the AlwaysOn Availablity Group after a failure.
- Veeam Proxy server is a CPU intensive component in the backup and restore design. Allocate enough CPU resource to the server can advance the backup and restore speed. For example, in our validation, comparing 4 vCPU in our single VM backup test, 8 vCPU can reduce the backup duration from around 12 minutes to 10 minutes while increasing the bandwidth from 275MB/s to 336MB/s. For proper sizing best practices, see the Sizing a Backup Proxy by Veeam.
- You may choose backup and restore architecture according to your needs. However, the highly desired recommendation is to perform backup to the local vSAN datastore, and leverage Veeam Backup Copy jobs to copy the backups to a remote datastore. For restoration, restoring from the local vSAN datastore is the fastest way. Thus, for extra protection, we recommend you keep the backups on local and copy them to remote vSAN datastore. Refer Backup Copy for Backup from backups.
- vSAN provides flexible policies to protect data. Failures to tolerate (FTT), can be set to 0, 1, 2 or 3. This setting determines the number of failures to protect from. For example, if FTT=1, every VMDK object will be replicated consuming double the storage capacity. If capacity is a concern, you may use FTT=0 on the virtual disks since backup data protection is handled by Veeam as it is replicated to an offsite location, and the local datastore stores it temporarily.
Solution Validation - SQL Server Centralized Management
In this section, we discuss how to provide SQL Server centralized management using vRealize Operations Manager 6.6 with management packs and Blue Medora vRealize Management Pack for SQL Server.
Test Overview
In this section, we discuss how to provide SQL Server centralized management using vRealize Operations Manager 6.6 with management packs of vRealize Operations Native Management Pack for Storage Devices, and Blue Medora VMware vRealize Operations Management Pack for Microsoft SQL Server .
To generate performance alerts in the vRealize Operations Manager, we ran an OLTP workload on an SQL Server Database using HammerDB for approximately 12 hours.
This section shows the resulting ready-to-use dashboards for health, performance monitoring and troubleshooting for vSAN and the SQL Server Database after generating a 12-hour OLTP workload.
Centralized vSAN Cluster Overview
vRealize Operations Manager with native vSAN Management provides IO metrics at the VM level and the VMDK (Virtual disk) level. To get global visibility into the vSAN and Storage Devices across vSAN Clusters for monitoring and proactive alerts and notifications on an ongoing basis. We logged into the central management of the vRealize Operations Manager. Through Environment-> vSAN Cluster -> Related Hierarchies , we checked the health status of the vSAN cluster and Database server virtual machine. We also checked the map of the vSAN cluster, Datacenter, hosts and vSAN Datastore in the map tab.
vSAN Health Check
The vSAN Health Check screen displays the overall health of the vSAN environment including disk groups, datastores, host systems, vCenter Servers and all the virtual machines with green, yellow and red indications. Figure 16 shows the example in our test case. Overall the vSAN cluster is healthy except for two virtual machines displayed in yellow.

Figure 16. Environment View of vSAN showing the Health and Performance Alerts in a Centralized Pane
To understand the warning shown, double-click the yellow warning icon, to drill down to the virtual machine. In this test, we found an out of space warning on both VMs, which was not directly related to our test case; therefore it is out of scope of this solution
We also monitored the overall vSAN disk usage details in the past days or months. See Figure 17 for the disk space usage. We observed that overall disk usage changed from July 22 to July 28.
The vSAN Datastore capacity usage can be opened via Environment-> VMware vSAN-> vSAN and Storage Devices -> vCenter -> vSAN Cluster -> vSANDatastore .

Figure 17. vSAN Disk Usage Trends
vSAN IOPS
Figure 18 shows the VM level IO metrics during the 12-hour OLTP run, specifically IOPS. Displayed is the vSAN datastore level physical IOPS for both reads and writes with trends. The average write IOPS was around 9000 and the average read IOPS was around 1700 during this period. This vSAN overview can help identify vSAN usage issues.
The vSAN IOPS overview can be opened via Environment-> vSphere Storage->vSphere World->vCenter>Data Center->vSANDatastore->Storage .

Figure 18. vSAN IOPS During 12-hour OLTP Run
vSAN Datastore Latency
Figure 19 shows the VM level IO metrics during the 12-hour OLTP run, specifically latency. The highest read latency was less than 2.5 millisecond, and the highest write latency was less than 7.8 milliseconds. The third graph shows the outstanding I/O requests. These three metrics can identify the response time from a virtual disk level.
The vSAN Datastore latency metrics can be opened via Environment-> vSphere Storage->vSphere World->vCenter->Data Center->vSANDatastore->All Metrics

Figure 19. vSAN Latency Metrics During 12-hour OLTP Run
vSAN Capacity Usage
Figure 20 shows the overall space usage of vSAN and available space. The vSAN overview helps identify vSAN usage during the OLTP workload. You can see the available space was reduced from 4079GB to 3600GB, this view is helpful to monitor the space usage for capacity planning.
The Capacity overview can be opened via Environment-> vSphere Storage->vSphere World->vCenter->Cluster->vSAN Datastore->Disk Space

Figure 20. vSAN Capacity Metrics During 12-hour OLTP Run
Metrics from SQL Server and VM Level with OLTP Workload
The Blue Medora Management Pack for Microsoft SQL Server is an embedded adapter for VMware vRealize Operations. It retrieves data from Microsoft SQL Server to monitor, manage, and collect key performance metrics regarding SQL Server resources. The following shows the results during our 12-hour OLTP workload.
DB Performance Metrics
Figure 21 shows the database level metrics during the 12-hour OLTP run. The test run was using TPC-C benchmark on HammerDB for SQL Server on a 50GB database initially. The Virtual User number was 125 and total transaction per user was 1 million. The figure shows the transactions per second, CPU utilization and disk usage. The average transaction per second was around 14 thousand at the database level. This end-to-end view and correlation can help identify key trends and troubleshoot bottlenecks.

Figure 21. Database Transactions, CPU Usage, and Disk Usage During 12-hour OLTP Run
VM Metrics
Figure 22 shows the VM level IO metrics during the 12-hour OLTP run. The test run was using TPC-C benchmark on HammerDB for SQL Server on a 50GB database initially. The Virtual User number was 125 and total transaction per user was 1 million. The figure shows the read, write and total IOPS of the VM disk.

Figure 22. VM Level IOPS During 12-hour OLTP Run
Metrics from SQL Server AlwaysOn Availability Group and Health
The Blue Medora Management Pack for Microsoft SQL Server provides several full-stack dashboards and displays heat maps for each resource kind in your Microsoft SQL Server environment. It enables administrators to view key performance metrics that help dictate the health of SQL Servers, AlwaysOn
Availability Groups, and Databases. Their metrics are very helpful to understand the AlwaysOn
Availability Groups enabled environment. In Figure 23 below, you can find the health status of Availability Group - AAG01, and database general properties like capacity and read/write operations displayed on the dashboard.
The metrics can be opened via Dashboard->Microsoft SQL Server AlwaysOn Group Overview .

Figure 23. Dashboard->Microsoft SQL Server AlwaysOn Group Overview During 12-Hour OLTP Run
The Blue Medora Management Pack for Microsoft SQL Server also provides the detailed view of the AlwaysOn Availability Group relationships. The health status can be found on the icon. Like Figure 24 shown below, the out of space warning will be displayed using the small yellow icon on each AlwaysOn Availablity Group instance. And the suspended status on the secondary replica of the AlwaysOn Availability Group will be displayed as a yellow icon too. These AlwaysOn Availability Group relationships and health icons are helpful to monitor and troubleshoot the AlwaysOn Availability Groups enabled SQL Server.
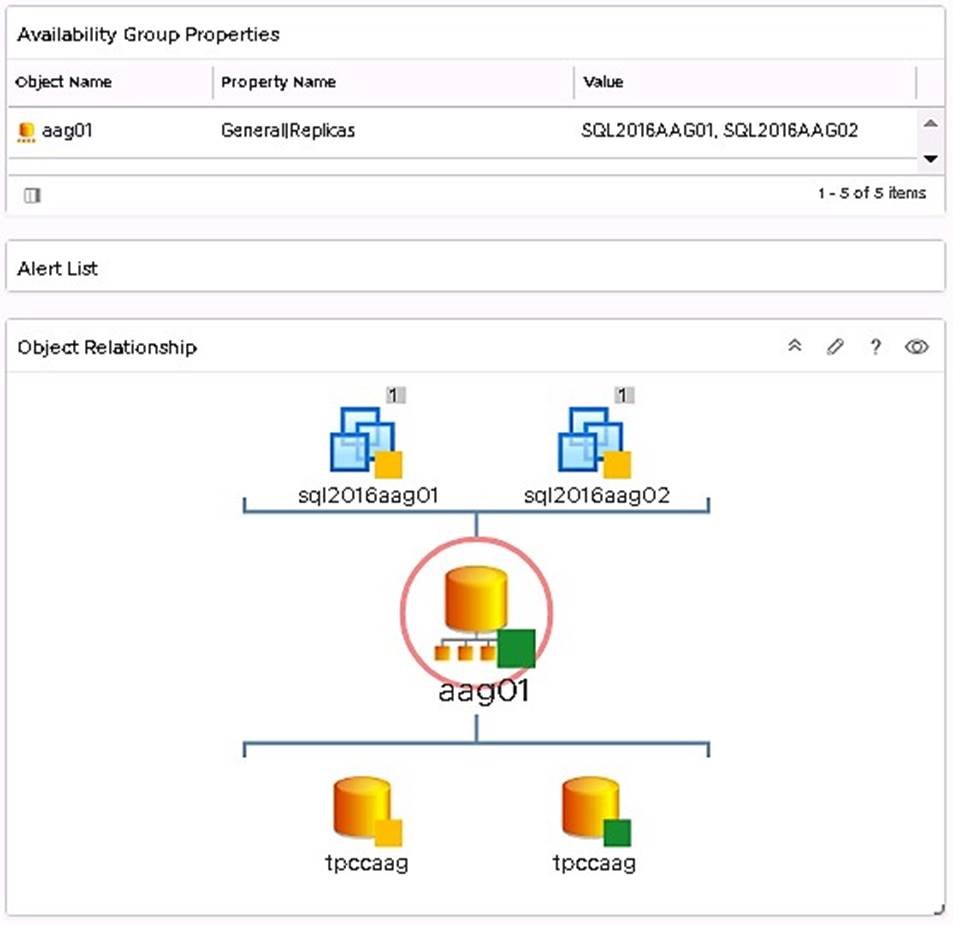
Figure 24. AlwaysOn Group Relationship
Troubleshoot vSAN and vSphere Issues
To troubleshoot issues on a vSAN and vSphere cluster, vRealize Operations Manager 6.6 provides a dashboard. The dashboard can easily identify the issue from the alert list.
Troubleshooting Disk Latency Issues
The following example is provided to help troubleshoot disk latency issues. It is not related to the testing from the previous sections.
From Figure 25 below you can find the cluster, host, vSAN datastore relationship and the alert list. In the test environment, we can find the environment has four ESXi hosts formed a vSAN and vSphere cluster. The overview of the workload of the cluster can also be viewed.

Figure 25. vSAN Alert List
From Figure 26, you may also find the Issue list, and we may troubleshoot the issue using this warning message. From our test environment, you may find that the top one is “Virtual machine disk I/O write latency is high.” Double click the first alert you may find this is high disk latency issue.

Figure 26. Troubleshooting Alerts
To double confirm the issue, go to the virtual disk of the affected virtual machine – “c200a-1” in our test environment, you may found the VM did encounter high latency issue: the average disk latency was more than 50ms and the peak write latency was more than 171ms.

Figure 27. Confirmation of Peak Write Latency
After checking the disk of the virtual machine, we found the virtual disk was on local datastore on the host rather than on All-Flash vSAN.

Figure 28. Checking the Disk of the Virtual Machine
We solved this issue by using storage vMotion to migrate the disk to vSAN disk.
SQL Server Centralized Management with vRealize Operations Management Summary
vRealize Operations Native Management Pack, together with the Blue Medora VMware vRealize Operations Management Pack for Microsoft SQL Server, provides centralized management, monitoring and troubleshooting tool allow users to optimize their SQL Server resources, avoid possible issues for Day 2 Operations.
Conclusion
VMware vSAN is a cost-effective and high-performance HCI platform that is rapidly deployed, easy to maintain, and is fully integrated into the VMware vSphere platform. VMware vSAN 6.0 and above has improved the snapshot capability, which provides users with enterprise-class snapshots and clones.
Veeam Backup & Replication is a backup solution developed for VMware vSphere and other virtual environments. Veeam Backup & Replication provides a set of features for performing data protection and disaster recovery tasks. Veeam Backup and Recovery for Microsoft SQL Server can be complementary to the VMware native backup and recovery to recover SQL Server standalone VM, and AlwaysOn Availability Groups enabled databases.
The VMware vRealize Operations Native Management Pack for Storage Devices and the Blue Medora VMware vRealize Operations Management Pack for Microsoft SQL Server provide powerful management and monitoring capabilities for SQL Server running on vSAN. With the metrics and relationship data from these management packs, operations teams can consolidate reporting on health, performance and capacity reports are all from inside vRealize Operations, thereby increasing the productivity of HCI administrator.
In summary, this operation guide validates vSAN to be an HCI platform that is capable of delivering efficient SQL Server Database Day 2 Operations. In addition, vSAN provides improved data protection, cloning, and day-to-day management and troubleshooting functions by integrating with SQL Server database technologies.
References
This section lists the relevant references used for this document
References
- M. Rouse, "What is Veeam Backup & Replication? - Definition from ...," February 2017. [Online]. Available: http://searchdatabackup.techtarget.com/definition/Veeam-Backup-Replication. [Accessed 23 August 2017].
- "Backing up and Restoring Microsoft SQL Server Databases," Veeam, 1 February 2017. [Online]. Available: https://helpcenter.veeam.com/evaluation/backup/vsphere/en/sql_backup_and_restore.html [Accessed 23 August 2017].
- "Know Your Infrastructure Resources - Veeam Backup & Replication," Veeam, 2 June 2016. [Online]. Available: https://helpcenter.veeam.com/backup/howtosql/how2_sql_know_resources.html. [Accessed 23 August 2017].
- "Backup Repository - Veeam Backup Guide for Hyper-V," Veeam, 28 July 2017. [Online]. Available: https://helpcenter.veeam.com/docs/backup/hyperv/backup_repository.html. [Accessed 23 August 2017].
- Arkiteck, "Veeam Backup & Replication v9 U2 Best Practice e-book (free)," 15 August 2016. [Online]. Available: https://www.reddit.com/r/sysadmin/comments/4xtje1/veeam_backup_and_replication_v9_u2_best_practice/. [Accessed 23 August 2017].
- "Built-in deduplication and compression for VM backup files," Veeam, [Online]. Available: https://www.veeam.com/hyper-v-vmware-backup-deduplication-compression.html. [Accessed 23 August 2017].
- "Application-Aware Processing - Veeam Backup Guide for vSphere," Veeam, 12 July 2017. [Online]. Available: https://helpcenter.veeam.com/docs/backup/vsphere/application_aware_processing.html?ver=95. [Accessed 23 August 2017].
- "Support for AlwaysOn Availability Groups - Veeam Backup ...," Veeam, 21 April 2016. [Online]. Available: https://helpcenter.veeam.com/backup/howtosql/how2_sql_always_on.html. [Accessed 23 August 2017].
About the Author and Contributor
This section provides a brief background on the author and contributors to this document.
Tony Wu, Senior Solution Architect in the Product Enablement team of the Storage and Availability Business Unit, wrote the original version of this paper.
Ellen Herrick, Technical Writer in the Product Enablement team of the Storage and Availability Business Unit, edited this paper to ensure that the contents conform to the VMware writing style.

© 2018 Veeam Software. All rights reserved. All trademarks are the property of their respective owners.