
Upgrade Guide: Modernize Your IT Infrastructure with Hybrid Cloud Solutions from Lenovo and VMware
Summary
This upgrade guide covers the steps to upgrade an existing VMware Software Defined Datacenter (SDDC) deployed using VMware Cloud Foundation 4.5.1, with Lenovo integrations, to VCF 5.0. The guide ensures that customer environments remain accessible with no downtime for workloads running on the cluster being upgraded.
The upgrade guide is intended for IT professionals with varying levels of VMware expertise who are responsible for managing VMware-based SDDCs. The audience will benefit from having a base understanding of the VMware SDDC stack.
Overview
This upgrade guide covers the steps from downloading of depots in VMware SDDC Manager to the creation of a new VMware ESXi image with specific Lenovo addons.
New Software Bill of Materials
This guide will upgrade the following components to the versions listed below:
- SDDC Manager
- Version: 5.0.0.1
- Build: 22485660
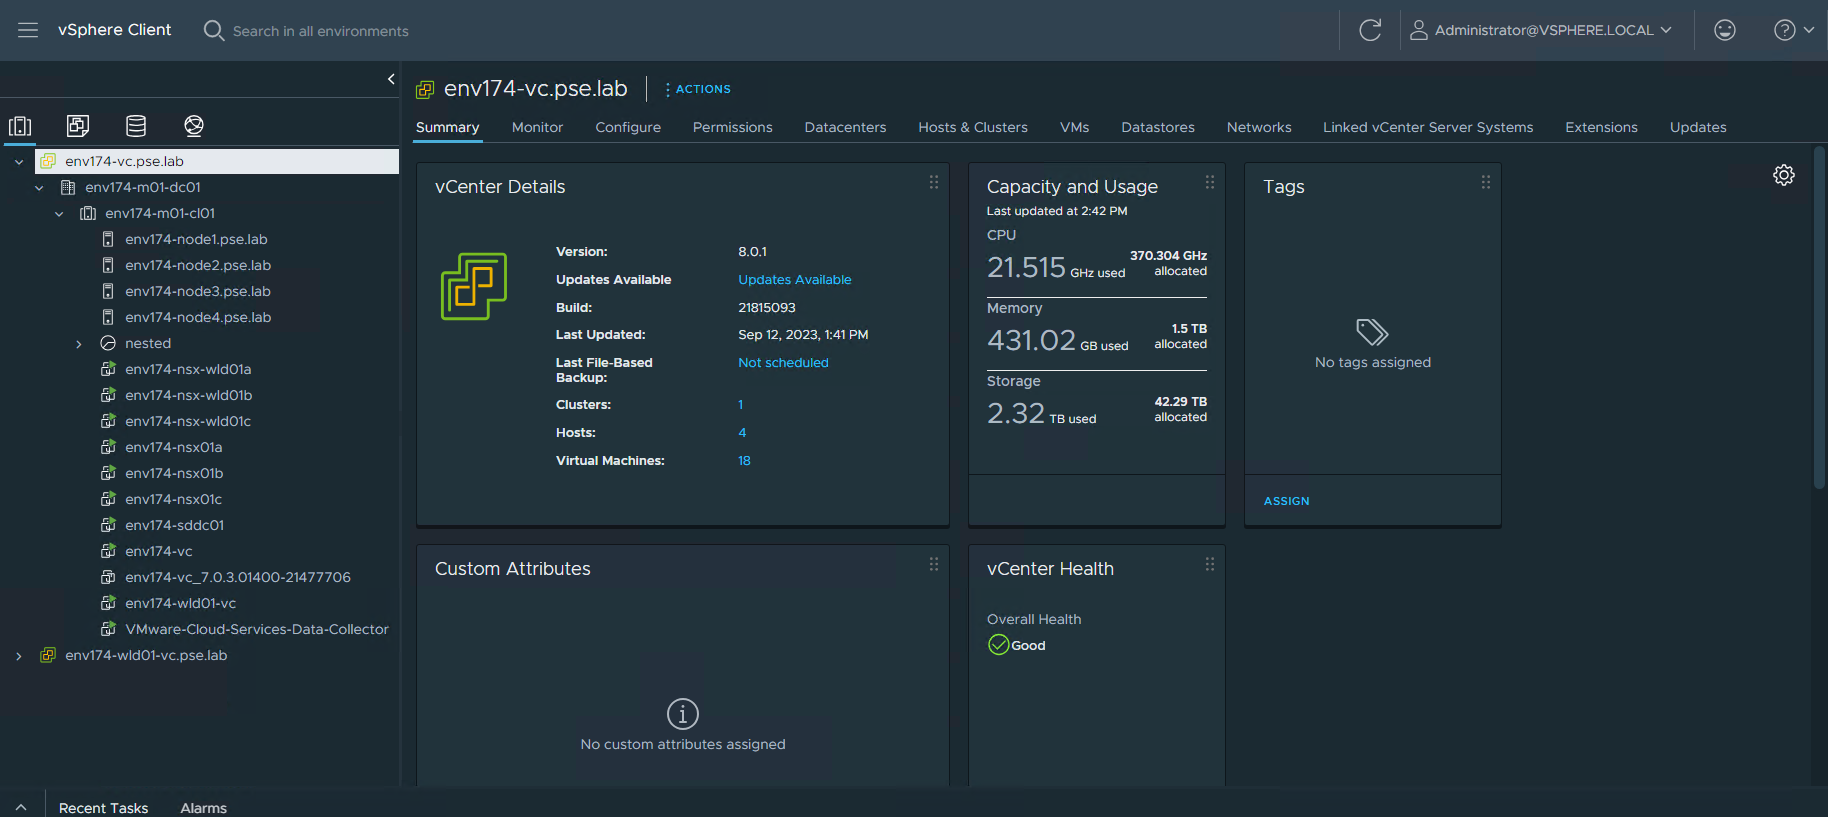
- vCenter
- Version: 8.0 U1a
- Build: 21815093
- vSphere/ESXi & vSAN
- Version: 8.0 U1a
- Build: 21813344
- NSX
- Version: 4.1.0.2
- Build: 21761691
For a complete list of VMware Cloud Foundation versions and their respective BOMs, see the following: https://kb.vmware.com/s/article/52520.
Prerequisites
VMware components
New VMware license keys will be needed for the following components:
- VMware vCenter
- VMware vSphere
- VMware vSAN
Below are the required VMware components which can be downloaded from VMware Customer Connect:
- VMware vSphere Hypervisor (ESXi)
- VMware vSphere Hypervisor (ESXi) Offline Bundle version 8.0u1a – build number 21813344
- Ensure download of the offline bundle .ZIP file, not the .ISO file
- VMware vSphere Hypervisor (ESXi) Offline Bundle version 8.0u1a – build number 21813344
- Lenovo OEM Addon for ESXi 8.0 U1
- Ensure download of the proper addon file to match the environment’s hardware
- Refer to the "Best Recipe" documentation for the appropriate file needed for the servers in the environment.
- To view the latest Best Recipes for ThinkAgile VX, see the following: https://support.lenovo.com/us/en/solutions/ht505302-thinkagile-vx-best-recipes
- At the time of this writing, the latest Best Recipe for ThinkAgile VX is 23.1: https://support.lenovo.com/us/en/solutions/HT515336
- Ensure download of the proper addon file to match the environment’s hardware
"In this release, there will be two types of custom images. Custom Images for sustaining products (in support since a previous Best Recipe,) with suffix S01 and custom images for new products (in support for the first time within the best recipe) with suffix N01"
- Servers listed under "New Products Supported" should download the N01 addon file, while all others should download the S01 addon file.
- To view the addon version, under ThinkAgile VX Best Recipe details, select "Solution Stack Guidelines"
- For example, this document is designed around the ThinkAgile VX 3331 V2 (SR630 V2). Since this chassis is not listed under New Products Supported, it falls under "Sustaining Products", thus the addon is 8.0.1-LVO.801.12.1 with S01 suffix:
- lnv-esx-LVO.801.12.1-20230530-S01-addon.zip
- The chassis listed under New Products Supported are SR630 V3, SR650 V3, ST650 V3, SR850 V3, SR860 V3, SR635 V3, SR655 V3, SR645 V3, SR665 V3, SR675 V3, SE350 V2, and SE360 V2, thus the N01 suffix file would be downloaded:
- lnv-esx-LVN-801.10.3-20230605-N01-addon.zip
Lenovo components
Verify if any newer versions or patches are available for Lenovo XClarity Administrator and Lenovo XClarity Integrator for VMware vCenter:
- Check for Lenovo XClarity Administrator (LXCA) updates
- Expand Lenovo XClarity Administrator Updates and click Download the latest fix pack for LXCA
- The original Reference Architecture and Deployment Guide deployed LXCA 4.0 and GA Fix 4.0.3
- As of this writing, version 4.0.14 GA Fix is the latest
- Download all four (4) files associated to the new GA Fix: fix, readme, change history, and InstallXML
- Expand Lenovo XClarity Administrator Updates and click Download the latest fix pack for LXCA
- Check for Lenovo XClarity Integrator for VMware vCenter (LXCI) updates
- Scroll down to Lenovo XClarity Integrator Virtual Appliance Updates
- The original Reference Architecture and Deployment Guide deployed LXCI 8.2.0
- As of this writing, version 8.3.0 is the latest
- Scroll down to Lenovo XClarity Integrator Virtual Appliance Updates
My VMware Depot connectivity
Verify an active connection by logging into SDDC Manager and navigating to Online Depot under Administration:

VMware Cloud Foundation Upgrade Steps
There will be five (5) major steps to the upgrade process, each requiring bundles be applied as part of this upgrade:
- SDDC Manager
- SDDC Manager configuration drift
- NSX
- vCenter
- ESXi
- This guide outlines both methods to upgrade ESXi, a custom ISO that can be imported into Lenovo XClarity Administrator (LXCA) and a vSphere Lifecycle Management Image, but the generic ESXi upgrade bundle is still required to be downloaded.
VMware SDDC Manager
- Navigate to Inventory > Workload Domains and click the Management Workload Domain
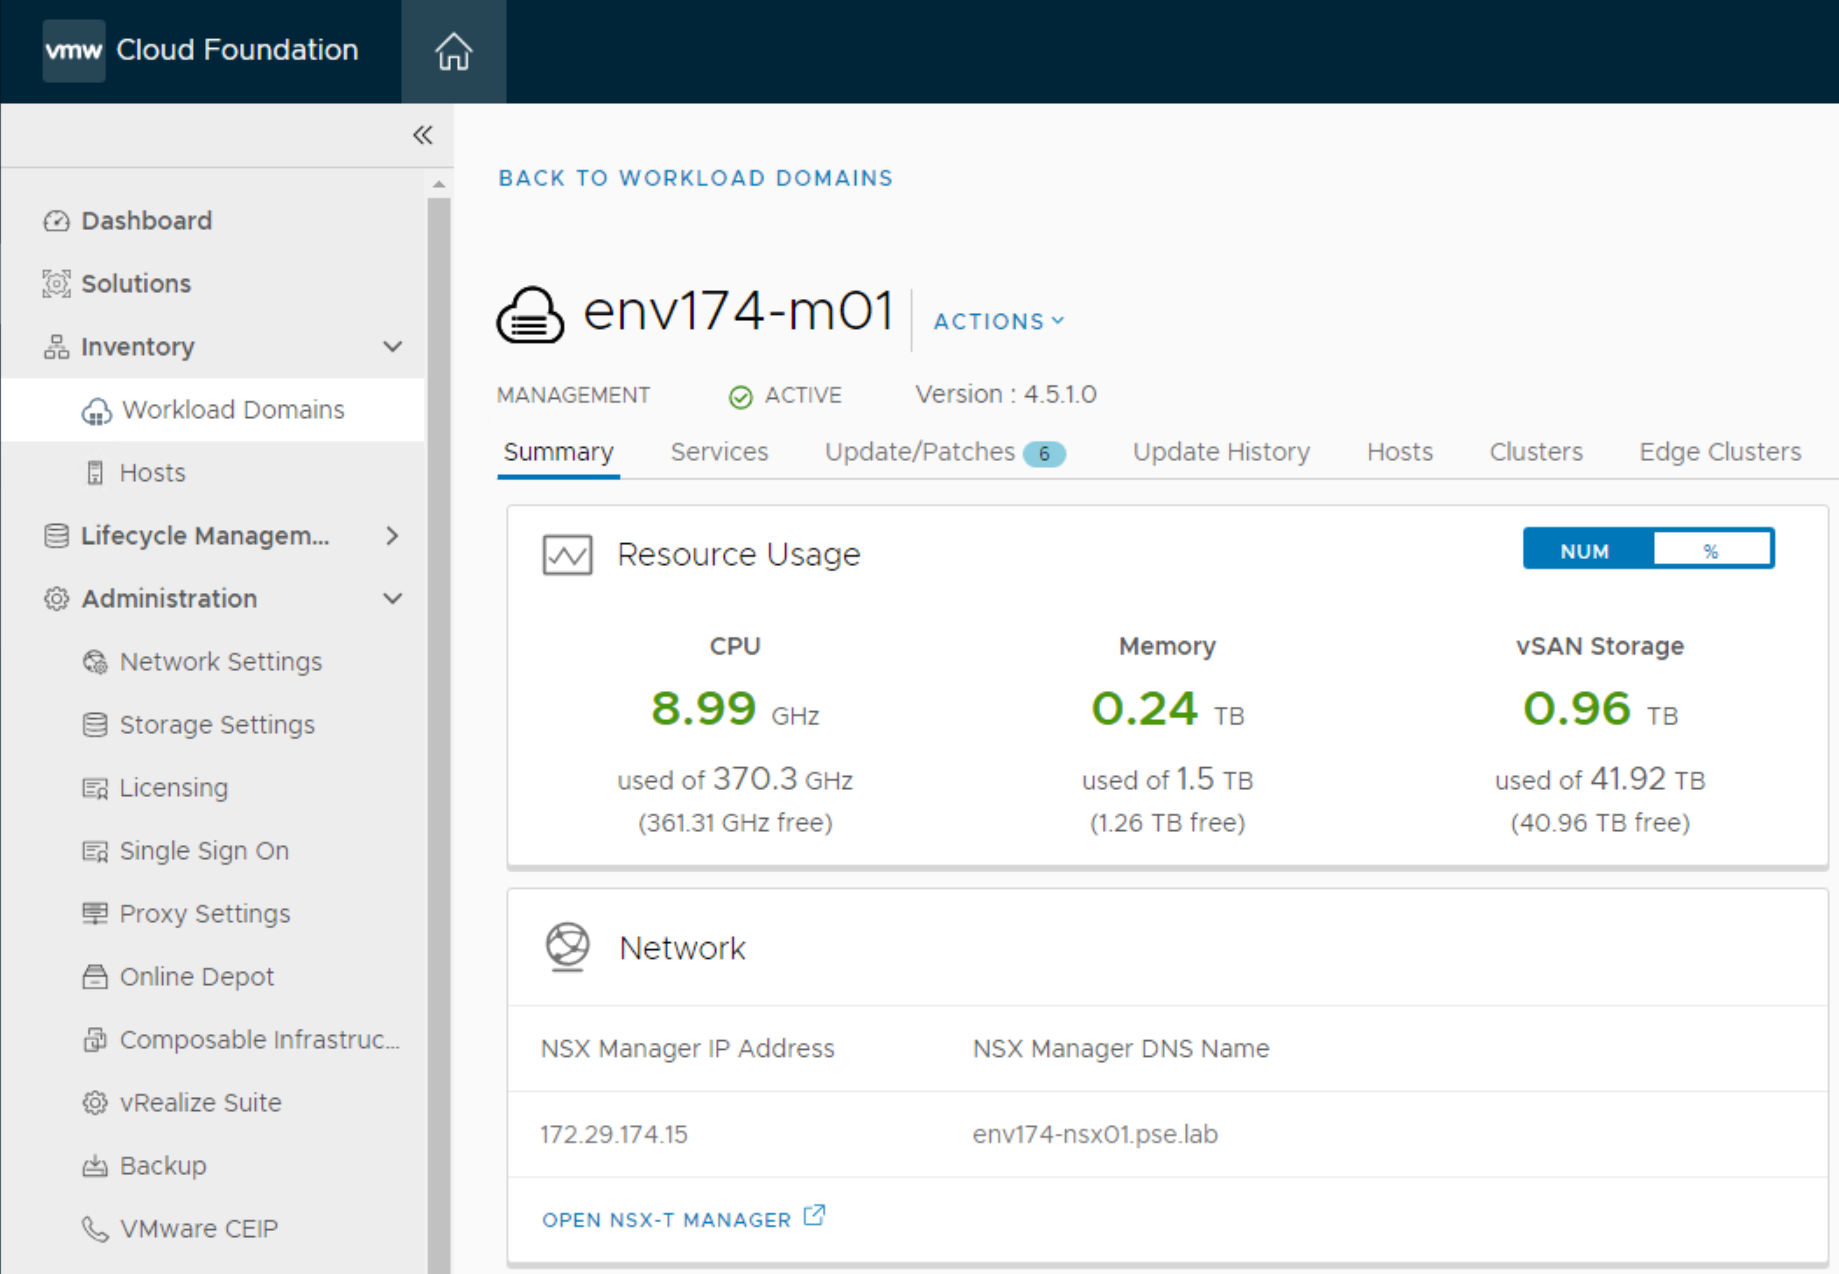
- Navigate to the Update/Patches tab
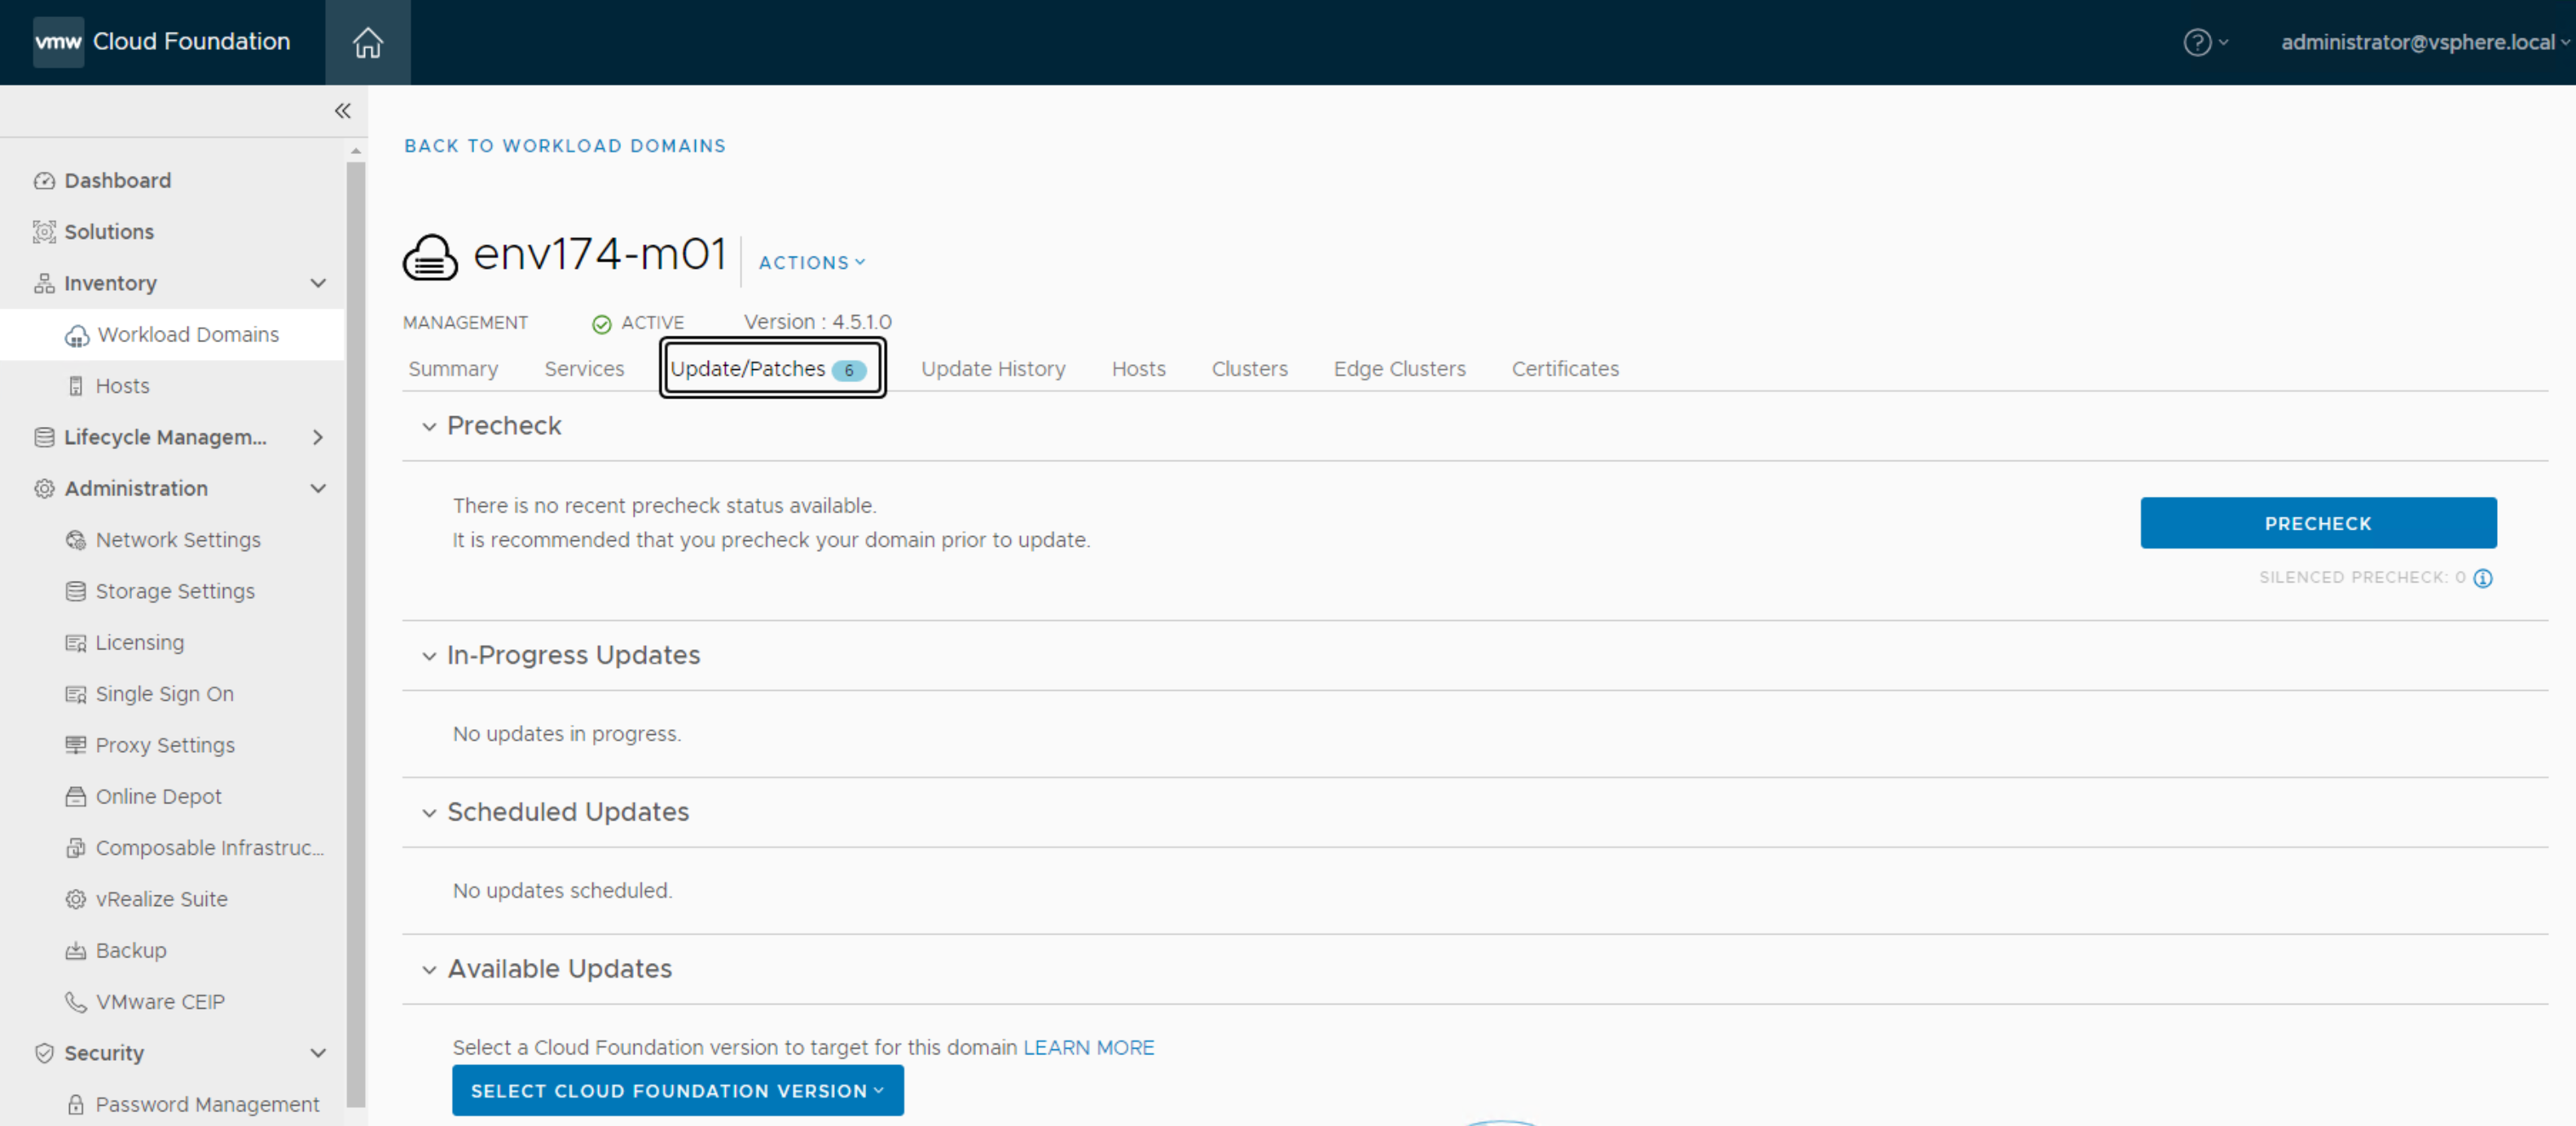
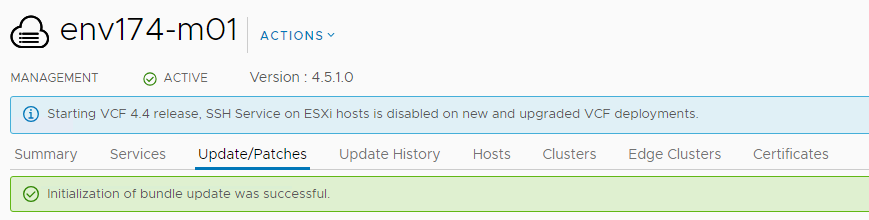
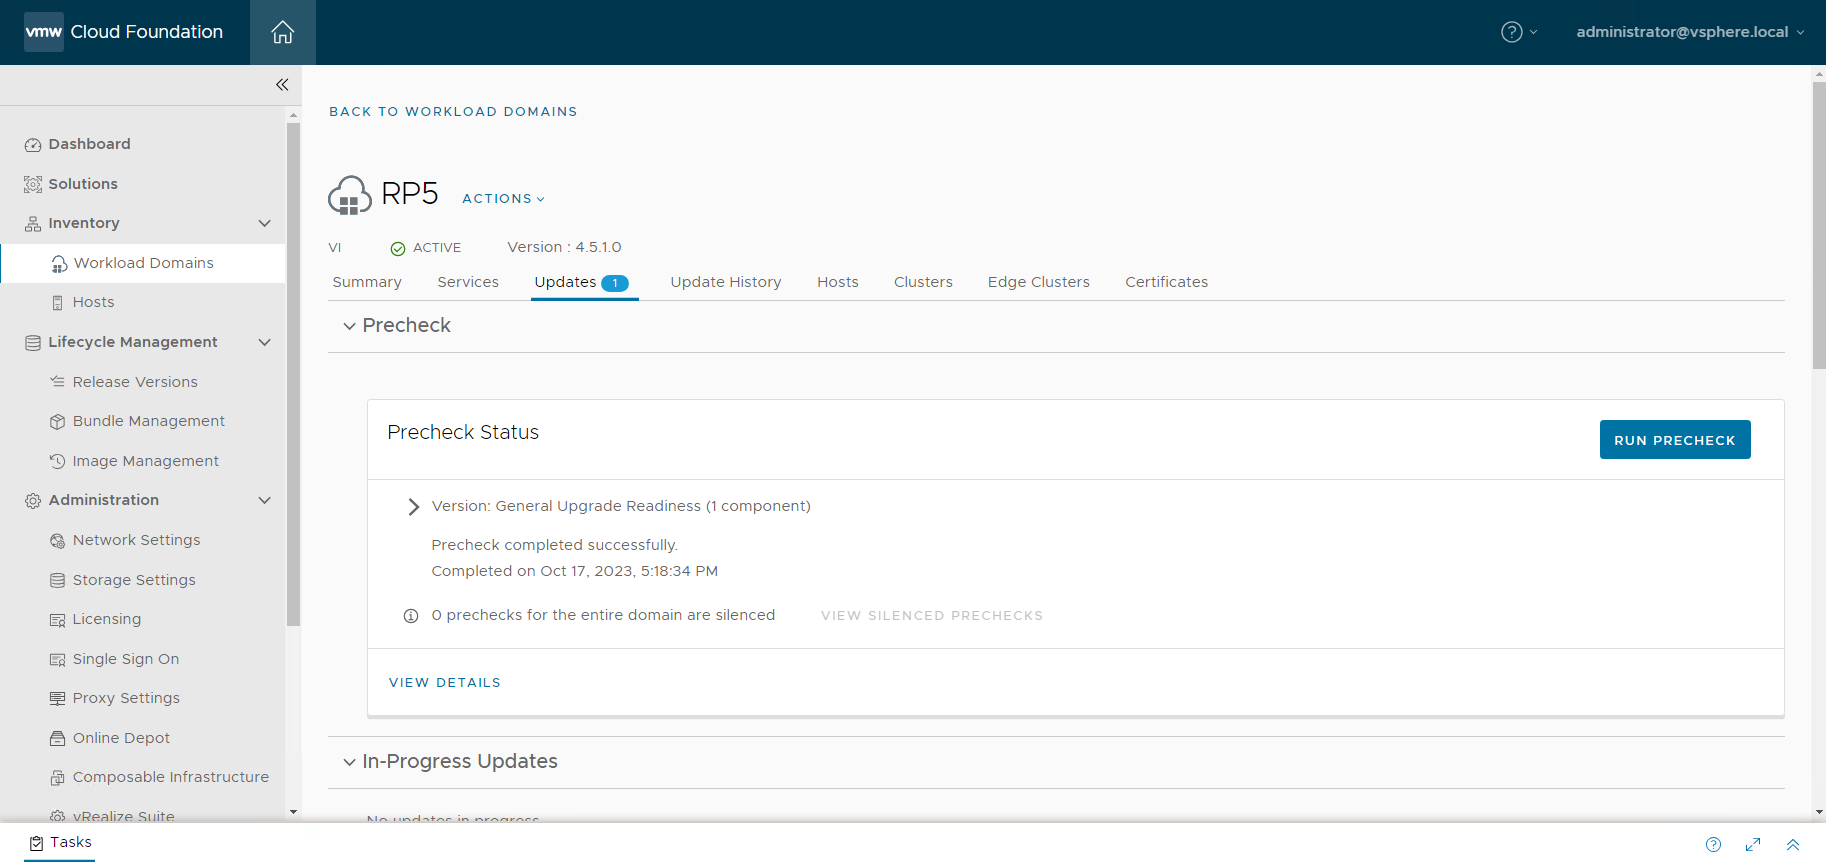
- Under Precheck, click the Precheck button, then click View Status to monitor progress
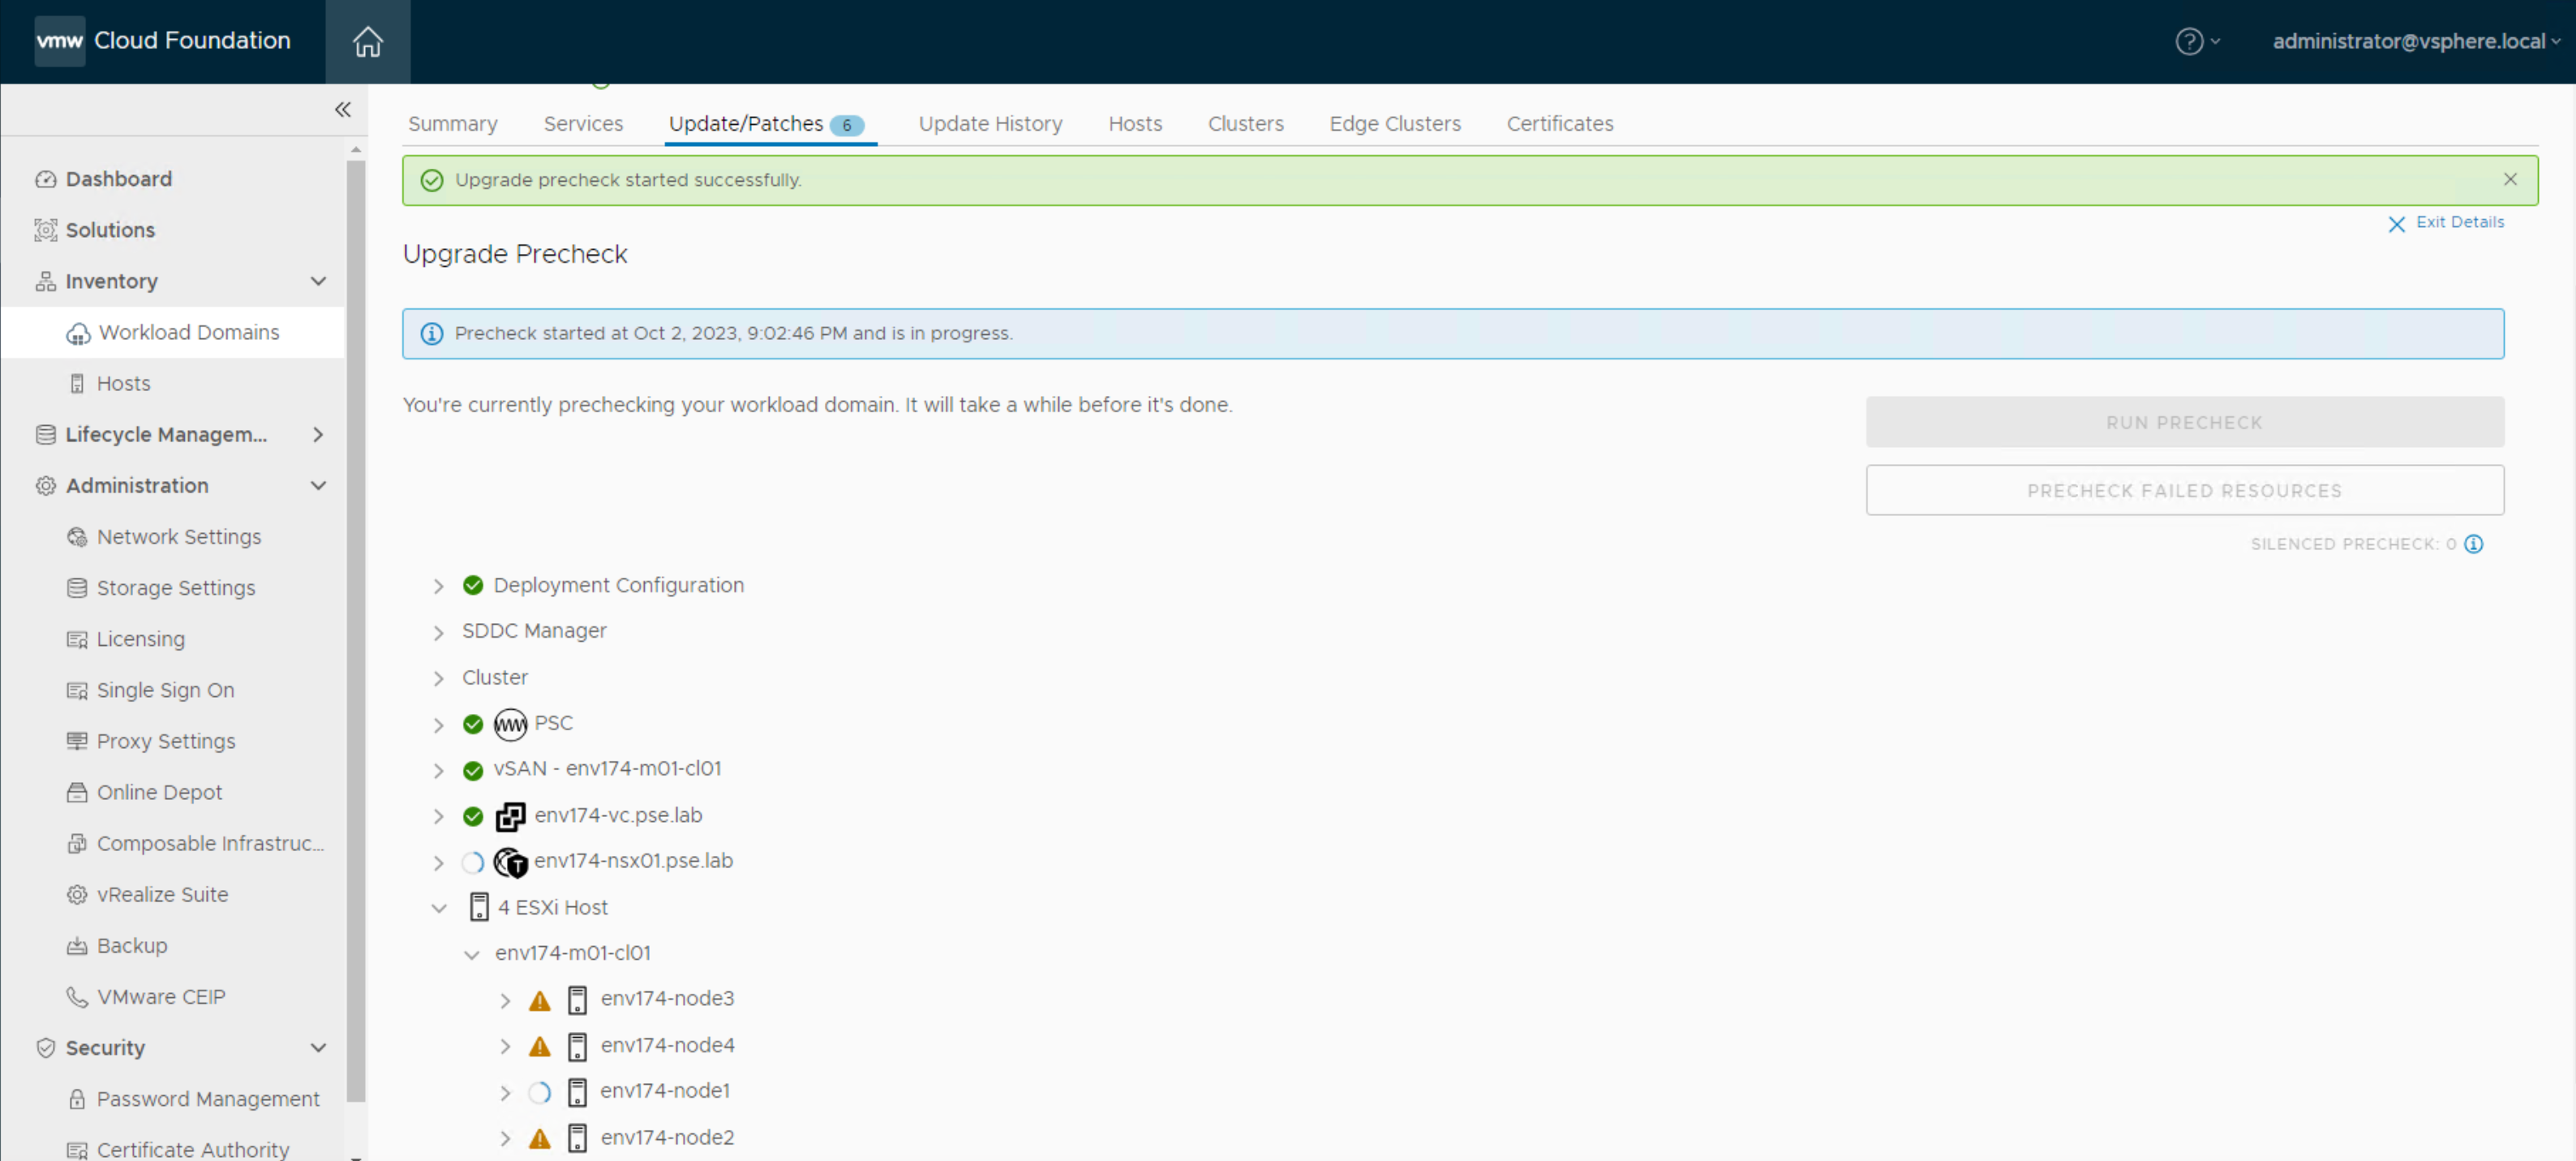
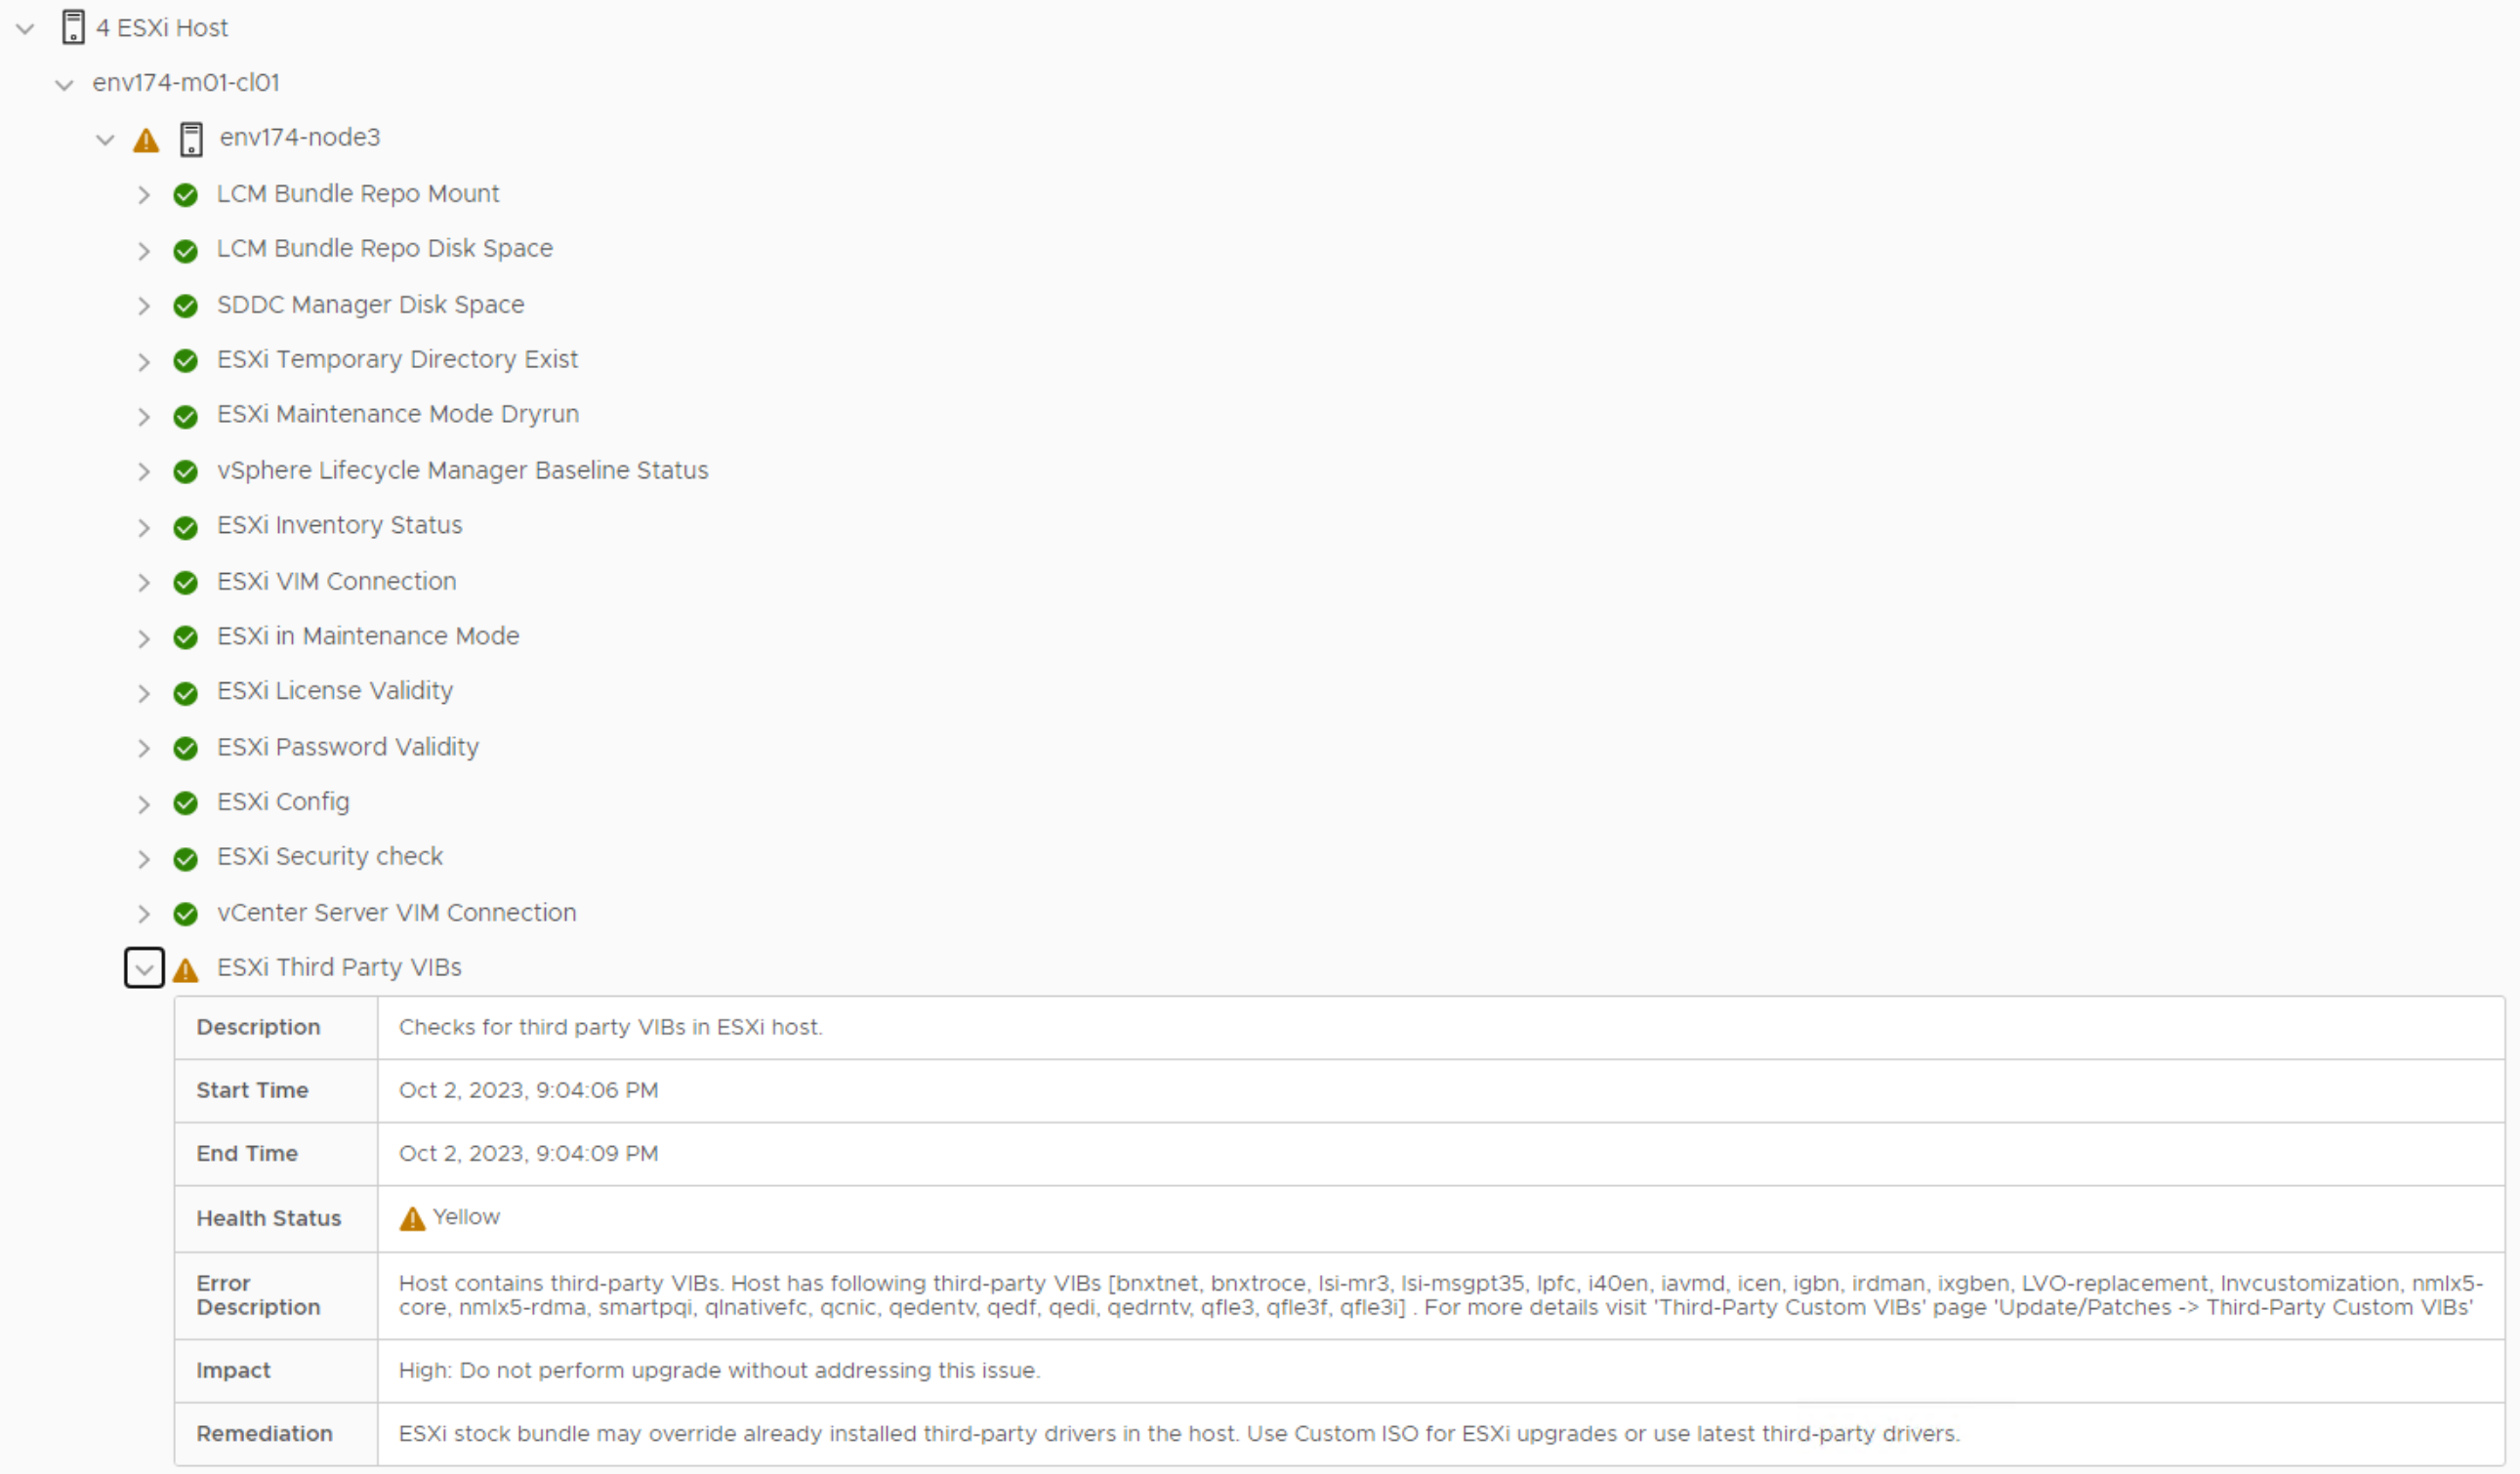
- There will be a warning regarding Third Party VIBs - This is expected with the Lenovo customizations
- Click "Exit Details" at the top right to go back to the Update/Patches section.
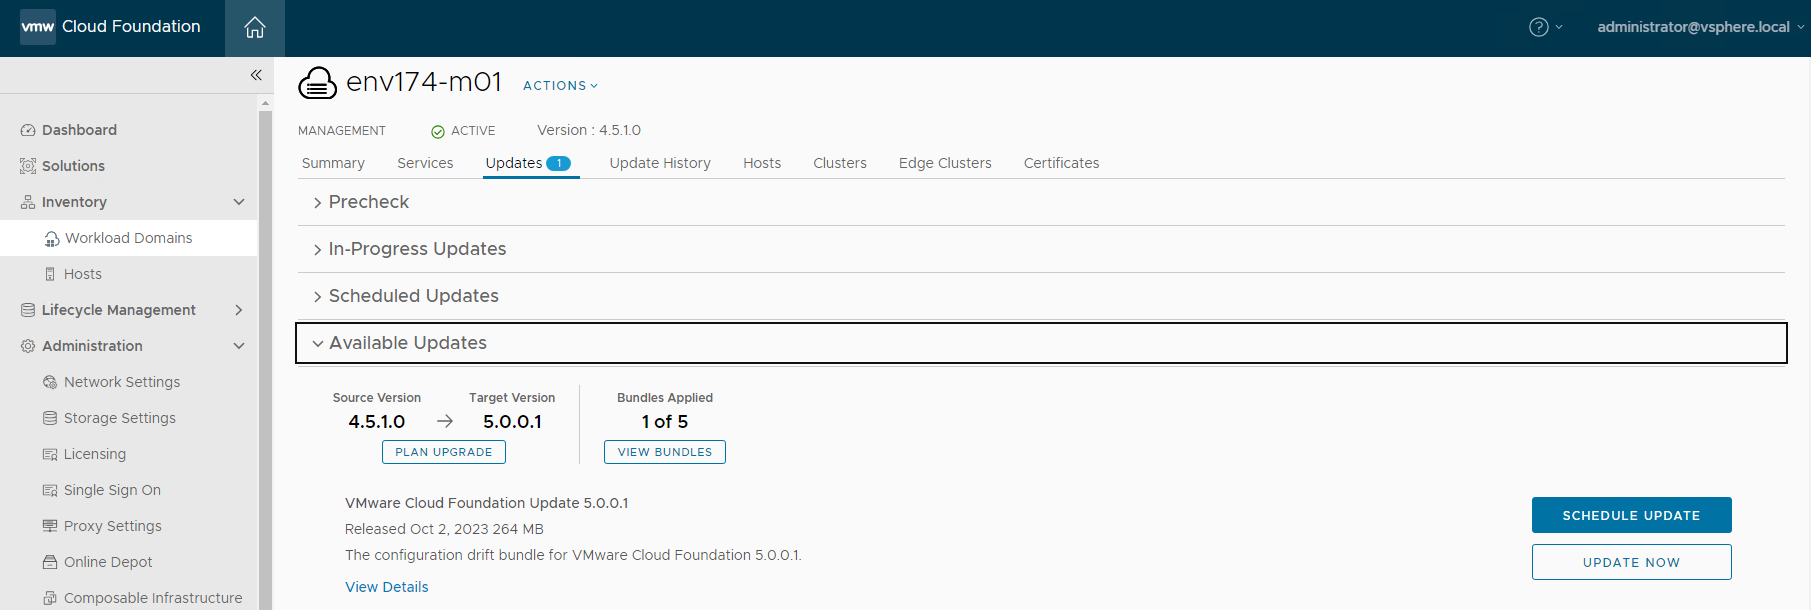
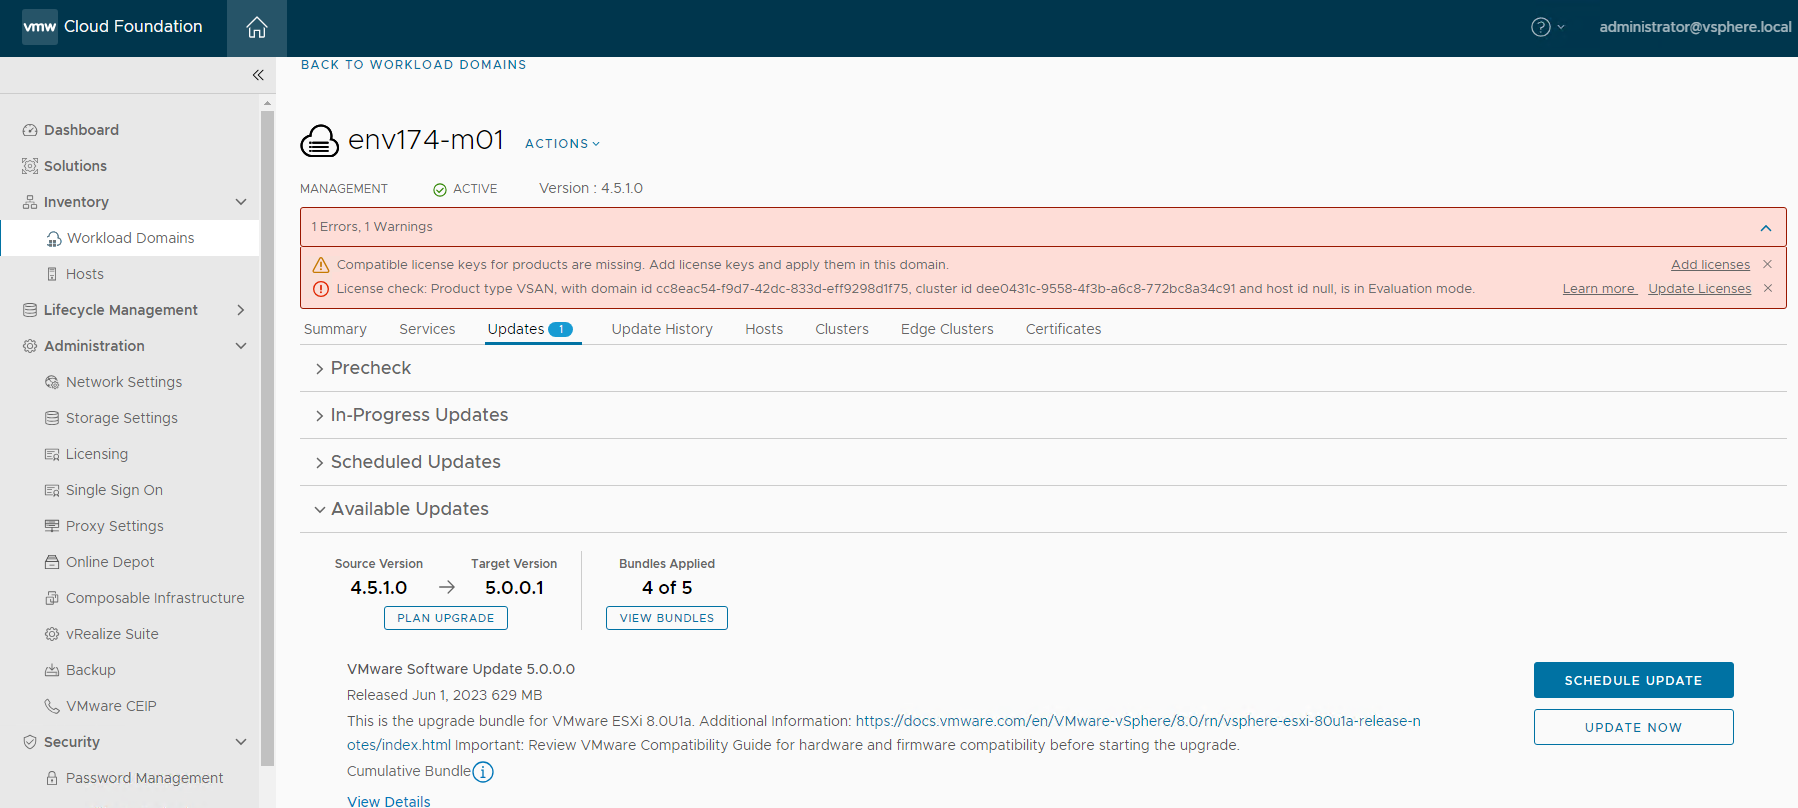
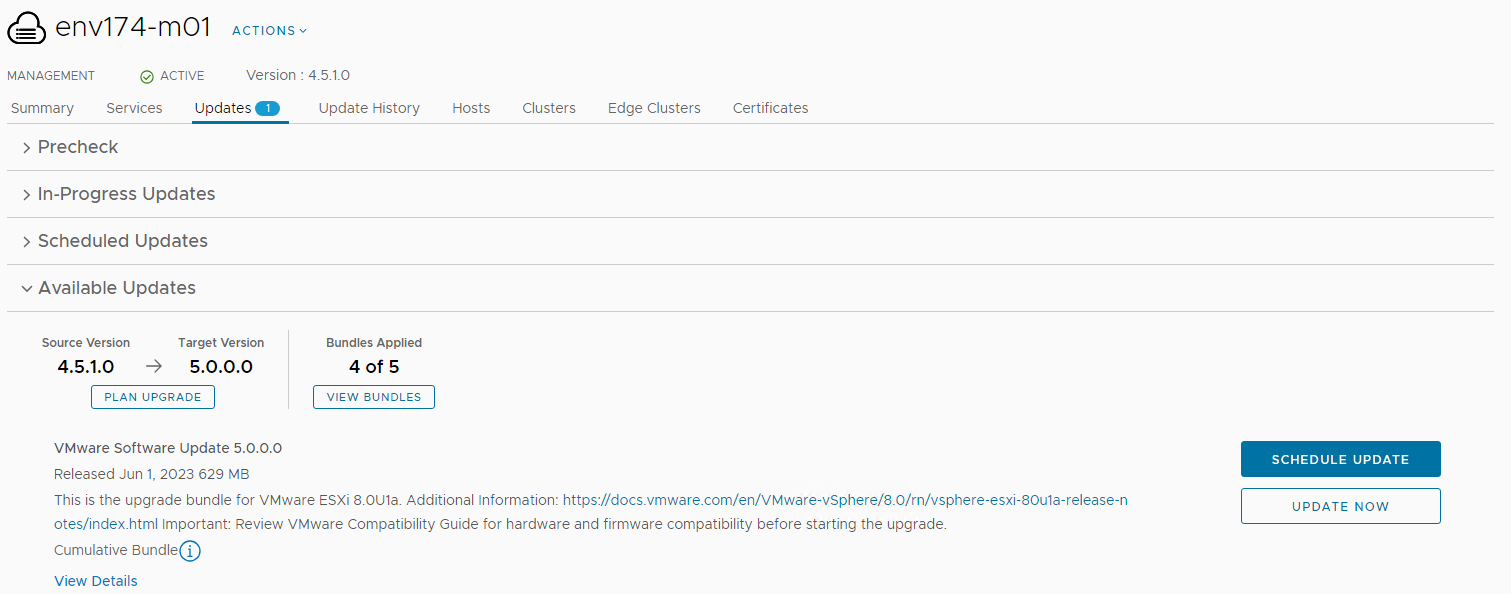
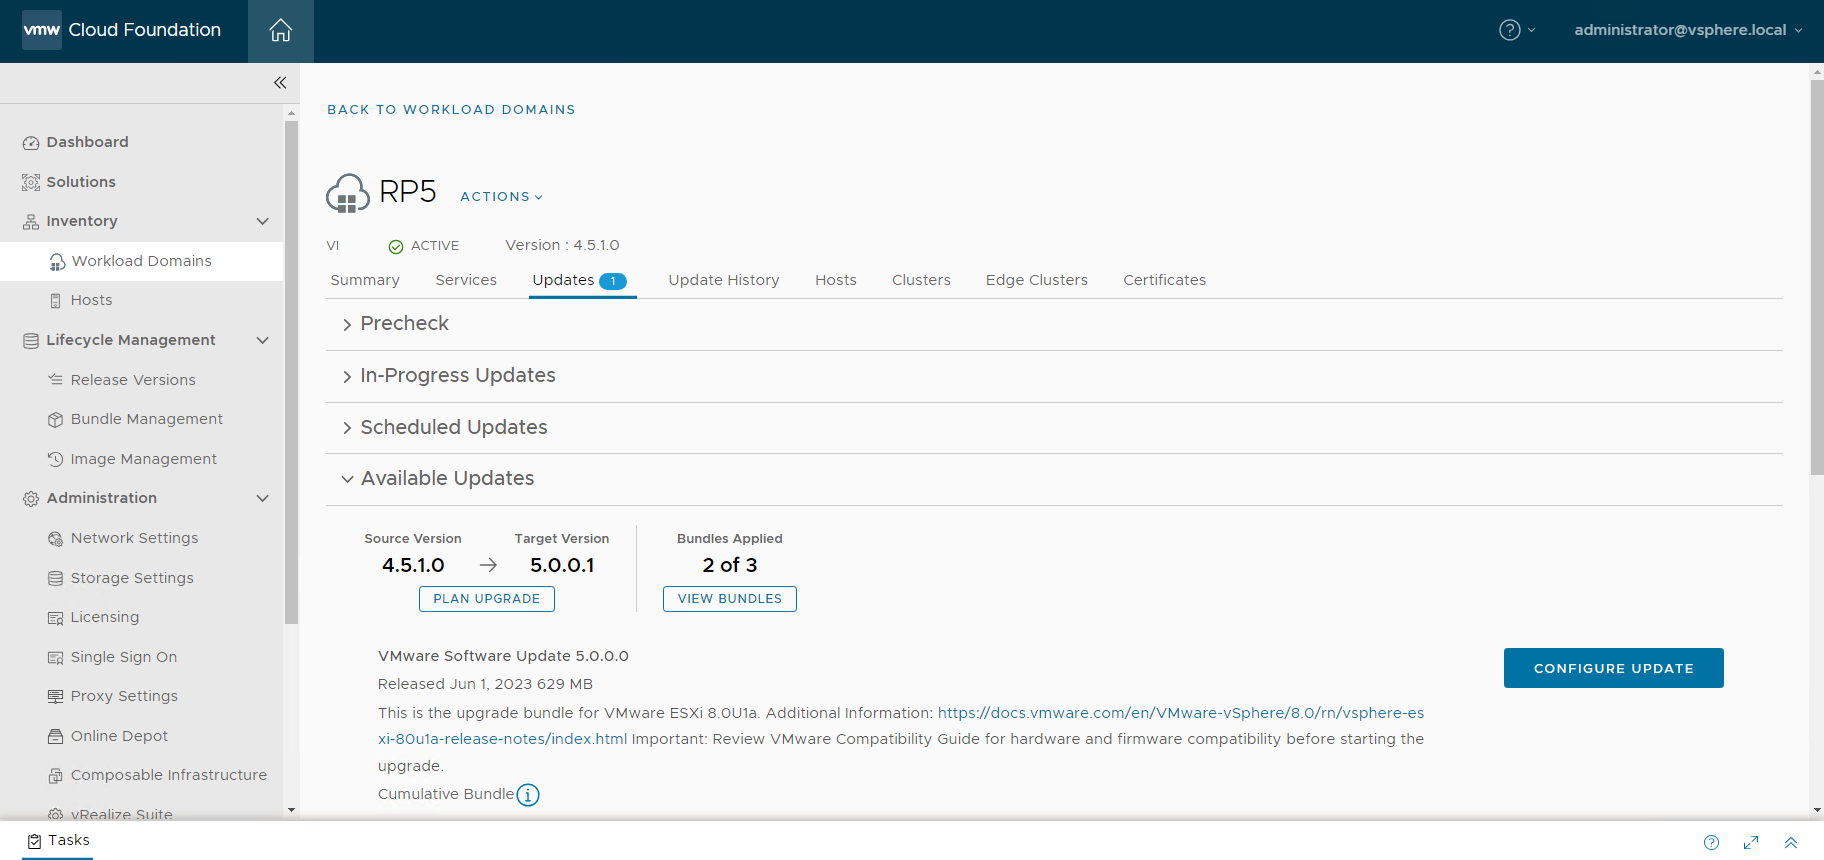
- Under Available Updates, click the dropdown menu and select Cloud Foundation 5.0.0.1
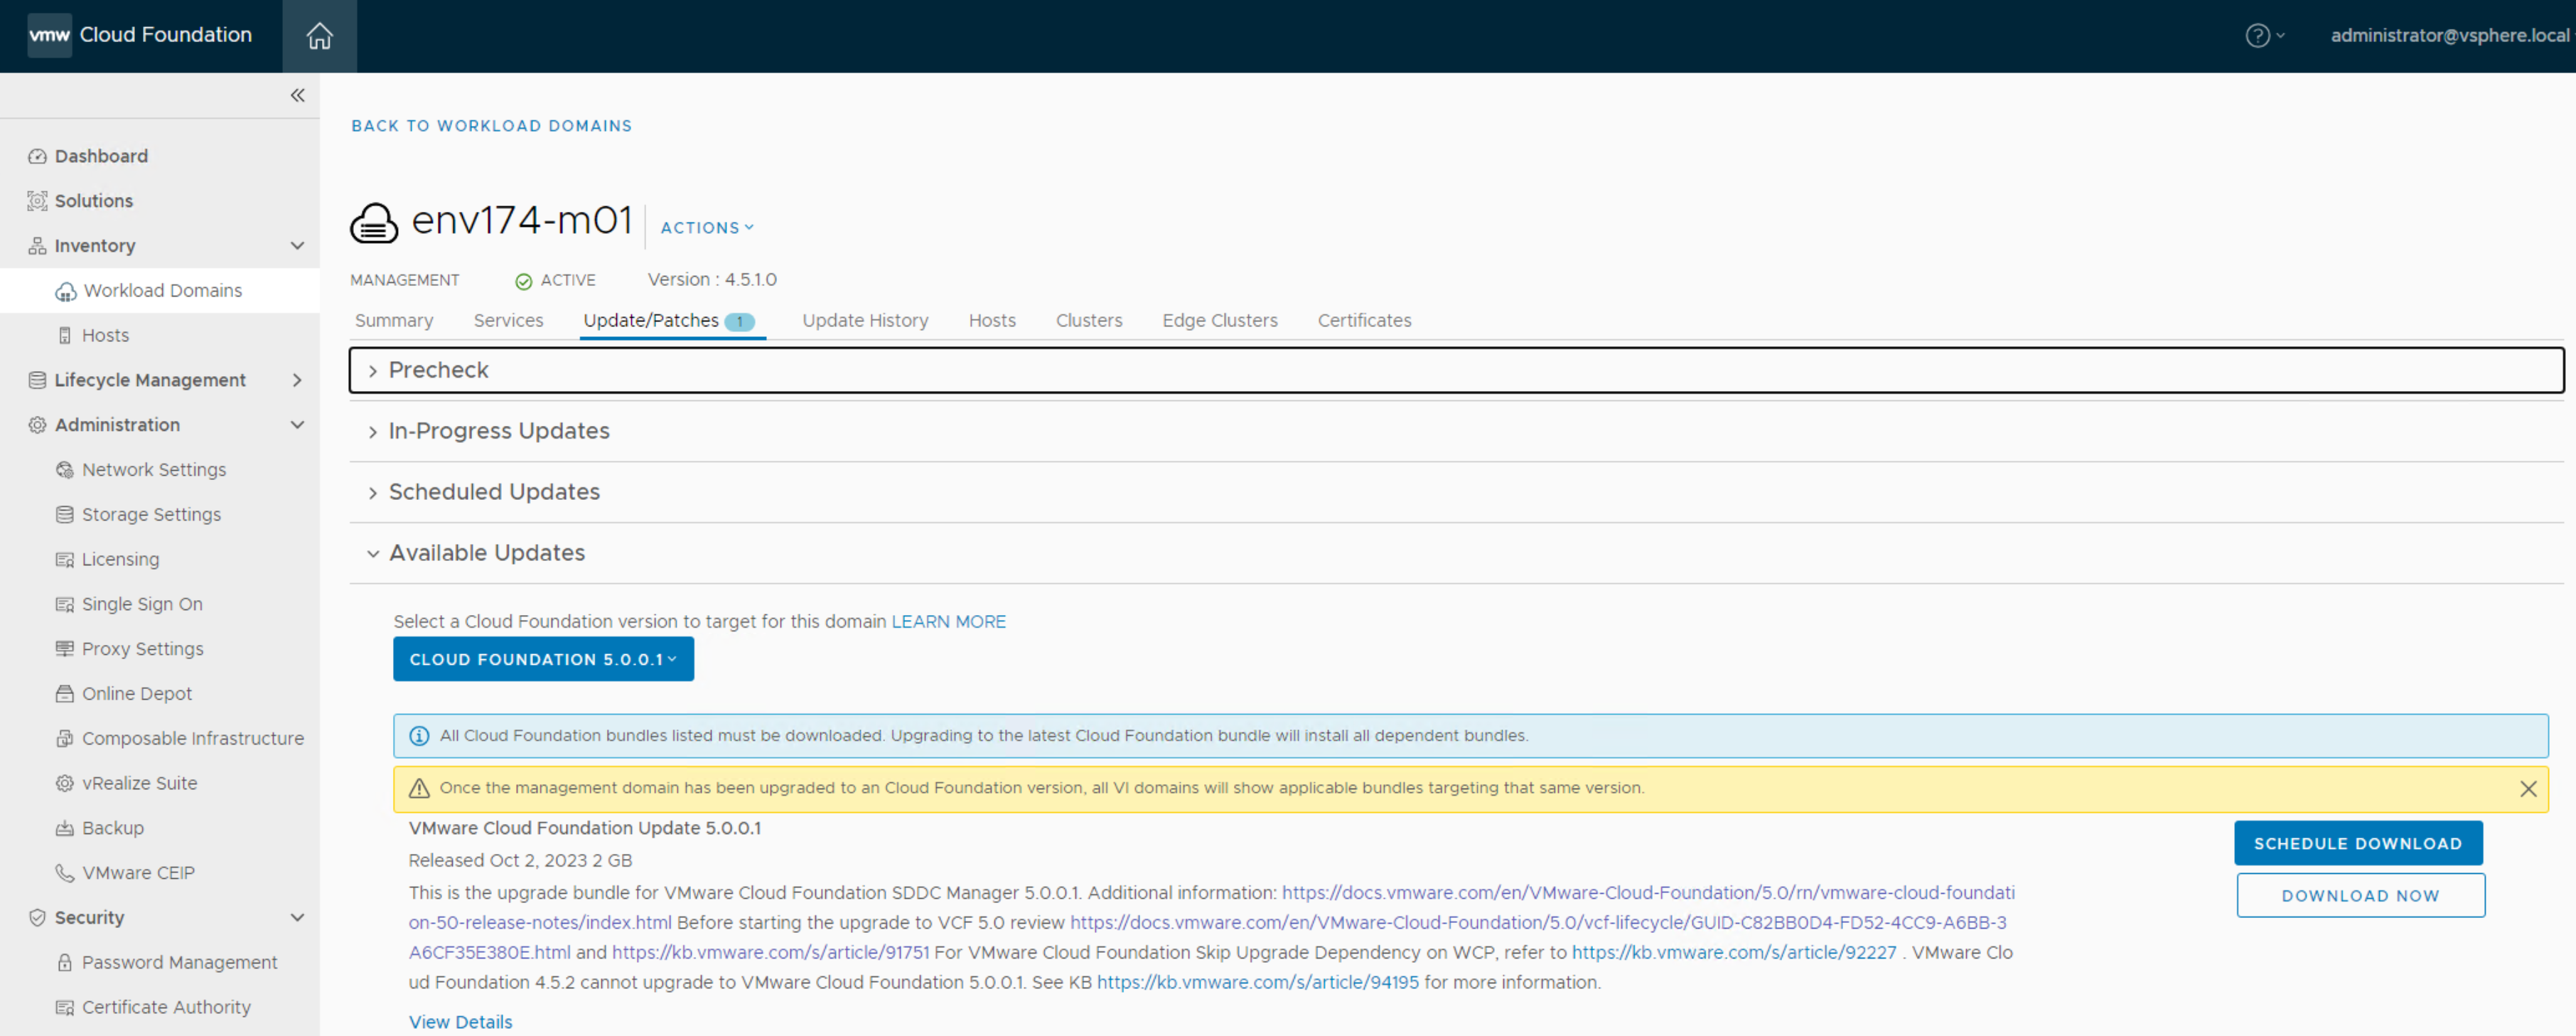
- Click Download Now for the VMware Cloud Foundation Update 5.0.0.1

- While the bundle is downloading, navigate to the SDDC manager VM in vCenter and take a snapshot of the running VM, including memory. If something fails at this step, this step makes it easier to recover.
- Once the download is complete, click Update Now (or Schedule Update). There will be a notification stating the initialization of the bundle update was successful
- Monitor the progress of the upgrade
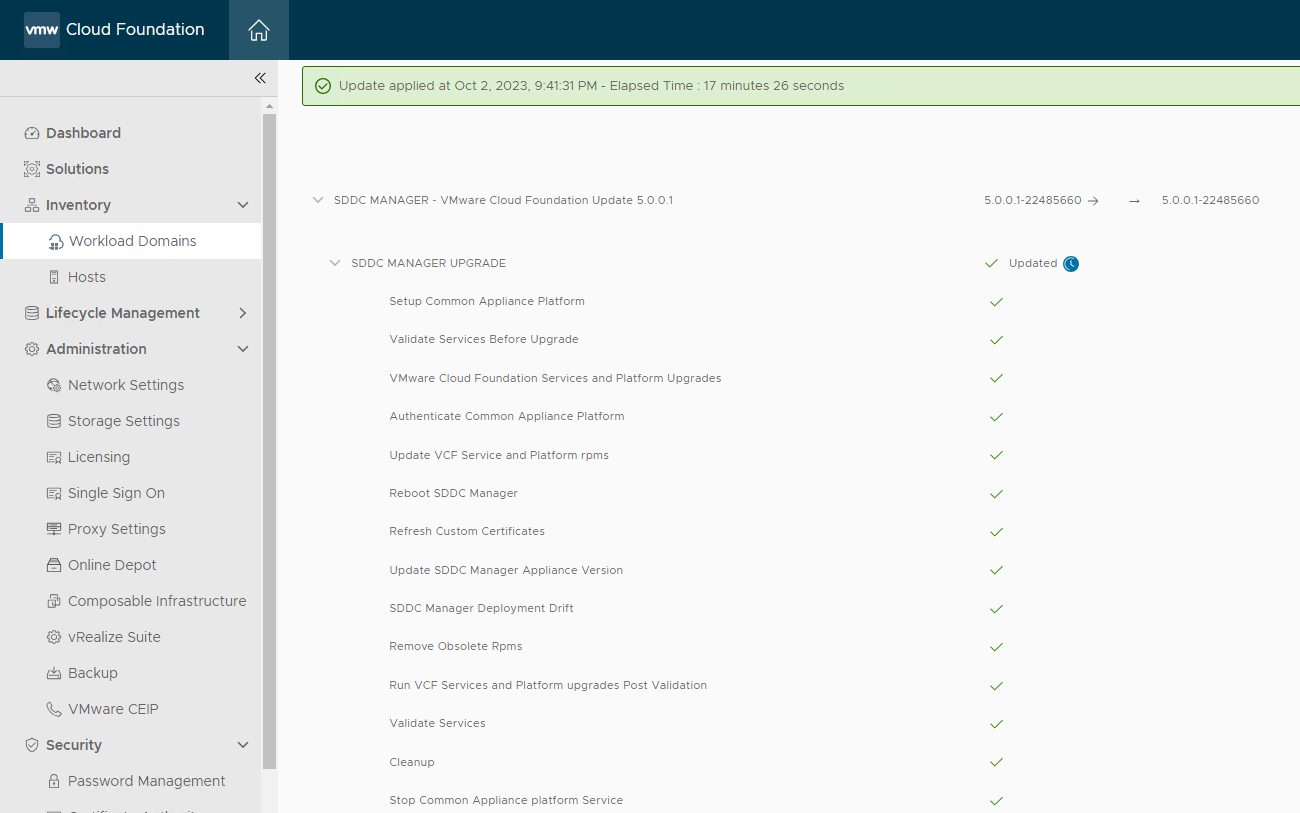
- After the upgrade has completed successfully, delete the snapshot on the SDDC Manager VM.
- Navigate to Inventory > Workload Domains, click the Management Workload Domain and select the Updates tab
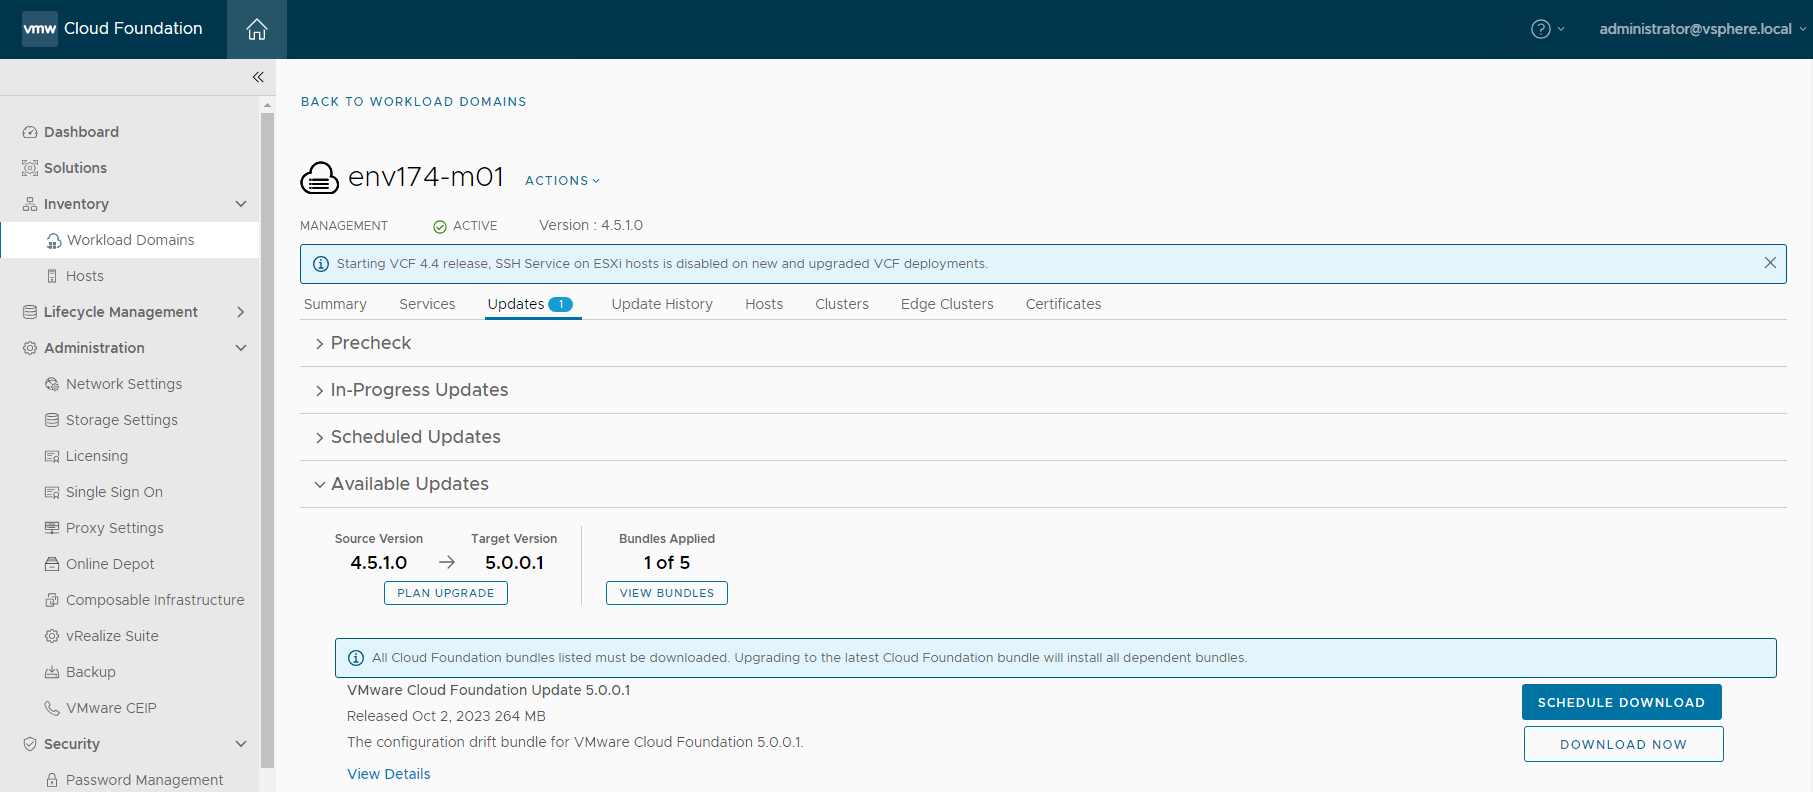
- *NOTE* - the Version will remain 4.5.1.0 until all components are upgraded, despite SDDC Manager being upgraded to 5.0.0.1
- Click DOWNLOAD NOW for the configuration drift bundle.
- When the download is complete, click UDPATE NOW. This update bundle will take only a few minutes to apply.
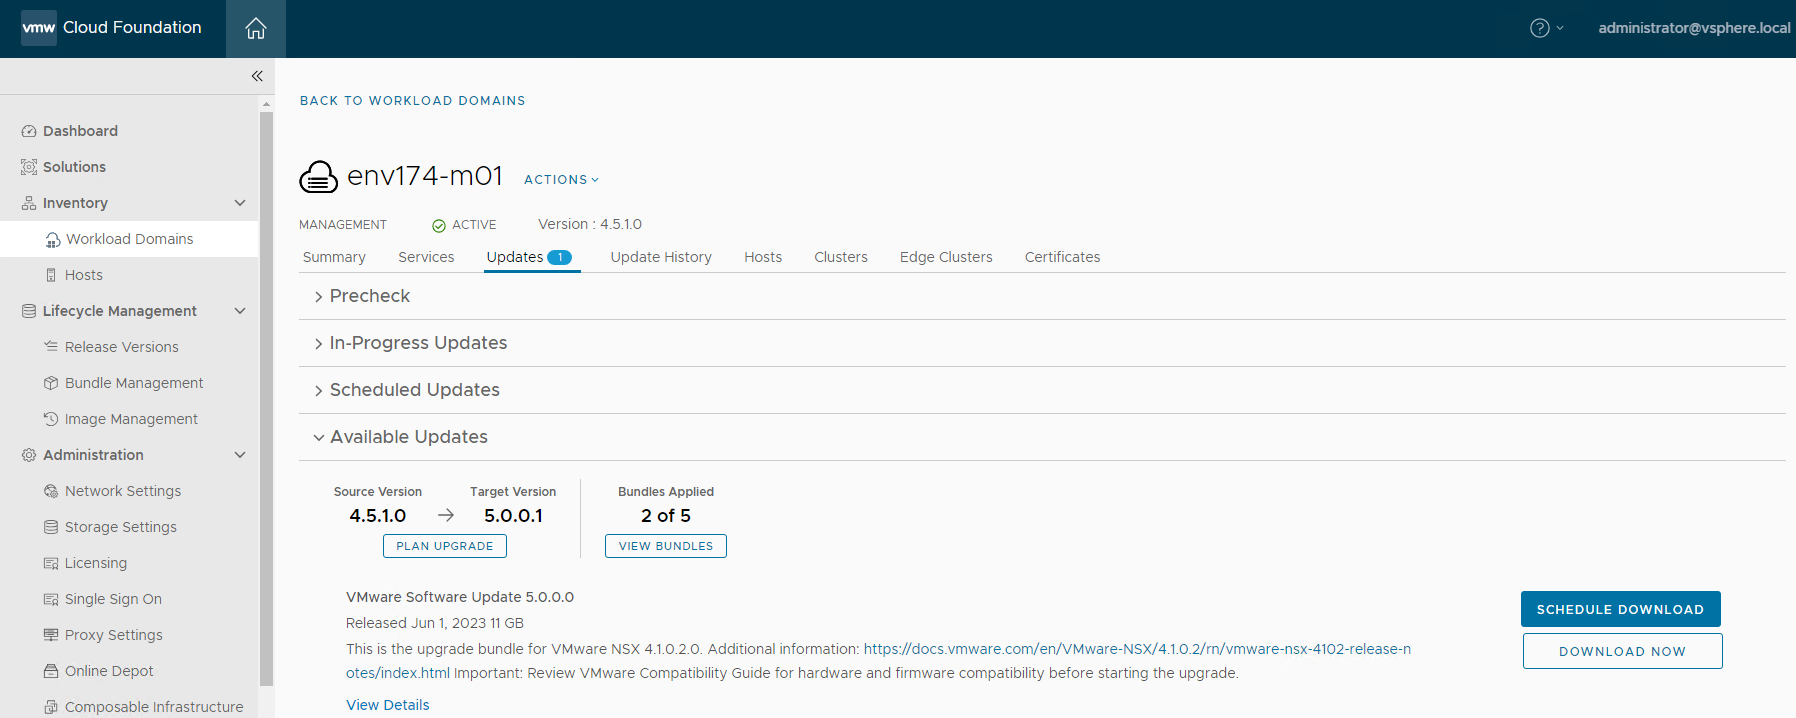
- After the update bundle has been successfully applied, wait for the Updates tab to show the NSX upgrade bundle (a page refresh may be required)
VMware NSX
Once the NSX bundle is available, click DOWNLOAD NOW
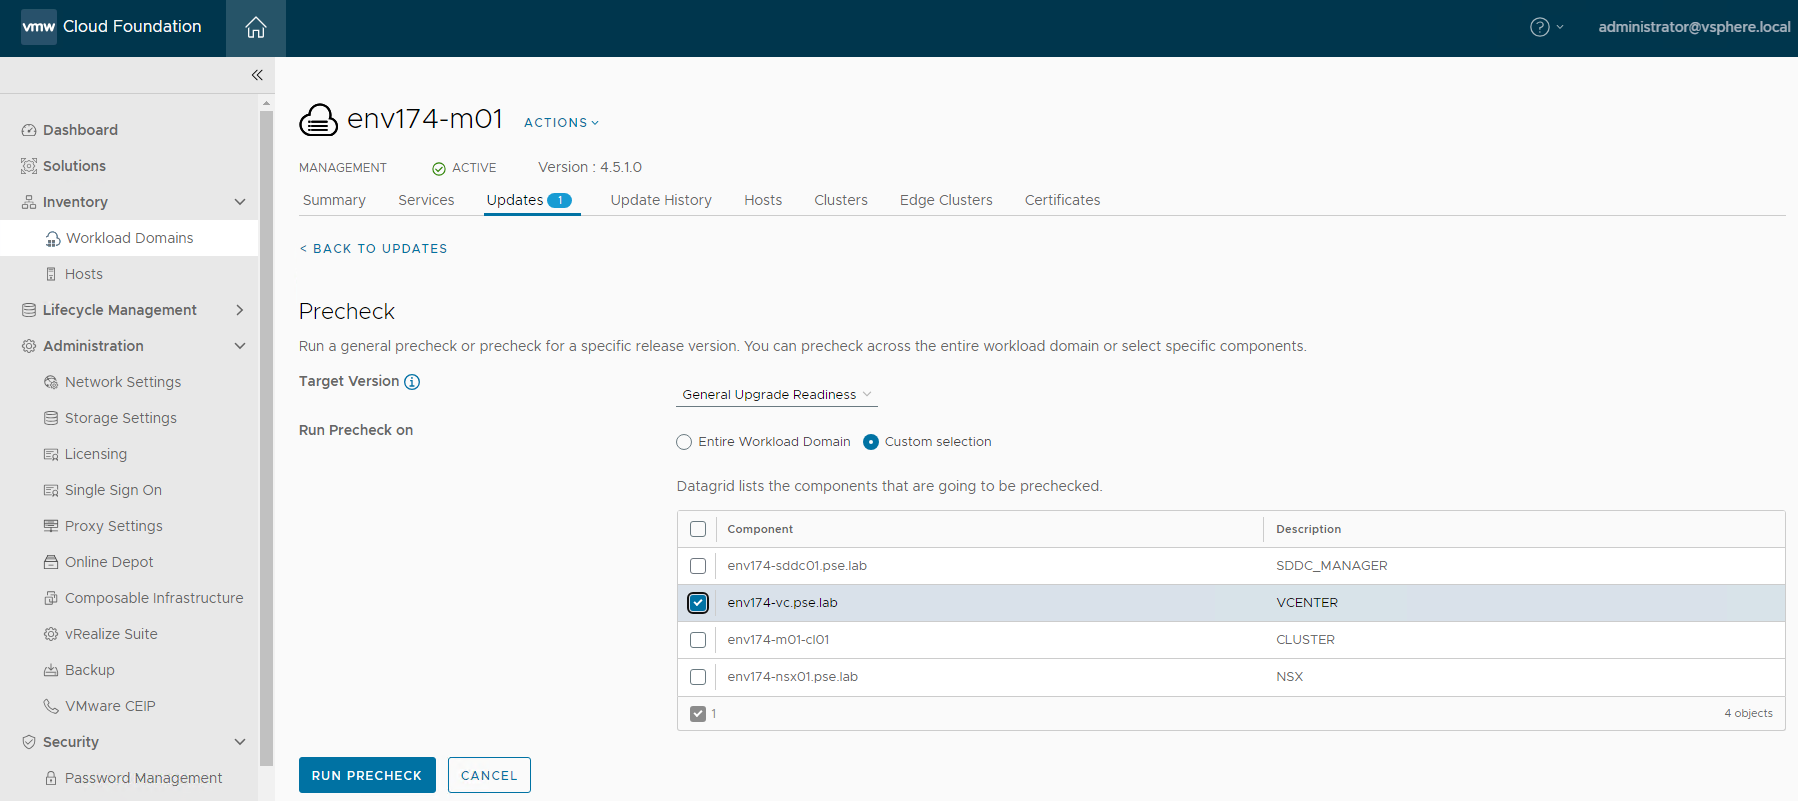
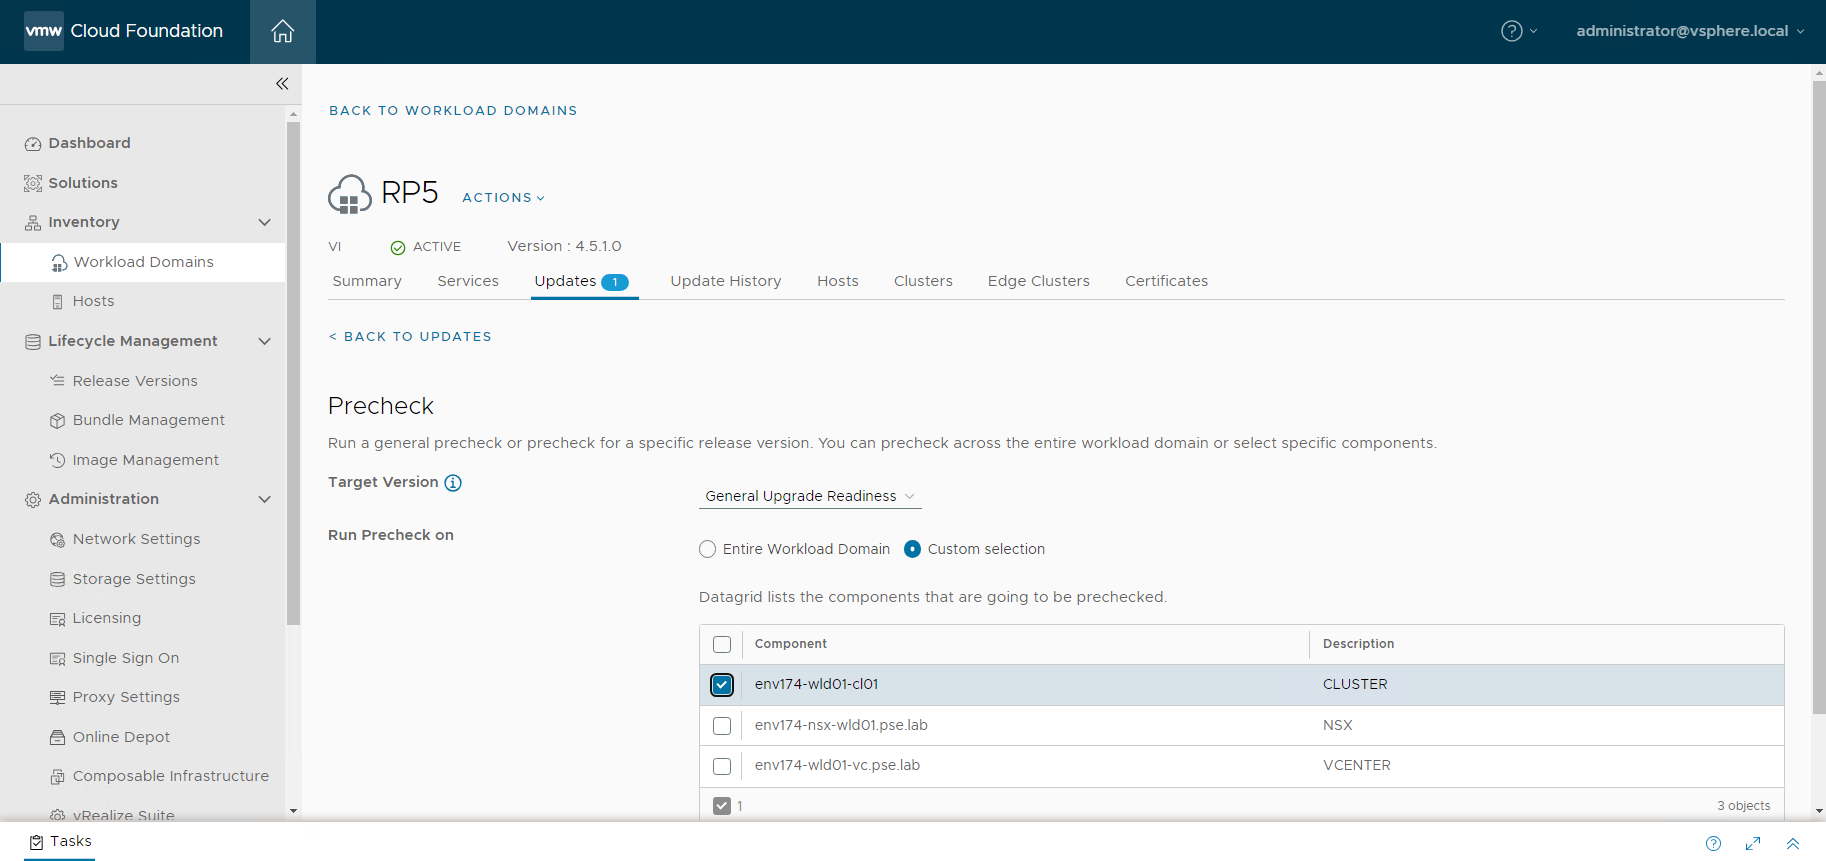
- While the NSX bundle is downloading, under Precheck, click the RUN PRECHECK button.
- Select General Upgrade Readiness as the target version
- Select "Custom selection" for Run Precheck on, then select NSX
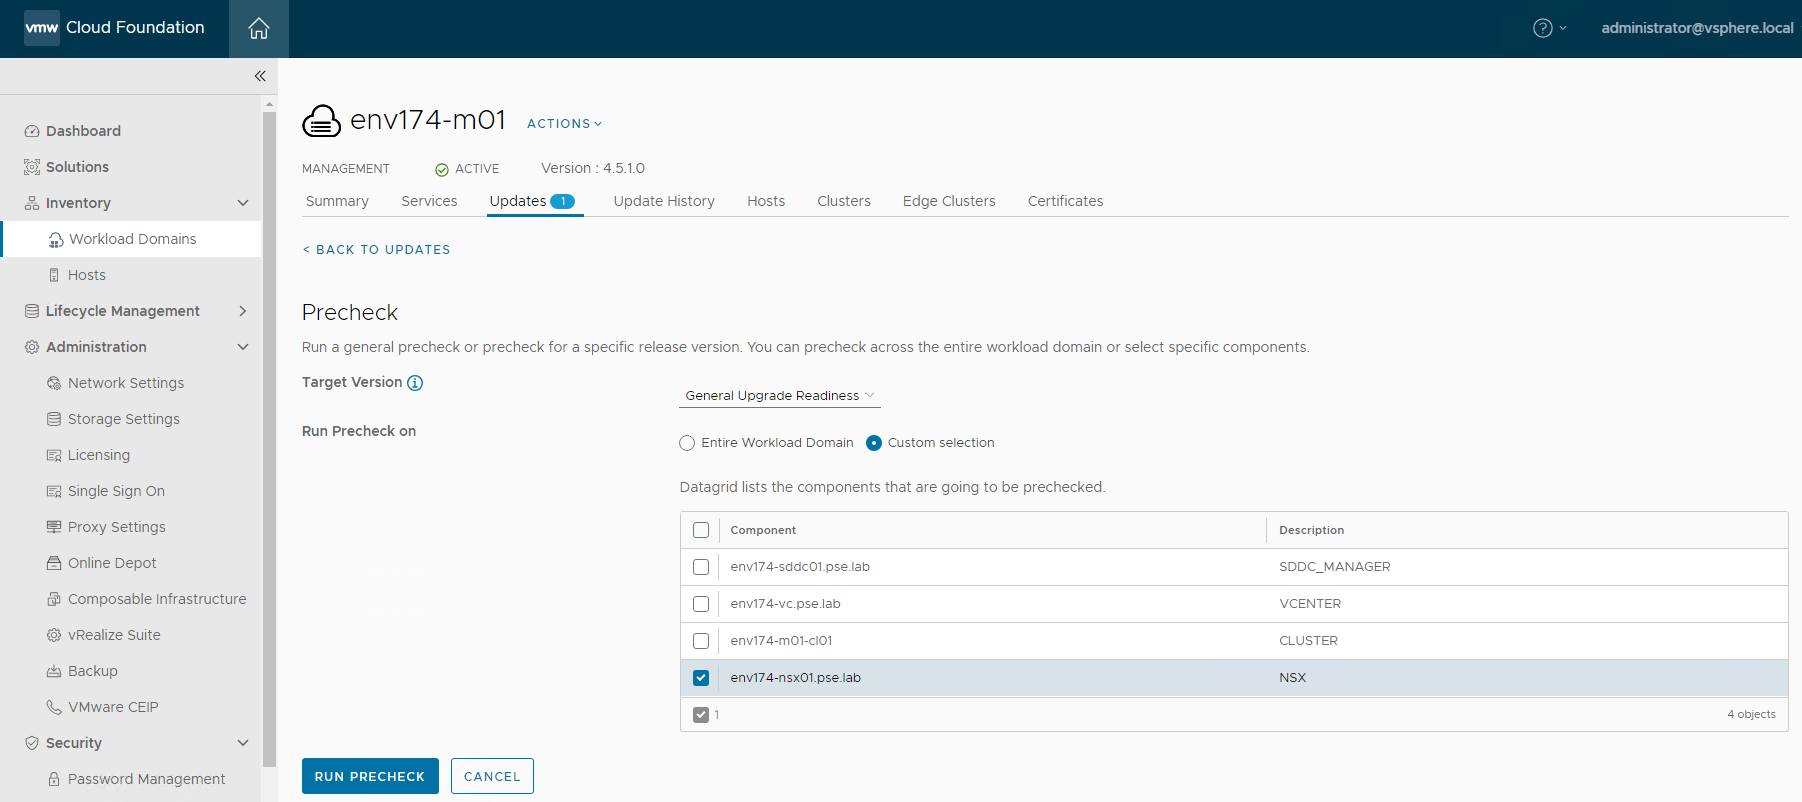
- Click RUN PRECHECK
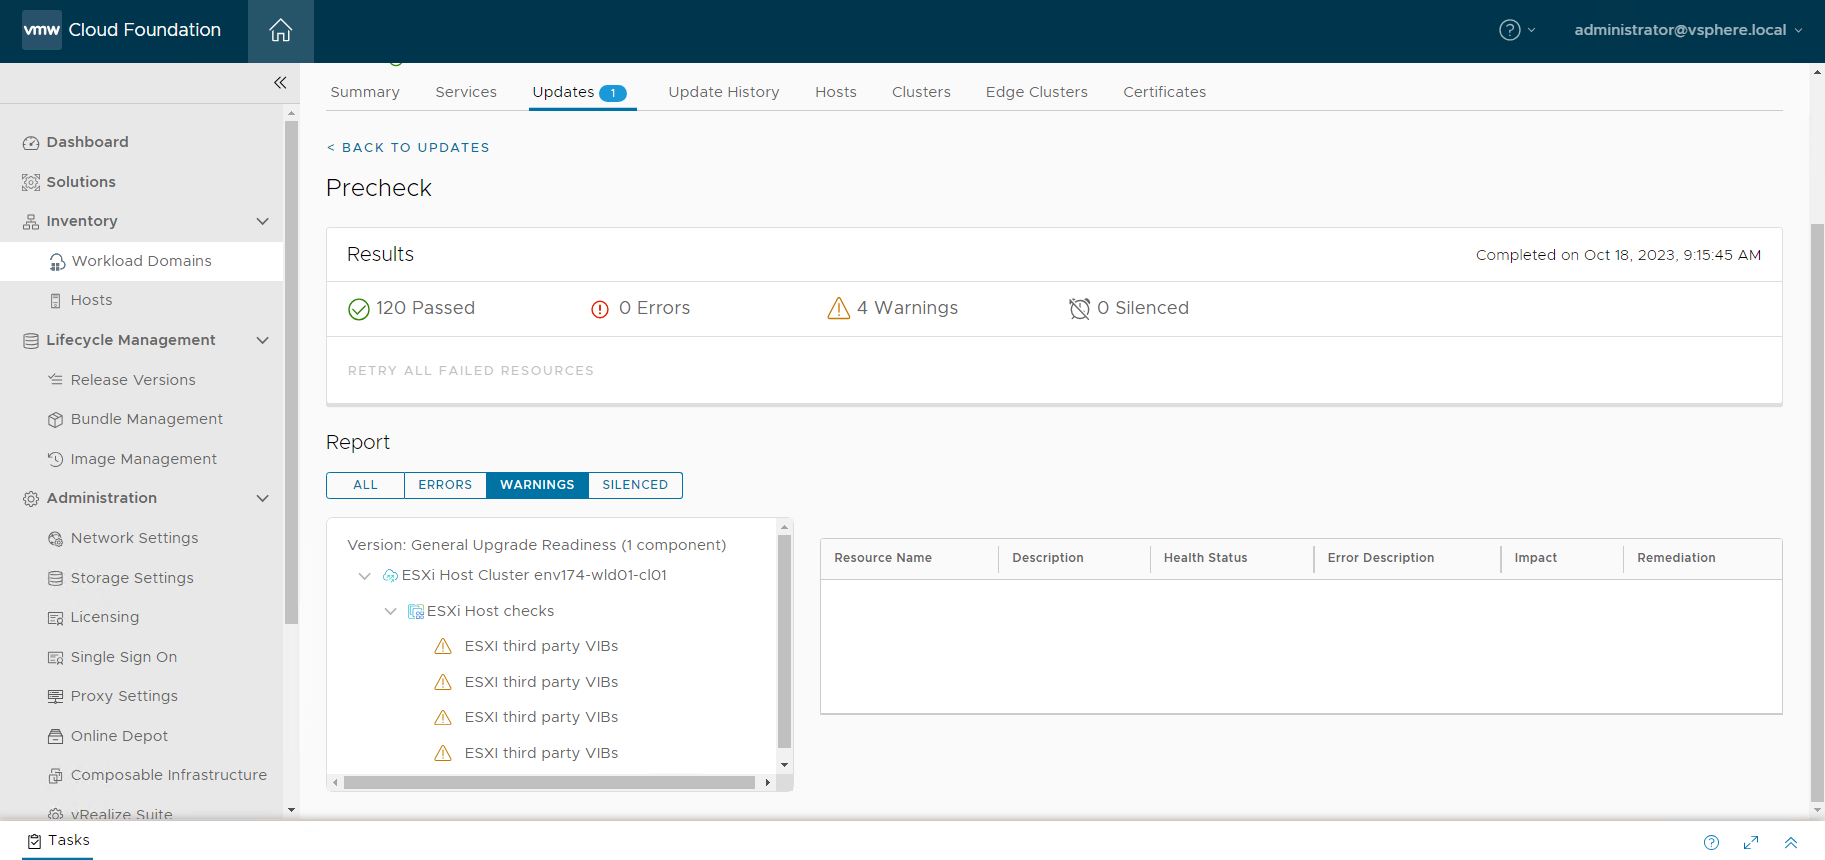
- When completed, address any errors or warnings that may appear

- Ensure you have backups of NSX before proceeding.
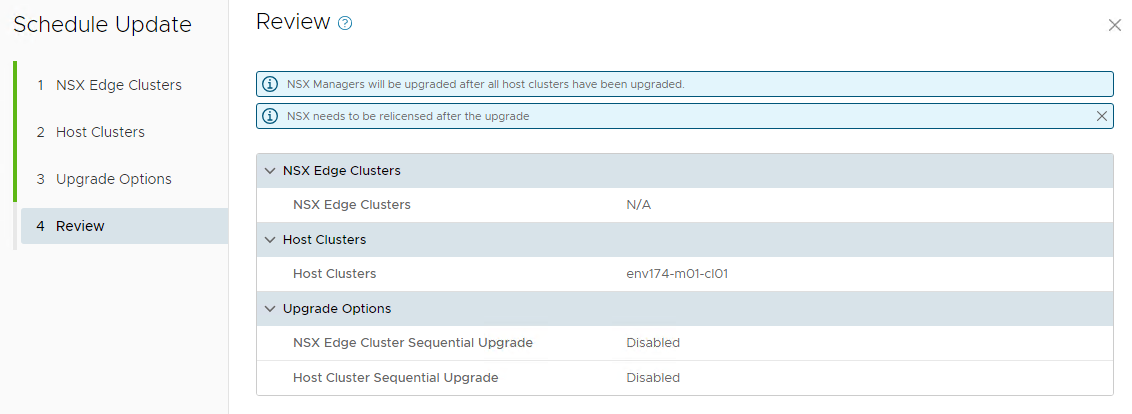
- Click UPDATE NOW to apply the NSX 4.1.0.2.0 upgrade bundle
- The NSX Bundle allows you to select individual Edge & Host clusters to upgrade

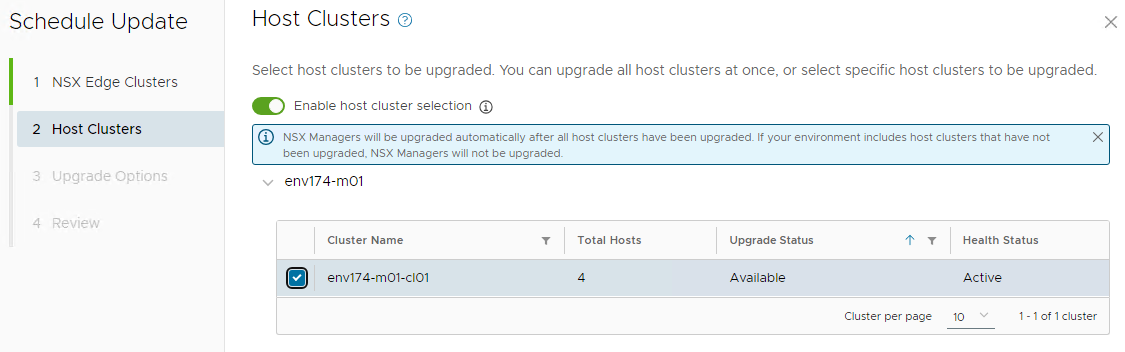
- The update bundle also offers the option to update clusters in parallel or in sequence
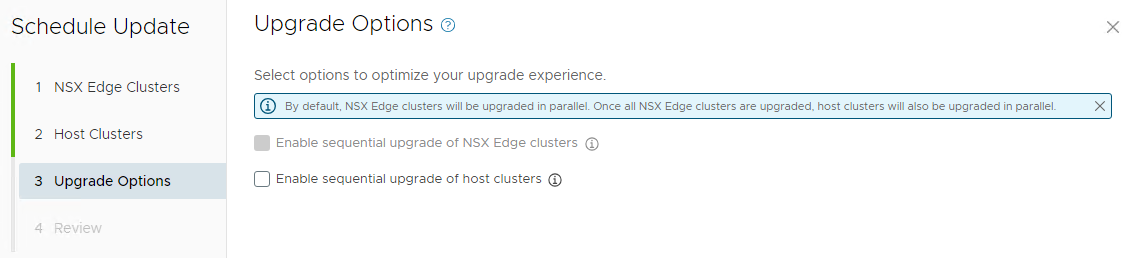
- This document accepts all default options
- *NOTE* - The version will show "VMware Software Update 5.0.0.0" despite SDDC Manager being on version 5.0.0.1
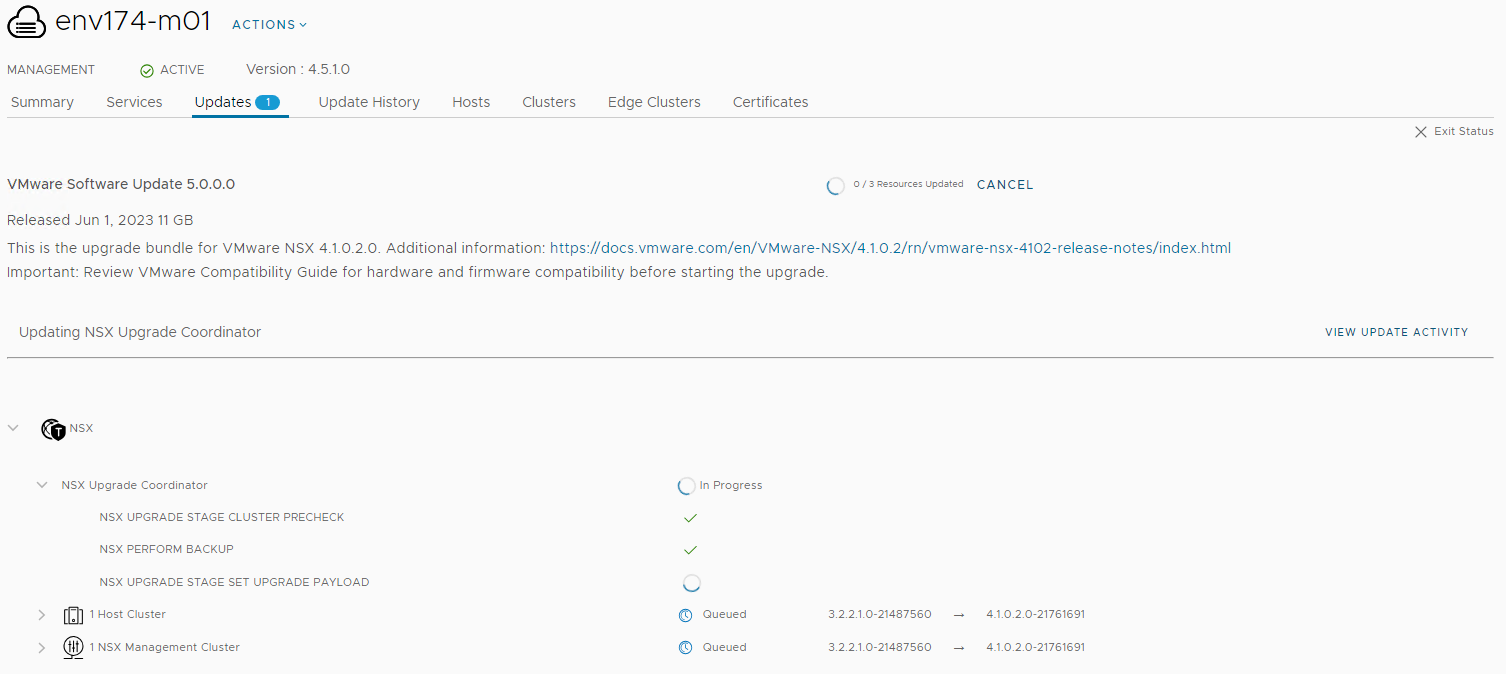
- This update bundle will take approximately 2, or more, hours to complete, depending on the configuration of the environment and options chosen while applying the bundle.
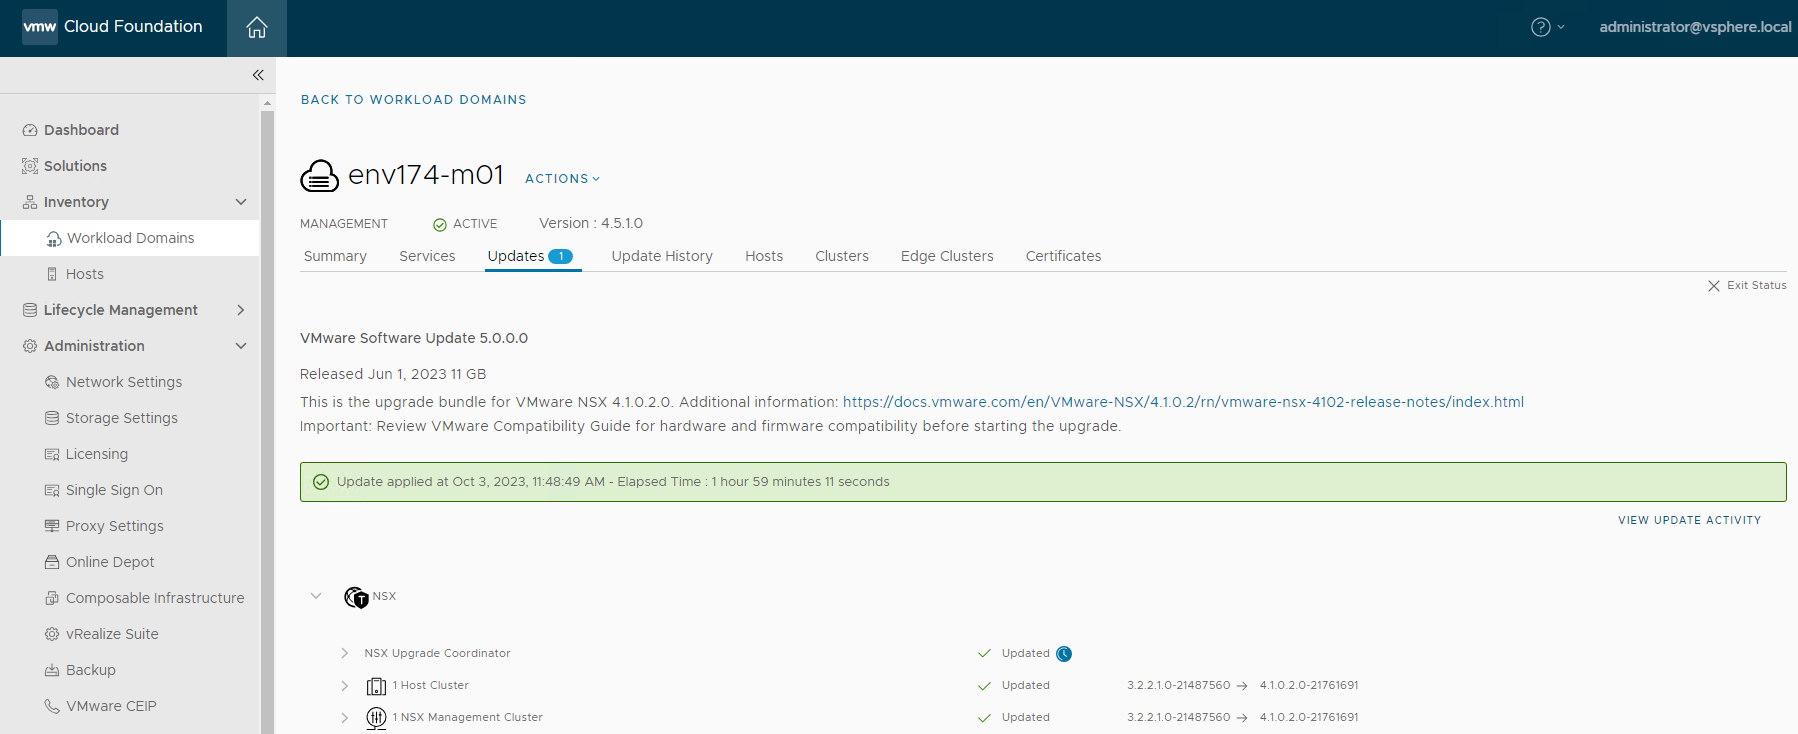
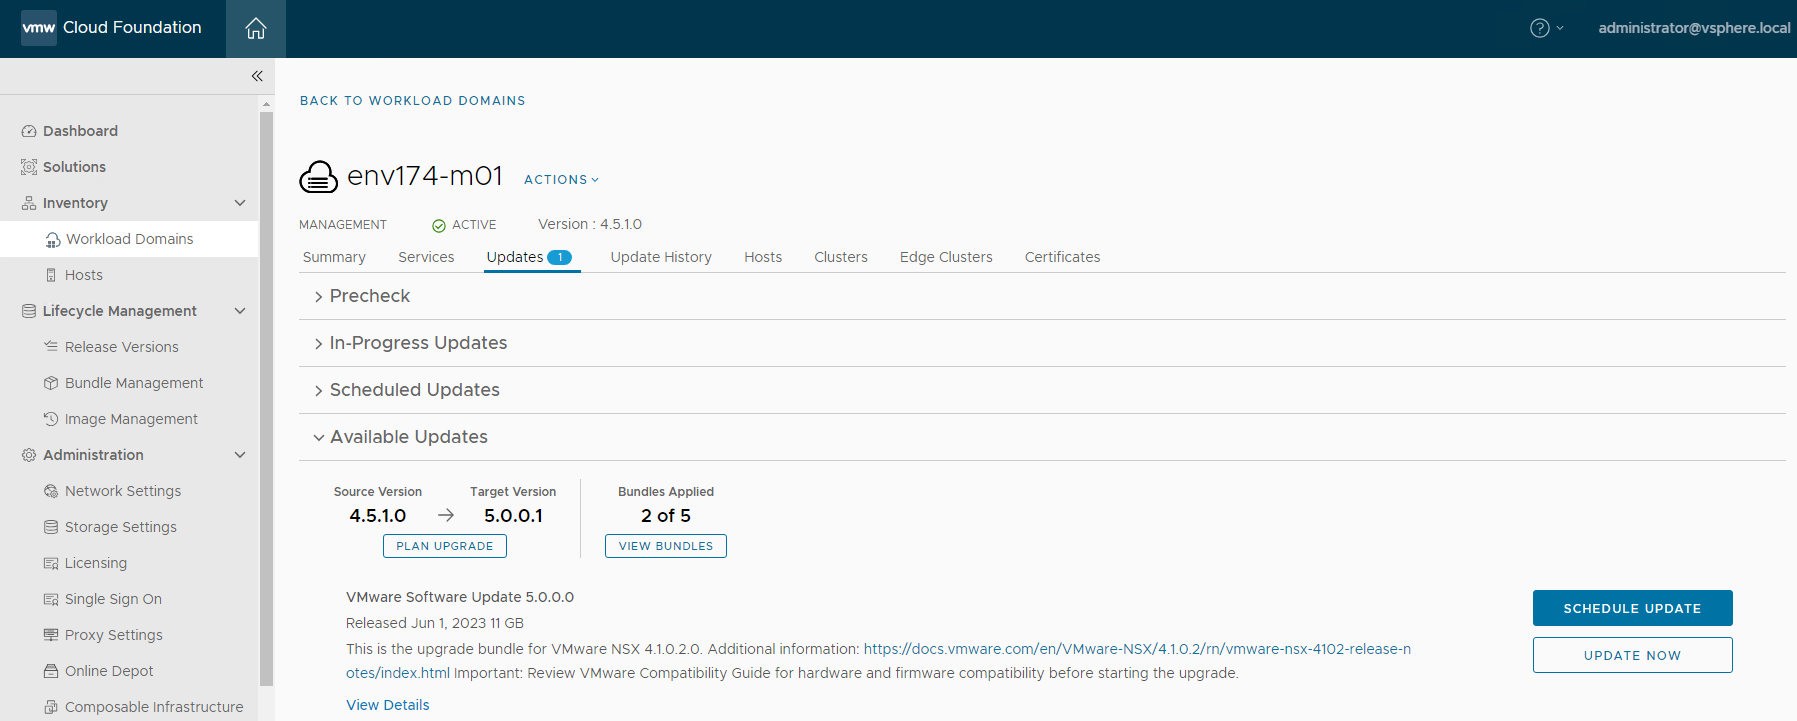
- Click Exit Status at the top right, then the Available Updates will show 3 of 5 bundles applied
VMware vCenter
The next bundle to apply is vCenter 8.0U1a.
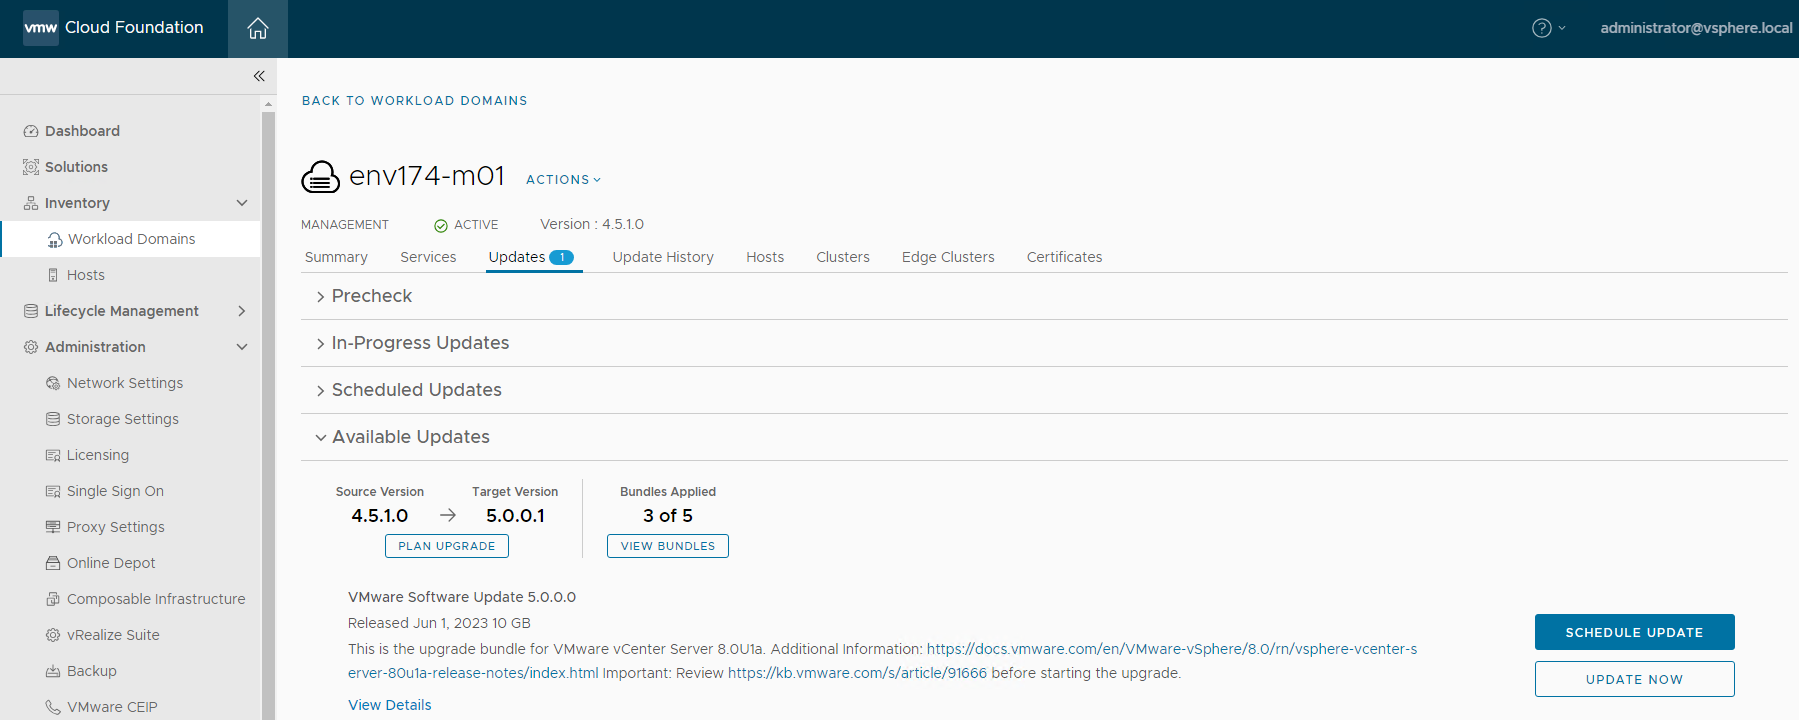
- Before clicking UPDATE NOW, rerun Precheck by selecting vCenter for the precheck
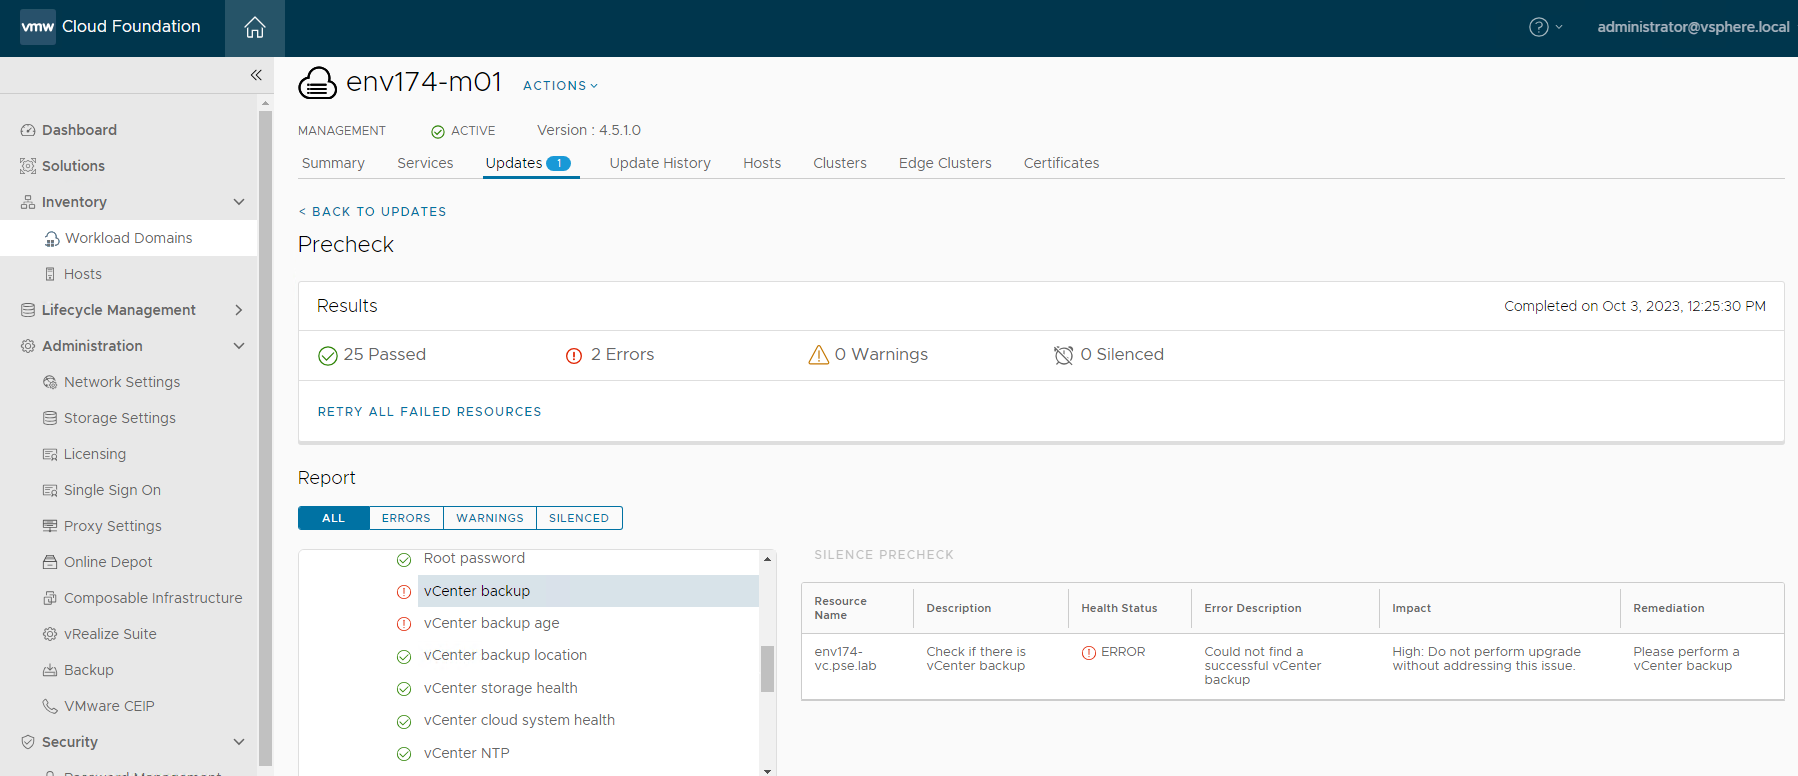
- Address any errors or warnings that may appear, and ensure you have a backup of vCenter before proceeding
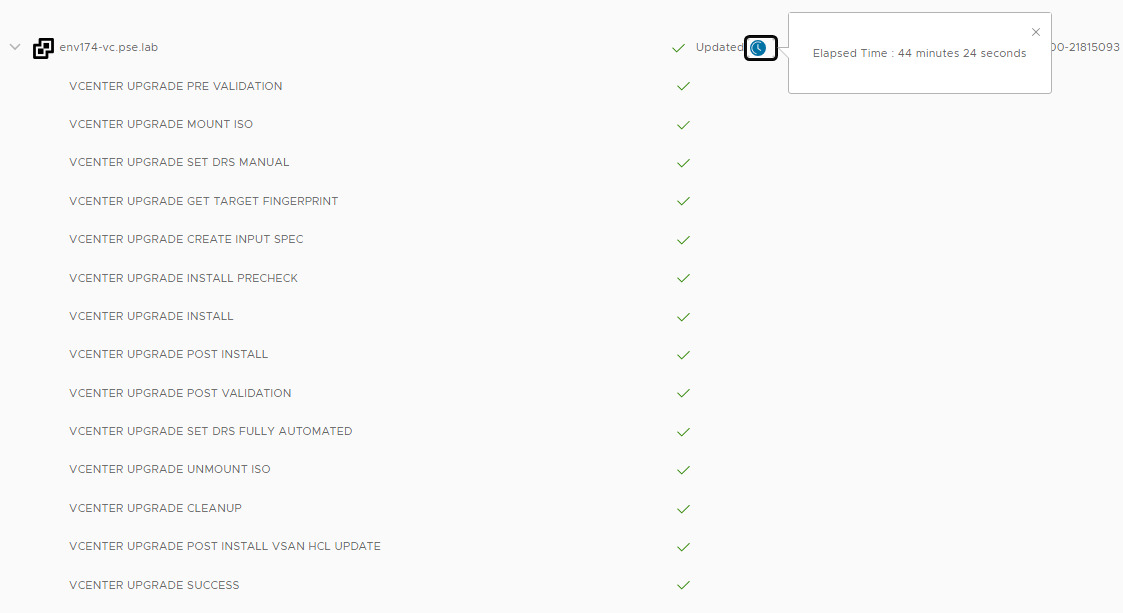
- Click UPDATE NOW on the vCenter upgrade bundle
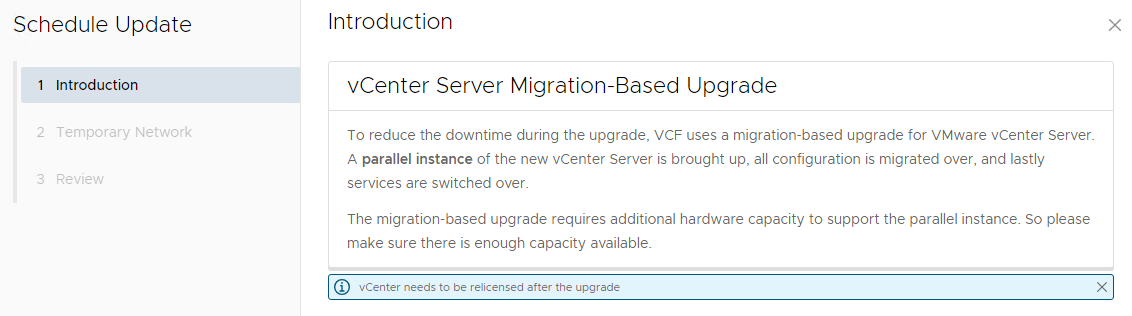
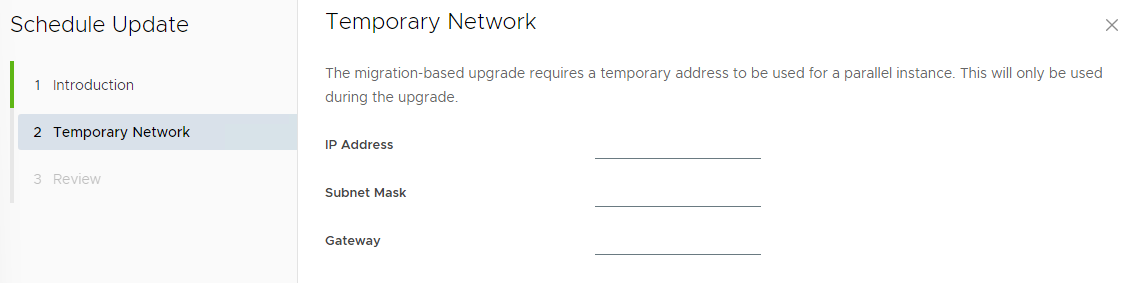
- vCenter leverages a migration-based upgrade and requires a temporary network configuration to allow the new appliance to run in parallel during the upgrade

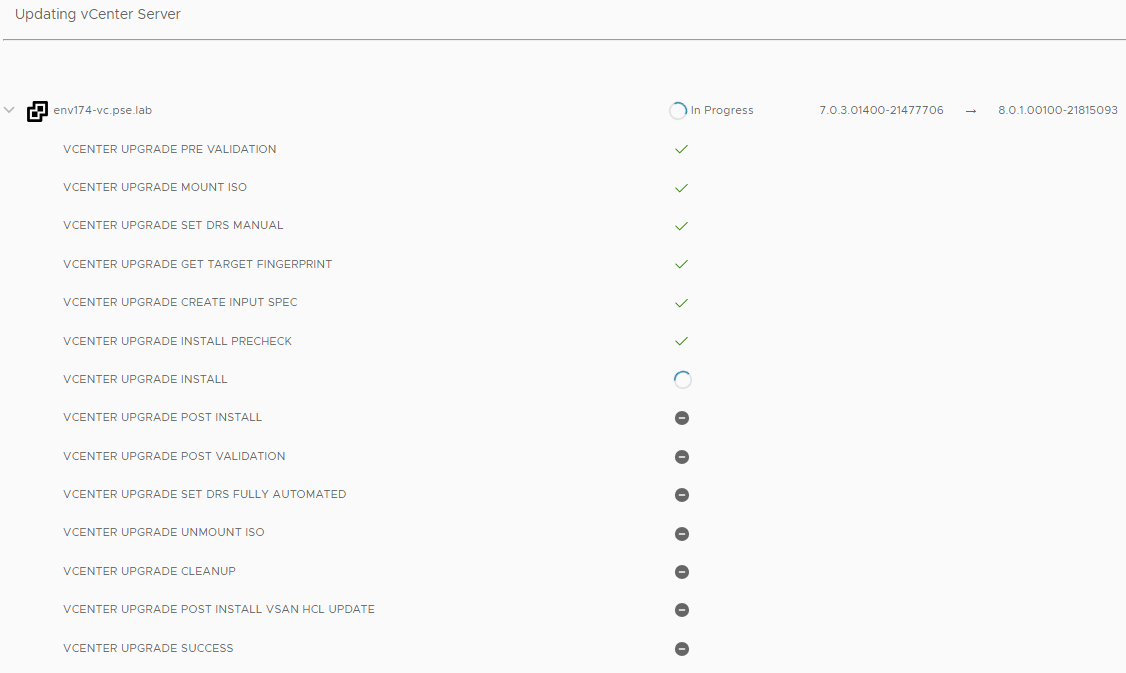
- During the vCenter upgrade, you can view the new appliance being deployed in vCenter

- When the upgrade is complete, you can view the old vCenter 7.0 appliance in vCenter
- After the upgrade, SDDC Manager will display warnings about license key compatibility
- This can be ignored for now, silencing this error requires applying the licenses directly in vCenter
and will be addressed after upgrading ESXi
- Add new vCenter, vSphere, and vSAN licenses to SDDC Manager under Administration > Licensing for use with future workload domain deployments
VMware vSphere Hypervisor (ESXi)
There are multiple methods to upgrade ESXi. Any clusters or workload domains that were initially deployed using either an OEM ESXi ISO, or with a custom ESXi ISO, must follow this same method when applying the ESXi update. Migrating to the vSphere Lifecycle Management Image is not supported on existing clusters deployed through VCF. See the Lessons Learned and other Considerations for details.
Custom ISO
This method will follow the same procedure as outlined in the Deployment Guide, which includes using Image Builder to create a custom ISO with the Lenovo addon. This custom ISO must be applied to the management domain in VCF.
- Ensure the ESXi 8.0u1a update bundle is downloaded in the SDDC Manager
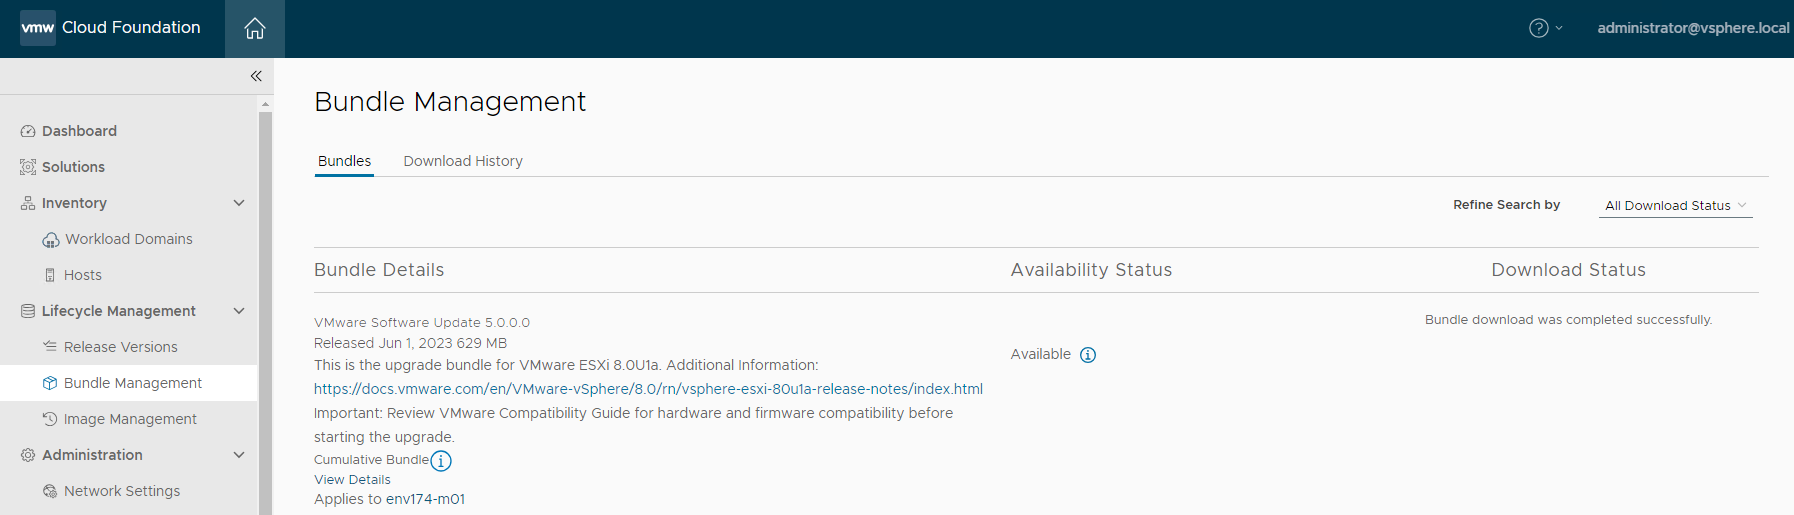
- Click View Details. Copy both Bundle ID and Update to Version

- For detailed instructions on setting up Image Builder, refer to the deployment guide
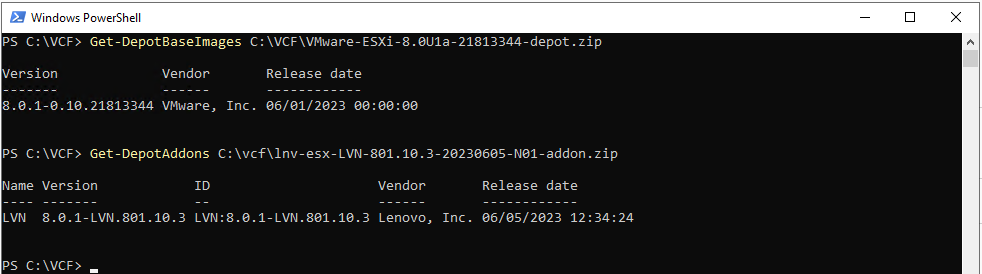
- Get the base image version and addon depot name & version using the Image Builder cmdlets
- Get-DepotBaseImages C:\VCF\VMware-ESXi-8.0U1a-21813344-depot.zip
- Get-DepotAddons C:\VCF\lnv-esx-LVO.801.12.1-20230530-S01-addon.zip
- Using the above information, create a custom json spec file. Ensure usage of the required N01 or S01 file. N01 is pictured above, S01 is used in the json template below:
{
"base_image": {
"version": "8.0.1-0.10.21813344"
},
"add_on": {
"name": "LVO",
"version": "8.0.1-LVO.801.12.1"
}
}
- Use Image Builder to create the new custom ISO from the supplied .zip files and json spec file
- New-IsoImage -Depots C:\VCF\VMware-ESXi-8.0U1a-21813344-depot.zip,C:\vcf\lnv-esx-LVN-801.10.3-20230605-N01-addon.zip -SoftwareSpec C:\vcf\lenovo-v8-spec.json -Destination c:\vcf\Lenovo-ESXi-8.0U1a-21813344.iso
- Upload the new custom ISO to the SDDC Manager
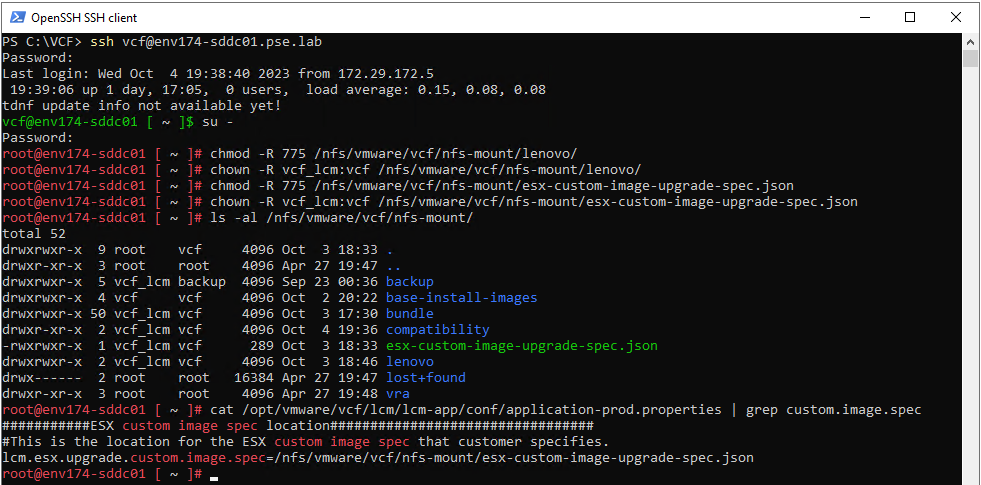
- SSH into the SDDC Manager appliance using the vcf user account
- Create a new folder:
- mkdir /nfs/vmware/vcf/nfs-mount/lenovo
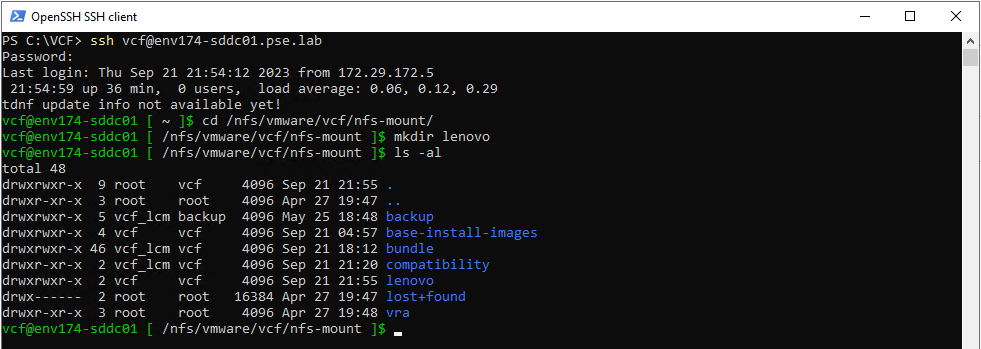
- SCP the file to the newly created folder:
- scp c:\VCF\Lenovo-ESXi-8.0U1a-21813344.iso vcf@sddc-manager.fqdn:/nfs/vmware/vcf/nfs-mount/lenovo/

- cd to /nfs/vmware/vcf/nfs-mount and create a new file named esx-custom-image-upgrade-spec.json
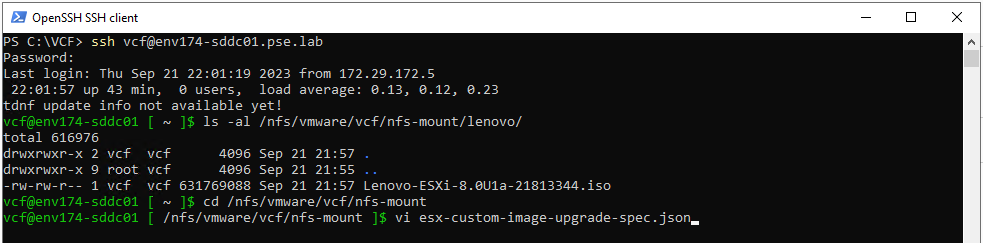
- Use the following as a template, update bundle ID and target ESXi version if needed:
{
"esxCustomImageSpecList": [{
"bundleId": "ef970211-02bf-429a-8edd-91f3bc7c1b42",
"targetEsxVersion": "8.0.1-21813344",
"useVcfBundle": false,
"customIsoAbsolutePath":
"/nfs/vmware/vcf/nfs-mount/lenovo/Lenovo-ESXi-8.0U1a-21813344.iso"
}]
}
- *NOTE* - “useVcfBundle” must be false to instruct VCF to use the custom ISO specified in the path given

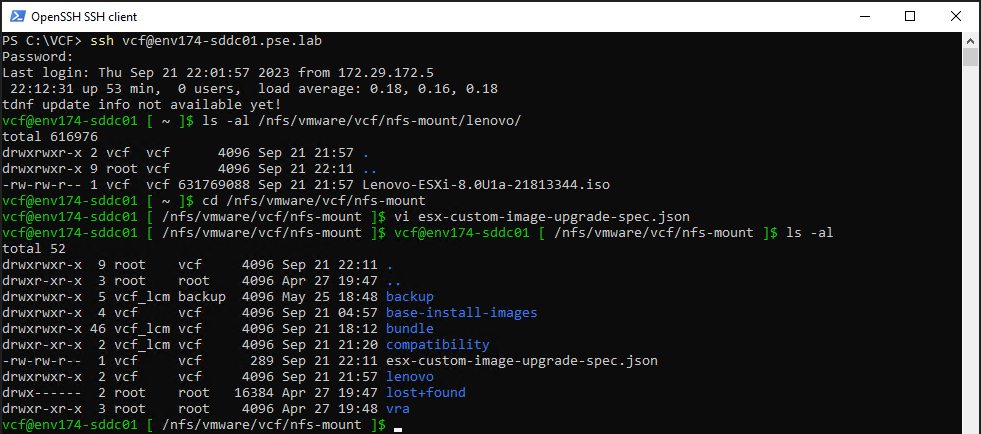
- Update permissions and ownership of the newly created folder & files
su - to root
chmod -R 775 /nfs/vmware/vcf/nfs-mount/lenovo/
chown -R vcf_lcm:vcf /nfs/vmware/vcf/nfs-mount/lenovo/
chmod -R 775 /nfs/vmware/vcf/nfs-mount/esx-custom-image-upgrade-spec.json
chown -R vcf_lcm:vcf /nfs/vmware/vcf/nfs-mount/esx-custom-image-upgrade-spec.json
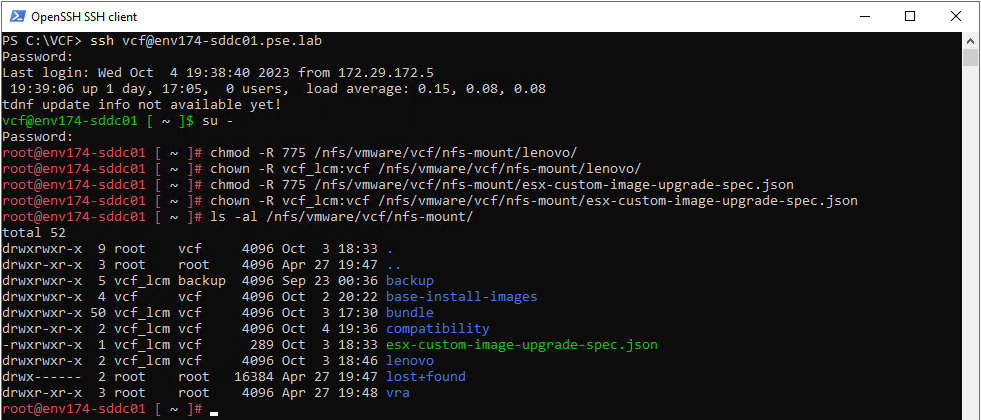
- Ensure lcm.esx.upgrade.custom.image.spec contains the location of the newly created spec file in /opt/vmware/vcf/lcm/lcm-app/conf/application-prod.properties
-
cat /opt/vmware/vcf/lcm/lcm-app/conf/application-prod.properties | grep custom.image.spec
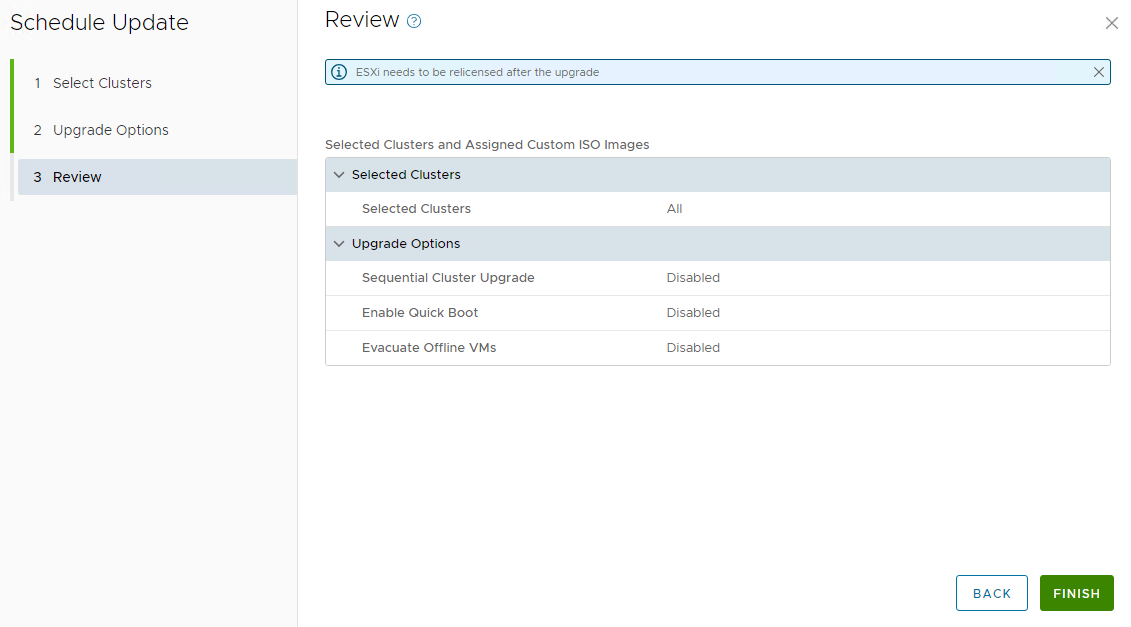
- In SDDC Manager, navigate to Workload Domains, select the management domain, select the Updates tab
- Click UPDATE NOW
- Accept the defaults
- *NOTE* - Click FINISH only once.
- There's a slight UI delay after clicking FINISH and clicking twice may result in two upgrade tasks
- You will see errors regarding the license of any upgraded hosts, these will be addressed later.
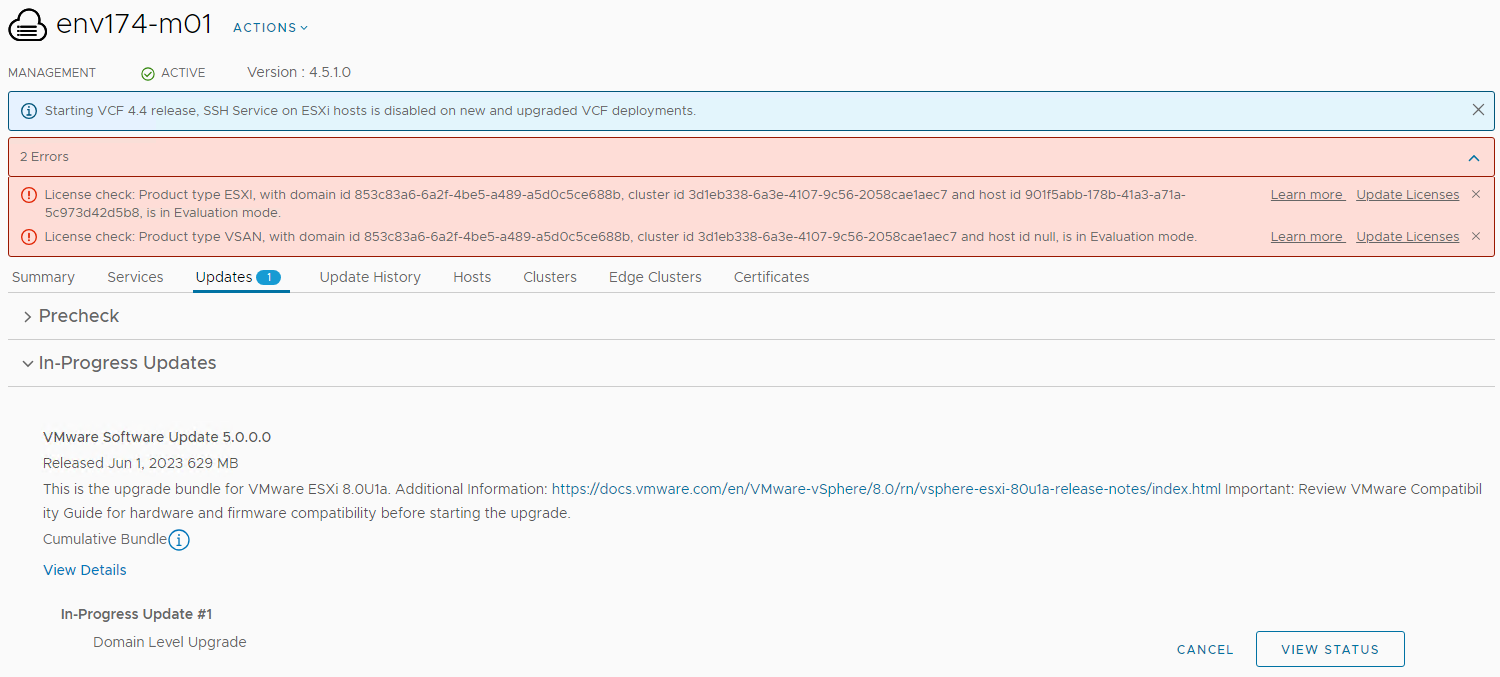
- Click VIEW STATUS under In-Progress Updates to track progress
- You can also monitor progress in vCenter as the hosts are placed into Maintenance Mode.
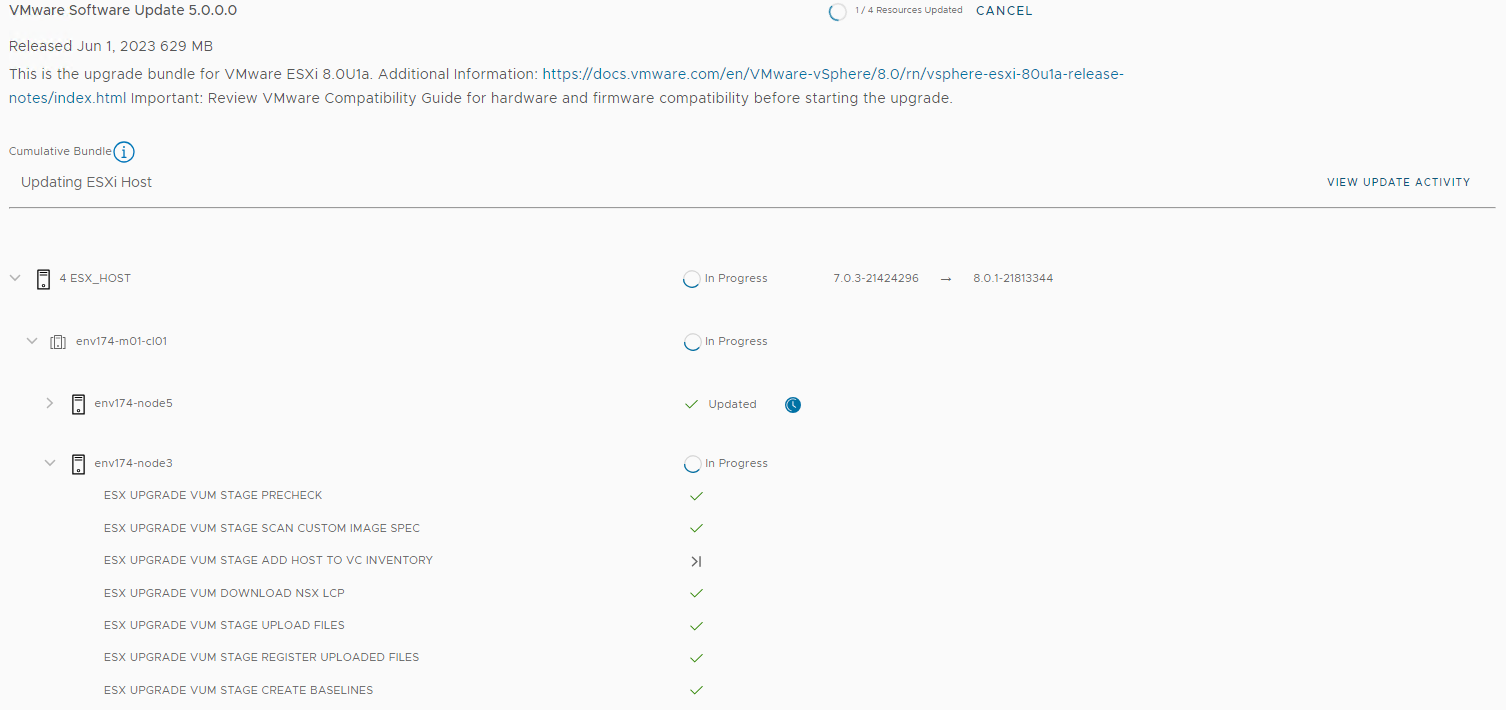
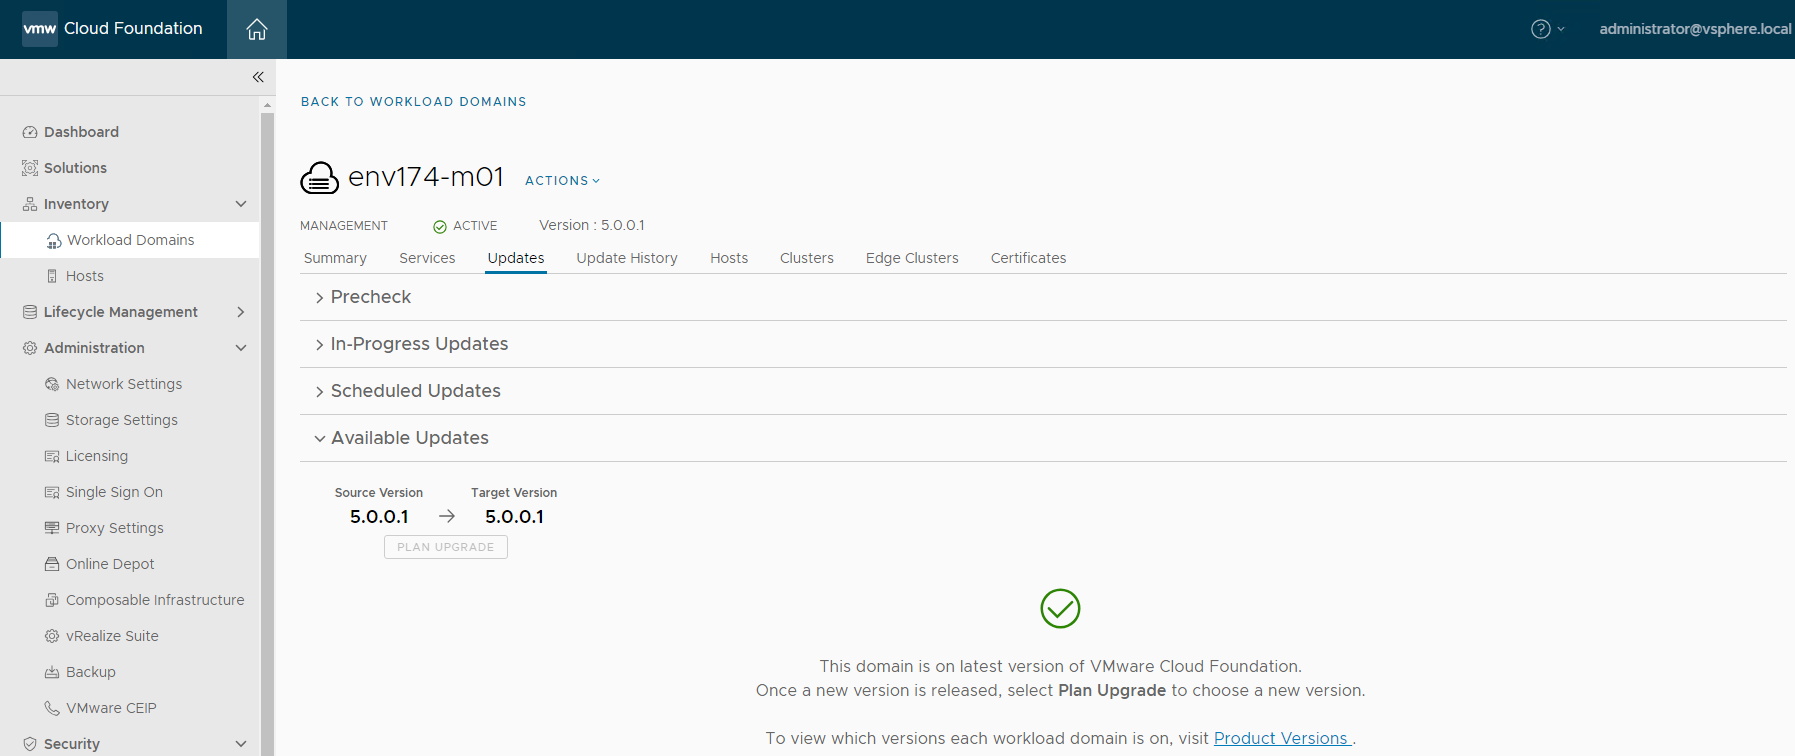
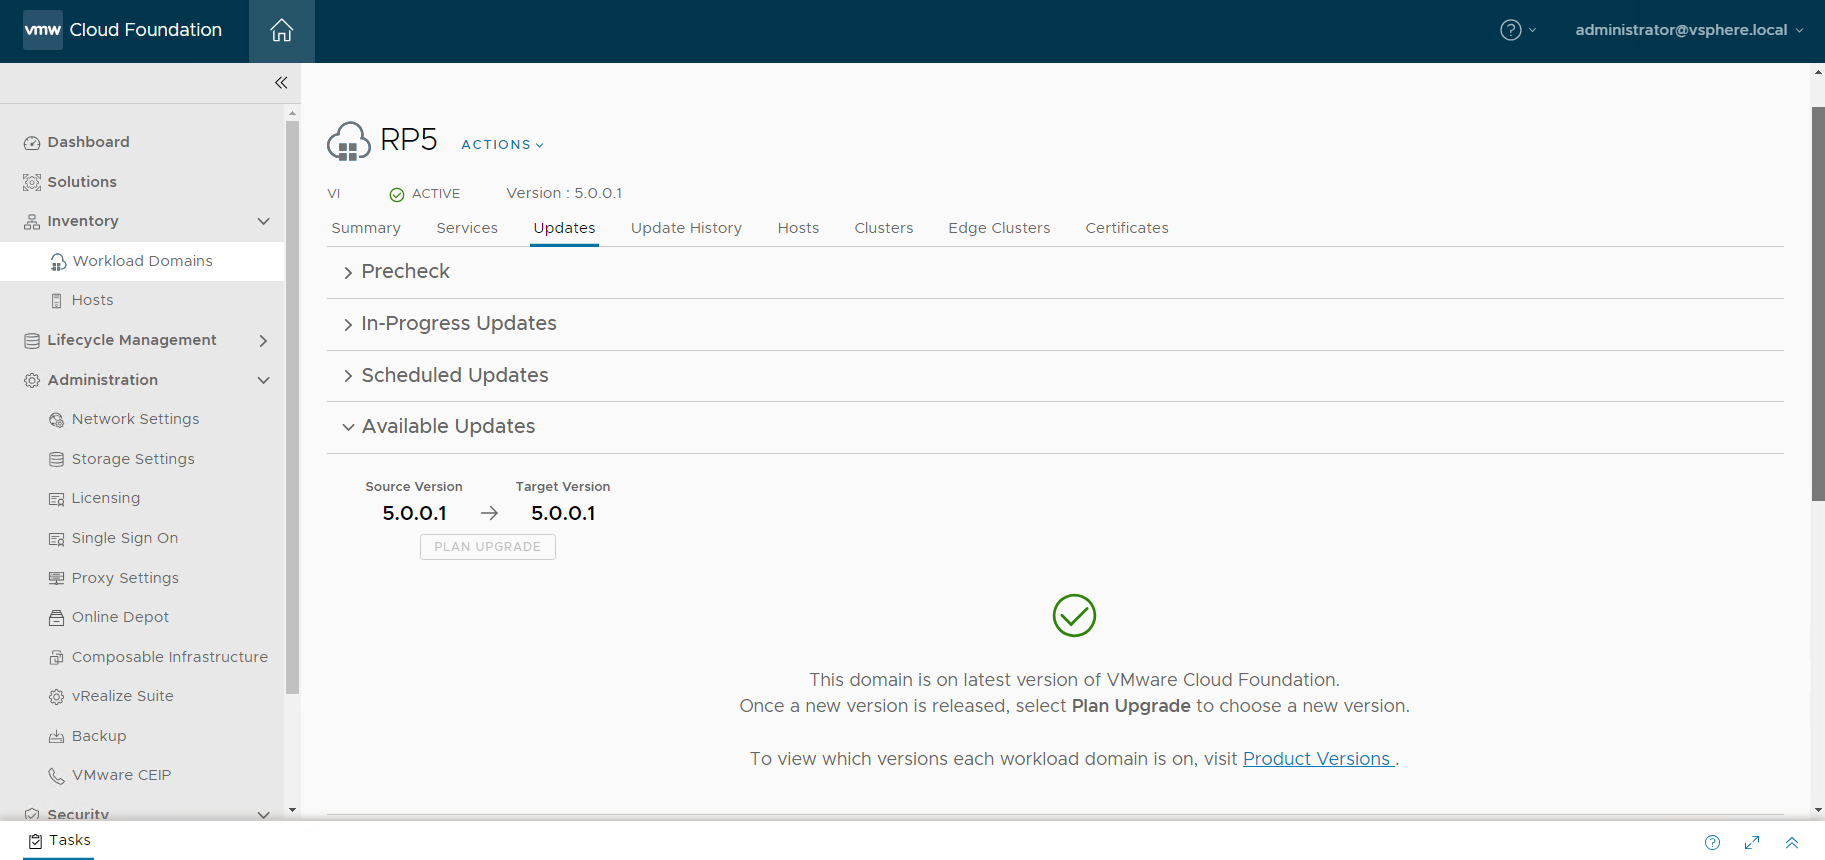
- Once all nodes are upgraded, the Updates tab will show the version as 5.0.0.1
- OPTIONAL: Scroll down to Available Configuration Updates and select APPLY ALL
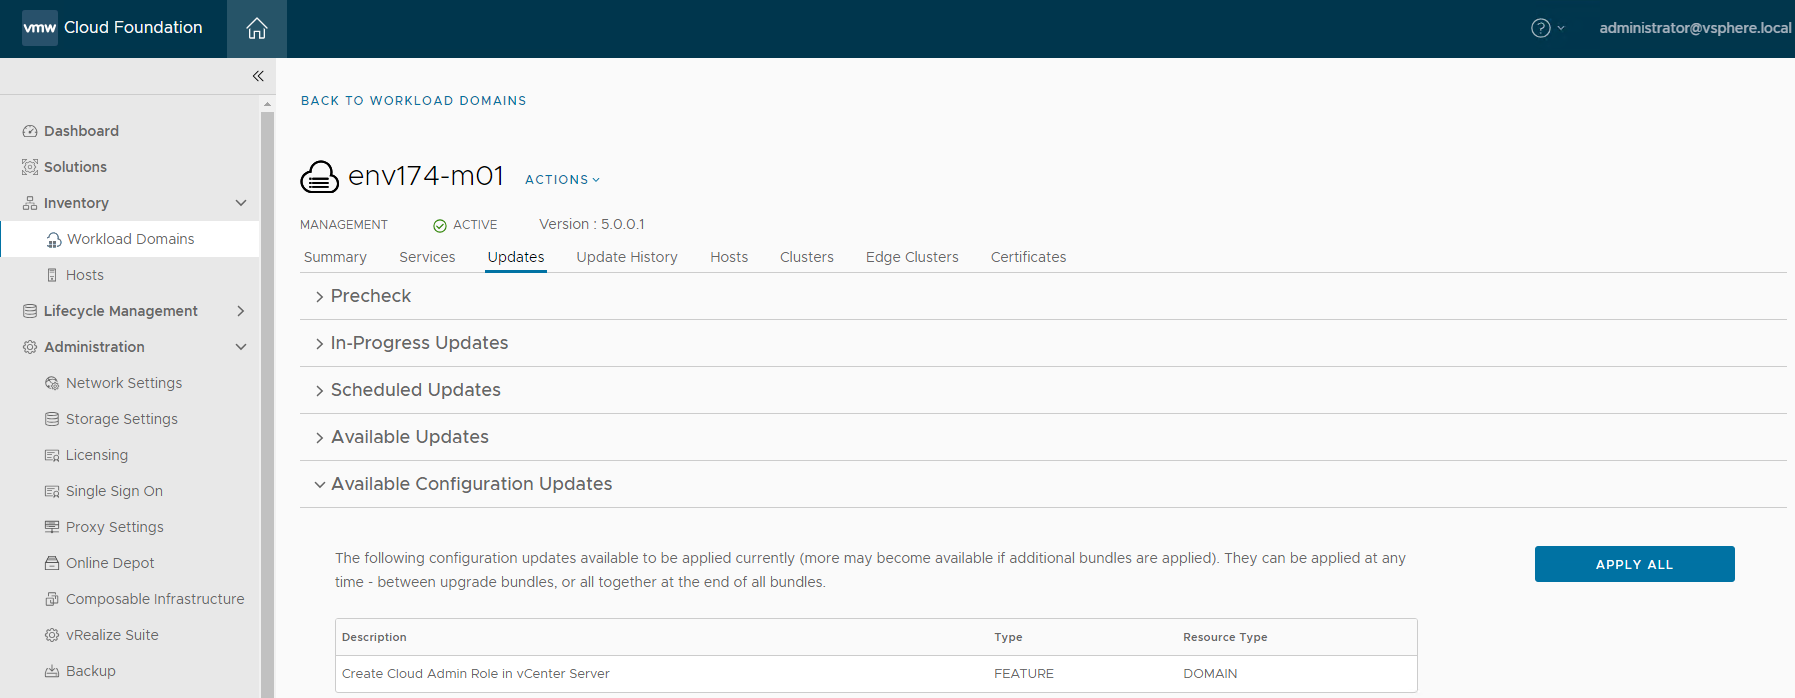

- The Configuration Update applies in only a few minutes.
VMware vSphere Lifecycle Management (vLCM) Images
*NOTE* - vLCM Images *SHOULD NOT* be applied directly to any existing clusters directly in vCenter or the vCenter API. This method is only for clusters or workload domains created with a vLCM image initially.
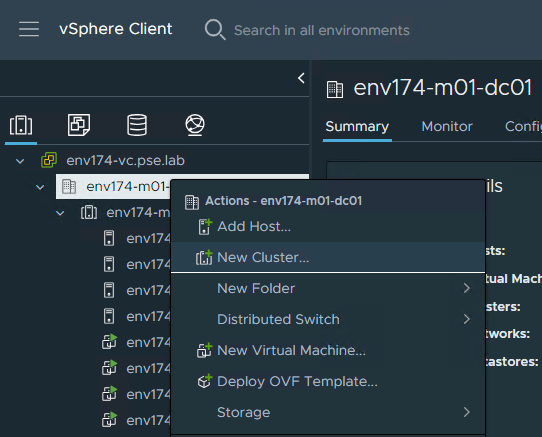
- Create a new empty cluster in vCenter
- Right click on the virtual datacenter and select New Cluster
- Provide a descriptive name, leave DRS, HA, and vSAN off, but ensure to check the box for Manage all hosts in the cluster with a single image

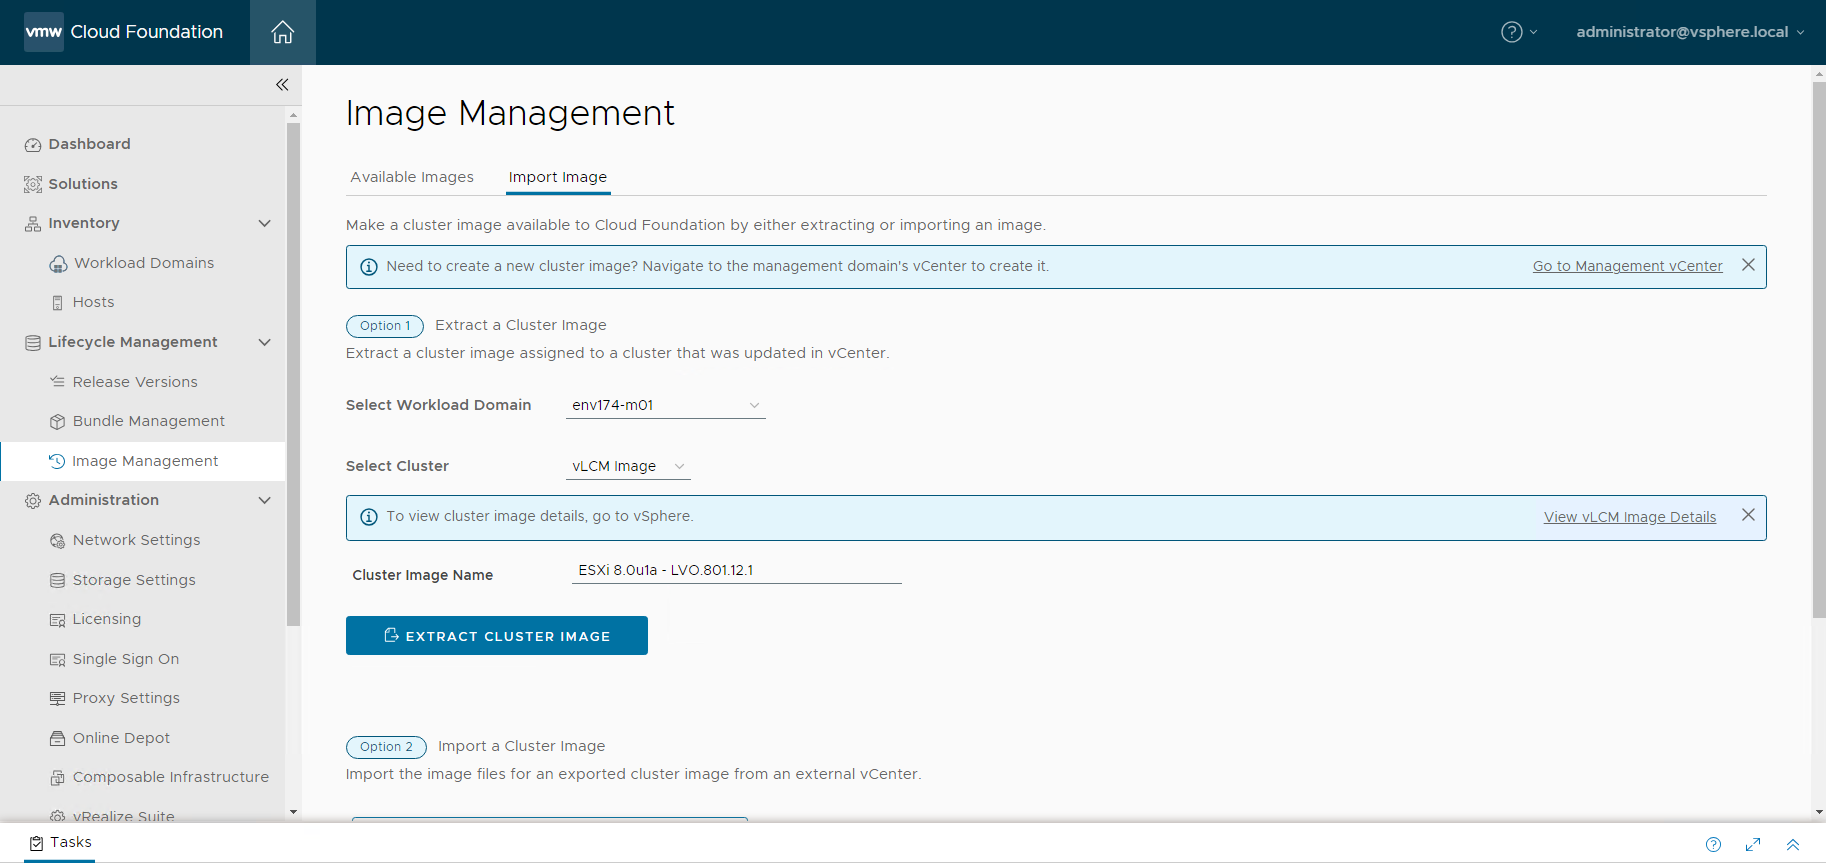
- For ESXi Version, select 8.0u1a – 21813344 as the specific ESXi build, and the appropriate Lenovo Customization Addon for Lenovo that was determined earlier in this guide.
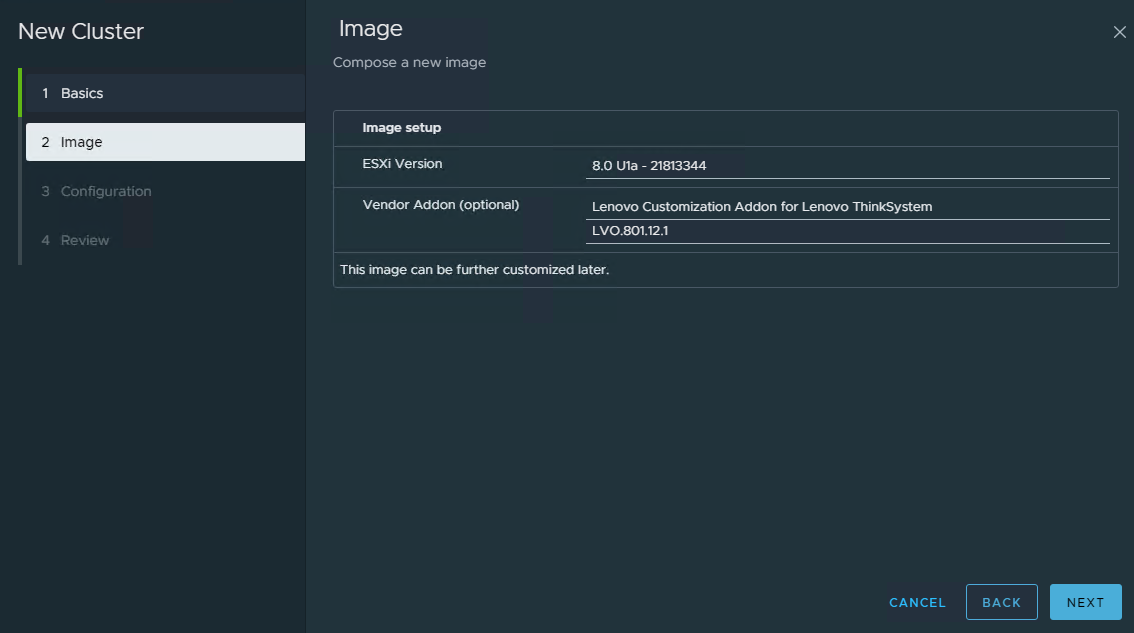
- Accept the defaults and finish creating the new cluster
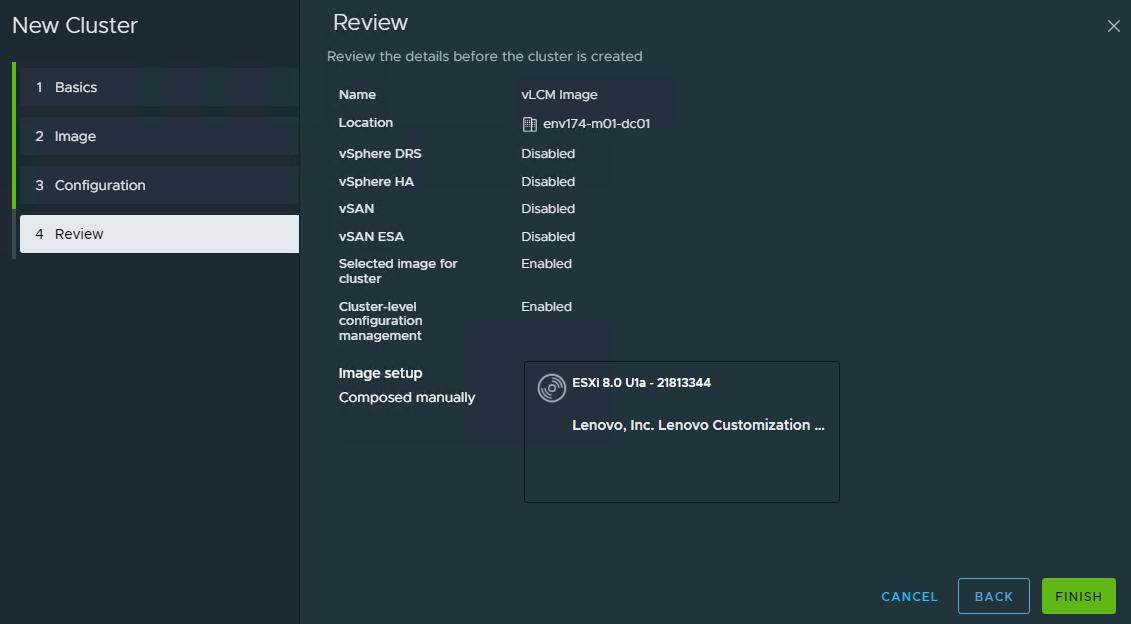
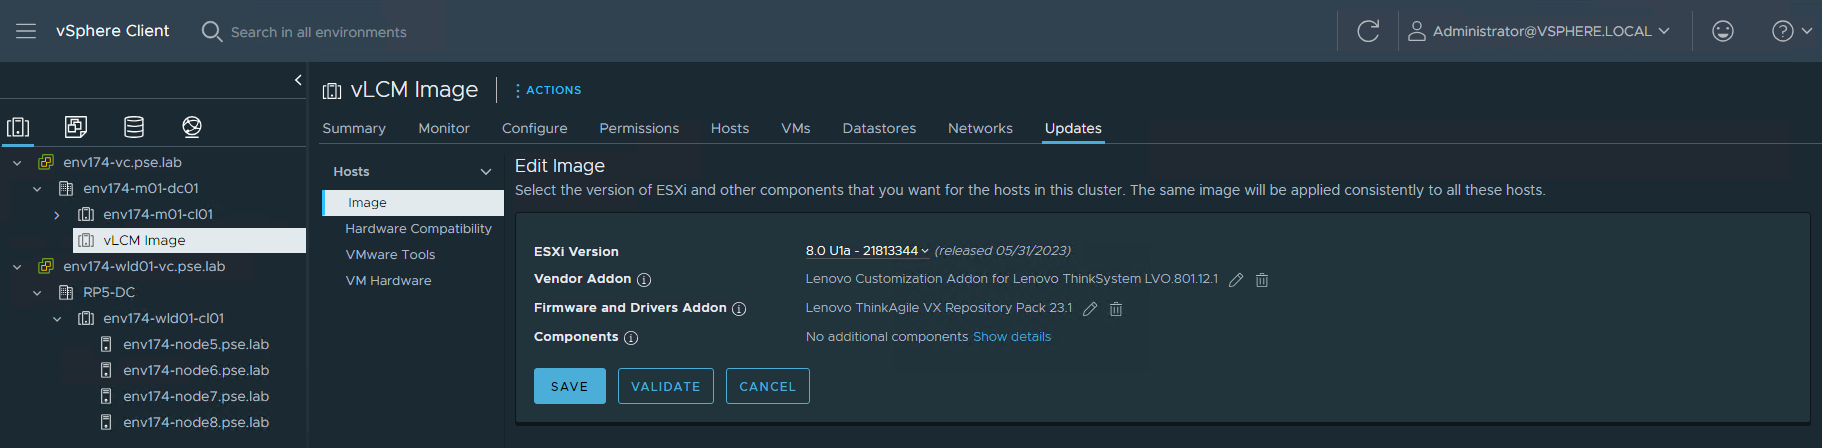
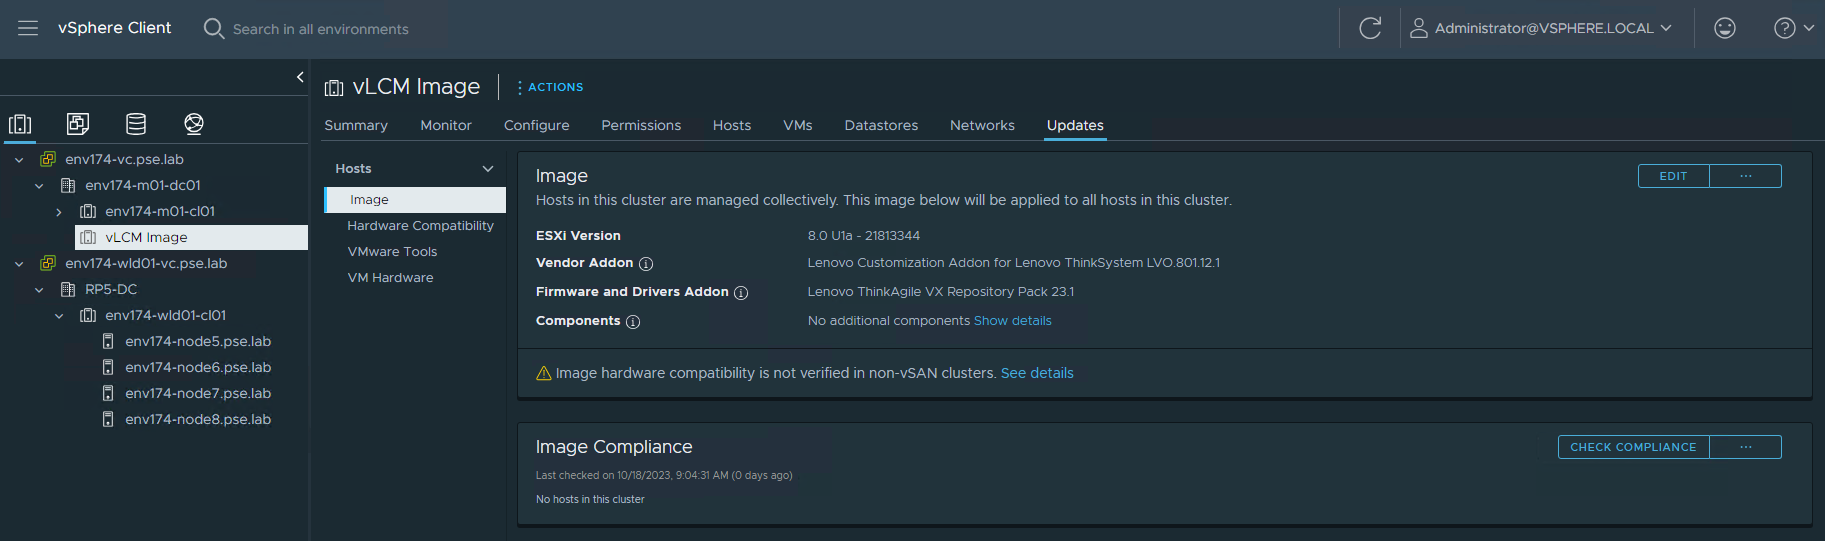
- Select the cluster and navigate to the Updates tab and click Edit for the newly assigned image
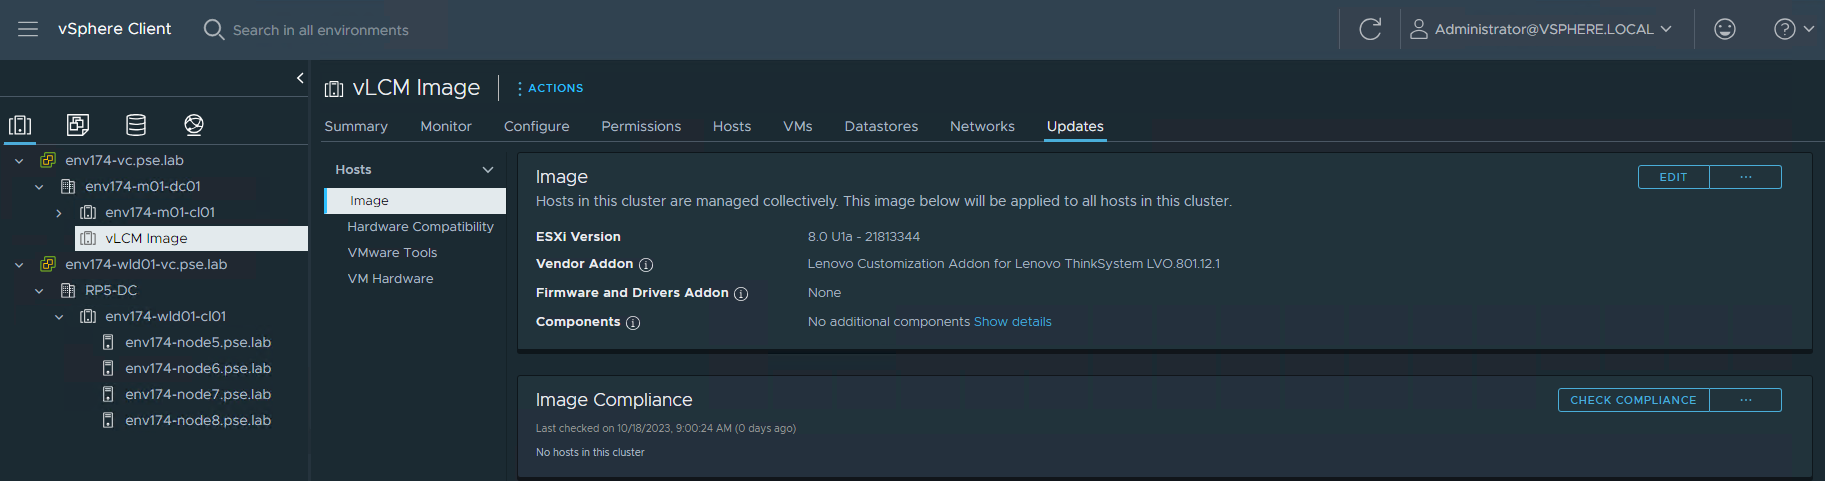
- Click SELECT for Firmware and Drivers Addon
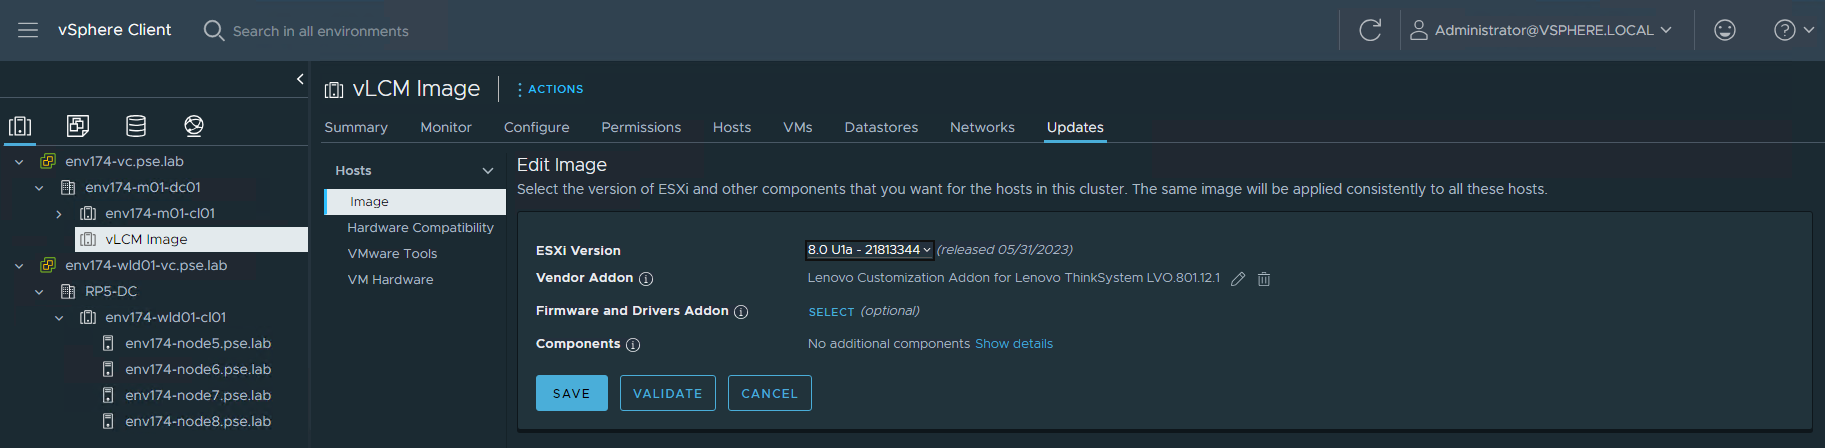
- Select Lenovo XClarity Integrator from the hardware support manager drop-down menu, then select the latest supported pack
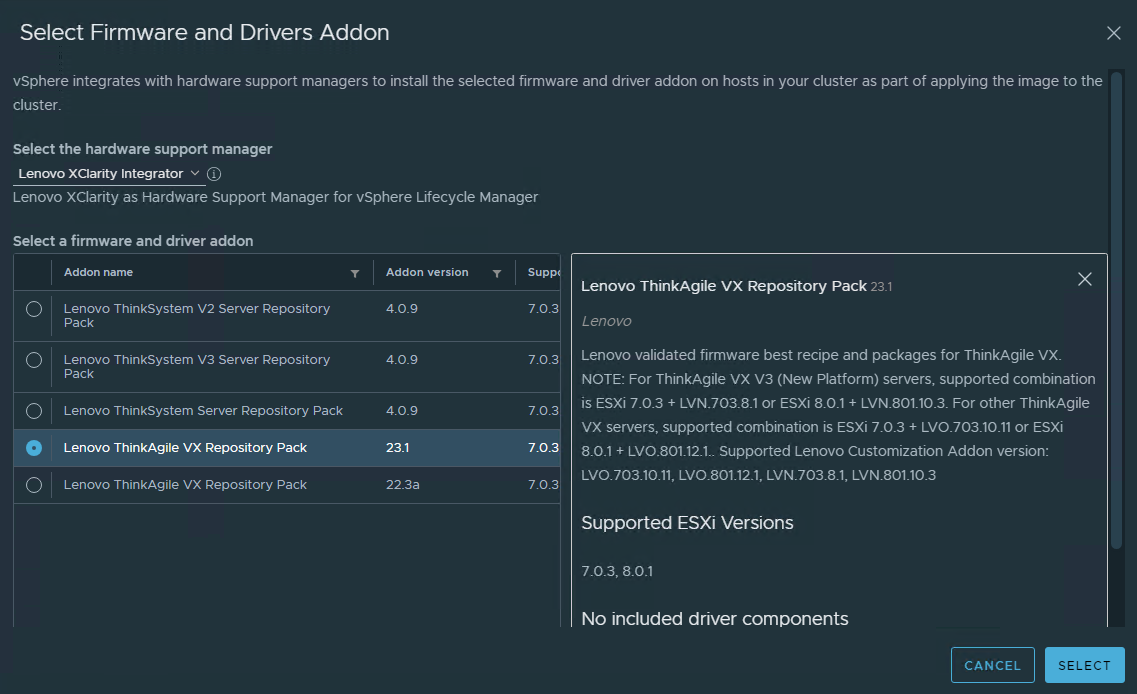
*Note the Supported Lenovo Customization Addon versions listed and ensure compatibility with the version selected for the image
- Click SAVE to apply the image to the cluster
- Import the image into SDDC Manager
- Log in to SDDC Manager and navigate to Image Management under Lifecycle Management
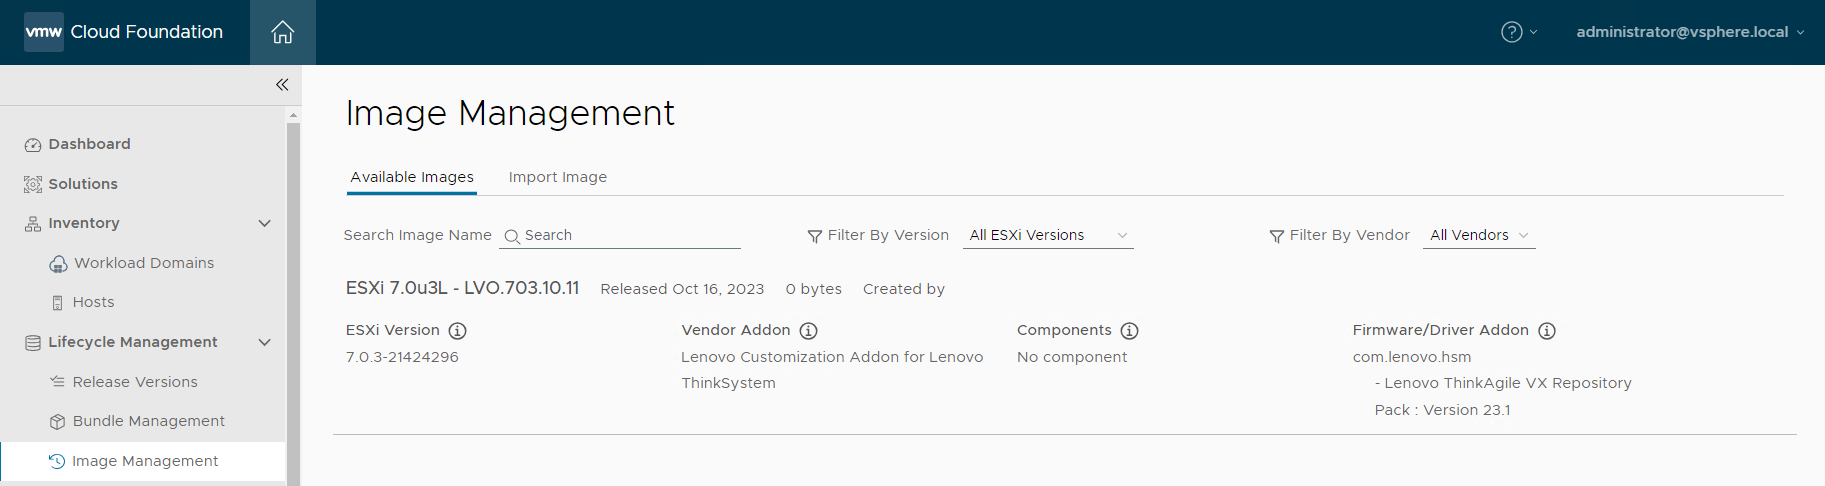
- Select the Import Image tab
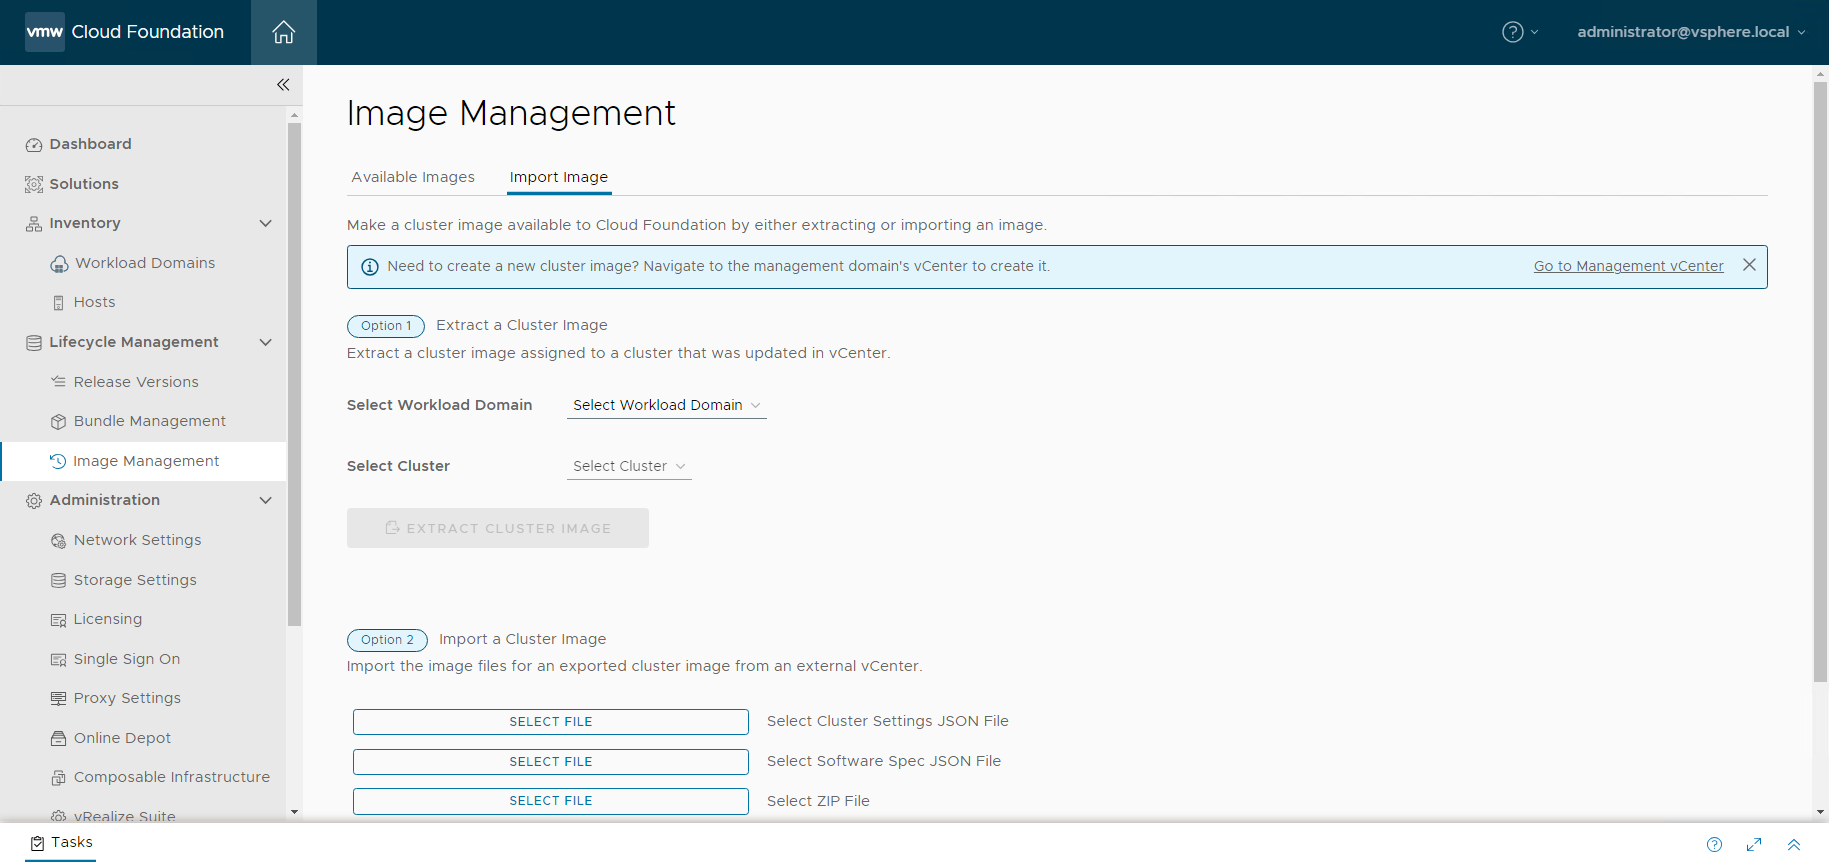
- In the dropdown menu for workload domain, select the workload domain where the empty cluster is created, then select the cluster, provide a descriptive name for the image, and click EXTRACT CLUSTER IMAGE
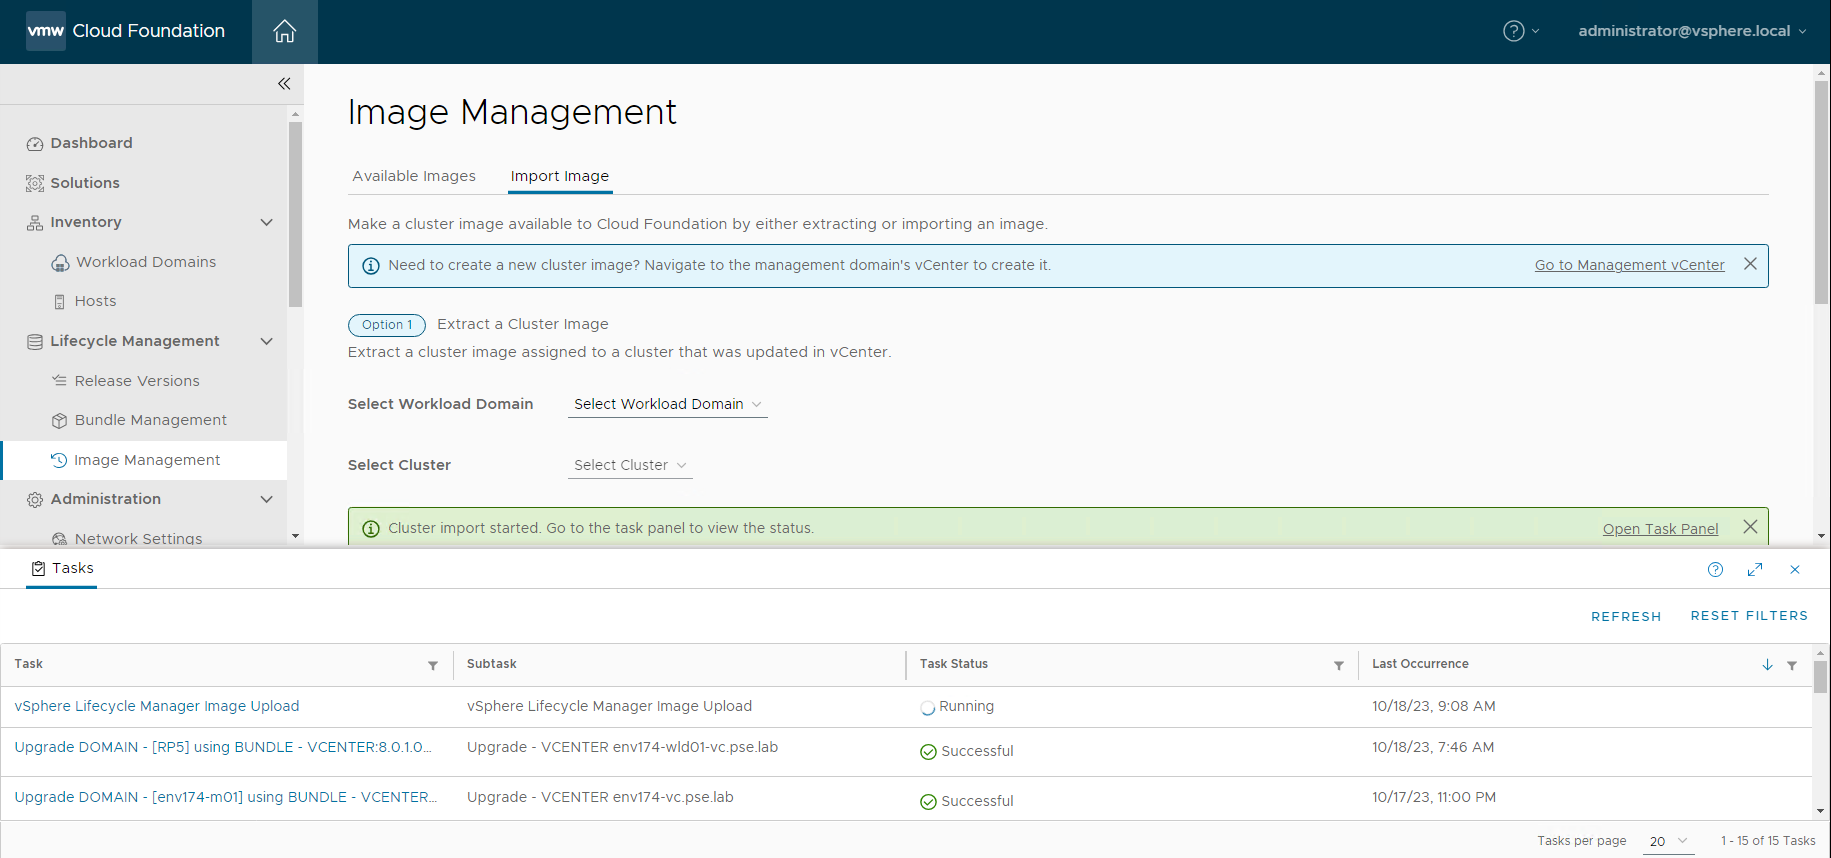
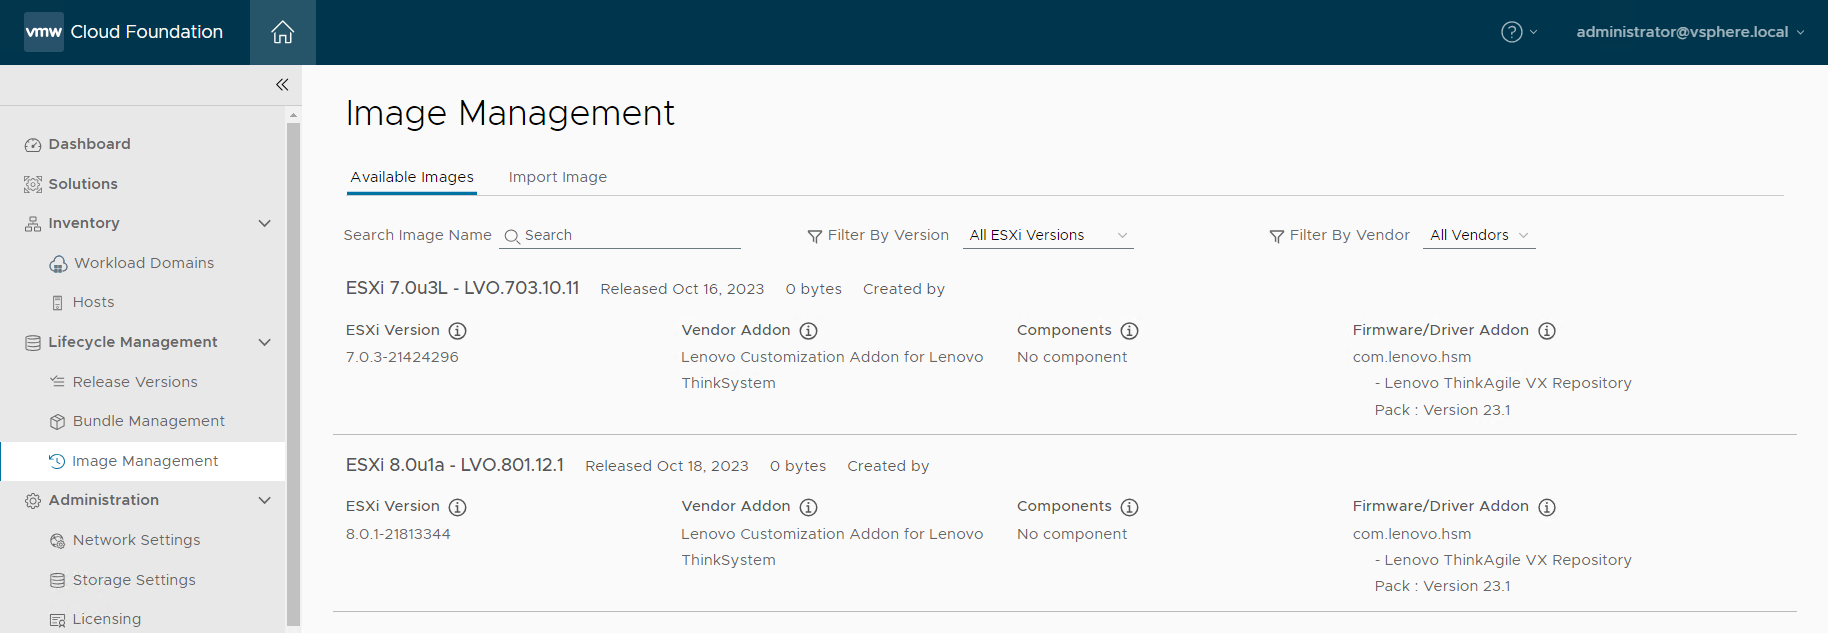
- Navigate to the Available Images tab to view the newly imported image
- Apply the update bundle
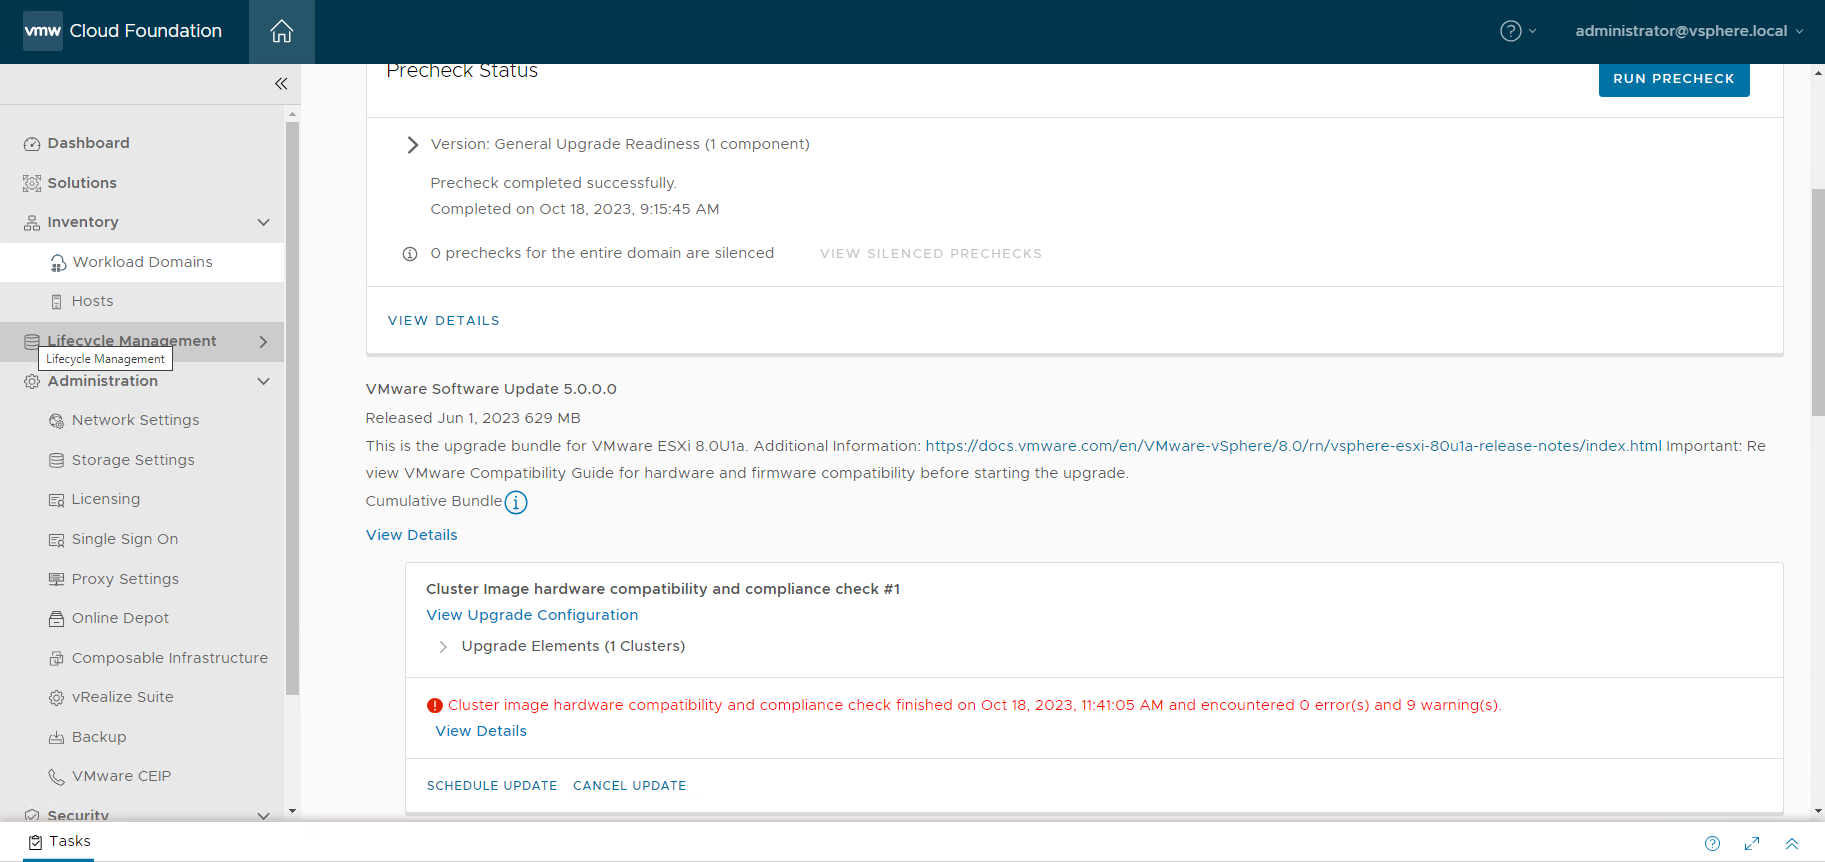
- Navigate to Workload Domains under Inventory, select the Updates tab and click RUN PRECHECK
- Select General Upgrade Readiness for Target Version, select Custom selection, check the box for the cluster, and then click RUN PRECHECK
- Expect to see warnings for third party VIBs
- Click BACK TO UPDATES, scroll down to Available Updates and click CONFIGURE UPDATE
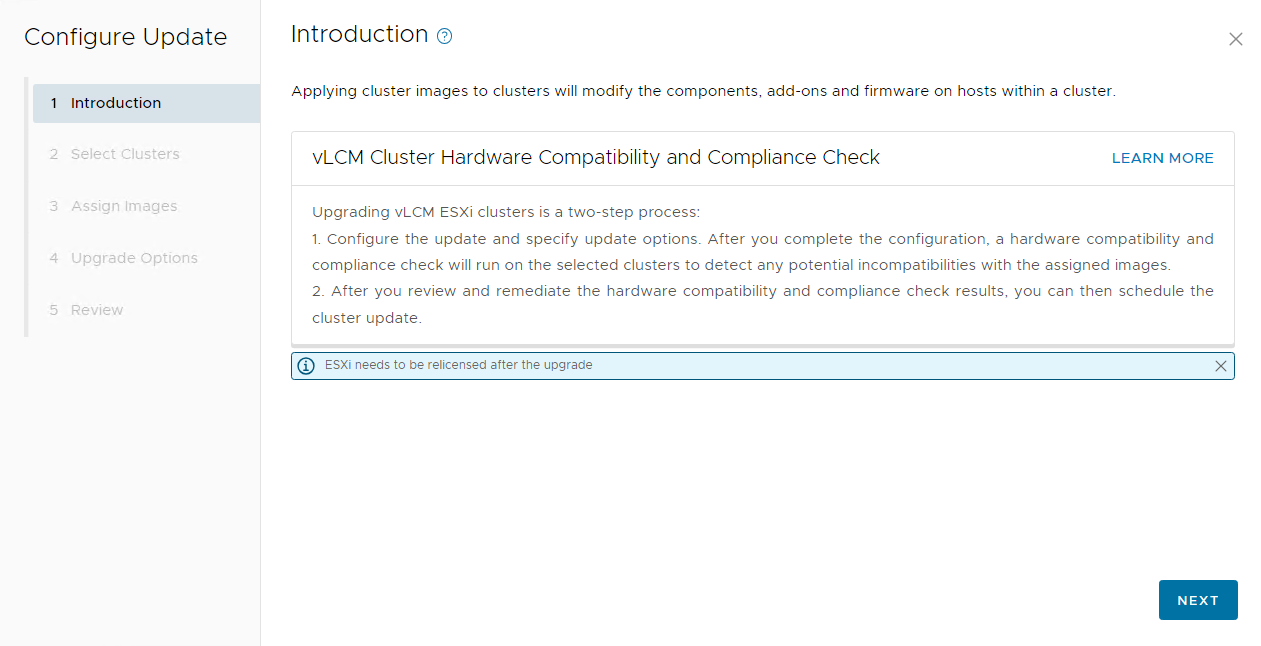
- In the Configure Update wizard, click NEXT for steps 1 & 2
- In the Assign Images step, check the box next to the cluster being upgraded, then select the newly imported image from the Cluster Image drop down menu
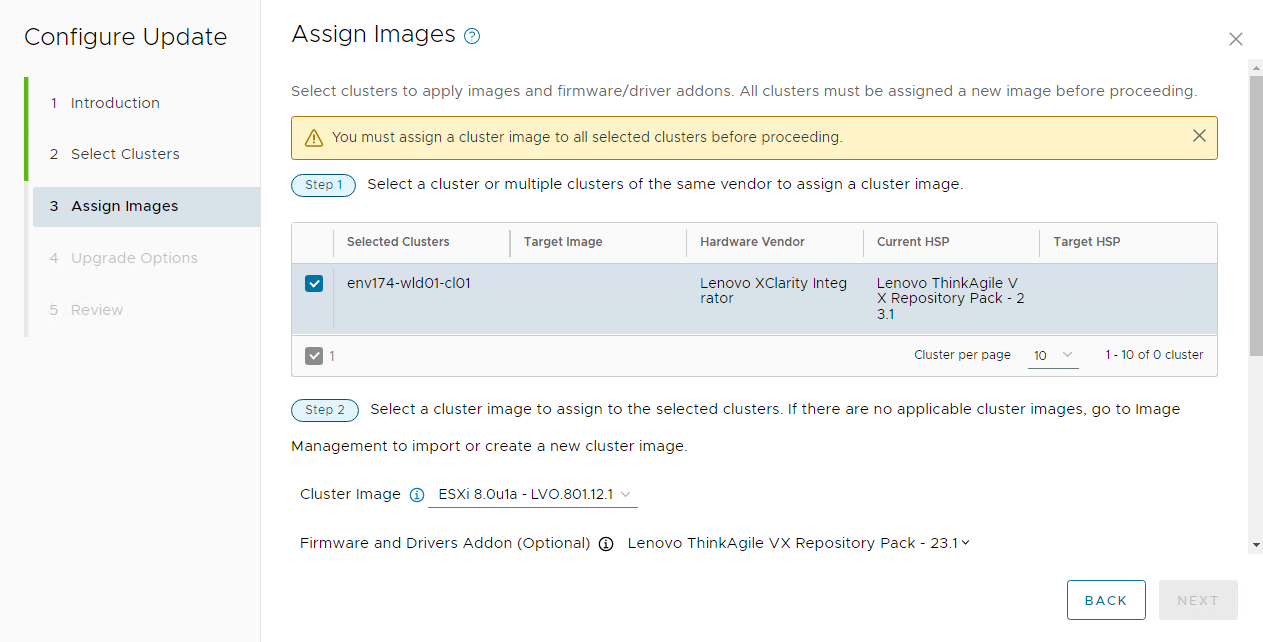
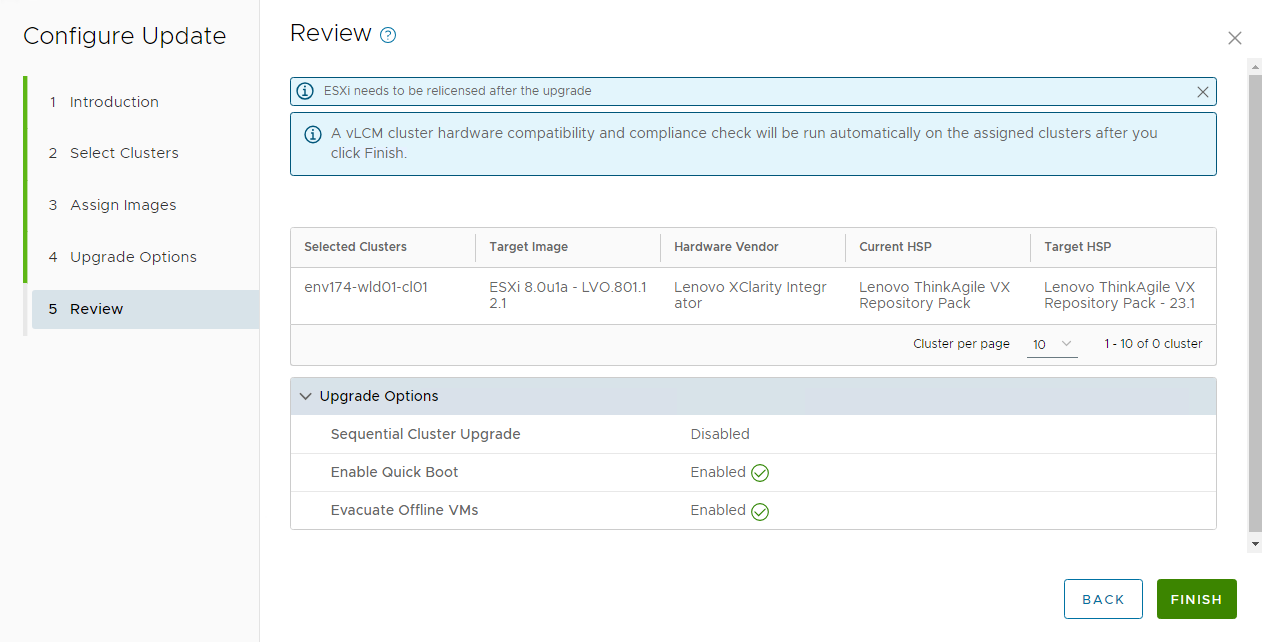
- Scroll down and click APPLY IMAGE
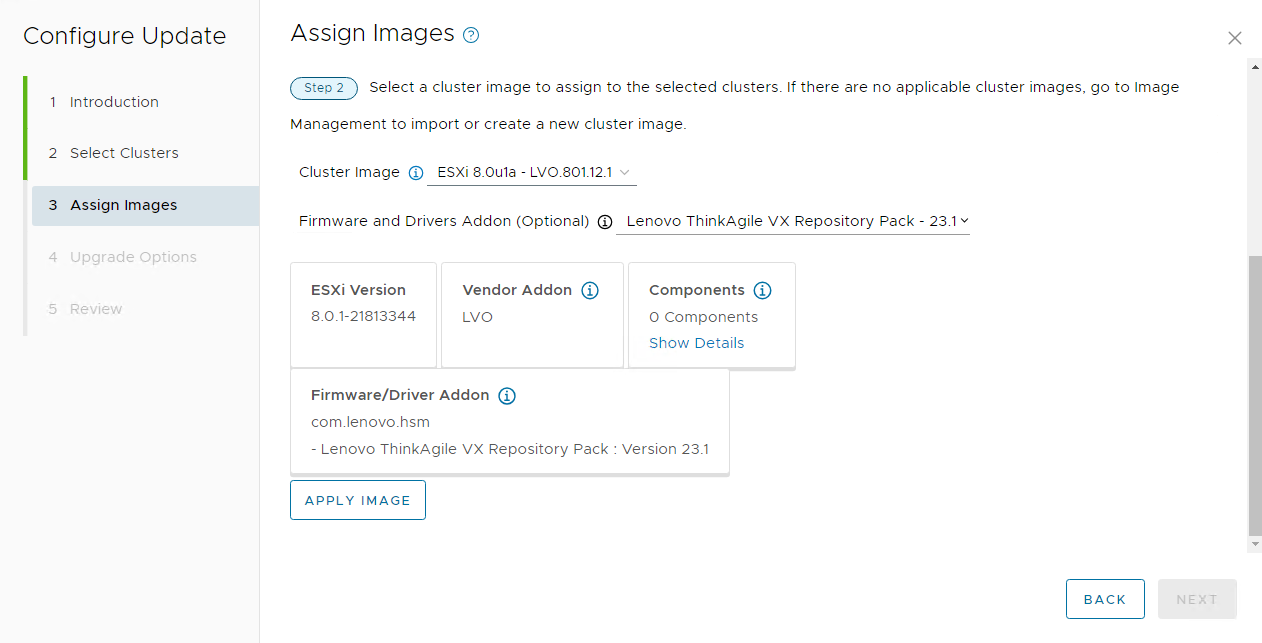

- Verify the cluster now has the assigned target image and HSP (Hardware Support Package), then click NEXT
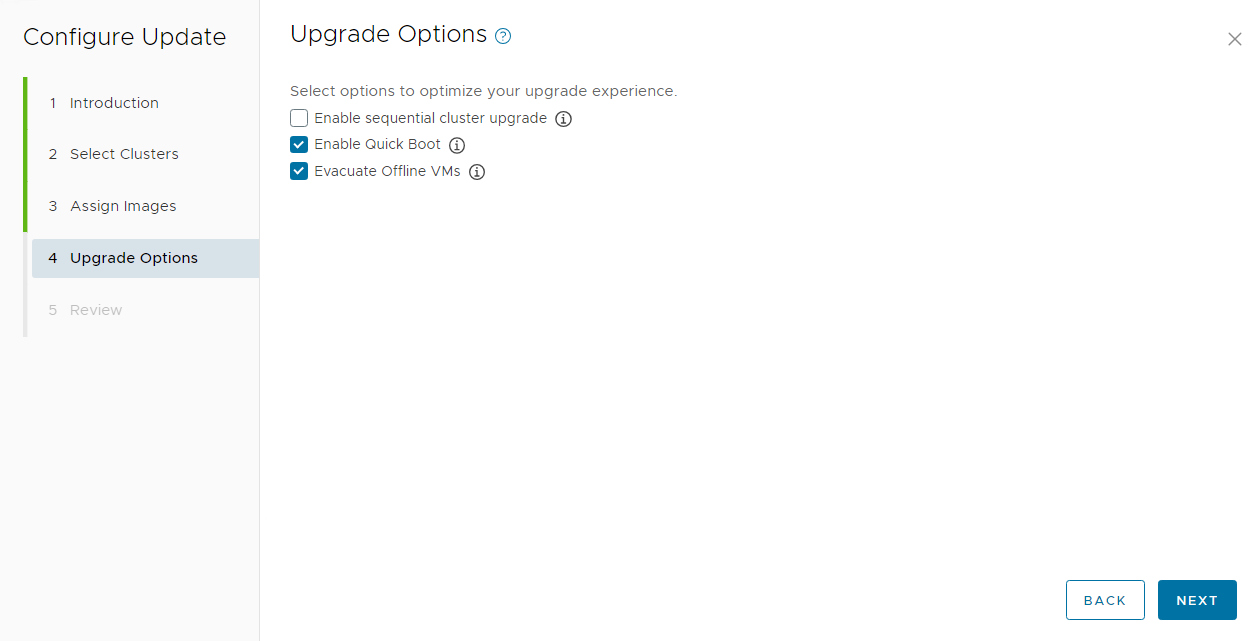
- NOTE: Quick Boot may not be supported on the Lenovo ThinkAgile VX servers in the environment, but leaving it checked will not impact the upgrade if it is not supported.
- Click FINISH to begin validation of the image configuration. Click FINISH only once, as there may be a lag in the UI and clicking multiple times will result in multiple tasks and possible errors.
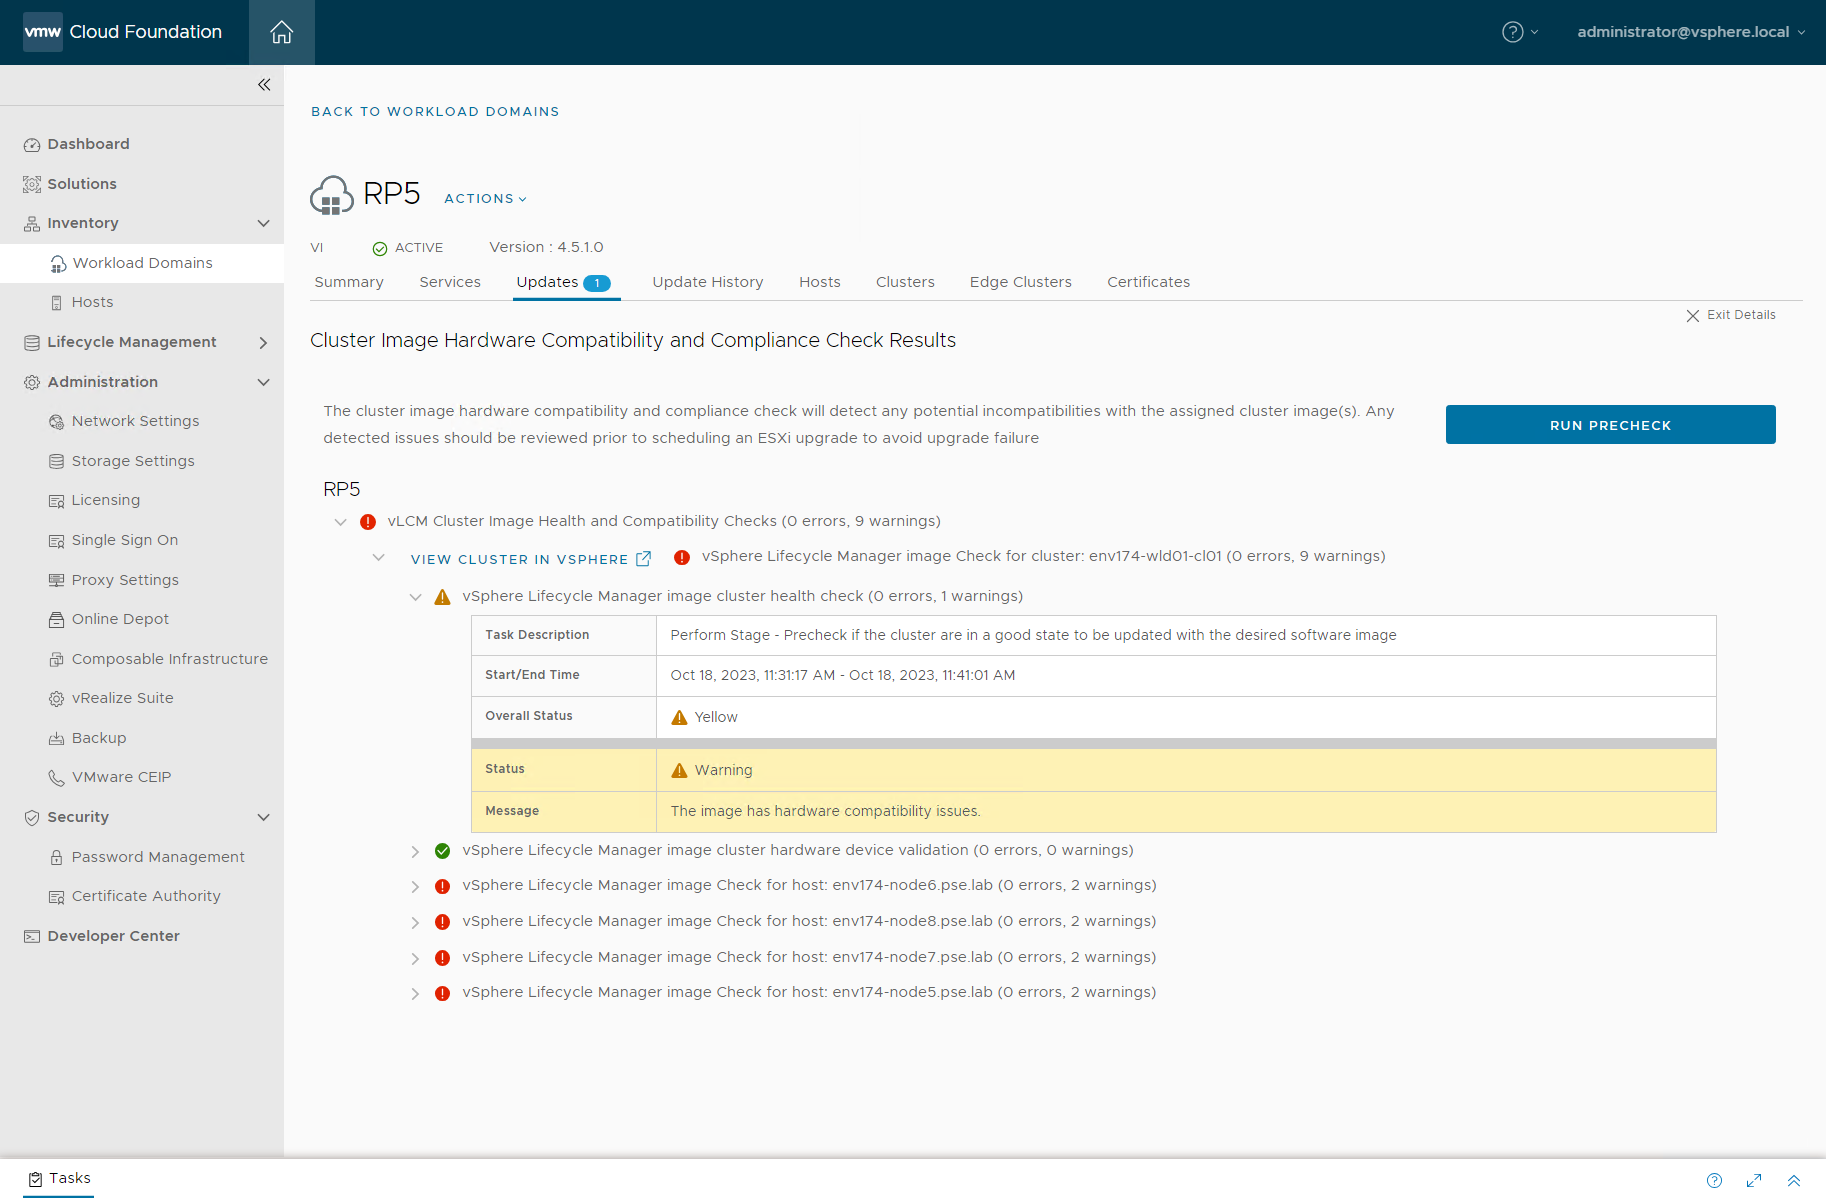
- Once submitted, expand the Precheck section to view the details of the Image Compatibility and Compliance check
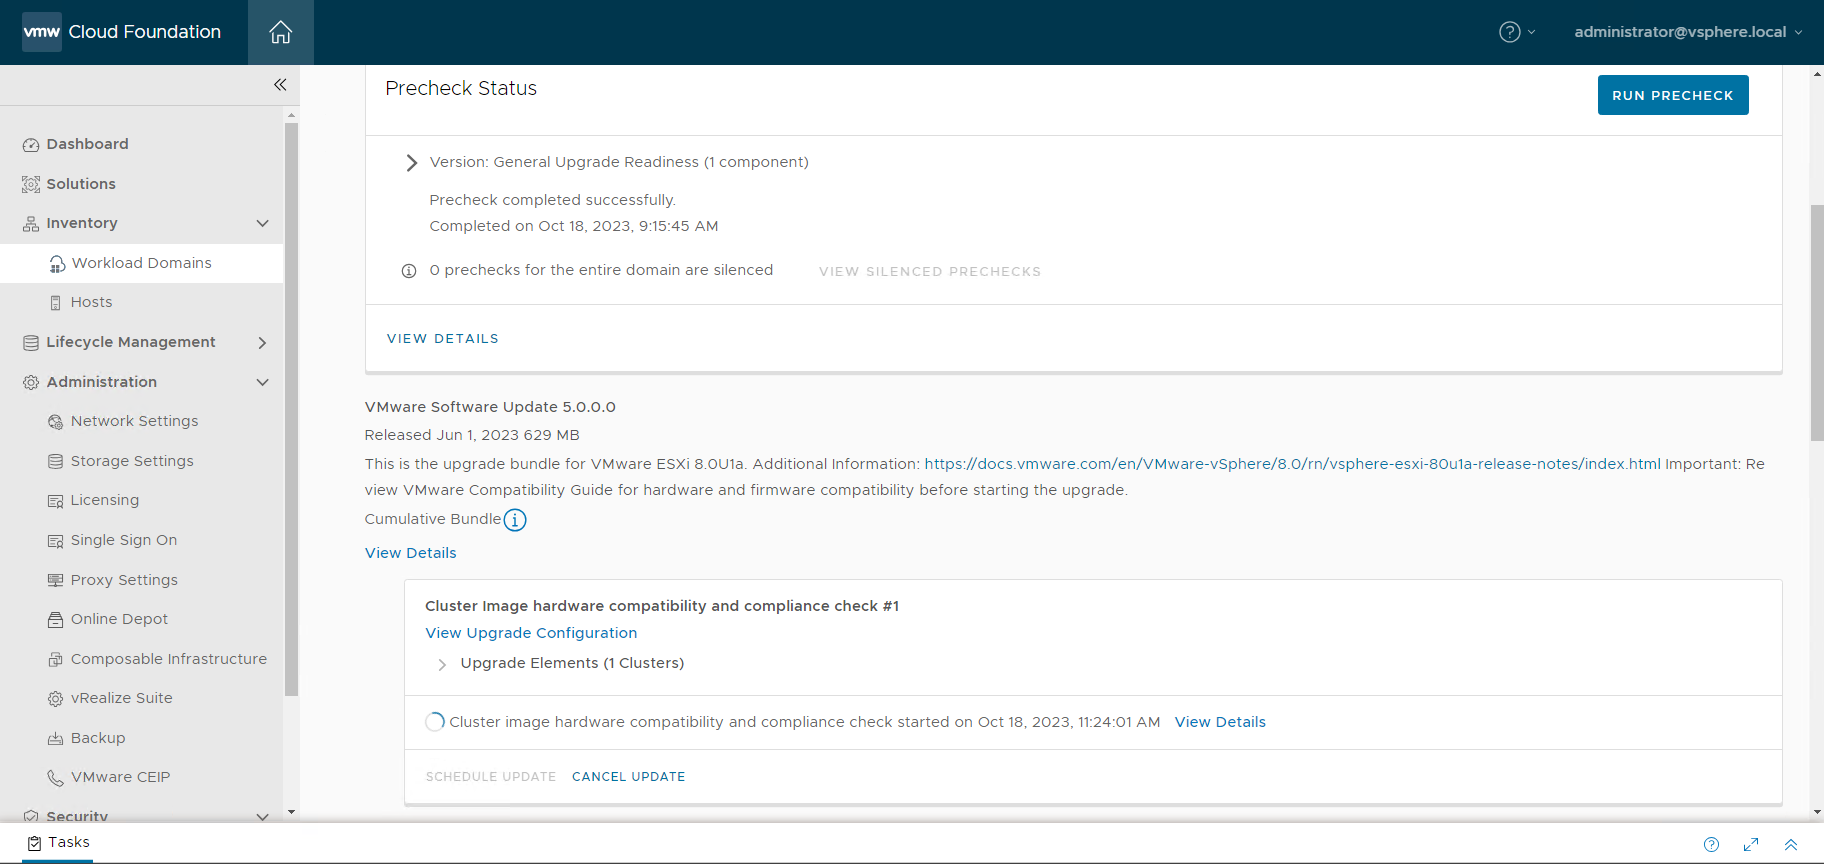
- Click View Details to monitor the progress

- Log into the vSphere Client and navigate to the cluster to monitor the pre-check. Note the updated Image settings applied.

- Inspect any warnings or errors from the compatibility check
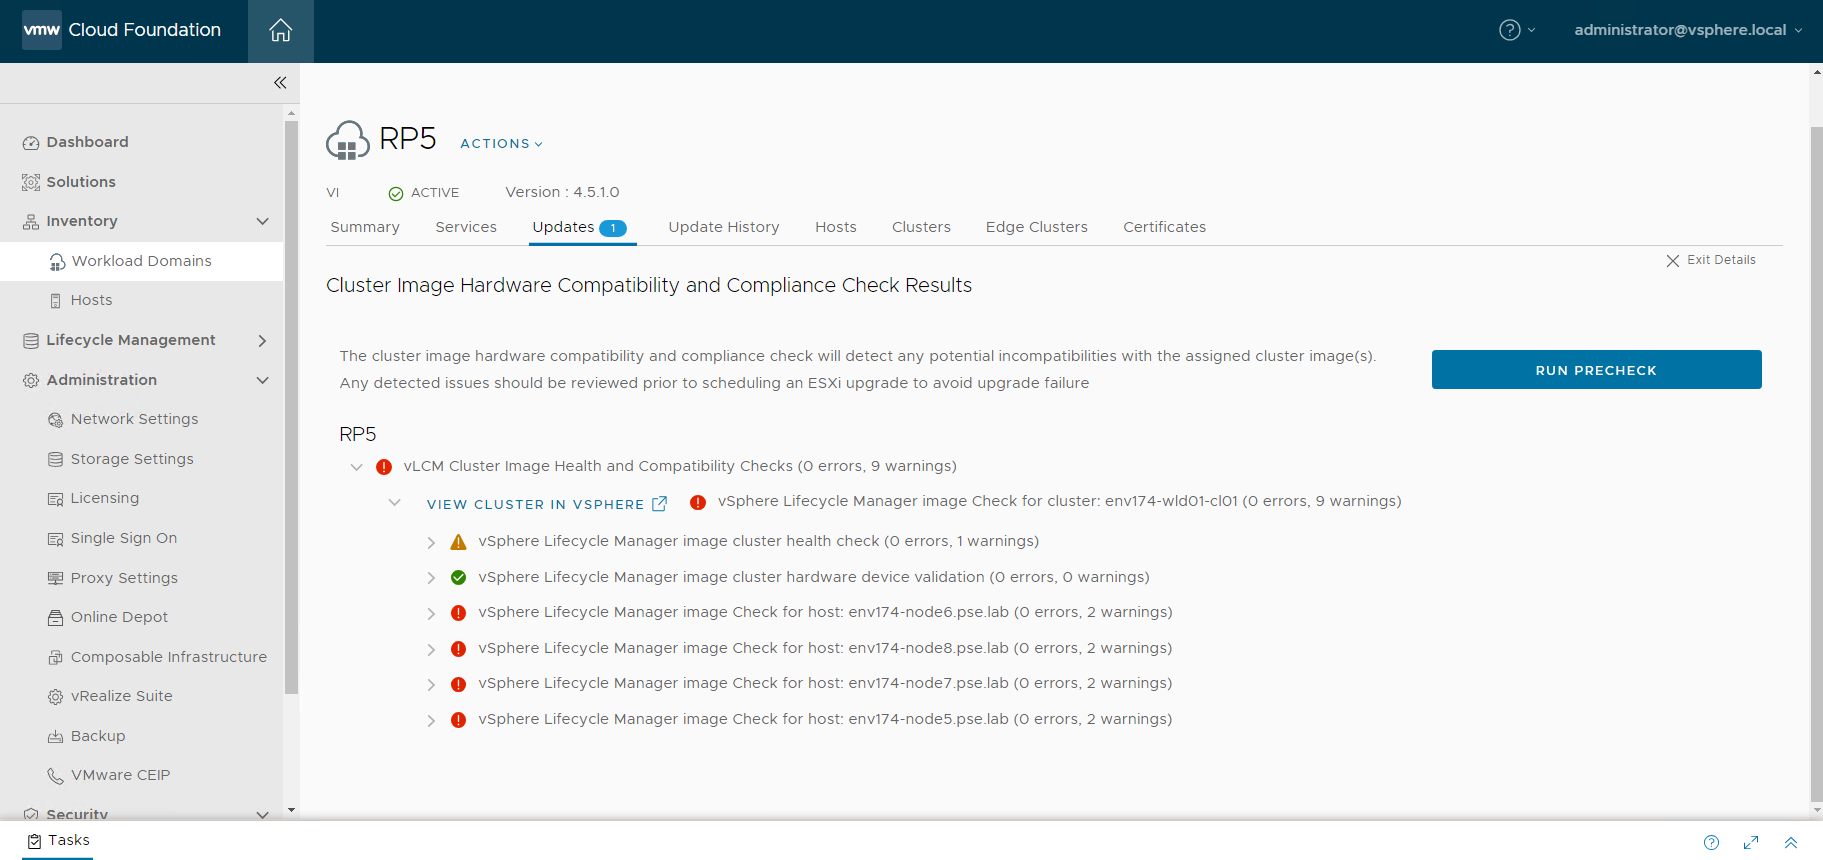
- In this case, it’s showing the target base OS version and target addon version
- The compatibility checks may also show vSAN compatibility issues
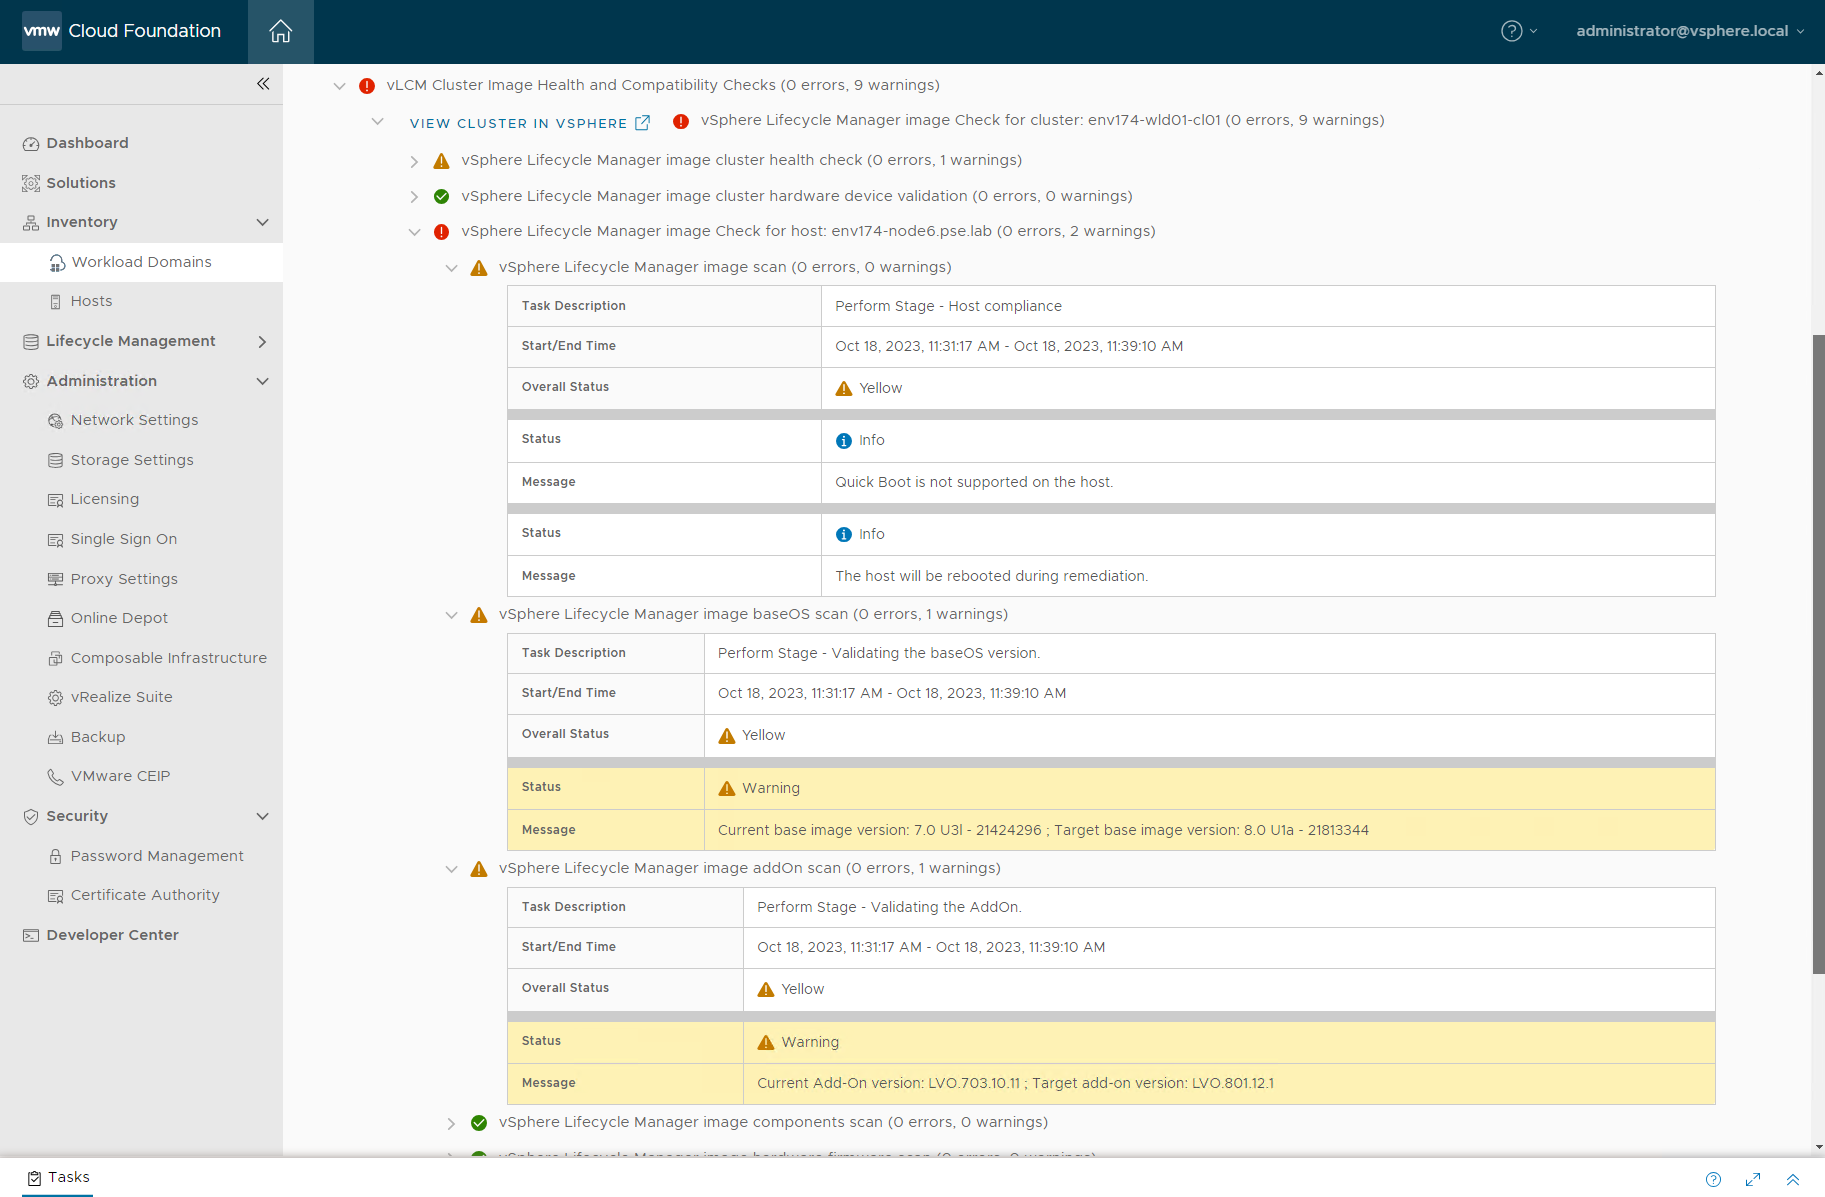
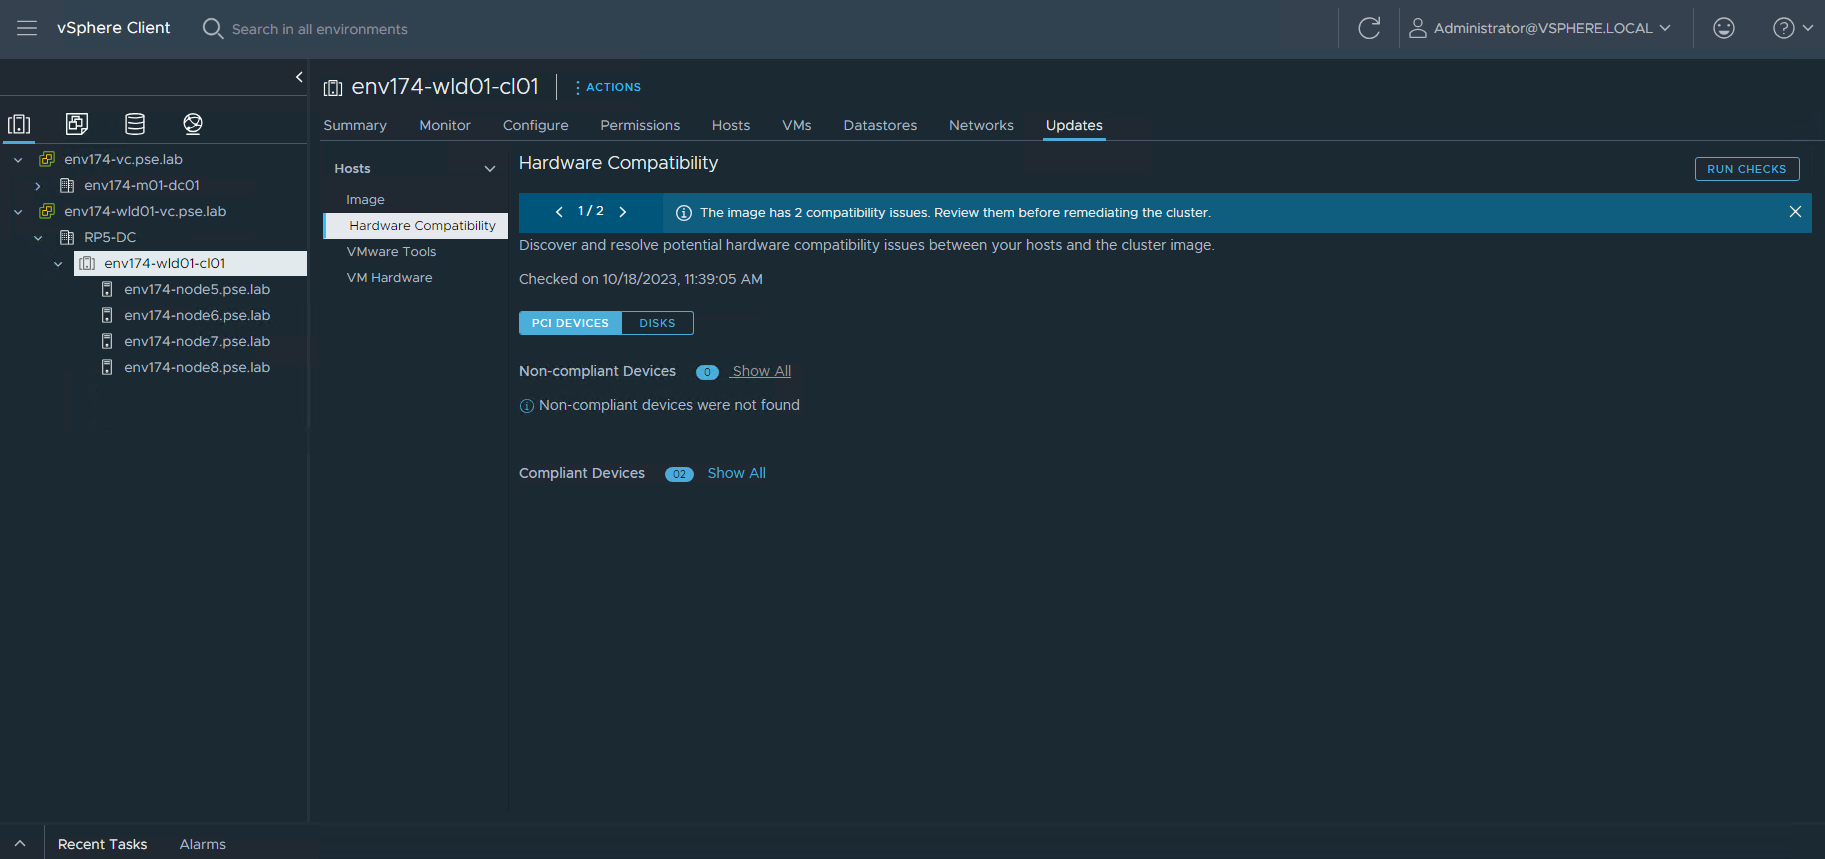
- Log into the vSphere Client, navigate to the cluster and select the Updates tab to view the status
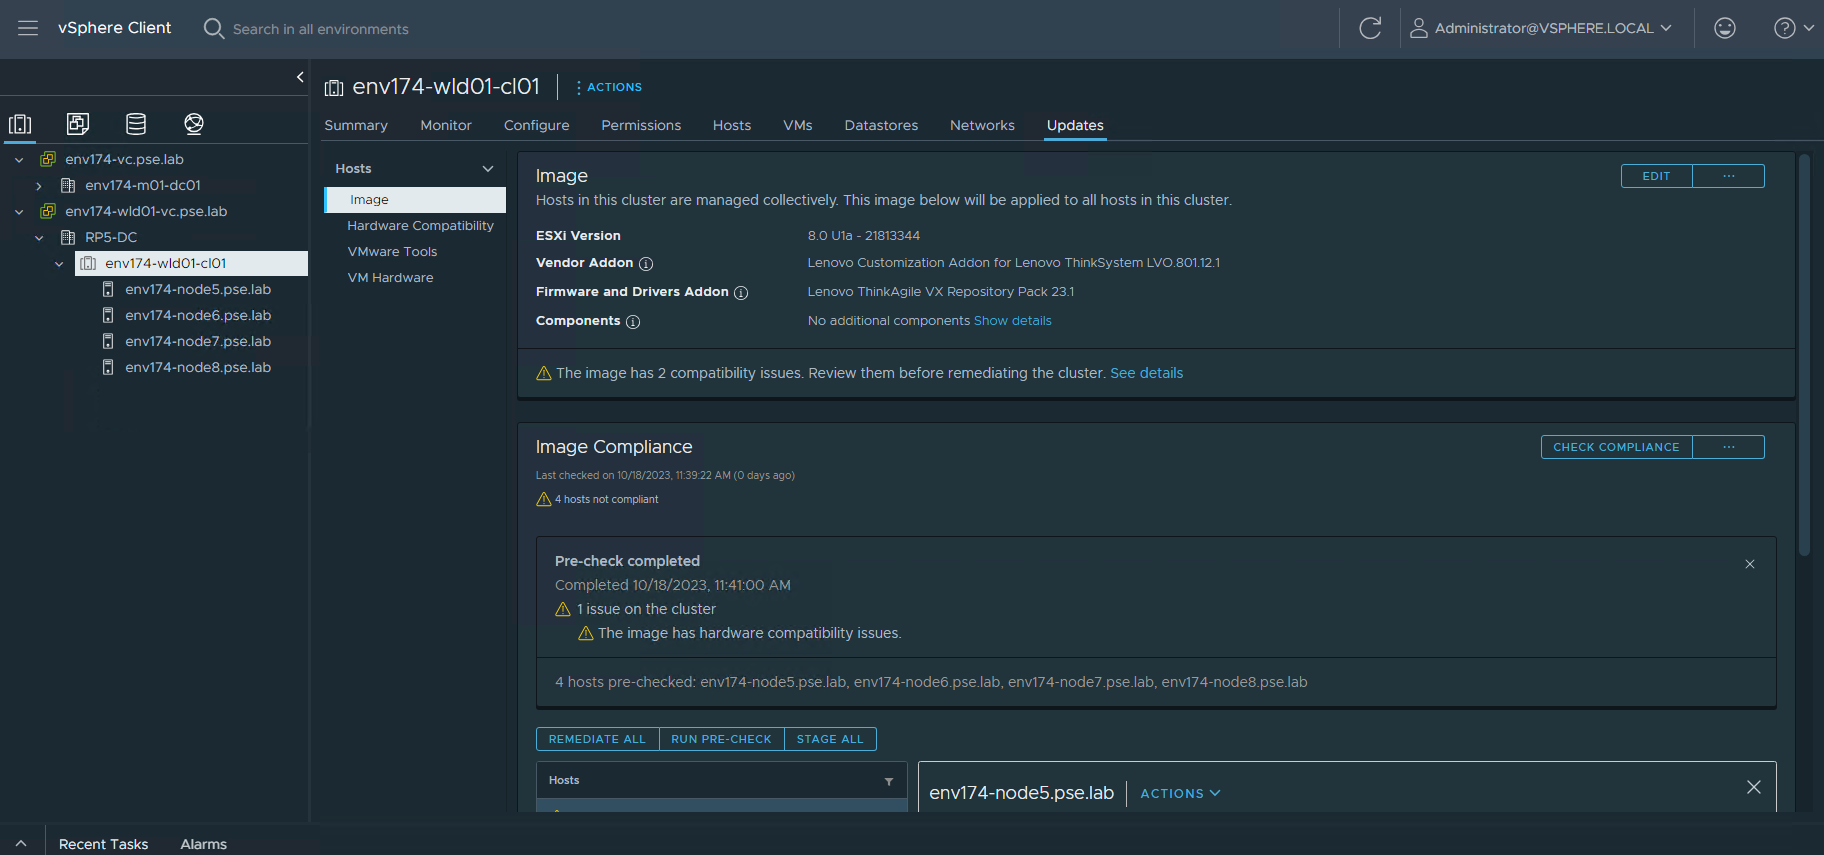
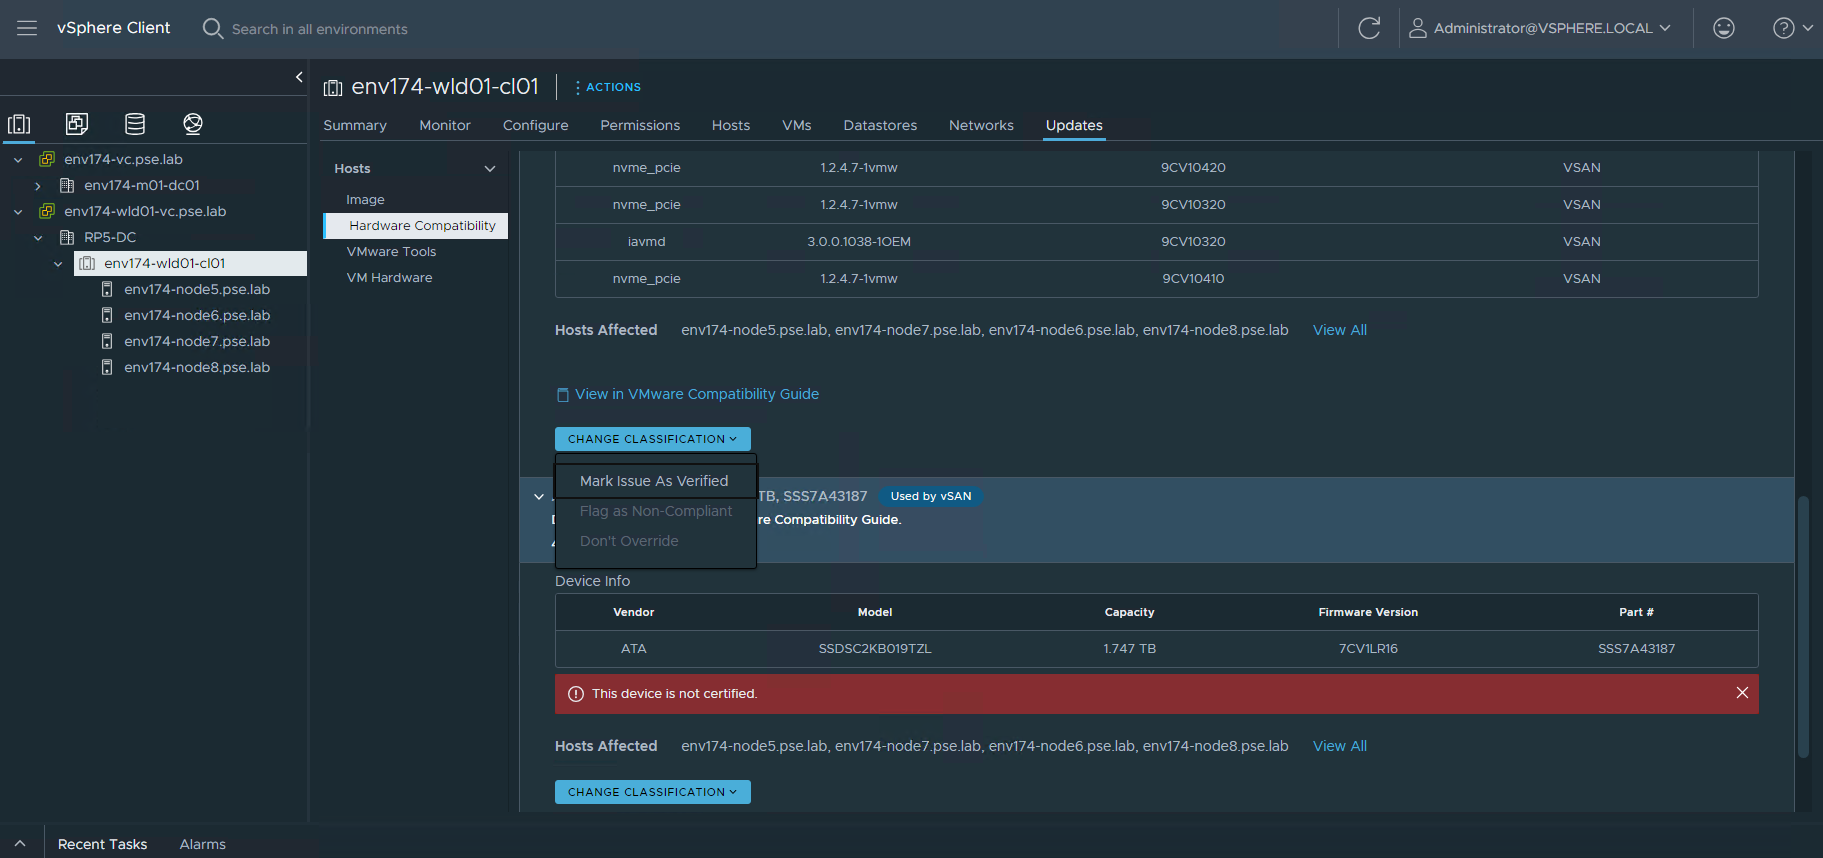
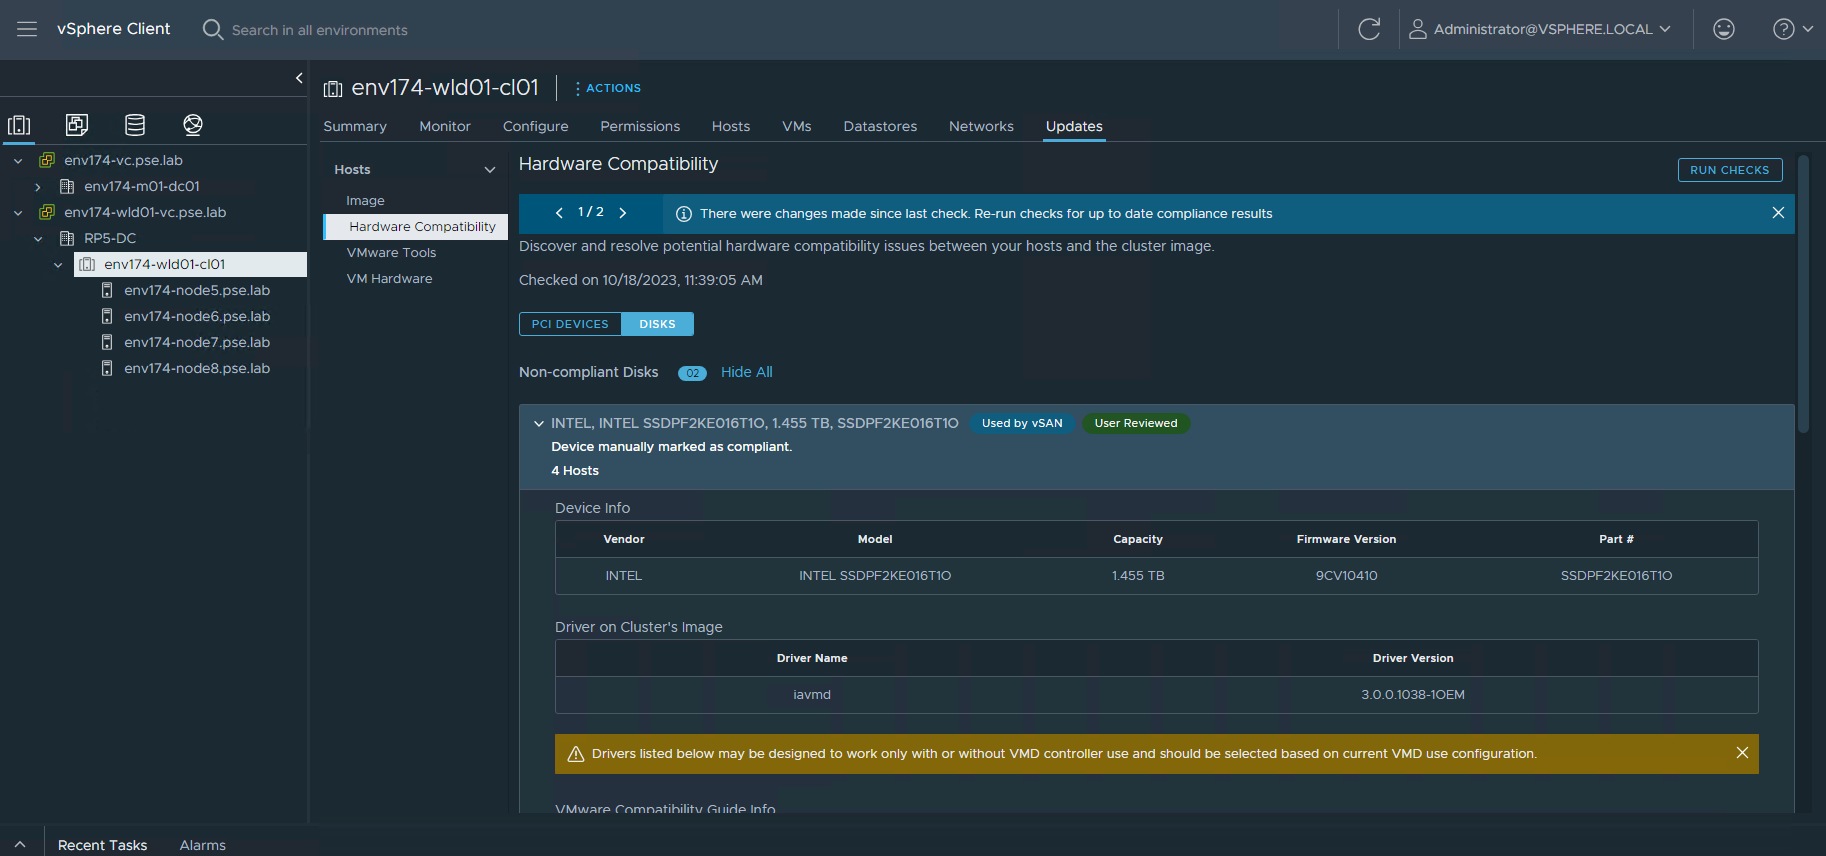
- Select the Hardware Compatibility section of the Updates tab and review any PCI Devices or disks that may be listed as non-compliant


- Review the vSAN HCL for proper combinations of firmware & drivers for the specific hardware in the server: https://www.vmware.com/resources/compatibility/search.php?deviceCategory=vsanio
- To view the firmware version on the NVMe storage, click on the host on the left navigation pane, click the Monitor tab, then select Inventory under Lenovo XClarity Integrator
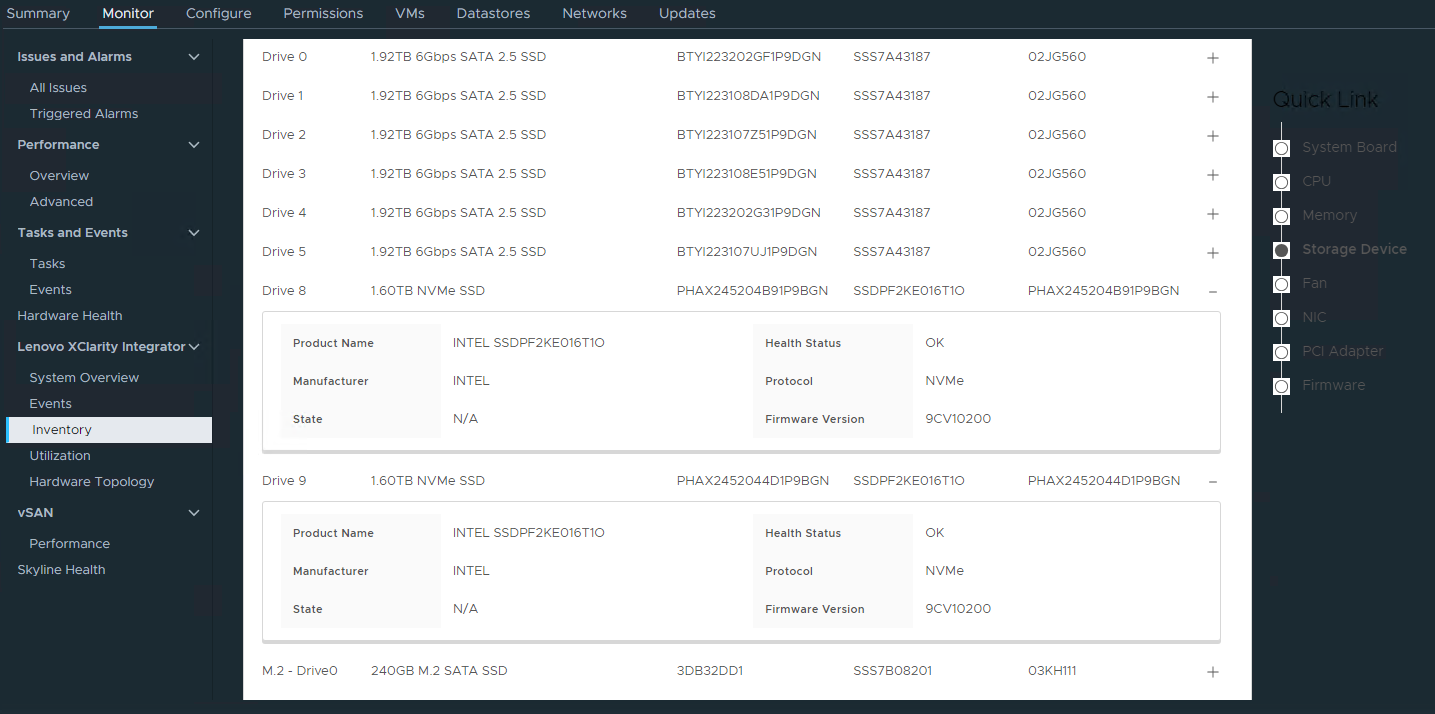
- In this case, the NVMe firmware is 9CV10200. The Lenovo Best Recipe 23.1 will upgrade the firmware to 9CV10420, and the accompanying addon of LVO.801.12.1 will supply the appropriate driver.
- After verification of all hardware compliance warnings, click CHANGE CLASSIFICATION and select Mark Issue As Verified

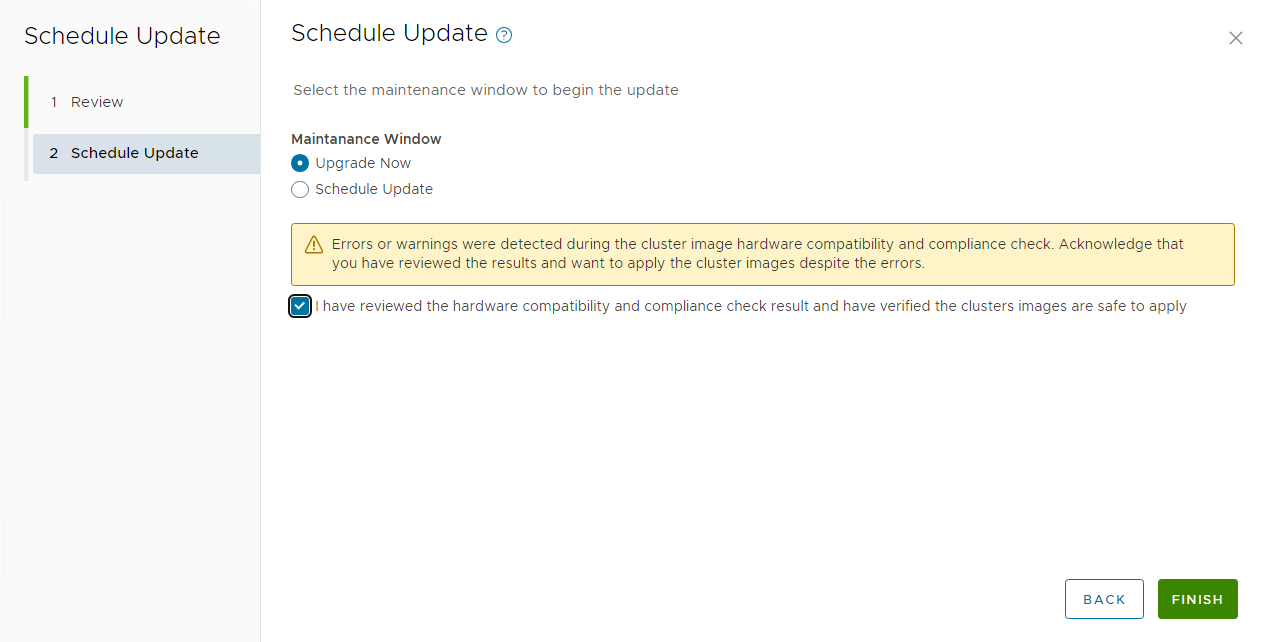
- In SDDC Manager, click Exit Details on the top right to be taken back to the Updates tab, click SCHEDULE UPDATE
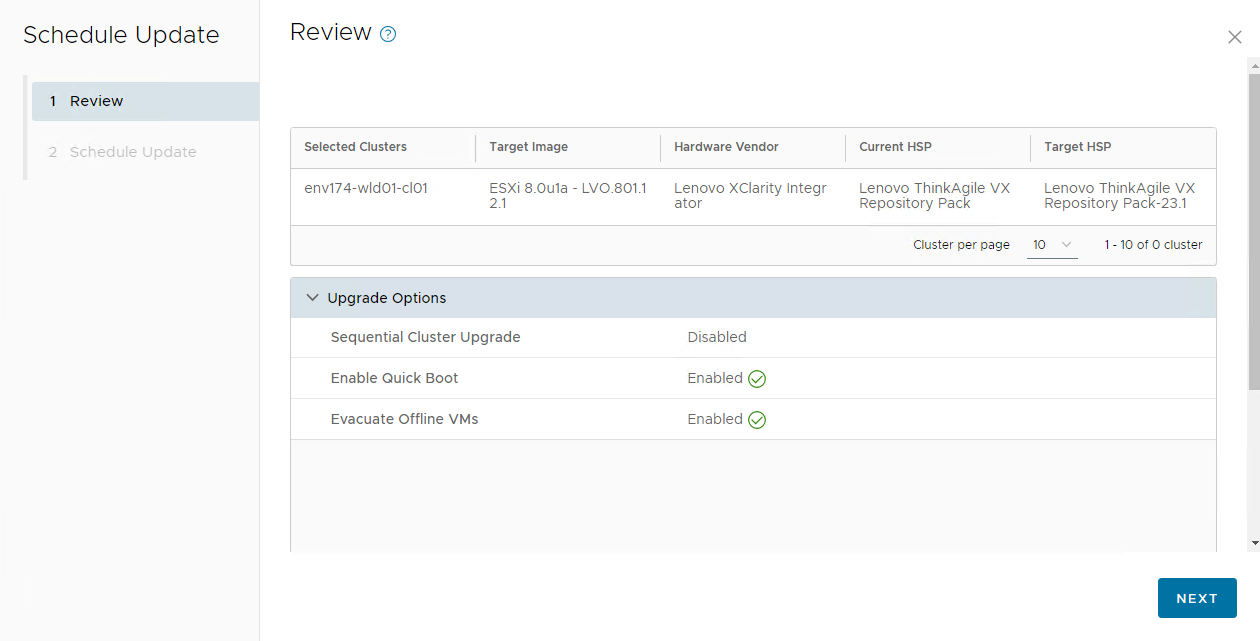
- Select Upgrade Now and check the box confirming review of the vSAN HCL, then click FINISH
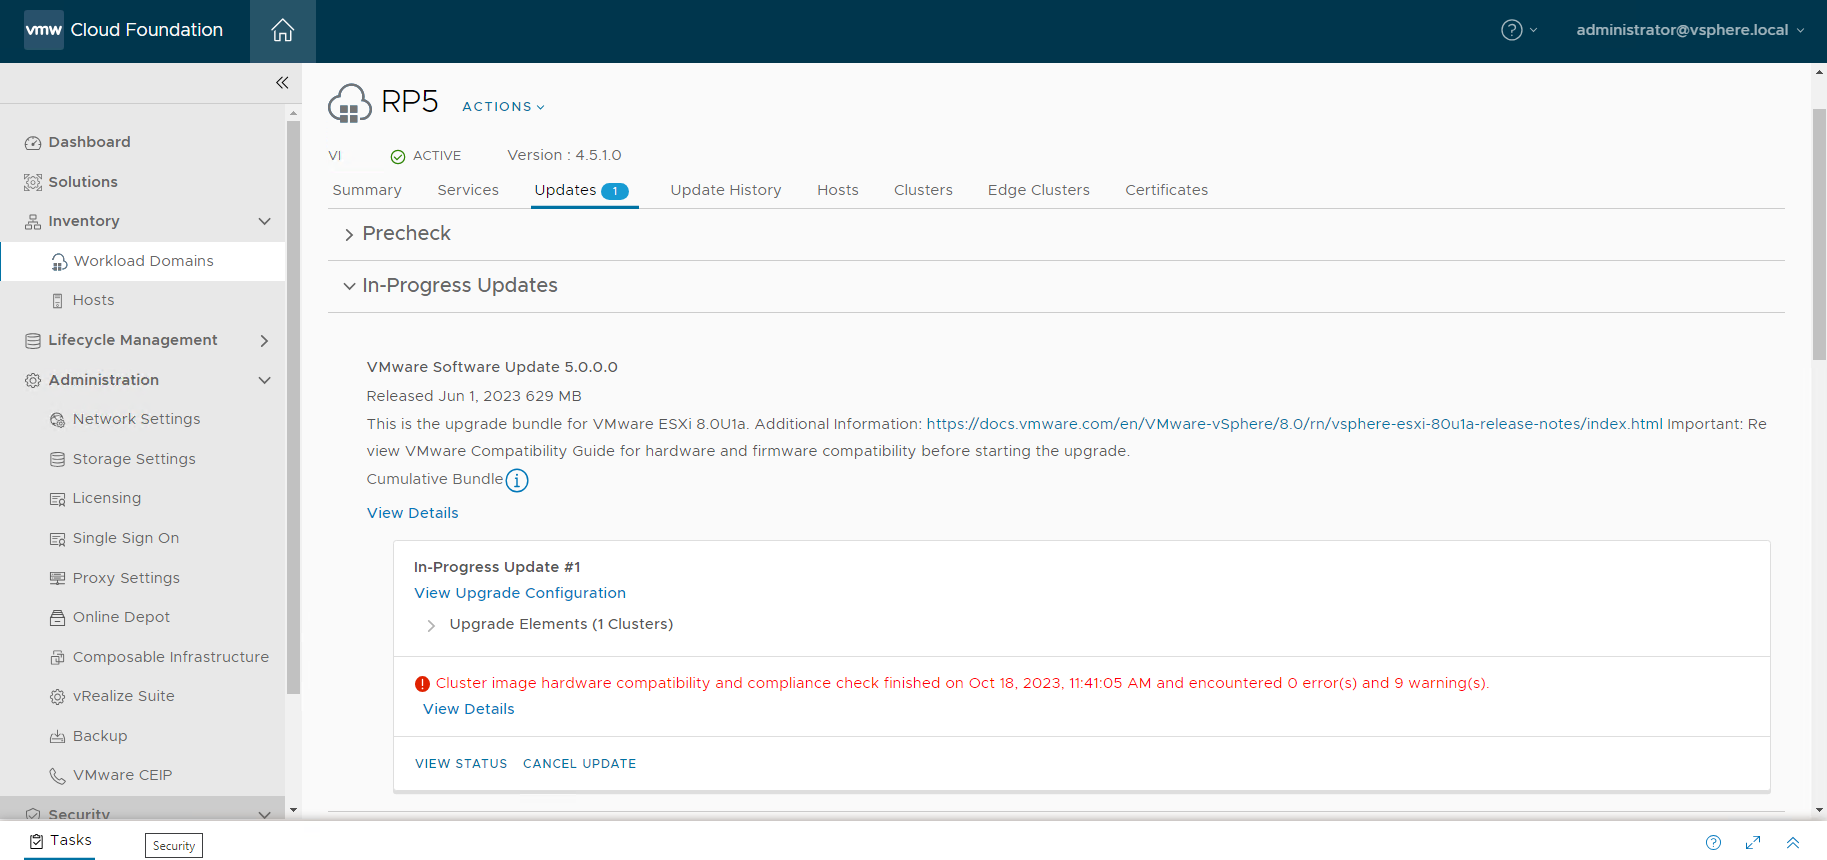
- After the upgrade begins, the VIEW STATUS button will become visible, click on it to follow the update process
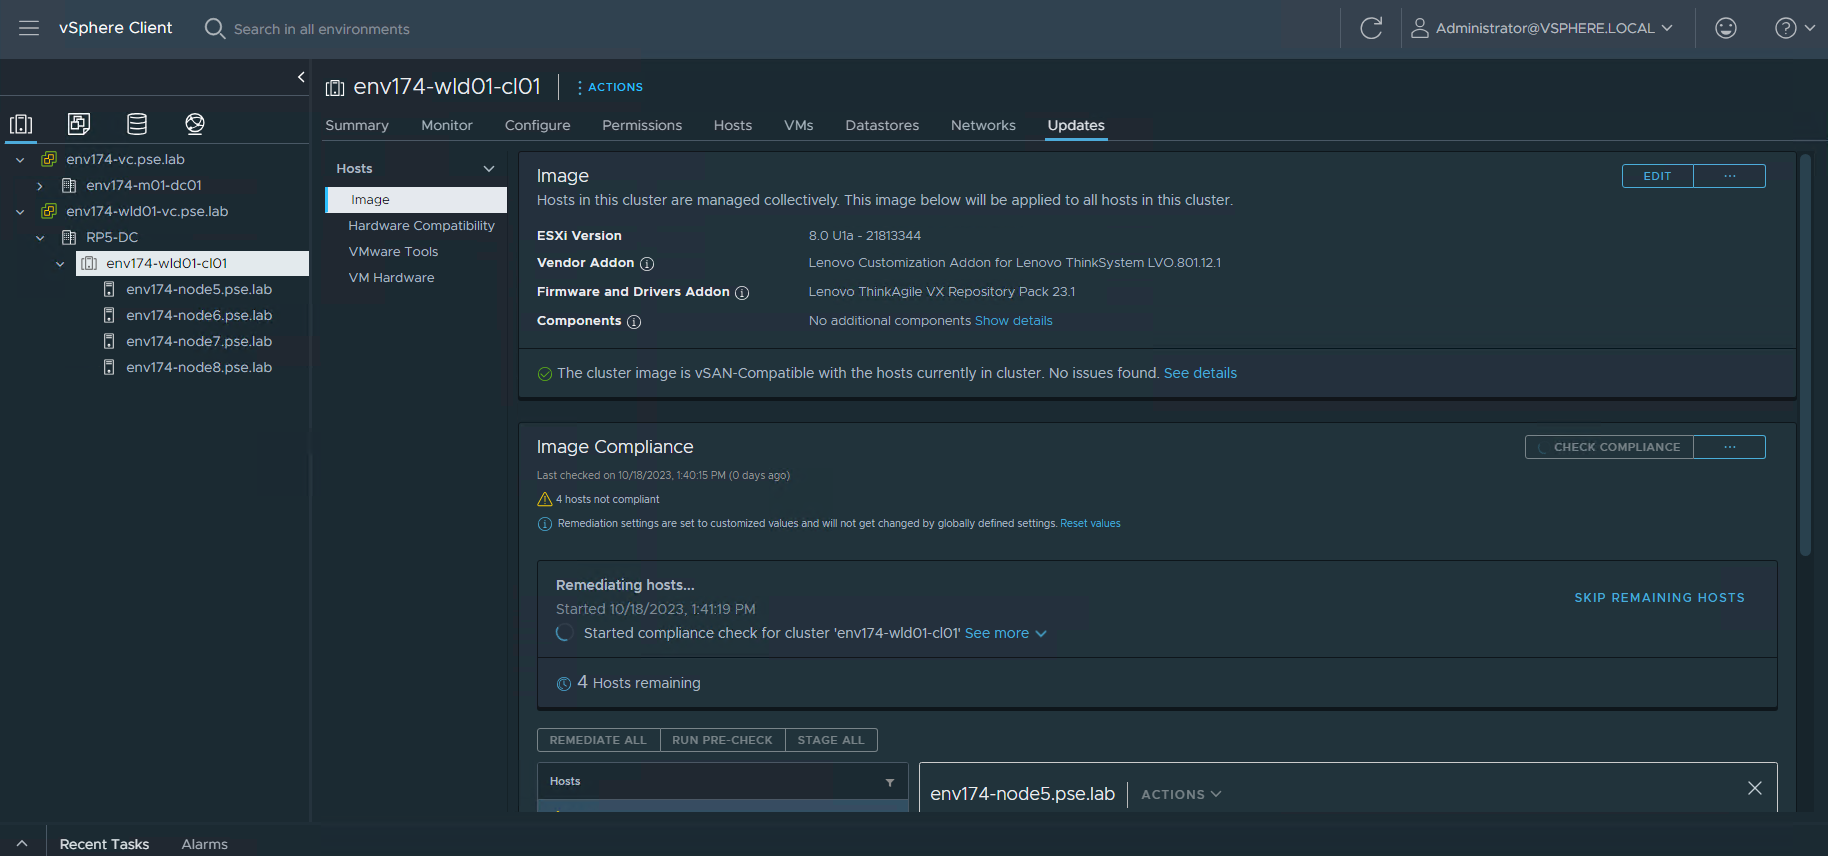
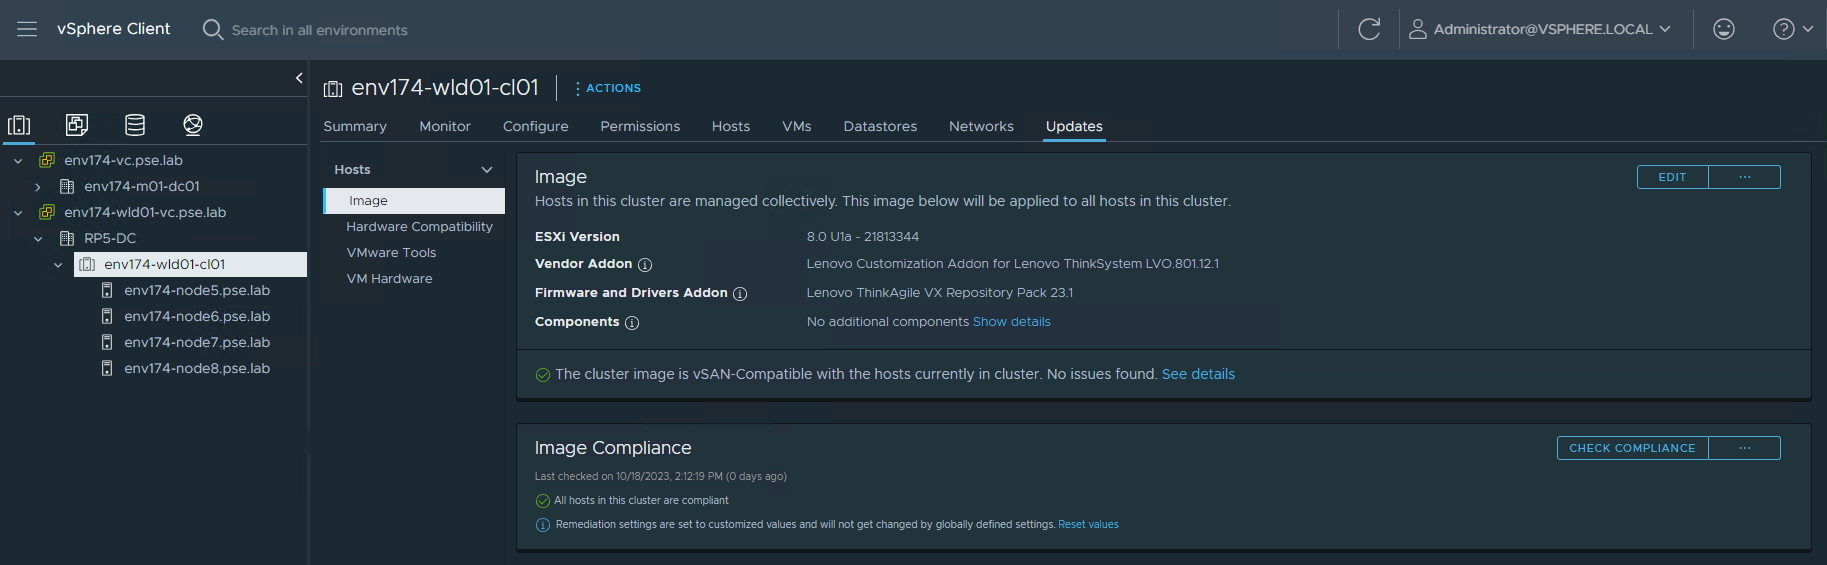
- In the vSphere Client, click the cluster on the left navigation pane, select the Updates tab, and select Image to view the remediation process
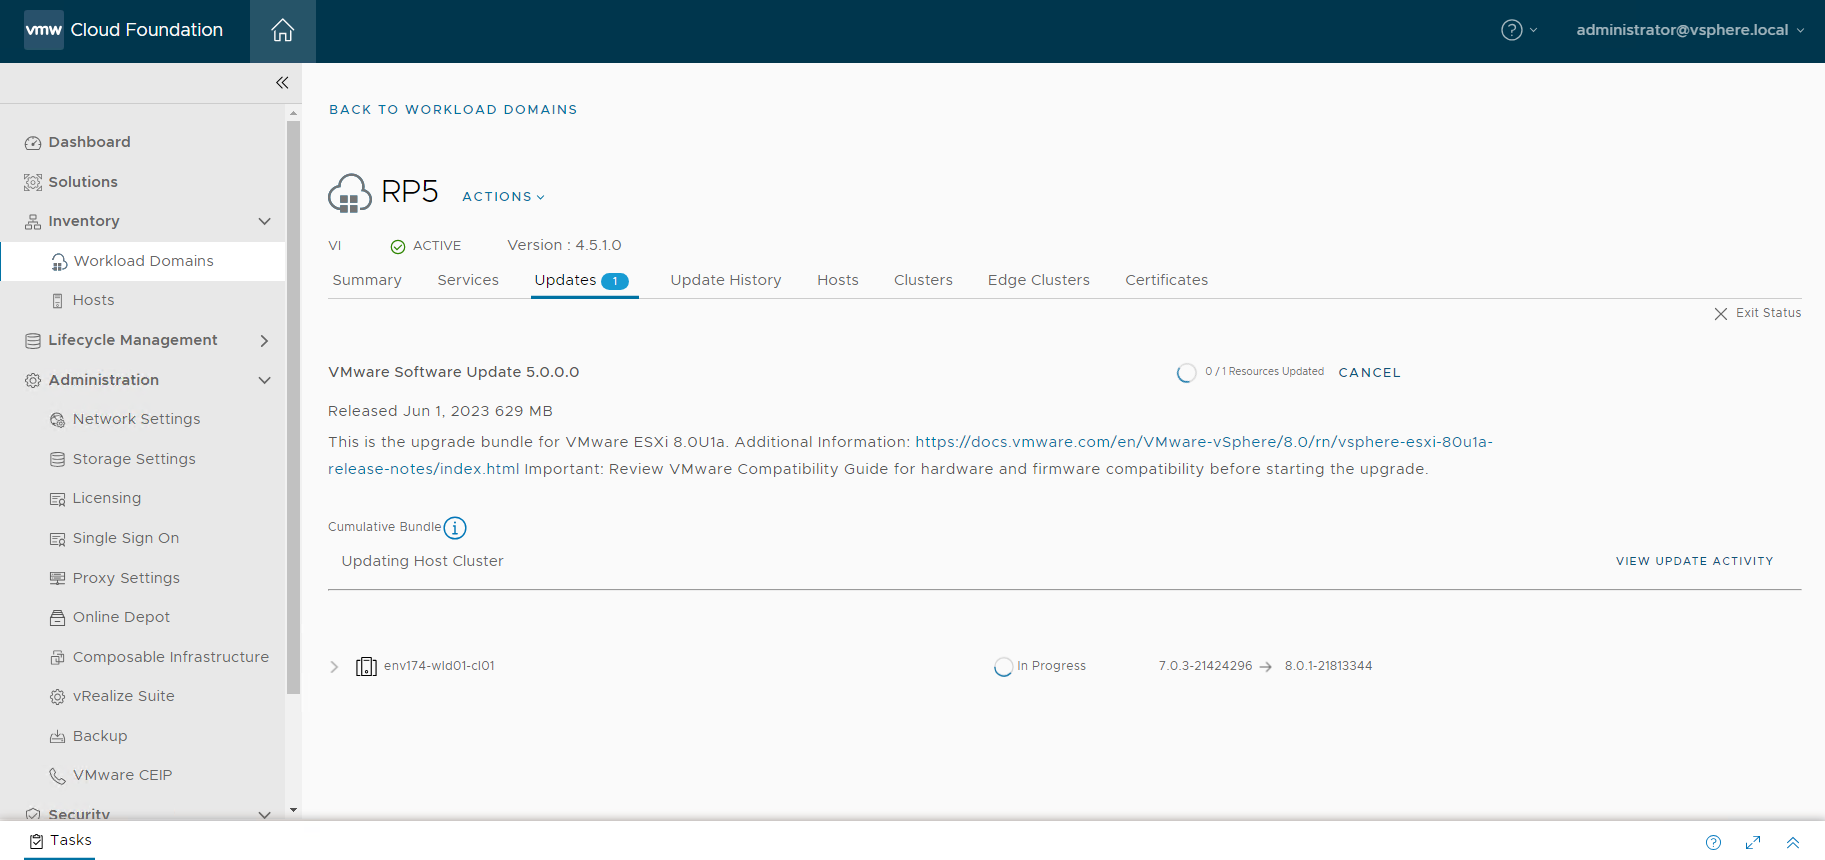
- Monitor SDDC Manager for the update task to complete
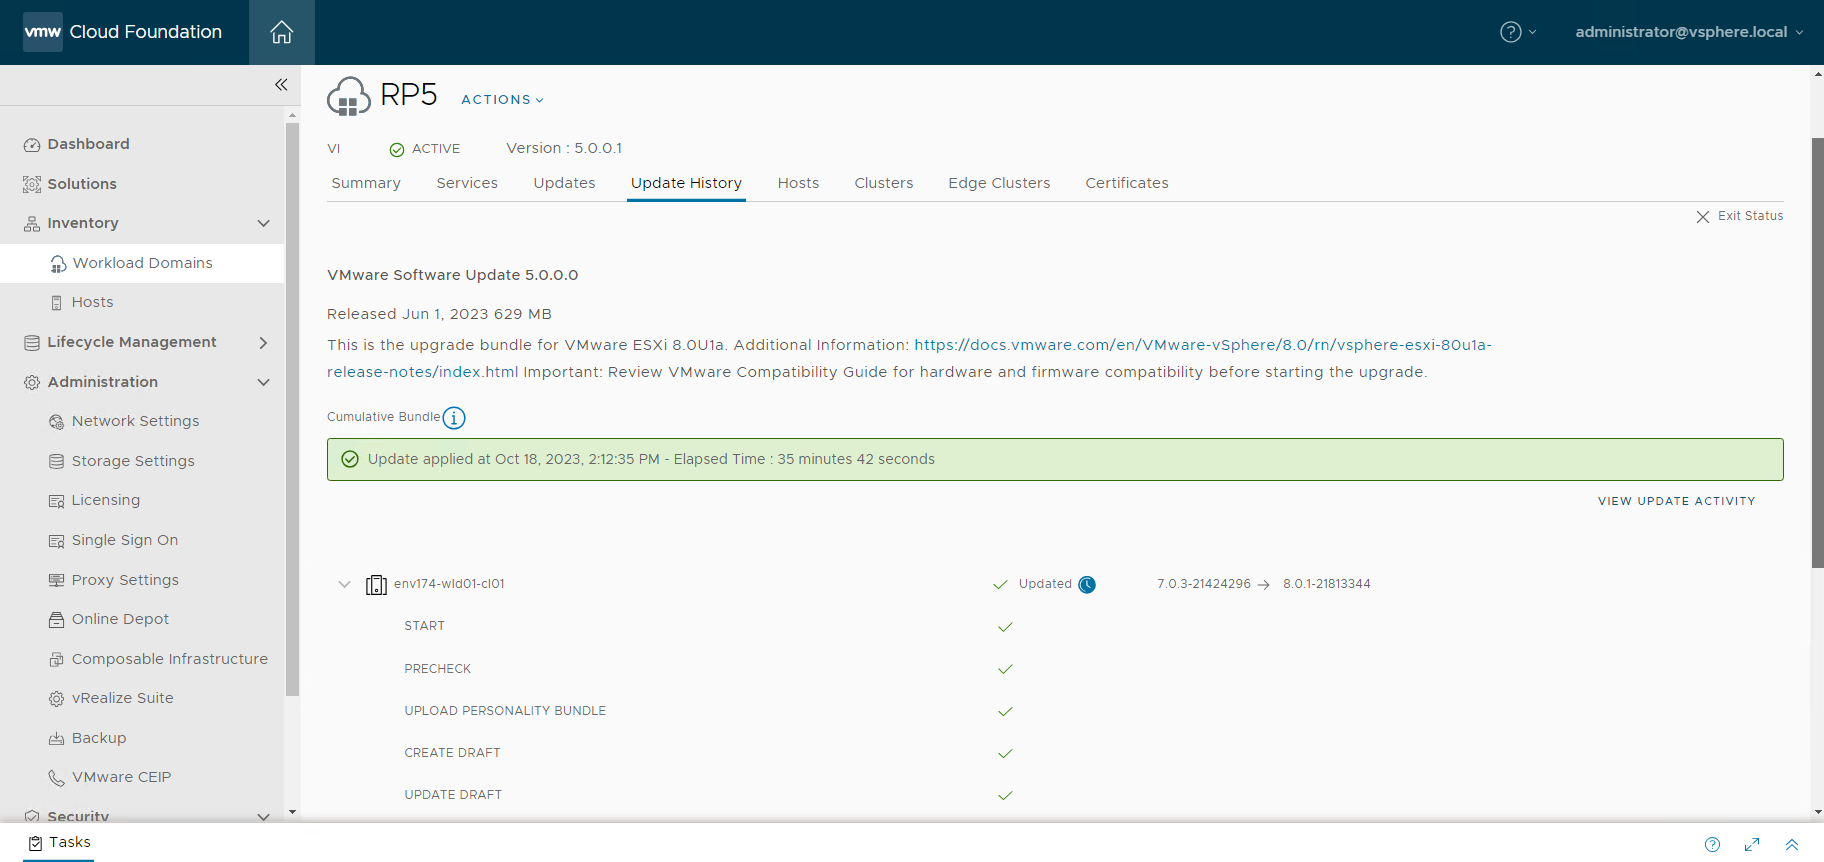
- Check the Image Compliance in the vSphere Client
- The workload domain has been successfully upgraded
Additional Steps
The upgrade of VMware Cloud Foundation to version 5.0.0.1 is now complete, but there are some remaining tasks that should be completed:
Add new VMware license keys
- Log into vCenter, click the Navigation menu on the top left, and select Administration.
- Select Licenses on the left and click ADD
- Add new license keys needed for vCenter, vSphere, and/or vSAN.
- Navigate to the Assets tab and go through each section to locate any items listed in Evaluation Mode.
- Check the Checkbox next to the item and click ASSIGN LICENSE to assign the new license key.
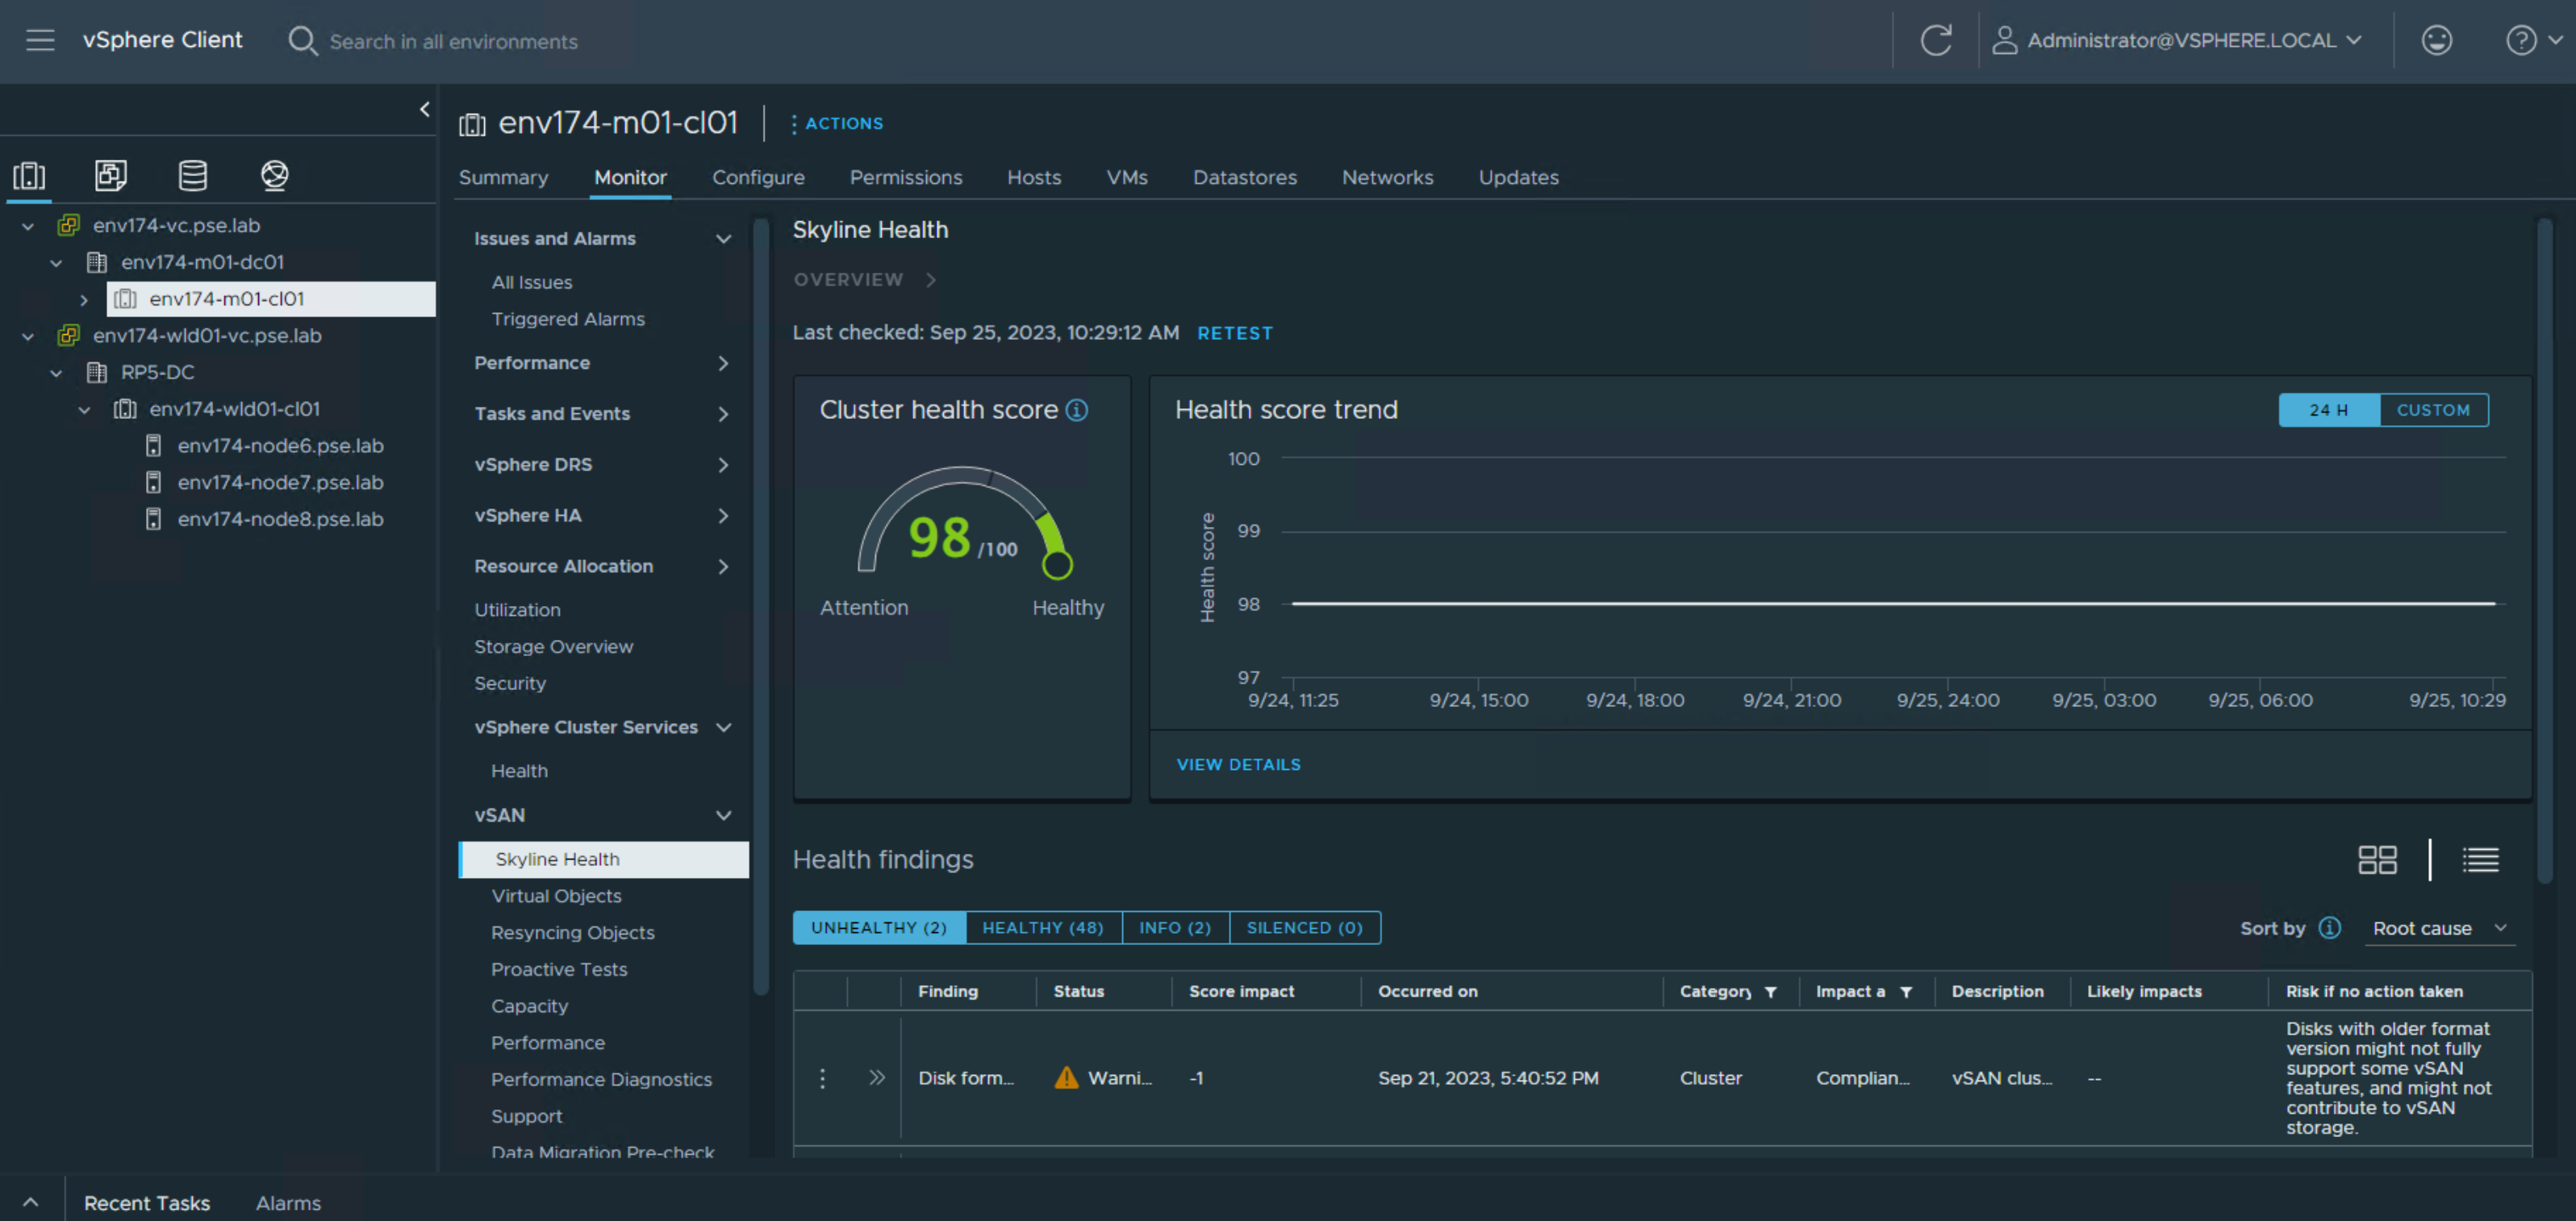
Check Skyline Health
- Navigate to the Cluster, select the Monitor tab, then select Skyline Health under vSAN to identify any health issues
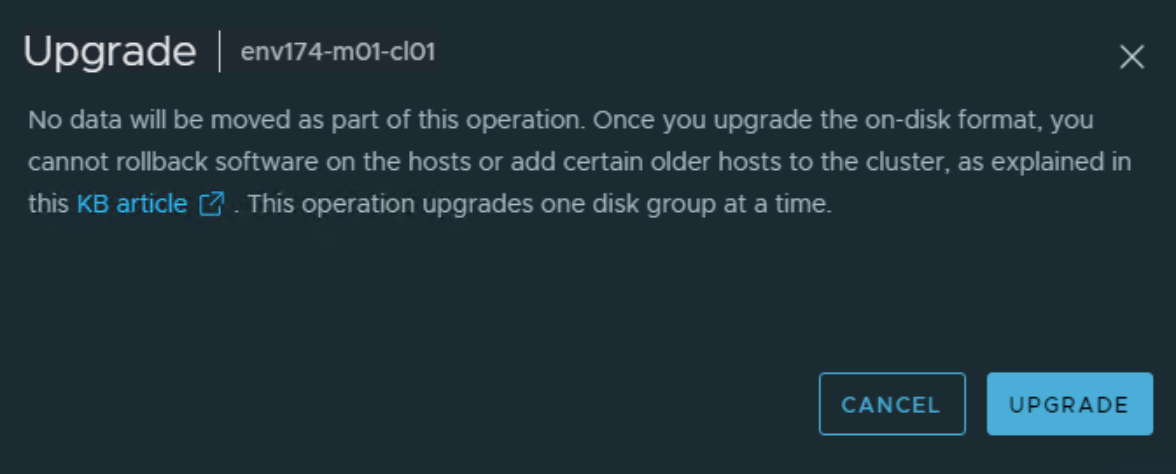
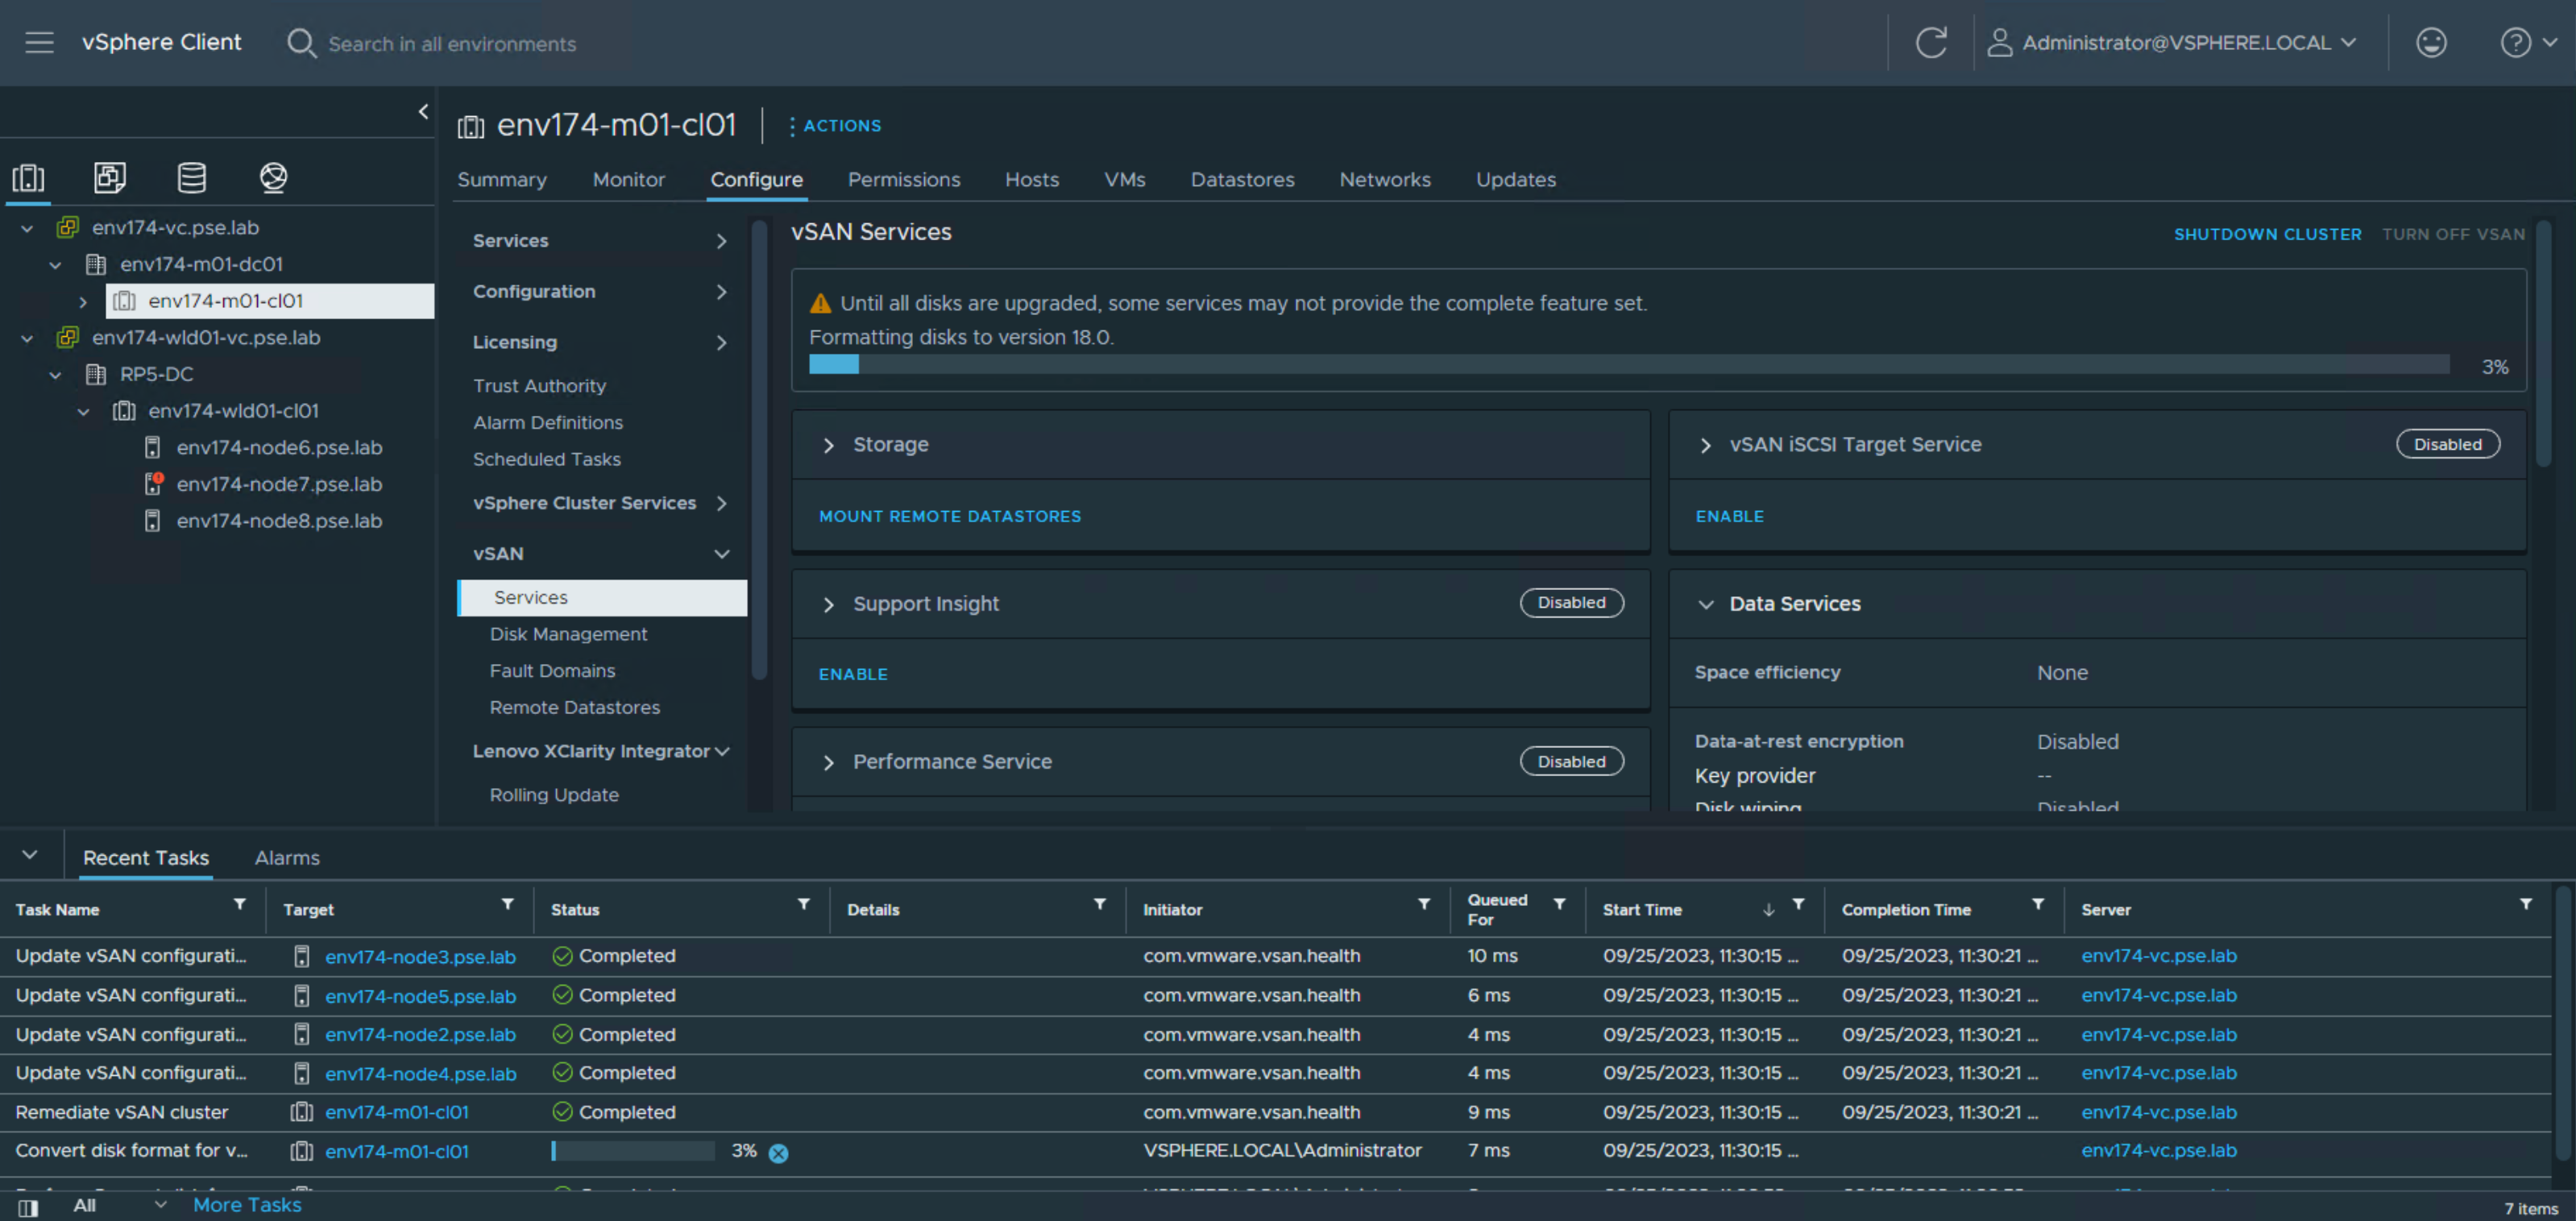
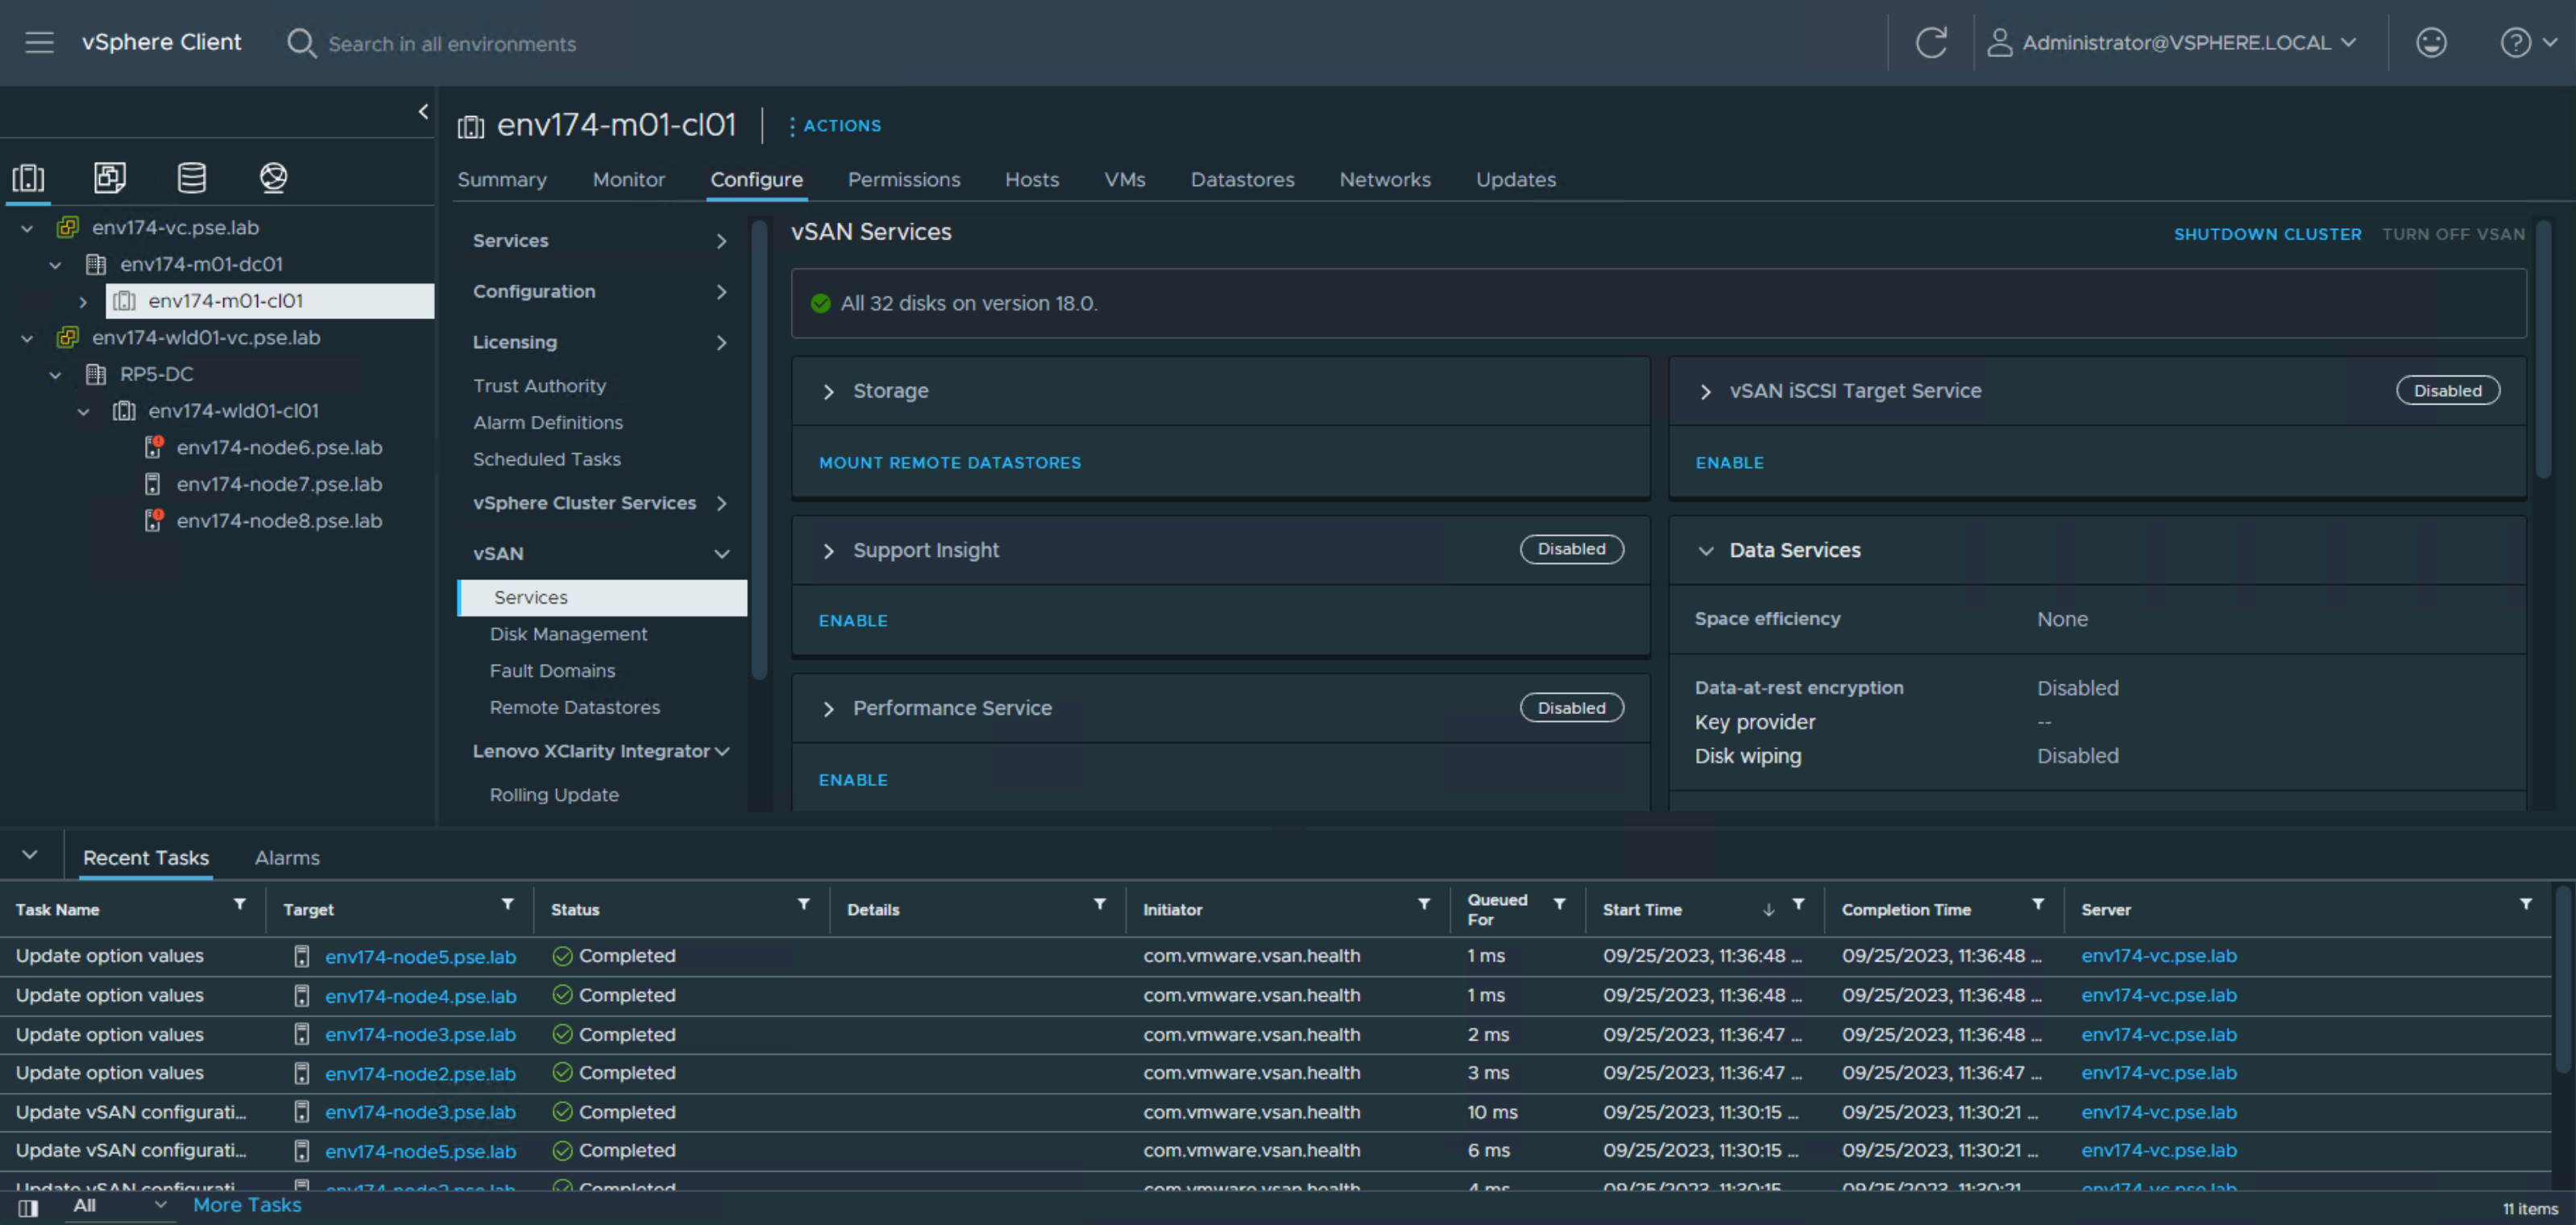
- To upgrade the vSAN Disk format version, select the Configure tab and navigate to Services under vSAN

- Click PRE-CHECK UPGRADE to verify the vSAN disk format version is able to be upgraded

- Click UPGRADE, then click UPGRADE on the pop-up box
- It is recommended to enable Support Insight and Performance Service if not already enabled.
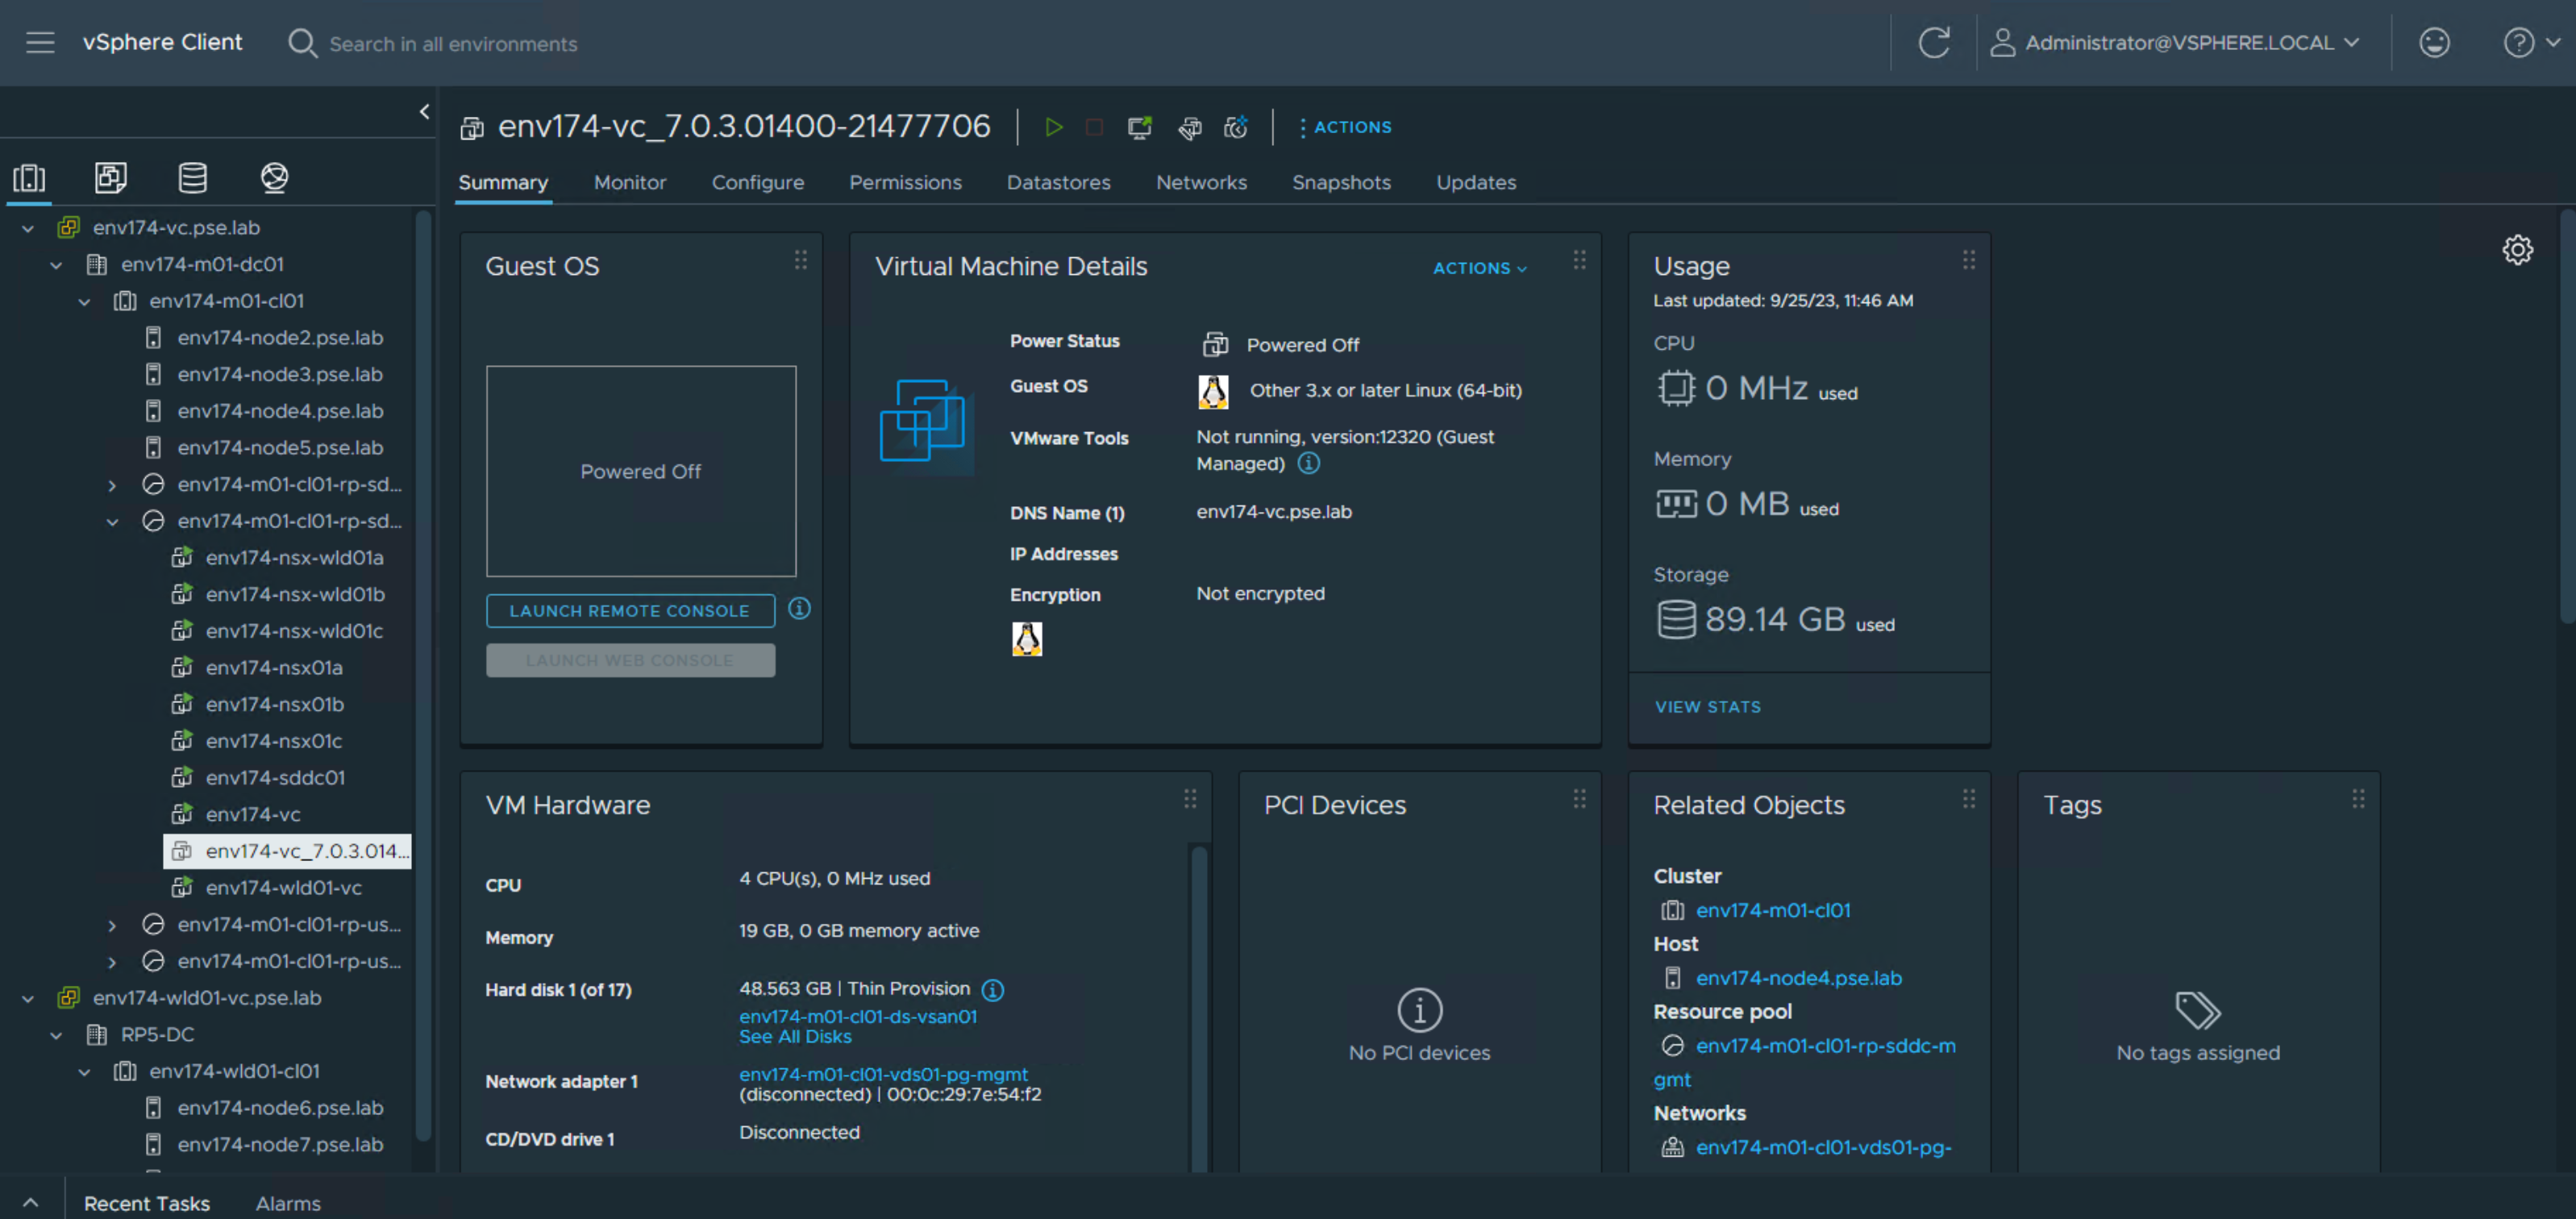
Delete the old vCenter 7.0 appliance
- Right-click, or with the appliance selected click ACTIONS, and select Delete from Disk
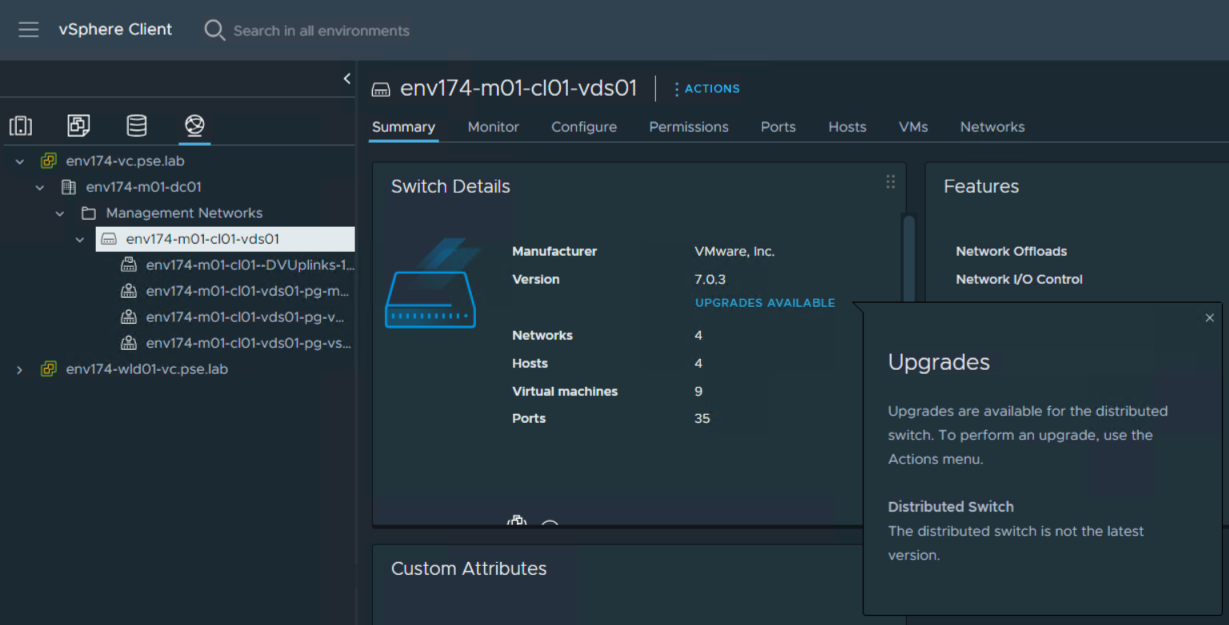
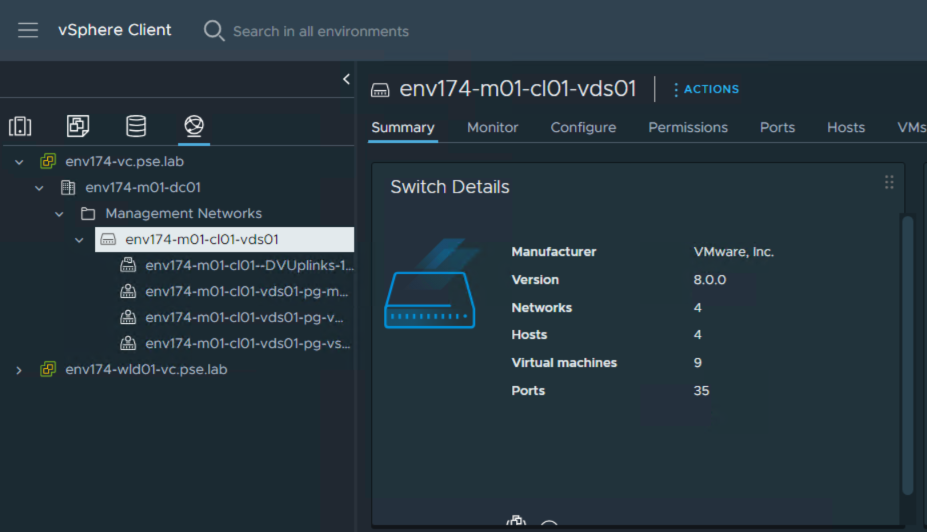
Upgrade the vSphere Distributed Switch
- Navigate to the networking tab in the Inventory view and locate the vSphere Distributed Switch
- Notice version states UPGRADES AVAILABLE
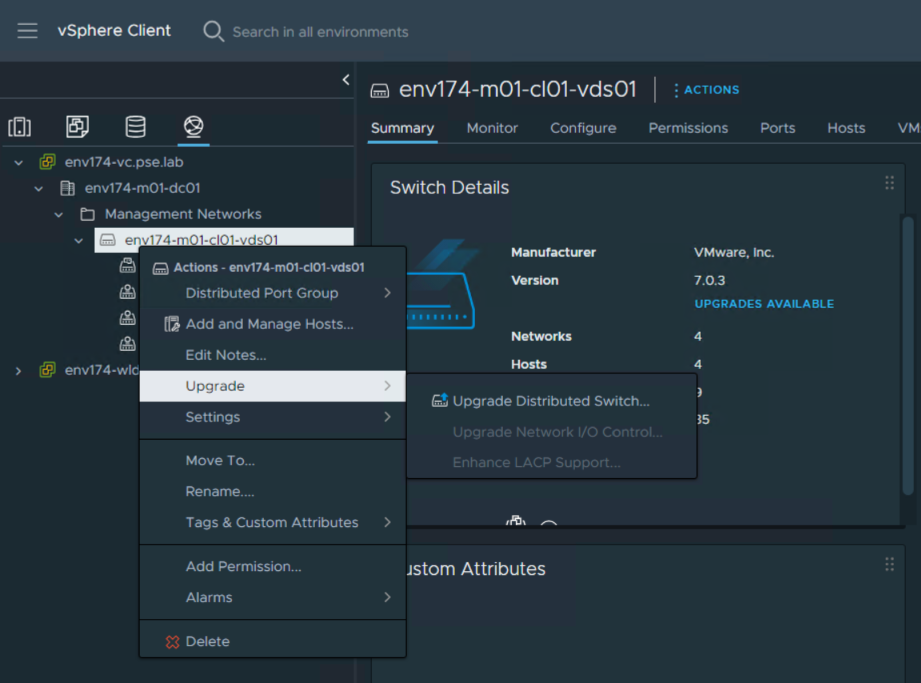
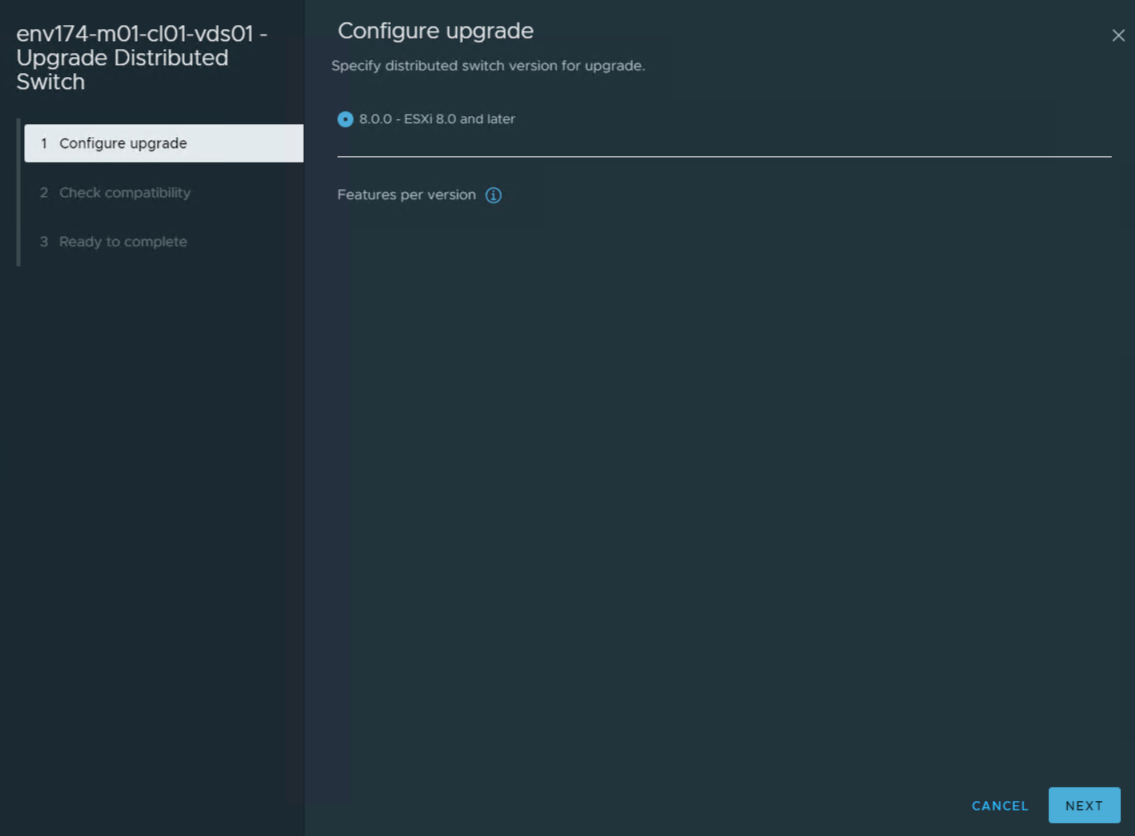
- Right-click on the switch, select Upgrade, then select Upgrade Distributed Switch

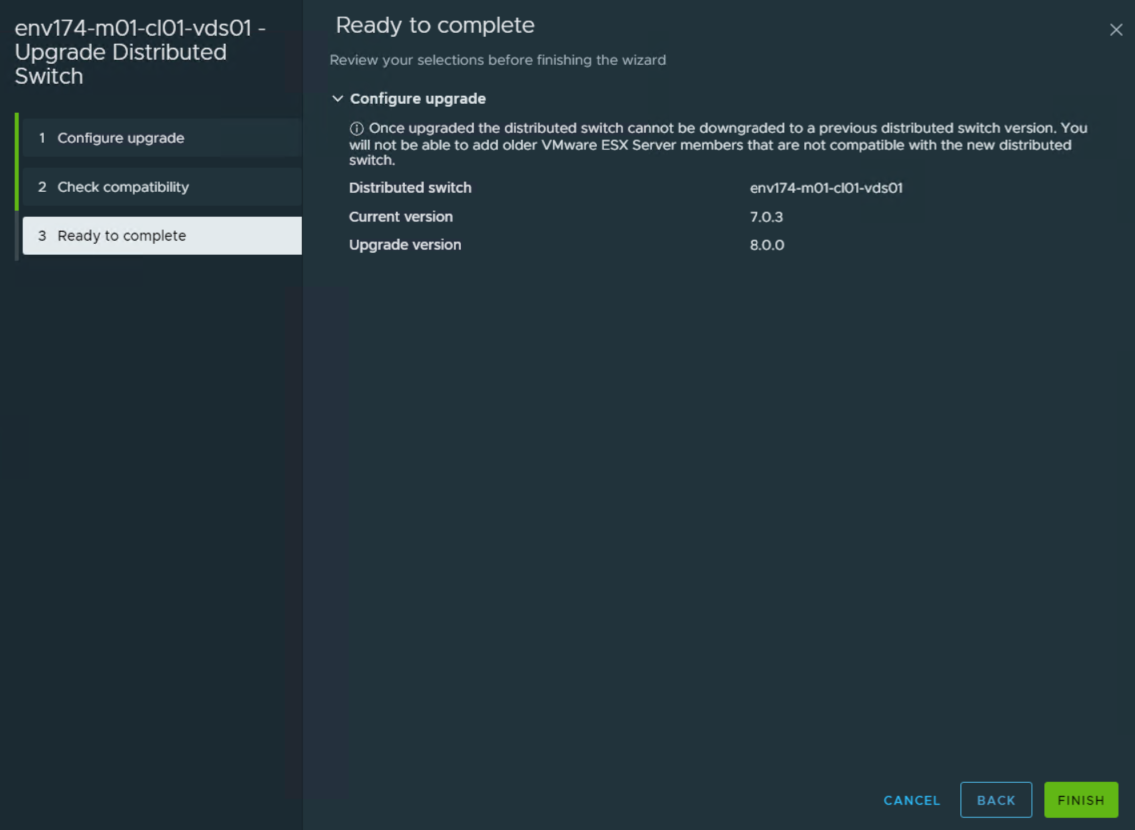
- Upgrade successful
Import custom Lenovo ISO into LXCA
This ensures any new hardware will receive the proper ESXi version to match the SDDC Manager.
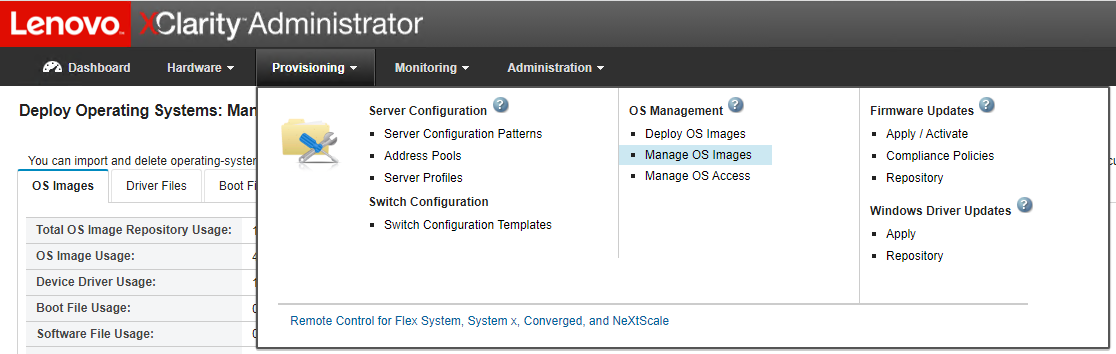
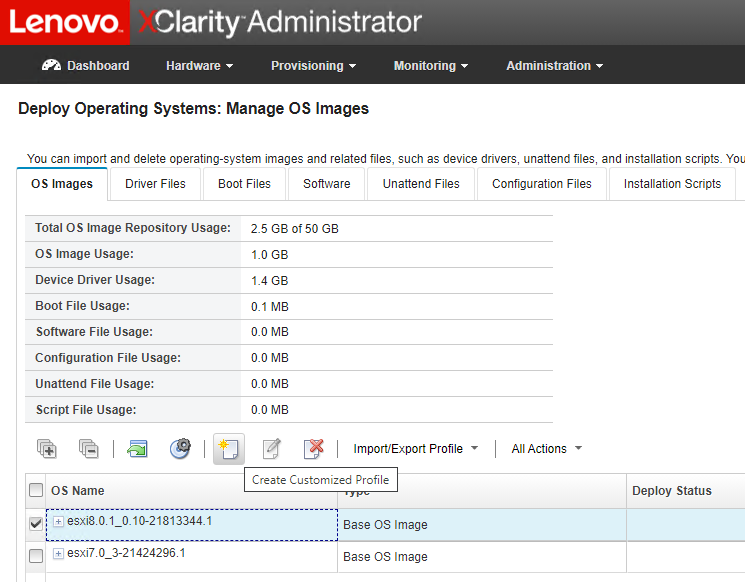
- Log into LXCA and navigate to Manage OS Images under Provisioning
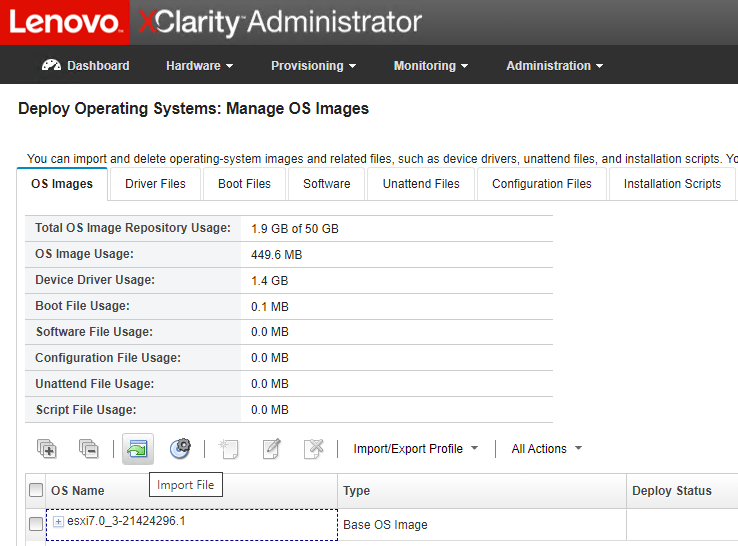
- Click the Import File button to import the ISO
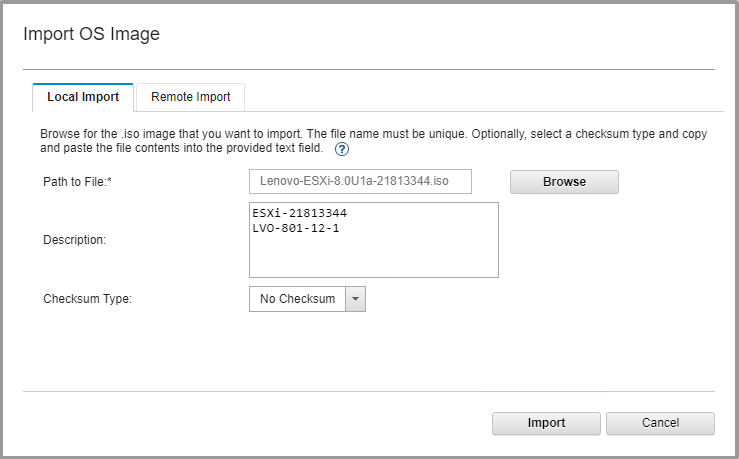
- Click Browse and locate the ISO created earlier in this document
- *NOTE* - Periods or dots (.) cannot be used in the description, as it will cause the import to fail
- Click the checkbox for the newly imported ESXi 8.0u1a image and click the Create Customized Profile button
- Provide a name & description and set Customization Type to "Only unattend files":
- *NOTE* - Periods or dots (.) in the Name or Description may cause the creation of the new profile to fail.
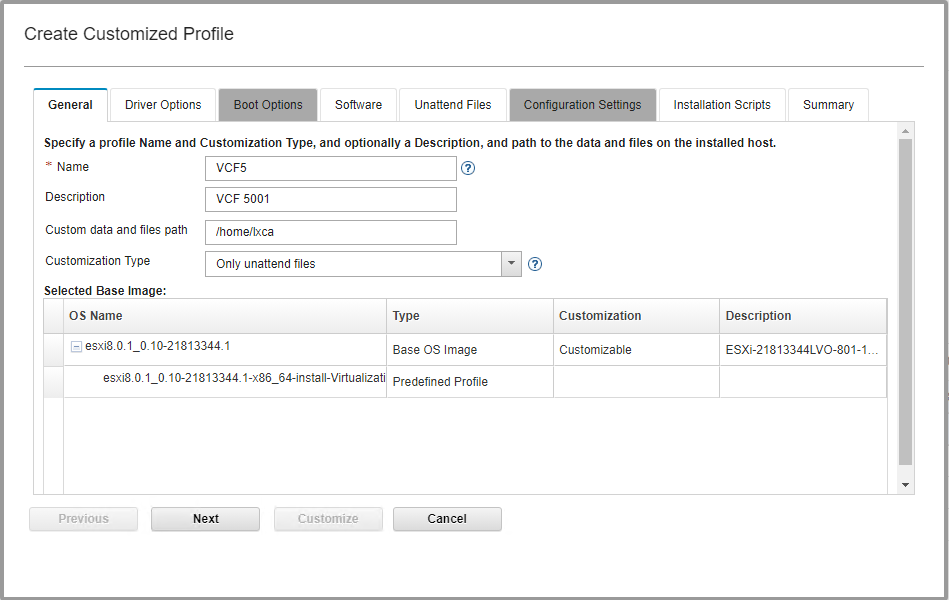
- The same unattend files used in the Deployment Guide for VCF 4.5.1 can be reused here
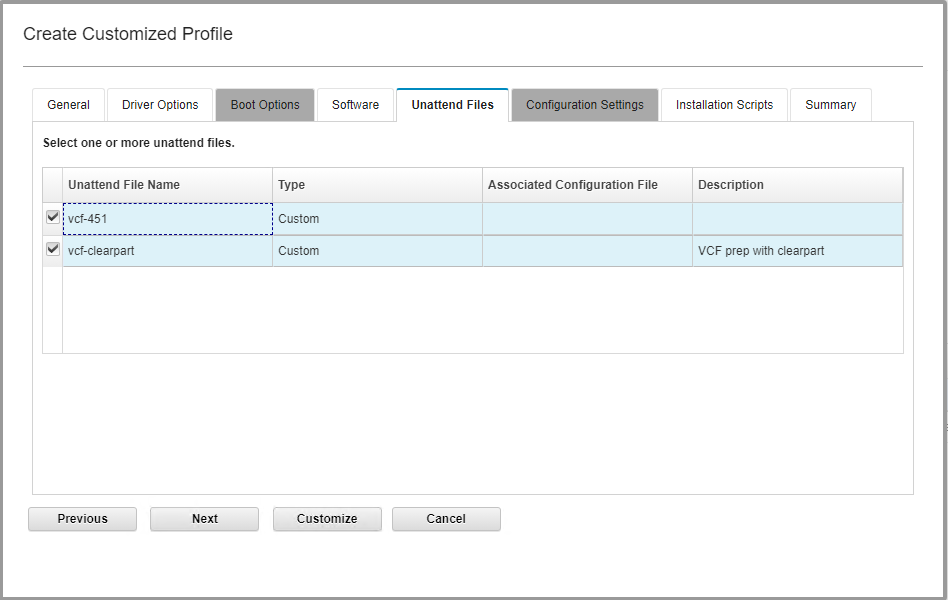
- Click Customize
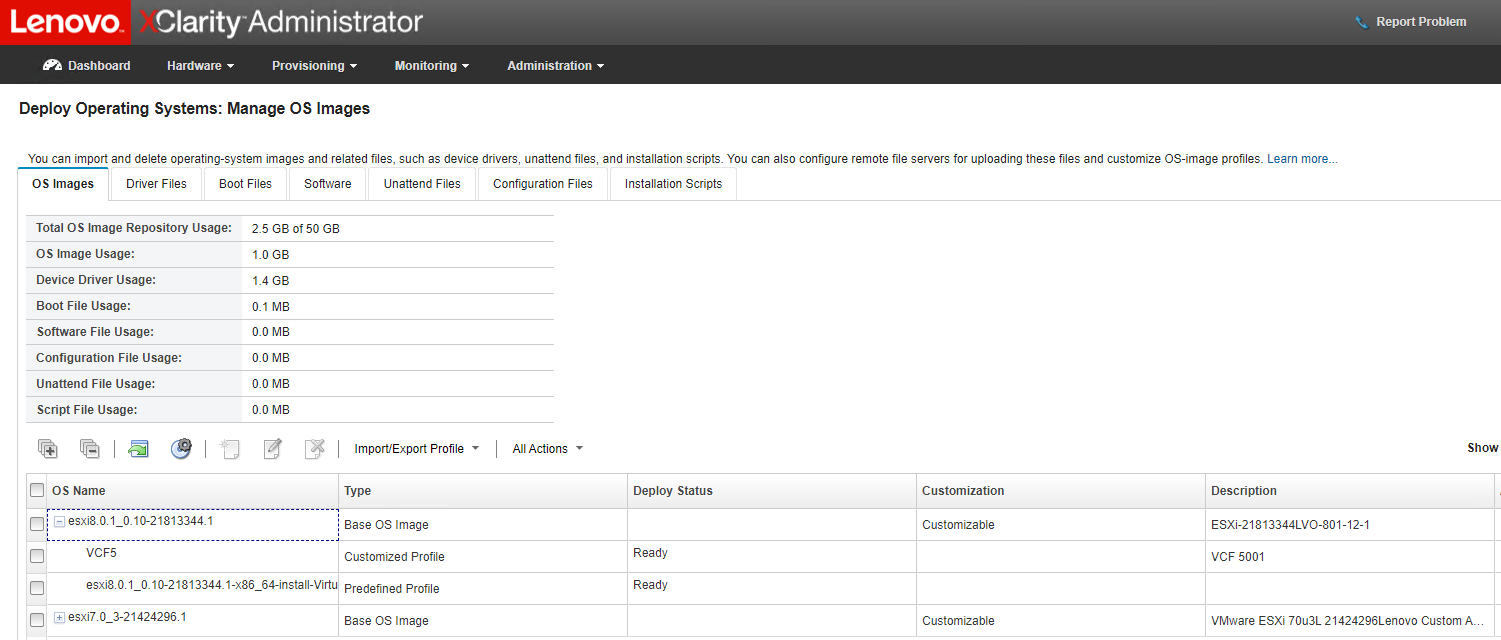
- This image can now be used on any Lenovo servers that match the customizations added to the ESXi image
Lenovo XClarity Administrator (LXCA)
- Check for Lenovo XClarity Administrator (LXCA) updates under Patch at the following URL:
- Download all four (4) files associated to the new GA Fix: fix, readme, change history, and InstallXML
- Log into Lenovo XClarity Administrator, click the Administration drop down and select Update Management Server

- Click the Import icon and locate four (4) files downloaded
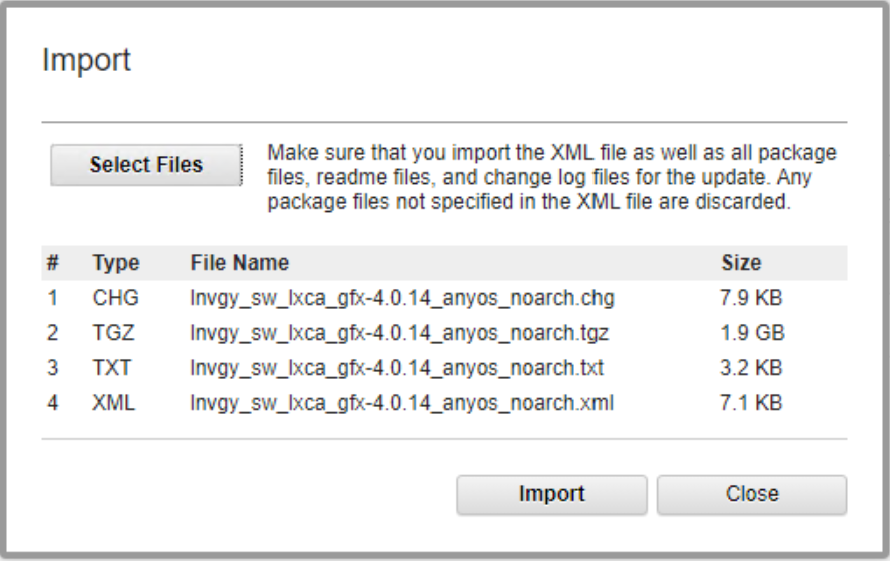
- Click Import
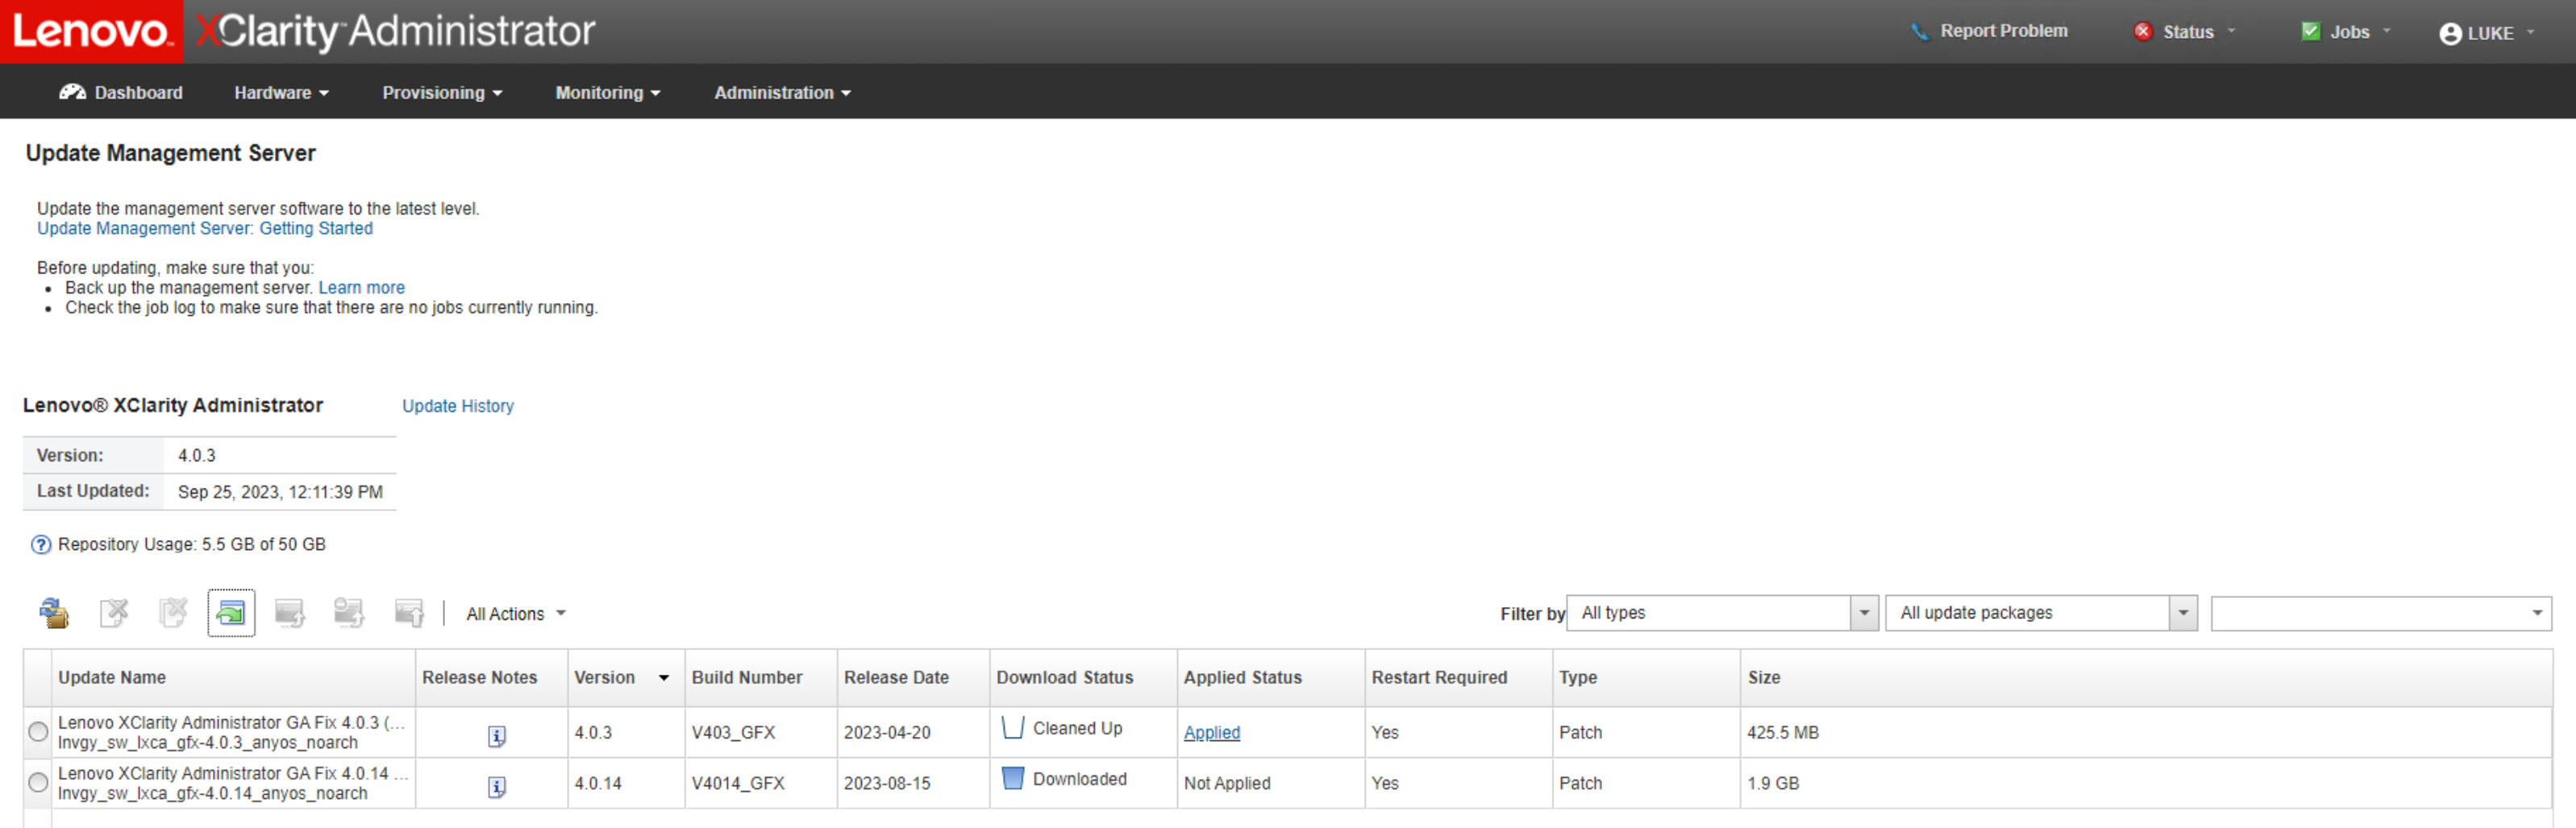
- Select the newly imported update and click Perform Update

- LXCA will be offline/inaccessible during the update
- Verify the version matches the applied GA Fix

Lenovo XClarity Integrator (LXCI) for VMware vCenter
- Log into LXCI and select Version and upgrade on the left
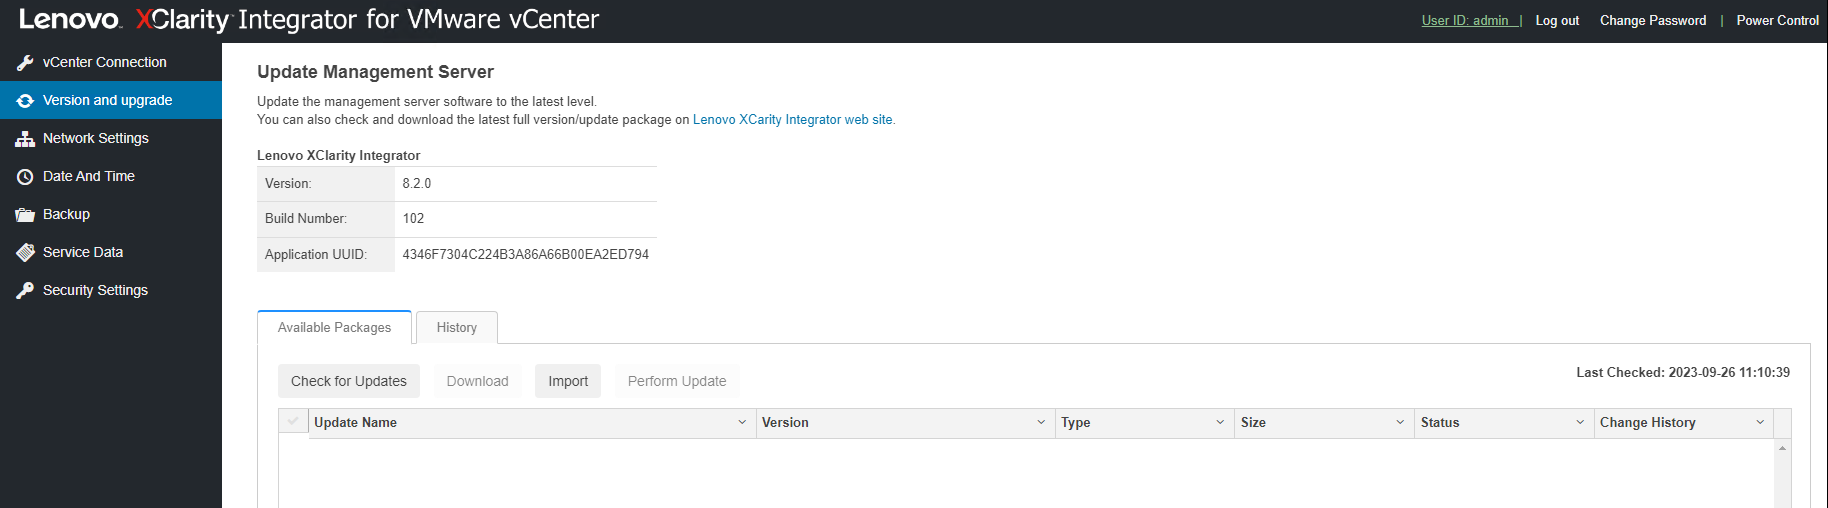
- Click the Check for Updates button to verify if there are any updates available
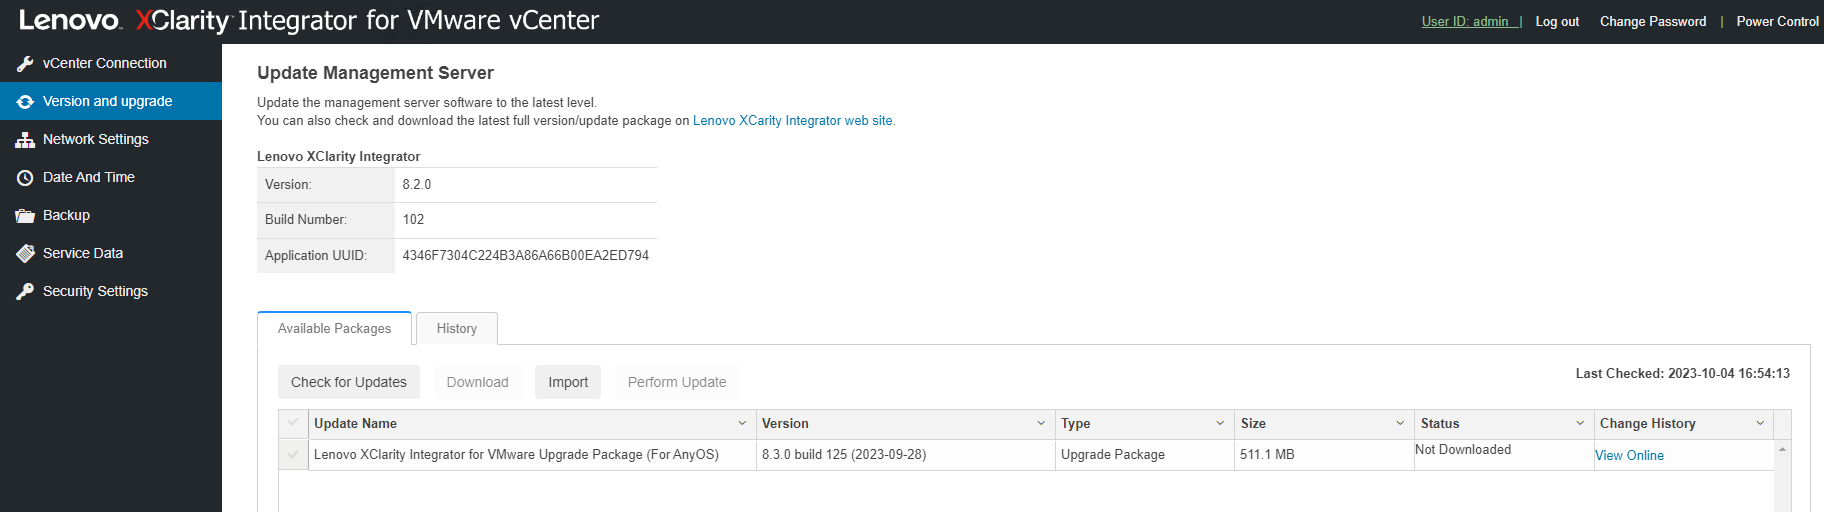
- Select the checkbox next to the available update and click the Download button
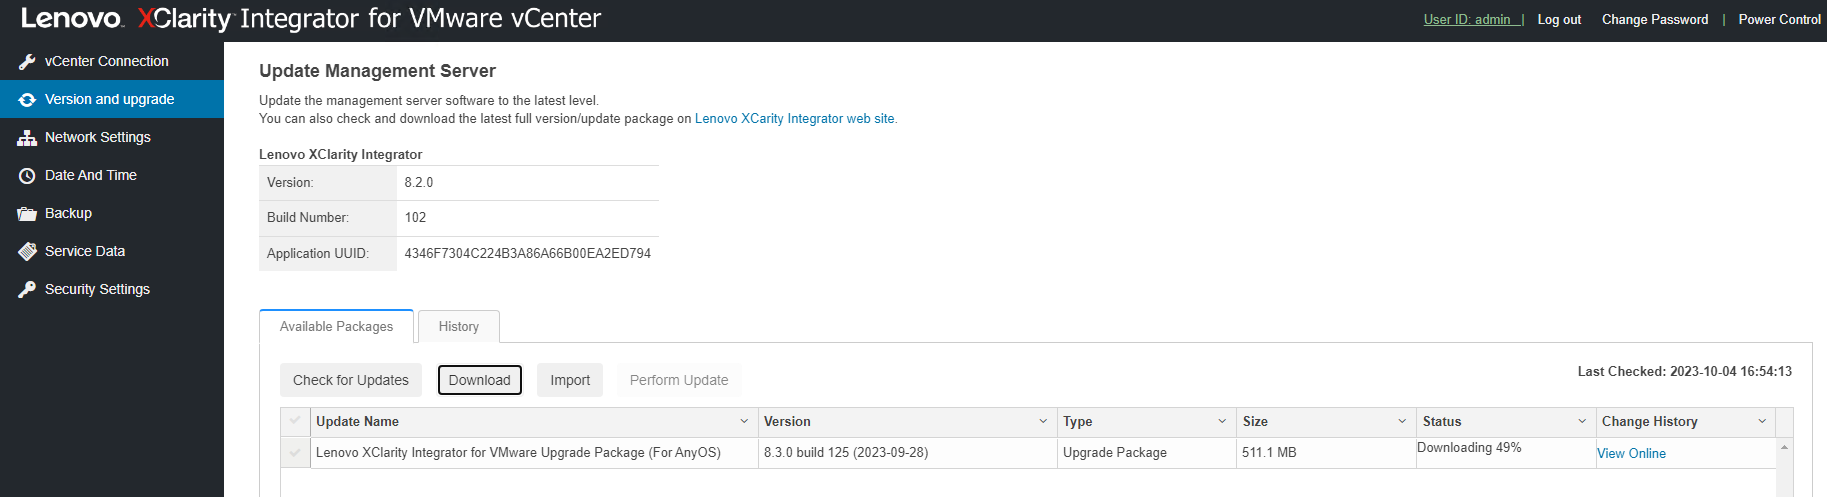
- Once the update has been downloaded, check the box next to the available update and click the Perform Update button
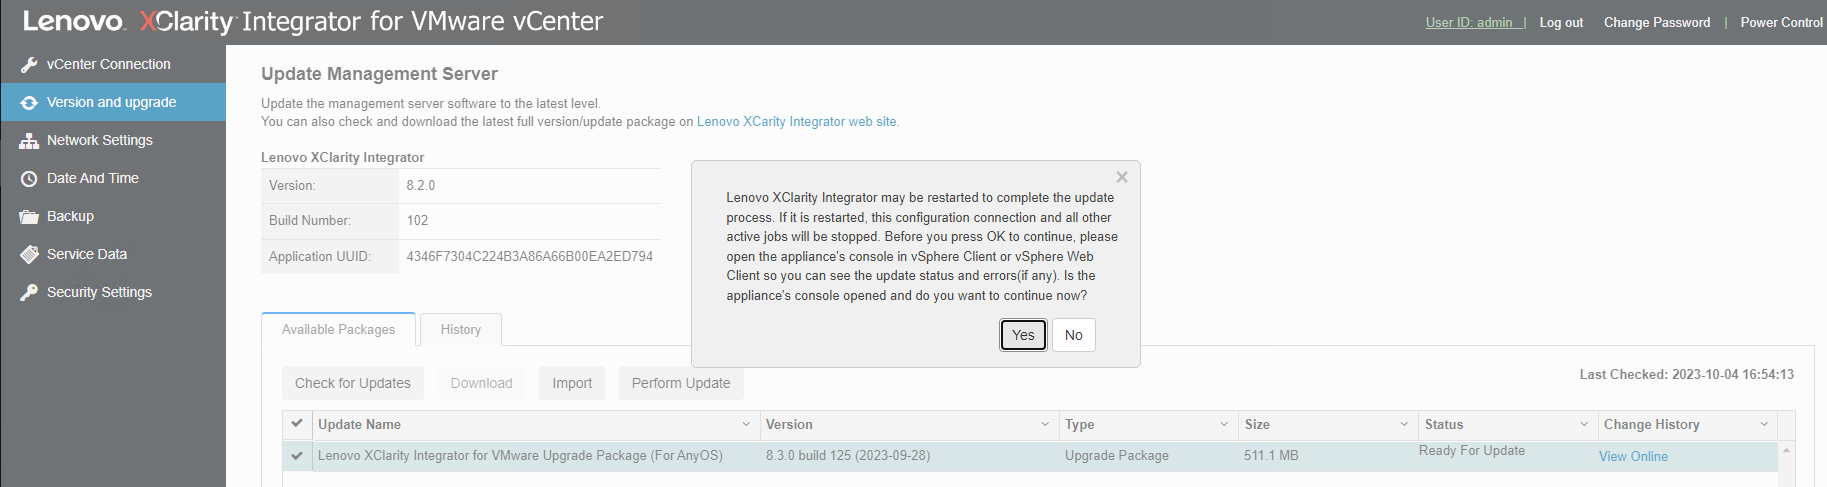
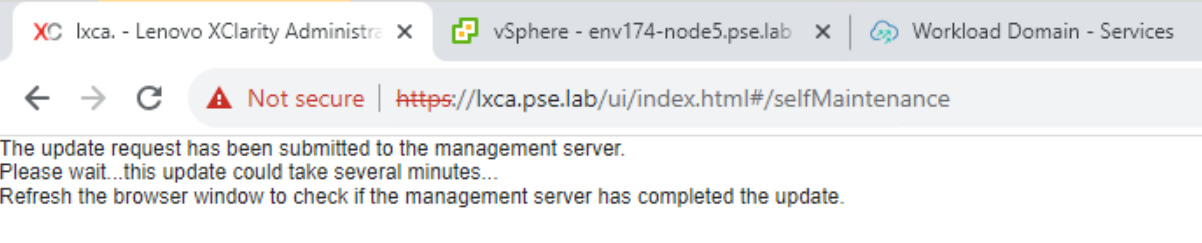
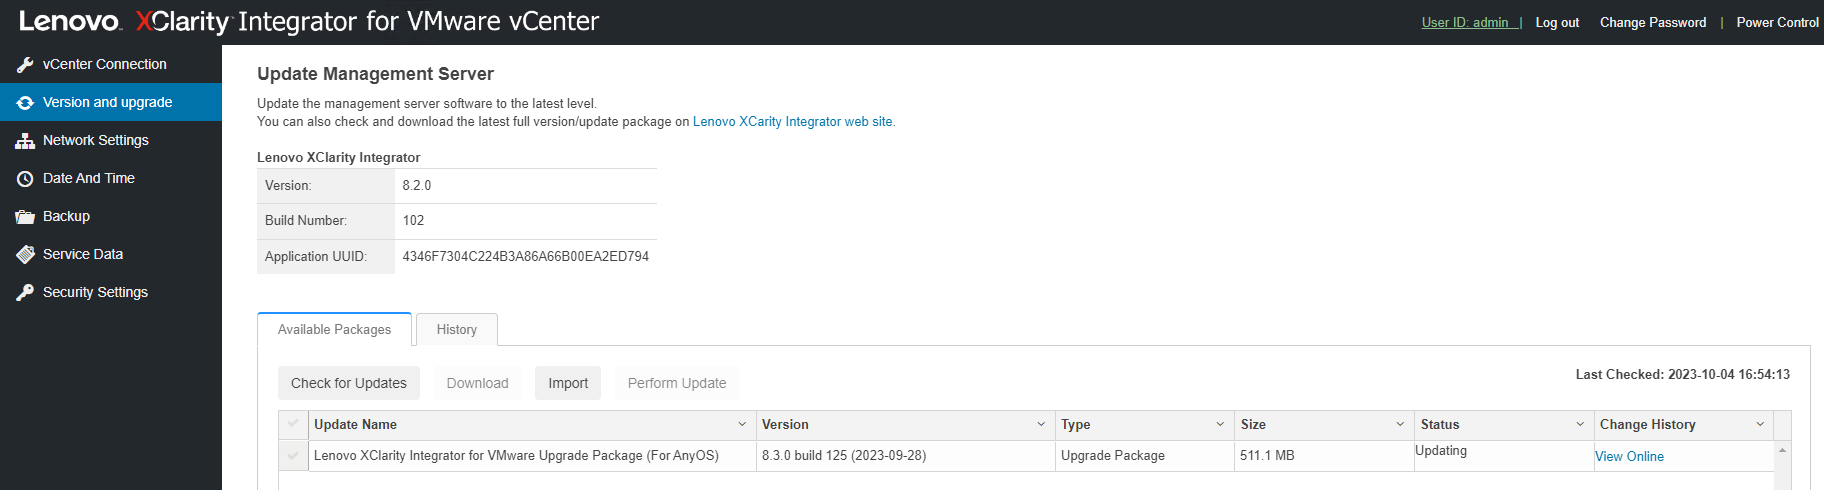
- Click Yes and refresh the page to verify status is Updating
- The LXCI interface will become unresponsive and provide the following warning
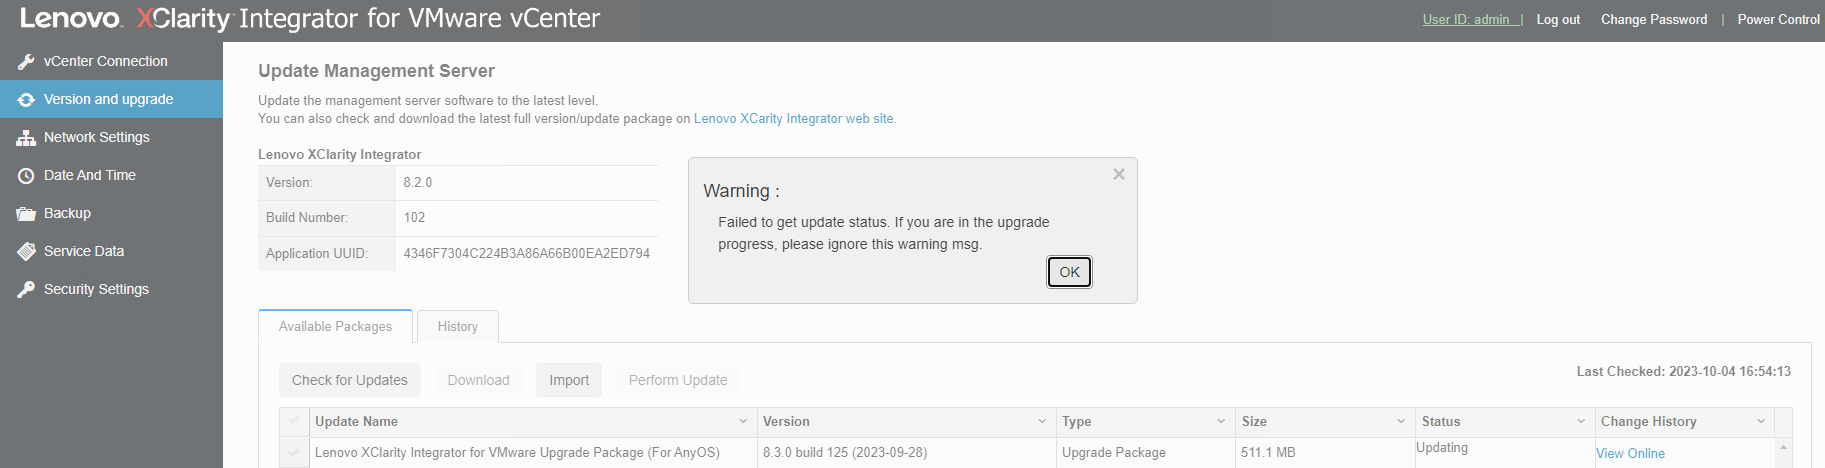
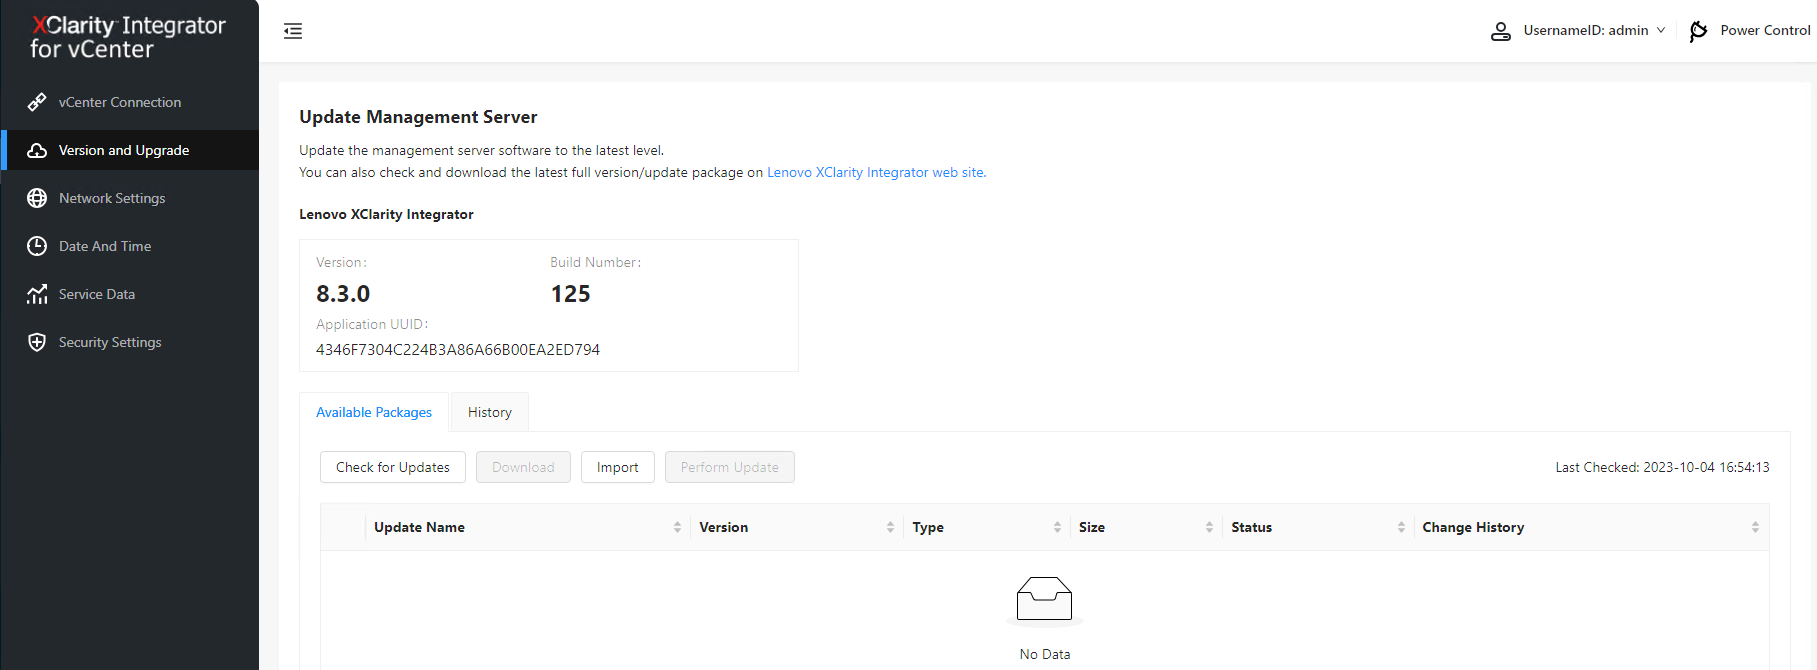
- After the appliance has rebooted, refresh the page to verify the upgrade is complete
- Notice Version now says 8.3.0
- Upgrade completed successfully
- To manually import the update, see the following steps
- Check for Lenovo XClarity Integrator (LXCI) for VMware vCenter updates
- Scroll down to Lenovo XClarity Integrator Virtual Appliance Updates
- Click the link for "lnvgy_sw_lxci_upack_8.3.0_anyos_noarch"
- Download the four files associated with the update: change history, fix, readme, and InstallXML
- Click Import and provide the four files downloaded.
- The remaining process is the same as starting at Step 4 above
Lessons Learned and other Considerations
A critical consideration is the imperative distinction between managing vSphere clusters through vCenter and SDDC Manager. Customers must exercise caution when applying vSphere Lifecycle Manager (vLCM) images, as the timing and method can significantly impact the ESXi upgrade process. Specifically, when managing a cluster through SDDC Manager, vLCM images must be created and applied during VI Workload Domain or cluster creation process in SDDC Manager to ensure seamless operation. Applying these images within vCenter after cluster deployment can lead to adverse consequences and potential upgrade failures. Understanding and adhering to this key practice is pivotal for a smooth and efficient infrastructure management experience.
Please see the following KB - https://kb.vmware.com/s/article/93220
Additional Resources/References
Modernize Your IT Infrastructure with Hybrid Cloud Solutions from Lenovo and VMware - https://core.vmware.com/resource/modernize-your-it-infrastructure-hybrid-cloud-solutions-lenovo-and-vmware
Deployment Guide: Modernize Your IT Infrastructure with Hybrid Cloud Solutions from Lenovo and VMware - https://core.vmware.com/resource/deployment-guide-modernize-your-it-infrastructure-hybrid-cloud-solutions-lenovo-and-vmware
Author
Luke Huckaba, VCIX-NV & vExpert, is a Solutions Architect on the Partner Solutions Engineering team in VMware’s Office of the CTO. Luke has over 20 years of experience in IT, more than half of which has been focused on large-scale enterprise VMware solutions. He’s spent the last several years working with large enterprise customers designing resilient multi-cloud VMware solutions that span multiple datacenters and managed service providers, while being deployed across multiple geographic locations.