
vSphere 7 Update 2 vGPU Operations Guide
Introduction
Overview
This operations guide demonstrates the prerequisites and procedures for conducting multiple Day-2 operational jobs including upgrading a VMware vSphere® Cluster with running VMs that are configured with one or more vGPUs, scaling up and down the GPU resources for the Machine Learning workload and extending single-node Machine Learning with a single VMware ESXi™ host to multi-node Machine Learning with multiple ESXi hosts with GPUs installed.
This document has three major sections:
- Operations Jobs:
There are five operational jobs that are categorized into two deployment architectures, single node learning with single ESXi host and multi-node learning with multiple ESXi hosts. Each operation job has comprehensive information illustrated including motivation, preconditions, and high-level steps. For the critical steps, the details of the information and considerations are described in the Operations Tasks and Operations Considerations sections.
- Operations Tasks:
Operations tasks are written as the references of the critical steps in Operations Jobs. The tasks are categorized into vSphere ESXi host related tasks such as Verify the Temporary ESXi Host’s Configuration and virtual machine related tasks such as vMotion VM with vGPU to another ESXi host, each operations task consists of preconditions, detailed operational steps, and some other related information.
- Operations Considerations:
Operations Considerations section includes the information and topics that are important to plan or consider upfront, this section is referred by both Operation Jobs and Operation Tasks sections.
It is recommended to read through a particular operations job that may apply to your work, understand the high-level procedures, and then refer to the details including operations tasks and considerations.
Intended Audience
The primary audience for this document is the VMware administrators who are tasked with managing and maintaining the GPU-based vSphere Cluster and vSphere Virtual Machines for the Machine Learning practitioners, the data scientists, or application architects. The document is also targeted at the IT Manager in charge of such a data center as well as the application architects who need to understand the infrastructure and its operational steps to support working and virtualized Machine Learning applications.
End-User Goals
The goals of a data center project team that would use this document can be categorized into the following areas:
- To maintain or upgrade a VMware vSphere Cluster or standalone ESXi host with Machine Learning workloads running without interruption.
- To scale up, down or out the GPU resources for the vGPU-enabled VM that is running Machine Learning workloads depending on the demand of the GPU resources.
- In a more advanced use case, to extend the single node Machine Learning on a single ESXi host to multi-node Machine Learning on multiple ESXi hosts to run distributed training workload with more ESXi hosts and GPU resources.
Operations Jobs
Single-node Learning
Upgrade vSphere Cluster while Machine Learning Workload is Running in VMs
To upgrade a vSphere Cluster or standalone ESXi host where the single node Machine Learning workload is running, at least one additional ESXi host with the same or more spare resources is needed. The resources include CPU, memory, network, and GPU. Also, all the ESXi hosts need to be placed into the same vSphere Cluster.
This additional ESXi host will be used as the temporary ESXi server to keep the Machine Learning workload running without interruption while the upgrade task is being performed on the other ESXi hosts in round robin-manner.
If there is no additional ESXi host available, ensure there is a host in the cluster with the same or more spare resources.
Preconditions:
-
At least one ESXi host with the same or more spare resources is placed into the same vSphere Cluster with the ESXi host having a single node Machine Learning workload running.
-
VMware vSphere vMotion® vmkernel is properly configured for all the ESXi hosts. Refer to Host Configuration for vMotion for more information and requirements.
-
If the ESXi hosts will be upgraded, upgrade the vCenter before upgrading ESXi, the version of vCenter needs to be equal to or higher than ESXi hosts.
The upgrade job can be broken down into the following steps:
-
Add a temporary host into the vSphere Cluster if it is not there already.
-
Enter the original ESXi host into maintenance mode.
-
The following tasks can be performed on the ESXi host in maintenance mode:
-
Upgrade the ESXi to a newer version.
-
Install additional physical GPU or other resources into the ESXi server.
-
Change one of a set of physical GPUs from time-sliced mode to MIG or vice versa (but you must retain the original type on the GPUs that are used by the VMs. Additionally, if the advanced parameter pciPassthruX.cfg.gpu-pci-id is set for the VMs, the same specific GPUs must be retained)
-
-
After the maintenance or upgrade task is done, exit maintenance mode on this ESXi host.
-
vMotion the VMs in the Step. 3 back to this upgraded ESXi host.
-
Repeat Step. 2 through Step. 7 for any other ESXi hosts that have machine learning tasks running.
-
Remove the temporary ESXi host from the cluster.
Scale Up GPU Resources in the VM
When the GPU resources configured on the VM are not powerful enough for the Machine Learning workloads, you can scale up the GPU resources in the VM. The additional GPU resources may come from:
-
The same physical GPU that are currently only partially used by the VM (as identified by the vGPU profile).
-
Other physical GPUs installed on the same ESXi host.
For both cases above, the VM needs to be powered off to get the vGPU related settings reconfigured. Make sure to save the progress of the Machine Learning workloads before the procedure.
Preconditions:
-
There are additional available GPU resources on the ESXi host to be assigned to the VM.
-
The Machine Learning workloads are securely saved.
This scale-up job can be broken down into the following steps:
-
Securely save and back up the Machine Learning workloads on the VM.
-
Power off the VM.
-
If MIG vGPU is configured on the VM, verify MIG instance availability on the ESXi host to see if the GPU has enough free MIG instances for the larger vGPU profile; if non MIG vGPU profile is configured on the VM, verify if there is still some GPU memory buffer that can be allocated to the VM.
-
Either or both of the following items can be used to reconfigure the VM to scale up the GPU resource:
-
Power on the VM and resume the Machine Learning workloads.
Scale Down GPU Resources in the VM
When parts of the GPU resources are not needed anymore by the VM running Machine Learning workloads, you can scale down to release the GPU resources. The GPU resources can be released using the following options:
-
Reduce the size of the vGPU profile if only one vGPU profile is configured on the VM.
-
Reduce the number of the vGPU profiles if two or more vGPU profiles are configured on the VM.
For both cases above, you need to power off the VM to reconfigure the vGPU related settings. Make sure to save the Machine Learning tasks before the procedure.
Preconditions:
-
The Machine Learning workloads are securely saved.
This scale down job can be broken down into the following steps:
-
Securely save and back up the Machine Learning workloads on the VM.
-
Power off the VM.
-
Either or both of the following tasks can be performed to reconfigure the VM to scale down the GPU resources:
-
Power on the VM and resume the AI/ML workloads.
Multi-node Learning
Upgrade vSphere Cluster while a Machine Learning Workload is Running in VMs
If a VMXNet3 or PVRDMA type of Virtual Network Adapter is configured on the VMs for multi-node learning, and there is no other PCI Device configured on the VM other than the NVIDIA GRID vGPU, then the vSphere Cluster can be upgraded while keeping the Machine Learning workload running. In this case, at least one additional ESXi host is needed with the same or more spare resources. The needed resources include CPU, memory, network adapter (Mellanox NICs are recommended), GPUs, and configurations (such as time-sliced mode or MIG) as the GPU original host on which the VM runs up to now. For the additional ESXi host, RDMA should be configured on the network adapter and switch ports if the existing network adapters on ESXi hosts are configured with RDMA.
This additional ESXi host will be used as the temporary ESXi server to keep the Machine Learning task running without interruption while the upgrade task is being performed on the other ESXi hosts in a round robin-manner.
If there is no additional ESXi host available, ensure there is a ESXi host in the cluster can provide the same or more spare resources.
Preconditions:
-
At least one ESXi host is available with the same or more spare resources.
-
PVRDMA is configured on the temporary ESXi host if the existing VMs have PVRDMA type of Virtual Network Adapter configured.
-
vMotion vmkernel is properly configured on all the ESXi hosts. Refer to Host Configuration for vMotion for more information and requirements.
-
There is no other PCI Device configured on the VM other than the NVIDIA GRID vGPU.
-
If the ESXi hosts will be upgraded, upgrade the vCenter before upgrading ESXi, the version of vCenter needs to be equal or higher than the ESXi hosts.
This job can be broken down into the following steps:
-
Add a temporary host into the vSphere Cluster if it is not there already.
-
In addition to verifying the temporary ESXi host’s configuration for single-node learning, the following conditions should also be met if the existing VMs have a PVRDMA type of Virtual Network Adapter configured:
-
Mellanox or other RDMA capable NIC is installed on the temporary ESXi server.
-
Mellanox or other NIC and switch ports are configured for RoCE
-
-
Enter the original ESXi host into maintenance mode.
-
The following tasks can be performed on the ESXi host in maintenance mode:
-
Upgrade the ESXi to a newer version.
-
Install additional physical GPU or other resources into the ESXi server.
-
Change one of a set of physical GPUs from time-sliced mode to MIG or vice versa (but you must retain the original type on the GPUs that are used by the VMs. Additionally, if the advanced parameter pciPassthruX.cfg.gpu-pci-id is set for the VMs, the same specific GPUs must be retained).
-
-
After the maintenance or upgrade task is done, exit maintenance mode on this ESXi host.
-
vMotion the VMs in Step. 3 back to this upgraded ESXi host.
-
Repeat Step. 2 through Step. 7 for other ESXi hosts.
-
Remove the temporary ESXi host from the cluster.
Scale Out GPU Resource to Multiple VMs on Multiple ESXi Hosts
If the GPU resources in one ESXi host are not enough for the Machine Learning workloads, it can be extended from a single-node learning environment to multi-node learning where more GPUs from different ESXi hosts can be used for the jobs; if the GPU resources are not enough for the distributed Machine Learning workloads, the multi-node learning can be extended with more ESXi hosts and VMs.
This extension can be done by adding more VMs on more ESXi hosts, configuring the VMs with either VMXNet3 or PVRDMA type of Virtual Network Adapter or RoCE backed PCI or SR-IOV Passthrough Network Interface for VM-to-VM traffic if not configured.
To do so, there should be at least one additional ESXi host with GPU installed in the cluster. In addition to the single node learning deployment prerequisites, it is recommended to have a dedicated RDMA capable network adapter (Mellanox ConnectX-5 or ConnectX-6 NICs are recommended) on each ESXi server for VM-to-VM traffic.
Here are some options that can be configured on the VM for VM-to-VM traffic:
-
VMXNet3 Virtual Network Adapter
-
PVRDMA Virtual Network Adapter
-
Passthrough RoCE-backed Network Interface
-
SR-IOV Passthrough Virtual Network Adapter
-
-
Dynamic DirectPath I/O
-
DirectPath I/O
-
-
Each of those options above would have its benefits and tradeoffs; for example, DirectPath I/O would guarantee the best network performance, while it would not allow the VM to be used with vMotion. The table below illustrates the matrix of VM network devices support for vSphere features.

Figure 1. VM Network Device with vGPU Supports for vSphere FeaturesThe following preconditions must be met:
-
At least one additional ESXi host with GPUs installed is available in the same cluster.
-
Each ESXi host should have a physical Network Adapter that is connected to the same vLAN, or port group configured for VM-to-VM network traffic.
This job can be broken down into the following steps:
-
Add the additional ESXi hosts into the vSphere Cluster if it is not already there.
-
In addition to verifying the additional ESXi host’s configuration for single node learning, each ESXi server should have an RDMA capable Network Interface Card installed. This applies if PVRDMA or RoCE-backed PCI or an SR-IOV Passthrough Network Interface will be used for VM-to-VM traffic.
-
If needed, reconfigure all the ESXi hosts for multi-node learning network if PVRDMA or RoCE backed PCI or SR-IOV Passthrough Network Interface will be used.
-
Add new VM to the additional ESXi hosts by cloning from the VM template or create a new VM with vGPU profile assigned.
-
If necessary, power off and reconfigure all the VMs for the network traffic with one of the following options after securely saving the Machine Learning workload process:
-
Virtual Network Adapter
-
VMXNet3
-
PVRDMA
-
SR-IOV Passthrough
-
-
PCI Device Passthrough:
-
Dynamic DirectPath I/O
-
DirectPath I/O
-
-
And optionally set the following Advanced Parameters on all the VMs:
-
Follow the instruction to Enable ACS and NUMA Affinity by setting Advanced Parameters here if PCI Device or SR-IOV passthrough is configured.
-
Reconfigure the distributed Machine Learning application with the newly added VMs with vGPU.
Operations Tasks
ESXi Host Tasks
Verify MIG Instance Availability
There are some restrictions on sharing a MIG-enabled GPU by different vGPU profiles. For example, for the NVIDIA A100, the restrictions include but are not limited to:
-
The combination of grid_A100-3-20c and grid_A100-4-20c sharing one A100 is not supported, meaning there cannot be two VMs one configured with grid_A100-3-20c vGPU profile and another with grid_A100-4-20c sharing one NVIDIA A100.
-
The combination of two grid_A100-3-20c profiles and one grid_A100-1-5c profile sharing one A100 is not supported because the total memory slices of these profiles would be nine which exceeds the maximum eight.
Refer to the NVIDIA Multi-Instance GPU (MIG) user guide for more details.
In this case, before deploying, cloning, or migrating a VM with MIG vGPU profile, or reconfiguring a VM with a larger MIG vGPU profile, the operations below are needed to verify whether a certain vGPU profile can be allocated to the MIG enabled GPU on the server.
Preconditions:
-
MIG is enabled on the NVIDIA GPU in the ESXi host
-
ESXi host has SSH service enabled
Steps:
-
SSH into ESXi server with administrator privilege
-
Run the following command to check the instance availability:
$ nvidia-smi mig -lgip
The highlighted area in Figure 1 indicates the A100 still has three slots for three VMs each configured with grid_A100-1-5c (MIG 1g.5gb) or one slot for one VM configured with grid_A100-2-10c (MIG 2g.10gb) that can be deployed, cloned, or migrated onto the ESXi host.

Figure 2. Show MIG Instance Availability
Upgrade NVIDIA Manager VIB
To upgrade the NVIDIA Host Driver (deployed in a VIB) on ESXi, a newer version of the NVIDIA Host Driver VIB file needs to be placed on a HTTP share or in a local directory of the ESXi server.
Preconditions:
-
ESXi host has ESXi shell and SSH enabled
-
A newer version of the NVIDIA Host Driver VIB file is placed in the local directory of ESXi or HTTP share
Steps:
-
SSH into the ESXi host with root privileges using putty or a tool of your choice
-
Find the existing version of NVIDIA manager VIB:
$ esxcli software vib list | grep -i nvidia
-
Upgrade the VIB:
$ esxcli software vib update -v Absolute_Path_of_Directory_of_the_VIB_File/NVIDIA**.vib
-
Validate the new version updated
$ esxcli software vib list | grep -i nvidia
-
Verify the compatibility of the new NVIDIA Manager VIB and the vGPU driver installed in the VM. To do so, run $ nvidia-smi on both the ESXi host and the VM migrated out from the ESXi host. If the major number in the version matches (such as R470.xx for the most recent drivers), meaning they are compatible, the vGPU driver can be upgraded later after migrating the VM back and Machine Learning workload is finished; if they don’t match up, the vGPU driver needs to be upgraded on the VM accordingly before migrating back to the ESXi host.

Figure 3. Upgrade NVIDIA Manager VIB
Configure ESXi Host for Multi-node Learning Network
If the network adapter(s) installed on the ESXi server is RDMA capable, there are some network configuration options can be chosen to leverage RDMA for the multi-node learning network.
PVRDMA
To configure PVRDMA on the ESXi host, check out Enable Multi-Node Learning with PVRDMA in the hardware settings and in the vSphere settings.
PCI Device Passthrough
Below are some options to use a passthrough network adapter on the VMs for multi-node learning. Check out Enable Multi-Node Learning with RoCE in the hardware settings and in the vSphere settings.
SR-IOV passthrough
Additionally, to enable SR-IOV Passthrough on the network interface, the prerequisite must be met, and follow the guide here to enable SR-IOV on a host physical adapter. Check out Configure Network Adapter to Passthrough in the vSphere settings to ensure the Virtual Functions of the SR-IOV enabled network adapter is set to passthrough.
DirectPath I/O or Dynamic DirectPath I/O
To configure the ESXi host to enable DirectPath I/O or Dynamic DirectPath I/O, follow the guide here, or look for Configure Network Adapter to Passthrough section in the vSphere settings.
NOTE: If SR-IOV is enabled on the physical network adapter, only the Virtual Functions of the physical adapter can be set to passthrough.
Verify the Temporary ESXi Host’s Configuration
Regarding the GPU related settings, the temporary ESXi host configuration should be verified from three perspectives: hardware configuration, vSphere configuration and configuration of the existing VMs running on the ESXi host. The details of hardware and vSphere configuration can be found in the vGPU deployment guide.
Hardware Configurations
-
GPU:
-
ESXi server has the same model of GPUs installed.
-
-
Global SR-IOV:
-
ESXi server has “Global SR-IOV" or the system vendor’s equivalent enabled at the BIOS level, if there are Ampere- architecture GPUs installed (A100, A30, and others).
-
vSphere Configurations
-
VMware vSphere Hypervisor:
-
Same or higher version of vSphere hypervisor is installed.
-
-
vSphere License:
-
Same or higher end of vSphere license is applied.
-
-
NTP Server:
-
Same NTP source is configured.
-
-
Set GPU device to vGPU mode:
-
Default graphics type to Shared Direct
-
Shared passthrough GPU assignment policy to Spread VMs across GPUs (best performance)
-
-
NVIDIA Virtual GPU Manager (also referred to as the NVIDIA Host Driver):
-
Same or higher version of NVIDIA Virtual GPU Manager vSphere Installation Bundle (VIB) is installed.
-
-
ECC Memory setting:
-
ECC Memory is enabled on the GPUs if the GPUs’ architecture is Pascal or later generations.
-
ECC Memory is deactivated on the GPUs if the GPUs’ architecture is earlier than Pascal.
-
-
Multi-GPU Instance(MIG) setting:
-
MIG mode is properly configured for all the GPUs.
-
-
Network Configurations:
-
The vMotion and VM networks are properly configured.
-
Existing VMs on the ESXi Host
If there are existing VMs with a vGPU profile configured that are running on this destination ESXi host, and any of the VMs to be moved with vMotion will share the same physical GPU resources, the following conditions should be met:
-
If the shared physical GPUs is not SR-IOV backed (for example, a GPU of a previous generation to the Ampere family)
-
The existing VMs are configured with the same vGPU profile as the VMs to vMotion.
-
The total vGPU memory allocation of all the VMs including the existing VMs and VMs to vMotion must be equal to or less than the shared physical GPU memory size.
-
-
If the shared physical GPUs is SR-IOV backed (for example, NVIDIA Ampere Architecture)
-
If the shared physical GPUs have MIG enabled, the total MIG compute slices of each physical GPU of all the VMs including existing VMs and VMs to vMotion must be equal to or less than seven, and the total MIG memory slices should be equal or less than eight.
-
Additionally, verify the MIG instance availability for the incoming VMs is needed before migrating each VM with the MIG vGPU profile.
-
-
If the shared physical GPUs have MIG deactived, ensure:
-
The existing VMs is configured with the same vGPU profile as the VMs to vMotion.
-
The total vGPU memory allocation of all the VMs including existing VMs and VMs to vMotion must be equal to or less than the shared physical GPU memory size.
-
-
If any of the conditions cannot be met, the existing VMs with vGPU profile configured on this destination ESXi host should be powered off.
Virtual Machine Tasks
Configure Network Device for the VM
If there are no physical RDMA capable network devices configured for the VM network traffic, the traditional VMXnet3 Virtual Network Adapter can be added for VM-to-VM traffic. Otherwise, the following options can be adopted depending on which option is configured on the ESXi host.
PVRDMA Virtual Network Adapter
To configure the PVRDMA as the type of Virtual Network Adapter for the VM, check out Enable Multi-Node Learning with PVRDMA here.
SR-IOV Passthrough Virtual Network Adapter
To configure SR-IOV Passthrough Virtual Network Adapter for the VM, follow the guide here.
DirectPath I/O or Dynamic DirectPath I/O
DirectPath I/O or Dynamic DirectPath I/O can be chosen to configure the passthrough network device or its Virtual Functions on the VM. The procedures could be found here by looking for Add Passthrough Network Adapter. This KB article describes the requirements and recommendations of both options.
vMotion VM with vGPU to another ESXi Host
To perform vMotion on a VM with a vGPU profile, see Migrate a Virtual Machine to a New Compute Resource for the prerequisites and procedures. The following conditions must also be met:
-
No PCI Devices configured on the VM except NVIDIA GRID vGPU
-
No SR-IOV Passthrough type of Virtual Network Adapter configure on the VM
-
If parameter pciPassthruX.cfg.gpu-pci-id is set on the VM to vMotion, refer here for more details.
Steps:
- Right click on the running VM with vGPU profile configured and select Migrate
- Choose Change compute resource only and click NEXT
- Choose the destination ESXi host from the list, ensure there is no compatibility issue, then click NEXT

Figure 4. Perform Compute vMotion
-
Choose Schedule vMotion with high priority (recommended) and click NEXT
-
Review the information and click FINISH to start the migration
Refer vMotion Considerations for more details regarding the vMotion stun time, performance impact and switchover time threshold.
Change to a Larger vGPU Profile
To reconfigure the VM with a larger vGPU profile, the following conditions must be met:
-
If MIG is enabled on the GPU, then:
-
The total MIG compute slices of all the VMs must be equal to or less than seven, and the total MIG memory slices must be equal to or less than eight.
-
-
If MIG is deactivated or not capable on the GPU, then:
-
The other VMs that are sharing the same GPU on the current ESXi host need to be powered off to reconfigure with the same larger vGPU profile.
-
The total vGPU memory allocation of all the VMs must be equal to or less than the physical GPU memory size.
-
Steps:
-
Click Edit Settings on the VM
-
Find the PCI Device for the NVIDIA GRID vGPU
-
Select a larger vGPU profile from the NVIDIA GRID vGPU Profile drop-down list

Figure 5. Change the vGPU profile (MIG deactivated) from grid_a100-10c to grid_a100-40c
-
If the VM has set parameter pciPassthruX.cfg.gpu-pci-id, follow the instruction here and additional steps might be needed.
-
Click OK to save the configuration.
Add vGPU Profile
To assign an additional vGPU profile to the VM, the following conditions must be met:
-
MIG should be deactivated for the physical GPU to be added, if applicable.
-
MIG should be deactivated for the physical GPU being used by the VM if applicable.
-
There is no other VM using the physical GPU to be added to the VM.
-
The existing vGPU profile configured on the VM has fully occupied all the physical GPU Frame Buffer (for example, the VM used the largest vGPU profile).
Steps:
-
Click Edit Settings on the VM
-
Choose PCI Device in the Other Devices section in the ADD NEW DEVICE drop-down list.
-
Choose NVIDIA vGPU for the New PCI device.
-
Select the largest non-MIG vGPU profile: grid_[GPU-MODEL]-[vGPU-MEMORY]c from the NVIDIA GRID vGPU Profile drop-down list.

Figure 6. Add a new NVIDIA vGPU PCI device and select the largest non-MIG vGPU profile
-
Assign GPU BUS ID if needed.
-
Repeat Step. 2 to 5 above to assign more GPUs if needed, up to 4 vGPU profiles can be configured per VM.
-
Click OK to save the configuration.
Change to a Smaller vGPU Profile
To reconfigure the VM with a smaller vGPU profile, the following conditions must be met:
-
There must be only one vGPU profile configured on the VM
-
If there are other VMs sharing the same physical GPU with MIG deactivated, the other VMs need to be powered off to reconfigure with the same smaller vGPU profile. This is because all VMs that share a time-sliced GPU must have the same share size.
Steps:
-
Click Edit Settings on the VM
-
Find the PCI Device for the NVIDIA GRID vGPU
-
Select a smaller vGPU profile from the NVIDIA GRID vGPU Profile drop-down list

Figure 7. Change the vGPU profile (MIG enabled) from grid_a100-7-40c to grid_a100-2-10c
-
Click OK to save the configuration.
Reduce vGPU Profile
Steps:
-
Click Edit Settings on the VM.
-
Remove PCI Device for the NVIDIA GRID vGPU.

Figure 8. Remove PCI device 1 for vGPU grid_a100-40c
-
If the VM has advanced parameter pciPassthruX.cfg.gpu-pci-id configured, which is associated with the GPU being removed, remove these parameters from VM advanced parameter list
-
If the rest of the vGPU profiles provided by the physical GPUs are interconnected by NVLink or belong to the same root complex with network adapter, for better Machine Learning workload performance, add parameters pciPassthruX.cfg.gpu-pci-id to specify those physical GPU can be considered.
Assign/Unassign/Modify Physical GPU BUS IDs for VMs.
If there are multiple GPUs installed on the same ESXi server, it is recommended to check whether the physical GPU BUS IDs need to be assigned, unassigned, or modified when the number of vGPU profiles configured on the VM is being changed, or before deploying, cloning, migrating a VM with vGPU profile. Please refer to the section of GPU PCI BUS ID Assignment Consideration for more details. Below are the operations steps.
Steps to assign GPU BUS IDs
-
Find the BUS IDs of physical GPUs that need to be allocated to the VM depending on the goal:
-
Ensure the BUS IDs are not being used by other running VMs that sharing the same SR-IOV backed GPU (Ampere Architecture) and refer here to check which VF’s BUS ID should be used.
-
Clicking Edit Settings on the VM when it is powered off.
-
For each PCI device for vGPU, find the PCI device sequence number X of the vGPU instance.
-
Click on the VM Options tab, expand Advanced, click EDIT CONFIGURATION… click ADD CONFIGURATION PARAMS in the pop-up window to add the following parameters and values, and then click OK.
-
pciPassthruX.cfg.gpu-pci-id = "ssss:bb:dd.f"

Figure 9. Assign VF’s BUS ID of GPU to the VM
Steps to unassign GPU BUS ID
-
Clicking Edit Settings on the VM when it is powered off.
-
For each PCI device for vGPU, find the PCI device sequence number X of the vGPU that is being removed.
-
Choose VM Options tab and expand Advanced, then click EDIT CONFIGURATION…
-
Find parameter pciPassthruX.cfg.gpu-pci-id, and set its value to empty, click OK to delete this parameter.
-
If VM is reconfigured to use all the GPUs on the ESXi host, find all the pciPassthruX.cfg.gpu-pci-id assigned earlier and delete their values.
-
Click OK to save the configuration.

Figure 10. Remove Parameter pciPassthruX.cfg.gpu-pci-id
Steps to modify GPU BUS ID
-
Find the GPU BUS IDs to replace with, depending on the goal:
-
Clicking Edit Settings on the VM when it is powered off.
-
For each PCI device for vGPU, find the PCI device sequence number X of the vGPU that is being modified.
-
Choose the VM Options tab and expand Advanced, then click EDIT CONFIGURATION…
-
Find parameter pciPassthruX.cfg.gpu-pci-id, and set its value to the new GPU BUS ID.
-
Click OK to save the configuration.
Operations Considerations
vMotion Considerations
vMotion Stun Time
vMotion introduces stun time to the VM being migrated. During the stun time, you are unable to access the VM, desktop, or application. From a Machine Learning and AI workload perspective, with more usage of the vGPU resource (as known as vGPU Frame Buffer), the stun time may increase. The details can be found in Using vMotion to Migrate vGPU Virtual Machines.
vMotion Performance Impact
vMotion may also introduce a performance drop in the application. The figure below illustrates the TensorFlow Convolutional Neural Network workload running on the vGPU with full Frame Buffer of NVIDIA A100(grid_a100-7-40c). There was about a 30% performance drop when vMotion started with 31.89s stun time, and the performance of the workload gradually came back without any interruption.

Figure 11. vMotion Performance Impact
vMotion Switchover Time
In the meanwhile, vMotion may fail if the migration procedure exceeds the max switchover time (the default is 100s) and you will get the error message below. To remedy this problem, either increase the default max switchover time or reduce the intensity of the Machine Learning workload. Follow the steps in this KB article to increase the max switchover time for the VM. However, increasing the max switchover time requires the VM to be powered off first, so plan ahead when setting up the VM to avoid interruptions of the Machine Learning workloads.

Figure 12. vMotion Exceeds the Max Switchover Time
GPU PCI BUS ID Assignment Considerations
When the vGPU profile configured on the VM only comes from a subset of physical GPUs on the ESXi server, the physical GPU BUS IDs may need to be assigned to the VM for the following reasons:
-
The subset of physical GPUs belongs to the same NUMA node, if NUMA affinity is configured on the VM.
-
The subset of physical GPUs is interconnected by NVLink.
-
The subset of physical GPUs belongs to the same root complex with network adapter if the VM has PCI or SR-IOV passthrough network interface configured.
In short, setting this parameter can help improve the performance of Machine Learning workload by leveraging certain GPUs which have shorter data path with other physical devices such as GPU, network adapter, or memory.
Also, sometimes after reconfiguring the VM, the GPU BUS IDs may need to be unassigned if it is assigned earlier, for example:
-
Reconfigure VM to use all the physical GPUs of the ESXi host
-
Reconfigure VM to remove vGPU profiles from the VM
The GPU BUS IDs may need to be modified, for example:
-
An existing VM’s GPU BUS ID is the same as that of the VM being migrated
-
NVLink is reconfigured for other GPUs
-
Network Adapter is newly added to the same root complex with another GPU
The physical GPU BUS ID should be used as the value of the parameter with the format “ssss:bb:dd.f” (Segment:Bus:Device.Function)
To find the GPU BUS ID:
-
SSH into ESXi server with administrator privilege
-
Run the following command to list the GPU PCI BUS ID:
$ lspci | grep -i nvidia
Find GPU PCI BUS ID for non-SR-IOV Backed GPU
The figure below is the output of non-SR-IOV backed GPU, it shows there are two NVIDIA V100S installed on the ESXi.
There are three major columns in the list:
-
PCI BUS ID, illustrated in grey below. This should be used as the value of the pciPassthruX.cfg.gpu-pci-id parameter.
-
PCI Device Adapter type and name, illustrated in orange below.
-
ESXi graphic device alias, illustrated in blue below.
![]()
Figure 13. List GPU PCI BUS ID of non-SR-IOV backed GPU
NVIDIA V100S is non-SR-IOV backed GPU, thus the PCI BUS IDs 0000:3b:00.0 or 0000:af:00.0 can be used as the value to represent these two V100S GPUs. All the VMs sharing on physical GPU can use the same PCI BUS ID as the value of pciPassthruX.cfg.gpu-pci-id parameter.
Find the GPU BUS ID for SR-IOV backed GPU
For the SR-IOV backed GPU, similarly, the output contains the same three columns, but it will list the PCI BUS IDs of both Physical Function and Virtual Functions, the Physical Function and Virtual Functions can be differentiated by the last column: graphic device alias, the ones with VF are Virtual Function entries and vmgfx0 is Physical Function. If parameter pciPassthruX.cfg.gpu-pci-id needs to be set, the value should be PCI BUS ID of the Virtual Functions; for more details, refer to MIG Capable (SR-IOV Backed) GPU Considerations.
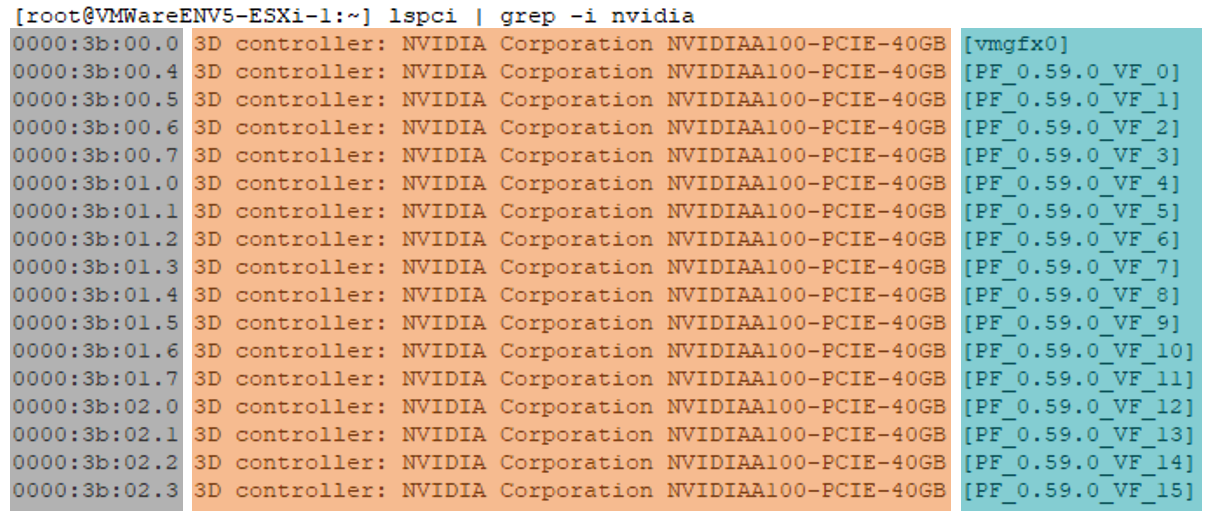
Figure 14. List GPU PCI BUS ID of SR-IOV Backed GPU
GPU BUS ID Assignment Tradeoffs
However, configuring this parameter may also introduce difficulties and tradeoff some flexibilities, and additional steps might be taken while operating on the VM. For example, while vMotion a VM with this parameter configured, the destination ESXi host needs to have the same type of GPU with the same settings with the same BUS ID as the source ESXi host; otherwise, the vMotion could not take place. Below are some examples showing the needed additional steps.
When Maintaining an ESXi Host to Change its GPU’s setting
While the GPUs installed on an ESXi host are being reconfigured, if any of the VMs that will be migrating back, has parameter pciPassthruX.cfg.gpu-pci-id set, the associated physical GPU should be intact because any changes on the GPU may lead to the incompatibility issue between VM and GPU. For example, for the GPU specified with this parameter in the VM, if the MIG setting is changed from MIG to time-sliced mode, the VM’s MIG vGPU profile would become incompatible with the GPU’s setting.
When vMotion a VM with This Parameter Set
If parameter pciPassthruX.cfg.gpu-pci-id was set on the VM to vMotion, the following additional steps should be taken when verifying the temporary (destination) ESXi host.
Ensure there is same type of physical GPU with the same BUS ID and same settings on the destination ESXi host, if this cannot be met, the VM must be powered off and remove the pciPassthruX.cfg.gpu-pci-id parameter.
-
If the VM to vMotion is configured with vGPU profile provided by SR-IOV backed GPU
-
If there are existing VMs running on the destination ESXi host sharing the same GPU with the incoming VM, and these existing VMs have the pciPassthruX.cfg.gpu-pci-id parameter configured, ensure the values are not conflicting with the incoming VM. If this cannot be met, the existing VM that has the conflict must be powered off.
-
If MIG is enabled on the GPU
-
If there are existing VMs running on the destination ESXi host sharing the MIG enabled GPU with the incoming VM, the vMotion might fail even verifying MIG instance availability shows there are still some slots for the incoming VM, refer here for more additional steps and details.
-
-
When Changing to a Larger vGPU profile on a VM with This Parameter Set
When changing to a larger vGPU profile for a VM with the pciPassthruX.cfg.gpu-pci-id parameter configured, and the vGPU profile is provided by a SR-IOV backed GPU, take the following considerations because a larger vGPU profile has fewer GPU Virtual Functions ID to specify than smaller ones.
-
If the VM is configured with MIG profile, follow the instruction here to check whether the GPU BUS ID configured earlier is still valid after reconfiguration.
-
If the VM is configured with non-MIG profile, follow the instruction here to check whether the GPU BUS ID configured earlier is still valid after reconfiguration.
When Reducing vGPU Profile on a VM with This Parameter Set
-
When reducing the number of vGPU profile for a VM with parameter pciPassthruX.cfg.gpu-pci-id which is associated with the GPU being removed, remove these parameters from VM advanced parameter list.
-
If the rest of the vGPU profiles provided by the physical GPUs are interconnected by NVLink or belong to the same root complex with a network adapter, add parameters pciPassthruX.cfg.gpu-pci-id to specify those physical GPUs can be considered for improving the Machine Learning performance.
MIG Capable (SR-IOV Backed) GPU Considerations
MIG Enabled
MIG (Multi-Instance GPU) allows multiple vGPUs (and thereby VMs) to run in parallel on a single NVIDIA A100, while preserving the isolation guarantees that vGPU provides. According to this technical brief, using A100 as an example, there are 5 types of vGPU profiles:
-
1 compute, 1 memory: grid_A100-1-5c
-
2 compute, 2 memory: grid_A100-2-10c
-
3 compute, 4 memory: grid_A100-3-20c
-
4 compute, 4 memory: grid_A100-4-20c
-
7 compute, 8 memory: grid_A100-7-40c
Those vGPU profiles can be used to share one NVIDIA A100 with different computing power, accumulated up to 7 compute slices or 8 memory slices in total whichever comes first. However, the following combination is not supported on one physical GPU: grid_A100-4-20c + grid_A100-3-20c, refer to NVIDIA Multi-Instance GPU User Guide for details.
The NVIDIA Ampere Architecture GPU has SR-IOV enabled, meaning besides the GPU device (Physical Function or PF), there are also Virtual Functions (VF) created by the GPU. In ESXi, these Virtual Functions can be seen by running the following command in ESXi:
$ lspci | grep -i nvidia
and the GPU device and its Virtual Functions will be listed:

Figure 15. List GPU PCI BUS ID of Virtual Functions
There are 16 VFs and one PF, the seven compute slices are associated with the first seven VFs, VF_0 to VF_6 showing in the figure above. Each vGPU profile is only allowed to be allocated to certain VF offsets. The table below illustrates the VF offsets that each vGPU profile can be allocated to (allocate to dark green cells and may consecutively take VFs in light green); for example, a 2-10c profile can be allocated to:
-
VF_0(00.4), and it will consecutively take VF_1(00.5)
-
VF_2(00.6), and it will consecutively take VF_3(00.7)
-
VF_4(01.0), and it will consecutively take VF_5(01.1)

Figure 16. VF allocation for NVIDIA A100 GPU Profiles
The system will automatically allocate the VF offset for a VM (configured with MIG vGPU profile) upon the VM is powering on if the parameter pciPassthruX.cfg.gpu-pci-id is not specified, in most cases, the system would tend to use “right-most” allowed VF for the vGPU profile configured on the VM, but in some cases, it does not allocate allowed VF in “right-most” manner as it tries to minimize fragmentation. In short, the system would try to save the possible largest slot for the next allocation.
For example, there are three VMs each configured with grid_a100-2-10c vGPU profile:
-
VM1 configured with grid_a100-2-10c
-
VM2 configured with grid_a100-2-10c
-
VM3 configured with grid_a100-2-10c
If powering on VMs in the following order:
-
Power on VM1, the system will allocate VF_4 for its vGPU, both VF_4 and VF_5 will be taken.
-
Power on VM2, the system will allocate VF_2 for its vGPU, both VF_2 and VF_3 will be taken.
-
Power on VM3, the system will allocate VF_0 for its vGPU, both VF_0 and VF_1 will be taken.
In this case, system allocates the vGPU in “right-most” manner.
If we power off the VM1 and VM2, the VF_2 through VF_6 will be released, only VM3 is still occupying VF_0 and VF_1. After that, if we power VM1 back on, the system will allocate VF_2 for its vGPU instead of VF_4.
In this case, the system is not following “right-most” manner since it would leave the largest possible slot (VF_4 to VF_6) for the next allocation by avoiding fragmentations.
On another hand, by specifying the parameter pciPassthruX.cfg.gpu-pci-id with the VF’s BUS ID, a user can allocate a vGPU profile to any of its allowed VFs.
Despite the allocation is done by the system or by specifying pciPassthruX.cfg.gpu-pci-id, the allocation would need to follow the rule addressed in NVIDIA Multi-Instance GPU User Guide: no two profiles overlap vertically. In the table above, no profiles in the green cells(both dark and light green) can coexist if they are vertically overlapped, for example, the 4-20c profile can’t coexist with the 2-10c profile allocated in VF_2. Here is an example from vSphere perspective, with three VMs sharing one NVIDIA A100:
-
VM1 configured with grid_a100-3-20c
-
VM2 configured with grid_a100-2-10c
-
VM3 configured with grid_a100-2-10c
If the VMs are powered on in the following order:
-
First power on VM1, the system will allocate VF_4 to its vGPU
-
Then power on VM2, the system will allocate VF_2 to VM2
-
Lastly power on VM3, the system will allocate VF_0 to VM3
In this case, all three VMs can be powered on successfully to share one A100 GPU.
However, if switch Step. 1 and Step. 2 above:
-
When powering on VM2, the system will allocate VF_4 to its vGPU
-
When powering on VM1, the system will allocate VF_0 to its vGPU
-
It will fail to power on VM3 because VF_4 is used by VM2, VF_0 is used by VM1, and VF_2 is also used by VM1 because VM1 takes VF_0 to VF_2. So, there is not enough VF for VM3 to power on.
-
In this case, VM1 and VM2 both need to be powered off to release the VFs and following the above steps before switching to power on all three VMs.
Operate VM with MIG vGPU Profile without pciPassthruX.cfg.gpu-pci-id Set
In short, before cloning, deploying, migrating, or reconfiguring a vGPU on a VM that is configured with a MIG vGPU profile on an ESXi host with VMs sharing the MIG-enabled GPU, verifying MIG instance availability is always needed.
Operate VM with MIG vGPU Profile with pciPassthruX.cfg.gpu-pci-id Set
If the VM is cloned, deployed, migrated, or reconfigured that has the parameter pciPassthruX.cfg.gpu-pci-id set, verifying MIG instance availability does not guarantee the VM can run because the VF BUS ID set for this parameter could be occupied by some other running VMs’ vGPU profile.
For example, there is VM1 with grid_a100-2-10c configured running on the ESXi host, and by default the system would allocate VF_4 for this profile. In this case, the VM2 configured with grid_a100-2-10c with pciPassthruX.cfg.gpu-pci-id set to 0000:3b:01.0 (VF_4’s BUS ID) would not be vMotion or powered up on the same ESXi host even verifying MIG instance availability shows there are still two slots for this vGPU profile.
In this case, perform the following steps to solve the issue:
Check if VM1 has parameter pciPassthruX.cfg.gpu-pci-id with the same VF BUS ID set:
-
If it does, choose one of the following steps to proceed:
-
Remove this parameter from VM2 and then power it on.
-
Change VM2's parameter pciPassthruX.cfg.gpu-pci-id value to another VF’s BUS ID allowed by profile grid_a100-2-10c (for example, VF_2) and power it on.
-
Power off VM1 and remove this parameter from VM1 then power on VM2 first then power on VM1.
-
Power off VM1 and change VM1's parameter pciPassthruX.cfg.gpu-pci-id value to another VF’s BUS ID allowed by profile grid_a100-2-10c (for example, VF_2) and power both VMs on.
-
-
If it does not, choose one of the following steps to proceed:
-
Remove this parameter from VM2 and then power it on.
-
Change VM2's parameter pciPassthruX.cfg.gpu-pci-id value to another VF’s BUS ID allowed by profile grid_a100-2-10c (for example VF_2) and power it on.Change VM2’s parameter pciPassthruX.cfg.gpu-pci-id value to another VF’s BUS ID allowed by profile grid_a100-2-10c(for example VF_2) and power it on.
-
Power off VM1, then power on VM2 first then power on VM1 back.
-
Another example, there is VM1 with grid_a100-2-10c configured running on the ESXi host and have pciPassthruX.cfg.gpu-pci-id set to 0000:3b:00.6(VF_2’s BUS ID). In this case, the VM2 configured with grid_a100-3-20c with pciPassthruX.cfg.gpu-pci-id set to 0000:3b:00.4(VF_0’s BUS ID) would not be vMotion or powered up on the same ESXi host even verifying MIG instance availability show there is still one slot of this vGPU profile, because those two profiles with GPU BUS IDs specified are vertically overlapped in the table above. In this case, the pciPassthruX.cfg.gpu-pci-id needs to be removed or modified on either of those VMs to proceed.
MIG Deactivated
When MIG is deactivated on the MIG capable GPUs; similarly, the GPU BUS IDs can be found by running the following command in ESXi:
$ lspci | grep -i nvidia
and the GPU device and its Virtual Functions will be listed.

Figure 17. List GPU PCI BUS ID for VFs
Using NVIDIA A100 as an example, there are six vGPU profiles:
-
grid_a100-4c
-
grid_a100-5c
-
grid_a100-8c
-
grid_a100-10c
-
grid_a100-20c
-
grid_a100-40c
If there are VMs configured with grid_a100-[X]c sharing the same physical GPU, the VMs number can be up to 40/X(40 divided by X), then the first 40/X VFs’ BUS ID can be used if parameter pciPassthruX.cfg.gpu-pci-id needs to be set.
For example, if there are VMs configured with grid_a100-8c sharing the same physical GPU, the VMs number can be up to five, in this case, as shown in the figure above, the first five VFs’ BUS ID can be used if parameter pciPassthruX.cfg.gpu-pci-id needs to be set. After reconfiguring the VMs with larger vGPU profile grid_a100-10c, the VMs number can be up to four and for each VM, the value of parameter pciPassthruX.cfg.gpu-pci-id may need to be modified to one of the first four VFs’ BUS ID.
Unlike MIG vGPU profile, with non-MIG profile, VM can use any of those first 40/X VFs’ BUS ID as the value of pciPassthruX.cfg.gpu-pci-id if it is not used by other VMs that share the same GPU.
About the Authors
Chen Wei, Staff Solutions Architect in the VMware Cloud Platform Business Unit, wrote this document with contributions from the following members:
-
Aaron Chu, Intern Solutions Architect, VMware
-
Jim Brogan, Senior Technical Marketing Architect, VMware
-
Justin Murray, Staff Technical Marketing Architect, VMware
-
Catherine Xu, Manager of CPBU Solutions Architecture team, VMware